1
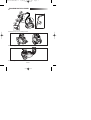
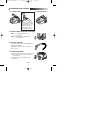
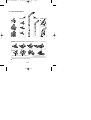
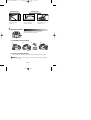
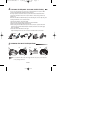
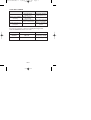
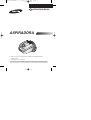
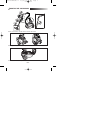
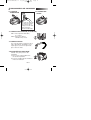
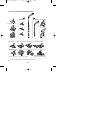
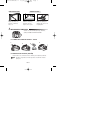
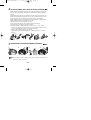
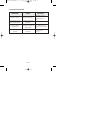
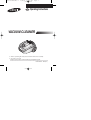
DJ68-00341X(EN)-1
1/24/07 12:06 PM
EN
Page 1
Operating Instructions
VACUUM CLEANER
❈ Before operating this unit, please read the instructions carefully.
❈ For indoor use only.
Register your product at www.samsung.com/global/register
DJ68-00341X REV(0.0)
DJ68-00341X(EN)-1
1/24/07 12:06 PM
Page 2
IMPORTANT SAFEGUARDS
1. Read all instructions carefully. Before switching on, make sure that the voltage
of your electricity supply is the same as that indicated on the rating plate on
the bottom of the cleaner.
2. WARNING: Do not use the vacuum cleaner when rug or floor is wet.
Do not use to suck up water.
3. This appliance is not intended for use by young persons or infirm persons
without supervision unless they have been adequately supervised by a
responsible person to ensure that they can use the appliance safely.
Young children should be supervised to ensure that they do not play with the
appliance.
4. Do not use the vacuum cleaner without a dust bag. Replace the dust bag
before it is full in order to maintain the best efficiency.
5. Do not use the vacuum cleaner to pick up matches, live ashes or cigarette
butts. Keep the vacuum cleaner away from stoves and other heat sources.
Heat can deform and discolour the plastic parts of the unit.
6. Avoid picking up hard, sharp objects with the vacuum cleaner as they may
damage the cleaner parts. Do not stand on the hose assembly. Do not put a
weight on the hose. Do not block the suction or the exhaustion part.
7. Switch the vacuum cleaner off at the machine before unplugging from the
electrical outlet. Do not pull on the cord to disconnect the plug from the
electrical outlet. Ensure that it is disconnected before attending to the filter.
8. The plug must be removed from the socket out-let before cleaning or
maintaining the appliance.
9. The use of an extension cord is not recommended.
10. If your vacuum cleaner is not operating correctly, switch off the power supply
and consult an authorized service agent.
11. If the supply cord is damaged, it must be replaced by the manufacturer or its
service agent or a similarly qualified person in order to avoid a hazard.
12. The vacuum cleaner is provided with a self-resetting thermal cut-out which
automatically shuts off on over-heating. Overheating can be caused by
blockage in the filter, nozzle, tube or hose. After removing the cause and
allowing the motor to cool, the vacuum cleaner will automatically restart.
EN-1
DJ68-00341X(EN)-1
1/24/07 12:06 PM
Page 3
1 ASSEMBLING THE CLEANER
OPTION
OPTION
OPTION
▲
Features may vary according to model.
▲
For storage, park the floor nozzle.
▲
Tool storage
EN-2
DJ68-00341X(EN)-1
1/24/07 12:06 PM
Page 4
2 OPERATING YOUR CLEANER
2-1 POWER CORD
2-2 ON/OFF SWITCH
NOTE :
When removing the
plug from the socket,
please take care to
grasp the plug, not
the cord in order to
avoid undue stress.
2-3 POWER CONTROL(VOLUME TYPE ONLY)
MIN = For delicate fabrics, e.g.
net curtains.
MAX = For hard floors and heavily
soiled carpets.
2-4 SUCTION CONTROL
To reduce suction for cleaning draperies,
small rugs and other
light fabrics, slide the air vent until the
hole is open.
2-5 USING THE BLOWER
Located on the left rear side of the cleaner.
1) Disconnect the hose from the body
of the cleaner.
2) Connect the hose clamper to the
blow hole.
EN-3
MIN
MAX
DJ68-00341X(EN)-1
1/24/07 12:06 PM
Page 5
2-6 USING FLOOR TOOLS
OPTION
OPTION
OPTION
Floor Nozzle
Dusting
Crevice
OPTION Detach transparent drum cover for easy cleaning.
OPTION
Blanket brush Bedclothes or Blanket
▲
Features may vary according to model.
EN-4
Cut off pet hairs or threads
surrounding brush by using scissors.
DJ68-00341X(EN)-1
1/24/07 12:06 PM
DUSTING BRUSH
- Dusting brush for
furniture. shelves,
books, etc.
Page 6
CREVICE TOOL
- Crevice tool for radiators,
crevices, corners,
between cushions.
- For efficiency. clean
Floor Nozzle with
Crevice Tool.
3 INDICATOR LIGHTS
When the indicator color has changed
Please replace the dust bag.
3-1 CHANGING THE DUST BAG
1
2
3
4
3-2 FOR CLOTH BAG (OPTION)
After using, if the cloth bag is full of dust, clean the cloth bag and use it again.
WARNING : Please do not attempt to operate the cleaner without a dust bag
fitted.
EN-5
DJ68-00341X(EN)-1
1/24/07 12:06 PM
Page 7
4 CYCLONIC FILTER(ONLY CYCLONIC FILTER TYPES)
You can use a dust bag in your cleaner for a long time thanks to the Cyclonic Filter
system and it maintain the maximum cleaning efficiency.
The larger particle of dust filtered from Cyclonic Filter remain in Dust Barrel when
suctioned air and dust revolves in the Cyclonic Filter. So the dust bag contains only
smaller ones.
When the Dust Barrel is filled with dust up to the indicating line, it needs disposing and
cleaning. Dust Barrel can be cleaned in water.
1.Turn the Dust Barrel to the left and pull it.
2.Disconnect the Cyclonic Filter from extension wand and handle.
3.Remove thread and hair tangled around the net.
4.After cleaning the Dust Barrel and Cyclonic Filter,connect the Cyclonic Filter with
extension wand and handle(washed part should be dried in the shade throughly
before assembling).
5.Push and turn the Dust Barrel to the right.
Adjust indicating marks each other carved on Dust Barrel and Cyclonic Filter.
CYCLONIC
FILTER
CREVICE
TOOL
DUST
BARREL
5 CLEANING THE INLET FILTER(OPTION)
1
2
3
4
NOTE : Do not allow the filter to become clogged as this may cause power reduction
or may damage the motor.
EN-6
DJ68-00341X(EN)-1
1/24/07 12:06 PM
Page 8
- IF YOU HAVE A PROBLEM
PROBLEM
CAUSE
REMEDY
Motor does not start.
No power supply.
Thermal cut-out.
Check cable, plug and
socket.Leave to cool.
Suction force is gradually
decreasing.
Nozzle, suction hose or
tube is blocked.
Remove the object.
Cord does not rewind fully.
Check that the cord is not
twisted or wound unevenly.
Pull the cord out 2-3m and push
down the cord rewind button.
Vacuum cleaner does not
pick up dirt.
Crack or hole in hose.
Check hose and replace if
required.
If you have any comments or questions regarding Samsung products,
contact the SAMSUNG customer care center.
Country
Customer Care Center
☎
Web Site
PANAMA
800-7267
www.samsung.com/latin
COLOMBIA
01 8000 112 112
www.samsung.com/co
EN-7
DJ68-00341X(ES)-2
2/6/07 10:46 AM
ES
Page 1
Instrucciones de uso
ASPIRADORA
❈ Antes de poner en marcha esta unidad, lea detenidamente las
instrucciones.
❈ Sólo para uso en interiores.
Gane premios cuando registre su producto en www.samsung.com/global/register
DJ68-00341X(ES)-2
2/6/07 10:46 AM
Page 2
MEDIDAS DE SEGURIDAD IMPORTANTES
1. Lea detenidamente las instrucciones. Antes de ponerlo en marcha, compruebe que
la tensión del suministro eléctrico es la misma que la indicada en la placa dedatos
situada en la parte inferior del aspiradora.
2. ADVERTENCIA: No use el aspiradora con la alfombra o el piso húmedo.
No lo use para aspirar agua.
3. Este aparato no ha sido diseñado para personas jóvenes o enfermas sin supervisión
salvo que estén bajo la supervisión de una persona responsable que garantice la
seguridad durante el uso del aparato. Se recomienda vigilar a los niños para que no
jueguen con el aparato.
4. No utilice el aspiradora sin instalar el contenedor de polvo. Vacíe el contenedor de
polvo antes de que esté lleno con el fin de mantener la máxima eficiencia.
5. No utilice el aspiradora para recoger cerillas, cenizas o colillas de cigarro encendidas.
Manténgalo alejado de estufas y otras fuentes de calor, ya que podrían deformarse y
decolorarse las piezas de plástico.
6. No recoja objetos duros o afilados, podría dañar las piezas de limpieza. No pise ni
coloque ningún peso sobre el conjunto de la tubería. No bloquee la zona de succión
o de escape de aire.
7. Apague primero el aspiradora pulsando el control de la carcasa antes de
desenchufarlo de la red. Desconecte el cable de la toma de corriente sujetándolo por
el enchufe antes de proceder a la limpieza del filtro y la bolsa.
8. El enchufe macho debe retirarse del enchufe hembra antes de proceder a la limpieza
o mantenimiento del dispositivo.
9. No es aconsejable usar un prolongador.
10. Si el aspiradora no funciona correctamente, apáguelo y consulte al servicio técnico.
11. En caso de que el cable de alimentación esté dañado, el fabricante o su servicio
técnico o persona cualificada para ello deberá sustituirlo con el fin de evitar
cualquier peligro.
12. El aspiradora dispone de una protección de desconexión térmica auto-activable
que cortará automáticamente la corriente en caso de sobrecalentamiento. El
sobrecalentamiento puede estar provocado por una obstrucción en el filtro,
boquilla, tubo o tubo flexible. El aspiradora comenzará a funcionar de nuevo de
forma automática cuando se haya solucionado la obstrucción y el motor se haya
refrigerado.
ES-1
DJ68-00341X(ES)-2
2/6/07 10:46 AM
Page 3
1 MONTAJE DEL ASPIRADORA
OPCIONAL
OPCIONAL
OPCIONAL
▲
Las características pueden variar en función del modelo.
▲
Para guardarlo, quite el accesorio para el suelo.
▲
Almacenamiento de componentes
ES-2
DJ68-00341X(ES)-2
2/6/07 10:46 AM
Page 4
2 FUNCIONAMIENTO DEL ASPIRADORA
2-1 CABLE DE
ALIMENTACIÓN
2-2 INTERRUPTOR
ON/OFF
NOTA :
Al retirar la clavija de
la toma de corriente,
procure tirar de la
clavija y no del cable
para evitar una
tensión inadecuada.
2-3 CONTROL DE ASPIRACIÓN (TIPO VOLUME)
MIN = Para superficies delicadas,
p. ej. visillos.
MAX = Para suelos duros y
alfombras muy sucias.
2-4 CONTROL DE AIRE
Con el fin de reducir la aspiración de los
trapos de limpieza, alfombrillas y otros
tejidos ligeros, presione la tapa hasta
que se abra el orificio.
2-5UTILIZACIÓN DEL VENTILADOR
Situado en la parte posterior del
aspiradora.
1) Desconecte el tubo flexible de la
carcasa del aspiradora.
2) Conecte el fijador del tubo flexible al
orificio de ventilación.
ES-3
MIN
MAX
DJ68-00341X(ES)-2
2/6/07 10:46 AM
Page 5
2-6 USO DE LOS ACCESORIOS DE SUELO
OPCIONAL
OPCIONAL
OPCIONAL
Boquilla para el suelo
PARA POLVO
PARA RENDIJAS
OPCIONAL - Retire la cubierta transparente del tambor para facilitar la limpieza.
OPCIONAL
Boquilla para mantas Ropa de cama o mantas
Utilice las tijeras para retirar el
pelo de su mascota o las
fibras que rodean la boquilla.
▲
Las características pueden variar en función del modelo.
ES-4
DJ68-00341X(ES)-2
2/6/07 10:47 AM
BOQUILLA PARA EL POLVO
Page 6
BOQUILLA PLANA
Boquilla ideal para
limpiar el polvo de los
muebles, estanterías,
libros, etc.
Boquilla plana ideal para
radiadores, superficies
agrietadas, rincones,
espacios entre cojines.
Para una mayor eficiencia,
limpie la boquilla para
limpieza del suelo con la
boquilla plana.
3 INDICADORES LUMINOSOS
Cuando el color del indicador haya cambiado,
sustituya la BOLSA PARA EL POLVO
3-1 CAMBIO DE LA BOLSA PARA EL POLVO
1
2
3
4
3-2 PARA BOLSAS DE TELA (OPCIÓN)
Después de su uso, si la bolsa de tela se llena de polvo, límpiela y reutilícela.
AVISO:
No utilice el aspiradora sin haber ajustado correctamente la bolsa
para polvo.
ES-5
DJ68-00341X(ES)-2
2/6/07 10:47 AM
Page 7
4 FILTRO CICLÓNICO (SÓLO TIPOS DE FILTRO CICLÓNICO)
Puede utilizar una misma bolsa para polvo en su aspiradora durante un largo período
de tiempo gracias al sistema de Filtro Ciclónico, manteniendo la máxima eficiencia de
limpieza.
Las partículas más grandes de polvo filtradas por el Filtro Ciclónico permanecen en el
Tambor para Polvo durante la aspiración y el polvo gira en el Filtro Ciclónico. De modo
que la bolsa para polvo sólo almacena las partículas de polvo más pequeñas.
Cuando el Tambor para Polvo se llena hasta la línea de indicación, se deberá retirar y
limpiar. El Tambor para Polvo puede limpiarse con agua.
1.Gire el Tambor de Polvo a la izquierda y tire de él.
2. Desconecte el Filtro Ciclónico de la varilla de extensión y del mango.
3. Retire las fibras y pelo que haya quedado enredado.
4. Después de limpiar el Tambor para Polvo y el Filtro Ciclónico, conecte el Filtro
Ciclónico a la varilla de extensión y al mango (las piezas lavadas deberán colocarse
a secar resguardadas del sol antes de proceder a su montaje).
5. Coloque y gire el Tambor para Polvo a la derecha.
Ajuste por las marcas indicadoras talladas en el Tambor para Polvo y en el Filtro
Ciclónico.
FILTRO
CICLÓNICO
BOQUILLA
PLANA
TAMBOR
PARA
POLVO
5 LIMPIEZA DEL FILTRO DE ENTRADA (OPCIONAL)
1
2
3
4
NOTA: No permita que el filtro se obstruya ya que puede producirse una reducción en
la potencia o daños en el motor.
ES-6
DJ68-00341X(ES)-2
2/6/07 10:47 AM
Page 8
- SI TIENE ALGÚN PROBLEMA
PROBLEMA
CAUSA
El motor no arranca.
No hay alimentación
eléctrica. Corte térmico.
Compruebe el cable, el
enchufe y la toma de
corriente. Deje que se
enfríe.
La fuerza de succión
disminuye gradualmente.
La boquilla, la tubera de
succión o el tubo está
bloqueado.
Retire el objeto.
El cable no rebobina
completamente.
El aspiradora no recoge la
suciedad.
SOLUCIÓN
Compruebe que el cable no
Saque el cable de 2 a 3 m y
está retorcido o arrollado de
presione el botón de rebobinado.
forma desigual.
La tubera está rota o
perforada.
ES-7
Compruebe la tubera y
cámbiela si fuese
necesario.