1
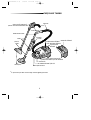
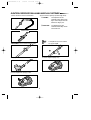
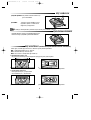
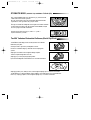
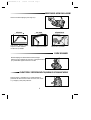
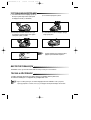
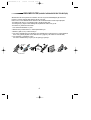
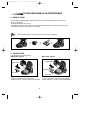
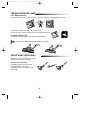
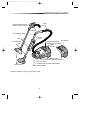
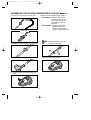
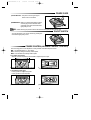
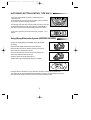
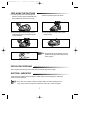
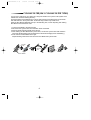
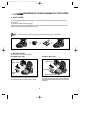
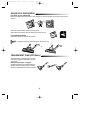
DJ68-00093A (0.4)
1/18/05 11:14 AM
Page 1
Kullaným Kýlavuzu
ELEKTRÝKLÝ SÜPÜRGE
❈ Bu cihazý çalýþtýrmadan önce lütfen talimatlarý dikkatlice okuyun.
DJ68-00093A (0.4)
1/18/05 11:14 AM
Page 2
ÖZELLÝKLER
Özelliklere otomatik kablo sarma ve toz göstergesi dahildir.
NOT : Modelleri tümü ayný özelliklere sahip deðildir.
ÖNEMLÝ GÜVENLÝK UYARILARI
1. Tüm talimatlarý dikkatlice okuyun. Cihazý çalýþtýrmadan önce
deðerinin, süpürgenin arkasýndaki plakada belirtilen deðer ile ayný olduðundan emin olun.
2. DÝKKAT:
Halý ya da zemin ýslakken elektrikli süpürgeyi kullanmayýn.
3. Cihazý çocuðun bulunduðu bir ortamda kullanýrken dikkatli olun. Elektrikli süpürgenin bir oyuncak gibi
kullanýlmasýna izin vermeyin. Elektrikli süpürgenin baþýboþ þekilde dolaþtýrýlmasýna izin vermeyin.
Elektrikli süpürgeyi bu talimatlarda da açýklandýðý gibi sadece amacýna uygun bir þekilde kullanýn.
4. Elektrikli süpürgeyi toz torbasý olmadan kullanmayýn. Etkili kullanýma devam edebilmek için toz torbasý
tamamen dolmadan önce onu deðiþtirin.
5. Elektrikli süpürgeyi kibrit, yanan kül veya sigara izmaritlerini çekmek için kullanmayýn. Elektrikli
süpürgeyi fýrýn ya da diðer ýsý kaynaklarýndan uzak tutun. Isý ünitenin plastik aksamýný bozarak
zarar verebilir.
6. Sert ve keskin objeleri elektrikli süpürge ile çekmekten sakýnýn. Bunlar süpürgenin aksamýna zarar
verebilir. Hortumu monte edilmiþ þekilde býrakmayýn. Hortumun üzerine aðýrlýk koymayýn.
Emme aksamýný bloke etmeyin.
7. Fiþi prizden çekmeden önce elektrikli süpürgeyi düðmesine basarak kapatýn. Kabloya, fiþe ya da
prize zarara vermemek için fiþi sýkýca tutarak prizden çýkartýn. Toz torbasýný deðiþtirmeden önce
mutlaka cihazýn elektrik baðlantýsýný kesin.
8. Uzatma kablosu kullanýmý tavsiye edilmemektedir.
9. Eðer, elektrikli süpürgeniz doðru þekilde çalýþmýyorsa, güç kaynaðýný kapatýn ve yetkili bir
servise danýþýn.
10. Eðer süpürgenin kablosu hasar gördü ise, bu, üretici ya da yetkili servisi veya eþ deðer
nitelikteki bir servis elemaný tarafýndan deðiþtirilmelidir. Aksi takdirde zarar görebilirsiniz.
UYARI
Hortum elektrik baðlantýsý içermektedir:
1. Su çekmek için kullanmayýn.
2. Temizleme amacýyla suya batýrmayýn.
3. Hortum düzenli olarak kontrol edilmelidir ve zarar gördü ise kullanýlmamalýdýr.
1
DJ68-00093A (0.4)
1/18/05 11:14 AM
Page 3
PARÇALARI TANIMA
HORTUM*
UZAKTAN GÜÇ KONTROLÜ *
(SADECE UZAKTAN KUMANDA MODELÝNDE)
TUTMA APARATI
EMME REGÜLATÖRÜ*
BORU*
SÝKLONÝK
FILTRE *
KABLO SARMA DÜÐMESÝ
ÞEFFAF
BORU*
YER BAÞLIÐI*
OTOMATÝK DÜÐMESÝ
GÜÇ KONTROL DÜÐMESÝ*
AÇMA/KAPAMA
DÜÐMESÝ
APARAT MUHAFAZA KAPAÐI
EMME HORTUMUNU ÇIKATMA DÜÐMESÝ
TOZ KAPAÐI
TOZ TORBASI BÖLMESÝ ÝÇÝN KÝLÝT
TAÞIMA APARATI
*ile iþaretlenmiþ özellikler modele baðlý olarak deðiþiklik gösterebilir.
2
DJ68-00093A (0.4)
1/18/05 11:14 AM
Page 4
ELEKTRÝKLÝ SÜPÜRGEYÝ KULLANIMA HAZIR HALE GETÝRMEK
1) Emme hortumunu emme borusuna takýn.
2)Emme borusunu ayarlayýn (modele baðlý olarak).
① UZATMA:
Teleskopik borunun dar
tarafýndan elinizle tutarak, kolu,
diðer elinizle tuttuðunuzun aksi
istikametine doðru çekin.
➁ KISALTMA:
OPSÝYON
NOT:
OPSÝYON : Emme borularýný birbirine takýn.
Teleskopik borunun dar
tarafýndan tutarak diðer elinizle
tutma kolunu itin.
Teleskopik boru ayarý tüm modeller
için geçerli deðildir.
4) Hortum baðlantý kapaðýný açýn.
3) Baþlýðý emme borusuna takýn.
5) Gövde baðlantýsýný süpürgeye takýn.
3
DJ68-00093A (0.4)
1/18/05 11:14 AM
Page 5
GÜÇ KABLOSU
1) DIÞARI ÇEKME: Güç kablosu rahat bir kullaným için
yeterli uzunluktadýr.
2) SARMA:
Temizleme iþlemini bitirdikten sonra
fiþi prizden çýkartýn ve kablo sarma
düðmesine yavaþça basýn.
NOT: Kabloyu elektrik prizinden çýkartýrken fiþten tutarak çekin, kablodan çekmeyin.
Elektrikli süpürgeyi yavaþça açma/kapama düðmesine
basmak suretiyle çalýþtýrabilir ya da durdurabilirsiniz.
AÇMA/KAPAMA DÜÐMESÝ
GÜÇ KONTROLÜ (SADECE DEÐÝÞTÝRÝLEBÝLÝR KONTROL TÝPLERÝNDE)
Vakum gücü, elektrikli güç kontrolü ile her duruma uyacak þekilde ayarlanabilir.
MIN = Hassas dokumalar için, örn. perdeler.
ECO = Normal halýlar için ekonomi ayarý
MAX = Sert zemin ve sýk dokumalý aðýr halýlar için.
1) Sürgülü Kontrol Tipleri Ýçin
Güç çýkýþýný ayarlamak için kontrol sürgüsünü aþaðý ya da yukarý yönde kaydýrýn.
■
Kontrol devresinin gövde üzerinde olduðu model
■
Kontrol devresinin tutma kolu üzerinde olduðu model
■
Kontrol devresinin tutma kolu üzerinde olduðu model
2) Tuþlu Kontrol Tipleri Ýçin
Gücü yükseltmek için (+) tuþuna basýn.
Gücü azaltmak için (-) tuþuna basýn.
■
Kontrol devresinin gövde üzerinde olduðu model
4
DJ68-00093A (0.4)
1/18/05 11:14 AM
Page 6
OTOMATÝK MODU (SADECE TUÞ KONTROLLÜ TÝPLER ÝÇÝN)
Eðer "AUTO MODE" düðmesine basarsanýz, güç otomatik olarak
1200~1300 watt üzerinden ayarlanýr.
Bu mod, motora giden hava akýþ miktarýndaki dalgalanmalardan
kaynaklanan emme gücündeki iniþ çýkýþlarý azaltýr.
Örneðin, toz torbasý dolu olduðunda, motora giden hava miktarý azalacak
ve dolayýsýyla güç de düþecektir. Bu durumda "AUTO" MODU, baþarýlý
bir emme için gücü otomatik olarak arttýrýr.
Normal kontrol tipine dönmek için, sadece "+" ya da "-"
tuþlarýna basmanýz yeterlidir.
Toz Biti Yoketme Sisteminin Kullanýmý (Modele Baðlý Olarak)
Toz Biti Öldürme (Mite Killing) turunun temizlik iþleminin hemen ardýndan
kullanýlmasý iyi bir yoldur.
Cihazýn prize takýlý ve gücün de açýk olduðundan emin olun.
Hortumun ucundaki iki düðmeye basarak hortumu süpürgeden
çýkartýn.
Süpürgenin üzerindeki hortum baðlantý kabaðýný kapatýn.
Tamamen kapalý olduðundan emin olun.
Süpürgeyi açýn. Cihaz çalýþmaya baþlayacaktýr.
Ýþlem tamamlandýðýnda Toz Biti Öldürme turu otomatik olarak durur.
Süpürgeyi prizden çekin, kabloyu sarýn, hortum baðlantý kapaðýný açýn ve hortumu tekrar takýn.
Toz Biti öldürme turu tamamlandýktan ya da kesildikten sonra süpürgenizi hemen kullanabilirsiniz.
Bunun için, süpürgeyi kapatýn, hortum baðlantý kapaðýný açýn ve hortumu tekrar takýn.
5
DJ68-00093A (0.4)
1/18/05 11:14 AM
Page 7
AKSESUARLARIN KULLANIMI
Aksesuar muhafaza kapaðýný yukarý doðru açýn.
KÖÞELER
Köþe aparatý; kalorifer, yarýklar,
köþeler ve minder aralarýný
temizlemek için idealdir.
TOZ ALMA
Toz alma fýrçasý; mobilyalar,
raflar ve kitaplar için idealdir.
DÖÞEMELÝKLER
Döþeme fýrçasý; perde ve
döþemelikler için idealdir.
PARK KONUMU
Elektrikli süpürgenin arkasýndaki üst tarafta, baþlýðýn
kullanýmýna ara verdiðiniz süre boyunca, uygun park konumu
için yararlanabileceðiniz bir destek mevcuttur.
ELEKTRÝKLÝ SÜPÜRGENÝN TAÞINMASI VE MUHAFAZASI
Kolay bir taþýma ve muhafaza için, bu elektrikli süpürgenin
gövdesinde bir tutturma sistemi vardýr. Bu sistem, boru, hortum
ve yer baþlýðýný yukarý pozisyonda tutar.
6
DJ68-00093A (0.4)
1/18/05 11:14 AM
Page 8
TOZ TORBASININ DEÐÝÞTÝRÝLMESÝ
1) Toz torbasý bölmesinin toz kapaðýný açmak için
kilit tuþuna yukarý doðru bastýrýn (kilit aparatý
toz kapaðýnýn önünde yer almaktadýr).
2) Toz torbasýný süpürgeden çýkartýn.
3) Kullanýlmýþ toz torbasýný attýktan sonra, yeni
toz torbasýnýn mukavva aðzýný emme giriþini
hizalayacak þekilde yerleþtirin.
4) Tekrar kilitlenene kadar toz kapaðýný aþaðýya
doðru yavaþça itin.
NOT:
Çýkarýlan kullanýlmýþ toz torbasýnýn aðzýný,
yapýþkan þeridi kullanarak kapatýnýz.
BEZ FÝLTRE TORBASI ÝÇÝN
Kullandýktan sonra, eðer bez filtre torbasý doldu ise torbayý temizleyin ve tekrar kullanýn.
TOZ-DOLU GÖSTERGESÝ
Temizlik esnasýnda “Dust-Full” (Toz-Dolu) göstergesi “KIRMIZI” olarak yanarsa, bu,
toz torbasýnýn dolduðunu ve deðiþtirilmesi gerektiðini ifade eder.
NOTE : Eðer Toz-dolu göstergesi, toz torbasý deðiþtiði halde hala “KIRMIZI” renkte yanýyorsa,
süpürgeyi kapatýn ve hortum, boru veya yer baþlýðýnýn týkanýp týkanmadýðýný kontrol edin.
7
DJ68-00093A (0.4)
1/18/05 11:14 AM
Page 9
SÝKLONÝK FILTRE (SADECE SÝKLONÝK FÝLTRE TÝPLERÝ ÝÇÝN)
Siklonik Filtre sistemi sayesinde toz torbalarýný uzun süre boyunca kullanabildiðiniz gibi cihazýnýzýn
temizleme verimi de maksimumda kalmaya devam edecektir.
Emilen hava ve tozlar Siklonik Filtrede dönerken filtre tarafýndan süzülen tozlarýn büyük parçalarý
Toz Varilinde kalýr. Böylece toz torbasýna sadece küçük parçalar gider.
Toz Varili gösterge çizgisine kadar dolduðunda, boþaltýlarak temizlenmesi gerekir.
Toz Varili su ile yýkanarak temizlenebilir.
1. Toz Varilini sola döndürün ve çekin.
2. Siklonik Filtreyi uzatma borusu ve tutma aparatýndan ayýrýn.
3. Dolanmýþ, iplik, lif, saç ve kýllarý temizleyin.
4. Toz Varili ve Siklonik Filtreyi temizledikten sonra, Siklonik Filtreyi uzatma borusu ve tutma aparatýna
monte edin (yýkanan parçalar monte edilmeden önce gölge bir yerde tamamen kurutulmalýdýr).
5. Toz Varilini itin ve saða doðru çevirin.
Toz Varili ve Siklonik Filtreye ayrýlmýþ her bir göstergeyi ayarlayýn.
SÝKLONÝK
FILTRE
KÖÞE
APARATI
TOZ VARÝLÝ
8
DJ68-00093A (0.4)
1/18/05 11:14 AM
Page 10
FÝLTRELERÝN BAKIMI VEYA DEÐÝÞTÝRÝLMESÝ
▲
GÝRÝÞ FÝLTRESÝ
Toz torbasý bölmesinin arkasýndaki ýzgaranýn gerisinde, motor ünitesini parçacýklardan korumak için ikinci
bir filtre yer almaktadýr.
Bu filtrenin týkanmasýna izin vermeyin.
Aksi takdirde emme gücü azalýr ya da motor hasar görebilir. Eðer filtre kirlenirse, ýzgarayý çekin ve filtreyi alýn.
Ýkinci filtreyi temizledikten sonra tekrar yerine yerleþtirin.
NOT:
Filtreler toz bölmesindeki yerlerine takýlmadan önce tamamen kurutulmalýdýr.
▲
ÇIKIÞ FÝLTRESÝ
Toz kapaðýný açýn ve ýzgarayý kaldýrýn.
HEPA Filtre Tipi Ýçin
Mikro Filtre Tipi Ýçin
Izgara Filtre
HEPA Filtre
Mikro Filtre
Ön Filtre
Ön Filtre
Filtreyi tutun ve ön filtre ile birlikte çekin.
Ön filtreyi temizledikten sonra, iþlemi tersten
yaparak yeni filtreyi ve ön filtreyi yeniden konumlandýrýn.
9
Filtreyi tutun ve ön filtre ile birlikte çekin.
Ön filtreyi temizledikten sonra, iþlemi tersten yaparak
yeni filtre bölmesini ve ön filtreyi yeniden konumlandýrýn.
DJ68-00093A (0.4)
1/18/05 11:14 AM
Page 11
YER BAÞLIÐININ KULLANIMI
HALI / ZEMÝN SEÇÝCÝ ÝÇÝN
Kullanmadan önce seçicinin temizlenecek yüzey tipine göre doðru konumda olduðundan emin olun.
Halý temizleyeceðiniz zaman halý göstergesini ➀ seçin.
Zemin veya marley temizleyeceðiniz zaman zemin göstergesini ➁ seçin.
EVRENSEL FIRÇALAR ÝÇÝN
Yer baþlýðýný temizlenecek tüm yüzey tipleri için kullanabilirsiniz.
NOT: En iyi etki için, baþlýk fýrçalarýný köþe aparatýyla temizleyin.
ÞEFFAF BORU (OPSÝYONEL)
Þeffaf boru, hortum ve borunun çorap, kumaþ
gibi nesnelerle týkanmasýný engeller.
Þeffaf Boru týkandýðý zaman;
Yer baþlýðýný borudan ayýrýn. Bir çubuk
yardýmýyla yabancý cismi çýkartýn.
Temizledikten sonra, yer baþlýðýný tekrar
boruya takýn.
10
DJ68-00093A (0.4)
1/18/05 11:14 AM
Page 12
ARIZA GÝDERME
PROBLEM
SEBEP
ÇÖZÜM
Motor çalýþmýyor.
Güç kaynaðý yok.
Kabloyu, fiþi, prizi kontrol edin.
Emme gücü kademeli
olarak azalýyor.
Filtre, baþlýk, emme hortumu
ya da boru týkanmýþ.
Objeyi çýkartýn.
Kablo tamamen sarýlmýyor.
Kablonun kývrýlýp kývrýlmadýðýný
veya düzensiz dolanýp
dolanmadýðýný kontrol edin.
Kabloyu 2-3m dýþarý çekin ve
tekrar kablo sarma düðmesine
basýn.
Bu Elektrikli Süpürge aþaðýdakileri karþýlamaktadýr:
EMC Yönergesi : 89/336/EEC, 92/31/EEC ve 93/68/EEC
Düþük Voltaj Güvenlik Yönergesi : 73/23/EEC ve 93/68/EEC
11
DJ68-00093A (0.4)
1/18/05 11:14 AM
Page 1
Operating Instructions
VACUUM CLEANER
❈ Before operating this unit, please read the instructions carefully.
• Register your product at www.samsung.com/global/register
DJ68-00093A (0.4)
1/18/05 11:14 AM
Page 2
FEATURES
Features include indicator and automatic cord rewind.
NOTE : Not all models have the same features.
IMPORTANT SAFEGUARDS
1. Read all instructions carefully. Before switching on, make sure that the voltage of your electricity supply is the same as that indicated on the rating plate on the bottom of the cleaner.
2. WARNING: Do not use the vacuum cleaner when rug or floor is wet.
3. Close supervision is necessary when any appliance is used by or near children. Do not allow the vacuum cleaner to be used as a toy. Do not allow the vacuum cleaner to run unattended at any time. Use
the vacuum cleaner only for its intended use as described in these instructions.
4. Do not use the vacuum cleaner without a dust bag. Change the dust bag before it is full in order to
maintain the best efficiency.
5. Do not use the vacuum cleaner to pick up matches,live ashes or cigarette butts. Keep the vacuum
cleaner away from stoves and other heat sources. Heat can deform and discolour the plastic parts of
the unit.
6. Avoid picking up hard,sharp objects with the vacuum cleaner as they may damage the cleaner parts.
Do not stand on the hose assembly. Do not put a weight on the hose. Do not block the suction or the
exhaustion part.
7. Switch the vacuum cleaner off at the machine before unplugging from the electrical outlet. Grasp the
plug to disconnect cord from electrical outlet before changing the dust bag.
8. The use of an extension cord is not recommended.
9. If your vacuum cleaner is not operating correctly,switch off the power supply and consult an authorized service agent.
10. Do not attempt to replace a damaged power supply cord. Only the manufacturer or qualified service
personnel can replace power cords. Serious injury may result.
WARNING
1. Do not use to suck up water.
2. Do not immerse in water for cleaning
3. The hose should be checked regularly and must not be used if damaged.
1
DJ68-00093A (0.4)
1/18/05 11:14 AM
Page 3
IDENTIFICATIONS OF PARTS
HOSE*
REMOTE POWER CONTROL*
(REMOTE CONTROL TYPE ONLY)
HANDLE
SUCTION REGULATOR*
CYCLONIC
FILTER *
TUBE*
CORD REWIND BUTTON
TRANSPARENT
TUBE*
AUTO BUTTON
POWER CONTROL SWITCH*
ON/OFF
BUTTON
TOOL STORAGE COVER
BUTTON FOR SUCTION HOSE REMOVAL
DUST COVER
CLAMPER FOR DUST BAG COMPARTMENT
FLOOR NOZZLE*
Features marked with
CARRYING HANDLE
* may vary according to model.
2
DJ68-00093A (0.4)
1/18/05 11:14 AM
Page 4
ASSEMBLING THE VACUUM-CLEANER READY FOR USE
1) Connect the suction hose to the suction tube.
OPTION
2) Adjust the suction tube(depending on model).
① EXTENDING : Holding the narrow part of
the telescopic tube with one
hand, push the handle in the
opposite direction with your
other hand.
➁ SHORTENING : Holding the narrow part of
the telescopic tube with
one hand, pull the handle
towards it using the other hand.
NOTE : Adjustable telescopic tube is not
OPTION : Connect the suction tubes together.
available with all models.
4) Open the hose connection cover.
3) Connect the nozzle to the suction tube.
5) Connect the body connector to the body of the
cleaner.
3
DJ68-00093A (0.4)
1/18/05 11:14 AM
Page 5
POWER CORD
1) PULLING OUT : The power cord is long enough to
drawn out for convenience.
2) REWINDING : When you have finished cleaning,disconnect the plug from the electrical outlet
and simply press the cord rewind button
lightly with your toe.
NOTE : When removing the power cord from the electrical outlet,grasp the plug,not the cord.
ON/OFF SWITCH
You can start or stop your vacuum cleaner by pressing the
on/off switch lightly with your toe.
POWER CONTROL(VARIABLE CONTROL TYPE ONLY)
The vacuuming power can be adjusted to suit any situation with electrical power control.
MIN = For delicate fabrics, e.g. net curtains.
ECO = Economy setting for normally soiled carpets.
MAX = For hard floors and heavily soiled carpets.
1) For slider control types
Slide the controller to upwards or downwards to adjust the power output.
■
Model with controller on the body of cleaner
■
Model with controller on the handle
■
Model with controller on the handle
2) For button control types
Press (+)button to heighten the power.
Press (-)button to lower the power.
■
Model with controller on the body of cleaner
4
DJ68-00093A (0.4)
1/18/05 11:14 AM
Page 6
AUTO MODE (BUTTON CONTROL TYPE ONLY)
If you press AUTO MODE, the power is automatically set at
1200~1300 watt.
This mode reduces the suction power fluctuation which is caused by
the fluctuation of airflow quantity to the motor.
For example, when dust bag is full, the quantity of air to the motor will
be decreased and power will be down followingly. AUTO MODE, in
this case, increases the power automatically for sufficient suction.
If you want to go back to the normal control type, just press "+" or "-"
buttons.
Using Exbug Elimination System (DEPENDING ON MODEL)
It is best to use the Mite Killing cycle immediately after you have finished
your cleaning.
Ensure machine is plugged in and the power point is switched on.
Disconnect the hose from the cleaner by pressing in the two buttons on the hose end and lift the hose out.
Close the hose connection cover on the top of the cleaner until
tone is heard. Make sure that it is fully shut.
Switch the cleaner on and the cleaner will run.
The Mite Killer cycle will automatically stop when complete.
Unplug the cleaner, rewind the cord, open the hoses connection cover and re-connect the hose.
Your cleaner can be used immediately after the Mite Killer cycle stop or by interrupting the cycle. To do
this,switch cleaner off,open the hose connection cover and re-connect the hose.
5
DJ68-00093A (0.4)
1/18/05 11:14 AM
Page 7
USING THE ACCESSORIES
Open the tool storage cover upwards.
CREVICE
Crevice tool for radiators, crevices,
corners, between cushions.
DUSTING
Dusting brush for furniture,
shelves, books, etc.
UPHOLSTERY
Upholstery brush for cushions
and drapery.
PARK POSITION
Located in the top rear side of the vacuum cleaner,there is
a nozzle support that can be used to park the nozzle during
pauses in cleaning
TRANSPORTING AND STORING THE VACUUM CLEANER
For easy storage and transportation, this vacuum cleaner has a
clip system built into body, which will keep the wand, hose and
nozzle in an upright position.
6
DJ68-00093A (0.4)
1/18/05 11:14 AM
Page 8
REPLACING THE DUST BAG
1) To open the dust cover of the dust bag compartment, press the clamper upwards(the clamper is located at the front of the dust cover).
2) Remove the dust bag from the cleaner
3) After removing the used dust bag, insert the
cardboard bag collar of the new dust bag into
its original position.
4) Press the dust cover down gently until the
clamper relocks.
NOTE : Used dust bags can be sealed by removing
the film from the paper and sticking over the
suction opening.
FOR CLOTH FILTER BAG
After using,if the cloth filter bag is full of dust, clean the cloth filter bag and use it again.
DUST-FULL INDICATOR
If the “Dust-Full” indicator switch changes to “RED” while you are cleaning, the dust bag is
full and must be replaced.
NOTE : If the “Dust-Full” indicator continues to display “RED” even after changing the dust
bag, turn the cleaner off and check whether the hose, tube or nozzle is clogged.
7
DJ68-00093A (0.4)
1/18/05 11:14 AM
Page 9
CYCLONIC FILTER (ONLY CYCLONIC FILTER TYPES)
You can use a dust bag in your cleaner for a long time thanks to the Cyclonic Filter system and it
maintain the maximum cleaning efficiency.
The larger particle of dust filtered from Cyclonic Filter remain in Dust Barrel when suctioned air
and dust revolves in the Cyclonic Filter. So the dust bag contains only smaller ones.
When the Dust Barrel is filled with dust up to the indicating line, it needs disposing and cleaning.
Dust Barrel can be cleaned in water.
1. Turn the Dust Barrel to the left and pull it.
2. Disconnect the Cyclonic Filter from extension wand and handle.
3. Remove thread and hair tangled around the net.
4. After cleaning the Dust Barrel and Cyclonic Filter, connect the Cyclonic Filter with extension
wand and handle(washed part should be dried in the shade throughly before assembling.)
5. Push and turn the Dust Barrel to the right.
Adjust indicating marks each other carved on Dust Barrel and Cyclonic Filter.
CYCLONIC
FILTER
CREVICE
TOOL
DUST BARREL
8
DJ68-00093A (0.4)
1/18/05 11:14 AM
Page 10
MAINTENANCE OR REPLACEMENT OF THE FILTERS
▲
INLET FILTER
The secondary filter, located behind the grille in the back of dust bag compartment, protects the motor from
dirt particles.
Do not allow the filter to become clogged.
Suction power reduction or motor damage may result. If filter becomes dirty, pull off the grille and lift out filter.
After cleaning the secondary filter attach it in place.
NOTE : The filters must be completely dried before being replaced in the dust compartment.
▲
OUTLET FILTER
Open the dust cover and lift off the grille.
For HEPA Filter Type
For Micro Filter Type
Grille Filter
HEPA Filter
Micro Filter
Preliminary
Filter
Preliminary Filter
Grasp filter and pull it out with preliminary filter.
After cleaning preliminary filter, reposition new filter
and preliminary filter by reversing this procedure.
Grasp grille filter and pull it out with preliminary filter.
After cleaning preliminary filter, reposition new filter
compartment and preliminary filter by reversing this
procedure.
9
DJ68-00093A (0.4)
1/18/05 11:14 AM
Page 11
USAGE OF FLOOR NOZZLE
FOR RUG / FLOOR SELECTOR
Before use make sure that the position of the selector is in the right position for the type of surface to be
cleaned.
Select the carpet indicator ➀ when cleaning carpets.
Select flat surface indicator ➁ when cleaning the floors, tiles, etc.
FOR UNIVERSAL BRUSH
Use the floor nozzle for cleaning all surfaces.
NOTE: For optimum efficiency, clean floor brush with crevice tool.
TRANSPARENT TUBE (OPTIONAL)
Transparent tube prevent the tube and hose
from being clogged by obstacle like as socks
and clothes.
When transparent tube is clogged.
Separate the nozzle from the tube. Remove
the alien substance with a stick from it. After
cleaning it, reassemble the nozzle to the tube.
10
DJ68-00093A (0.4)
1/18/05 11:14 AM
Page 12
TROUBLE SHOOTING
PROBLEM
CAUSE
REMEDY
Motor does not start.
No power supply.
Check cable, plug and
socket.
Suction force is gradually
decreasing.
Filter, nozzle, suction hose
or tube is blocked.
Remove the object.
Cord does not rewind fully.
Check that the cord is not
twisted or wound unevenly.
Pull the cord out 2~3m &
push down the cord rewind
button.
This Vacuum cleaner is approved the following.
EMC Directive : 89/336/EEC , 92/31/EEC and 93/68/EEC
Low Voltage Safety Directive : 73/23/EEC and 93/68/EEC
Samsung Electronics Co., Ltd.
12th Fl., Samsung Main Bldg.,
250, 2-Ka, Taepyung-Ro, Seoul
Korea
TEL: 82-31-200-0909
TÜV Product Service GmbH
Ridlerstr. 65, 80339 Munchen, Germany
TEL: +49 89 5008 40
CODE-NO:DJ68-00093W REV(0.0)