1
LCD TV
LE32S6
LE37S6
LE40S6
Contact SAMSUNG WORLD-WIDE
If you have any questions or comments relating to Samsung products,
please contact the SAMSUNG customer care centre.
Contacte con SAMSUNG WORLD-WIDE
Si tiene alguna pregunta o comentario referente a nuestros productos, por favor
contacte con nuestro Servicio de Atención al Cliente
Country
BELGIUM
CZECH REPUBLIC
DENMARK
FINLAND
FRANCE
GERMANY
HUNGARY
ITALIA
LUXEMBURG
NETHERLANDS
NORWAY
POLAND
PORTUGAL
REPUBLIC OF IRELAND
SLOVAKIA
SPAIN
SWEDEN
Switzerland
U.K
ESTONIA
LATVIA
LITHUANIA
KAZAKHSTAN
RUSSIA
UKRAINE
UZBEKISTAN
Web Site
Customer Care Centre
02 201 2418
www.samsung.com/be
844 000 844
www.samsung.com/cz
“Distributor pro Českou republiku:
Samsung Zrt., česka organizační složka Vyskočilova 4, 14000 Praha 4”
70 70 19 70
www.samsung.com/dk
030-6227 515
www.samsung.com/fi
3260 SAMSUNG(7267864) (€ 0,15/min) www.samsung.com/fr
01805-121213 (€ 0,14/Min)
www.samsung.de
06-80-SAMSUNG (7267864)
www.samsung.com/hu
800 SAMSUNG(7267864)
www.samsung.com/it
0032 (0)2 201 24 18
www.samsung.lu
0900 20 200 88 (€ 0,10/Min)
www.samsung.com/nl
815-56 480
www.samsung.com/no
0 801 801 881
www.samsung.com/pl
80 8 200 128
www.samsung.com/pt
0818 717 100
www.samsung.com/uk
0800-SAMSUNG (7267864)
www.samsung.com/sk
902 10 11 30
www.samsung.com/es
0771-400 200
www.samsung.com/se
0800-7267864
www.samsung.com/ch
0870 SAMSUNG (7267864)
www.samsung.com/uk
800-7267
www.samsung.ee
800-7267
www.samsung.com/lv
8-800-77777
www.samsung.lt
8 800 080 1188
www.samsung.kz
8-800-200-0400
www.samsung.ru
8-800-502-0000
www.samsung.com/ur
140-1234
www.samsung.uz
Owner’s Instructions
Before operating the unit,
please read this manual thoroughly,
and retain it for future reference.
ON-SCREEN MENUS
PC DISPLAY
PICTURE IN PICTURE (PIP)
TELETEXT
Register your product at www.samsung.com/global/register
BN68-01147B-00
BN68-01147B-00Cover.indd 1
2007-02-13 �� 8:04:11
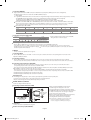
Precautions When Displaying a Still Image
A still image may cause permanent damage to the TV screen.
• Do not display a still image on the LCD panel for more than 2 hours as it can cause screen image retention.
This image retention is also known as "screen burn".
To avoid such image retention, reduce the degree of brightness and contrast of the screen when displaying a still image.
•
Watching the LCD TV in 4:3 format for a long period of time may leave traces of borders displayed on the left,
right and center of the screen caused by the difference of light emission on the screen.
Playing a DVD or a game console may cause a similar effect to the screen.
Damages caused by the above effect are not covered by the Warranty.
• Displaying still images from Video games and PC for longer than a certain period of time may produce partial after-images.
To prevent this effect, reduce the ‘brightness’ and ‘contrast’ when displaying still images.
Precauciones al mostrar en la pantalla una imagen fija
La imagen fija puede causar daños permanentes en la pantalla del televisor.
• No deje una imagen fija en la pantalla LCD durante más de dos horas ya que se podría producir una retención de la imagen en la pantalla. Este
fenómeno de retención de imágenes también se denomina “quemadura de pantalla”. Para evitar que se produzca esa persistencia de la imagen,
reduzca el nivel de luminosidad y de contraste de la pantalla cuando muestre imágenes fijas.
•
•
El uso del televisor LCD en formato 4:3 durante un tiempo prolongado puede dejar rastros de bordes en las partes izquierda,
derecha y central de la pantalla debido a las diferencias en la emisión de luz en la pantalla.
Reproducir un DVD o una videoconsola puede causar un efecto similar en la pantalla. La garantía no cubre estos daños.
Ver imágenes fijas de videojuegos y PC durante más tiempo del indicado puede producir imágenes fantasma parciales.
Para evitar este efecto, reduzca el ‘brillo’ y el ‘contraste’ cuando vea imágenes fijas.
© 2007 Samsung Electronics Co., Ltd. All rights reserved.
CO79.12258B.11.M13/joec!!!3
3117.21.31!!!!6;1:;38
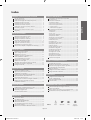
English
Contents
CONNECTING AND PREPARING YOUR TV
List of Parts .........................................................................................................
Installing the Stand .........................................................................................
Installing the Wall Mount Kit .................................................................
Viewing the Control Panel ............................................................................
Viewing the Connection Panel ...................................................................
Viewing the Remote Control .......................................................................
Installing Batteries in the Remote Control .............................................
Switching On and Off .....................................................................................
Placing Your Television in Standby Mode ...............................................
Plug & Play..........................................................................................................
USING THE DTV FEATURE
2
2
2
3
4
6
6
7
7
7
Previewing the DTV Menu System ............................................................
Basic Functions .................................................................................................
1. Display Screen ..............................................................................................
2. Volume Control ............................................................................................
3. Select Soundtrack .......................................................................................
4. Select Videotrack .........................................................................................
5. Service List ...................................................................................................
6. Program Information................................................................................
Operating the DTV Menu..............................................................................
Main Menu .........................................................................................................
1. Installation .....................................................................................................
1.1 Select Country ...........................................................................................
1.2 Auto Scanning ...........................................................................................
1.3 Manual Scanning ......................................................................................
1.4 Reset to Factory Defaults .......................................................................
2. Channel Organising....................................................................................
2.1 Delete Frequency......................................................................................
2.2 Delete Channel ..........................................................................................
2.3 Delete All Channels ..................................................................................
2.4 Move & Edit Channel ...............................................................................
3. Parental Lock.................................................................................................
3.1 Set Channel Lock ......................................................................................
3.2 Change PIN Code ......................................................................................
4. System Setup ................................................................................................
4.1 Language Selection .................................................................................
4.2 OSD Setting ................................................................................................
4.3 Time Setting................................................................................................
4.4 System Information..................................................................................
4.5 Software Upgrade ....................................................................................
Installing the CI card .......................................................................................
SETTING THE CHANNELS
Storing Channels Automatically................................................................. 8
Storing Channels Manually .......................................................................... 8
Setting the Channel Manager ..................................................................... 9
Activating the Child Lock ....................................................................... 9
Sorting the Stored Channels ....................................................................... 10
Assigning Channels Names.......................................................................... 10
Fine Tuning Channel Reception ................................................................. 10
LNA (Low Noise Amplifier) ........................................................................... 11
SETTING THE PICTURE
Changing the Picture Standard ..................................................................
Adjusting the Custom Picture .....................................................................
Changing the Colour Tone ...........................................................................
Resetting the Picture Settings to the
Factory Defaults ...............................................................................................
Changing the Picture Size ............................................................................
Freezing the Current Picture........................................................................
Digital Noise Reduction.................................................................................
DNIe Demo (Digital Natural Image engine) ...........................................
Viewing the Picture In Picture (PIP)...........................................................
PIP Settings ........................................................................................................
11
11
11
12
12
12
12
13
13
14
USING THE TELETEXT FEATURE
Teletext Decoder........................................................................................ 28
Displaying the Teletext Information ................................................... 28
Selecting a Specific Teletext Page ....................................................... 29
Using Fastext to Select a Teletext Page ............................................. 29
Setting Up Your Remote Control ......................................................... 30
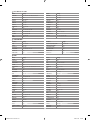
Remote Control Codes ............................................................................ 32
SETTING THE SOUND
Changing the Sound Standard............................................................. 14
Adjusting the Sound Settings ............................................................... 14
Connecting headphones ........................................................................ 14
Setting the TruSurround XT (SRS TSXT)............................................. 15
Adjusting the Volume Automatically ................................................. 15
Selecting the Internal Mute ................................................................... 15
Listening to the Sound of the Sub Picture ....................................... 15
Resetting the Sound Settings to the Factory Defaults ................ 16
19
20
20
20
20
20
21
21
22
22
22
22
22
23
23
23
24
24
24
24
25
25
25
26
26
26
26
27
27
27
SETTING THE PC
Setting up Your PC Software
(Based on Windows XP)........................................................................... 35
Display Modes ............................................................................................ 35
Setting the PC ............................................................................................. 36
SETTING THE TIME
Setting and Displaying the Current Time ......................................... 16
Setting the Sleep Timer ........................................................................... 16
Switching the Television
On and Off Automatically....................................................................... 16
RECOMMENDATIONS FOR USE
Using the Anti-Theft Kensington Lock............................................... 37
Troubleshooting:
Before Contacting Service Personnel................................................. 37
Technical and Environmental Specifications .................................. 38
SETTING THE OTHERS
Choosing Your Language ....................................................................... 17
Using Game Mode .................................................................................... 17
Setting the Blue Screen Mode /
Selecting the Melody .............................................................................. 17
Using the Energy Saving Feature ........................................................ 18
Selecting the Source ................................................................................ 18
Editing the Input Source Names .......................................................... 18
Symbol
Press
Important
Note
One-Touch
Button
English-1
CO79.12258B.11.M13/joec!!!2
3117.21.31!!!!6;1:;3:
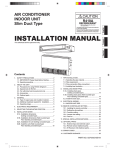
List of Parts
Please make sure the following items are included with your LCD TV.
If any items are missing, contact your dealer.
M4 X L16
Remote Control &
Batteries (AAA x 2)
Power Cord
Owner’s Instructions
Cover-Bottom
Stand Screw X 4
Warranty card
Stand
Safety Guide
Cleaning Cloth
Registration Cards
Warranty card / Safety Guide / Registration Cards (Not available in all locations)
The stand and stand screw may not be included depending on the model.
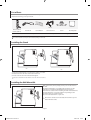
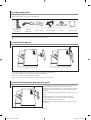
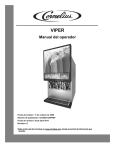
Installing the Stand
<2>
<3>
1. Place the TV faced down on a soft cloth or cushion on a table.
2. Put the stand into the hole at the bottom of the TV.
3. Insert screw into the hole indicated and tighten.
The stand is installed for models with the screen size of 40 inch and above.
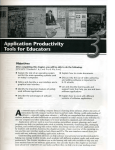
Installing the Wall Mount Kit
Wall mount items (sold separately) allow you to mount the TV on
the wall.
For detailed information on installing the wall mount, see the
instructions provided with the Wall Mount items. Contact a
technician for assistance when installing the wall mounted bracket.
Samsung Electronics is not responsible for any damage to the
product or injury to yourself or others
if you elect to install the TV on your own.
Remove the stand and cover the bottom hole with a cap and
fasten with two screws.
English-2
CO79.12258B.11.M13/joec!!!3
3117.21.31!!!!6;1:;42
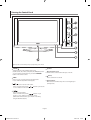
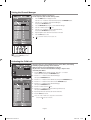
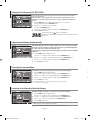
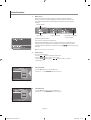
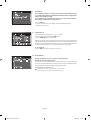
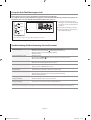
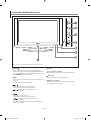
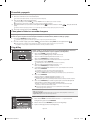
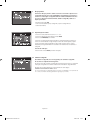
Viewing the Control Panel
The product colour and shape may vary depending on the model.
SOURCE
Toggles between all the available input sources
(TV, Ext.1, Ext.2, AV, S-Video, Component, PC, HDMI, DTV). In the
on-screen menu, use this button as you use the ENTER/OK
button on the remote control.
MENU
Press to see an on-screen menu of your TV’s features.
In case of DTV mode, the DTV menu appears.
Speakers
Remote Control Sensor
Aim the remote control towards this spot on the TV.
(Power)
Press to turn the TV on and off.
Power Indicator
Blinks and turns off when the power is on and lights up in
stand-by mode.
Press to increase or decrease the volume.
In the on-screen menu, use the
buttons as you use the
and buttons on the remote control.
Press to change channels.
In the on-screen menu, use the
buttons as you
use the and buttons on the remote control.
(Without the Remote Control, you can turn on the TV by
using the Channel buttons.)
English-3
CO79.12258B.11.M13/joec!!!4
3117.21.31!!!!6;1:;54
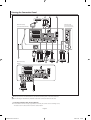
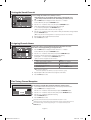
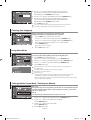
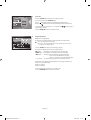
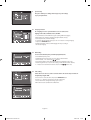
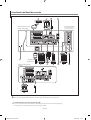
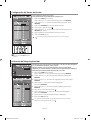
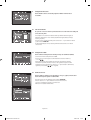
Viewing the Connection Panel
Side Panel Jacks]
[Rear Panel Jacks]
(32 inch/37 inch/40 inch)
(27 inch model does not
have the side panel jacks.)
[Rear Panel Jacks]
(27 inch)
Whenever you connect an external device to your TV, make sure that power on the unit is turned off.
When connecting an external device, match the colour of the connection terminal to the cable.
Connecting an Aerial or Cable Television Network
To view television channels correctly, a signal must be received by the set from one of the following sources:
- An outdoor aerial / A cable television network / A satellite network
English-4
CO79.12258B.11.M13/joec!!!5
3117.21.31!!!!6;1:;5:
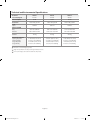
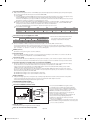
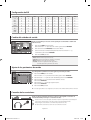
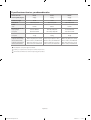
Connecting HDMI/DVI
- Supports connections between HDMI-connection-enabled AV devices (Set-Top Boxes, DVD players, AV receivers and digital TVs).
- No additional Audio connection is needed for an HDMI to HDMI connection.
What is HDMI?
- “High Definition Multimedia interface” allows the transmission of high definition digital video data and multiple channels of digital audio (5. 1 channels).
- The HDMI/DVI terminal supports DVI connection to an extended device with the appropriate cable (not supplied).
The difference between HDMI and DVI is that the HDMI device is smaller in size, has the HDCP
(High Bandwidth Digital Copy Protection) coding feature installed, and supports multi - channel digital audio.
You should use the DVI-to-HDMI cable or DVI-HDMI Adapter for the connection, and the "R - AUDIO - L" terminal on DVI for sound output.
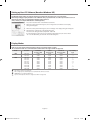
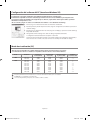
- When connecting this product via HDMI or DVI to a Set Top Box, DVD Player or Games Console etc, make sure that it has been set to a compatible
video output mode as shown in the table below. Failure to observe this may result in picture distortion, image breakup or no picture.
Supported modes for DVI or HDMI
1080i
720p
576p
576i
480p
480i
O
O
O
X
X
X
50 Hz
O
O
X
X
O
X
60 Hz
O
O
O
O
O
O
Component
- Do not attempt to connect the HDMI/DVI connector to a PC or Laptop Graphics Card. (This will result in a blank screen being displayed)
Connecting Set-Top Box, VCR or DVD
Connector
Video
Input
Audio (L/R)
RGB
EXT 1
EXT 2
Output
Video + Audio (L/R)
Only TV or DTV output is available.
Output you can choose.
- Inputs or outputs for external devices, such as VCR, DVD,
video game device or video disc players.
Connecting External A/V Devices
- Connect RCA or S-VIDEO cable to an appropriate external A/V device such as VCR, DVD or Camcorder.
- Connect RCA audio cables to "R - AUDIO - L" on the rear of your set and the other ends to corresponding audio out connectors on the A/V device.
- Headphone may be connected to the headphone output ( ) on the rear of your set. While the headphone is connected, the sound from
the built-in speakers will be disabled.
SERVICE
- Service connection for qualified service engineer.
Connecting AUDIO
- Connect RCA audio cables to "R - AUDIO - L" on the rear of your set and the other ends to corresponding audio in connectors on the
Amplifier or DVD Home Theater.
Connecting Computer
- Connect the D- Sub cable (optional) to "PC (PC IN)" on the rear of your set and the other end to the Video Card of your computer.
- Connect the stereo audio cable (optional) to "AUDIO (PC IN)" on the rear of your set and the other end to "Audio Out" of the sound card on your computer.
Connecting Component Devices (DTV/DVD)
- Connect component video cables (optional) to component connector ("PR", "PB", "Y") on the rear of your set and the other ends to
corresponding component video out connectors on the DTV or DVD.
- If you wish to connect both the Set-Top Box and DTV (or DVD), you should connect the Set-Top Box to the DTV (or DVD) and connect the
DTV (or DVD) to component connector ("PR", "PB", "Y") on your set.
- The PR, PB and Y connectors on your component devices (DTV or DVD) are sometimes labeled Y, B-Y and R-Y or Y, Cb and Cr.
- Connect RCA audio cables (optional) to "R - AUDIO - L" on the rear of your set and the other ends to corresponding audio out connectors on the DTV or DVD.
- This LCD TV displays its optimum picture resolution in 720p mode.
- This LCD TV displays its maximum picture resolution in 1080i mode.
Kensington Lock
- The Kensington lock (optional) is a device used to physically fix the system when used in a public place.
- If you want to use a locking device, contact the dealer where you purchased the TV.
- The place of the Kensington Lock may be different depending on its model.
DIGITAL AUDIO OUT (OPTICAL)
- Connect to a Digital Audio Component.
Connecting CI (Common Interface) CARD
Please insert
the card as
shown
CI CARD
- When not inserting "CI CARD" in some channels,
"Scrambled Signal" is displayed on the screen.
- The pairing information containing a telephone number,
CI CARD ID, Host ID, and other information will be displayed
in about 2~3 minutes. If an error message is displayed,
please contact your service provider.
- When the channel information configuration has finished,
the message "Updating Completed" is displayed,
indicating that the channel list is now updated.
You must obtain a CI CARD from a local cable service provider.
Remove the CI CARD by carefully pulling it out with your
hands since dropping the CI CARD may cause damage to it.
TV Rear Panel
Service Port
- Service connection for qualified service engineer.
Modem connection port(Not available)
English-5
CO79.12258B.11Foh/joee!!!6
3117.21.38!!!!6;48;52
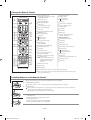
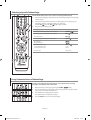
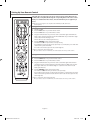
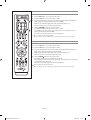
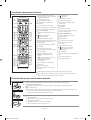
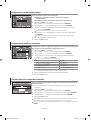
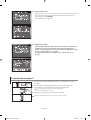
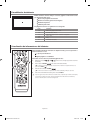
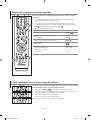
Viewing the Remote Control
Selects a target device to be
controlled by the Samsung remote control
(TV, DVD, STB, CABLE, VCR)
(Refer to page 30~34)
Television Standby button
Toggle between the TV
and Radio channel
P : Next channel
P : Previous channel
Exit the OSD
Number buttons for direct
channel access
Control the cursor in the menu
One/Two-digit channel selection
Use to see information on the
current broadcast
It display "Channel Manager"
on the screen.
Not available
Selects the TV and DTV mode directly
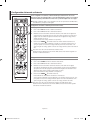
VCR/DVD Functions
Rewind, Stop, Play/Pause,
Fast/Forward
Volume increase
Volume decrease
Temporary sound switch-off
Menu display and
change confirmation
Not available
Picture freeze
Select the soundtrack/videotrack
list for the current service
Teletext Functions
Exit from the teletext display
Teletext index
Teletext hold
Electronic Program Guide (EPG) display
Teletext size selection
Picture-In-Picture On / Off
Teletext mode selection (LIST/FLOF)
Not available
Teletext sub page
Sound effect selection
P : Teletext next page
P : Teletext previous page
This key is also used to back to the
previous page in D.MENU.
Teletext cancel
SET: Adjusts 5 separate devices - TV, DVD,
STB, CABLE, or VCR.
RESET: When your remote does not work,
change the batteries and press the
“RESET” button for 2-3 seconds
before use.
Teletext reveal
Alternately select Teletext, Double, or Mix.
Fastext topic selection
Teletext store
Available source selection
Previous channel
DTV menu display
The performance of the remote control may be affected by bright light.
This is a special remote control for the visually impaired, and has Braille points on the Power,
Channel and Volume buttons.
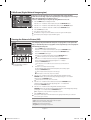
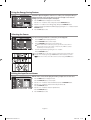
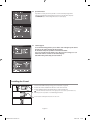
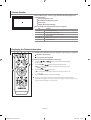
Installing Batteries in the Remote Control
1.
Lift the cover at the back of the remote control upward as shown in the figure.
2.
Install two AAA size batteries.
Make sure to match the "+" and "–" ends of the batteries with the diagram inside the compartment.
3.
Replace the cover.
Remove the batteries and store them in a cool, dry place if you won’t be using the remote control for a long time. The
remote control can be used up to about 23 feet from the TV.
(Assuming typical TV usage, the batteries last for about one year.)
If the remote control doesn’t work, check the following:
1. Is the TV power on?
2. Are the plus and minus ends of the batteries reversed?
3. Are the batteries drained?
4. Is there a power outage, or is the power cord unplugged?
5. Is there a special fluorescent light or neon sign nearby?
English-6
CO79.12258B.11.M13/joec!!!7
3117.21.31!!!!6;21;13
Switching On and Off
The mains lead is attached to the rear of your set.
1.
Plug the mains lead into an appropriate socket.
2.
Press the
The standby indicator lights up on the front of the set.
button on the front of the set.
You also can press the POWER
button or the TV/DTV button on the remote control to turn the TV on.
The programme that you were watching last is reselected automatically.
3.
Press the numeric buttons (0~9) or channel up/down ( / ) buttons on the remote control or
buttons on the right side of the set.
When you switch the set on for the very first time, you will be asked to choose language in which the menus are to be displayed.
4.
To switch your set off, press the POWER
button again.
Placing Your Television in Standby Mode
Your set can be placed in standby mode in order to reduce the power consumption. The standby mode can be useful when you wish to
interrupt viewing temporarily (during a meal, for example).
1.
Press the POWER
button on the remote control.
The screen is turned off and a red standby indicator appears on the front of your set.
2.
To switch your set back on, simply press the POWER
, numeric buttons (0~9), TV/DTV button or channel up/down ( / ) buttons again.
Do not leave your set in standby mode for long periods of time (when you are away on holiday, for example).
It is best to unplug the set from the mains and aerial.
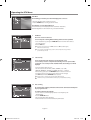
Plug & Play
When the TV is initially powered on, several basic settings proceed automatically and
subsequently. The following settings are available.
1.
Press the POWER button on the remote control.
The message "Start Plug & Play." is displayed with "OK" selected.
2.
Select the appropriate language by pressing the or
Press the ENTER/OK button to confirm your choice.
3.
The message "Check antenna input." is displayed with "OK" selected.
Press the ENTER/OK button.
4.
Select the appropriate country by pressing the or
Press the ENTER/OK button to confirm your choice.
5.
The "Auto Store" menu is displayed with the "Start" selected. Press the ENTER/OK button.
button.
Please check that the antenna cable is connected correctly.
button.
The channel search will start and end automatically.
After all the available channels are stored, the "Clock Set" menu appears.
Press the ENTER/OK button at any time to interrupt the memorization process.
6.
Press the ENTER/OK button.
Select the "Hour" or "Minute" by pressing the or button.
Set the "Hour" or "Minute" by pressing the or button.
7.
Press the ENTER/OK button to confirm your setting.
The DTV channel scan menu appears and the DTV channel is automatically updated.
You can also set the hour and minute by pressing the number buttons on the remote control.
If the DTV channel is updated, the Source in the source list of the Input menu is
automatically changed to DTV.
For detailed descriptions about DTV channel update, refer to page 22 of this manual.
Language: Select your language.
Country: Select your country.
Auto Store: Automatically scans for and stores channels available in the local area.
Clock Set: Sets the current time for the TV clock.
If you want to reset this feature...
1. Press the MENU button to display the menu.
Press the or button to select "Setup", then press the ENTER/OK button.
2. Press the ENTER/OK button again, to select "Plug & Play".
3. The message "Start Plug & Play" is displayed.
English-7
CO79.12258B.11.M13/joec!!!8
3117.21.31!!!!6;21;31
- Storing Channels Automatically
- Storing Channels Manually
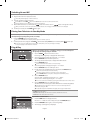
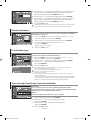
Storing Channels Automatically
You can scan for the frequency ranges available to you (and availability depends on your country).
Automatically allocated programme numbers may not correspond to actual or desired programme numbers.
However, you can sort numbers manually and clear any channels you do not wish to watch.
1.
Press the MENU button to display the menu.
Press the or button to select "Channel", then press the ENTER/OK button.
2.
Press the ENTER/OK button to select "Country".
3.
Select the appropriate country by pressing the
4.
Press the
5.
Press the ENTER/OK button.
or
or
button. Press the ENTER/OK button to confirm your choice.
button to select "Auto Store", then press the ENTER/OK button.
The TV will begin memorizing all of the available channels.
Press the ENTER/OK button at any time to interrupt the memorization process and return to the "Channel" menu.
6.
After all the available channels are stored, the "Sort" menu appears.
Storing Channels Manually
You can store up to 100 channels, including those received via cable networks.
When storing channels manually, you can choose:
Whether or not to store each of the channels found.
The programme number of each stored channel which you wish to identify.
1.
Press the MENU button to display the menu.
Press the or button to select "Channel", then press the ENTER/OK button.
2.
Press the
3.
Press the ENTER/OK button to select "Programme".
or
button to select "Manual Store", then press the ENTER/OK button.
4.
To assign a programme number to a channel, find the correct number by pressing the
and then press the ENTER/OK button.
5.
Press the
6.
Select the colour standard required by pressing the
7.
Press the
8.
Select the sound standard required by pressing the
or
button
You can also set a programme number by pressing the number buttons on the remote control.
or
or
button to select "Colour System", then press the ENTER/OK button.
or
button then, press the ENTER/OK button.
button to select "Sound System", then press the ENTER/OK button.
or
button, then press the ENTER/OK button.
If there is an abnormal sound or no sound, re-select the sound system required.
9.
If you know the number of the channel to be stored, press the or button to select "Channel". Press the ENTER/OK button. Select C
(Air channel) or S (Cable channel) by pressing the or button. Press the
button to select channel.
Select the required number by pressing the or button and then press the ENTER/OK button.
Channel mode: P (Programme mode), C (Air channel mode), S (Cable channel mode)
You can also set a channel number by pressing number buttons on the remote control.
10. If you do not know the channel numbers, press the
Press the ENTER/OK button. Search by pressing the
11. Press the
or
or
or
button to select "Search".
button and then press the ENTER/OK button.
button to select "Store". Press the ENTER/OK button to select "OK".
12. Repeat steps 3 to 11 for each channel to be stored.
Programme: Selects a program number for the channel.
Colour System: Sets the colour supporting system.
Sound System: Sets the sound supporting system.
Channel: Selects a channel.
Search: Scans for the frequency value for the channel.
Store: Saves your settings.
English-8
CO79.12258B.11.M13/joec!!!9
3117.21.31!!!!6;21;39
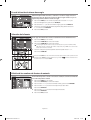
Setting the Channel Manager
Set the channels according to your preference.
You can easily delete, add, or lock the channel you want.
1.
Press the MENU button to display the menu.
Press the or button to select "Channel", then press the ENTER/OK button.
2.
Press the or button to select "Channel Manager",
then press the ENTER/OK button.
3.
Press the ENTER/OK button again, to select "Channel Manager".
4.
Press the
5.
Press the or button to select the undesired channel,
then press the ENTER/OK button to cancel.
6.
Repeat steps 5 for each channel to be selected or canceled
7.
Press the EXIT button to exit.
"
button to select "
" line.
" is active when "Child Lock" is selected to "On".
You can select these options by simply
pressing the CH MGR button on the
remote control.
Activating the Child Lock
This feature allows you to prevent unauthorized users, such as children, from watching
unsuitable programmes by muting out video and audio.
Child Lock cannot be released using the buttons on the side.
Only the remote control can release the Child Lock setting, so keep the remote
control away from children.
1.
Press the MENU button to display the menu. Press the
to select "Channel", then press the ENTER/OK button.
or
button
2.
Press the or button to select "Channel Manager",
then press the ENTER/OK button.
3.
Press the
or
button to select "Child Lock", then press the ENTER/OK button.
4.
Press the
or
button to select "On" . Press the ENTER/OK button.
5.
Press the or button to select "Channel Manager",
then press the ENTER/OK button.
button to select " " line.
6.
Press the
7.
Press the or button to select the channels you want to lock,
then press the ENTER/OK button.
8.
Repeat steps 7 for each channel to be locked or unlocked.
9.
Press the EXIT button to exit.
Select "On" or "Off" in "Child Lock" to easily turn the channels which
selected on " " to be active or inactive.
English-9
CO79.12258B.11.M13/joec!!!:
3117.21.31!!!!6;21;44
Sorting the Stored Channels
You can exchange the numbers of two channels, in order to:
Modify the numeric order in which the channels have been automatically stored.
Give easily remembered numbers to the channels that you watch most often.
1.
Press the MENU button to display the menu. Press the
to select "Channel", then press the ENTER/OK button.
2.
Press the
3.
Select channel number that you wish to change by pressing the
or button repeatedly. Press the ENTER/OK button.
4.
Press the or button to move to the position in which you would like to change and then
press the ENTER/OK button.
5.
Repeat steps 3 to 4 for another channel to be sorted.
6.
Press the EXIT button to exit.
or
or
button
button to select "Sort", then press the ENTER/OK button.
The selected channel number and name are moved to right side.
The selected channel is exchanged with the one previously stored to the chosen number.
Assigning Channels Names
Channel names will be assigned automatically when channel information is broadcast.
These names can be changed, allowing you to assign new names.
1.
Press the MENU button to display the menu. Press the
to select "Channel", then press the ENTER/OK button.
2.
Press the
3.
If necessary, select the channel to be assigned to a new name by
pressing the or button. Press the ENTER/OK button.
or
or
button
button to select "Name", then press the ENTER/OK button.
The selection bar is displayed around the name box.
4.
To...
Then...
Select a letter, number or symbol
Press the
or
Move on the next letter
Press the
button
Move back the previous letter
Press the
button
Confirm the name
Press the ENTER/OK button
button
The characters available are :
Letters of the alphabet (A~Z) / Numbers (0~9) / Special characters ( -, space)
5.
6.
Repeat steps 3 to 4 for each channel to be assigned to a new name.
Press the EXIT button to exit.
Fine Tuning Channel Reception
Use fine tuning to manually adjust a particular channel for optimal reception.
1.
Use the number buttons to directly select the channel that you want to fine tune.
2.
Press the MENU button to display the menu.
Press the or button to select "Channel", then press the ENTER/OK button.
3.
Press the
4.
Press the or button to adjust the fine tuning.
Press the ENTER/OK button.
5.
or
button to select "Fine Tune", then press the ENTER/OK button.
Press the EXIT button to exit.
Fine tuned channels that have been saved are marked with an asterisk "*" on the
right-hand side of the channel number in the channel banner. And the channel number turns red.
To reset the fine-tuning, select "Reset" by pressing the or button and then press the
ENTER/OK button.
English-10
CO79.12258B.11.M13/joec!!!21
3117.21.31!!!!6;21;4:
LNA (Low Noise Amplifier)
If the TV is operating in a weak-signal area, the LNA function can improve the reception
(a low-noise preamplifier boosts the incoming signal).
1.
Press the MENU button to display the menu.
Press the or button to select "Channel", then press the ENTER/OK button.
2.
Press the
or
button to select "LNA", then press the ENTER/OK button.
3.
Press the
or
button to select "On" or "Off". Press the ENTER/OK button.
4.
Press the EXIT button to exit.
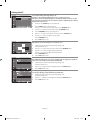
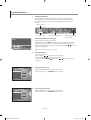
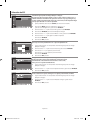
Changing the Picture Standard
You can select the type of picture which best corresponds to your viewing requirements.
1.
Press the MENU button to display the menu.
Press the or button to select "Picture", then press the ENTER/OK button.
2.
Press the ENTER/OK button again, to select "Mode".
Press the ENTER/OK button again.
3.
Press the
4.
Press the EXIT button to exit.
or
button to select the desired picture effect. Press the ENTER/OK button.
Dynamic: Selects the picture for high-definition in a bright room.
Standard: Selects the picture for optimum display in a normal environment.
Movie: Selects the picture for comfortable display in a dark room.
Custom: Select to view your favorite display settings. (Refer to "Adjusting the Custom Picture")
The Picture mode must be adjusted separately for each input source.
You can return to the factory defaults picture settings by selecting the "Reset".
(Refer to "Resetting the Picture Settings to the Factory Defaults" on page 12)
Adjusting the Custom Picture
Your set has several settings which allow you to control picture quality.
1.
To select the desired picture effect, follow the
"Changing the Picture Standard" instructions number 1 to 3.
2.
Press the
3.
Press the or button to decrease or increase the value of a particular item.
Press the ENTER/OK button.
4.
or
button to select a particular item. Press the ENTER/OK button.
Press the EXIT button to exit.
Contrast: Adjusts the lightness and darkness between objects and the background.
Brightness: Adjusts the brightness of the whole screen.
Sharpness: Adjusts the outline of objects to either sharpen them or make them more dull.
Colour: Adjusts the colours, making them lighter or darker.
Tint (NTSC only): Adjusts the colour of objects, making them more red or green for a more natural look.
The adjusted values are stored according to the selected Picture mode.
In PC Mode, Only “Contrast”, “Brightness” and “Colour” can be adjusted
Changing the Colour Tone
You can select the most comfortable colour tone to your eyes.
1.
To select the desired picture effect, follow the
"Changing the Picture Standard" instructions number 1 to 3.
2.
Press the
3.
Press the or button to select the desired colour tone setting.
Press the ENTER/OK button.
4.
Press the EXIT button to exit.
or
button to select "Colour Tone", then press the ENTER/OK button.
Cool2: Makes the colour temperature bluer than "Cool1" menu.
Cool1: Makes whites bluish.
Normal: Keeps whites white.
Warm1: Makes whites reddish.
Warm2: Makes the colour temperature redder than
"Warm1" menu.
The adjusted values are stored according to the selected Picture mode.
English-11
CO79.12258B.11.M13/joec!!!22
3117.21.31!!!!6;21;56
Resetting the Picture Settings to the Factory Defaults
You can return to the factory defaults picture settings.
1.
To select the desired picture effect, follow the
"Changing the Picture Standard" instructions number 1 to 3 on page 11.
2.
Press the
3.
or
button to select "Reset", then press the ENTER/OK button.
Press the EXIT button to exit.
The "Reset" will be set for each picture mode.
Changing the Picture Size
You can select the picture size which best corresponds to your
viewing requirements.
1.
Press the MENU button to display the menu.
Press the or button to select "Picture", then press the ENTER/OK button.
2.
Press the
3.
Select the required option by pressing the
Press the ENTER/OK button.
4.
or
button to select "Size", then press the ENTER/OK button.
or
button.
Press the EXIT button to exit.
Auto Wide: Automatically adjusts the picture size to the "16:9" aspect ratio.
16:9: Adjusts the picture size to 16:9 appropriate for DVDs or wide broadcasting.
Zoom: Magnifies the 16:9 wide picture (in the vertical direction) to fit the screen size.
4:3: This is the default setting for a video movie or normal broadcasting.
“Auto Wide” function is available only in “TV”, “Ext1”, “Ext2”, “AV”, and “S-Video” mode.
In PC Mode, only "16:9" and "4:3" mode can be adjusted.
Select
by pressing the or button. Use the or button to move the picture up
and down. After selecting
, use the or button to magnify or reduce the picture size
in the vertical direction.
The Zoom mode cannot be selected in the DTV mode.
Freezing the Current Picture
Press the STILL button to freeze a moving picture into a still one.
Press again to cancel.
Digital Noise Reduction
If the broadcast signal received by your TV is weak, you can activate the Digital Noise Reduction
feature to help reduce any static and ghosting that may appear on the screen.
1.
Press the MENU button to display the menu.
Press the or button to select "Picture", then press the ENTER/OK button.
2.
Press the
or
button to select "Digital NR", then press the ENTER/OK button.
3.
Press the
or
button to select "On" or "Off". Press the ENTER/OK button.
4.
Press the EXIT button to exit.
English-12
CO79.12258B.11.M13/joec!!!23
3117.21.31!!!!6;21;61
DNIe Demo (Digital Natural Image engine)
Samsung’s new technology brings you more detailed images with contrast and white
enhancement. A new image compensation algorithm gives viewers brighter and clearer images.
DNIe technology will match every signal to your eyes.
You can see how DNIe improves the picture by setting DNIe Demo mode to On.
1.
Press the MENU button to display the menu.
Press the or button to select "Picture", then press the ENTER/OK button.
2.
Press the
or
button to select "DNIe Demo", then press the ENTER/OK button.
3.
Press the
or
button to select "On" or "Off". Press the ENTER/OK button.
4.
Press the EXIT button to exit.
These functions don’t work in PC mode.
The DNle Demo is designed to show the difference between the regular and DNIe pictures.
By default, the product displays the picture with DNle applied.
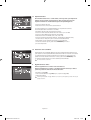
Viewing the Picture In Picture (PIP)
You can display a sub picture within the main picture of set programme or video input. In this
way, you can watch the picture of set programme or video input from any connected equipment
while watching the main picture.
1.
Press the MENU button to display the menu.
Press the or button to select "Picture", then press the ENTER/OK button.
2.
Press the
3.
Press the ENTER/OK button again.
Press the or button to select "On", then press ENTER/OK button.
4.
Press the or button to select "Source", then press ENTER/OK button.
Select a source of the sub picture by pressing the or button
and press the ENTER/OK button.
or
button to select "PIP", then press the ENTER/OK button.
If the PIP is activated, the size of the main picture turns to “16:9”.
Press the PIP button on the remote
control repeatedly to activate or
deactivate the "PIP".
The sub picture can serve different source selections based on what the main
picture is set to.
5.
Press the or button to select "Swap".
To interchange the main picture and the sub picture, select "Swap" option
and press the ENTER/OK button.
The main picture and the sub picture are interchanged.
If main picture is in "PC" mode, "Swap" is not available.
6.
Press the or button to select "Size" of the sub picture and then press the
ENTER/OK button. Select a size of the sub picture by pressing the or button
and then press the ENTER/OK button.
7.
Press the or button to select "Position", then press the ENTER/OK button.
Select the position of the sub picture by pressing the or button and
then press the ENTER/OK button.
8.
Press the or button to select "Programme" and then press the
ENTER/OK button. You can select the channel that you want to view through sub picture by
pressing the or button. Press the ENTER/OK button.
9.
Press the EXIT button to exit.
If main picture is in "PC" mode, "Size" is not available.
The "Programme" can be active when the sub picture is set to TV.
You may notice that the picture in the PIP window becomes slightly unnatural when you use the main
screen to view a game or karaoke.
Source: Used to select a source of the sub picture.
Swap: Used to interchange the main picture and the sub picture.
Size: Used to select a size of the sub picture.
Position: Used to move the sub picture.
Programme: Used to Change the sub picture.
English-13
CO79.12258B.11.M13/joec!!!24
3117.21.31!!!!6;21;67
PIP Settings
O: PIP operates, X: PIP doesn’t operate
Main
Sub
TV
Ext.1
Ext.2
AV
S-Video
Component
PC
HDMI
DTV
TV
X
X
X
X
X
X
O
O
X
Ext.1
X
X
X
X
X
X
O
O
X
Ext.2
X
X
X
X
X
X
O
O
X
AV
X
X
X
X
X
X
O
O
X
S-Video
X
X
X
X
X
X
X
O
X
Component
X
X
X
X
X
X
X
O
X
PC
X
X
X
X
X
X
X
X
X
HDMI
O
O
O
O
O
O
X
X
X
DTV
X
X
X
X
X
X
X
X
X
Changing the Sound Standard
You can select the type of the special sound effect to be used when watching
a given broadcast.
1.
Press the MENU button to display the menu.
Press the or button to select "Sound", then press the ENTER/OK button.
2.
Press the ENTER/OK button again, to select "Mode".
3.
Select the required sound effect by pressing the
the ENTER/OK button.
4.
or
button repeatedly and then press
Press the EXIT button to exit.
Standard: Selects the normal sound mode.
Music: Emphasizes music over voices.
Movie: Provides live and full sound for movies.
Speech: Emphasizes voices over other sounds.
Custom: Selects your custom sound settings.
(Refer to "Adjusting the Sound Settings")
Adjusting the Sound Settings
The sound settings can be adjusted to suit your personal preferences.
1.
Press the MENU button to display the menu.
Press the or button to select "Sound", then press the ENTER/OK button.
2.
Press the
3.
Press the or button to select a particular item.
Press the ENTER/OK button.
4.
Press the or
button to reach the required setting.
Press the ENTER/OK button.
5.
or
button to select "Equalizer", then press the ENTER/OK button.
Press the EXIT button to exit.
If you make any changes to these settings, the Sound Mode is automatically switched to "Custom".
Connecting headphones
You can connect a set of headphones to your set if you wish to watch a
TV programme without disturbing the other people in the room.
When you insert the head set jack into the corresponding port, you can operate only
“Internal Mute” and “Sound Select” (in PIP mode) in Sound menu.
Prolonged use of headphones at a high volume may damage your hearing.
You will not receive sound from the speakers when you connect headphones to the system.
English-14
CO79.12258B.11.M13/joec!!!25
3117.21.31!!!!6;22;13
Setting the TruSurround XT (SRS TSXT)
TruSurround XT is a patented SRS technology that solves the problem of playing 5.1 multichannel
content over two speakers.
TruSurround delivers a compelling,virtual surround sound experience through any two-speaker
playback system, including internal television speakers. It is fully compatible with all multichannel
formats.
1. Press the MENU button to display the menu. Press the
select “Sound”, then press the ENTER/OK button.
2. Press the or button to select “SRS TSXT”,
then press the ENTER/OK button.
or
button to
3. Press the or button to select “On” or “Off”. Press the ENTER/OK button.
4. Press the EXIT button to exit.
TruSurround XT, SRS and
symbol are trademarks of
SRS Labs, Inc. TruSurround XT technology is incorporated under license from
SRS Labs, Inc.
Adjusting the Volume Automatically
Each broadcasting station has its own signal conditions, and so it is not easy for you to adjust
the volume every time the channel is changed. This feature allows you to automatically adjust
the volume of the desired channel by lowering the sound
output when the modulation signal is high or by raising the sound output when the modulation
signal is low.
1.
Press the MENU button to display the menu.
Press the or button to select "Sound", then press the ENTER/OK button.
2.
Press the
or
button to select "Auto Volume", then press the ENTER/OK button.
3.
Press the
or
button to select "On" or "Off". Press the ENTER/OK button.
4.
Press the EXIT button to exit.
Selecting the Internal Mute
If you want to hear the sound through separate speakers, cancel the internal amplifier.
1.
Press the MENU button to display the menu.
Press the or button to select "Sound", then press the ENTER/OK button.
2.
Press the
or
3.
Press the
or
4.
Press the EXIT button to exit.
"
p
s
button to select "Internal Mute", then press the ENTER/OK button.
u
v
button to select "On" or "Off". Press the ENTER/OK button.
When "Internal Mute" is set to "On’, the Sound menus except for "Sound Select"
(in PIP mode) cannot be adjusted.
Listening to the Sound of the Sub Picture
During the PIP features activation, you can listen to the sound of the sub picture.
1.
Press the MENU button to display the menu.
Press the or button to select "Sound", then press the ENTER/OK button.
2.
Press the
or
3.
Press the
or
4.
button to select "Sound Select", then press the ENTER/OK button.
button to select "Sub". Press the ENTER/OK button.
Press the EXIT button to exit.
Main: Used to listen to the sound of the main picture.
Sub: Used to listen to the sound of the sub picture.
You can select this option when the "PIP" is set to "On". (refer to page 13)
English-15
CO79.12258B.11.M13/joec!!!26
3117.21.31!!!!6;22;19
Resetting the Sound Settings to the Factory Defaults
If Game Mode is On, the Reset Sound function is activated. Selecting the Reset function after
setting the equalizer resets the equalizer setting to the factory defaults.
1.
Press the MENU button to display the menu.
Press the or button to select "Sound", then press the ENTER/OK button.
2.
Press the
3.
Press the EXIT button to exit.
or
button to select "Reset", then press the ENTER/OK button.
You can select this option when the "Game Mode” is set to "On".
Setting and Displaying the Current Time
You can set the TV’s clock so that the current time is displayed when you press the INFO
button. You must also set the time if you wish to use the automatic On/Off timers.
1.
Press the MENU button to display the menu.
Press the or button to select "Setup", then press the ENTER/OK button.
2.
Press the
3.
Press the ENTER/OK button to select "Clock Set".
4.
or
button to select "Time", then press the ENTER/OK button.
To...
Press the...
Move to "Hour" or "Minute"
or
button.
Set the "Hour" or "Minute"
or
button.
Press the ENTER/OK button.
5.
Press the EXIT button to exit.
If you disconnect the power cord, you have to set the clock again.
You can also set hour and minute by pressing the number buttons on the remote control.
Setting the Sleep Timer
You can select a time period of between 30 and 180 minutes after which the
television automatically switches to standby mode.
1.
Press the MENU button to display the menu.
Press the or button to select "Setup", then press the ENTER/OK button.
2.
Press the
or
button to select "Time", then press the ENTER/OK button.
or
button to select "Sleep Timer", then press the ENTER/OK button.
3.
Press the
4.
Press the or button repeatedly until the desired time appears
(Off, 30, 60, 90, 120, 150, 180). Press the ENTER/OK button.
5.
Press the EXIT button to exit.
The TV automatically switches to standby mode when the timer reaches 0.
Switching the Television On and Off Automatically
You can set the On/Off timers so that the set will:
Switch on automatically and tune to the channel of your choice at the time you select.
Switch off automatically at the time you select.
The first step is to set the television’s clock.
1. Press the MENU button to display the menu.
Press the or button to select "Setup", then press the ENTER/OK button.
2.
Press the
or
button to select "Time", then press the ENTER/OK button.
3.
Press the
or
button to select "On Timer", then press the ENTER/OK button.
English-16
CO79.12258B.11.M13/joec!!!27
3117.21.31!!!!6;22;28
4.
Press the or button to adjust "Hour", then press the button to
move to the next step. Set other items using the same method as above.
When finished, press the ENTER/OK button to return.
5.
Press the
6.
Press the or button to adjust "Hour", then press the button to
move to the next step. Set other items using the same method as above.
When finished, press the ENTER/OK button to return.
7.
or
button to select "Off Timer", then press the ENTER/OK button.
Press the EXIT button to exit.
You can also set hour and minute by pressing the number buttons on the remote control.
The "Activation" setting must be set to "Yes" in order for the timers to work.
Choosing Your Language
When you start using your set for the first time, you must select the
language which will be used for displaying menus and indications.
1.
Press the MENU button to display the on-screen menu.
Press the or button to select "Setup", then press the ENTER/OK button.
2.
Press the
3.
Select a particular language by pressing the
Press the ENTER/OK button.
or
button to select "Language", then press the ENTER/OK button.
4.
Press the EXIT button to exit.
or
button repeatedly.
You can choose one of 5 languages.
Using Game Mode
When connecting to a game console such as PlayStationTM or XboxTM,
you can enjoy a more realistic gaming experience by selecting game menu.
1.
Press the MENU button to display the menu.
Press the or button to select “Setup”, then press the ENTER/OK button.
2.
Press the
or
button to select “Game Mode”, then press the ENTER/OK button.
3.
Press the
or
button to select “On” or “Off”. Press the ENTER/OK button.
4.
Press the EXIT button to exit.
To disconnect the game console and connect another external device, cancel game mode
in the picture menu.
If you display the TV menu in Game mode, the screen shakes slightly.
Game Mode is not available in TV mode.
If Game Mode is On:
• Picture Mode and Sound Mode are automatically changed to Custom and users cannot change the mode.
• Sound Mode in the Sound menu is deactivated. Adjust the sound using the equalizer.
• The Reset Sound function is activated. Selecting the Reset function after setting the equalizer resets the
equalizer setting to the factory defaults.
Setting the Blue Screen Mode / Selecting the Melody
Blue Screen:
If no signal is being received or the signal is very weak, a blue screen automatically replaces the
noisy picture background. If you wish to continue viewing the poor picture, you must set the
"Blue Screen" mode to "Off".
Melody:
You can hear melody sound when the television is powered on or off.
1.
Press the MENU button to display the menu.
Press the or button to select "Setup", then press the ENTER/OK button.
2.
Press the or button to select "Blue Screen" or "Melody".
Press the ENTER/OK button.
3.
Press the or button to select "On" or "Off".
Press the ENTER/OK button.
4.
Press the EXIT button to exit.
English-17
CO79.12258B.11.M13/joec!!!28
3117.21.31!!!!6;22;36
Using the Energy Saving Feature
This function adjusts the brightness of the TV so as to reduce power consumption. When you
watching TV at night, set the "Energy Saving " mode option to "High" so as to reduce the
dazzling of your eyes as well as the power consumption.
1.
Press the MENU button to display the on-screen menu.
Press the or button to select "Setup", then press the ENTER/OK button.
2.
Press the
3.
Select the required option (Off, Low, Medium, High) by pressing the
ENTER/OK button.
or
button to select "Energy Saving", then press the ENTER/OK button.
4.
Press the EXIT button to exit.
or
button. Press the
Selecting the Source
You can select among external sources connected to your TV’s input jacks.
1.
Press the MENU button to display the menu.
Press the ENTER/OK button, to select "Input".
2.
Press the ENTER/OK button again, to select "Source List".
When no external device is connected to your set, only "TV", "Ext.1", "Ext.2", "DTV" are
activated in the "Source List". "AV", "S-Video", "Component", "PC", "HDMI" are activated
only when they are connected to your set.
3.
Select the required device by pressing the
Press the ENTER/OK button.
or
button.
Press the SOURCE button on the remote control to toggle between all the available source.
TV mode can be selected by pressing the TV/DTV button, number buttons(0~9), and the
P / buttons on the remote control. But it cannot be selected using the SOURCE button.
Editing the Input Source Names
Name the device connected to the input jacks to make your input source selection easier.
1.
Press the MENU button to display the menu.
Press the ENTER/OK button, to select "Input".
2.
Press the
3.
Press the or button to select the device that you wish to edit.
Press the ENTER/OK button.
4.
Press the or button to select the required device.
Press the ENTER/OK button.
5.
Press the EXIT button to exit.
or
button to select "Edit Name", then press the ENTER/OK button.
English-18
CO79.12258B.11.M13/joec!!!29
3117.21.31!!!!6;22;45
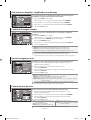
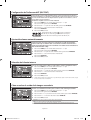
Previewing the DTV Menu System
To help you navigate around the on-screen menu system and adjust the various
settings available, refer to the following illustration.
Available in the Digital TV mode.
Press the D.MENU button.
Installation
Select Country
Auto Scanning
Manual Scanning
Reset to Factory Defaults
Channel Organising
Delete Frequency
Delete Channel
Delete All Channels
Move & Edit Channel
Parental Lock
Set Channel Lock
Change PIN Code
System Setup
Language Selection
OSD Setting
Time Setting
System Information
Software Upgrade
The sub-items of the CI Menu may vary depending on the CAM model.
In the Digital TV mode, do not turn the power off before the screen is completely loaded.
You can select these options by simply
pressing the D.MENU button on the
remote control.
English-19
CO79.12258B.11.M13/joec!!!2:
3117.21.31!!!!6;22;54
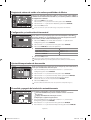
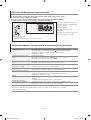
Basic Functions
1.
Display Screen
Before you can view the television program, you must perform the installation.
Therefore you will see only menu images at first. After the television channels have
been programmed, you will see the following picture (banner) each time you switch
channels:
Channel Number
Signal Status
Program Information
The number of soundtrack
in current channel
Detailed program information
First you will see the banner described above.
After pressing the INFO button for the second time you will receive detailed program
information for current program can be displayed on another banner, if there is more
information. When this information is more than one page, P / can be used for page up
and down.
This service depends on service provider.
2.
Volume Control
To control the volume level :
buttons to adjust the volume level.
• Press the
• Press the MUTE
button to turn to silence mode.
• Press the MUTE
button again or
buttons in order to cancel the
mute function.
3.
Select Soundtrack
• Press the ALT button to see the soundtrack list.
• Press the or and ENTER/OK buttons to select one.
4.
Select Videotrack
• Press the ALT button twice to see the videotrack list.
• Press the or and ENTER/OK buttons to select one.
English-20
CO79.12258B.11.M13/joec!!!31
3117.21.31!!!!6;22;62
5.
Service List
• Press the CH MGR button while you are viewing a program.
• Select list by pressing the TV/RADIO button.
behind the channel name symbolizes scrambled channel,
The icon
and the icon
behind the channel name symbolizes parental locked channel.
• Select the channel by pressing the / and press the P
down pages on the lists.
• Press the ENTER/OK button to watch that channel.
6.
/
for moving up or
Program Information
EPG-Electronic Program Guide
The electronic program guide gives you a programme list for the channels.
1. This service depends on service provider.
2. After receiver recognized the GMT -time from the signal which takes few seconds,
it can display correct EPG information.
• Press the GUIDE button while you are viewing a program.
This function is displayed on the screen by using only time.
• RED button
: Red button is for moving back to the previous date.
• GREEN button : Green button is for moving to the next coming date.
• INFO button : This button is used to watch the program information,
if there is more information than one page.
Usethe / buttons to move up and down pages.
• / buttons : Use to display the program list by 30 minutes per block.
Time interval can be adjusted by pressing buttons as followings on EPG screen:
1 button: 1 hour and 30 minutes
2 button: 30 minutes
3 button: 15 minutes
• Select the channel by pressing the / buttons and
press the ENTER/OK button to watch this channel.
English-21
CO79.12258B.11.M13/joec!!!32
3117.21.31!!!!6;22;6:
Operating the DTV Menu
Main Menu
After installing your antenna system and TV with appropriate connectors.
• Plug in the AC main power and switch on the TV.
• Press the D.MENU button to bring up the main menu.
The following on-screen display will appear:
The sub menu topics will be displayed. For the sub-menus "Installation",
"Channel Organization" and "Parental Lock", you need the PIN Code.
1.
Installation
This menu consists of 4 sub-menus:
Select Country, Auto Scanning, Manual Scanning and Reset to Factory Defaults.
• Select "Installation" by pressing the ENTER/OK button in the main menu mode to
select the sub menu.
• Enter the PIN Code.
If you have not entered your own PIN Code then the PIN Code 0000 applies,
which was set at the factory.
Once you have entered PIN Code, you do not have to input the code again unless
you turn the TV power off.
1.1
Select Country
To tune-in new channels, the TV has been provided with the option
“Select Country”. Select the country where broadcasting services are provided. After
selecting the “Select Country” from the Installation Menu, the following screen will be
displayed:
• Select the country which you are in.
You can select the value of "ITALY", "SPAIN", "SWEDEN", "UK", "USER",
"BELGIUM", "GERMANY", "FINLAND", or "FRANCE" by using / buttons.
• After selecting option, press the ENTER/OK button to choose the nation of
broadcasting area to be served. If you don’t want to save the changes,
press EXIT button without ENTER/OK button pressed.
If national code is changed, all of saved programs will be deleted.
USER: An user may set Channel Number and Frequency in Auto/Manual scanning.
1.2
Auto Scanning
The sub menu “Auto Scanning” will enable download of the channels automatically from
the preprogrammed load.
To download channels automatically:
• You can select the specified frequency between "Start Frequency" and
"End Frequency".
• Press the ENTER/OK button.
Auto Scanning menu will be displayed.
All the channels in the list will be automatically downloaded.
English-22
CO79.12258B.11.M13/joec!!!33
3117.21.31!!!!6;23;16
1.3
Manual Scanning
To tune-in new channels and weak signals, the TV has been provided with the option
“Manual Scanning” where the channel data can be entered by the user. After selecting the
“Manual Scanning” from the Installation Menu, the following screen will be displayed:
• Select the Channel Number.
You can select the specified channel you want to find.
The followings are defined as a default, but optionally you can choose it.
Signal Status bar shows you if it is valid.
• Input the frequency of the channel you want to find.
• Select the bandwidth. You can select the value of "6", "7" or "8" MHz.
• Select the Guard Interval Mode.
You can select the value of "AUTO", "1/32", "1/16", "1/8", or "1/4".
• Select the FFT (Fast Fourier Transform) Mode.
One of the values-"AUOT", "2 K", and "8 K"- will be selected automatically.
You may change the set value as your preference.
• After selecting option, press the ENTER/OK button to start the scanning process.
1.4
Reset to Factory Defaults
This is to restore the factory set values in case the user has encountered some problems
after changing any values of channel data and others which may be in error. At the request
window, if you press the ENTER/OK button, the TV will be reset to factory default settings
automatically.
This causes your previous settings to be deleted!
2.
Channel Organising
The “Channel Organising” menu has four functions:
The “Channel Organising” menu is used to delete the Frequencies and Channels or
Move&Edit Channel as you want.
• Enter the PIN Code.
If you have not entered your own PIN Code 0000 applies,
which was set at the factory.
Once you have entered PIN Code, you do not have to input the code again
unless you turn the TV power off.
English-23
CO79.12258B.11.M13/joec!!!34
3117.21.31!!!!6;23;24
2.1
Delete Frequency
• Select the desired frequency list you want to delete by pressing the RED button.
• Press the ENTER/OK button for confirmation.
This feature doesn’t delete frequency itself but deletes the list of channels registered
for frequency.
2.2
Delete Channel
• Select the desired channel you want to delete by pressing the RED button.
• Press the ENTER/OK button for confirmation.
2.3
Delete All Channels
At the request window, press the ENTER/OK button to delete all channels and press the
EXIT button to exit.
2.4
Move & Edit Channel
To move the Channel Name
• Select the TV/RADIO/Interactive list with / buttons.
• Select the TV/RADIO/Interactive list with / or P / buttons.
• Select channel by pressing the RED button.
• Press the / buttons to change the position of the channel you want,
and P / for moving up or down pages on list. Press the ENTER/OK button
for confirmation.
• If you want to return the channel to the initial position, do not press the
ENTER/OK button but press the BLUE button.
To edit Channel Name
• Select the TV/RADIO/Interactive list with / buttons.
• Select a channel list to move to other location with / or P / buttons.
• Press the GREEN button. Font Table will be displayed.
• Select desired character with / , / and then press the ENTER/OK button
to paste character to the string.
P button : Backspace for deleting previous character.
• Press the D.MENU button and then press the ENTER/OK button to save the set data.
English-24
CO79.12258B.11.M13/joec!!!35
3117.21.31!!!!6;23;34
3.
Parental Lock
This “Parental Lock” feature sets viewing restrictions and prevents unauthorized access
to your TV through the PIN (Personal Identification Number), which is a 4-digit number.
(The factory preset PIN Code : 0000)
On selecting this menu, you will have three options: to set lock for any desired channel
and to change your PIN Code and to Set Modem Lock.
• Enter the PIN Code.
If you have not entered your own PIN Code then the PIN Code 0000 applies,
which was set at the factory.
3.1
Set Channel Lock
• Select the channel by pressing the / or / buttons.
• Select the channel lock by pressing the RED button.
• Press the ENTER/OK button for confirmation.
Whenever you need to view the locked channel, you will have to enter the PIN Code at the
request window. After entering PIN Code to be able to access a parental locked channel, it
will work on all parental locked channels. It means that you can access all parental locked
channels with entering PIN Code on any parental locked channel successfully.
To cancel the lock:
• Press the RED button again in order to cancel the lock.
3.2
Change PIN Code
To change the PIN Code, select the second option “Change PIN Code”.
This will take you to the following menu:
In this option, you need to enter the current PIN Code at the first cursor, and at the second
cursor enter the desired PIN Code. To confirm, you need to enter the new PIN Code again.
Please remember the PIN Code should be a 4 digit numerical value.
THE FACTORY PRESET PIN CODE : 0 0 0 0.
If you forget the PIN Code, contact your dealer or service provider.
Once you change password, please do not forget and keep well.
English-25
CO79.12258B.11.M13/joec!!!36
3117.21.31!!!!6;23;48
4.
System Setup
This option enables you to change the factory preset system settings
as per your requirements.
4.1
Language Selection
The “Language Selection” option allows the user to select the desired
language of the OSD, Soundtrack, Teletext, and EPG.
• To accommodate user from different regions speaking different languages,
OSD languages are available 5 languages. (English, Deutsch, Français,
Italiano, Español and provided currently)
• To select the desired language menu, press the / buttons to change language
and press the ENTER/OK button.
• The OSD, Soundtrack, Teletext, or EPG language will vary according to
the selected language.
4.2
OSD Setting
You can set the OSD transparency and the display (banner) time.
• Select OSD Transparency level.
The OSD Transparency level from 0 to 100%. Setting is made with the
numeric buttons, / buttons or P / buttons.
• Set the display duration of the information(banner) box displayed in the screen.
The time ranges from 0.5 to 60.0 seconds. Setting is made with the numeric buttons,
/ buttons to be decrement/increment of 0.5sec and P / buttons 1sec.
4.3
Time Setting
Various time modes can be set, such as current local time. The exact local present time can
be adjusted by using the GMT.
• Place the cursor on this sub menu and press the ENTER/OK button.
• Press the / buttons to change the Local time in Time Zone.
The local time will be changed according to your location.
GMT is referred to the standard time of Greenwich.
English-26
CO79.12258B.11.M13/joec!!!37
3117.21.31!!!!6;23;54
4.4
System Information
If you have to contact your service provider or a service center they might ask for
information available from this menu.Place the cursor on this sub menu and press
the ENTER/OK button. The following will be the on-screen display.
4.5
Software Upgrade
You can download and upgrade the system software of the TV through a specific channel
through a specific channel designated by the broadcaster.
The broadcaster will provide you with more information about that.
If you select to download a new software version, all your previous settings, access code
and favourite channels etc. will be erased! Downloading may
take a While ‘During downloading’ don’t turn off the TV.
Installing the CI card
1.
Purchase the CI CAM module by visiting your nearest dealer or by phone.
2.
Insert the CI card into the CAM in the direction of the arrow until it fits.
3.
Insert the CAM with the CI card installed into the common interface slot.
4.
Check if you can see a picture on a scrambled signal channel.
Insert the CAM in the direction of the arrow, right up to the end so that it is parallel with the slot.
You can install the CAM anytime whether the TV is ON or OFF.
English-27
CO79.12258B.11.M13/joec!!!38
3117.21.31!!!!6;23;66
Teletext Decoder
Most set channels carry " teletext ", pages of written information that provide
information such as:
Television programme times.
News bulletins and Weather forecasts.
Sports results.
Subtitles for the hard of hearing.
The teletext pages are organized according to six categories:
Contents
Part
A
Selected page number.
B
Broadcasting station identity.
C
Current page number or search status.
D
Date and time.
E
Text.
F
Status information.
Displaying the Teletext Information
You can display teletext information at any time, but signal reception must be good. Otherwise:
Information may be missing.
Some pages may not be displayed.
To activate the teletext mode and display the contents page:
1.
Using the P
(
teletext service.
2.
Press the TTX/MIX (
) or P
(
) button, select the channel providing the
) button to activate the teletext mode.
The contents page is displayed. It can be redisplayed at any time by pressing the
) button.
MENU (
3.
Press the TTX/MIX (
) button again.
The actual broadcast will be displayed with “Teletext”, “Double”, and “Mix” in order
on the screen.
4.
Press the TV/DTV button to exit from the Text display.
If any broken character appears while Text is being viewed, make sure that the Text language is
identical with the language in the "Setup" menu mode. If both languages are different, select the same
language with the Text language on the "Setup" menu.
English-28
CO79.12258B.11.M13/joec!!!39
3117.21.31!!!!6;24;14
Selecting a Specific Teletext Page
Press the number buttons on the remote control to enter the page number directly:
1.
Enter the three-digit page number listed in the contents by pressing the corresponding
numeric buttons.
2.
If the selected page is linked with several secondary pages, the secondary pages are
displayed in sequence. To freeze the display on a given page,
press the PIP ( ) . Press the PIP ( ) button again to resume.
3.
Using the various display options:
To display...
Press the...
Both teletext information and the normal broadcast
TTX/MIX (
Hidden text (answers to quiz games, for example)
INFO (
)
The normal screen
INFO (
)
A secondary page, by entering its 4-digit number
PRE-CH (
The next page
The previous page
P
P
Double-size letters in the:
Upper half of the screen
Lower half of the screen
DUAL I-II (
Once
Twice
Normal screen
(
(
)
)
)
)
)
Three times
Using Fastext to Select a Teletext Page
The various topics included in the teletext pages are colour-coded, and can be selected by
pressing the coloured buttons on the remote control.
1.
Display the teletext contents page by pressing the TTX/MIX (
2.
Press the coloured button corresponding to the topic that you wish to select (The available
topics are listed on the status information line).
3.
Press the Red button to display the previous page.
Press the Green button to display the next page.
4.
Press the TV/DTV button to exit from the Text display.
) button.
English-29
CO79.12258B.11.M13/joec!!!3:
3117.21.31!!!!6;24;21
Setting Up Your Remote Control
After it has been set up properly, your remote control can operate in five different modes:
TV, DVD, Cable, Set-Top Box, VCR. Pressing the corresponding button on the remote control
allows you to switch between these modes, and control whichever piece of equipment you
choose.
The remote control might not be compatible with all DVD Players, VCRs, Cable boxes,
and Set-Top Boxes.
Setting Up the Remote to Operate Your VCR
1. Turn off your VCR.
2. Press the VCR button on your TV’s remote control.
3. Press the SET button on your TV’s remote control.
4. Using the number buttons on your remote control, enter three digits of the VCR code
listed on page 32 of this manual for your brand of VCR. Make sure you enter three digits
of the code, even if the first digit is a “0”.
(If more than one code is listed, try the first one.)
5. Press the POWER button on the remote control.
Your VCR should turn on if your remote is set up correctly.
If your VCR does not turn on after set up, repeat steps 2, 3, and 4, but try one of the other
codes listed for your brand of VCR.
If no other codes are listed, try each code, 000 through 080.
Note on Using Remote Control Modes: VCR
When your remote control is in “VCR” mode, the volume buttons still control your TV’s volume.
Setting Up the Remote to Operate Your Cable Box
1. Turn off your cable box.
2. Press the CABLE button on your TV’s remote control.
3. Press the SET button on your TV’s remote control.
4. Using the number buttons on your remote control, enter three digits of the cable box
code listed on page 33 of this manual for your brand of cable box. Make sure you enter
three digits of the code, even if the first digit is a “0”. (If there is more than one code
listed, try the first one.)
5. Press the POWER button on the remote control.
Your cable box should turn on if your remote is set up correctly.
If your cable box does not turn on after set up, repeat steps 2, 3, and 4, but try one of the
other codes listed for your brand of cable box. If no other codes are listed, try each code,
000 through 046.
Note on Using Remote Control Modes: Cable Box
When your remote control is in “CABLE” mode, the volume buttons still control your TV’s volume.
English-30
CO79.12258B.11.M13/joec!!!41
3117.21.31!!!!6;24;34
Setting Up the Remote to Operate Your DVD
1. Turn off your DVD.
2. Press the DVD button on your TV’s remote control.
3. Press the SET button on your TV’s remote control.
4. Using the number buttons on your remote control, enter three digits of the DVD code
listed on page 33~34 of this manual for your brand of DVD.
Make sure you enter three digits of the code, even if the first digit is a “0”.
(If there is more than one code listed, try the first one.)
5. Press the POWER button on the remote control.
Your DVD should turn on if your remote is set up correctly.
If your DVD does not turn on after set up, repeat steps 2, 3, and 4, but try one of the
other codes listed for your brand of DVD.
If no other codes are listed, try each code, 000 through 141.
Note on Using Remote Control Modes: DVD
When your remote control is in “DVD” mode, the volume buttons still control your TV’s volume.
Setting Up the Remote to Operate Your STB
1. Turn off your STB.
2. Press the STB button on your TV’s remote control.
3. Press the SET button on your TV’s remote control.
4. Using the number buttons on your remote control, enter three digits of the STB code
listed on page 34 of this manual for your brand of STB.
Make sure you enter three digits of the code, even if the first digit is a “0”.
(If there is more than one code listed, try the first one.)
5. Press the POWER button on the remote control.
Your STB should turn on if your remote is set up correctly.
If your STB does not turn on after set-up, repeat steps 2, 3 and 4, but try one of the other
codes listed for your brand of STB.
If no other codes are listed, try each code, 000 through 074.
Note on Using Remote Control Modes: STB
When your remote control is in “STB” mode, the volume buttons still control your TV’s volume.
English-31
CO79.12258B.11.M13/joec!!!42
3117.21.31!!!!6;24;42
Remote Control Codes
VCR
Brand
Code
Brand
SAMSUNG
000 001 002 003 004 005 077 078 079
MONTGOMERY WARD
Code
020
ADMIRAL
020
MTC
002 025
AIWA
025
MULTITECH
002 005 025 038
AKAI
004 027 032
NEC
007 008 018 026 037 062 064
AUDIO DYNAMICS
007 026
OPTIMUS
020
BELL&HOWELL
018
ORION
073 074 075 076
BROKSONIC
022
PANASONIC
021 056 071 072
CANDLE
002 003 006 008 015 055
PENTAX
019 041 075
CANON
021 056
PENTEX RESEARCH+
008
CITIZEN
002 003 006 008 015 055
PHILCO
021 056 059
COLORTYME
007
PHILIPS
021 080
CRAIG
002 024
PIONEER
019 026 039 053
CURTIS MATHES
002 007 008 017 021 025 056 064 066
PORTLAND
015 049 055
DAEWOO
003 010 011 012 013 014 015 016
PROSCAN
017
DB
007 026
QUARTZ
018
DIMENSIA
017
QUASAR
021 056
DYNATECH
025
006 018 020 021 024 025 029 034 048 056
ELECTROHOME
034
RADIO SHACK/
REALISTIC
EMERSON
001 003 006 021 022 025 030 032 034 040 047
050 052 060 063 065 066 067 069 073
RCA
002 017 019 021 035 041 043 057 068 076
SANSUI
026
FISHER
018 024 028 029 048 051 061
SANYO
018 024
FUNAI
025
SCOTT
003 047 052 067
GENERAL ELECTRIC
002 005 017 021 056
SEARS
006 018 019 024 028 029 041 048 051
GO VIDEO
002
SHARP
020 034 045 015
HARMAN KARDON
007
SHIMTOM
027 033 038 058
HITACHI
019 025 041 042 074
SIGNATURE
025
INSTANT REPLAY
021
SONY
027 033 044
JC PENNEY
002 007 018 019 021 026 037 041 054 056
SYLVANIA
021 025 056 059
JCL
007 008 018 021 026 037
SYMPHONIC
025
JVC
081 082 083
TANDY
018 025
KENWOOD
007 008 018 021 026 037
TASHIKA
006
KLH
070
TATUNG
037
KONIA
036
TEAC
025 037 068
LG(Goldstar)
006 007 008 009 010
TECHNICS
021
LIOYD
025
TEKNIKA
006 021 025 031
LOGIK
038
TMK
066
LXI
025
TOSHIBA
003 019 029 051 052
MAGNAVOX
021 056 059
TOTEVISION
002 006
MARANTZ
007 008 018 021 026 037 062
UNITECH
002
MARTA
006
VECTOR RESEARCH
007 026
MEI
021
VICTOR
026
MEMOREX
006 021 024 025
VIDEO CONCEPTS
007 026
MGA
034
VIDEOSONIC
002
MIDLAND
005
WARDS
002 003 006 019 020 021 024 025 034 038 041
MINOLTA
019 041 075
YAMAHA
007 008 018 026 037
MITSUBISHI
019 034 041 046
ZENITH
023 027 033
English-32
CO79.12258B.11.M13/joec!!!43
3117.21.31!!!!6;24;45
CABLE BOX
Brand
Code
Brand
Code
SAMSUNG
000 001 002 003 004 005 006 007
REGENCY
015 023
GI
041
SA
042 043
HAMLIN
003 024 031
SCIENTIFIC ATLAN
042 043
HITACHI
025 030
SPRUCER
022
JERROLD
038 039
STARGATE 2000
036
MACOM
025 030
SYLVANIA
016
MAGNAVOX
019 023 028
TEXSCAN
016
OAK
026
TOCOM
032
PANASONIC
003 022 027 037 044
UNIVERSAL
033 034
PHILIPS
019 021 023 028
VIEWSTAR
019 021 023 028
PIONEER
004 018 020 044
WARNER AMEX
046
RCA
014 022 040
ZENITH
017 029 035 037 045
REGAL
003
SAMSUNG DVD
Product
Code
Product
DVD
000 001 002
Home Theater VCR COMBO
Code
014 015 016
DVDR
003 004
HDD Recorder COMBO
017
BD Record
005 006
TWIN TRAY COMBO
018
VCR COMBO
007 008 009 010 011
STB DVD COMBO
019
VCR Record
012
DVD Receiver
020
DHR COMBO
013
AV Receiver
021
Brand
Code
Brand
Code
ANAM
030
INTEGRA
092
AUDIOVOX
075
JBL
091
AUDIOLOGIC
085
JVC
022 033 115 116
ANABA
072
JATON
073
APEX DIGITAL
070 071 074 086 083 084 088 111 112
KENWOOD
051 108 109
AIWA
114
KISS
073
BROKSONIC
062
KONKA
059 100 106 107
BLAUPUNKT
074
KLH
074 075
B&K
122 123
LG(Goldstar)
025 031
CURTIS MATHES
027
LOEWE
057
CYBER HOME
077 078 079 082
LASONIC
058
CLARION
080 125
MOBILE AUTHORITY
054
CIRRUS
081
MEMOREX
055
CYBER HOME
065
MALATA
056
CINEVISION
095
MAGNAVOX
076 093
DAEWOO
066
MINTEK
074 094
DENON
146
MONYKA
073
FARENHEIT
067 068
NORCENT
048 049 050
FISHER
090
NEXT BASE
052
GPX
060
NEC
053
GO VIDEO
061 089 133 135
NANTAUS
144
DVD
GE
069 074
NESA
074
GREENHILL
074
OPTOMEDIA ELECTRONICS
105
HITACHI
064 113
OPTIVIEW
072
HITEKER
071
ONKYO
076 092 119
HOYO
073
PHILCO
044 045
HARMAN / KARDON
091 110
PRINCETON
046 047
IRT
089
PROSCAN
023
English-33
CO79.12258B.11.M13/joec!!!44
3117.21.31!!!!6;24;48
DVD
Brand
Code
Brand
Code
PANASONIC
024 034 124 134 136 137 138
THOMSON
145
PHILIPS
036 076
TOSHIBA
028 062 076
ROTEL
117 118
TECHNICS
139
RIO
120
TVIEW
072
RCA
023 035 074 075 131 132
TOKAI
073
RAITE
073
TEAC
096
ROWA
038
TECHWOOD
097
SAMPO
104
TREDEX
098 099 101
SONY
026 029 126 127 128 129 130 141
URBAN CONCEPTS
076
SHERWOOD
039 041
VENTURER
075
SVA
042
VOCOPRO
102
SYLVANIA
043 093
YAMAHA
032 063
SHARP
140
YAMAKAWA
040 073
SANSUI
062
XWAVE
103
SANYO
062 090
ZENITH
076 121
SHINSONIC
094
SAMSUNG SET-TOP BOX
Product
Code
Product
Ground wave STB
001 002
Satellite STB HDD COMBO Premium
Code
010
Satellite STB
003
CABLE STB HDD COMBO Standard
011
CABLE STB
004
CABLE STB HDD COMBO Premium
012
STB DVD COMBO
008
Ground wave STB HDD COMBO Standard
013
Satellite STB HDD COMBO Standard
009
Ground wave STB HDD COMBO Premium
014
SET-TOP BOX
Brand
Code
Brand
ALPHASTAR
023
MAGNAVOX
Code
016 021 036 038 039 040 041 042
ANAM
043
MEMOREX
016
CHANNEL MASTER
018 034
MOTOROLA
064
CROSSDIGITAL
019
MACOM
018
CHAPARRAL
035
MITSUBISHI
015
DIRECT TV
015 016 017 019 022 045 060 061 062 065
066 067 068
NEXT LEVEL
047 048 064
PHILIPS
DAEWOO
074
015 016 017 021 033 036 038 039 040 041
042 067
046 049 050 063
DISH NETWORK SYSTEM
069 070
PRIMESTAR
DISHPRO
069
PANASONIC
058 059 061 062
DRAKE
018 024 032
PAYSAT
016
DX ANTENNA
027
PROSCAN
065 066
ECHOSTAR
025 069 070 071
RCA
051 052 053 065 066
EXPRESSVU
069
RADIOSHACK
064
GOI
069
REALISTIC
057
GE
065
STAR TRAK
026
020 027
GENERAL INSTRUMENT
046 047 048 063 064
STS
HTS
069
SKY
031
HOME CABLE
056
SKY LIFE
005 006 007
HITACHI
022
SHACK
064
HUGHES NETWORK
015 017
STAR CHOICE
064
IQ
020
SONY
054 060
IQ PRISM
020
TOSHIBA
015 017 028 029 030 072
JANEIL
059
ULTIMATE TV
060 066
JERROID
063
UNIDEN
016 021 037 055 056 057
JVC
069 070
ZENITH
024 031 068
LG(Goldstar)
044 073
English-34
CO79.12258B.11.M13/joec!!!45
3117.21.31!!!!6;24;56
Setting up Your PC Software (Based on Windows XP)
The Windows display-settings for a typical computer are shown below. The actual screens on your PC may be
different depending upon your particular version of Windows and your particular video card. Even if your actual screens look
different, the same, basic set-up information will apply in almost all cases.
(If not, contact your computer manufacturer or Samsung Dealer.)
1. First, click on "Control Panel" on the Windows start menu.
2. When the control panel window appears, click on "Appearance and Themes" and a display
dialog-box will appear.
3. When the control panel window appears, click on "Display" and a display dialog-box will appear.
4. Navigate to the "Settings" tab on the display dialog-box.
The correct size setting (resolution): Optimum- 1360 X 768
If a vertical-frequency option exists on your display settings dialog box, the correct value is
"60" or "60 Hz". Otherwise, just click "OK" and exit the dialog box.
Display Modes
Both screen position and size will vary depending on the type of PC monitor and its resolution.
The resolutions in the table are recommended. (All resolutions between the supported limits are supported)
Mode
Resolution
Horizontal
Frequency (kHz)
Vertical
Frequency (Hz)
Pixel Clock
Frequency (MHz)
Sync Polarity
(H/V)
IBM
640 x 480
720 x 400
31.469
31.469
59.940
70.087
25.175
28.322
-/-/+
VESA
640 x 480
640 x 480
800 x 600
800 x 600
800 x 600
1024 x 768
1024 x 768
1024 x 768
1360 x 768
37.861
37.500
37.879
48.077
46.875
48.364
56.476
60.023
47.712
72.809
75.000
60.317
72.188
75.000
60.000
70.069
75.029
60.015
31.500
31.500
40.000
50.000
49.500
65.000
75.000
78.750
85.800
-/-/+ /+
+ /+
+ /+
-/-/+ /+
+ /+
The interface mode is not supported.
The set might operate abnormally if a non-standard video format is selected.
HDMI/DVI does not support PC function.
Separate and Composite modes are supported. SOG is not supported.
English-35
CO79.12258B.11.M13/joec!!!46
3117.21.31!!!!6;24;59
Setting the PC
Coarse and Fine Tuning of the Image (Image Lock):
The purpose of picture quality adjustment is to remove or reduce picture noise.
If the noise is not removed by Fine-tuning alone, then adjust the frequency as best as possible
(coarse) and Fine-tune again. After the noise has been reduced, re-adjust the picture so that it is
aligned on the center of screen.
1.
Preset: Press the SOURCE button to select PC mode.
2.
Press the MENU button to display the menu.
Press the or button to select "Setup", then press the ENTER/OK button.
3.
Press the
4.
Press the ENTER/OK button to select "Image Lock".
or
button to select "PC", then press the ENTER/OK button.
5.
Press the
6.
Press the or button to adjust the screen quality.
Press the ENTER/OK button.
7.
Press the EXIT button to exit.
or
button to select "Coarse" or "Fine", then press the ENTER/OK button.
Changing the Image Position (Position):
Adjust the PC’s screen positioning if it does not fit the TV screen.
1.
Follow the "Coarse and Fine Tuning of the Image (Image Lock)"
instructions number 1 to 3.
2.
Press the
3.
Press the or button to adjusting the Vertical-Position.
Press the or button to adjust the Horizontal-Position.
Press the ENTER/OK button.
4.
Press the EXIT button to exit.
or
button to select "Position", then press the ENTER/OK button.
Adjusting the PC Screen Automatically (Auto Adjustment):
Auto adjustment allows the PC screen of set to self-adjust to the incoming PC video signal. The
values of fine, coarse and position are adjusted automatically.
1.
Follow the "Coarse and Fine Tuning of the Image (Image Lock)"
instructions number 1 to 3.
2.
Press the
3.
Press the EXIT button to exit.
or
button to select "Auto Adjustment", then press the ENTER/OK button.
Initializing the Image Settings (Image Reset):
You can replace all image settings with the factory default values.
1.
Follow the "Coarse and Fine Tuning of the Image (Image Lock)"
instructions number 1 to 3.
2.
Press the
3.
Press the EXIT button to exit.
or
button to select "Image Reset", then press the ENTER/OK button.
English-36
CO79.12258B.11.M13/joec!!!47
3117.21.31!!!!6;24;68
Using the Anti-Theft Kensington Lock
The Kensington lock is a device used to physically fix the system when using it in a public place.
The locking device has to be purchased separately. The appearance and locking method may differ from the illustration depending on the
manufacturer. Please refer to the manual provided with the Kensington lock for proper use.
1. Insert the locking device into the
Kensington slot on the LCD TV (Figure
1), and turn it in the locking direction
(Figure 2).
Cable
Figure 2
2. Connect the Kensington lock cable.
3. Fix the Kensington lock to a desk or a
heavy stationary object.
Figure 1
<Optional>
The place of the Kensington Lock may be different depending on its model.
Troubleshooting: Before Contacting Service Personnel
No sound or picture
Check that the mains lead has been connected to a wall socket.
Check that you have pressed the
button on the front of the set.
Check the picture contrast and brightness settings.
Check the volume.
Normal picture but no sound
Check the volume.
Check whether the MUTE
button has been pressed on the remote control.
Check if "Internal Mute" is off
No picture or black and white picture
Adjust the colour settings.
Check that the broadcast system selected is correct.
Sound and picture interference
Try to identify the electrical appliance that is affecting the set and move it further away.
Plug your set into a different mains socket.
Blurred or snowy picture,
distorted sound
Check the direction, location and connections of your aerial.
This interference is often due to the use of an indoor aerial.
Remote control malfunctions
Replace the remote control batteries.
Clean the upper edge of the remote control (transmission window).
Check the battery terminals.
"Check signal cable."
message is displayed.
Check that the signal cable is firmly connected to the PC or video sources.
Check that the PC or video sources are turned on.
On PC mode, "Not Supported Mode."
message is displayed.
Check the maximum resolution and the frequency of the video adaptor.
Compare these values with the data in the Display Modes.
The TFT LCD panel uses a panel consisting of sub pixels (3,133,440) which require sophisticated technology to produce.
However, there may be few bright or dark pixels on the screen. These pixels will have no impact on the performance of the product.
English-37
CO79.12258B.11.M13/joec!!!48
3117.21.31!!!!6;25;23
Technical and Environmental Specifications
Model Name
LE32S6
LE37S6
LE40S6
Screen Size (Diagonal)
32 inch
37 inch
40 inch
Power Consumption
152 W
170 W
190 W
1360 x 768 @ 60 Hz
1360 x 768 @ 60 Hz
1360 x 768 @ 60 Hz
10 W X 2
10 W X 2
10 W X 2
893 x 82 x 544 mm
893 x 249 x 615 mm
1027 × 94 × 626 mm
1027 × 330 × 699 mm
1101 x 95 x 661 mm
1101 x 330 x 733 mm
13.9 kg
22.5 kg
23.7 kg
10 °C to 40 °C (50 °F to 104 °F)
10 % to 80 %, non-condensing
-20 °C to 45 °C (-4 °F to 113 °F)
5 % to 95 %, non-condensing
10 °C to 40 °C (50 °F to 104 °F)
10 % to 80 %, non-condensing
-20 °C to 45 °C (-4 °F to 113 °F)
5 % to 95 %, non-condensing
10 °C to 40 °C (50 °F to 104 °F)
10 % to 80 %, non-condensing
-20 °C to 45 °C (-4 °F to 113 °F)
5 % to 95 %, non-condensing
PC Resolution
Sound
Output
Dimension (WxDxH)
Body
With stand
Weight
With stand
Environmental Considerations
Operating Temperature
Operating Humidity
Storage Temperature
Storage Humidity
This device is a Class B digital apparatus.
Design and specifications are subject to change without prior notice.
For the power supply, refer to the label attached to the product.
English-38
BN68-01147B-00Eng.indd 38
2007-02-13 �� 7:31:22
This page is intentionally
left blank.
CO79.12258B.11.M13/joec!!!4:
3117.21.31!!!!6;25;31
Indice
CONEXIÓN Y CONFIGURACIÓN DEL TELEVISOR
USO DE LA FUNCIÓN DE DTV
2
2
2
3
4
6
6
7
7
7
Previsualización del sistema de menús del DTV ..................................
Funciones básicas ............................................................................................
1. Pantalla de visualización...........................................................................
2. Control del volumen ..................................................................................
3. Selección de la pista sonora ....................................................................
4. Selección de la pista de vídeo ................................................................
5. Lista de servicios ........................................................................................
6. Información del programa .....................................................................
Funcionamiento del menú DTV .................................................................
Menú principal..................................................................................................
1. Instalación ......................................................................................................
1.1 Selec. país ....................................................................................................
1.2 Exploración automática..........................................................................
1.3 Exploración manual .................................................................................
1.4 Restaurar los valores de fábrica...........................................................
2. Organización de los canales....................................................................
2.1 Borrar frecuencia.......................................................................................
2.2 Suprimir canal ............................................................................................
2.3 Suprimir todos los canales ....................................................................
2.4 Desplazar y editor canal .........................................................................
3. Bloqueo primario ........................................................................................
3.1 Fijar el bloqueo de canales ...................................................................
3.2 Cambiar el código PIN ............................................................................
4. Configuración del sistema .......................................................................
4.1 Selección del idioma ...............................................................................
4.2 Configuración de OSD ............................................................................
4.3 Parámetros de hora..................................................................................
4.4 Información del sistema .........................................................................
4.5 Ampliación del software ........................................................................
Instalación de la tarjeta CI ............................................................................
AJUSTE DE LOS CANALES
Memorización automática de canales ..................................................... 8
Memorización manual de canales............................................................. 8
Configuración del Gestor de Canales ....................................................... 9
Activación del bloqueo para niños ..................................................... 9
Orden de los canales memorizados.......................................................... 10
Asignación de nombres de canales .......................................................... 10
Sintonía fina de la recepción de canales................................................. 10
LNA (Low Noise Amplifier - Amplificador de ruido bajo).................. 11
AJUSTE DE LA IMAGEN
Cambio de la imagen estándar...................................................................
Ajuste de imagen personal ..........................................................................
Cambio del tono del color............................................................................
Reajuste de los valores de la imagen a los
valores predefinidos de fábrica ..................................................................
Selección del Tamaño de la imagen .........................................................
Congelación de la imagen actual ..............................................................
Reducción de ruido digital ...........................................................................
DNIe Demo (motor digital de imágenes naturales) ............................
Visualización de Imagen en imagen (PIP)...............................................
Configuración de PIP ......................................................................................
11
11
11
12
12
12
12
13
13
14
USO DE LA FUNCIÓN DE TELETEXTO
Decodificador de teletexto .................................................................... 28
Visualización de informaciones del teletexto ................................. 28
Selección de una página de teletexto específica .......................... 29
Uso de Fastext para seleccionar una
página del teletexto ................................................................................. 29
Configuración del mando a distancia ................................................ 30
Códigos del mando a distancia ............................................................ 32
AJUSTE DEL SONIDO
Cambio del estándar de sonido ........................................................... 14
Ajuste de los parámetros de sonido................................................... 14
Conexión de los auriculares................................................................... 14
Configuración de TruSurround XT (SRS TSXT) ................................ 15
Ajuste del volumen automáticamente .............................................. 15
Selección del silencio interno ............................................................... 15
Cómo escuchar el sonido de la imagen secundaria ..................... 15
Reajuste de valores de sonido a los valores
predefinidos de fábrica ........................................................................... 16
19
20
20
20
20
20
21
21
22
22
22
22
22
23
23
23
24
24
24
24
25
25
25
26
26
26
26
27
27
27
Español
Lista de componentes....................................................................................
Instalación del soporte ..................................................................................
Instalación del equipo de montaje en la pared .............................
Visualización del Panel de control .............................................................
Visualización del Panel de conexión.........................................................
Visualización del mando a distancia.........................................................
Instalación de las pilas en el mando a distancia ..................................
Encendido y apagado ....................................................................................
Cómo poner el televisor en modo de espera........................................
Plug & Play..........................................................................................................
AJUSTE DEL PC
Configuración del software del PC
(basado en Windows XP) ........................................................................ 35
Modo de visualización (PC).................................................................... 35
Selección del PC ......................................................................................... 36
RECOMENDACIONES PARA EL USO
AJUSTE DE LA HORA
Utilización del bloqueo Kensington antirrobo ............................... 37
Solución de problemas:
antes de ponerse en contacto con el servicio técnicoa .............. 37
Especificaciones técnicas y medioambientales ............................. 38
Configuración y visualización de hora actual ................................. 16
Ajuste del temporizador de desconexión ........................................ 16
Encendido y apagado de la
televisión automáticamente ................................................................. 16
OTROS AJUSTES
Selección del idioma ................................................................................ 17
Uso del Modo Juego ................................................................................ 17
Ajuste del modo Pantalla Azul /
Selección de Melodía ............................................................................... 17
Uso de la función de ahorro de energía ........................................... 18
Selección de la fuente.............................................................................. 18
Edición de los nombres de fuentes de entrada ............................. 18
Símbolos
Pulsar
Importante
Nota
Botón de
unapulsación
Español-1
CO79.12258B.11.M13/joec!!!2
3117.21.31!!!!6;25;32
Lista de componentes
Asegúrese de que los siguientes elementos se incluyan con el televisor de pantalla LCD.
Si falta alguno, póngase en contacto con su distribuidor.
M4 X L16
Mando a distancia
+ pilas (2x AAA)
Cable de
alimentación
Manual de instrucciones
Cubierta - inferior
4 tornillos estándar
Tarjeta de garantía
Soporte
Guía de seguridad
Paño de limpieza
Tarjetas de registro
Tarjeta de garantía / Guía de seguridad / Tarjetas de registro (no esta disponible en todas las localidades).
El soporte y el tornillo del soporte podrían no estar incluidos, según el modelo.
Instalación del soporte
<2>
<3>
1. Coloque hacia abajo el TV sobre un paño suave o un almohadón sobre una mesa.
2. Coloque el soporte en el orificio de la parte inferior del televisor.
3. Inserte el tornillo en el orificio indicado y apriételo.
En los modelos con un tamaño de pantalla de 40 pulgadas y más el soporte ya está instalado.
Instalación del equipo de montaje en la pared
Los elementos para montaje en la pared (se venden por separado)
permiten instalar el televisor en una pared. Si desea más
información sobre la instalación de los componentes para montaje
en la pared, consulte las instrucciones que se facilitan con dichos
elementos.
Para la instalación del soporte mural, póngase en contacto con un
técnico.
Samsung Electronics no se hace responsable de los daños
causados al producto o a los usuarios si éstos han efectuado
personalmente la instalación del televisor.
Retire el soporte, tape el agujero inferior; asegure con los dos
tornillos.
Español-2
CO79.12258B.11.M13/joec!!!3
3117.21.31!!!!6;25;3:
Visualización del Panel de control
El color y la forma del producto pueden variar según el modelo.
SOURCE
Cambia entre todas las fuentes de entrada disponibles
(TV, Ext.1, Ext.2, AV, S-Vídeo, Componente, PC, HDMI, DTV). En
el menú de la pantalla, use este botón del mismo modo que el
botón ENTER/OK del mando a distancia.
MENU
Púlselo para ver en pantalla un menú de las características del
televisor.
En el modo DTV, aparece el menú DTV.
Altavoces
Sensor del mando a distancia
Dirija el mando a distancia hacia este punto del televisor.
(Encendido)
Púlselo para encender o apagar el televisor.
Indicador de encendido
Parpadea y se apaga cuando la unidad está encendida y
se enciende en modo de espera.
Púlselo para aumentar o reducir el volumen.
En el menú de la pantalla, use estos botones
del mismo modo que los botones y
del mando a distancia.
Púlselos para cambiar de canal.
En el menú de la pantalla, use estos botones
del mismo modo que los botones y
del mando a distancia.
(Sin mando a distancia, puede encender el TV utilizando el
botón de los canales.)
Español-3
CO79.12258B.11.M13/joec!!!4
3117.21.31!!!!6;25;53
Visualización del Panel de conexión
[Tomas del panel lateral]
[Tomas del panel posterior]
(32pulg./ 37pulg. /40pulg.)
(El modelo 27 pulg. no tiene
tomas en el panel lateral.)
Entrada de
alimentación
[Tomas del panel posterior]
(27 pulg.)
Cada vez que conecte un dispositivo externo al televisor, compruebe que la unidad esté desconectada de la alimentación.
Cuando conecte un terminal externo, debe hacer coincidir los colores del terminal de conexión y del cable.
Conexión a la antena o a la red de televisión por cable
Para ver los canales de televisión correctamente, la unidad debe recibir una señal de una de las fuentes siguientes:
- Una antena exterior / Una red de televisión por cable / Una red por satélite
Español-4
CO79.12258B.11.M13/joec!!!5
3117.21.31!!!!6;25;62
Conexión de HDMI/DVI
- Admite conexiones entre dispositivos de AV con conexión HDMI (receptores de televisión digital, reproductores de DVD, receptores de AV y televisores digitales).
- No se necesita conexión de audio adicional para una conexión de HDMI a HDMI.
¿Qué es HDMI?
- “La interfaz multimedia de alta definición” (HDMI) permite la transmisión de los datos de vídeo digital de alta definición y varios canales de sonido digital (5.1 canales).
- El terminal HDMI/DVI admite la conexión DVI con un dispositivo ampliado mediante el cable apropiado (no suministrado).
La diferencia entre HDMI y DVI es que el dispositivo HDMI es de menor tamaño, tiene una función de codificación HDCP (protección alta de la copia
digital del ancho de banda) y es compatible con el sonido digital de varios canales.
Debe utilizar un cable de DVI a HDMI o un prolongador DVI-HDMI para la conexión, y el terminal “R - AUDIO - L” en DVI para salida de sonido.
- Cuando conecte este equipo a un decodificador, un reproductor de DVD, una consola de juegos, etc., a través de HDMI o DVI debe
comprobar que el modo de salida de vídeo sea compatible como se muestra en la tabla inferior.
Un error de compatibilidad puede causar distorsión o ruptura de la imagen o que ésta no se vea.
Modos admitidos para DVI o HDMI
1080i
720p
576p
576i
480p
480i
O
O
O
X
X
X
50 Hz
O
O
X
X
O
X
60 Hz
O
O
O
O
O
O
Componente
- No intente conectar en la toma HDMI/DVI un PC o una tarjeta gráfica portátil. (Sólo se conseguirá una pantalla en blanco.)
Conexión del receptor de TV digital, vídeo o DVD
Conector
Vídeo
Entrada
Audio (L/R)
Salida
Vídeo + Audio (L/R)
Sólo está disponible la salida de TV o DTV.
La salida que puede elegir.
RGB
EXT 1
EXT 2
- Tomas de entrada o salida para dispositivos externos,
como aparatos de vídeo, reproductores de DVD,
videojuegos o reproductores de videodiscos.
Conexión a dispositivos de A/V
- Conecte el cable RCA o S-VIDEO a un dispositivo A/V externo apropiado, como un vídeo, DVD o cámara de vídeo.
- Conecte los cables de sonido RCA a “R - AUDIO - L” de la parte posterior del aparato y los otros extremos a los conectores de salida de sonido correspondientes en el dispositivo A/V.
- Los auriculares pueden estar conectados a la salida de auriculares ( ) ubicada en la parte posterior del aparato. Mientras los auriculares
están conectados, se desactiva el sonido de los altavoces integrados.
SERVICE (servicio)
- Conexión de servicio para el ingeniero de servicio cualificado.
Conexión del audio
- Conecte los cables de audio RCA a “R - AUDIO - L” en la parte posterior de la unidad y los otros extremos a los conectores de salida de
audio correspondientes en el amplificador o el sistema DVD Home Theater.
Conexión a un equipo
- Conecte el cable D- sub (opcional) a “PC (PC IN)”, en la parte posterior del aparato, y el otro extremo a la tarjeta de vídeo del ordenador.
- Conecte el cable estéreo de audio (opcional) a la entrada “AUDIO (PC IN)” en la parte posterior del equipo y el otro extremo a la salida “Audio Out” de la tarjeta de sonido del ordenador.
Conexión de dispositivos con salida de vídeo por componentes (DTV/DVD)
- Conecte los cables de vídeo de componentes (opcionales) al conector de componentes (“PR”, “PB”, “Y”) de la parte posterior del equipo y
los otros extremos a los conectores de salida de vídeo de los componentes correspondientes en el DTV o DVD.
- Si desea conectar tanto el decodificador como el DTV (o DVD), deberá conectar el decodificador al DTV (o DVD) y conectar el DTV
(o DVD) al conector de componentes (“PR”, “PB”, “Y”) de su equipo.
- Los conectores Y, PB y PR de los dispositivos con salida de vídeo por componentes (DTV o DVD) se denominan a veces Y, B-Y y R-Y o Y, Cb y Cr.
- Conecte los cables de sonido RCA (opcionales) a “R - AUDIO - L” de la parte posterior del aparato y los otros extremos a os conectores de
salida de sonido correspondientes en el DTV o DVD.
- Este TV LCD muestra la imagen con la resolución óptima en modo 720p.
- Este TV LCD muestra la imagen con la resolución máxima en modo 1080i.
Bloqueo Kensington
- El bloqueo Kensington (opcional) es un dispositivo que se utiliza para fijar físicamente el sistema cuando se utiliza en un sitio público.
- Si desea usar un dispositivo de bloqueo, póngase en contacto con el distribuidor donde adquirió el televisor.
- La ubicación del “Bloqueo Kensington” puede variar según el modelo.
SALIDA DE AUDIO DIGITAL (ÓPTICA)
- Se conecta a un componente de audio digital.
Conexión de la TARJETA CI (Interfaz común)
Inserte la
tarjeta tal como
se indica
TARJETA CI
Panel posterior del TV
- Si no se inserta una “TARJETA CI” con algunos canales,
en la pantalla aparece “Scramble Signal” (Señal codificada).
- En 2 o 3 minutos aparecerá en la pantalla la información del
enlace que contiene un número telefónico, un identificador de
TARJETA CI, un identificador del sistema y demás
información. Si aparece un mensaje de error, póngase en
contacto con su proveedor de servicios.
- Una vez completada la configuración de la información del
canal, aparecerá el mensaje “Updating Completed”
(Actualización completada), para indicar que la lista de
canales ya se ha actualizado.
Debe obtener una TARJETA CI en un proveedor local de servicios. Para
retirar la TARJETA CI, extráigala cuidadosamente con los dedos, puesto
que si cae al suelo se puede dañar.
Puerto de servicio
- Conexión de servicio para el ingeniero de servicio cualificado.
Puerto de conexión del módem (No disponible)
Español-5
CO79.12258B.11Tqb/joee!!!6
3117.21.38!!!!6;49;28
Visualización del mando a distancia
Selecciona un dispositivo de destino que
controlar con el mando a distancia Samsung
(TV, DVD, STB, CABLE, VCR).
(Consulte la página 30~34.)
Botón de suspensión del televisor
Botón numéricos para elegir un canal
directamente
Selección de canal de uno/dos dígitos
Muestra el “Gestor de Canales” en la pantalla.
Selecciona directamente los modos TV y DTV
Funciones de VÍDEO/DVD
Rebobinar, Parar, Reproducir/Pausa, Avance
rápido
Disminución del volumen
Aumento del volumen
Interrupción momentánea del sonido
Pantalla de menús y confirmación de cambios
Visualización de la Guía electrónica de
programas (EPG).
Activar/desactivar PIP (imagen en imagen)
No disponible
P : Canal siguiente
P : Canal anterior
Sale del menú en pantalla
Controla el cursor en el menú
Se utiliza para ver información sobre la
emisión actual
No disponible
No disponible
Congelación de la imagen
Selecciona la lista de las pistas sonoras y de
vídeo para el servicio actual
Funciones de Teletexto
Sale de la visualización del teletexto
Índice del teletexto
Hold del teletexto
Selección de tamaño de teletexto
Selección del modo de teletexto
(Lista o Flof)
Página secundaria de teletexto
Selección de los efectos de sonido
P : Siguiente página de teletexto
P : Página de teletexto anterior
Se utiliza también para retroceder a la página
Cancelar teletexto
anterior del D.MENU.
Mostrar teletexto
SET: Ajusta 5 dispositivos diferentes:
TV, DVD, decodificador, cable o aparato
de vídeo.
RESET: Si el mando a distancia no funciona,
cambie las pilas y pulse el botón
"RESET" durante 2-3 segundos
antes de utilizarlo.
Seleccione alternativamente Teletxt, Double o
Mix.
Selección de tema de fastext
Awaiting for explanation
Selección de fuente de entrada de vídeo
Canal anterior
Menú de pantalla del DTV
Botón para alternar entre canal de radio y
canal de TV
El funcionamiento del mando a distancia se puede ver afectado por la luz brillante.
Es un mando a distancia especial para personas con discapacidades visuales; presenta puntos
Braille en los botones de encendido, de canales y del volumen.
Instalación de las pilas en el mando a distancia
1.
Levante la tapa de la parte posterior del mando a distancia, como se muestra en la ilustración.
2.
Coloque dos pilas de tamaño AAA.
3.
Vuelva a colocar la tapa.
Compruebe que los extremos “+” y “–” de las pilas concuerdan con el diagrama del interior del compartimiento.
Si no va a usar el mando a distancia durante un largo período de tiempo, extraiga las pilas y guárdelas en un lugar fresco y
seco. El mando se puede utilizar hasta una distancia de unos 7 metros del televisor.
(Con un uso normal del TV,las pilas duran alrededor de un año.)
Si el mando a distancia no funciona, haga estas comprobaciones:
1. ¿Está encendido el TV?
2. ¿Están invertidos los extremos positivo y negativo de las pilas?
3. ¿Se han agotado las baterías?
4. ¿Ha habido un corte de luz o el cable está desenchufado?
5. ¿Hay cerca una luz fluorescente o un letrero de neón?
Español-6
CO79.12258B.11.M13/joec!!!7
3117.21.31!!!!6;26;19
Encendido y apagado
El cable de alimentación se encuentra en la parte posterior de la unidad.
1.
Conecte el cordón eléctrico en un enchufe adecuado.
2.
Pulse el botón
Se enciende el indicador de modo en espera de la parte frontal del equipo.
de la parte frontal del aparato.
También puede pulsar el botón POWER
o el botón TV/DTV del mando a distancia para encender el televisor.
El programa que estaba viendo por última vez se vuelve a seleccionar de forma automática.
3.
Pulse el botón numérico (0~9) o el botón de canal siguiente/anterior ( / ) del mando a distancia o el botón
equipo.
4.
Para apagar el equipo, pulse de nuevo POWER
de la parte derecha del
Cuando encienda el equipo pro primera vez, se le pedirá que elija el idioma en el que quiere que aparezcan los menús.
.
Cómo poner el televisor en modo de espera
Se puede dejar el Televisor en modo de espera para reducir el consumo de energía.
El modo de espera es muy útil si desea interrumpir la visualización momentáneamente (durante la comida, por ejemplo).
1.
Pulse el botón POWER
del mando a distancia.
La pantalla se apaga y aparece un indicador rojo de modo en espera en la parte frontal del aparato.
2.
Para volver a encender el equipo, pulse de nuevo POWER
, los botones numéricos (0~9), TV/DTV o de canal siguiente/anterior ( / ).
No deje el Televisor en modo de espera durante largos períodos de tiempo (cuando esté fuera de casa por vacaciones,
por ejemplo). Lo más apropiado es desenchufar el cordón de corriente y el cable de la antena.
Plug & Play
Cuando el equipo se enciende por primera vez, se presenta automáticamente una serie de
opciones de configuración básicas. Los ajustes siguientes están disponibles.
1. Pulse el botón POWER del mando a distancia.
Aparece el mensaje “Start Plug & Play” con “OK” seleccionado.
2. Seleccione el idioma apropiado pulsando los botones o .
Pulse el botón ENTER/OK para confirmar la elección.
3. Aparece el mensaje “Comprovar la entrada de la antena” con la opción “OK”
seleccionada. Pulse el botón ENTER/OK.
Compruebe que el cable de la antena esté conectado correctamente.
4.
5.
Seleccione el país apropiado pulsando los botones o .
Pulse el botón ENTER/OK para confirmar la elección.
Se visualiza el menú “Guardado automático” con la opción “Empezar” seleccionada.
Pulse el botón ENTER/OK.
La búsqueda de canales comenzará y terminará automáticamente.
Después de memorizar todos los canales, se muestra “Ajustar hora”
Pulse el botón ENTER/OK en cualquier momento para interrumpir el proceso de memorización.
6.
Pulse el botón ENTER/OK.
Seleccione la “Hora” o el “Minuto” pulsando los botones
Establezca la “Hora” o el “Minuto” pulsando los botones
o
o
.
.
También puede ajustar la hora y los minutos pulsando los botones numéricos del mando a distancia.
7.
Pulse el botón ENTER/OK para confirmar el ajuste. Aparece el menú de búsqueda de
canales de DTV y el canal de DTV se actualiza automáticamente.
Cuando se actualiza el canal de DTV, la fuente de la lista de fuentes del menú Input
(Entrada) se cambia automáticamente a DTV.
Para obtener información detallada acerca de la actualización de canales de DTV,
consulte la página 27 de este manual.
Idioma: Seleccione el idioma.
País: Seleccione el país.
Guardado automático: Automáticamente busca y almacena los canales disponibles en el área local.
Ajustar hora: Ajusta la hora actual del reloj del televisor.
Si quiere volver a ajustar esta característica...
1. Pulse el botón MENU ver el menú. Pulse los botones
“Configuración” y pulse el botón ENTER/OK.
o
para seleccionar
2. Pulse de nuevo el botón ENTER/OK para seleccionar “Plug & Play”.
3. Aparece el mensaje para iniciar “Start Plug & Play”
Español-7
CO79.12258B.11.M13/joec!!!8
3117.21.31!!!!6;26;42
- Memorización automática de canales
- Memorización manual de canales
Memorización automática de canales
Puede explorar los rangos de frecuencia disponibles (la disponibilidad varía en función del país).
Los números de programa adjudicados automáticamente puede que no se correspondan con los números de programa reales o deseados.
No obstante, puede ordenar los números manualmente y borrar los canales que no desea ver.
1.
Pulse el botón MENU para ver el menú.
Pulse los botones o para seleccionar “Canal” y pulse el botón ENTER/OK.
2.
Pulse el botón ENTER/OK para seleccionar “País”.
3.
Seleccione el país apropiado pulsando los botones
4.
Pulse los botones
5.
Pulse el botón ENTER/OK.
o
o
. Pulse el botón ENTER/OK para confirmar la elección.
para seleccionar “Guardado automático” y pulse el botón ENTER/OK.
El televisor empezará a memorizar todos los canales disponibles.
Pulse el botón ENTER/OK en cualquier momento si desea interrumpir el proceso de memorización y volver al menú “Canal”.
6.
Una vez memorizados todos los canales disponibles, aparecerá el menú “Ordenar”.
Memorización manual de canales
Se pueden memorizar hasta 100 canales, que incluyen los que se reciben a través de redes por cable.
Cuando memorice los canales manualmente, podrá elegir:
Si se memoriza o no cada canal que se encuentre
El número de programa con el que desea identificar cada canal memorizado
1.
Pulse el botón MENU para ver el menú.
Pulse los botones o para seleccionar “Canal” y pulse el botón ENTER/OK.
2.
Pulse los botones
3.
Pulse el botón ENTER/OK para seleccionar “Programa”.
o
para seleccionar “Guardado manual” y pulse el botón ENTER/OK.
4.
Para asignar un número de programa a un canal, busque el número correcto pulsando el botón
y pulse el botón ENTER/OK.
5.
Pulse los botones
o
También puede establecer el número de cada programa pulsando los botones numéricos en el mando a distancia.
o
para seleccionar “Sistema de color” y pulse el botón ENTER/OK.
6.
Seleccione el estándar de color deseado pulsando varias veces los botones
7.
Pulse los botones
8.
Seleccione el estándar de sonido deseado pulsando varias veces los botones
o
o
y, a continuación, pulse el botón ENTER/OK.
para seleccionar “Sistema de sonido” y pulse el botón ENTER/OK.
o
y, a continuación, pulse el botón ENTER/OK.
Si se produce un sonido anormal o no se produce sonido, vuelva a seleccionar el sistema de sonido adecuado.
9.
Si sabe el número del canal que desea almacenar, pulse el botón o para seleccionar “Canal”. Pulse el botón
ENTER/OK. Seleccione C (canal aéreo) o S (canal por cable) pulsando el botón o . Pulse el botón
para seleccionar el canal.
Seleccione el número que desea pulsando el botón o y, a continuación, pulse el botón ENTER/OK.
Modo de canal: P (Modo Programa), C (Modo de canal aéreo), S (Modo Canal por cable)
También puede definir el canal pulsando los botones numéricos en el mando a distancia.
10. Si no conoce los números de canal, pulse los botones o para seleccionar “Buscar”. Pulse el botón ENTER/OK.
Realice la búsqueda pulsando los botones o y, a continuación, pulse el botón ENTER/OK.
11. Pulse el botón
o
para seleccionar “Guardar”. Pulse el botón ENTER/OK para seleccionar “Aceptar”.
12. Repita los pasos 3 a 11 para cada canal que quiera memorizar.
Programa: Selecciona un número de programa para el canal.
Sistema de color: Ajusta el sistema de soporte del color.
Sistema de sonido: Ajusta el sistema de soporte del sonido.
Canal: Selecciona un canal.
Buscar: Busca el valor de frecuencia del canal.
Guardar: Guarda la configuración.
Español-8
CO79.12258B.11.M13/joec!!!9
3117.21.31!!!!6;26;52
Configuración del Gestor de Canales
Puede configurar los canales como prefiera.
Puede suprimir, añadir o bloquear fácilmente el canal que desee.
1.
Pulse el botón MENU para ver el menú.
Pulse los botones o para seleccionar “Canal” y pulse el botón ENTER/OK.
2.
Pulse los botones
ENTER/OK.
3.
Pulse el botón ENTER/OK para seleccionar “Gestor de Canales”.
4.
Pulse el botón
5.
Pulse los botones o para seleccionar el canal no deseado y pulse el botón
ENTER/OK para cancelar.
6.
Repita el paso 5 con cada canal que desee seleccionar o cancelar.
7.
Pulse el botón EXIT para salir.
“
o
para seleccionar “Gestor de Canales” y pulse el botón
para seleccionar “
”.
” está activo cuando “Seguridad para niños” está seleccionado como “Activado”.
Puede seleccionar estas opciones
pulsando el botón CH MGR del mando a
distancia.
Activación del bloqueo para niños
Esta función permite evitar que usuarios no autorizados, como niños, puedan ver programas
poco recomendables desactivando el vídeo y el audio.
El bloqueo infantil no se puede desactivar mediante los botones del panel lateral.
Únicamente con el mando a distancia es posible desactivar el ajuste del bloqueo infantil; por
tanto, mantenga el mando a distancia fuera del alcance de los niños.
1.
Pulse el botón MENU para ver el menú.
Pulse los botones o para seleccionar “Canal” y pulse el botón ENTER/OK.
2.
Pulse los botones
ENTER/OK.
o
para seleccionar “Gestor de Canales” y pulse el botón
3.
Pulse los botones
ENTER/OK.
o
para seleccionar “Seguridad para niños” y pulse el botón
4.
Pulse el botón o seleccionar “Activado” o “Desactivado”.
Pulse el botón ENTER/OK.
5.
Pulse los botones
ENTER/OK.
6.
Pulse el botón
7.
Pulse los botones o para seleccionar los canales que desee bloquear y
pulse el botón ENTER/OK.
o
para seleccionar “Gestor de Canales” y pulse el botón
para seleccionar la línea “ ”.
8.
Repita el paso 7 con cada canal que desee bloquear o desbloquear.
9.
Pulse el botón EXIT para salir.
Seleccione “Activado” u “Desactivado” en “Seguridad para niños” para activar o desactivar
fácilmente los canales que estén marcados con “ ”.
Español-9
CO79.12258B.11.M13/joec!!!:
3117.21.31!!!!6;26;58
Orden de los canales memorizados
Puede intercambiar los números de dos canales para:
Modificar el orden numérico en que los canales se han memorizado
automáticamente.
Asignar números fáciles de recordar a los canales que ve con más frecuencia.
1.
Pulse el botón MENU para ver el menú.
Pulse los botones o para seleccionar “Canal” y pulse el botón ENTER/OK.
2.
Pulse los botones
3.
Seleccione el número del canal que desea cambiar pulsando varias veces los botones
o . Pulse el botón ENTER/OK.
4.
Pulse los botones
botón ENTER/OK.
5.
Repita los pasos 3 a 4 para clasificar otro canal.
6.
Pulse el botón EXIT para salir.
o
para seleccionar “Ordenar” y pulse el botón ENTER/OK.
El número de canal seleccionado y su nombre se mueven al lado derecho.
o
para desplazarse a la posición a la que desea cambiar y pulse el
El canal seleccionado se intercambia con el memorizado previamente con el número elegido.
Asignación de nombres de canales
Los nombres de los canales se asignarán automáticamente si se emite la información del canal.
Estos nombres se pueden cambiar y puede asignar nombres nuevos.
1.
Pulse el botón MENU para ver el menú.
Pulse los botones o para seleccionar “Canal” y pulse el botón ENTER/OK.
2.
Pulse los botones
3.
Si es necesario, seleccione el canal al que se va a asignar un nombre nuevo pulsando
los botones o . Pulse el botón ENTER/OK.
o
para seleccionar “Nombre” y pulse el botón ENTER/OK.
La barra de selección se muestra en el cuadro de nombre.
4.
Para...
Entonces...
Seleccionar una letra, número o símbolo
Pulse el botón
Desplazarse a la letra siguiente
Pulse el botón
Retroceder a la letra anterior
Pulse el botón
Confirme el nombre
Pulse el botón ENTER/OK
o
Los caracteres disponibles son:
Letras del alfabeto (A~Z) / Números (0~9) / Caracteres especiales (-, espacio)
5.
6.
Repita los pasos 3 a 4 para cada canal al que se asigne un nombre nuevo.
Pulse el botón EXIT para salir.
Sintonía fina de la recepción de canales
Utilice la sintonización fina para ajustar manualmente un determinado canal de modo que la
recepción sea óptima.
1.
Utilice los botones numéricos para seleccionar directamente el canal que desee ajustar
con precisión.
2.
Pulse el botón MENU para ver el menú.
Pulse los botones o para seleccionar “Canal” y pulse el botón ENTER/OK.
3.
Pulse los botones
o
4.
Pulse los botones
o
5.
Pulse el botón EXIT para salir.
para seleccionar “Sintonización fina” y pulse el botón ENTER/OK.
para ajustar la sintonización fina. Pulse el botón ENTER/OK.
Los canales guardados en los que se haya efectuado un ajuste fino están marcados con un asterisco “*” en el lado
derecho del número del canal, en la banda de canales. Y el número de canal se pone de color rojo.
Para reiniciar el ajuste fino, seleccione “Restabl.” pulsado los botones o y, a continuación, pulse el botón
ENTER/OK.
Español-10
CO79.12258B.11.M13/joec!!!21
3117.21.31!!!!6;26;65
LNA (Low Noise Amplifier - Amplificador de ruido bajo)
Si el TV funciona en una zona de señal débil, la función LNA puede mejorar la recepción (un
preamplificador de nivel bajo de ruido aumenta la señal de entrada).
1.
Pulse el botón MENU para ver el menú.
Pulse los botones o para seleccionar “Canal” y pulse el botón ENTER/OK.
2.
Pulse los botones
o
3.
Pulse el botón
seleccionar “Activado” o “Desactivado”. Pulse el botón ENTER/OK.
4.
Pulse el botón EXIT para salir.
o
para seleccionar “LNA” y pulse el botón ENTER/OK.
Cambio de la imagen estándar
Se puede seleccionar el tipo de imagen que mejor se corresponda a los requisitos de
visualización.
1. Pulse el botón MENU para ver el menú.
Pulse los botones o para seleccionar “Imagen” y pulse el botón ENTER/OK.
2. Pulse de nuevo el botón ENTER/OK para seleccionar “Modo”.
Pulse el botón ENTER/OK de nuevo.
3. Pulse el botón o para seleccionar el efecto de imagen deseado. Pulse el botón ENTER/OK.
4. Pulse el botón EXIT para salir.
Dinámico: Selecciona la alta definición en la imagen, en una habitación luminosa.
Estándar: Selecciona la visualización óptima de la imagen, en un entorno normal.
Película: Selecciona una visualización agradable de la imagen, en una sala oscura.
Personal: Selecciónelo para ver los ajustes de pantalla favoritos. (Consulte “Ajuste de imagen personal”)
El modo Imagen se debe ajustar independientemente para cada fuente de entrada.
Puede volver a los ajustes de imagen predefinidos de fábrica seleccionando “Restablecer”.
(Consulte “Reajuste de los valores de la imagen a los valores predefinidos de fábrica” en la página 12)
Ajuste de imagen personal
La unidad ofrece varias configuraciones que permiten controlar la calidad de imagen.
1. Para seleccionar el efecto de imagen deseado, siga las instrucciones 1 a 3 de
“Cambio de la imagen estándar”.
2. Pulse los botones o para seleccionar un elemento concreto.
Pulse el botón ENTER/OK.
3. Pulse los botones o para reducir o aumentar el valor de un elemento concreto.
Pulse el botón ENTER/OK.
4. Pulse el botón EXIT para salir.
Contraste: Ajusta la claridad y oscuridad entre los objetos y el fondo.
Brillo: Ajusta el brillo de toda la pantalla.
Nitidez: Ajusta el contorno de los objetos para que estén más o menos nítidos.
Color: Ajusta los colores para que aparezcan más claros o más oscuros.
Matiz(Sólo NTSC): Ajusta el color de los objetos haciendo que sean más rojos o verdes para que tengan un
aspecto más natural.
Los parámetros ajustados se almacenan de acuerdo con el modo Imagen seleccionado.
En el modo PC, sólo “Contraste”, “Brillo” y “Color” se pueden ajustar.
Cambio del tono del color
Puede seleccionar el tono de color que le resulte más cómodo para su vista.
1. Para seleccionar el efecto de imagen deseado, siga las instrucciones 1 a 3 de
“Cambio de la imagen estándar”.
2. Pulse los botones o para seleccionar “Tono de color” y pulse el botón ENTER/OK.
3. Pulse los botones o para seleccionar el ajuste de tono de color deseado.
Pulse el botón ENTER/OK.
4. Pulse el botón EXIT para salir.
Frío2: Hace que la temperatura del color sea más azul
que en el menú “Frío1”.
Frío1: Hace que el blanco sea azulado.
Normal: Mantiene el color blanco sin modificaciones.
Cálido1: Hace que el blanco sea rojizo.
Cálido2: Hace que la temperatura del color sea más azul
que en el menú “Cálido1”.
Los parámetros ajustados se almacenan de acuerdo con el modo Imagen seleccionado.
Español-11
CO79.12258B.11.M13/joec!!!22
3117.21.31!!!!6;27;16
Reajuste de los valores de la imagen a los valores predefinidos de fábrica
Puede volver a los ajustes de imagen predefinidos de fábrica.
1.
Para seleccionar el efecto de imagen deseado, siga las instrucciones 1 a 3 de
“Cambio de la imagen estándar” de la página Reducción de ruido digital 11.
2.
Pulse los botones
3.
o
para seleccionar “Restablecer” y pulse el botón ENTER/OK.
Pulse el botón EXIT para salir.
La función “Restablecer” afectará a cada modo de imagen.
Selección del Tamaño de la imagen
Puede seleccionar el tamaño de imagen que mejor corresponda con sus requisitos de
visualización.
1.
Pulse el botón MENU para ver el menú. Pulse los botones
seleccionar “Imagen” y pulse el botón ENTER/OK.
2.
Pulse los botones
3.
Seleccione la opción que desee pulsando el botón
Pulse el botón ENTER/OK.
o
4.
Pulse el botón EXIT para salir.
o
para
para seleccionar “Tamaño” y pulse el botón ENTER/OK.
o
.
Ancho automát.: Ajusta automáticamente el tamaño de la imagen a la relación de aspecto de la pantalla
“16:9”.
16:9: Ajusta el tamaño de la imagen a 16:9, adecuado para ver los DVD o las emisiones en formato ancho.
Zoom: Amplía la imagen ancha de 16:9 (en sentido vertical) para que la imagen ocupe el tamaño de la
pantalla.
4:3: Es la configuración predeterminada para una película de vídeo o una emisión normal.
La función “Ancho automát.” sólo está disponible en los modos “TV”, “Ext1”, “Ext2”, “AV” y “S-Vídeo”.
En modo PC, solamente se puede ajustar el modo “16:9” y “4:3”.
Seleccione
pulsando los botones o . Utilice los botones o para mover la imagen arriba y
abajo. Después de seleccionar
, utilice los botones o para ampliar o reducir el tamaño de la
imagen en dirección vertical.
El modo Zoom (Zoom) no se puede seleccionar en el modo de DTV.
Congelación de la imagen actual
Pulse el botón STILL (Imagen fija) para congelar una imagen en movimiento en una imagen fija.
Vuelva a pulsar el botón STILL para cancelar.
Reducción de ruido digital
Si la señal de emisión que recibe el televisor es débil, puede activarse la función de reducción
digital del ruido para reducir la estática y las imágenes superpuestas que pueden aparecer en
la pantalla.
1.
Pulse el botón MENU para ver el menú. Pulse los botones
seleccionar “Imagen” y pulse el botón ENTER/OK.
2.
Pulse los botones
3.
Pulse el botón o seleccionar “Activado” o “Desactivado”.
Pulse el botón ENTER/OK.
o
4.
Pulse el botón EXIT para salir.
o
para
para seleccionar “Digital NR” y pulse el botón ENTER/OK.
Español-12
CO79.12258B.11.M13/joec!!!23
3117.21.31!!!!6;27;29
DNIe Demo (motor digital de imágenes naturales)
La nueva tecnología de Samsung le ofrece imágenes más detalladas con mejoras en contraste
y blancos. Un nuevo algoritmo de compensación de imagen proporciona a los usuarios una
imagen más brillante y más clara.
La tecnología DNIe adaptará todas las señales a su vista.
Puede ver cómo DNIe mejora la imagen activando el modo DNIe Demo.
1. Pulse el botón MENU para ver el menú. Pulse los botones o para
seleccionar “Imagen” y pulse el botón ENTER/OK.
2. Pulse los botones o para seleccionar “DNIe Demo” y pulse el botón ENTER/OK.
3.
4.
Pulse el botón o seleccionar “Activado” o “Desactivado”.
Pulse el botón ENTER/OK.
Pulse el botón EXIT para salir.
Estas funciones no están operativas en el modo PC.
El DNle Demo se ha diseñado para mostrar la diferencia entre las imágenes habituales y DNIe.
De forma predeterminada, el producto aplica DNIe a la presentación de la imagen.
Visualización de Imagen en imagen (PIP)
Puede visualizar una imagen secundaria dentro de la imagen principal del programa o de la
entrada de video definidos. De esta manera, es posible visualizar la imagen del programa o la
entrada de video definidos desde cualquier equipo conectado mientras se visualiza la imagen
principal.
1.
Pulse el botón MENU para ver el menú. Pulse los botones
seleccionar “Imagen” y pulse el botón ENTER/OK.
2.
Pulse los botones
3.
Pulse el botón ENTER/OK de nuevo.
Seleccione “Activado” pulsando el botón
o
o
para
para seleccionar “PIP” y pulse el botón ENTER/OK.
o
y , a continuación, pulse el botón ENTER/OK.
Si PIP está activado, el tamaño de la imagen principal cambia a “16:9”.
4.
Pulse repetidamente el botón PIP del
mando a distancia para activar o
desactivar “PIP”.
Pulse los botones o para seleccionar “Fuente” y pulse el botón ENTER/OK.
Seleccione una fuente de entrada de la imagen secundaria pulsando los botones
o y pulse el botón ENTER/OK.
La imagen secundaria puede servir a diferentes selecciones de fuente basadas en cómo esté
configurada la imagen principal.
5.
Pulse el botón o para seleccionar “Intercambiar”.
Para intercambiar la imagen principal y la imagen secundaria, seleccione la opción
“Intercambiar” y pulse el botón ENTER/OK.
Se intercambian la imagen principal y la imagen secundaria.
Si la imagen principal está en modo “PC”, la opción “Intercambiar” no está disponible.
6.
Pulse el botón o para seleccionar “Tamaño” de la imagen secundaria y pulse el botón
ENTER/OK. Seleccione el tamaño de la imagen secundaria pulsando los botones o y
pulse el botón ENTER/OK.
7.
Pulse los botones o para seleccionar “Posición” y pulse el botón ENTER/OK.
Seleccione una fuente de entrada de la imagen secundaria pulsando los botones
o y pulse el botón ENTER/OK.
8.
Pulse el botón o para seleccionar “Programa” y pulse el botón ENTER/OK.
Puede seleccionar el canal que desee ver en la imagen secundaria pulsando el botón
Pulse el botón ENTER/OK.
Si la imagen principal está en modo “PC”, la opción “Tamaño” no está disponible.
o
.
“Programa” puede estar activo cuando la imagen secundaria esté configurada como TV.
9.
Pulse el botón EXIT para salir.
Cuando utilice la pantalla principal para visualizar un juego o un karaoke, podrá advertir que la imagen en
la ventana PIP no resultará del todo natural.
Fuente: Se usa para seleccionar la fuente de entrada de la imagen secundaria.
Intercambiar: Se utiliza para intercambiar la imagen principal y la secundaria.
Tamaño: Se utiliza para seleccionar el tamaño de la imagen secundaria.
Posición: Se usa para desplazar la imagen secundaria.
Programa: Se utiliza para cambiar la imagen secundaria.
Español-13
CO79.12258B.11.M13/joec!!!24
3117.21.31!!!!6;27;49
Configuración de PIP
(O: PIP está activado, X: PIP está desactivado)
Principal
Secundaria
TV
Ext.1
Ext.2
AV
S-Video
Component
PC
HDMI
DTV
TV
X
X
X
X
X
X
O
O
X
Ext.1
X
X
X
X
X
X
O
O
X
Ext.2
X
X
X
X
X
X
O
O
X
AV
X
X
X
X
X
X
O
O
X
S-Video
X
X
X
X
X
X
X
O
X
Component
X
X
X
X
X
X
X
O
X
PC
X
X
X
X
X
X
X
X
X
HDMI
O
O
O
O
O
O
X
X
X
DTV
X
X
X
X
X
X
X
X
X
Cambio del estándar de sonido
Puede seleccionar un tipo de efecto de sonido especial que se usará cuando se visualice una
emisión concreta.
1.
Pulse el botón MENU para ver el menú.
Pulse los botones o para seleccionar “Sonido” y pulse el botón ENTER/OK.
2.
Pulse de nuevo el botón ENTER/OK para seleccionar “Modo”.
3.
Seleccione el efecto de sonido deseado pulsando varias veces el botón
a continuación, pulse el botón ENTER/OK.
4.
o
y,
Pulse el botón EXIT para salir.
Estándar: Selecciona el modo de sonido normal.
Música: Realza la música respecto de las voces.
Película: Proporciona un sonido vivo y natural en las películas.
Diálogo: Realza las voces respecto de los sonidos.
Personal: Seleccione los ajustes del sonido que prefiera.
(Consulte “Ajuste de los parámetros de sonido”)
Ajuste de los parámetros de sonido
Es posible ajustar los parámetros del sonido según sus preferencias personales.
1.
Pulse el botón MENU para ver el menú.
Pulse los botones o para seleccionar “Sonido” y pulse el botón ENTER/OK.
2.
Pulse los botones
3.
Pulse los botones o para seleccionar un elemento concreto.
Pulse el botón ENTER/OK.
4.
Pulse el botón o
para llegar al ajuste necesario.
Pulse el botón ENTER/OK.
5.
o
para seleccionar “Ecualizador” y pulse el botón ENTER/OK.
Pulse el botón EXIT para salir.
Si efectúa algún cambio en esta configuración, el modo de sonido cambiará automáticamente a “Personal”.
Conexión de los auriculares
Puede conectar unos auriculares al Televisor si desear ver un programa en el Televisor sin
molestar a las demás personas que se encuentren en la sala.
Cuando se inserta el conector del conjunto del cabezal en el puerto correspondiente, se puede trabajar sólo
con las opciones, “Silencio interno” y “Selección de sonido”, en el modo PIP, del menú Sonido.
El uso prolongado de los auriculares a un volumen alto puede dañar los oídos.
No recibirá sonido de los altavoces cuando conecte los auriculares al sistema.
Español-14
CO79.12258B.11.M13/joec!!!25
3117.21.31!!!!6;27;61
Configuración de TruSurround XT (SRS TSXT)
TruSurround XT es una tecnología patentada de SRS que resuelve el problema de la reproducción de
contenidos multicanal 5.1 con dos altavoces. TruSurround XT proporciona una convincente experiencia
de sonido surround virtual a través de cualquier sistema de reproducción con dos altavoces, como los
propios altavoces internos del televisor.
Es totalmente compatible con todos los formatos multicanal.
1.
2.
3.
4.
Pulse el botón MENU para ver el menú. Pulse los botones o para
seleccionar “Sonido” y pulse el botón ENTER/OK.
Pulse los botones o para seleccionar “SRS TSXT” y pulse el botón ENTER/OK.
Pulse el botón o seleccionar “Activado” o “Desactivado”.
Pulse el botón ENTER/OK.
Pulse el botón EXIT para salir.
TruSurround XT, SRS y el símbolo
son marcas comerciales
de SRS Labs, Inc. La tecnología TruSurround XT se incorpora
Selección del silencio interno bajo licencia de SRS Labs, Inc.
Ajuste del volumen automáticamente
Cada emisora tiene sus propias condiciones de señal, así que no resulta cómodo ajustar el
volumen cada vez que se cambia de canal. Con esta función el volumen del canal deseado se
ajusta de forma automática ya que reduce la salida de sonido cuando la señal de modulación es
alta o la aumenta cuando es baja.
1. Pulse el botón MENU para ver el menú. Pulse los botones o para
seleccionar “Sonido” y pulse el botón ENTER/OK.
2. Pulse los botones o para seleccionar “Volumen autom.” y pulse el botón ENTER/OK.
3.
4.
Pulse el botón o seleccionar “Activado” o “Desactivado”.
Pulse el botón ENTER/OK.
Pulse el botón EXIT para salir.
Selección del silencio interno
Si desea oír el sonido a través de altavoces independientes, desactive el amplificador interno.
1. Pulse el botón MENU para ver el menú. Pulse los botones o para
seleccionar “Sonido” y pulse el botón ENTER/OK.
2. Pulse los botones o para seleccionar “Silencio interno” y pulse el botón ENTER/OK.
3.
Pulse el botón o seleccionar “Activado” o “Desactivado”.
Pulse el botón ENTER/OK.
4.
Pulse el botón EXIT para salir.
Cuando “Silencio interno” está en “Activado”, no es posible efectuar ajustes en los menús de sonido, excepto
en “Selección de sonido” en el modo PIP.
Cómo escuchar el sonido de la imagen secundaria
Mientras esté activada la función PIP se puede escuchar el sonido de la imagen secundaria.
1.
Pulse el botón MENU para ver el menú. Pulse los botones
seleccionar “Sonido” y pulse el botón ENTER/OK.
2.
Pulse los botones
3.
Pulse el botón
4.
Pulse el botón EXIT para salir.
o
o
o
para
para seleccionar “Selección de sonido” y pulse el botón ENTER/OK.
seleccionar “Sub”. Pulse el botón ENTER/OK.
Principal: Se usa para escuchar el sonido de la imagen principal.
Sub: Se usa para escuchar el sonido de la imagen secundaria.
Puede seleccionar esta opción cuando “PIP” está ajustado como “Activado”.(consulte la página 13).
Español-15
CO79.12258B.11.M13/joec!!!26
3117.21.31!!!!6;27;69
"
p
s
u
v
Reajuste de valores de sonido a los valores predefinidos de fábrica
Si Modo Juego está activado, la función de restablecer el sonido se activa. Si, tras configurar el
ecualizador selecciona la función Reset (Restablecer), se restauran los parámetros de fábrica de
la configuración del ecualizador.
1.
Pulse el botón MENU para ver el menú.
Pulse los botones o para seleccionar “Sonido” y pulse el botón ENTER/OK.
2.
Pulse los botones
3.
Pulse el botón EXIT para salir.
o
para seleccionar “Restablecer” y pulse el botón ENTER/OK.
Puede seleccionar esta opción cuando “Modo Juego” está ajustado como “Activado”.
Configuración y visualización de hora actual
TV
Ajustar hora
Hora
Minuto
00
00
Mover
Ajustar
Puede establecer el reloj del TV para que aparezca la hora actual al pulsar el botón INFO .
Si el ruido no desaparece sólo con la sintonización precisa, realice los ajustes de frecuencia
hasta el máximo y vuelva a realizar la sintonización precisa.
Volver
1.
Pulse el botón MENU para ver el menú. Pulse los botones
“Configuración” y pulse el botón ENTER/OK.
2.
Pulse los botones
3.
Pulse el botón ENTER/OK para seleccionar “Ajustar hora”.
4.
o
o
para seleccionar
para seleccionar “Hora” y pulse el botón ENTER/OK.
Para...
Pulse...
Vaya a “Hora” o “Minuto”
El botón
o
.
Ajuste la “Hora” o los “Minuto”
El botón
o
.
Pulse el botón ENTER/OK.
5.
Pulse el botón EXIT para salir.
Si desconecta el cable de alimentación, tendrá que establecer el reloj en hora otra vez.
También puede definir la hora y los minutos pulsando los botones numéricos en el mando a distancia.
Ajuste del temporizador de desconexión
Puede seleccionar un período de tiempo entre 30 y 180 mins para que, una vez transcurridos, el
televisor pase automáticamente al modo de espera.
1.
Pulse el botón MENU para ver el menú. Pulse los botones
“Configuración” y pulse el botón ENTER/OK.
o
para seleccionar
2.
Pulse los botones
o
para seleccionar “Hora” y pulse el botón ENTER/OK.
3.
Pulse los botones
o
para seleccionar “Temp. de desc.” y pulse el botón ENTER/OK.
4.
Pulse los botones o varias veces hasta que aparezca la hora deseada
(Desactivado, 30, 60, 90, 120, 150, 180). Pulse el botón ENTER/OK.
5.
Pulse el botón EXIT para salir.
El Televisor cambiará automáticamente a modo de espera cuando el temporizador llegue a 0.
Encendido y apagado de la televisión automáticamente
Puede ajustar los temporizadores de Des./Act. para que el Televisor:
Se encienda automáticamente y sintonice el canal seleccionado en el momento
que seleccione.
Se apague automáticamente a la hora que seleccione.
El primer paso es ajustar el reloj del televisor.
1. Pulse el botón MENU para ver el menú. Pulse los botones o para seleccionar
“Configuración” y pulse el botón ENTER/OK.
2.
Pulse los botones
o
para seleccionar “Hora” y pulse el botón ENTER/OK.
3.
Pulse los botones
o
para seleccionar “Temp. de encen.” y pulse el botón ENTER/OK.
Español-16
CO79.12258B.11.M13/joec!!!27
3117.21.31!!!!6;28;21
4.
Pulse los botones o para ajustar “Hora” y pulse el botón para ir al paso siguiente.
Ajuste otras opciones utilizando el mismo método que se indica anteriormente.
Cuando haya terminado, pulse el botón ENTER/OK para volver.
5.
Pulse los botones
6.
Pulse los botones o para ajustar “Hora” y pulse el botón para ir al paso siguiente.
Ajuste otras opciones utilizando el mismo método que se indica anteriormente.
Cuando haya terminado, pulse el botón ENTER/OK para volver.
7.
o
para seleccionar “Temp. de apag.” y pulse el botón ENTER/OK.
Pulse el botón EXIT para salir.
También puede definir la hora y los minutos pulsando los botones numéricos en el mando a distancia.
El ajuste “Activación” debe estar establecido en “Sí” para que los temporizadores funcionen.
Selección del idioma
Cuando utilice la unidad por primera vez, debe seleccionar el idioma que se utilizará para
visualizar menús e indicaciones.
1.
Pulse el botón MENU para ver el menú en pantalla. Pulse los botones
seleccionar “Configuración” y pulse el botón ENTER/OK.
2.
Pulse los botones
3.
Seleccione un idioma pulsando varias veces los botones
Pulse el botón ENTER/OK.
4.
Pulse el botón EXIT para salir.
o
o
para
para seleccionar “Idioma” y pulse el botón ENTER/OK.
o
.
Puede elegir uno de los 5 idiomas.
Uso del Modo Juego
Si se conecta a una consola de videojuegos como PlayStationTM o XboxTM, podrá experimentar
sensaciones más realistas seleccionando el menú de juego.
1. Pulse el botón MENU para ver el menú en pantalla. Pulse los botones o para
seleccionar “Configuración” y pulse el botón ENTER/OK.
2. Pulse los botones o para seleccionar “Modo Juego” y pulse el botón ENTER/OK.
3. Pulse el botón o para seleccionar “Activado” o “Desactivado”.
Pulse el botón ENTER/OK.
4. Pulse el botón EXIT para salir.
Si desea desconectarse de la consola de videojuegos y conectar otro dispositivo externo,
cancele el Modo Juego en el menú de la imagen.
Si ve la televisión en Modo Juego, la pantalla tiembla ligeramente.
Modo Juego no está disponible en el modo de TV.
Si Modo Juego está activado:
• Los modos Imagen y Sonido cambian automáticamente a Custom (Personal) y los usuarios no
pueden cambiar el modo.
• El modo Sonido del menú Sound (Sonido) se desactiva. Debe ajustar el sonido mediante el ecualizador.
• La función de establecer el sonido se activa. Si, tras configurar el ecualizador, selecciona la función Reset
(Restablecer), se restauran los parámetros de fábrica de la configuración del ecualizador.
Ajuste del modo Pantalla Azul / Selección de Melodía
Pantalla azul:
Si no se recibe ninguna señal o la señal es muy débil, una pantalla azul sustituirá
automáticamente el fondo ruidoso de la imagen. Si desea continuar visualizando la imagen
deficiente, ajuste el modo “Pantalla azul” en “Desactivado”.
Melodía:
Puede oír la melodía cuando la televisión se enciende o se apaga.
1.
Pulse el botón MENU para ver el menú en pantalla. Pulse los botones
seleccionar “Configuración” y pulse el botón ENTER/OK.
2.
Pulse el botón o para seleccionar “Pantalla azul” o ”Melodía”.
Pulse el botón ENTER/OK.
Pulse el botón o para seleccionar “Activado” o “Desactivado”.
Pulse el botón ENTER/OK.
Pulse el botón EXIT para salir.
3.
4.
o
para
Español-17
CO79.12258B.11.M13/joec!!!28
3117.21.31!!!!6;28;31
Uso de la función de ahorro de energía
Esta función ajusta el brillo del televisor, lo cual reduce el consumo de energía. Si desea ver
la televisión por la noche, ajuste la opción del modo “Ahorro energía” en “Alto” sus ojos se lo
agradecerán y, además, reducirá el consumo de energía.
1.
Pulse el botón MENU para ver el menú en pantalla. Pulse los botones
seleccionar “Configuración” y pulse el botón ENTER/OK.
o
o
para
2.
Pulse los botones
3.
Seleccione la opción deseada (Desactivado, Bajo, Medio, Alto) pulsando los botones
or . Pulse el botón ENTER/OK.
para seleccionar “Ahorro energía” y pulse el botón ENTER/OK.
4.
Pulse el botón EXIT para salir.
Selección de la fuente
Puede elegir entre varias fuentes externas conectadas a las tomas de entrada del televisor.
1.
Pulse el botón MENU para ver el menú.
Pulse el botón ENTER/OK para seleccionar “Entrada”.
2.
Pulse el botón ENTER/OK para seleccionar “Fuentes”.
Si no hay ningún dispositivo externo conectado a la unidad, solo las opciones “TV”, “EXT.1”, “EXT.2”,
“DTV” están activadas en “Fuentes”. “AV”, “S-Vídeo”, “Componente”, “PC” y “HDMI” solo se activan si tales
fuentes están conectadas a su unidad.
3.
Seleccione el dispositivo que desea pulsando de forma repetida el botón
Pulse el botón ENTER/OK.
o
.
Pulse el botón SOURCE hasta seleccionar la fuente de entrada que desea. El modo TV se puede seleccionar
pulsando el botón TV/DTV, los botones numéricos (0~9) y el botón P / del mando a distancia. Pero no
se puede seleccionar con el botón SOURCE.
Edición de los nombres de fuentes de entrada
Dé un nombre al dispositivo conectado en las tomas de entrada; de esta manera será más fácil
seleccionar el dispositivo de entrada.
1.
Pulse el botón MENU para ver el menú.
Pulse el botón ENTER/OK para seleccionar “Entrada”.
2.
Pulse los botones
3.
Pulse los botones o para seleccionar el dispositivo que desea editar.
Pulse el botón ENTER/OK.
4.
Pulse los botones o para seleccionar el dispositivo deseado.
Pulse el botón ENTER/OK.
5.
Pulse el botón EXIT para salir.
o
para seleccionar “Editar nombre” y pulse el botón ENTER/OK.
Español-18
CO79.12258B.11.M13/joec!!!29
3117.21.31!!!!6;28;44
Previsualización del sistema de menús del DTV
Para desplazarse por el sistema de menús en pantalla y para ajustar las
configuraciones disponibles, consulte la ilustración siguiente.
Disponible en el modo de televisión digital.
Pulse el botón D.MENU.
Instalación
Selec. País
Exploración automática
Exploración manual
Restaurar los valores de fábrica
Organización de los canales
Borrar frecuencia
Suprimir canal
Suprimir todos los canales
Desplazar y editor canal
Bloqueo primario
Fijar el bloqueo de canales
Cambiar el código PIN
Configuración del sistema
Selección del idioma
Configuración de OSD
Parámetros de hora
Información del sistema
Ampliación del software
Las opciones secundarias del menú CI pueden variar según el modelo de CAM.
En el modo Digital TV (Televisión digital), no desconecte el aparato antes de que la pantalla se
cargue completamente.
Puede seleccionar estas opciones pul
sando el botón D.MENU del mando a
distancia.
Español-19
CO79.12258B.11.M13/joec!!!2:
3117.21.31!!!!6;28;55
Funciones básicas
1.
Pantalla de visualización
Antes de poder ver el programa de televisión se ha de llevar a cabo la instalación.
Por tanto, al principio sólo se verán imágenes de menú. Una vez programados los
canales de televisión, se verá la siguiente imagen (banda) cada vez que se cambie
de canal:
Número de canal
Estado de la señal
Información del programa
Número de la pista sonora
del canal actual
Información detallada sobre el programa
En primer lugar verá la banda descrita arriba.
Después de pulsar el botón INFO por segunda vez, recibirá información detallada del
programa actual, que se puede mostrar en otra banda si hay más información. Si la
extensión de la información es superior a una página, puede utilizar P / para ir a la
página anterior y siguiente.
Este servicio depende del proveedor de servicios.
2.
Control del volumen
Para controlar el volumen:
para ajustar el nivel de volumen.
• Pulse los botones
• Pulse el botón MUTE
para cambiar al modo de silencio.
• Vuelva a pulsar el botón MUTE
o los botones
para cancelar la función
de silencio.
3.
Selección de la pista sonora
• Pulse el botón ALT para mostrar la lista de pistas sonoras.
• Pulse los botones o y ENTER/OK para seleccionar una.
4.
Selección de la pista de vídeo
• Pulse el botón ALT para mostrar la lista de pistas de vídeo.
• Pulse los botones o y ENTER/OK para seleccionar una.
Español-20
CO79.12258B.11.M13/joec!!!31
3117.21.31!!!!6;28;66
5.
Lista de servicios
• Pulse el botón CH MGR mientras está viendo un programa.
• Seleccione la lista pulsando el botón TV/RADIO.
que aparece detrás del nombre del canal indica que está codificado, mientras
El icono
que el icono
significa que el canal está bloqueado.
• Seleccione el canal pulsando los botones / y pulse P
anterior o siguiente de las listas.
• Pulse el botón ENTER/OK para ver el canal seleccionado.
6.
/
para ir a la página
Información del programa
EPG: guía electrónica de programas
La guía electrónica de programas ofrece una lista de programas de los canales.
1. Este servicio depende del proveedor de servicios.
2. Cuando el receptor ha reconocido la hora GMT de la señal (lo que lleva unos segundos),
puede mostrar la información correcta de la EPG.
• Pulse el botón GUIDE mientras está viendo un programa.
Esta función aparece en la pantalla usando sólo la hora.
• Botón ROJO
: El botón rojo sirve para retroceder a la fecha anterior.
• Botón VERDE : El botón verde sirve para ir a la fecha siguiente.
• Botón INFO
: Este botón sirve para ver la información del programa si su
extensión excede una página.
Utilice los botones / para ir a la página anterior o siguiente.
• Botón /
: Se utiliza para ver la lista de programas en bloques de 30 minutos.
El intervalo de tiempo se puede ajustar pulsando los botones de la pantalla de la EPG
de la manera siguiente:
Botón 1: 1 hora y 30 minutos
Botón 2: 30 minutos
Botón 3: 15 minutos
• Seleccione el canal pulsando los botones
para verlo.
/
y pulse el botón ENTER/OK
Español-21
CO79.12258B.11.M13/joec!!!32
3117.21.31!!!!6;29;15
Funcionamiento del menú DTV
Menú principal
Después de instalar el sistema de antena y el TV con los conectores adecuados.
• Enchufe el televisor a la corriente de red y enciéndalo.
• Pulse el botón D.MENU para ver el menú principal.
Aparecerá la siguiente visualización en pantalla:
Aparecen las opciones del submenú. Para los submenús “Instalación”,
“Organización de los canales” y “Bloqueo primario”, necesitará el código PIN.
1.
Instalación
El menú Instalación consta de 4 submenús:
Selec. país, Exploración automática, Exploración manual y Restaurar los valores
de fábrica.
• Seleccione “Instalación” pulsando el botón ENTER/OK en el modo de menú
principal para seleccionar el submenú.
• Introduzca el código PIN.
Si aún no ha introducido su propio código PIN, se aplica el código PIN 0000 establecido
en fábrica.
Cuando haya introducido el código PIN una vez, no será necesario repetir la operación a
menos que apague el televisor.
1.1 Selec. país
Para sintonizar nuevos canales, el televisor cuenta con la opción “Selec. país”. Debe
seleccionar un país que proporcione servicio de emisión.
Tras seleccionar “Selec. país” en el menú Instalación, aparecerá la pantalla siguiente:
• Seleccione el país donde se encuentra.
Puede seleccionar el valor de “ITALY”, “SPAIN”, “SWEDEN”, “UK”, “USER”,
“BELGIUM”, “GERMANY”, “FINLAND”, o “FRANCE” mediante los botones / .
• Tras seleccionar la opción, pulse el botón ENTER/OK para elegir el área de
emisión para la que desea servicio. Si no quiere guardar los cambios,
pulse el botón EXIT sin pulsar el botón ENTER/OK.
Si se cambia el código nacional, todos los programas guardados se perderán.
USER (Usuario): El usuario puede establecer el número de canal y la frecuencia en la
exploración manual/automática.
1.2 Exploración automática
El submenú “Exploración automática” permite descargar canales automáticamente
desde la carga programada previamente.
Para descargar canales automáticamente:
• Puede seleccionar la frecuencia especificada entre “Inic. frecuencia” y “Fin. frecuencia”.
• Pulse el botón ENTER/OK.
Aparecerá el menú Exploración automática.
Todos los canales de la lista se descargarán automáticamente.
Español-22
CO79.12258B.11.M13/joec!!!33
3117.21.31!!!!6;29;25
1.3 Exploración manual
Para sintonizar canales nuevos o señales débiles, el TV incorpora la opción “Exploración
manual” en la que el usuario puede introducir los datos del canal. Tras seleccionar
“Exploración manual” en el menú Instalación, aparecerá la pantalla siguiente:
• Seleccione el número de canal.
Puede seleccionar el canal concreto que desea buscar.
Los valores siguientes son los predeterminados, pero es posible seleccionarlos.
La barra de estado de la señal le dirá si son válidos.
• Introduzca la frecuencia del canal que desea encontrar.
• Seleccione el ancho de banda. Puede seleccionar el valor “6”, “7” o “8” MHz.
• Seleccione el modo Guard Interval (Intervalo de seguridad).
Puede seleccionar el valor “AUTO”, “1/32”, “1/16”, “1/8” o “1/4”.
• Seleccione el modo FFT (Fast Fourier Transform – Transformación rápida de Fourier).
Uno de los valores -“Auto”, “2K” y “8K”- se seleccionará automáticamente.
Puede cambiar el valor establecido de acuerdo con sus preferencias.
• Una vez seleccionada la opción, pulse el botón ENTER/OK para iniciar el
proceso de exploración.
1.4 Restaurar los valores de fábrica
El menú Reset to Factory Defaults (Restaurar los valores predeterminados de fábrica) sirve
para restaurar los valores predeterminados establecidos en fábrica si el usuario se encuentra
con problemas después de cambiar algún valor de los datos de los canales u otros que
puedan ser erróneos. Cuando la ventana se lo solicite, pulse el botón ENTER/OK y el TV
se restaurará automáticamente a los valores de fábrica predeterminados.
Los valores anteriores se borrarán.
2.
Organización de los canales
El menú “Organización de los canales” tiene cuatro funciones:
El menú “Organización de los canales” se usa para borrar las frecuencias y los canales o
para mover y editar un canal a la conveniencia del usuario.
• Introduzca el código PIN.
Si aún no ha introducido el código PIN propio, se aplica el código 0000,
establecido en fábrica.
Cuando haya introducido el código PIN una vez, no será necesario repetir la operación a menos que
apague el televisor.
Español-23
CO79.12258B.11.M13/joec!!!34
3117.21.31!!!!6;29;44
2.1 Borrar frecuencia
• Seleccione la lista de frecuencias que desea borrar pulsando el botón ROJO.
• Pulse el botón ENTER/OK para confirmar.
Esta función no suprime la frecuencia sino la lista de canales registrados de aquélla.
2.2 Suprimir canal
• Seleccione el canal que desea borrar pulsando el botón ROJO.
• Pulse el botón ENTER/OK para confirmar.
2.3 Suprimir todos los canales
Cuando la ventana lo solicite, pulse el botón ENTER/OK para borrar todos los canales y
pulse el botón EXIT para salir.
2.4 Desplazar y editor canal
Para desplazar el nombre del canal:
• Seleccione la lista TV/RADIO/Interactiva mediante los botones / .
• Seleccione la lista TV/RADIO/Interactiva mediante los botones / o P / .
• Seleccione el canal pulsando el botón ROJO.
• Pulse los botones / para cambiar la posición del canal que desee,
y pulse P / para desplazarse a la página anterior o siguiente de la lista.
Pulse el botón ENTER/OK para confirmar.
• Si desea que el canal vuelva a la posición inicial, no pulse el botón ENTER/OK,
sino el botón AZUL.
Para editar el nombre del canal
• Seleccione la lista TV/RADIO/Interactiva mediante los botones / .
• Seleccione la lista de canales y desplácela a otro lugar mediante los botones
/ oP / .
• Pulse el botón VERDE. Aparecerá la tabla de tipos de letra.
• Seleccione el carácter deseado con / , / y pulse el botón ENTER/OK
para pegar el carácter a la cadena.
Botón P : Tecla de retroceso para borrar el carácter anterior.
• Pulse el botón D.MENU y, a continuación, pulse el botón ENTER/OK para guardar
los datos establecidos.
Español-24
CO79.12258B.11.M13/joec!!!35
3117.21.31!!!!6;29;61
3.
Bloqueo primario
La función de “Bloqueo primario” establece restricciones de visionado e impide el acceso
no autorizado al televisor por medio del PIN (Número de identificación personal), que es
un número de cuatro dígitos. (Código PIN establecido en fábrica: 0000) Este menú ofrece
tres opciones: bloquear un canal determinado, cambiar el código PIN y establecer el
bloqueo para módem.
• Introducción del código PIN.
Si aún no ha introducido su propio código PIN, se aplica el código PIN 0000
establecido en fábrica.
3.1 Fijar el bloqueo de canales
• Seleccione el canal pulsando los botones / o / .
• Seleccione el bloqueo de canal pulsando el botón ROJO.
• Pulse el botón ENTER/OK para confirmar.
Si desea ver el canal bloqueado, deberá introducir el código PIN cuando la ventana se lo
solicite. Una vez introducido el código PIN para acceder a un canal bloqueado, se podrá
acceder a los demás canales bloqueados. Es decir, puede acceder a todos los canales
bloqueados para seguridad infantil si ha accedido a uno introduciendo correctamente el
código PIN.
Para cancelar el bloqueo:
• Pulse de nuevo el botón ROJO para anular el bloqueo.
3.2 Cambiar el código PIN
Para cambiar el código PIN, seleccione la segunda opción “Cambiar el código PIN”.
De este modo se desplazará al menú siguiente:
En esta opción se debe introducir el código PIN actual junto al primer cursor y el código PIN
nuevo junto al segundo. Para confirmar se debe volver a introducir el código PIN nuevo.
Recuerde que el código PIN debe ser un valor numérico de cuatro dígitos.
CÓDIGO PIN ESTABLECIDO EN FÁBRICA: 0 0 0 0.
Si no recuerda cuál es su código PIN, póngase en contacto con el distribuidor o con el proveedor de
servicios. Si cambia la contraseña, guárdela en un lugar seguro y no la olvide.
Español-25
CO79.12258B.11.M13/joec!!!36
3117.21.31!!!!6;2:;22
4.
Configuración del sistema
Puede cambiar los valores del sistema prefijados en fábrica en función de sus
necesidades.
4.1 Selección del idioma
La opción de “Selección de idioma” permite al usuario seleccionar el idioma de OSD, pista
sonora, teletexto y EPG.
• Para adaptarse a los usuarios de distintas zonas que hablan distintas lenguas, las
OSD están disponibles en cinco idiomas (actualmente English, Deutsch, Français,
Italiano, y Español).
• Para seleccionar el menú del idioma, pulse los botones / para cambiar el idioma
y pulse el botón ENTER/OK.
• El idioma de OSD, pista sonora, teletexto y EPG variará de acuerdo con el idioma
seleccionado.
4.2 Configuración de OSD
Puede establecer la transparencia de la OSD y el tiempo de visualización (banda).
• Selección del nivel de transparencia de la OSD.
El nivel va de 0 a 100% El ajuste se realiza mediante los botones numéricos,
/ oP / .
• Ajuste de la duración de la visualización del cuadro de información (banda)
mostrado en la pantalla. El tiempo va de 0,5 a 60 segundos. El ajuste se realiza
mediante los botones numéricos, los botones / para aumentar o disminuir 0,5
segundos y los botones P / para 1 segundo.
4.3 Parámetros de hora
Pueden establecerse distintos modos para la hora, como, por ejemplo, la hora local. La
hora local exacta puede ajustarse mediante GMT.
• Coloque el cursor en este submenú y pulse el botón ENTER/OK.
• Pulse los botones / para cambiar la hora local en Zona horaria.
La hora local cambiará de acuerdo con su ubicación.
GMT es la hora estándar de Greenwich.
Español-26
CO79.12258B.11.M13/joec!!!37
3117.21.31!!!!6;2:;2:
4.4 Información del sistema
Cuando se ponga en contacto con el proveedor de servicios o con un centro de servicio, es
posible que soliciten información disponible en este menú. Coloque el cursor en este
submenú y pulse el botón ENTER/OK.
En la pantalla aparecerá lo siguiente.
4.5 Ampliación del software
Puede descargar y actualizar el software de este televisor a través de un canal específico
designado por la emisora de televisión. Ésta le proporcionará más información al
respecto. Si decide descargar una nueva versión del software, la configuración, el código
de acceso, los canales favoritos, etc. se borrarán.
La descarga puede tardar un poco. No apague el televisor durante el proceso de
descarga.
Instalación de la tarjeta CI
1.
Puede adquirir el módulo del CAM de CI por teléfono o en el distribuidor más cercano a
su domicilio.
2.
Inserte la tarjeta CI en el CAM siguiendo la dirección de la flecha hasta que encaje.
3.
Inserte el CAM con la tarjeta CI instalada en la ranura para interfaz común.
Inserte el CAM, siguiendo la dirección de la flecha, hasta el fondo,
de modo que quede paralelo a la ranura.
4.
Compruebe si se ven imágenes en un canal de señal codificada.
La instalación del CAM puede efectuarse con el televisor encendido o apagado.
Español-27
CO79.12258B.11.M13/joec!!!38
3117.21.31!!!!6;2:;42
Decodificador de teletexto
Muchos canales de Televisor incluyen “teletexto”, páginas de información escrita
que proporciona datos como:
Horas de los programas de televisión
Boletines de noticias y partes meteorológicos.
Resultados deportivos
Subtítulos para sordos
Las páginas de teletexto se organizan en seis categorías:
Contenido
Parte
A
Número de página seleccionado.
B
Identidad de la emisora.
C
Número de página actual o estado de la búsqueda.
D
Fecha y hora.
E
Texto.
F
Información de estado.
Visualización de informaciones del teletexto
Puede visualizar la información del teletexto en cualquier momento, pero la recepción de la se
al debe ser buena. Si no es así:
Se puede perder información
Algunas páginas no se visualizarán
Para activar el modo de teletexto y visualizar la página de ndice:
1.
Mediante los botón P
de teletexto.
2.
Pulse el botón TTX/MIX (
(
)oP
(
), seleccione el canal que proporciona el servicio
) para activar el modo de teletexto.
Se visualiza el contenido de la página. Se puede volver a visualizar en cualquier momento si se
).
pulsa el botón MENU (
3.
Pulse de nuevo el botón TTX/MIX (
).
La emisión real se mostrará en la pantalla como “Teletext”, “Double” y “Mix” por este orden.
4.
Para salir de la visualización de texto, pulse el botón TV/DTV.
Si aparece algún carácter extraño mientras se visualiza el texto, compruebe que el idioma de Text (texto)
es el mismo que el idioma en el modo de menú “Configuración”. Si ambos idiomas son diferentes,
seleccione el mismo idioma en el menú “Configuración”.
Español-28
CO79.12258B.11.M13/joec!!!39
3117.21.31!!!!6;2:;51
Selección de una página de teletexto específica
Pulse los botón numéricos en el mando a distancia para introducir los números de página
directamente:
1.
Introduzca los tres dígitos del número de la página que se enumera en el índice
pulsando los botón numéricos correspondientes.
2.
Si la página seleccionada está vinculada con varias páginas secundarias, éstas se
mostrarán secuencialmente. Para congelar la imagen en una página, pulse el botón
PIP ( ). Para reanudar, vuelva a pulsar el bon PIP ( ).
3.
Uso de varias opciones de pantalla:
Para visualizar...
Pulse...
)
Tanto la información del teletexto como la emisión normal
TTX/MIX (
Texto oculto (respuestas a juegos, por ejemplo)
INFO (
)
La pantalla normal
INFO (
)
Página secundaria, escriba los 4 dígitos del número
PRE-CH (
Página siguiente
Página anterior
P
P
O doble de las letras en:
Mitad superior de la pantalla
Mitad inferior de la pantall
DUAL I-II ( )
Una vez
Dos veces
La pantalla normal
(
(
)
)
)
Tres veces
Uso de Fastext para seleccionar una página del teletexto
Las distintos temas que aparecen en las páginas del teletexto tienen varios colores, y se pueden
seleccionar utilizando los botón coloreados del mando a distancia.
1.
Pulse el botón TTX/MIX (
2.
Pulse el botón del color correspondiente para el tema que desear seleccionar (los temas
disponibles se enumeran en la línea de información de estado).
3.
Pulse el botón rojo para mostrar la página anterior.
Pulse el botón verde para mostrar la página siguiente.
4.
Para salir de la visualización de texto, pulse el botón TV/DTV.
) para visualizar la página de índice del teletexto.
Español-29
CO79.12258B.11.M13/joec!!!3:
3117.21.31!!!!6;2:;66
Configuración del mando a distancia
Una vez configurado correctamente, el mando a distancia puede funcionar en cinco modos
diferentes: TV, vídeo, Decodificador, DVD o receptor TV digital. Pulsando el botón correspondiente
del mando a distancia podrá cambiar de un modo a otro y controlar cualquiera de estos equipos.
El mando a distancia quizá no sea compatible con todos los reproductores de DVD, vídeos,
decodificadores y receptores de TV digital.
Configuración del mando a distancia para controlar el vídeo.
1.
Apague el vídeo.
2.
Pulse el botón VCR del mando a distancia del televisor.
3.
Pulse el botón SET del mando a distancia del televisor.
4.
Mediante los botóns de número del mando a distancia, intro duzca los tres dígitos del
código del vídeo correspondi-entes a la marca de su vídeo, que aparece en la lista de la
página 33 de este manual. Asegúrese de introducir los tres dígitos del código, incluso
aunque el primero sea un “0”.
(Si aparece más de un código, inténtelo con el primero.)
5.
Pulse el botón POWER
del mando a distan-cia. El vídeo debería encenderse si el
mando está correctamente configurado. Si el vídeo no se enciende, repita los pasos 2,
3 y 4, pero pruebe con otro de los códigos indicados para la marca de su vídeo. Si no
aparece ningún otro código, pruebe con todos los códigos de vídeo, desde el 000 hasta el
080.
Nota sobre el uso de los modos del mando a distancia: vídeo
Cuando el mando a distancia esté en el modo “VCR”, los botón de volumen seguirán controlando el volumen del televisor.
Configuración del mando a distancia para controlar el decodificador de cable.
1.
Apague el decodificador de cable.
2.
Pulse el botón CABLE del mando a distancia del televisor.
3.
Pulse el botón SET del mando a distancia del televisor.
4.
Mediante los botóns de número del mando a distancia, intro duzca los tres dígitos
del código de decodificador de cable cor respondientes a la marca de su decodificador,
que aparece en la lista de la página 34 de este manual. Asegúrese de introducir los tres
dígitos del código, incluso aunque el primer dígito sea un “0”.
(Si se indica más de un código, inténtelo con el primero.)
5.
Pulse el botón POWER
del mando a distan-cia.
El decodificador de cable debería encenderse si el mando está
correcta-mente configurado. Si el decodificador no se enciende, repi-ta los pasos 2, 3 y 4,
pero pruebe con otro de los códigos indicados para la marca de su decodificador. Si no
aparece ningún otro código, pruebe con todos los códigos, desde el 000 al 046.
Nota sobre el uso de los modos del mando a distancia: decodificador de cable.
Cuando el mando a distancia esté en el modo “CABLE”, los botón de volu-men seguirán
controlando el volumen del televisor.
Español-30
CO79.12258B.11.M13/joec!!!41
3117.21.31!!!!6;31;19
Configuración del mando a distancia para controlar el DVD.
1.
Apague el DVD.
2.
Pulse el botón DVD del mando a distancia del televisor.
3.
Pulse el botón SET del mando a distancia del televisor.
4.
Mediante los botóns de número del mando a distancia, intro duzca los tres dígitos del
código del DVD correspondi-entes a la marca de su DVD, que aparece en la lista de la
página 34~35 de este manual. Asegúrese de introducir los tres dígitos del códi go, incluso
aunque el primer dígito sea un “0”. (Si se indica más de un código, inténtelo con el
primero.)
5.
Pulse el botón POWER
del mando a dis-tancia.
El DVD debería encenderse si el mando está correctamente configurado.
Si el DVD no se enciende, repita los pasos 2, 3 y 4, pero pruebe con otro de los códigos
indicados para la marca de su DVD. Si no aparece ningún otro código, inténtelo con cada
uno de ellos, del 000 al 141.
Nota sobre el uso de los modos del mando a distancia: DVD
Cuando el mando a distancia esté en el modo “DVD”, los botóns de volumen seguirán
controlando el volumen del televisor.
Configuración del mando a distancia para controlar el STB.
1.
Apague el STB.
2.
Pulse el botón STB del mando a distancia del televisor.
3.
Pulse el botón SET del mando a distancia del televisor.
4.
Mediante los botóns de número del mando a distancia, intro duzca los tres dígitos del
código del STB correspondi-entes a la marca de su STB, que aparece en la lista de la
página 35 de este manual. Asegúrese de introducir los tres dígitos del códi go, incluso
aunque el primer dígito sea un “0”. (Si se indica más de un código, inténtelo con el
primero.)
5.
Pulse el botón POWER
del mando a dis-tancia.
El STB debería encenderse si el mando está correctamente configurado.
Si el STB no se enciende, repita los pasos 2, 3 y 4, pero pruebe con otro de los códigos
indicados para la marca de su STB. Si no aparece ningún otro código, inténtelo con cada
uno de ellos, del 000 al 074.
Nota sobre el uso de los modos del mando a distancia: STB
Cuando el mando a distancia esté en el modo “STB”, los botóns de volumen seguirán
controlando el volumen del televisor.
Español-31
CO79.12258B.11.M13/joec!!!42
3117.21.31!!!!6;31;24
Códigos del mando a distancia
Vídeo,
Marca
Código
Marca
SAMSUNG
000 001 002 003 004 005 077 078 079
MONTGOMERY WARD
Código
020
ADMIRAL
020
MTC
002 025
AIWA
025
MULTITECH
002 005 025 038
AKAI
004 027 032
NEC
007 008 018 026 037 062 064
AUDIO DYNAMICS
007 026
OPTIMUS
020
BELL&HOWELL
018
ORION
073 074 075 076
BROKSONIC
022
PANASONIC
021 056 071 072
CANDLE
002 003 006 008 015 055
PENTAX
019 041 075
CANON
021 056
PENTEX RESEARCH+
008
CITIZEN
002 003 006 008 015 055
PHILCO
021 056 059
COLORTYME
007
PHILIPS
021 080
CRAIG
002 024
PIONEER
019 026 039 053
CURTIS MATHES
002 007 008 017 021 025 056 064 066
PORTLAND
015 049 055
DAEWOO
003 010 011 012 013 014 015 016
PROSCAN
017
DB
007 026
QUARTZ
018
DIMENSIA
017
QUASAR
021 056
DYNATECH
025
006 018 020 021 024 025 029 034 048 056
ELECTROHOME
034
RADIO SHACK/
REALISTIC
EMERSON
001 003 006 021 022 025 030 032 034 040 047
050 052 060 063 065 066 067 069 073
RCA
002 017 019 021 035 041 043 057 068 076
SANSUI
026
FISHER
018 024 028 029 048 051 061
SANYO
018 024
FUNAI
025
SCOTT
003 047 052 067
GENERAL ELECTRIC
002 005 017 021 056
SEARS
006 018 019 024 028 029 041 048 051
GO VIDEO
002
SHARP
020 034 045 015
HARMAN KARDON
007
SHIMTOM
027 033 038 058
HITACHI
019 025 041 042 074
SIGNATURE
025
INSTANT REPLAY
021
SONY
027 033 044
JC PENNEY
002 007 018 019 021 026 037 041 054 056
SYLVANIA
021 025 056 059
JCL
007 008 018 021 026 037
SYMPHONIC
025
JVC
081 082 083
TANDY
018 025
KENWOOD
007 008 018 021 026 037
TASHIKA
006
KLH
070
TATUNG
037
KONIA
036
TEAC
025 037 068
LG(Goldstar)
006 007 008 009 010
TECHNICS
021
LIOYD
025
TEKNIKA
006 021 025 031
LOGIK
038
TMK
066
LXI
025
TOSHIBA
003 019 029 051 052
MAGNAVOX
021 056 059
TOTEVISION
002 006
MARANTZ
007 008 018 021 026 037 062
UNITECH
002
MARTA
006
VECTOR RESEARCH
007 026
MEI
021
VICTOR
026
MEMOREX
006 021 024 025
VIDEO CONCEPTS
007 026
MGA
034
VIDEOSONIC
002
MIDLAND
005
WARDS
002 003 006 019 020 021 024 025 034 038 041
MINOLTA
019 041 075
YAMAHA
007 008 018 026 037
MITSUBISHI
019 034 041 046
ZENITH
023 027 033
Español-32
CO79.12258B.11.M13/joec!!!43
3117.21.31!!!!6;31;34
Decodificador de cable
Marca
Código
Marca
Código
SAMSUNG
000 001 002 003 004 005 006 007
REGENCY
015 023
GI
041
SA
042 043
HAMLIN
003 024 031
SCIENTIFIC ATLAN
042 043
HITACHI
025 030
SPRUCER
022
JERROLD
038 039
STARGATE 2000
036
MACOM
025 030
SYLVANIA
016
MAGNAVOX
019 023 028
TEXSCAN
016
OAK
026
TOCOM
032
PANASONIC
003 022 027 037 044
UNIVERSAL
033 034
PHILIPS
019 021 023 028
VIEWSTAR
019 021 023 028
PIONEER
004 018 020 044
WARNER AMEX
046
RCA
014 022 040
ZENITH
017 029 035 037 045
REGAL
003
SAMSUNG DVD
Producto
Código
Producto
DVD
000 001 002
Home Theater VCR COMBO
Código
014 015 016
DVDR
003 004
HDD Recorder COMBO
017
BD Record
005 006
TWIN TRAY COMBO
018
VCR COMBO
007 008 009 010 011
STB DVD COMBO
019
VCR Record
012
DVD Receiver
020
DHR COMBO
013
AV Receiver
021
Marca
Código
Marca
Código
ANAM
030
INTEGRA
092
AUDIOVOX
075
JBL
091
AUDIOLOGIC
085
JVC
022 033 115 116
ANABA
072
JATON
073
APEX DIGITAL
070 071 074 086 083 084 088 111 112
KENWOOD
051 108 109
AIWA
114
KISS
073
BROKSONIC
062
KONKA
059 100 106 107
BLAUPUNKT
074
KLH
074 075
B&K
122 123
LG(Goldstar)
025 031
CURTIS MATHES
027
LOEWE
057
CYBER HOME
077 078 079 082
LASONIC
058
CLARION
080 125
MOBILE AUTHORITY
054
CIRRUS
081
MEMOREX
055
CYBER HOME
065
MALATA
056
CINEVISION
095
MAGNAVOX
076 093
DAEWOO
066
MINTEK
074 094
DENON
146
MONYKA
073
FARENHEIT
067 068
NORCENT
048 049 050
FISHER
090
NEXT BASE
052
GPX
060
NEC
053
GO VIDEO
061 089 133 135
NANTAUS
144
DVD
GE
069 074
NESA
074
GREENHILL
074
OPTOMEDIA ELECTRONICS
105
HITACHI
064 113
OPTIVIEW
072
HITEKER
071
ONKYO
076 092 119
HOYO
073
PHILCO
044 045
HARMAN / KARDON
091 110
PRINCETON
046 047
IRT
089
PROSCAN
023
Español-33
CO79.12258B.11.M13/joec!!!44
3117.21.31!!!!6;31;37
DVD
Marca
Código
Marca
Código
PANASONIC
024 034 124 134 136 137 138
THOMSON
145
PHILIPS
036 076
TOSHIBA
028 062 076
ROTEL
117 118
TECHNICS
139
RIO
120
TVIEW
072
RCA
023 035 074 075 131 132
TOKAI
073
RAITE
073
TEAC
096
ROWA
038
TECHWOOD
097
SAMPO
104
TREDEX
098 099 101
SONY
026 029 126 127 128 129 130 141
URBAN CONCEPTS
076
SHERWOOD
039 041
VENTURER
075
SVA
042
VOCOPRO
102
SYLVANIA
043 093
YAMAHA
032 063
SHARP
140
YAMAKAWA
040 073
SANSUI
062
XWAVE
103
SANYO
062 090
ZENITH
076 121
SHINSONIC
094
SAMSUNG receptor TV digital.
Producto
Código
Producto
Ground wave STB
001 002
Satellite STB HDD COMBO Premium
Código
010
Satellite STB
003
CABLE STB HDD COMBO Standard
011
CABLE STB
004
CABLE STB HDD COMBO Premium
012
STB DVD COMBO
008
Ground wave STB HDD COMBO Standard
013
Satellite STB HDD COMBO Standard
009
Ground wave STB HDD COMBO Premium
014
Receptor TV digital.
Marca
Código
Marca
ALPHASTAR
023
MAGNAVOX
Código
016 021 036 038 039 040 041 042
ANAM
043
MEMOREX
016
CHANNEL MASTER
018 034
MOTOROLA
064
CROSSDIGITAL
019
MACOM
018
CHAPARRAL
035
MITSUBISHI
015
DIRECT TV
015 016 017 019 022 045 060 061 062 065
066 067 068
NEXT LEVEL
047 048 064
PHILIPS
DAEWOO
074
015 016 017 021 033 036 038 039 040 041
042 067
046 049 050 063
DISH NETWORK SYSTEM
069 070
PRIMESTAR
DISHPRO
069
PANASONIC
058 059 061 062
DRAKE
018 024 032
PAYSAT
016
DX ANTENNA
027
PROSCAN
065 066
ECHOSTAR
025 069 070 071
RCA
051 052 053 065 066
EXPRESSVU
069
RADIOSHACK
064
GOI
069
REALISTIC
057
GE
065
STAR TRAK
026
GENERAL INSTRUMENT
046 047 048 063 064
STS
020 027
HTS
069
SKY
031
HOME CABLE
056
SKY LIFE
005 006 007
HITACHI
022
SHACK
064
HUGHES NETWORK
015 017
STAR CHOICE
064
IQ
020
SONY
054 060
IQ PRISM
020
TOSHIBA
015 017 028 029 030 072
JANEIL
059
ULTIMATE TV
060 066
JERROID
063
UNIDEN
016 021 037 055 056 057
JVC
069 070
ZENITH
024 031 068
LG(Goldstar)
044 073
Español-34
CO79.12258B.11.M13/joec!!!45
3117.21.31!!!!6;31;3:
Configuración del software del PC (basado en Windows XP)
A continuación se muestra la configuración de visualización de Windows para un ordenador típico.
Probablemente la pantalla real de su PC sea distinta; dependerá de la versión concreta de Windows y de la tarjeta de vídeo
que tenga. Pero aunque las pantallas reales tengan un aspecto diferente, se aplicarán los mismos ajustes básicos y la misma
información en la mayoría de los casos.
(En caso contrario, póngase en contacto con el fabricante del ordenador o con el distribuidor de Samsung.)
1. Primero, haga clic en “Control Panel” dentro del menú Inicio de Windows.
2. Cuando aparezca la pantalla del panel de control, haga clic en “Appearance and Themes” aparecerá un
cuadro de diálogo.
3. Cuando aparece la pantalla de Panel de control, haga clic en “Display” y aparecerá el cuadro de diálogo
Propiedades de Pantalla.
4. Navegue hasta la ficha “Settings” en el cuadro de diálogo Propiedades de Pantalla.
La configuración adecuada del tamaño es: Óptima - 1360 X 768
Si existe una opción de frecuencia vertical en ese cuadro de diálogo de configuración dela pantalla, el
valor correcto es “60” o “60 Hz”. Si no, basta con hacer clic en “OK” y salir del cuadro de diálogo.
Modo de visualización (PC)
Tanto la posición en la pantalla como el tamaño varían dependiendo del tipo de monitor del PC y de su resolución.
Se recomiendan las resoluciones de la tabla. (Son compatibles todas las resoluciones entre los límites admitidos)
Modo
Resolución
Frecuencia
horizontal (kHz)
Frecuencia del
vertical (Hz)
Frecuencia del reloj
de píxeles (MHz)
Polaridad
sincronizada (H/V)
IBM
640 x 480
720 x 400
31,469
31,469
59,940
70,087
25,175
28,322
-/-/+
VESA
640 x 480
640 x 480
800 x 600
800 x 600
800 x 600
1024 x 768
1024 x 768
1024 x 768
1360 x 768
37,861
37,500
37,879
48,077
46,875
48,364
56,476
60,023
47,712
72,809
75,000
60,317
72,188
75,000
60,000
70,069
75,029
60,015
31,500
31,500
40,000
50,000
49,500
65,000
75,000
78,750
85,800
-/-/+ /+
+ /+
+ /+
-/-/+ /+
+ /+
No se admite el modo entrelazado.
El aparato puede funcionar incorrectamente si se selecciona un formato de vídeo que no sea estándar.
El HDMI/DVI no es compatible con la función PC.
Los modos Independiente y Compuesto no se admiten. SOG no se admite.
Español-35
CO79.12258B.11.M13/joec!!!46
3117.21.31!!!!6;31;42
Selección del PC
Sintonización gruesa y fina de la imagen (Bloqueo de Imagen):
El propósito del ajuste de imagen calidad es remitir o reducir el ruido de la imagen. Si no se
eliminan mediante la sintonización Fina, ajuste la frecuencia lo mejor que pueda (grueso) y
vuelva a realizar la sintonización fina. Después de reducir el ruido, vuelva a ajustar la imagen
para que quede alineada en el centro de la pantalla.
1.
Ajustes predefinidos: Pulse el botón SOURCE para seleccionar el modo PC.
2.
Pulse el botón MENU para ver el menú. Pulse los botones o
para seleccionar “Configuración” y pulse el botón ENTER/OK.
3.
Pulse los botones
4.
Pulse el botón ENTER/OK para seleccionar “Bloqueo de Imagen”.
5.
Pulse los botones
6.
Pulse los botones o para ajustar la calidad de la pantalla.
Pulse el botón ENTER/OK.
7.
Pulse el botón EXIT para salir.
o
o
para seleccionar “PC” y pulse el botón ENTER/OK.
para seleccionar “Grueso” o “Fino” y pulse el botón ENTER/OK.
Cambio de la posición de la imagen (Posición):
Ajuste la posición de la pantalla del PC si no se ajusta a la pantalla del TV.
1.
Siga las instrucciones de 1 a 3 del apartado “Sintonización gruesa y fina de la imagen
(Bloqueo de Imagen)”.
2.
Pulse los botones
3.
Pulse el botón o para ajustar la posición vertical.
Pulse el botón o para ajustar la posición horizontal.
Pulse el botón ENTER/OK.
4.
Pulse el botón EXIT para salir.
o
para seleccionar “Posición” y pulse el botón ENTER/OK.
Configuración automática de la pantalla del PC (Ajuste automático):
El ajuste automático permite que la pantalla de PC de la unidad se ajuste
automáticamente a la señal de vídeo de PC entrante. Los valores Fino,
Grueso y Posición se ajustan automáticamente.
1.
Siga las instrucciones de 1 a 3 del apartado “Sintonización gruesa y fina de la imagen
(Bloqueo de Imagen)”.
2.
Pulse los botones
3.
Pulse el botón EXIT para salir.
o
para seleccionar “Ajuste automático” y pulse el botón ENTER/OK.
Inicialización de los ajustes de imagen (Restablecer imagen):
Puede sustituir todos los ajustes de imagen con los ajustes predeterminados de fábrica.
1.
Siga las instrucciones de 1 a 3 del apartado “Sintonización gruesa y fina de la imagen
(Bloqueo de Imagen)”.
2.
Pulse los botones
ENTER/OK.
3.
Pulse el botón EXIT para salir.
o
para seleccionar “Restablecer imagen” y pulse el botón
Español-36
CO79.12258B.11.M13/joec!!!47
3117.21.31!!!!6;31;47
Utilización del bloqueo Kensington antirrobo
El anclaje Kensington es un dispositivo utilizado para asegurar un aparato cuando se utiliza en un sitio público.
Este dispositivo de bloqueo se adquiere por separado.
El aspecto y método de bloqueo puede diferir del que se muestra en la ilustración dependiendo del fabricante.
Consulte el manual incluido con el anclaje Kensington para utilizarlo adecuadamente.
1. Inserte el dispositivo de anclaje en la
apertura Kensington del TV LCD (Figura
1), y gírelo en la del
bloqueo (Figura 2).
Cable
Figura 2
2. Conecte el cable de anclaje
Kensington.
Figura 1
3. Asegure el anclaje Kensington a una
mesa o a un objeto pesado ofijo.
<Opcional>
La ubicación del “Bloqueo Kensington” puede variar según el modelo.
Solución de problemas: antes de ponerse en contacto con el servicio técnicoa
No hay imagen o sonido.
Compruebe que el cable de alimentación esté enchufado a la toma de corriente.
Compruebe que haya presionado los botones
de la parte frontal de equipo.
Compruebe los ajustes de contraste y luminosidad de la imagen.
Compruebe el volumen.
La imagen es normal pero no hay
sonido.
Compruebe el volumen.
Compruebe si se ha pulsado el botón MUTE
en el mando a distancia.
Compruebe que “Silencio interno” esté desactivado.
No hay imagen o es en blanco y
negro.
Ajuste la configuración de color.
Compruebe que el sistema de emisión seleccionado sea correcto.
Interferencia en el sonido y la imagen.
Intente identificar el aparato eléctrico que está afectando al televisor y aléjelo.
Enchufe el televisor en una toma de corriente diferente.
Imagen borrosa o nevada,
sonido distorsionado.
Anomalías del mando a distancia.
Mensaje
“Comprobar el cable de señal.”
En modo PC, se muestra el
mensaje “Modo no compatible”.
Compruebe la dirección, la ubicación y las conexiones de la antena.
Esta interferencia a menudo se debe al uso de una antena interna.
Sustituya las pilas del mando a distancia.
Limpie el borde superior del mando a distancia (ventana de transmisión).
Compruebe los terminales de la pila.
Compruebe que el cable de señal se haya conectado firmemente al PC o a la fuente
de vídeo.
Compruebe que el PC o la fuente de vídeo estén encendidos.
Compruebe el máximo de la resolución y la frecuencia del adaptador de vídeo.
Compare estos valores con los datos de los modos de Pantalla.
La pantalla TFT LCD utiliza un panel compuesto por subpíxeles (3.133.440) fabricado mediante un proceso de muy alta tecnología.
No obstante, pueden existir algunos píxeles brillantes u oscuros en la pantalla que, en cualquier caso, no afectarán al
funcionamiento del producto.
Español-37
CO79.12258B.11.M13/joec!!!48
3117.21.31!!!!6;31;59
Especificaciones técnicas y medioambientales
Nombre del modelo
LE32S6
LE37S6
LE40S6
Tamaño de pantalla (diagonal)
32 pulg.
37 pulg.
40 pulg.
152 W
170 W
190 W
1360 x 768 @ 60 Hz
1360 x 768 @ 60 Hz
1360 x 768 @ 60 Hz
10 W X 2
10 W X 2
10 W X 2
893 x 82 x 544 mm
893 x 249 x 615 mm
1027 x 94,1 x 626,1 mm
1027 x 330,0 x 698,8 mm
1101 x 95 x 661 mm
1101 x 330 x 733 mm
13,9 kg
22,5 kg
23,7 kg
Entre 10 °C y 40 °C (50 °F a 104 °F)
Del 10 % al 80 %, sin condensación
Entre -20 °C y 45 °C (-4 °F a 113 °F)
Del 5 % al 95 %, sin condensación
Entre 10 °C y 40 °C (50 °F a 104 °F)
Del 10 % al 80 %, sin condensación
Entre -20 °C y 45 °C (-4 °F a 113 °F)
Del 5 % al 95 %, sin condensación
Entre 10 °C y 40 °C (50 °F a 104 °F)
Del 10 % al 80 %, sin condensación
Entre -20 °C y 45 °C (-4 °F a 113 °F)
Del 5 % al 95 %, sin condensación
Consumo de energía
PC Resolución
Sonido
Salida
Dimensiones (An x Pr x Al)
Cuerpo principal
Con soporte
Peso
Con soporte
Factores medioambientales
Temperatura de funcionamiento
Humedad de funcionamiento
Temperatura de almacenamiento
Humedad de almacenamiento
Este dispositivo es un aparato digital de la Clase B.
El diseño y las especificaciones están sujetos a cambios sin previo aviso.
Para la fuente de alimentación, consulte la etiqueta pegada al producto.
Español-38
BN68-01147B-00Spa.indd 38
2007-02-13 �� 7:36:15
Esta página se ha dejado en
blanco expresamente.
CO79.12258B.11.M13/joec!!!4:
3117.21.31!!!!6;31;67
Correct Disposal of This Product (Waste Electrical & Electronic Equipment)
(Applicable in the European Union and other European countries with separate collection systems)
This marking shown on the product or its literature, indicates that it should not be disposed with other household
wastes at the end of its working life. To prevent possible harm to the environment or human health from uncontrolled waste disposal, please separate this from other types of wastes and recycle it responsibly to promote the
sustainable reuse of material resources. Household users should contact either the retailer where they purchased
this product, or their local government office, for details of where and how they can take this item for environmentally safe recycling. Business users should contact their
supplier and check the terms and conditions of the purchase contract. This product should not be mixed with
other commercial wastes for disposal.
Eliminación correcta de este producto (material eléctrico y electrónico de descarte)
(Aplicable en la Unión Europea y en países europeos con sistenmas de recogida selectiva de residuos)
La presencia de esta marca en el producto o en el material informativo que lo acompaña, indica que al finalizar su vida útil
no deberá eliminarse junto con otros residuos domésticos. Para evitar los posibles daños al medio ambiente o a la salud
humana que representa la eliminación incontrolada de residuos, separe este producto de otros tipos de residuos y recíclelo
correctamente para promover la reutilización sostenible de recursos materiales. Los usuarios particulares pueden contactar
con el establecimiento donde adquirieron el producto, o con las autoridades locales pertinentes, para informarse sobre cómo y
dónde pueden llevarlo para que sea sometido a un reciclaje ecológico y seguro.
Los usuarios comerciales pueden contactar con su proveedor y consultar las condiciones del contrato de compra.
Este producto no debe eliminarse mezclado con otros residuos comerciales.
CO79.12258B.11.M13/joec!!!51
3117.21.31!!!!6;31;68