1
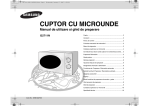
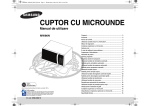
CUPTOR CU MICROUNDE
Manual de utilizare
MW87W
Cuptor ...............................................................................................2
Accesorii............................................................................................2
Panou de control .............................................................................2
Folosirea manualului de instructiuni .................................................3
Masuri de siguranta ..........................................................................3
Instalarea cuptorului cu microunde ..................................................5
Setarea ceasului ...............................................................................5
Ce trebuie facut atunci cand cuptorul nu functioneaza corect..........6
Preparare/ Reincalzire .....................................................................6
Nivele putere.....................................................................................7
Oprirea prepararii..............................................................................7
Ajustarea timpului de preparare........................................................7
Folosirea functiunii Auto Reincalzire................................................8
Setarile functiunii Auto Reincalzire...................................................8
Folosirea functiunii de Auto Dezghetare..........................................9
Setarile functiunii Auto Dezghetare .................................................9
Folosirea functiunii Power Steam..................................................10
Functiunea de deodorizare.............................................................11
Setarea timpului de asteptare.........................................................11
Folosirea functiunii Custom Cook..................................................11
Oprirea semnalului sonor................................................................12
Blocarea cuptorului cu microunde..................................................12
Ghid accesorii de preparare ..........................................................13
Curatarea cuptorului cu microunde................................................14
Depozitare si reparatii cuptor cu microunde...................................14
Specificatii tehnice ...... ................................................................15
Code No.: DE68-02924F
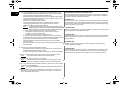
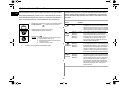
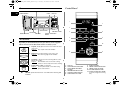
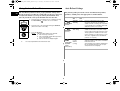
Cuptor
Panou de control
ORIFICII DE VENTILATIE
RO
LAMPA
MANER USA
AFISAJ
1
7
2
USA
INCUIETORI USA
INEL DE RULARE
PLATAN
CUPLAJ
PANOU DE CONTROL
3
8
4
9
DISPOZITIVE
DE SIGURANTA
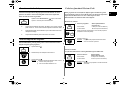
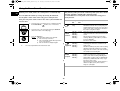
Accesorii
5
In functie de modelul pe care l-ati achizitionat, vi se vor livra cateva
accesorii, care pot fi folosite in diferite moduri.
10
1. Cuplaj, deja plasat pe axul motorului situat la baza
cuptorului.
Scop :
Cuplajul roteste platanul.
6
11
2. Inel de rulare, care se plaseaza in centrul cuptorului.
Inelul de rulare sustine platanul.
Scop :
3. Platan, care se plaseaza pe inelul de rulare si centrul
fixandu-se la cuplaj.
Scop :
Platanul serveste ca suprafata principala de
preparare; poate fi scos cu usurinta, pentru curatare.
1. AFISAJ
2. SELECTARE AUTO REINCALZIRE
3. BUTON DEZGHETARE
AUTOMATA
4. BUTON DEODORIZARE
5. SETARE TIMP ASTEPTARE
6. BUTON STOP/ ANULARE
4. Dispozitiv preparare cu aburi Power steam, vedeti pagina 10.
Scop :
Folositi dispozitivul de preparare cu aburi,
confectionat din material plastic.
☛
Nu folositi niciodata cuptorul cu microunde fara inelul de rulare si
platan.
2
7.
8.
9.
10.
11.
SETARE CEAS
SELECTARE POWER STEAM
SETARE NIVEL PUTERE
BUTON CUSTOM COOK
BUTON START/ SETARE
((timp de preparare, greutate si
portie de servire))
Folosirea manualului de instructiuni
Masuri de siguranta
Tocmai ati achizitionat un cuptor cu microunde SAMSUNG. Manualul
de instructiuni cuprinde informatii importante referitoare la prepararea
alimentelor cu ajutorul cuptorului cu microunde:
• Masuri de siguranta
• Accesorii potrivite si vesela de preparare
• Sfaturi utile de preparare
Masuri de siguranta importante.
Cititi cu atentie si pastrati manualul pentru o folosire ulterioara.
Inainte de a prepara alimente sau lichide in cuptorul cu microunde, va
rugam sa verificati daca au fost luate urmatoarele masuri de siguranta.
1. Nu folositi nici un vas metalic in interiorul cuptorului cu microunde.
• Containere metalice
• Vesela cu ornamentatii de aur sau argint
• Frigarui , furculite, etc.
Motiv : Pot apare scantei sau arc electric, care vor deteriora cuptorul.
2. Nu incalziti:
• Sticle, borcane, containere etanse sau sigilate in vid.
Ex: Borcane cu alimente pentru copii.
• Alimente sigilate ermetic.
Ex: Oua, rosii.
Motiv : Presiunea va creste la incalzire si poate duce la explozia acestora.
Sfat
: Scoateti capacele si intepati sacii sau pungile, etc.
3. Nu puneti in functionare cuptorul cu microunde, atunci cand acesta este gol.
Motiv : Peretii cuptorului se pot deteriora.
Sfat
: Lasati intotdeauna un pahar cu apa in interiorul cuptorului.
Apa va absoarbe microundele in cazul unei porniri accidentale a
cuptorului cu microunde, atunci cand acesta este gol.
4. Nu acoperiti orificiile de ventilatie cu carpe sau hartie.
Motiv : Carpele sau hartia pot lua foc datorita aerului cald evacuat din cuptor.
La inceputul manualului veti gasi ilustratii asupra cuptorului, si in
special ale panoului de comanda, astfel ca veti recunoaste butoanele
mult mai usor.
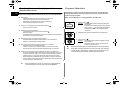
Procedurile pas cu pas folosesc trei simboluri diferite:
☛
✉
Important
Nota
RO
Rotiti
PRECAUTII PENTRU EVITAREA UNEI POSIBILE EXPUNERI
EXCESIVE LA ENERGIA MICROUNDELOR
Cititi cu atentie urmatoarele masuri de siguranta; in caz contrar poate avea loc o
expunere la energia microundelor, ce poate avea umari neplacute.
(a) In nici un caz, nu trebuie sa incercati sa folositi cuptorul cu microunde cu usa
deschisa, sa modificati incuietorile de siguranta ale usii sau sa introduceti
obiecte un gaurile incuietorilor de siguranta.
(b) Nu plasati nici un obiect intre usa cuptorului si partea frontala si nu permiteti
resturilor alimentare sa se acumuleze pe suprafetele de etansare. Asigurati-va
ca usa si suprafetele de etansare sunt curate, stergandu-le dupa folosire cu o
carpa umeda si apoi cu o carpa moale si uscata.
(c) Nu folositi cuptorul cu microunde, daca acesta este defect. Apelati la ajutorul
unui tehnician service, instruit de catre producator.
Este foarte important ca usa cuptorului sa se inchida corect si sa nu existe
nici o defectiune a:
(1) Usii, incuietorilor acesteia si a suprafetelor de etansare
(2) Balamalelor usii (rupte sau slabite)
(3) Cablului de alimentare
(d) Cuptorul cu microunde nu trebuie modificat sau reparat, decat de catre un
tehnician service calificat corespunzator si instruit de catre producator.
5. Folositi intotdeauna manusi atunci cand scoateti alimente sau vesela din cuptor.
Motiv : Unele vase absorb microundele si caldura este transferata intotodeauna de
la aliment la vas. De aceea, vasele sunt fierbinti.
6. Nu atingeti elementul de incalzire si peretii interiori ai cuptorului cu microunde.
Motiv : Acesti pereti ar putea sa fie destul de fierbinti incat sa va arda chiar si dupa
ce prepararea a luat sfarsit. Nu permiteti ca materiale inflamabile sa intre in
contact cu aria interioara a cuptorului. Lasati intai cuptorul sa se raceasca.
7. Pentru a reduce riscul unui incendiu in cavitatea cuptorului:
• Nu depozitati materiale inflamabile in interiorul cuptorului cu microunde.
• Indepartati sigiliile metalice ale ambalajelor de plastic sau hartie, ale alimentelor.
• Nu folositi cuptorul pentru a usca ziare.
• Daca observati ca iese fum, lasati usa cuptorului inchisa si opriti aparatul sau
deconectati-l de la sursa de alimentare.
3
Masuri de siguranta (continuare)
RO
8. Aveti o grija deosebita atunci cand, incalziti lichide sau alimente pentru copii.
• Lasati intotdeauna un timp de asteptare de 20 de secunde, dupa ce cuptorul
a fost oprit, pentru a permite echilibrarea temperaturii.
• Amestecati pe durata incalzirii, daca este necesar, si intotdeauna dupa incalzire.
• Aveti grija atunci cand luati vasul din cuptor, dupa incalzire. In cazul in care,
vasul este prea fierbinte, va puteti arde.
• Exista risul unei eruptii intarziate a fierberii.
• Pentru a preveni fierberea intarziata si o posibila oparire, ar trebui sa
introduceti o lingurita de plastic sau o bagheta de sticla in lichide si
amestecati inainte, in timpul si dupa preparare.
Motiv
: Pe durata incalzirii lichidelor, punctul de fierbere poate fi intarziat;
aceasta inseamna ca poate apare o eruptie a fierberii imediat dupa ce
recipientul a fost scos din cuptor. In acest caz, exista pericolul oparirii.
• In caz de oparire, urmati instructiunile de prim ajutor urmatoare:
* Introduceti zona oparita in apa rece, pentru cel putin 10 minute.
* Acoperiti cu o haina curata si uscata.
* Nu aplicati nici un fel de creme, uleiuri sau lotiuni.
• Nu umpleti niciodata complet vasul si alegeti un vas care este mai larg la
gura decat la baza, pentru a preveni scurgerea la fierbere a lichidului. Sticlele
cu gat subtire pot de asemenea exploda, daca sunt supraincalzite.
• Verificati intotdeauna temperatura alimentelor pentru copii si a laptelui,
inainte de servire.
• Nu incalziti niciodata o sticla pentru copii cu biberonul atasat; poate exploda
la supraincalzire.
9. Aveti grija sa nu deteriorati cablul de alimentare.
• Nu introduceti cablul de alimentare sau stecherul in apa si tineti cablul de
alimentare departe de suprafetele incalzite.
• Nu folositi acest aparat daca, cablul de alimentare sau stecherul este defect.
MASURI DE SIGURANTA IMPORTANTE
Pe durata prepararii, ar trebui sa va uitati din cand in cand in interiorul cuptorului,
atunci cand alimentele sunt incalzite sau preparate in recipiente de unica folosinta
din plastic, hartie sau alt material combustibil.
IMPORTANT
Nu trebuie permis copiilor sa foloseasca sau sa se joace la cuptorul cu microunde.
Nu trebuie lasati copii nesupravegeati in apropierea cuptorului, atunci cand acesta
este in functiune. Obiecte care pot trezi interesul copiilor, nu trebuie depozitate sau
ascunse pe cuptorul cu microunde.
AVERTIZARE:
Daca usa sau garniturile de etansare ale acesteia sunt defecte, nu folositi cuptorul
pana la repararea de catre personal autorizat.
AVERTIZARE:
Operatiunile de service sau reparatii, ce implica demontarea capacului de protectie
impotriva expunderii la energia miocroundelor, trebuie executate numai de catre
personal calificat.
AVERTIZARE:
Lichidele sau alte tipuri de alimente nu trebuie incalzite in recipiente etanse,
deoarece acestea pot exploda.
AVERTIZARE:
Permiteti copiilor sa foloseasca cuptorul cu microunde fara supraveghere, numai
atunci cand acestia au fost corespunzator instruiti, astfel incat sa fie capabili de
a utiliza aparatul in siguranta si de a intelege riscurile unei utilizari incorecte.
10. Atunci cand deschideti usa cuptorului, stati la o lungime de brat de acesta.
Motiv : Aerul cald sau aburul eliberat pot provoca oparirea.
11. Pastrati curat interiorul cuptorului cu microunde .
Motiv : Particulele de alimente sau petele de ulei de pe peretii sau baza
cuptorului, pot deteriora vopseaua si reduce eficienta aparatului.
12. Un "clic" poate fi observat pe durata functionarii, in special, atunci cand cuptorul
se afla in modul de dezghetare.
Motiv : Atunci cand puterea de iesire se schimba, este posibil sa auzuti acest sunet.
13. Daca cuptorul cu microunde functioneaza gol, alimentarea cu energie se va
opri automat, pentru siguranta. Puteti folosi din nou cuptorul, in mod normal,
dupa o perioada de 30 de minute.
4
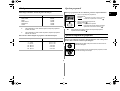
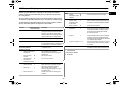
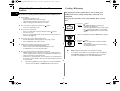
Instalarea cuptorului cu microunde
Setarea ceasului
Asezati cuptorul cu microunde pe o suprafata neteda, dreapta si destul
de rezistenta incat sa suporte greutatea acestuia.
Cuptorul cu microunde are un ceas incorporat. Ora poate fi afisata in RO
sistem de notare de 24 de ore sau de 12 ore. Trebuie sa setati ceasul:
• Atunci cand instalati cuptorul cu microunde pentru prima data
• Dupa o cadere de tensiune
20cm
deasupra
10cm
in spate
10cm
pe laterale
1. Atunci cand instalati cuptorul cu microunde, asigurati-va ca
exista o ventilare adecvata, lasand un spatiu de cel putin
10 cm in spate si in laterale, un spatiu de 20 cm deasupra
acestuia si un spatiu de 85 cm de la podea la cuptor.
✉
Nu uitati sa resetati ceasul atunci cand, se face trecerea de la ora
de vara la cea de iarna, si invers.
1. Pentru a afisa
timpul in...
Notare de 24 de ore
Notare de 12 ore
2. Scoateti toate materialele de ambalare din interiorul
cuptorului. Instalati inelul de rulare si platanul.
Verificati daca platanul se invarte corect.
Atunci apasati
butonul
...
O data
De doua ori
2. Rotiti butonul prezentat in figura, pentru a seta ora.
3. Acest cuptor cu microunde trebuie pozitionat astfel incat
stecherul cablului de alimentare sa fie usor accesibil.
☛
Nu blocati niciodata orificiile de ventilatie, deoarece cuptorul se va
3. Apasati butonul
☛
Pentru siguranta dumneavoastra, conectati cablul de alimentare la
o priza cu 3-pini, 230 Volti, 50Hz, AC si cu impamantare. Daca,
este deteriorat acesta trebuie inlocuit cu un cablu special (I-SHENG
SP022, KDK KKP4819D, EUROELECTRIC 3410, SAMIL SP106B, MOONSUNG EP-48E, HIGH PROJECT H.P 3). Contactati
dealerul local pentru inlocuire. Cablul de alimentare in ISRAEL
este PENCON(ZD16A), S/AFRICA APEX LEADS SA16 iar in
NIGERIA, GHANA, KENYA si U.A.E este PENCON(UD13A1).
4. Rotiti butonul prezentat in figura, pentru a seta minutele.
☛
supraincalzi si se va opri automat. Va ramane inoperabil pana ce
se raceste suficient.
5. Apasati butonul
Nu instalati cuptorul cu microunde in mediu cald si umed, precum
in apropierea unui cuptor obisnuit sau radiator. Specificatiile sursei
de alimentare a cuptorului trebuie respectate si orice extensie de
cablu trebuie sa aiba acelasi standard ca si cablul de alimentare,
livrat odata cu cuptorul. Stergeti interiorul si etansarea usii cu o carpa
umeda, inainte de a folosi cuptorul cu microunde pentru prima data.
5
.
.
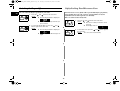
Preparare/ Reincalzire
Ce trebuie facut atunci cand cuptorul nu
functioneaza corect
RO
Urmatoarea procedura va arata cum puteti prepara sau reincalzi alimente.
Verificati intotdeauna setarile facute pentru preparare, inainte de a lasa
cuptorul nesupravegheat.
Daca aveti una din problemele enumerate mai jos, incercati solutiile date.
◆ Este normal.
• Aparitia condensului in interiorul cuptorului cu microunde.
• Iesirea aerului pe langa usa si carcasa exterioara.
• Reflectarea luminii pe langa usa si carcasa exterioara.
• Iesirea aburilor pe langa usa cuptorului.
◆ Cuptorul nu functioneaza atunci cand apasati butonul
• Usa este inchisa complet?
Intai, asezati alimentul in centrul platanului. Inchideti usa.
1. Apasati butonul . .
Rezultat
Indicatia 850W (puterea maxima de preparare)
este afisata.
Selectati nivelul corespunzator de putere apasand
din nou butonul
,pana ce nivelul dorit este afisat.
Vedeti tabelul nivelelor de putere din pagina
urmatoare.
.
◆ Alimentul nu este preparat deloc.
• Ati setat timpul corect si/ sau ati apasat butonul ?
• Usa este inchisa?
• Ati supraincarcat circuitul electric si ati provocat arderea unei siguranta sau
declansarea unui intreruptor automat?
2. Setati timpul de preparare rotind butonul la pozitia dorita.
◆ Alimentul este prea mult sau prea putin preparat.
• Ati setat durata de preparare corespunzator cu tipul alimentului?
• Ati ales un nivel de putere corespunzator?
3. Apasati butonul
.
Rezultat
Se aprinde lumina cuptorului si platanul incepe
sa se roteasca.
Prepararea incepe si atunci cand se termina
cuptorul emite patru bip-uri
◆ Apar scantei si arc electric in interiorul cuptorului cu microunde.
• Ati folosit vesela cu ornamente metalice?
• Ati lasat o furculita sau o ustensila metalica in interiorul cuptorului?
• Folia de aluminiu este prea aproape de peretii interiori ai cuptorului?
☛
✉
◆ Cuptorul cu microunde provoaca interferente cu radio-ul sau televizorul.
• O usoara interferenta poate fi observata la radio sau televizor, atunci cand
cuptorul functioneaza. Este normal. Pentru a rezolva aceasta problema,
instalati cuptorul cu microunde departe de radio, televizor sau antene
• Daca interferenta este detectata de catre procesorul cuptorului, afisajul ar
putea fi resetat. Pentru a rezolva aceasta, deconectati cablul de alimentare
si apoi reconectati-l. Resetati timpul.
✉
Daca informatiile de mai sus nu va ajuta sa rezolvati problema,
contactati dealer-ul local sau centrul service SAMSUNG.
6
Nu porniti niciodata cuptorul cu microunde, atunci cand acesta este gol.
Daca doriti sa incalziti mancare intr-un timp scurt la nivel de putere
maxim (850W), apasati butonul +30s o data pentru fiecare 30 de
secunde de timp de preparare. Cuptorul porneste imediat.
Nivele putere
Oprirea prepararii
Puteti alege unul dintre nivelele de putere de mai jos.
Puteti opri prepararea in orice moment, pentru a verifica alimentul.
Nivel putere
Iesire
Ridicat
Mediu ridicat
Mediu
Mediu scazut
Dezghetare
Scazut
850 W
600 W
450 W
300 W
180 W
100 W
✉
Daca selectati un nivel ridicat de putere, timpul de preparare
trebuie sa scada.
✉
Daca selectati un nivel scazut de putere, timpul de preparare
trebuie sa creasca.
1. Pentru a opri temporar prepararea;
Deschideti usa.
Rezultat :
Prepararea se opreste. Pentru a continua,
inchideti usa si apasati din nou butonul
☛
pana la 1 min
1 - 3 min
3 - 10 min
10 - 20 min
20 - 40 min
40 - 99 min
Puteti anula orice setare inainte de inceperea prepararii,
apasand butonul Cancel
. ( )
Ajustarea timpului de preparare
Daca doriti sa mariti timpul de preparare rotiti butonul astfel:
Timp
.
2. Pentru a opri complet prepararea;
Apasati butonul
.
Rezultat : Prepararea se opreste.
Daca doriti sa anulati setarile prepararii,
apasati din nou butonul Cancel ( ) .
Crestere timp
Puteti creste timpul de preparare apasand butonul +30s o data pentru
fiecare 30 de secunde ce doriti sa fie adaugate.
5 sec. unit
10 sec. unit
30 sec. unit
1 min unit
2 min unit
5 min unit
Apasati butonul +30s o data pentru fiecare 30 de secunde ce
doriti sa fie adaugate.
In timpul prepararii, pentru a ajusta timpul de preparare, invartiti
butonul catre stanga sau dreapta.
7
RO
RO
Folosirea functiunii Auto Reincalzire
Setarile functiunii Auto Reincalzire
Functiunea de Auto Reincalzire este programata cu trei timpi de preparare.
Nu este nevoie sa setati nici timpul de preparare si nici nivelul de putere.
Puteti ajusta numarul de portii prin simpla rotire a butonului.
Urmatorul tabel prezinta diferite programe de Auto Reincalzire,
cantitati, timp de asteptare si recomandari potrivite.
Intai, asezati alimentul in centrul platanului, apoi inchideti usa.
Buton
A l i m en t
Po r t i e
Ti m p d e Rec o m an d ar i
as t ep t ar e
1.
Gat a p r ep ar at
(re ce )
3 00-3 50 g
4 00-4 50 g
3 min.
A se z a ti a lim e ntu l pe o fa rfu rie
cera m ica si a coperiti cu pelicula .
A ce st progra m e ste potriv it
pe ntru m a nca re consta nd in 3
e le m e nte (de e x . ca rne cu sos,
le gu m e , ore z sa u pa ste ).
2.
G at a p r ep ar at 3 00 - 35 0 g 4 min.
(conge la t)
4 00 - 45 0 g
V e rifica ti da ca v a su l liv ra t
cu a lim e ntu l conge la t e ste
potriv it pe ntru m icrou nde .
Inte pa ti a lim e ntul sa u pe licula .
A sez a ti a lim entul in centrul
pla ta nu lu i. A lim e nte le conge la te
prepa ra te consta u din com bina tii
de 3 com ponente (de ex em plu
carne si sos, le gu m a , ore z sa u
pa ste ).
3.
B au t u r i
C a fe a , la pte ,
ce a i, a pa
la temperatura
ca m e re i
.
1. Selectati tipul alimentului ce doriti sa il preparati apasand
butonul Auto Reheat( ) , o data sau de mai multe ori.
2. Selectati marimea portiei rotind butonul.
(Vedeti tabelul din pagina urmatoare.)
3. Apasati butonul
.
Rezultat : Incepe prepararea. Atunci cand se termina:
1) Cuptorul emite patru bip-uri.
2) Semnalul de reamintire emite trei bip-uri
(la fiecare minut).
3) Timpul curent este afisat.
✉
Folositi numai recipiente compatibile si sigure.
8
150 m l
(1 ce a sca )
2 50 m l
(1 ca na )
1 - 2 min. T urnati lichidul intr-o ceasca
ce ra m ica si inca lz itisi inca lz iti
neacoperit. A sezati o ceasca
(150 m l) in ce ntru l pla ta nu lu i.
A m e ste ca ti ba u tu rile ina nte si
du pa tim pu l de a ste pta re .
Folosirea functiunii Auto Dezghetare
Setarile functiunii Auto Dezghetare
Functiunea de Auto Dezghetare va permite sa dezghetati carne, pasari,
peste. Timpul de dezghetare si nivelul de putere sunt setate automat.
Urmatorul tabel prezinta diferite programe de auto dezghetare,
cantitati, timp de asteptare si recomandari potrivite.
✉
Indepartati orice tip de material de ambalare, inainte de dezghetare.
Asezati alimentele congelate pe o farfurie ceramica dreapta.
Folositi numai tipuri de vase recomandate pentru cuptorul cu microunde.
Intai, asezati alimentul congelat in centrul platanului si apoi inchideti
usa.
1. Apasati Auto Power Defrost (
Rezultat:
Aliment
).
Este afisata urmatoarea indicatie:
Carne
Pasare
2. Selectati greutatea alimentului invartind butonul.
Este posibil sa setati maxim 1500g.
Peste
3. Apasati butonul
.
Rezultat:
◆ Incepe dezghetarea.
◆ Cuptorul va emite un bip la jumatatea
dezghetarii, pentru a va aminti sa intoarceti
alimentul.
◆ Apasati
, pentru a opri dezghetarea.
✉
Puteti dezgheta alimentele manual. Pentru aceasta, selectati
functiunea reincalzire/ preparare cu nivel de putere de 180W.
Pentru detalii, vedeti capitolul “ Reincalzire/Preparare” de la
pagina 6.
9
Portie
Timp de
asteptare
200-1500g 15-60min.
Recomandari
Inveliti marginile in folie de aluminiu. Intoarceti
alimentul atunci cand, cuptorul emite un bip.
Acest program este potrivit pentru carne
pentru cotlete, fripturi, chiftele, bucati de pui,
pui intreg sau fille de peste.
RO
Folosirea functiunii Power Steam
RO
Urmatorul tabel prezinta 4 programe automate ale functiunii Power
Steam, cantitati, timp de asteptare si recomandarile corespunzatoare.
Folositi intotdeuna dispozitivul de aburi atunci cand utilizati aceasta
functiune.
Folosind functiunea Power Steam, timpul de preparare este setat automat.
Puteti ajusta numarul de portii de servire rotind butonul de selectare.
Folositi intotdeauna dispozitivul de preparare cu aburi, din material plastic.
Intai, asezati dispozitivul in centrul platanului, apoi inchideti usa.
1. Selectati tipul alimentului ce doriti sa il preparati apasand
Power Steam (
) o data sau de mai multe ori.
Portie
Timp de Recomandari
asteptare
1.
250 g
375 g
4-5 min.
Orez
2. Selectati marimea portiei rotind butonul.
(Vedeti tabelul din pagina urmatoare).
2.
Cartofi
decojiti
3. Apasati butonul
.
Rezultat : Incepe prepararea. Atunci cand se termina:
1) Cuptorul emite patru bip-uri.
2) Semnalul de reamintire emite trei bip-uri
(la fiecare minut).
3) Timpul curent este afisat.
✉
Cod /
Aliment
3.
Legume
proaspete
Folositi numai recipiente compatibile si sigure.
4.
Compot
de fructe
10
Introduceti orezul alb in dispozitivul de preparare.
Adaugati 500 ml de apa rece pentru 250 g de orez si
adaugati 750 ml de apa pentru 375 g orez. Inchideti
capacul dispozitivului. Dupa preparare, indepartati
umezeala din interior, folosind hartie de bucatarie.
100-150 g 2-3 min.
200-250 g
300-350 g
400-450 g
500-550 g
Dupa curatare cantariti, spalati si taiati cartofii
in bucati de aceeasi marime. Introduceti apoi
cartofii in dispozitivul de preparare cu aburi.
Adaugati 15-30 ml (1-2 linguri) de apa pentru
o cantitate de 100-350 g si 45-60 ml (3-4
linguri) de apa pentru o cantitate de 400-550 g.
Inchideti capacul dispozitivului.
100-150 g 1-2 min.
200-250 g
300-350 g
400-450 g
Dupa spalare, cantariti, curatati si taiati legumele
in bucati de aceeasi marime. Introduceti legumele
in dispozitivul de preparare cu aburi. Adaugati 30 ml
(2 linguri)de apa pentru prepararea unei cantitati de
100-350 g, si adaugati 45 ml (3 linguri) de apa pentru o
cantitate de 400-450 g.Inchideti capacul dispozitivului.
Dupa preparare, amestecati inainte de timpul de asteptare.
100-150 g 2-3 min.
200-250 g
300-350 g
400-450 g
Dupa curatare, cantariti si spalati legumele proaspete
apoi taiati-le in felii sau cuburi de aceeasi marime.
Introduceti in dispozitiv. pentru prepararea a 100-350g
de fructe adaugati 15-30 ml (1-2 linguri.) de apa, pentru
400-450 adaugati 45ml (3linguri.). Adaugati 1-2
linguri de zahar. Inchideti capacul dispozitivului.
Amestecati bine dupa preparare. Acest program
este potrivit pentru mere, pere, caise, prune,
mango si ananas.
Functiunea de deodorizare
Folosirea functiunii Custom Cook
Folositi aceasta functiune dupa prepararea unui aliment cu miros
puternic sau atunci cand exista mult fum in interiorul cuptorului.
Daca preparati sau reincalziti des diferite tipuri de alimente, puteti
stoca timpul de preparare si nivelul de putere in memoria cuptorului,
astfel incat nu mai este nevoie sa le setati de fiecare data.
Intai curatati interiorul cuptorului.
Puteti introduce in memorie doua setari diferite.
Apasati butonul Deodorization (
) dupa ce ati curatat
cuptorul. Veti auzi patru semnale sonore.
Memorarea setarilor
1. Pentru a programa...
✉
Timpul de deodorizare este setat, din fabrica, la 5 minute. Acesta
poate creste cu 30 secunde la fiecare apasare a butonului +30s .
✉
Puteti ajusta timpul de deodorizare si prin rotirea butonului catre
dreapta sau stanga.
✉
Timpul de deodorizare poate fi de maxim 15 minute.
Prima setare
A doua setare
2. Setati programul de preparare in mod normal (timpul de
preparare si nivelul de putere).
Setarea timpului de asteptare
3. Apasati butonul
.
Rezultat: Programul de preparare setat este stocat
acum in memoria cuptorului.
Butonul Hold Time poate fi folosit pentru setarea automata a unui
timp de asteptare (fara preparare).
1. Apasati butonul
Atunci apasati butonul
Custom Cook ...
O data (Pe ecran este afisat P1)
De doua ori (Pe ecran este afisat P2)
.
Folosirea setarilor
Asezati intai alimentul in centrul platanului apoi inchideti usa.
2. Selectati timpul de asteptare rotind butonul.
1. Pentru a selecta...
Prima setare
A doua setare
3. Apasati butonul
.
Rezultat: Incepe cronometrarea timpului setat. La final:
1) Cutorul emite patru bipuri.
2) Ora curenta este afisata din nou.
Atunci apasati
butonul Custom Cook
O data (Pe ecran este afisat P1)
De doua ori (Pe ecran este afisat P2)
2. Apasati butonul
.
Rezultat: Alimentul va fi preparat in functie de setarile
memorate.
11
RO
RO
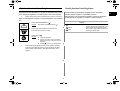
Oprirea semnalului sonor
Blocarea cuptorului cu microunde
Puteti opri in orice moment semnalul sonor de avertizare al cuptorului.
Cuptorul cu microunde este prevazut cu un program special Child Safety ,
care va permite sa blocati functionarea cuptorului, astfel incat, copiii sau
persoanele nefamiliarizate cu acesta, sa nu il poata activa din greseala.
1. Apasati butoanele
si
, in acelasi timp.
Rezultat :
Este afisata urmatoarea indicatie:
Puteti bloca, in orice moment, functionarea cuptorului.
Cuptorul nu mai emite semnal, la apasarea
butoanelor.
2. Pentru a activa din nou semnalul sonor, apasati butoanele
si
inca o data, in acelasi timp.
Rezultat :
Este afisata urmatoarea indicatie:
1. Apasati butoanele
si
, in acelasi timp.
Rezultat :
Cuptorul este blocat (nu poate fi selectata
nici o functie).
E
sste afisata indicatia “L”.
2. Pentru a debloca cuptorul, apasati din nou butoanele
si
in acelasi timp.
Rezultat : Cuptorul poate fi folosit normal.
Cuptorul va emite din nou semnal sonor.
12
Ghid accesorii de preparare
Pentru a prepara alimente in cuptorul cu microunde, microundele
trebuie sa poata penetra alimentul, fara a fi reflectate sau absorbite
de vesela folosita.
Metal
•
•
De aceea, trebuie sa alegeti cu grija accesoriile de preparare. Daca acestea
sunt marcate cu simbolul "microwave safe", nu trebuie sa va mai faceti griji.
Hartie
• Farfurii, cesti,
servetele, hartie
de bucatarie
• Hartie reciclata
Urmatorul tabel prezinta diferite tipuri de accesorii de preparare si indica
daca si cum trebuie folosite, in cuptorul cu microunde.
Accesorii
Recomandate pt uz
(microwave safe)
Folie de aluminiu
✓✗
Vesela
Ambalaje cu sigilii
metalice
Comentarii
Plastic
• Containere
Poate fi folosita in cantitati mici pentru a
proteja anumite zone impotriva prajirii
excesive. Arcul electric poate apare,
daca folia este prea aproape de peretii
cuptorului sau este in cantitate mare.
Vase de unica folosinta
din carton, poliester
✓
Unele alimente congelate sunt ambalate
in astfel de vase.
Hartie cerata
Pot fi folosite pentru incalzire.
Supraincalzirea poate duce la topirea
polistirenului.
Pot cauza incendiu.
✓ :Recomandat
✓✗ :Folositi cu atentie
✗ :Periculos
Sticla
• Vesela de masa
✓
•
Pahare fine
✓
•
Borcane de sticla
✓
Poate fi folosita, numai daca nu este
decorata cu ornamente metalice.
Pot fi folosite pentru incalzire.
Sticla fina se poate sparge sau crapa,
la supraincalzire.
Trebuie scos capacul. Numai pentru
incalzire.
13
✓
Numai daca e plastic rezistent la incalzire.
Unele tipuri de plastic, se deformeaza si
se decoloreaza la temperaturi ridicate.
Nu folositi melamina.
Poate fi folosita pentru a retine umezeala.
Aceasta nu trebuie sa atinga alimentele.
Aveti grija la indepartarea peliculei, deoarece
vor fi eliberati aburi fierbinti.
Numai daca rezista la fierbere. Nu trebuie
sa fie ermetica. Daca e necesar, intepati
cu furculita.
✓✗
Portelanul, ceramica, vasele din lut sunt
in mod obisnuit potrivite, numai daca nu
sunt decorate cu ornamente metalice.
Pot cauza arc electric.
Poate cauza arc electric.
Pungi de congelare
✓
•
✗
•
Portelan si ceramica
Pungi de hartie
✗
sau ziare
Hartie reciclata
✗
sau vesela cu
ornamente metalice
Pentru incalzire si timp de preparare scurt.
De asemenea, pentru absorbirea umiditatii.
✓
Nu preincalziti mai mult de opt minute.
•
✓
Pelicula
✓
Ambalaje Fast-food
• Cesti sau containere ✓
din polistiren
Pot cauza arc electric sau incendiu.
•
Farfurie crustata
RO
✗
✗
✓
Poate fi folosita pentru retinerea umezelii.
Impiedica formarea petelor de grasime, ulei.
RO
Curatarea cuptorului cu microunde
Depozitare si reparatii cuptor cu microunde
Urmatoarele parti ale cuptorului cu microunde trebuie curatate regulat,
pentru a preveni formarea depunerilor de resturi alimentare si grasimi:
• Suprafetele interioare si exterioare
• Usa si etansarile acesteia
• Platanul si inelul de rulare
Cateva precautii simple trebuie luate, atunci cand depozitati sau
transportati la centrul service cuptorul cu microunde.
☛
Cuptorul nu trebuie folosit daca, usa sau incuietorile acesteia sunt defecte:
• Balama rupta
• Etansari deteriorate
• Carcasa defomata sau indoita
Asigurati-va intotodeauna ca etansarile usii sunt curate si usa se
Reparatia trebuie facuta numai de catre personal service calificat.
inchide corect.
☛
1. Curatati suprafetele exterioare cu o carpa moale si apa calda cu sapun. Clatiti
si uscati.
2. Indepartati orice pete de pe suprafetele interioare sau inelul de rulare cu o carpa
cu sapun. Clatiti si uscati.
✉
3. Pentru a curata mai usor depunerile si a indeparta mirosurile, asezati o ceasca cu
suc de lamaie diluat pe platan, si incalziti timp de zece minute la putere maxima.
✉
4. Spalati platanul, oricand este necesar.
☛
Nu turnati apa pe orificiile de ventilatie. Nu folositi niciodata produse
abrazive sau solventi chimici. Aveti grija, atunci cand curatati
etansarile, ca particulele de alimente sa nu:
• Se acumuleze
• Blocheze inchiderea corecta a usii
14
Nu scoateti niciodata carcasa cuptorului cu microunde. Daca acesta
este defect si necesita service sau nu sunteti siguri de starea lui:
• Deconectati cablul de alimentare de la priza
• Contactati cel mai apropiat centru service
Daca doriti sa depozitati temporar cuptorul cu microunde, alegeti
un loc uscat, fara praf.
Motiv: Praful si umezeala pot afecta diferite componente
ale cuptorului.
Acest cuptor cu microunde nu este conceput pentru uz comercial.
Specificatii tehnice
Nota
SAMSUNG tinde sa isi imbunatateasca tot timpul produsele. Atat
specificatiile design-ului cat si acest manual de instructiuni se pot
schimba, fara notificare.
Model
MW87W
Sursa de alimentare
230V ~ 50 Hz
Putere de consum
Microunde
1250 W
Putere de iesire
100 W / 850 W (IEC-705)
Frecventa de operare
2450 MHz
Magnetron
OM75P(31)
Metoda de racire
Ventilator
Dimensiuni (W x H x D)
Exterior
Cavitate interioara cuptor
489 x 275 x 401.5 mm
330 x 211 x 329 mm
Volum
23 litri
Greutate
Neta
aproximativ 13.5 kg
RO
15
t~_^~nluTWY`Y[mniUGGwGXGG{ SGkGY_SGYWW[GGYa\ZGwt
MICROWAVE OVEN
Owner’s Instructions
MW87W
Oven ................................................................................................2
Accessories .....................................................................................2
Control Panel ...................................................................................2
Using this Instruction Booklet ..........................................................3
Safety Precautions...........................................................................3
Installing Your Microwave Oven ......................................................5
Setting the Time...............................................................................5
What to Do if You are in Doubt or Have a Problem.........................6
Cooking / Reheating ........................................................................6
Power Levels ...................................................................................7
Stopping the Cooking ......................................................................7
Adjusting the Cooking Time.............................................................7
Using the Auto Reheat Feature .......................................................8
Auto Reheat Settings.......................................................................8
Using the Auto Power Defrost Feature............................................9
Auto Power Defrost Settings ...........................................................9
Using the Power Steam Function ..................................................10
Using the Deodorization Feature...................................................11
Setting a Standing Time ................................................................11
Using the Custom Cook Feature ...................................................11
Switching the Beeper Off...............................................................12
Safety-Locking Your Microwave Oven ..........................................12
Cookware Guide ............................................................................13
Cleaning Your Microwave Oven ....................................................14
Storing and Repairing Your Microwave Oven ...............................14
Technical Specifications ................................................................15
t~_^~nluTWY`Y[mniUGGwGYGG{ SGkGY_SGYWW[GGYa\ZGwt
Oven
Control Panel
VENTILATION HOLES
GB
LIGHT
DOOR HANDLE
DISPLAY
1
7
2
DOOR
ROLLER RING
TURNTABLE
DOOR LATCHES
COUPLER
CONTROL PANEL
3
8
4
9
SAFETY INTERLOCK
HOLES
Accessories
5
Depending on the model that you have purchased, you are supplied
with several accessories that can be used in a variety of ways.
10
1. Coupler, already placed over the motor shaft in the base
of the oven.
Purpose : The coupler rotates the turntable.
6
11
2. Roller ring, to be placed in the centre of the oven.
Purpose : The roller ring supports the turntable.
3. Turntable, to be placed on the roller ring with the centre
fitting to the coupler.
Purpose : The turntable serves as the main cooking
surface; it can be easily removed for cleaning.
1. DISPLAY
2. AUTO REHEAT SELECTION
3. AUTO POWER DEFROST
BUTTON
4. DEODORIZATION BUTTON
5. STANDING TIME SETTING
6. STOP/CANCEL BUTTON
4. Power steam cooker, see page 10.
Purpose : Use the plastic steam cooker when using
power steam function.
☛
DO NOT operate the microwave oven without the roller ring and
turntable.
2
7.
8.
9.
10.
11.
CLOCK SETTING
POWER STEAM SELECTION
POWER LEVEL SETTING
CUSTOM COOK BUTTON
START BUTTON/ DIAL KNOB
(cook time, weight and serving
size)
t~_^~nluTWY`Y[mniUGGwGZGG{ SGkGY_SGYWW[GGYa\ZGwt
Using this Instruction Booklet
Safety Precautions
You have just purchased a SAMSUNG microwave oven. Your Owner’s
Instructions contain much valuable information on cooking with your
microwave oven:
• Safety precautions
• Suitable accessories and cookware
• Useful cooking tips
IMPORTANT SAFETY INSTRUCTIONS.
READ CAREFULLY AND KEEP FOR FUTURE REFERENCE.
Before cooking food or liquids in your microwave oven, please check
that the following safety precautions are taken.
1. DO NOT use any metallic cookware in the microwave oven:
• Metallic containers
• Dinnerware with gold or silver trimmings
• Skewers, forks, etc.
Reason: Electric arcing or sparking may occur and may damage the oven.
At the front of the booklet you will find illustrations of the oven, and
more importantly the control panel, so that you can find the buttons
more easily.
2. DO NOT heat:
• Airtight or vacuum-sealed bottles, jars, containers
Ex) Baby food jars
• Airtight food.
Ex) Eggs, nuts in shells, tomatoes
Reason: The increase in pressure may cause them to explode.
Tip:
Remove lids and pierce skins, bags, etc.
The step-by-step procedures use three different symbols.
☛
✉
Important
Note
Turn
PRECAUTIONS TO AVOID POSSIBLE EXPOSURE TO
EXCESSIVE MICROWAVE ENERGY
3. DO NOT operate the microwave oven when it is empty.
Reason: The oven walls may be damaged.
Tip:
Leave a glass of water inside the oven at all times.
The water will absorb the microwaves if you accidentally set the
oven going when it is empty.
Failure to observe the following safety precautions may result in harmful exposure to
microwave energy.
(a) Under no circumstances should any attempt be made to operate the oven with
the door open or to tamper with the safety interlocks (door latches) or to insert
anything into the safety interlock holes.
(b) Do not place any object between the oven door and front face or allow food or
cleaner residues to accumulate on sealing surfaces. Ensure that the door and
door sealing surfaces are kept clean by wiping after use first with a damp cloth
and then with a soft dry cloth.
(c) Do not operate the oven if it is damaged until it has been repaired by a
qualified microwave service technician trained by the manufacturer. It is
particularly important that the oven door closes properly and that there is no
damage to the:
(1) Door, door seals and sealing surfaces
(2) Door hinges (broken or loose)
(3) Power cable
(d) The oven should not be adjusted or repaired by anyone other than a properly
qualified microwave service technician trained by the manufacturer.
4. DO NOT cover the rear ventilation slots with cloths or paper.
Reason: The cloths or paper may catch fire as hot air is evacuated from the
oven.
5. ALWAYS use oven gloves when removing a dish from the oven.
Reason: Some dishes absorb microwaves and heat is always transferred
from the food to the dish.The dishes are therefore hot.
6. DO NOT touch heating elements or interior oven walls.
Reason: These walls may be hot enough to burn even after cooking has
finished, even though they do not appear to be so. Do not allow
inflammable materials to come into contact with any interior area of
the oven. Let the oven cool down first.
7. To reduce the risk of fire in the oven cavity:
• Do not store flammable materials in the oven
• Remove wire twist ties from paper or plastic bags
• Do not use your microwave oven to dry newspapers
• If smoke is observed, keep the oven door closed and switch off or
disconnect the oven from the power supply
3
GB
t~_^~nluTWY`Y[mniUGGwG[GG{ SGkGY_SGYWW[GGYa\ZGwt
Safety Precautions (continued)
GB
8. Take particular care when heating liquids and baby foods.
• ALWAYS allow a standing time of at least 20 seconds after the oven has
been switched off so that the temperature can equalize.
• Stir during heating, if necessary, and ALWAYS stir after heating.
• Take care when handling the container after heating. You may burn
yourself, if the container is too hot.
• A risk of delayed eruptive boiling exists.
• To prevent delayed boiling and possible scalding, you should put a plastic
spoon or glass stick into the beverages and stir before, during and after
heating.
Reason: During the heating of liquids the boiling point can be delayed; this
means that eruptive boiling can start after the container is removed
from the oven. You may scald yourself.
• In the event of scalding, follow these FIRST AID instructions:
* Immerse the scalded area in cold water for at least 10 minutes.
* Cover with a clean, dry dressing.
* Do not apply any creams, oils or lotions.
• NEVER fill the container to the top and choose a container that is wider at
the top than at the bottom to prevent the liquid from boiling over. Bottles
with narrow necks may also explode if overheated.
• ALWAYS check the temperature of baby food or milk before giving it to
the baby.
• NEVER heat a baby’s bottle with the teat on, as the bottle may explode if
overheated.
IMPORTANT SAFETY INSTRUCTIONS
During cooking, you should look into the oven from time to time when food is being
heated or cooked in disposable containers of plastic, paper or other combustible
materials.
IMPORTANT
Young children should NEVER be allowed to use or play with the microwave oven. Nor
should they be left unattended near the microwave oven when it is in use. Items of
interest to children should not be stored or hidden just above the oven.
WARNING:
If the door or door seals are damaged, the oven must not be operated until it has been
repaired by a competent person.
WARNING:
It is hazardous for anyone other than a comperent person to carry out any service or
repair operation which involves the removal of a cover which gives protection against
exposure to microwave energy.
WARNING:
Liquids and other foods must not be heated in sealed containers since they are liable
to explode.
9. Be careful not to damage the power cable.
• Do not immerse the power cable or plug in water and keep the power
cable away from heated surfaces.
• Do not operate this appliance if it has a damaged power cable or plug.
WARNING:
Only allow children to use the oven without supervision when adequate instructions
have been given so that the child is able to use the oven in a safe way and
understands the hazards of improper use.
10. Stand at arm’s length from the oven when opening the door.
Reason: The hot air or steam released may cause scalding.
11. Keep the inside of the oven clean.
Reason: Food particles or spattered oils stuck to oven walls or floor can
cause paint damage and reduce the efficiency of the oven.
12. You may notice a “Clicking” sound during operation(especially when the oven
is defrosting).
Reason: This sound is normal when the electrical power output is changing.
13. When the microwave oven is operating without any load, the power will be cut
off automati-cally for safety. You can operate normally after letting it stand for
over 30 minutes.
4
t~_^~nluTWY`Y[mniUGGwG\GG{ SGkGY_SGYWW[GGYa\ZGwt
Installing Your Microwave Oven
Setting the Time
Place the oven on a flat, level surface that is strong enough to safely
bear the weight of the oven.
Your microwave oven has an inbuilt clock. The time can be displayed
in either the 24-hour or 12-hour notation. You must set the clock:
• When you first install your microwave oven
• After a power failure
20cm
above
10cm
behind
10cm
on the side
1. When you install your oven, Make sure there is adequate
ventilation for your oven by leaving at least 10 cm (4
inches) of space behind, and on the sides of the oven, at
least 20 cm (8 inches) of space above the oven.
✉
1. To display the
time in the...
24-hour notation
12-hour notation
2. Remove all packing materials inside the oven.
Install the roller ring and turntable.
Check that the turntable rotates freely.
Then press the
Once
Twice
2. Turn the dial knob to set the hour.
3. This microwave oven has to be positioned so that plug is
accessible.
☛
Do not forget to reset the clock when you switch to and from
summer or winter time.
Never block the air vents as the oven may overheat and
3. Press the
button.
automatically switch itself off. It will remain inoperable until it has
cooled sufficiently.
☛
☛
For your personal safety, plug the cable into a 3-pin, 230 Volt,
50Hz, AC earthed socket. If the power cable of this appliance is
damaged, it must be replaced by a special cable (I-SHENG
SP022, KDK KKP4819D, EUROELECTRIC 3410, SAMIL SP106B, MOONSUNG EP-48E, HIGH PROJECT H.P 3). Contact
your local dealer to have it replaced. The power cable of ISRAEL
is PENCON(ZD16A), S/AFRICA APEX LEADS SA16 and
NIGERIA, GHANA, KENYA and U.A.E is PENCON(UD13A1).
4. Turn the dial knob to set the minute.
5. Press the
Do not install the microwave oven in hot or damp surroundings
like next to a traditional oven or radiator. The power supply
specifications of the oven must be respected and any extension
cable used must be of the same standard as the power cable
supplied with the oven. Wipe the interior and the door seal with a
damp cloth before using your microwave oven for the first time.
5
button.
button...
GB
t~_^~nluTWY`Y[mniUGGwG]GG{ SGkGY_SGYWW[GGYa\ZGwt
What to Do if You are in Doubt or Have a
Problem
Cooking / Reheating
The following procedure explains how to cook or reheat food.
GB
If you have any of the problems listed below try the solutions given.
ALWAYS check your cooking settings before leaving the oven
unattended.
◆ This is normal.
• Condensation inside the oven.
• Air flow around the door and outer casing.
• Light reflection around the door and outer casing.
• Steam escaping from around the door or vents.
◆ The oven does not start when you press the
• Is the door completely closed?
First, place the food in the centre of the turntable. Then, close the
door.
1. Press the
Result :
button.
◆ The food is not cooked at all
• Have you set the timer correctly and/or pressed the
button?
• Is the door closed?
• Have you overloaded the electric circuit and caused a fuse to blow or a
breaker to be triggered?
2. Set the cooking time by turning the dial knob as required.
◆ The food is either overcooked or undercooked
• Was the appropriate cooking length set for the type of food?
• Was an appropriate power level chosen?
3. Press the
Result :
◆ Sparking and cracking occur inside the oven (arcing)
• Have you used a dish with metal trimmings?
• Have you left a fork or other metal utensil inside the oven?
• Is aluminium foil too close to the inside walls?
☛
✉
◆ The oven causes interference with radios or televisions
• Slight interference may be observed on televisions or radios when the
oven is operating. This is normal.To solve this problem, install the oven
away from televisions, radios and aerials.
• If interference is detected by the oven’s microprocessor, the display may
be reset.To solve this problem, disconnect the power plug and reconnect
it. Reset the time.
✉
button.
The 850W (maximum cooking power)
indications are displayed:
Select the appropriate power level by pressing
the
button again until the corresponding
wattage is displayed. Refer to the power level
table.
If the above guidelines do not enable you to solve the problem,
contact your local dealer or SAMSUNG after-sales service.
6
button.
The oven light comes on and the turntable
starts rotating.
Cooking starts and when it has finished the
oven beeps four times.
Never switch the microwave oven on when it is empty.
If you wish to heat a dish for a short period of time at maximum
power(850W), simply press the +30s button once for each 30
seconds of cooking time. The oven starts immediately.
t~_^~nluTWY`Y[mniUGGwG^GG{ SGkGY_SGYWW[GGYa\ZGwt
Power Levels
Stopping the Cooking
You can choose from among the power levels below.
You can stop cooking at any time to check the food.
Power Level
HIGH
MEDIUM HIGH
MEDIUM
MEDIUM LOW
DEFROST
LOW / KEEP WARM
✉
✉
1. To stop temporarily;
Open the door.
Result :
Cooking stops. To resume cooking, close the door
Output
850 W
600 W
450 W
300 W
180 W
100 W
and press
again.
2. To stop Completely:
Press the
button.
The cooking stops.
Result :
If you wish to cancel the cooking setting,
press the Cancel(
) button again.
If you select the higher power level, the cooking time must be
decreased.
☛
You can cancel any setting before you start cooking by simply
pressing Cancel( ).
If you select the lower power level, the cooking time must be
increased.
Adjusting the Cooking Time
If you want to add the cooking time by turning dial knob.
Time
Increasing Time
Up to 1 min
1 - 3 min
3 - 10 min
10 - 20 min
20 - 40 min
40 - 99 min
5 sec. unit
10 sec. unit
30 sec. unit
1 min unit
2 min unit
5 min unit
You can increase the cooking time by pressing the +30s button once
for each 30 seconds to be added.
Press the +30s button once for each 30 seconds to be added.
During the cooking, to increase or decrease the cooking time of
your food, turn the dial knob right or left.
7
GB
t~_^~nluTWY`Y[mniUGGwG_GG{ SGkGY_SGYWW[GGYa\ZGwt
GB
Using the Auto Reheat Feature
Auto Reheat Settings
The Auto Reheat feature has three pre-programmed cooking times.
You do not need to set either the cooking times or the power level. You
can adjust the number of servings by turning the dial knob. First,
place the food in the centre of the turntable and close the door.
The following table presents the various Auto Reheat Programmes,
quantities, standing times and appropriate recommendations.
1. Select the type of food that you are cooking by pressing
the Auto Reheat(
) button once or more times.
Code/ Food
Serving
Size
Standing Recommendations
Time
1.
300-350 g
400-450 g
3 min.
Put on a ceramic plate and cover with
microwave cling film. This programme is
suitable for meals consisting of 3 components
(e.g. meat with sauce, vegetables and a side
dishes like potatoes, rice or pasta).
300 - 350 g 4 min.
400 - 450 g
Take frozen ready meal and check if dish is
suitable for microwave. Pierce film of ready
meal. Put the frozen ready meal in the centre.
This programme is suitable for frozen ready
meals consisting of 3 components (e.g. meat
with sauce, vegetables and a side dish like
potatoes, rice or pasta).
Ready Meal
(Chilled)
2. Select the size of the serving by turning the dial knob.
(Refer to the table on the side.)
2.
3. Press the
Result :
✉
Ready Meal
(Frozen )
button
Cooking starts. When it has finished:
1) The oven beeps four times.
2) The end reminder signal will beep 3 times
(once every minutes)
3) The current time is displayed again.
150 ml
(1 cup)
Drinks
250 ml
Coffee, milk,
(1 mug)
tea, water
(roomtemperature)
3.
Use only recipients that are microwave-safe.
8
1-2 min. Pour into a ceramic cup (150 ml) or mug
(250 ml) and place in the centre of turntable.
Reheat uncovered.
Stir carefully before and after standing time.
Be careful while taking the cups out (see
safety instructions for liquids).
t~_^~nluTWY`Y[mniUGGwG`GG{ SGkGY_SGYWW[GGYa\ZGwt
Using the Auto Power Defrost Feature
Auto Power Defrost Settings
The Auto Power Defrost feature enables you to defrost meat, poultry
or fish. The defrost time and power level are set automatically.
The following table presents the Power Defrost programme, quantities, GB
standing times and appropriate recommendations.
✉
Remove all kind of package material before defrosting. Place meat,
poultry and fish on a flat ceramic plate.
Use only dishes that are microwave-safe.
First, place the frozen food in the centre of the turntable and close the
door.
1. Press the Auto Power Defrost(
Result :
Food
) button.
The following indication is displayed:
Meat
Poultry
2. Select the food weight by turning the dial knob.
It is possible to set up to a maximum of 1500g.
3. Press
Result :
✉
Fish
button.
◆ Defrosting begins.
◆ The oven beeps halfway through
defrosting to remind you to turn the food
over.
◆ Press
button again to finish defrosting
You can also defrost food manually. To do so, select the
microwave cooking/reheating function with a power level of
180W. Refer to the section entitled “ Cooking/Reheating” on page
6 for further details.
9
Portion
Standing
Time
200-1500g 15-60min.
Recommendation
Shield the edges with aluminium foil. Turn
the pieces over, when the oven beeps.
This programme is suitable for meat such
as steaks, chops or minced meat, chicken
pieces, whole chicken or fish fillets.
t~_^~nluTWY`Y[mniUGGwGXWGG{ SGkGY_SGYWW[GGYa\ZGwt
Using the Power Steam Function
GB
With the power steam feature, the cooking time is set automatically.
The following table presents the 4 Auto Programs of the Power Steam
function, quantities, standing times and appropriate
recommendations. Use the plastic steam cooker when using power
steam function.
You can adjust the number of servings by turning the dial knob.
Use the plastic steam cooker when using power steam function.
First, place the plastic steam cooker in the centre of the turntable and
close the door.
Code / Food Serving
Size
1. Select the type of food that you are cooking by pressing
the Power Steam (
)button once or more times.
1.
Rice
2. Select the size of the serving by turning the dial knob.
(Refer to the table on the side page.)
2.
3. Press the
Result :
✉
Peeled
Potatoes
button.
Cooking starts. When it has finished:
1) The oven beeps four times.
2) The end reminder signal will beep 3 times
(once every minute)
3) The current time is displayed again.
250 g
375 g
Standing Recommendations
Time
4-5 min.
Put white rice (parboiled) into the steam cooker.
Add 500 ml cold water when cooking 250 g rice
and add 750 ml water for 375 g rice. Close lid of
steam cooker. After cooking remove moisture in
the cavity by using kitchen paper.
100-150 g 2-3 min.
200-250 g
300-350 g
400-450 g
500-550 g
Weigh the potatoes after peeling, washing and
cutting into similar size. Put them into the steam
cooker.
Add 15-30 ml (1-2 tablespoons) water when
steaming 100-350 g, add 45-60 ml (3-4 tablespoons) for 400-550 g.
Close lid of steam cooker.
100-150 g 1-2 min.
200-250 g
Fresh
Vegetables 300-350 g
400-450 g
3.
Use only recipients that are microwave-safe.
4.
Fruit
Compote
10
100-150 g 2-3 min.
200-250 g
300-350 g
400-450 g
Weigh the vegetables after washing, cleaning
and cutting into similar size. Put them into the
steam cooker.
Add 30 ml (2 tablespoons) water, when steaming
100-350 g, add 45 ml (3 tablespoons) for 400450 g. Close lid of steam cooker. After steaming
stir carefully before standing time.
Weigh the fresh fruits after peeling and washing
and cut into similar slices or cubes. Put into
steam cooker. When steaming 100-350g fruits
add 15-30 ml (1-2 tbsp.) water, for 400-450 add
45ml (3 tbsp.). Additionally add 1-2 tbsp. sugar.
Close lid of steam cooker.
After steaming stir carefully. This programme is
suitable for apples, pears, plums, apricots,
mangoes or pineapple.
t~_^~nluTWY`Y[mniUGGwGXXGG{ SGkGY_SGYWW[GGYa\ZGwt
Using the Deodorization Feature
Using the Custom Cook Feature
Use this feature after cooking odorous food or when there is a lot of
smoke in the oven interior.
If you often cook or reheat the same types of dishes, you can store the
cooking times and power levels in the oven’s memory, so that you do
not have to reset them each order.
First clean the oven interior.
You can store two different setting.
Press the Deodorization( ) button after you have
finished cleaning. you will hear four beeps.
Storing the Setting
1. To programme the...
✉
✉
✉
The deodorization time has been specified as 5 minutes. It
increases by 30 seconds whenever the +30s button is pressed.
First setting
Second setting
Then press the
Custom Cook button
Once (Display is P1)
Twice (Display is P2)
2. Set your cooking programme as usual(Cooking time and
power level) see if necessary.
You can also adjust deodorization time by turning the dial knob
right or left.
The maximum deodorization time is 15 minutes.
Setting a Standing Time
3. Press
Result :
button.
Your setting are now stored in the oven’s
memory.
The Hold Time can be used to set a standing time automatically
(without microwave cooking).
1. Press the
button.
Using the settings
First, place the food in the centre of the turntable and close the door
2. Select the standing time by turning the dial knob.
1. To select the...
3. Press the
Result :
First setting
Second setting
button.
Standing time starts. When it has finished:
1) The oven beeps four times.
2) The current time is displayed again.
2. Press
Result :
11
Then press the
Custom Cook button
Once (Display is P1)
Twice (Display is P2)
button.
The food is cooked as requested.
GB
t~_^~nluTWY`Y[mniUGGwGXYGG{ SGkGY_SGYWW[GGYa\ZGwt
GB
Switching the Beeper Off
Safety-Locking Your Microwave Oven
You can switch the beeper off whenever you want.
Your microwave oven is fitted with a special Child Safety programme,
which enables the oven to be “locked” so that children or anyone
unfamiliar with it cannot operate it accidentally.
1. Press the
Result :
and
buttons at the same time.
◆ The following indication is displayed.
The oven can be locked at any time.
1. Press the
Result :
◆ The oven will not beep each time you
press a button.
2. To switch the beeper back on, press the
and
buttons again at the same time.
Result :
◆ The following indication is displayed.
and
buttons at the same time.
◆ The oven is locked (no functions can be
selected).
◆ The display shows “L”.
2. To unlock the oven, press the
and
buttons again at
the same time.
Result :
The oven can be used normally.
◆ The oven operates with the beeper on
again.
12
t~_^~nluTWY`Y[mniUGGwGXZGG{ SGkGY_SGYWW[GGYa\ZGwt
Cookware Guide
To cook food in the microwave oven, the microwaves must be able to
penetrate the food, without being reflected or absorbed by the dish
used.
Paper
•
Care must therefore be taken when choosing the cookware. If the
cookware is marked microwave-safe, you do not need to worry.
•
Plastic
• Containers
The following table lists various types of cookware and indicates
whether and how they should be used in a microwave oven.
Cookware
MicrowaveSafe
Aluminium foil
✓✗
Comments
Can be used in small quantities to protect
areas against overcooking. Arcing can
occur if the foil is too close to the oven
wall or if too much foil is used.
Browning plate
✓
Do not preheat for more than eight
minutes.
China and earthenware
✓
Porcelain, pottery, glazed earthenware
and bone china are usually suitable,
unless decorated with a metal trim.
Disposable polyester
cardboard dishes
Fast-food packaging
• Polystyrene cups
containers
• Paper bags or
newspaper
• Recycled paper or
metal trims
Glassware
• Oven-to-table
ware
• Fine glassware
•
Metal
•
•
✓
Some frozen foods are packaged in
these dishes.
✓
✗
Can be used to warm food. Overheating
may cause the polystyrene to melt.
May catch fire.
✗
May cause arcing.
✓
Can be used, unless decorated with a
metal trim.
Can be used to warm foods or liquids.
Delicate glass may break or crack if
heated suddenly.
Must remove the lid. Suitable for warming
only.
✓
Glass jars
✓
Dishes
Freezer bag twist
ties
✗
✗
Plates, cups,
napkins and
Kitchen paper
Recycled paper
13
✗
May cause arcing.
✓
Particularly if heat-resistant
thermoplastic. Some other plastics may
warp or discolour at high temperatures.
Do not use Melamine plastic.
Can be used to retain moisture. Should
not touch the food. Take care when
removing the film as hot steam will
escape.
Only if boilable or oven-proof. Should not
be airtight. Prick with a fork, if necessary.
Cling film
✓
•
Freezer bags
✓✗
✓ :Recommended
✓✗ :Use Caution
✗ :Unsafe
May cause arcing or fire.
For short cooking times and warming.
Also to absorb excess moisture.
•
Wax or grease-proof paper
GB
✓
✓
Can be used to retain moisture and
prevent spattering.
t~_^~nluTWY`Y[mniUGGwGX[GG{ SGkGY_SGYWW[GGYa\ZGwt
GB
Cleaning Your Microwave Oven
Storing and Repairing Your Microwave Oven
The following parts of your microwave oven should be cleaned
regularly to prevent grease and food particles from building up:
• Inside and outside surfaces
• Door and door seals
• Turntable and Roller rings
A few simple precautions should be taken when storing or having your
microwave oven serviced.
☛
☛
The oven must not be used if the door or door seals are damaged:
• Broken hinge
• Deteriorated seals
• Distorted or bent oven casing
ALWAYS ensure that the door seals are clean and the door
Only a qualified microwave service technician should perform repair
closes properly.
Failure to maintain the oven in a clean condition could lead to
deterioration of the surface that could adversely affect the of the
appliance and possibly result in a hazardous situation.
☛
1. Clean the outside surfaces with a soft cloth and warm, soapy water. Rinse and
dry.
✉
2. Remove any splashes or stains on the inside surfaces or on the roller ring with
a soapy cloth. Rinse and dry.
✉
3. To loosen hardened food particles and remove smells, place a cup of diluted
lemon juice on the turntable and heat for ten minutes at maximum power.
4. Wash the dishwasher-safe plate whenever necessary.
☛
DO NOT spill water in the vents. NEVER use any abrasive
products or chemical solvents.Take particular care when cleaning
the door seals to ensure that no particles:
• Accumulate
• Prevent the door from closing correctly
14
NEVER remove the outer casing from the oven. If the oven is
faulty and needs servicing or you are in doubt about its condition:
• Unplug it from the wall socket
• Contact the nearest after-sales service centre
If you wish to store your oven away temporarily, choose a dry,
dust-free place.
Reason: Dust and damp may adversely affect the working parts in
the oven.
This microwave oven is not intended for commercial use.
t~_^~nluTWY`Y[mniUGGwGX\GG{ SGkGY_SGYWW[GGYa\ZGwt
Technical Specifications
Note
SAMSUNG strives to improve its products at all times. Both the design
specifications and these user instructions are thus subject to change
without notice.
Model
MW87W
Power source
230V ~ 50 Hz
Power consumption
Microwave
1250 W
Output power
100 W / 850 W (IEC-705)
Operating frequency
2450 MHz
Magnetron
OM75P(31)
Cooling method
Cooling fan motor
Dimensions (W x H x D)
Outside
Oven cavity
489 x 275 x 401.5 mm
330 x 211 x 329 mm
Volume
23 liter
Weight
Net
13.5 kg approx
GB
15
t~_^~nluTWY`Y[mniUGGwGX]GG{ SGkGY_SGYWW[GGYa\ZGwt