1
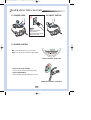
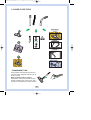
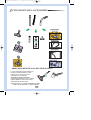
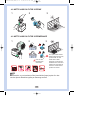
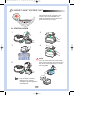
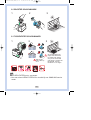
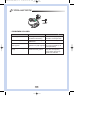
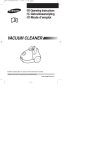
DJ68-00163D(3EA)-0.5
2/28/03 2:14 PM
EN
FR
NL
Page 2
Operating Instructions
Mode d’emploi
Gebruiksaanwijzing
VACUUM CLEANER
❈ Before operating
❈ Indoor use only.
this unit, please read the instructions carefully.
DJ68-00163D(3EA)-0.5
2/28/03 2:14 PM
Page 3
▼
1 ASSEMBLING THE CLEANER
Features may vary according to model.
For storage, park the floor nozzle.
EN-1
DJ68-00163D(3EA)-0.5
2/28/03 2:14 PM
Page 4
2 OPERATING THE CLEANER
2-1 POWER CORD
2-2 ON/OFF SWITCH
NOTE
When removing the
plug from the
electrical outlet,grasp the
plug,not the cord.
2-3 POWER CONTROL
MIN = For delicate fabrics, e.g. net curtains.
MAX = For hard floors and heavily soiled carpets.
BODY CONTROL TYPE ONLY
• SLIDE IN THE STOP POSITION
Vacuum-cleaner switches off (standby mode)
• SLIDE TOWARDS MAX
Suction capacity increases steplessly up to max.
HANDLE CONTROL TYPE ONLY
EN-2
DJ68-00163D(3EA)-0.5
2/28/03 2:14 PM
Page 5
2-4 USING FLOOR TOOLS
PARQUET SPECIALIST
OPTION
CREVICE
DUSTING
UPHOLSTERY
- TRANSPARENT TUBE
The transparent tube prevents the tube and
hose from being clogged by obstacle such as
socks and cloth.
When transparent tube is clogged.
Separate the nozzle from the tube. Remove
the alien substance with a stick from it. After
cleaning it, reassemble the nozzle to the tube.
EN-3
DJ68-00163D(3EA)-0.5
2/28/03 2:14 PM
Page 6
3 FILTER FULL INDICATOR
When the lamp is lighted,
check the grille (3-2) and intermediate filter
(3-3). And, clean those parts, according to
the following guide.
3-1 EMPYT THE DUST BIN
1
2
3
4
OPTIONAL
You can rinse the bin with water. Do not
immerse the whole cleaner in water.
Ensure completely dry before replacing.
5
NOTE : Empty the dust bin before it
is full in order to maintain the
best efficiency.
EN-4
DJ68-00163D(3EA)-0.5
2/28/03 2:14 PM
Page 7
3-2 CLEANING GLILLE
1
2
3
3-3 CLEANING THE HEPA FILTER
1
2
3
Wash the rubber
sealed side.
When filter is set to be
dried, make sure the
rubber sealed side down.
Make sure filter is completely dry before placing
back in the machine.
Allow 12 hours for it to dry.
NOTE
• A HEPA-FILTER is expendable.
• You can buy a HEPA-FILTER as a replacement part at authorized
samsung service center.
EN-5
DJ68-00163D(3EA)-0.5
2/28/03 2:14 PM
Page 8
4 OUTLET FILTER
- IF YOU HAVE A PROBLEM
PROBLEM
Motor dose not start.
Suction force is gradually
decreasing
Cord dose not rewind fully.
Vacuum cleaner won’t
pick up dirt
CAUSE
REMEDY 0
No power supply.
Thermal cut-out.
Nozzle, suction hose or tube
is blocked.
Check cable, plug and socket.
Leave to cool.
Romove the object.
Check that the cord is not
twisted or wound unevenly.
Pull the cord out 2-3m and
push down the cord rewind
button.
Crack or hole in hose.
Dust bin is not assembled
properly.
Check hose and replace it
if need.
Position it correctly and
lock in place.
EN-6
DJ68-00163D(3EA)-0.5
2/28/03 2:14 PM
Page 9
IMPORTANT SAFEGUARDS
1. Read all instructions carefully. Before switching on, make sure that the voltage of your
electricity supply is the same as that indicated on the rating plate on the bottom of the
cleaner.
2. WARNING: Do not use the vacuum cleaner when rug or floor is wet.
Do not use to suck up water.
3. Close supervision is necessary when any appliance is used by or near children. Do not
allow the vacuum cleaner to be used as a toy. Do not allow the vacuum cleaner to run
unattended at any time. Use the vacuum cleaner only for its intended use as described in
these instructions.
4. Do not use the vacuum cleaner without a dust bin. Empty the dust bin before it is full in
order to maintain the best efficiency.
5. Do not use the vacuum cleaner to pick up matches,live ashes or cigarette butts. Keep the
vacuum cleaner away from stoves and other heat sources. Heat can deform and discolour the plastic parts of the unit.
6. Avoid picking up hard,sharp objects with the vacuum cleaner as they may damage the
cleaner parts. Do not stand on the hose assembly. Do not put a weight on the hose. Do
not block the suction or the exhaustion part.
7. Switch the vacuum cleaner off at the machine before unplugging from the electrical outlet.
Grasp the plug to disconnect cord from the electrical outlet before changing the dust bag.
8. The plug must be removed from the socket out-let before cleaning or maintaining the
appliance.
9. The use of an extension cord is not recommended.
10. If your vacuum cleaner is not operating correctly,switch off the power supply and consult
an authorized service agent.
11. If the supply cord is damaged, it must be replaced by the manufacturer or its service
agent or a similarly qualified person in order to avoid a hazard.
This Vacuum cleaner is approved the following.
EMC Directive : 89/336/EEC , 92/31/EEC and 93/68/EEC
Low Voltage Safety Directive : 73/23/EEC and 93/68/EEC
EN-7
DJ68-00163A REV(0.0)
DJ68-00163D(3EA)-0.5
2/28/03 2:14 PM
Page 10
▼
1 ASSEMBLAGE DE L’ASPIRATEUR
Les fonctions peuvent varier selon les modèles.
Pour ranger l’aspirateur, fixer le
tube à l’endroit prévu à cet effet.
FR-1
DJ68-00163D(3EA)-0.5
2/28/03 2:14 PM
Page 11
2 UTILISATION DE L’ASPIRATEUR
2-1 CÂBLE
D'ALIMENTATION
2-2 INTERRUPTEUR
MARCHE/ARRÊT
REMARQUE
Lorsque vous débranchez votre aspirateur,
veillez à saisir la prise
et non le câble.
2-3 VARIATEUR DE PUISSANCE
MIN = tissus fragiles (rideaux, etc.).
MAX = sols à revêtement dur et tapis encrassés.
MODÈLE AVEC LA COMMANDE
SUR LE CORPS
• Glissière sur la position STOP
L’aspirateur s’arrête (mode veille).
• Glissière vers la position MAX
La puissance d’aspiration augmente progressivement.
MODÈLE AVEC LA COMMANDE
SUR LA POIGNÉÉ
FR-2
DJ68-00163D(3EA)-0.5
2/28/03 2:14 PM
Page 12
3 UTILISATION DES ACCESSOIRES
BROSSE SPECIALE PARQUET
EN OPTION
SUCEUR PLAT
BROSSE A MEUBLES
SUCEUR A COUSSINS
- SMART BRUSH ROTATIVE À 180° AVEC PIÈGE À OBJETS
Le tuyau transparent permet d'éviter que
le tuyau et la partie flexible ne soient
obstrués par un objet comme des
chaussettes ou un vêtement.
Si le piège à objets est obstrué :
Séparer la tête suceuse du tuyau. Enlever
l’objet indesirable. Après l'avoir nettoyé,
réassembler la tête et le tuyau.
NB) ATTENTION : LE PIEGE À OBJETS NE PEUT
ÊTRE UTILISÉ QU’AVEC LA SMART BRUSH
FR-3
DJ68-00163D(3EA)-0.5
2/28/03 2:14 PM
Page 13
4 ENTRETIEN DES FILTRES
Lorsque l’indicateur électronique de remplissage est allumé, verifier le niveau de
remplissage du bac à poussières ou le
niveau de saturation des différents filtres.
4-1 VIDER LE BAC À POUSSIÈRES
1
2
3
4
EN OPTION
Il est possible de laver le réceptacle à l'eau. Ne
pas immerger l'aspirateur entier sous l'eau.
S'assurer que le réceptacle est totalement sec
avant de le remettre en place.
5
NOTE : Videz le bac avant qu’il ne
soit complètement rempli afin
de garantir une puissance
d’aspiration optimale.
FR-4
DJ68-00163D(3EA)-0.5
2/28/03 2:14 PM
Page 14
4-2 NETTOYAGE DU FILTRE INTERNE
1
2
3
4-3 NETTOYAGE DU FILTRE INTERMÉDIAIRE
1
2
3
Laver le côté
hermétique en
caoutchouc.
Pour que le filtre intermédiaire (Hepa) soit bien sec,
penser à bien le faire
sécher des 2 côtés.
S'assurer que le filtre est
totalement sec avant de le
remettre en place dans la
machine. Le faire sécher
pendant 12 heures.
NOTE
Si nécessaire, on peut racheter le filtre intermédiaire (hepa) auprès d’un des
services pièces détachées agréés par Samsung services.
FR-5
DJ68-00163D(3EA)-0.5
2/28/03 2:14 PM
Page 15
4-4 FILTRE DE SORTIE
5 PROBLEMES ET SOLUTIONS
PROBLÈME
Le moteur ne démarre pas.
CAUSE
Abscence d’alimentation
électrique ou surchauffe du
moteur.
SOLUTION 0
Vérifier le cable d’alimentation, la prise et la fiche.
S’il y a surchauffe, laisser
refroidir le moteur.
La force d’aspiration diminue. Le filte, le bac, la brosse, ou
le tuyau sont obstrués.
Retirer l’objet en cause.
Le câble ne s'enroule pas
complètement.
Tirer la corde de 2-3m et
appuyer sur le bouton d’enroulement du câble.
Verifier que le câble n’est
pas emmêlé.
FR-6
DJ68-00163D(3EA)-0.5
2/28/03 2:14 PM
Page 16
PRÉCAUTIONS D’UTILISATION
1. Lisez attentivement toutes les instructions. Avant de mettre l’aspirateur en marche, vérifiez
que la tension du secteur est identique à celle indiquée sur la plaque signalétique située
sur le bas de l’appareil.
2. ATTENTION : N’utilisez pas l’aspirateur sur une moquette ou un sol humide.
N’utilisez pas l’aspirateur pour aspirer de l’eau ou liquides.
3. Si vos enfants utilisent ou se trouvent à proximité de l’aspirateur, surveillez-les attentivement car cet appareil n’est pas un jouet. Ne laissez à aucun moment l’appareil fonctionner sans surveillance. Utilisez-le uniquement dans le but pour lequel il a été conçu. Cet
appareil ne doit pas être utilisé sur les êtres humains.
4. N’utilisez pas l’appareil pour aspirer des allumettes, des cendres ou des mégots de cigarettes encore allumés. Évitez également de placer l’aspirateur à proximité d’une cuisinière
ou de toute autre source de chaleur susceptible de déformer et de décolorer les pièces
plastiques de l’unité principale.
5. Évitez d’aspirer des objets pointus ou tranchants, au risque de détériorer certaines pièces
de l’aspirateur. Ne marchez pas sur le tuyau flexible ou ses composants. Évitez également de placer un objet lourd sur le tuyau flexible. Ne bloquez pas les orifices d’aspiration
ou d’évacuation de l’air aspiré.
6. Avant tout débranchement de la prise électrique, mettez toujours l’aspirateur hors tension
à l’aide du bouton d’arrêt prévu à cet effet. Saisissez directement la fiche afin de ne pas
endommager le cordon, la fiche, les broches ou la prise. Ne tirez pas sur le cordon.
7. La prise doit être débranchée avant de procéder à des opérations de nettoyage ou de
réparation.
8. Évitez d’utiliser une rallonge.
9. N’essayez pas de remplacer un cordon d’alimentation endommagé car cette opération
délicate doit être exécutée uniquement par le fabricant ou un technicien qualifié.
10.Si le câble d’alimentation est endommagé, il doit etre remplacé par le fabricant, son service après vente ou une personne de qualification similaire afin d’éviter un danger.
11.Cet appareil est destiné à un usage domestique.
PRENEZ SOIN DE DÉPOSER L’EMBALLAGE DE VOTRE APPAREIL
DANS UN CENTRE DE RECYCLAGE DE TYPE
FR-7
DJ68-00163? REV(0.0)
DJ68-00163D(3EA)-0.5
2/28/03 2:14 PM
Page 17
▼
1 STOFZUIGER IN ELKAAR ZETTEN
De kenmerken kunnen per model verschillen.
Als u de stofzuiger na gebruik
wegzet, kunt u de buis met zuigmond op de stofzuiger bevestigen.
NL-1
DJ68-00163D(3EA)-0.5
2/28/03 2:14 PM
Page 18
2 GEBRUIK VAN DE STOFZUIGER
2-1 NETSNOER
2-2 AAN/UIT
SCHAKELAAR
NB
Houd de stekker vast als
u deze uit het stopcontact trekt,en niet het
snoer.
2-3 ZUIGKRACHTREGELING
MIN = Voor fijne stoffen, zoals gordijnen.
MAX = Voor harde vloeren of sterk bevuilde tapijten.
ALLEEN BIJ MODEL MET
BEDIENING OP DE STOZUIGER
• SCHUIFREGELAAR IN DE STAND STOP
De stofzuiger wordt uitgeschakeld (standby stand).
• SCHUIFREGELAAR IN DE STAND MAX
In deze stand wordt een zo groot mogelijke
zuigkracht gebruikt.
ALLEEN BIJ MODEL MET
HANDVATBEDIENING
NL-2
DJ68-00163D(3EA)-0.5
2/28/03 2:14 PM
Page 19
2-4 ACCESSOIRES GEBRUIKEN
PARKETSPECIALIST
OPTIE
KIERENZUIGER
`STOFZUIGMOND
MEUBELZUIGMOND
- DOORZICHTIGE BUIS
De doorzichtige buis voorkomt dat de buis en
de slang verstopt raken door bijvoorbeeld
sokken of andere kleine kledingstukken of
voorwerpen. Als de doorzichtige buis verstopt
is, haalt u de zuigmond van de buis af en
verwijdert u met een stokje het voorwerp dat
de verstopping veroorzaakt. Daarna zet u de
zuigmond terug op de buis.
NL-3
DJ68-00163D(3EA)-0.5
2/28/03 2:14 PM
Page 20
3 LAMPJE VOOR "FILTER VOL"
Als het lampje brandt, controleert u het
rooster (3-2) en het tussenfilter (3-3).
Maak de onderdelen schoon door de volgende instructies op te volgen.
3-1 STOFZAK LEGEN
1
2
3
4
OPTIE
U kunt de stofzak met water schoonmaken.
Houd nooit de stofzuiger zelf onder de kraan.
Zorg dat de stofzak goed droog is voordat u
hem terugplaatst.
5
NB : Leeg de stofzak voordat hij
helemaal vol is, zodat de
stofzuiger zo goed mogelijk zijn
werk blijft doen.
NL-4
DJ68-00163D(3EA)-0.5
2/28/03 2:14 PM
Page 21
3-2 ROOSTER SCHOONMAKEN
1
2
3
3-3 TUSSENFILTER SCHOONMAKEN
1
2
3
Was de kant
waar rubber op
zit af.
Zet het filter tijdens het
drogen met de kant met
het rubber naar omlaag.
Zorg ervoor dat het filter
goed droog is voordat u dit
terugplaatst. Laat het
tenminste 12 uur drogen.
NB
• Het HEPA-FILTER kunt u vervangen.
• Voor een nieuw HEPA-FILTER kunt u terecht bij een SAMSUNG service
center.
NL-5
DJ68-00163D(3EA)-0.5
2/28/03 2:14 PM
Page 22
4 UITBLAASFILTER
- PROBLEMEN OPLOSSEN
PROBLEEM
De stofzuiger doet niets.
Afnemende zuigkracht.
OORZAAK
Der er ingen strømforsyning.
Automatisk varmesikring
Zuigmond, buis of slang is
geblokkeerd.
OPLOSSING0 0
Kontroller kablet, stikproppen og
stikkontakten. Lad støvsugeren afkøle.
Verwijder het voorwerp.
Het snoer wordt niet helemaal opgerold.
Controleer of het snoer
Trek het snoer 2 tot 3 meter
gedraaid of ongelijk opgerold uit en druk nogmaals op de
is.
snoeropwindknop.
De stofzuiger neemt geen
stof op.
Scheur of gat in de slang.
Stofzak zit er niet goed in.
NL-6
Controleer de slang en vervang hem zonodig. Zorg
ervoor dat hij goed op zijn
plaats zit en vast klikt.
DJ68-00163D(3EA)-0.5
2/28/03 2:14 PM
Page 23
BELANGRIJKE VEILIGHEIDSINFORMATIE
1. Lees alle aanwijzingen zorgvuldig door. Voordat u de stofzuiger aanzet, moet u eerst controleren of de spanning van uw stroomvoorziening dezelfde is als de spanning die is vermeld op het typeplaatje aan de onderkant van de stofzuiger.
2. WAARSCHUWING: Gebruik de stofzuiger nooit op een nat tapijt of een natte vloer.
Zuig er nooit water of andere vloeistoffen met op.
3. Let goed op wanneer de stofzuiger door of in de buurt van kinderen gebruikt wordt.
De stofzuiger mag niet als speelgoed gebruikt worden. Laat de stofzuiger niet zonder
toezicht aanstaan. Gebruik de stofzuiger alleen zoals beschreven in deze gebruiksaanwijzing.
4. Gebruik de stofzuiger nooit zonder stofzak. Leeg de stofzak voordat hij helemaal vol is,
zodat de stofzuiger zo goed mogelijk zijn werk blijft doen.
5. Gebruik de stofzuiger nooit om lucifers, gloeiende as of sigarettenpeuken op te zuigen.
Houd de stofzuiger uit de buurt van kachels of andere warmtebronnen. De hitte kan
ervoor zorgen dat de plastic onderdelen van de stofzuiger vervormen of verkleuren.
6. Zuig nooit harde voorwerpen met scherpe randen op, want deze kunnen onderdelen van
de stofzuiger beschadigen. Ga niet op de slang staan en zet er geen voorwerpen op.
Blokkeer het zuig- en blaaselement niet.
7. Zet de stofzuiger uit voordat u de stekker uit het stopcontact trekt. Houd de stekker vast
wanneer u deze uit het stopcontact trekt, en niet het snoer.
8. Haal altijd de stekker uit het stopcontact voordat u de stofzak vervangt.
9. Het gebruik van een verlengsnoer wordt afgeraden.
10. Werkt uw stofzuiger niet goed, haal dan de stekker uit het stopcontact en neem contact
op met een erkend service center.
11. Probeer een beschadigd netsnoer niet zelf te vervangen. Alleen de fabrikant of gekwalificeerd onderhoudspersoneel mag de snoer vervangen. Trek niet aan het snoer.
Dit kan ernstige verwondingen veroorzaken.
Deze stofzuiger voldoet aan de volgende richtlijnen:
Richtlijn inzake EMC: 89/336/EEC , 92/31/EEC en 93/68/EEC
Richtlijn inzake Laagspanningsbeveiliging: 73/23/EEC en 93/68/EEC
NL-7
DJ68-00163D(3EA)-0.5
2/28/03 2:14 PM
Page 24
DJ68-00163D REV(0.5)