1
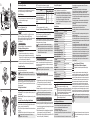
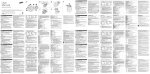
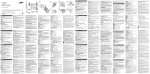
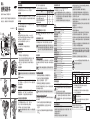
简体中文
镜头
使用本设备前
使用说明书
感谢您购买三星镜头。为在使用镜头时获得最佳性能,您必须保持相
机的固件最新。请访问 www.samsung.com 以下载固件。
特殊功能
NX 50-150mm F2.8 S ED OIS
此说明书专门为指导您了解镜头基本功能和特征而设计。
为保证安全、正确地使用,请仔细阅读此说明书。
AD68-08612A (1.1)
A
@
!
# 0
9
$
C
8
1
2
3
4
5
6
7
B
1
借助超快的 F2.8 最大光圈和相当于 35 mm 底片的 77–231 mm 对焦
范围,这款镜头非常适合拍摄运动、野生动物和人像摄影等多种用途。
拆开包装
三脚架插座套环
# 三脚架接口 $ 三脚架插座套环锁定旋钮
1卸下镜头盖、镜头接口盖和机身盖。
2让镜头上的红色标记对准相机机身上的红色标记。然后
如图所示旋转镜头,直到其锁定到位。(见图 B)
► 要
卸下镜头,按住镜头释放按钮,然后如图所示旋转镜头。
(见图 C)
旋转镜头上的变焦环设置相片的构图(镜头的焦距)。
更改焦距会造成对焦的轻微改变。建议拍照前重新调整对焦。
使用 i-Function
按下镜头上的 i-Function 按钮时,可以设置光圈值、曝光值、快门
速度、白平衡或 ISO。(见图 D-a)有关 i-Function 的更多信息,
请参阅相机说明书。
设置对焦方法
将镜头上的 AF/MF 开关置于 AF 或 MF。(见图 D-b)
自动对焦(AF):半按下 [快门] 时,对焦将会自动调整。
手动对焦(MF):可以通过旋转对焦圈来手动调整对焦。
G
H
NX10, NX5, NX11, NX100, NX200,
NX210, NX1000, NX1100, NX20,
NX mini 系列, Galaxy NX
NX300, NX300M, NX2000,
NX3000, NX30
使用光学图像稳定(OIS)功能
► 要安装镜头:
F
选项
FULL CUSTOM SET
各部位名称(见图 A)
使用变焦环
E
型号
* 对焦可在最小对焦距离和无限远之间调整。
** 对焦可在 2.4 m-无限远的范围内调整。
镜头
1 镜头遮光罩接口指示 2 对焦圈 3 i-Function 按钮
4 变焦环 5 脚架环锁定旋钮 6 脚架环 7 镜头连接指示
8 镜头触点 9 三脚架套环接口 0 OIS 开关
! 自定义对焦范围限制开关 @ AF/MF 开关
使用自定义对焦范围限制功能
可以通过设置对焦距离的范围来快速精确地调整对焦。将镜头上的自
定义对焦范围限制开关设置为一个选项。(见图 D-b)
FULL:对焦可在最小对焦距离和无限远之间调整。
CUSTOM:对焦可在您手动设置的范围内调整。
如果未设置对焦距离的范围,对焦将在 2.4 m-无限远的范围
内调整。
使用滤光镜(另购)
•• 请参阅下表以查看特定型号的可用选项。
镜头、镜头盖、镜头接口盖、遮光罩、三脚架插座套环、镜头包、
使用说明书(另购物品:滤光镜)
安装和卸下镜头
D
SET:可以手动设置对焦距离范围。
O
X*
X*
O
X**
X*
用户可使用 OIS 功能来减少相机的晃动。将镜头上的 OIS 开关置于
ON。(见图 D-b)
使用镜头遮光罩(见图 E)
若要避免影像画质因不必要的光线遮挡而变差,请使用镜头遮光罩。
在不使用镜头遮光罩时,可以将其反向安装到镜头上以便于存储。
在拍摄对象与相机之间距离较近的情况下使用闪光灯时,闪光
灯光线可能会被镜头或镜头遮光罩部分遮挡。为确保获得适当
的光照,请卸下镜头遮光罩或调整相机和拍摄对象之间的距
离。
使用三脚架
将三脚架连接至镜头
可以将三脚架直接连接至镜头上的三脚架套环接口上。如果将三脚架
连接至相机,相机和三脚架可能不平衡并会摔落。确保三脚架连接到
了镜头。
取决于三脚架,如果直接连接镜头,变焦环功能可能不起作
用。
连接至三脚架插座套环
1将三脚架插座套环装到镜头上的三脚架套环接口。
2按 LOCK 箭头的方向旋转三脚架插座套环锁
定旋钮,直至其锁定到位。(见图 F)
3将三脚架连接至三脚架插座套环上的三脚架接口。
要从镜头断开三脚架插座套环的连接,请按 LOCK 箭头的相反方向旋
转三脚架插座套环锁定旋钮。
确保在连接或断开连接三脚架插座套环时握住镜头和相机。
使用三脚架插座套环更改照片的构图
将三脚架连接至三脚架插座套环时,可以使用脚架环以轻松快捷地更
改照片的构图。
1按 LOCK 箭头的相反方向旋转以松开脚架环锁定旋钮。
2水平或垂直调整相机的位置,直至您已为照片构图。
(见图 G)
3按 LOCK 箭头的方向旋转脚架环锁定旋钮以将其锁定到位。
(见图 H)
将滤光镜连接在镜头上之前,请确保滤光镜与镜头兼容。
关于兼容的滤光片尺寸,请参考“规格”。
• 滤光镜是精密的光学设备。远离灰尘、污垢或刮痕。另外,
请勿尝试同时安装两个或更多滤光镜。否则可能会使图像质
量变差并导致虚光照(由于镜头的视角被隐藏,外围的图像
亮度或饱和度将会降低)。
• 如果使用广角镜头和较厚的滤光镜,影像可能会发暗。
规格
镜头名称
焦距
相当于 35 mm 的焦距
镜头结构-元件
镜头结构-组
ED 元件
XHR 元件
查看角度
最大光圈
最小光圈
光圈叶片数
最小焦距(广角)
最小焦距(长焦)
最大放大倍率
镜头遮光罩
光学图像稳定
接口类型
滤光片尺寸
最大直径
长度
重量
操作温度
操作湿度
NX 50-150mm F2.8 S ED OIS
50–150 mm
77–231 mm
20
13
4
1
31.4°–10.7°
F2.8
F22
9
0.7 m
0.98 m
0.13 X
附带
是
三星 NX 接口
72 mm
81 mm
154 mm
880 g
0–40 °C
5–85%
健康与安全信息
请仔细阅读下列安全注意事项以确保正确和安全使用。
• 不要通过镜头或相机看太阳。否则可能会严重损伤您的眼
睛。
警告 • 使您的镜头或相机远离儿童和宠物。
• 不要在未安装镜头盖的情况下,将镜头放在阳光直射的地
方。直射的阳光通过镜头后聚焦在易燃物上可能导致火灾。
注意 • 请仅使用坚固的三脚架。轻型或不稳定的三脚架可能会倒塌
并损坏相机。
镜头的存储和维护
• 请在干燥、通风的地方存放镜头。
• 请勿将镜头存放在温度或湿度过高的区域,或者放置于壁橱、车辆或
存放化学品的密闭区域。
• 请勿将镜头放在水中。
• 镜头未完全密封,避免在多尘的区域取下或更换镜头。
• 镜头无法绝对防水或防尘,它仅设计为抵抗大颗粒灰尘和细微的溅
水,故不建议在恶劣的条件下使用。
• 不要使用任何化学药品如稀释剂、酒精或苯擦拭灰尘。
• 小心不要掉落镜头或受到其他物体的撞击。镜头是精密光学设备。
• 避免在温度频繁变化的地方使用镜头。将镜头放在塑料袋或相机包,
防止镜头内外会产生水珠。
• 携带或不使用镜头时,请在镜头上装上镜头盖或镜头接口盖,以免镜
头被异物污染或被划伤。
• 不要把没带镜头盖的相机或镜头放在三脚架上。相机或镜头内部可能
被阳光直射损坏。
• 为保持镜头性能,每一年或两年检查一次。
• 不要对镜头前面施加外力。
• 为了安全地使用镜头,请在相机电源关闭的状态下安装或拆卸镜头。
• 对于使用其他公司镜头造成的任何损坏,三星不承担任何责任。
• 在安装镜头时,确保仅在清洁的环境更换镜头并且不要将手指伸到镜
头接口中。如果有异物进入相机机身或镜头,可能会影响拍摄效果或
导致故障。
• 在安装镜头时,请勿握住相机机身。否则可能导致相机或镜头接口损
坏。携带装置时,确保您握着镜头和相机。
• 为减少可能进入镜头的灰尘或湿汽量,镜头接口装上了橡胶密封圈。
如果密封圈损坏或磨损,请联系三星服务中心以进行更换(可能需要
收费)。橡胶密封圈及其接触表面可能发生磨损。这不会影响相机的
使用寿命或性能。
• 使用三脚架时,调整三脚架位置以避免镜头与三脚架接触。
PlanetFirst 体现三星通过生态导向业务与管理活动,对于
持续发展与社会责任的承诺。
产品中有害物质的名称及其含量
有害物质
铅
汞
镉
六价铬 多溴联苯 多溴二苯醚
(Pb) (Hg) (Cd) (Cr6+) (PBB)
(PBDE)
镜头/LENS ×
○
○
○
○
○
本表格依据 SJ/T 11364 的规定编制
○: 表
示该有害物质在该部件所有均质材料中的含量均在
GB/T 26572 规定的限量要求以下。
×: 表
示该有害物质至少在该部件的某一均质材料中的含量超出
GB/T 26572 规定的限量要求。
□ 产品名: 镜头(Lens)
□ 环保使用期限:10年
- 只
有按照本产品使用说明书中的方法正常使用时,环
保使用期限才能有效
部件名称
中国制造 天津三星光电子有限公司
中国 天津津港公路微电子工业区张衡道9号
保留备用
A
@
!
# 0
9
$
C
8
English
B
Before Using This Device
Thank you for purchasing the Samsung Lens. For best performance
when using this lens, you must keep the camera′s firmware up-todate. Visit www.samsung.com to download the firmware.
1
2
3
4
5
6
7
1
Special Features
With an ultra-fast F2.8 maximum aperture and 35 mm equivalent
77–231 mm focal range the lens is suitable for multiple uses, such as
sport, wildlife and portrait photography.
Unpacking
Lens, Lens cap, Lens mount cover, Hood, Tripod mount collar, Case,
User manual (Optional Item: Filter)
Layouts (See illustration A)
D
The lens
1 Lens hood mount index 2 Focus ring 3 i-Function button
4 Zoom ring 5 Tripod ring locking dial 6 Tripod ring
7 Lens mount index 8 Lens contacts 9 Tripod collar connection
0 OIS switch ! Custom Focus Range Limiter switch
@ AF/MF switch
The tripod mount collar
# Tripod connection $ Tripod mount collar lock dial
Attaching and Removing the Lens
► To attach the lens,
1 Remove the lens cap, lens mount cover, and body cap.
2 Align the red mark on the lens with the red mark on the
E
F
camera body. Then, rotate the lens as shown in the illustration
until it locks into place. (See illustration B)
► To remove the lens, press and hold the lens release button, and then
rotate the lens as shown in the illustration. (See illustration C)
Using the Zoom Ring
Set the composition of the photo (the focal distance of the lens) by
rotating the zoom ring on the lens.
When you use the zoom function, focus can be slightly
changed. Adjust the focus again before you capture a photo.
Using i-Function
When you press the i-Function button on the lens, you can set the
aperture value, exposure value, shutter speed, white balance, or ISO.
(See illustration D-a) For more information about i-Function, refer to
the camera manual.
G
H
Setting the Focus Method
Set the AF/MF switch on the lens to AF or MF. (See illustration D-b)
Auto Focus (AF): The focus is adjusted automatically when you halfpress [Shutter].
Manual Focus (MF): The focus can be adjusted manually by rotating
the focus ring.
Using the Custom Focus Range Limiter Function
You can adjust the focus quickly and precisely by setting the range for
the focus distance. Set the Custom Focus Range Limiter switch on
the lens to an option. (See illustration D-b)
FULL: The focus is adjusted to between the minimum focus distance
and infinity.
CUSTOM: The focus is adjusted within the range you set manually.
If a range for the focus distance is not set, the focus is
adjusted to within 2.4 m-infinity.
SET: You can set the focus distance range manually.
•See the table below to view the options available for specific models.
Model
NX10, NX5, NX11, NX100, NX200,
NX210, NX1000, NX1100, NX20,
NX mini series, Galaxy NX
NX300, NX300M, NX2000, NX3000,
NX30
FULL
Option
CUSTOM
SET
O
X*
X*
O
X**
X*
* The focus is adjusted to between the minimum focus distance and
infinity.
** The focus is adjusted to within 2.4 m-infinity.
Using the Optical Image Stabilization (OIS) Function
The user can minimize the shaking of camera by using the OIS function.
Set the OIS switch on the lens to ON. (See illustration D-b)
Using a Lens Hood (See illustration E)
To prevent deterioration of image quality by blocking out unnecessary
light, use a lens hood. When you are not using the lens hood it can be
reverse-mounted on the lens for storage.
When you use a flash in situations where the distance
between the subject and the camera is close, the flash light
may be partially blocked by the lens or a lens hood. To ensure
proper lighting, remove the lens hood or adjust the distance
between the camera and subjects.
Using a Tripod
Connecting the tripod to the lens
You can connect the tripod directly to the tripod collar connection on
the lens. If you connect the tripod to the camera, the camera and
the tripod may be unbalanced and can fall. Ensure that the tripod is
connected to the lens.
Depending on the tripod, if you connect the lens to it directly,
the zoom ring function may not be available.
Connecting to the tripod mount collar
1 Attach the tripod mount collar to the tripod collar connection
on the lens.
2 Rotate the tripod mount collar lock dial in the direction of the
LOCK arrow until it locks in place. (See illustration F)
3 Connect the tripod to the tripod connection on the tripod
mount collar.
To disconnect the tripod mount collar from the lens, rotate the tripod
mount collar lock dial in the opposite direction of the LOCK arrow.
Ensure that you hold the lens and the camera when
connecting or disconnecting the tripod mount collar.
Changing the photo′s composition using the tripod
mount collar
When you connect the tripod to the tripod mount collar, you can use
the tripod ring to quickly and easily change the photo′s composition.
1 Loosen the tripod ring locking dial by rotating it in the opposite
direction of the LOCK arrow.
2 Adjust the camera′s position, horizontally and vertically, until
you have composed your photo. (See illustration G)
3 Rotate the tripod ring locking dial in the direction of the LOCK
arrow to lock it in place. (See illustration H)
Using a Filter (optional)
Before putting a filter on the lens, make sure it is compatible.
Refer to "Specifications" for compatible filter size.
•A filter is a precise optical product. Keep away from dust, dirt,
or scratches. Also, do not try to mount two or more filters at the
same time. Doing so may deteriorate the image quality and cause
vignetting (a reduction of an image′s brightness or saturation at
the periphery as the viewing angle of the lens is hidden).
•In case of a thick framed filter, the vignetting can occur with a
wide-angle lens.
Specifications
Lens Name
Focal Length
Focal Length in 35 mm Equivalent
Lens Construction-Elements
Lens Construction-Groups
ED Elements
XHR Elements
Angle of View
Maximum Aperture
Minimum Aperture
Number of Diaphragm Blades
Minimum Focus Distance (Wide)
Minimum Focus Distance (Tele)
Maximum Magnification
Lens Hood
Optical Image Stabilizer
Mount Type
Filter Size
Max. Diameter
Length
Weight
Operating Temperature
Operating Humidity
NX 50-150mm F2.8 S ED OIS
50–150 mm
77–231 mm
20
13
4
1
31.4°–10.7°
F2.8
F22
9
0.7 m
0.98 m
0.13 X
Included
Yes
Samsung NX mount
72 mm
81 mm
154 mm
880 g
0–40 °C
5–85 %
Health and Safety Information
Please read the following safety tips carefully for proper and safe use.
•Do not stare at the sun through the lens or camera.
This may cause severe damage to your eyes.
Warning •Keep your lens or camera away from small children and pets.
•Do not store the lens in direct sunlight without the lens cap.
Direct sunlight that passes through the lens may combust if
it comes into contact with flammable materials.
Caution •Use only sturdy tripods. Lightweight or unstable tripods may
fall over and damage the camera.
•Do not drop the lens or apply excessive shock to it. The lens is a
precise optical product.
•Avoid using the lens anywhere there is a sudden temperature
change. Keep the lens in a plastic bag or a camera case to prevent
condensation from forming on the inside or outside of the lens.
•When carrying or not using the lens, place the lens cap and lens mount
cover on the lens to prevent contamination from foreign particles and
protect the lens from scratches.
•Do not keep the camera or the lens mounted on a tripod without the
lens cap. The inside of the camera or the lens can be damaged by
direct sunlight.
•Check the lens once every year or two for best performance.
•Do not apply excessive force to the front of the lens.
•For safe use of the lens, mount or dismount the lens while the camera
is turned off.
•Samsung is not responsible for any damage incurred by using other
manufacturers’ lenses.
•Make sure to change lenses only in a clean environment and do not
put your fingers into the lens mount when mounting the lens. Foreign
particles may affect shooting results or cause a malfunction if they enter
the camera body or the lens.
•Do not hold the camera body when the lens is attached. Doing so may
cause damage to the camera or the lens mount. Ensure that you hold
the lens and the camera when you are carrying the equipment.
•To reduce the amount of dust or moisture that can enter the lens, the lens
mount is fitted with a rubber seal. If the seal is damaged or worn, contact
a Samsung service center to have it replaced (charges may apply). The
rubber seal and the surfaces it contacts may experience wear and tear.
This should not affect your camera′s lifespan or performance.
•When using a tripod, position the tripod to avoid contact between the
lens and the tripod.
Correct Disposal of This Product
(Waste Electrical & Electronic Equipment)
(Applicable in countries with separate collection systems)
This marking on the product, accessories or literature indicates that the
product and its electronic accessories (e.g. charger, headset, USB cable)
should not be disposed of with other household waste at the end of their
working life. To prevent possible harm to the environment or human health
from uncontrolled waste disposal, please separate these items from other
types of waste and recycle them responsibly to promote the sustainable
reuse of material resources. Household users should contact either the
retailer where they purchased this product, or their local government office,
for details of where and how they can take these items for environmentally
safe recycling. Business users should contact their supplier and check the
terms and conditions of the purchase contract. This product and its electronic
accessories should not be mixed with other commercial wastes for disposal.
PlanetFirst represents Samsung Electronics' commitment
to the sustainable development and social responsibility
through eco-driven business and management activities.
Lens Storage and Maintenance
•Store the lens in dry and well ventilated areas.
•Do not store the lens in areas of high temperature or humidity or in a
closet, car, or confined area where chemicals are stored.
•Do not expose the lens to water.
•Avoid removing or changing the lens in dusty areas.
•The lens is not water or dust proof. Exposure to severe conditions is not
recommended.
•Do not use chemicals such as thinner, alcohol, or benzene to remove dust.
Please refer to the warranty that came with your product or
visit our website www.samsung.com for after-sales service
or inquiries.