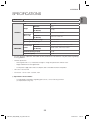
1
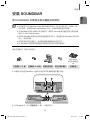
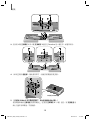
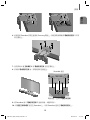
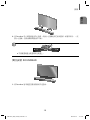
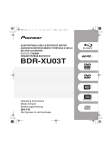
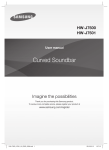
HW-J7501 User manual Curved Soundbar Imagine the possibilities Thank you for purchasing this Samsung product. To receive more complete service, please register your product at www.samsung.com/register HW-J7501_ZW_ENG(B_XU)_0313.indd 1 2015-03-19 2:35:04 GETTING STARTED GETTING STARTED FEATURES Streaming Music Services USB Host Support The Curved Soundbar makes diving into all your favourite music easier than ever before, thanks to its Wi-Fi capabilities. Simply access the Samsung Multiroom App to experience the best of the internet’s subscription streaming music services. You can connect and play music files from external USB storage devices such as MP3 players, USB flash memory, etc. using the Soundbar's USB HOST function. Surround Sound Expansion You can connect a Bluetooth device to the Soundbar and enjoy music with high quality stereo sound, all without wires! The Surround Sound Expansion feature adds depth and spaciousness to your listening experience. TV SoundConnect Connect your TV and Soundbar easily through Bluetooth with TV Sound Connect. The absence of trailing wires between the Soundbar and TV allows you to showcase the slim and sleek design of both systems, while maintaining a clean look in your living environment. Easily control the Soundbar and TV from a single TV remote. Bluetooth Function LICENCES Manufactured under Licence from Dolby Laboratories. Dolby and the double-D symbol are trademarks of Dolby Laboratories. Music Source Sharing (= Multiroom Play) Controlling and sharing one music source across multiple audio devices in various locations is made easy with Multiroom Link. The mobile app remotely controls volume and music on your system across different devices, including your TV, Soundbar, Home Entertainment System and Blu-ray Disc Player. Enjoy the audio you want, where you want. HDMI HDMI transmits video and audio signals simultaneously, and provides a clearer picture. The unit is also equipped with the ARC function which lets you listen to sound from your TV through the Soundbar via an HDMI cable. This function is only available if you connect the unit to an ARC compliant TV. For DTS patents, see http://patents.dts.com. Manufactured under licence from DTS Licensing Limited. DTS, the Symbol, & DTS and the Symbol together are registered trademarks, and DTS 2.0 Channel is a trademark of DTS, Inc. © DTS, Inc. All Rights Reserved. The terms HDMI and HDMI High-Definition Multimedia Interface, and the HDMI Logo are trademarks or registered trademarks of HDMI Licensing LLC in the United States and other countries. 2 HW-J7500_J7501_XU_ENG_0304- Basic.indd 2 2015-03-19 2:32:47 GETTING STARTED SAFETY INFORMATION TO REDUCE THE RISK OF ELECTRIC SHOCK, DO NOT REMOVE THE COVER (OR BACK). NO USER-SERVICEABLE PARTS ARE INSIDE. REFER SERVICING TO QUALIFIED SERVICE PERSONNEL. ENG SAFETY WARNINGS This symbol indicates “dangerous voltage” inside the product that presents a risk of electric shock or personal injury. CAUTION RISK OF ELECTRIC SHOCK DO NOT OPEN This symbol indicates important instructions accompanying the product. WARNING : To reduce the risk of fire or electric shock, do not expose this appliance to rain or moisture. CAUTION : TO PREVENT ELECTRIC SHOCK, MATCH WIDE BLADE OF PLUG TO WIDE SLOT, FULLY INSERT. • This apparatus shall always be connected to a AC outlet with a protective grounding connection. • To disconnect the apparatus from the mains, the plug must be pulled out from the mains socket, therefore the mains plug shall be readily operable. CAUTION • Do not expose this apparatus to dripping or splashing. Do not put objects filled with liquids, such as vases on the apparatus. • To turn this apparatus off completely, you must pull the power plug out of the wall socket. Consequently, the power plug must be easily and readily accessible at all times. 3 HW-J7501_ZW_ENG(B_XU)_0313.indd 3 2015-03-19 2:35:13 GETTING STARTED PRECAUTIONS 68.6 mm 99.1mm 99.1mm 99.1mm Ensure that the AC power supply in your house complies with the power requirements listed on the identification sticker located on the back of your product. Install your product horizontally, on a suitable base (furniture), with enough space around it for ventilation (7~10 cm). Make sure the ventilation slots are not covered. Do not place the unit on amplifiers or other equipment which may become hot. This unit is designed for continuous use. To fully turn off the unit, disconnect the AC plug from the wall outlet. Unplug the unit if you intend to leave it unused for a long period of time. During thunderstorms thunderstorms, disconnect the AC plug from the wall outlet. Voltage peaks due to lightning could damage the unit. Do not expose the unit to direct sunlight or oth other heat sources. This could lead to overheating and cause the unit to malfunction. Protect the product from moisture (i.e. vases), and excess heat (e.g. a fireplace) or equipment creating strong magnetic or electric fields. Disconnect the power cable from the AC supply if the unit malfunctions. Your product is not intended for industrial use. It is for personal use only. Condensation may occur if your product has been stored in cold temperatures. If transporting the unit during the winter, wait approximately 2 hours until the unit has reached room temperature before using. The batteries used with this product contain chemicals that are harmful to the environment. Do not dispose of batteries in the general household trash. Do not dispose of batteries in a fire. Do not short circuit, disassemble, or overheat the batteries. There is a danger of explosion if the battery is incorrectly replaced. Replace only with the same or equivalent type. WARNING, DO NOT INGEST BATTERY, CHEMICAL BURN HAZARD, The remote control supplied with this product contains a coin/button cell battery. If the coin/button cell battery is swallowed, it can cause severe internal burns in just 2 hours and can lead to death. Keep new and used batteries away from children. If the battery compartment does not close securely, stop using the product and keep it away from children. If you think batteries might have been swallowed or placed inside any part of the body, seek immediate medical attention. 4 HW-J7500_J7501_XU_ENG_0304- Basic.indd 4 2015-03-19 2:32:47 GETTING STARTED CONTENTS ENG 2 GETTING STARTED 25 FUNCTIONS 2 Features 25 Input Mode 3 Safety Information 26 Bluetooth 6 What’s Included 28 Using the Network Standby On Function 7 DESCRIPTIONS 28 Using the Multiroom Link 7 Top / Front Panel 30 Software Update 8 Rear / Bottom Panel 9 Remote Control 32 TROUBLESHOOTING 32 Troubleshooting 11 INSTALLATION 11 Installing Soundbar 11 Installing both Soundbar and TV to the Wall Mount Type 14 Installing Soundbar to TV Stand 15 Installing Soundbar to Free-Standing 16 Assembling the Clamp-Wire 16 Mounting the Cover-Foot onto Subwoofer 33 APPENDIX 33 Specifications Figures and illustrations in this User Manual are provided for reference only and may differ from actual product appearance. 17 CONNECTIONS 17 Connecting the Subwoofer 19 Connecting to a TV 19 Connections with TV Using HDMI (Digital) Cable 19 Connections with TV Using Optical (Digital) Cable 20 TV SoundConnect 22 Connections with External Device 22 HDMI Cable 22 Optical or AUX Cable 23 USB 5 HW-J7501_ZW_ENG(B_XU)_0313.indd 5 2015-03-19 2:35:13 GETTING STARTED WHAT’S INCLUDED BEFORE READING THE USER’S MANUAL Note the following terms before reading the user manual. + Icons used in this manual Icon Term Caution Note Definition Indicates a situation where a function does not operate or settings may be cancelled. Indicates tips or instructions on the page that help you operate a function. Check for the supplied accessories shown below. Main Unit Remote Control / Lithium Battery (3V : CR2032) Power Cord DC Adapter HDMI Cable USB Cable USB Converter Clamp-Wire User Manual Holder-Mount TV-Mount Holder-Screw 1 : 4EA Holder-Screw 2 : 10EA Holder-Fix Mount Holder-Foot : 3EA Subwoofer Power Cord Cover-Foot : 4EA Screw-Taptite : 4EA Foot Rubber : 4EA ● The appearance of the accessories may differ slightly from the illustrations above. ● Use the dedicated USB cable to connect external USB devices to the unit. 6 HW-J7501_ZW_ENG(B_XU)_0313.indd 6 2015-03-19 2:35:13 DESCRIPTIONS DESCRIPTIONS TOP / FRONT PANEL Controls the volume level. The numeric value of the volume level appears in the front panel display. (Power) Button Turns the power on and off. ENG VOL. - / + (Source) Button Display Selects the D.IN, AUX, HDMI, BT, TV, or USB input. Displays the current mode. ● While the unit is powered on, pressing (Source) button for more than the 3 seconds sets the button to act as (Mute) button. To cancel the the (Mute) button setup, press the (Source) button for more than 3 seconds again. ● To clean this apparatus, unplug the power cord from the wall outlet and wipe the product using a soft, dry cloth. Due to aluminum being a positive electrostatic material, static discharge may occur. ● When you plug in the AC cord, the power key will work in 4 to 6 seconds. ● When you turn on this unit, there will be a 4 to 5 second delay before it produces sound. ● If you want to enjoy the sound only from the Soundbar, you must turn off the TV's speakers in the Audio Setup menu of your TV. Refer to the owner's manual supplied with your TV. 7 HW-J7500_J7501_XU_ENG_0304- Basic.indd 7 2015-03-19 2:32:52 DESCRIPTIONS REAR / BOTTOM PANEL OPTICAL IN (D.IN) Connect to the digital (optical) output of an external device. HDMI OUT (TV-ARC) Outputs digital video and audio signals simultaneously using an HDMI cable. HDMI IN Inputs digital video and audio signals simultaneously using an HDMI cable. Use when connecting a supported external device. LAN Lets you connect to a network using a LAN cable. AUX IN AUX IN LAN HDMI IN HDMI OUT OPTICAL IN (TV-ARC) Connect to the Analogue output of an external device. DC 24V Wi-Fi SETUP SPK ADD 5V 0.5A LABEL 5V 0.5A Wi-Fi SETUP SPK ADD DC 24V Wi-Fi SETUP Press this button to connect your Soundbar to your network using Wi-Fi setup. SPK ADD Press the button to connect Soundbar to the HUB. (not supplied) DC 24V (Power Supply In) Connect the DC power adaptor to the power supply jack, and then connect the AC power adaptor plug to a wall outlet. (USB Port) Connect USB devices here to play files on the devices. ● When disconnecting the power cable of the AC power adaptor from a wall outlet, pull the plug. Do not pull the cable. ● Do not connect this unit or other components to an AC outlet until all connections between components are complete. 8 HW-J7500_J7501_XU_ENG_0304- Basic.indd 8 2015-03-19 2:33:00 DESCRIPTIONS REMOTE CONTROL ENG SOURCE Press to select a source connected to the Soundbar. Mute You can turn the volume down to 0 with the push of a button. Press again to restore the sound to the previous volume level. Repeat Press to set the Repeat function during music playback from a USB device. OFF - REPEAT : Cancells Repeat Playback. TRACK - REPEAT : Repeatedly play a track. ALL - REPEAT : Repeatedly play all tracks. RANDOM - REPEAT : Plays tracks in random order. (A track that has already been played may be played again.) Skip Forward If there is more than one file on the device you are playing, and you press the $ button, the next file is selected. SOUND CONTROL (*Use the #,$ buttons to adjust level.) Press to select TREBLE, BASS, or AUDIO SYNC. Then, use the #,$ buttons to adjust the Treble, Bass volume from -3 to +3. Press and hold the SOUND CONTROL button for about 5 seconds to adjust the sound for each frequency band. 150Hz, 300Hz, 600Hz, 1.2KHz, 2.5KHz, 5KHz, and 10KHz are selectable and each can be adjusted to a setting between -6 and +6. If the Soundbar is connected to a digital TV and the video appears out of sync with the audio, press the SOUND CONTROL button to sync the audio with the video. Use the #,$ buttons to set the audio delay between 0 ms and 300 ms. In USB mode, TV mode, and BT mode, the Audio Sync function may not available. Anynet+ Press the Anynet+ button to turn the Anynet+ function on or off. (Default : Auto Power Link OFF, ON - ANYNET+ / OFF - POWER LINK or OFF - ANYNET+ / ON - POWER LINK). The Anynet+ function lets you control the Soundbar with the remote from an Anynet+ compatible Samsung TV. The Soundbar must be connected to the TV via an HDMI cable. * Auto Power Link Synchronizes the Soundbar to a connected Optical source via the Optical jack so it turns on automatically when you turn on your TV. (See page 20) You can also activate Wi-Fi SETUP function by pressing and holding Anynet+ button on the remote for over 7 seconds. ● Soundbar is a Samsung proprietary name. ● Operate the TV using the TV's remote control. 9 HW-J7500_J7501_XU_ENG_0304- Basic.indd 9 2015-03-19 2:33:02 DESCRIPTIONS Power Turns the Soundbar on and off. Volume Adjusts the volume level of the unit. Play / Pause Press the & button to pause the playing of a file temporarily. Press the & button again to play the selected file. Skip Back If there is more than one file on the device you are playing, and you press the # button, the previous file is selected. SOUND EFFECT You can select the sound modes - STANDARD (Original Sound), MUSIC, VOICE, SPORTS, CINEMA, and NIGHT MODE - depending on the content you want to listen to. Select the STANDARD mode if you want to enjoy the original sound. SOUND Surr.Sound adds depth and spaciousness to the sound. Pressing the SOUND button repeatedly cycles through the Surr.Sound settings : ON - SURROUND SOUND, OFF - SURROUND SOUND STREAMING MUSIC Press STREAMING MUSIC button to listen to an Internet radio station. Each time you press this button, the Soundbar switches to the next default station, cycling through the 3 default stations. To use the STREAMING MUSIC function, the soundbar must be connected to the network. (See page 28) DRC (Dynamic Range Control) * Lets you apply dynamic range control to Dolby Digital, Dolby Digital Plus, and Dolby TrueHD audio. Press and hold the STREAMING MUSIC button, then the DRC (Dynamic Range Control) function toggles between ON and OFF. WOOFER (* Use the #,$ buttons to adjust woofer volume.) Press the WOOFER button. Then, use the #,$ buttons to adjust Subwoofer volume from -12, -6 to +6. You can also activate SPK ADD function of the soundbar by pressing and holding WOOFER button of the remote for over 5 seconds. INSTALLING THE BATTERY IN THE REMOTE CONTROL 1. Use a suitable coin to turn the remote control's battery cover counterclockwise to remove it as shown in the figure above. 2. Insert a 3V lithium battery. Keep the positive (+) pole facing up when inserting the battery. Put the battery cover on and align the '●' marks side by side as shown in the figure above. 3. Use a suitable coin to turn the remote control battery cover clockwise as far as it will go to fix it in place. 10 HW-J7500_J7501_XU_ENG_0304- Basic.indd 10 2015-03-19 2:33:03 INSTALLATION INSTALLATION INSTALLING SOUNDBAR ENG INSTALLING BOTH SOUNDBAR AND TV TO THE WALL MOUNT TYPE ● This model corresponds to the 2015 Samsung curved TV S8500/S9000 - 55"/65", S9500 - 65". Please refer to the home page of Samsung Electronics to see the detail list of corresponding models. ● When mounting the Soundbar to a JS9500 series TV, use the 1.6” Cover-Distance which is included in the Samsung Mini Wall Mount set. ● To mount both of a soundbar and the TV using the wall mount, make sure to mount the soundbar onto the TV first, then mount the TV. ● To mount the TV on the wall, refer to the user’s manual enclosed with the TV you purchased. ● This Soundbar cannot be installed to a non-compatible TV, in either form of TV mount or TV stand. Check for the supplied accessories shown below. Used for S9500, 65” TV model Holder-Screw 1 : 4EA Holder-Screw 2 : 10EA TV-Mount Holder-Fix Mount Holder-Mount AUX IN LAN HDMI IN HDMI OUT OPTICAL IN (TV-ARC) 1. Place the Soundbar as shown in the illustration, ensuring that none of the buttons touch the surface it is lying on. DC 24V Wi-Fi SETUP SPK ADD AUX IN LAN HDMI IN HDMI OUT OPTICAL IN (TV-ARC) 5V 0.5A DC 24V Wi-Fi SETUP SPK ADD 5V 0.5A 2. Remove Holder-Support (2EA) from the Soundbar as shown in the illustration. 11 HW-J7500_J7501_XU_ENG_0304- Basic.indd 11 2015-03-19 2:33:04 AUX IN LAN HDMI IN HDMI OUT OPTICAL IN (TV-ARC) INSTALLATION DC 24V Wi-Fi SETUP SPK ADD AUX IN LAN HDMI IN HDMI OUT OPTICAL IN (TV-ARC) 5V 0.5A DC 24V Wi-Fi SETUP SPK ADD 5V 0.5A AUX IN LAN HDMI IN HDMI OUT OPTICAL IN (TV-ARC) AUX IN LAN HDMI IN HDMI OUT OPTICAL IN (TV-ARC) 3. Fasten the four Holder-Screws 1 and four of the Holder-Screws 2 to the four holes in the Soundbar, as shown in the illustration. DC 24V Wi-Fi SETUP SPK ADD 5V 0.5A 4. If the Holder-Foot is attached, remove it first to install the TV-Mount. TV 65” S9500 TV 5. (When mounting to a S9500, 65” TV model. For other models, skip this step.) Seat the Holder-Mount onto the TV using the TV’s guide, fix it by fastening Holder-Screw 2 (4EA). Carefully align the Holder-Mount’s hole centred on the TV, not to place it one-sided. 12 HW-J7500_J7501_XU_ENG_0304- Basic.indd 12 2015-03-19 2:33:09 INSTALLATION ENG 65” S9500 TV 6. If you mount the Soundbar on a matched Samsung TV, use the Guide on TV to put the TV-Mount on TV securely. 7. Fasten the TV-Mount to the TV using the remaining 4 Holder-Screws 2. 8. After attaching the TV-Mount, mount the TV on the wall. Soundbar base TV base, with TV-Mount attached 9. Push the Soundbar onto the TV-Mount as far as it will go, as shown in the illustration. 10. Fasten the Holder-Fix Mount to the Soundbar to fix the Soundbar to the TV-Mount. 13 HW-J7500_J7501_XU_ENG_0304- Basic.indd 13 2015-03-19 2:33:18 INSTALLATION INSTALLING SOUNDBAR TO TV STAND You can install Soundbar to TV stand if you have Soundbar matching TV with this model. Check for the supplied accessories shown below. Holder-Foot : 3EA Holder-Screw 2 : 3EA AUX IN LAN HDMI IN HDMI OUT OPTICAL IN (TV-ARC) 2 Wi Fi SETUP SP AUX IN LAN HDMI IN HDMI OUT OPTICAL IN (TV-ARC) 1 DC 24V Wi-Fi SETUP SPK ADD 5V 0.5A AUX IN LAN HDMI IN HDMI OUT OPTICAL IN (TV-ARC) 1. Place the Soundbar as shown in the illustration, ensuring that none of the buttons touch the surface it is lying on. 2. Fix Holder-Foot (3EA) and Holder-Screw 2 (3EA) to the Soundbar as shown in the illustration. DC 24V Wi-Fi SETUP SPK ADD AUX IN LAN HDMI IN HDMI OUT OPTICAL IN (TV-ARC) 5V 0.5A DC 24V Wi-Fi SETUP SPK ADD 5V 0.5A 3. Remove Holder-Support (2EA) from the Soundbar as shown in the illustration. 14 HW-J7500_J7501_XU_ENG_0304- Basic.indd 14 2015-03-19 2:33:20 INSTALLATION ENG 4. Align the Soundbar’s centre with the centre of the base of the TV, and then carefully push it onto the stand as far as it will go, as shown in the illustration. Be careful not to unbalance the TV. ● Do not place a heavy thing or step on the main unit. INSTALLING SOUNDBAR TO FREE-STANDING 1. Centre the Soundbar on the flat area in front of the TV. 15 HW-J7500_J7501_XU_ENG_0304- Basic.indd 15 2015-03-19 2:33:27 INSTALLATION HDMI IN LAN Clamp-Wire AUX IN AUX IN LAN HDMI IN HDMI OUT (TV-ARC) HDMI OUT (TV-ARC) OPTICAL IN OPTICAL IN ASSEMBLING THE CLAMP-WIRE Attach the clamp-wire to the unit as shown, and then run the cables through the clamp-wire to keep them neat. MOUNTING THE COVER-FOOT ONTO SUBWOOFER PO WE R 1 2 3 1. Place each Cover-Foot on the 4 holes correspondingly as shown in the illustration. 2. Insert Screw-Taptite (4EA) into corresponding hole of Cover-Foot. 3. Block up the holes with Foot Rubber (4EA) to complete. 16 HW-J7500_J7501_XU_ENG_0304- Basic.indd 16 2015-03-19 2:33:28 CONNECTIONS CONNECTIONS ENG ● Do not connect the power cord of this product or your TV to a wall outlet until all connections between components are complete. ● Before moving or installing this product, be sure to turn off the power and disconnect the power cord. CONNECTING THE SUBWOOFER CONNECTING TO THE SUBWOOFER AUTOMATICALLY The main unit and subwoofer should link (connect wirelessly) automatically when the main unit and subwoofer are turned on. • If it is completely connected, the blue LED in the subwoofer stops blinking. CONNECTING TO THE SUBWOOFER MANUALLY The Subwoofer's linking ID is preset at the factory and the main unit and subwoofer should link (connect wirelessly) automatically when the main unit and subwoofer are turned on. If the Link indicator does not light when the main unit and subwoofer are turned on, please set the ID by following the procedure below. POWER 1. Plug the power cords of the main unit and subwoofer into an AC wall outlet. 2. Press the ID SET button on the back of the subwoofer with a small, pointed object for 5 seconds. • The STANDBY indicator is turned off and the LINK indicator (Blue LED) blinks quickly. 3. While the main unit is powered off (in STANDBY mode), press and hold the seconds. (Mute) on the remote control for 5 4. The ID SET message appears on the Soundbar's display. 5. To finalise the link, turn the main unit’s power on while the subwoofer’s Blue LED blinks. • The main unit and the subwoofer should now be linked (connected). • The Link indicator (Blue LED) on the subwoofer should be on. • If the Link indicator is not solid blue, the linking process has failed. Turn off the main unit and start again from Step 2. • You can enjoy better sound from the wireless subwoofer by selecting a Sound Effect. (See page 10) 17 HW-J7500_J7501_XU_ENG_0304- Basic.indd 17 2015-03-19 2:33:29 CONNECTIONS ● Before moving or installing the product, be sure to turn off the power and disconnect the power cord. ● If the main unit is powered off, the wireless subwoofer will be in standby mode and the STANDBY LED on the upper side will come on after the Link indicator (Blue LED) blinks for 30 seconds. ● If you use a device that uses the same frequency (2.4GHz) as the Soundbar near the Soundbar, interference may cause some sound interruption. ● The transmission distance of the wireless signal between the main unit and subwoofer is about 10 meters, but may vary depending on your operating environment. If a steel-concrete or metallic wall is between the main unit and the wireless subwoofer, the system may not operate at all, because the wireless signal cannot penetrate metal. ● If the main unit doesn't make a wireless connection, follow steps 1-5 on the previous page to re-set the connection between the main unit and wireless subwoofer. ● The wireless receiving antenna is built into the wireless subwoofer. Keep the unit away from water and moisture. ● For optimal listening performance, make sure that the area around the wireless subwoofer location is clear of any obstructions. 18 HW-J7501_ZW_ENG(B_XU)_0313.indd 18 2015-03-19 2:35:17 CONNECTIONS CONNECTING TO A TV ENG CONNECTIONS WITH TV USING HDMI (DIGITAL) CABLE HDMI Cable HDMI IN AUX IN LAN HDMI IN HDMI OUT OPTICAL IN (TV-ARC) HDMI OUT (TV-ARC) DC 24V Wi-Fi SETUP SPK ADD 5V 0.5A 1. Connect an HDMI cable from the HDMI OUT (TV-ARC) jack on the back of the product to the HDMI IN jack on your TV. (Source) button on the top panel of Soundbar or the SOURCE button on remote control to select 2. Press the the D.IN mode. ● HDMI is an interface that enables the digital transmission of video and audio data with just a single connector. ● If the TV provides an ARC port, connect the HDMI cable to the HDMI IN (ARC) port. ● We recommend you use a coreless HDMI cable if possible. If you use a cored HDMI cable, use one whose diameter is less than 14 mm. ● Anynet+ must be turned on. ● This function is not available if the HDMI cable does not support ARC. CONNECTIONS WITH TV USING OPTICAL (DIGITAL) CABLE Optical Cable (not supplied) OPTICAL OUT AUX IN LAN HDMI IN HDMI OUT OPTICAL IN (TV-ARC) OPTICAL IN DC 24V Wi-Fi SETUP SPK ADD 5V 0.5A 1. Connect OPTICAL IN (Audio) on the Soundbar to the OPTICAL OUT jack of the TV. 2. Press the (Source) button on the top panel of Soundbar or the SOURCE button on remote control to select the D.IN mode. 19 HW-J7500_J7501_XU_ENG_0304- Basic.indd 19 2015-03-19 2:33:32 CONNECTIONS + Auto Power Link If you have connected the main unit to a TV with a digital optical cable, set the Auto Power function ON to have the Soundbar turn on automatically when you turn the TV on. AUTO POWER LINK Display ON OFF - ANYNET+ / ON - POWER LINK OFF ON - ANYNET+ / OFF - POWER LINK 1. Connect the Soundbar and a TV with an Optical cable. (not supplied) (Source) button on the main unit’s top panel or the SOURCE button on the remote control to 2. Press the select the D.IN mode. 3. Press the Anynet+ button on the remote control to toggle the Auto Power Link function on and off. ● Depending on the connected device, Auto Power Link may not function. TV SOUNDCONNECT You can enjoy TV sound through your Soundbar when it is connected to a Samsung TV that supports the TV SoundConnect function. Connect 1. Turn on the TV and Soundbar. • Turn on the menu of the TV. • Move to Speaker Settings on "Sound" tab. • Set the "Add New Device" menu to "On". 2. Press the (Source) button on the main unit’s top panel or the SOURCE button on the remote control to select the TV mode. 3. On the TV, a message asking whether to enable the TV SoundConnect function appears. 4. Select <Yes> to finish connecting the TV and Soundbar using the TV's remote control. ● Switching the Soundbar’s mode from TV to another mode automatically terminates TV SoundConnect. ● To connect the Soundbar to another TV, the existing connection must be terminated. ● Terminate the connection to the existing TV, and then press the & button on the remote control for 5 seconds to connect to another TV. 20 HW-J7500_J7501_XU_ENG_0304- Basic.indd 20 2015-03-19 2:33:34 CONNECTIONS ENG ● The TV SoundConnect (SoundShare) function is supported by some Samsung TVs released from 2012 on. Check whether your TV supports the TV SoundConnect (SoundShare) function before you begin. (For further information, refer to the TV’s user manual.). ● If your Samsung TV was released before 2014, check the SoundShare setting menu. ● If the distance between the TV and Soundbar exceeds 10 meters, the connection may not be stable or the audio may stutter. If this occurs, relocate the TV or Soundbar so that they are within operational range, and then re-establish the TV SoundConnect connection. ● TV SoundConnect Operational Ranges: - Recommended pairing range: within 2 meters. - Recommended operational range: within 10 meters. ● The Play/Pause, Next, and Prev buttons on the Soundbar or Soundbar's remote do not control the TV. 21 HW-J7500_J7501_XU_ENG_0304- Basic.indd 21 2015-03-19 2:33:35 CONNECTIONS CONNECTIONS WITH EXTERNAL DEVICE HDMI CABLE HDMI is the standard digital interface for connecting to TVs, projectors, DVD players, Blu-ray players, set top boxes, and more. HDMI prevents any degradation to the signal due to conversion to analogue and maintains the video and audio quality of the original digital source. HDMI Cable HDMI OUT HDMI IN AUX IN LAN HDMI IN HDMI OUT OPTICAL IN (TV-ARC) Digital Devices DC 24V Wi-Fi SETUP SPK ADD 5V 0.5A 1. Connect an HDMI cable from the HDMI IN jack on the back of the product to the HDMI OUT jack on your digital device. (Source) button on the top panel of Soundbar or the SOURCE button on remote control to select 2. Press the the HDMI mode. OPTICAL OR AUX CABLE This unit comes equipped with one optical in digital jack and one audio analogue in jack, giving you two ways to connect it to an External Devices. Audio Cable (not supplied) AUX OUT OPTICAL IN OPTICAL OUT AUX IN LAN HDMI IN HDMI OUT OPTICAL IN (TV-ARC) BD / DVD player / Set-top box / Game console AUX IN Optical Cable (not supplied) DC 24V Wi-Fi SETUP SPK ADD 5V 0.5A 22 HW-J7500_J7501_XU_ENG_0304- Basic.indd 22 2015-03-19 2:33:35 CONNECTIONS + AUX Cable 1. Connect AUX IN (Audio) on the main unit to the AUDIO OUT jack of the Source Device. ENG 2. Press the (Source) button on the top panel of Soundbar or the SOURCE button on remote control to select the AUX mode. + Optical Cable 1. Connect OPTICAL IN (Audio) on the main unit to the OPTICAL OUT jack of the Source Device. 2. Press the (Source) button on the top panel of Soundbar or the SOURCE button on remote control to select the D.IN mode. USB You can play music files located on USB storage devices through the Soundbar. Display AUX IN LAN HDMI IN HDMI OUT OPTICAL IN (TV-ARC) USB port DC 24V Wi-Fi SETUP SPK ADD 5V 0.5A 5V 0.5A 1. Connect the USB device to the USB port on the back of the product. 2. Press the (Source) button on the main unit’s top panel or the SOURCE button on the remote control to select the USB mode. 3. USB appears on the display screen. • The Soundbar connection to the USB device is complete. • The Soundbar automatically turns off (Auto Power Off) if no USB device has been connected for more than 15 minutes. + Before you connect a USB device Be aware of the following: ● If the file name of a file or folder on a USB device exceeds 10 characters, it is not displayed on the Soundbar's display. ● This product may not be compatible with certain types of USB storage media. ● The Soundbar supports the FAT16 and FAT32 file systems. - The NTFS file system is not supported. ● Connect USB devices directly to the USB port of the product. Otherwise, you may encounter a USB compatibility problem. ● Do not connect multiple storage devices to the product via a multi-card reader. It may not operate properly. 23 HW-J7500_J7501_XU_ENG_0304- Basic.indd 23 2015-03-19 2:33:37 CONNECTIONS ● Digital camera PTP protocols are not supported. ● Do not remove the USB device while it is transferring files. ● DRM-protected music files (MP3, WMA) from commercial web sites cannot be played. ● External HDDs are not supported. ● Mobile phone devices are not supported. ● File Format Type Compatibility list: Extension *.mp3 *.wma Codec Sampling Rate Bit rate MPEG 1 Layer1 32/44.1/48 32 ~ 448kbps MPEG 1 Layer2 32/44.1/48 32 ~ 384kbps MPEG 1 Layer3 32/44.1/48 32 ~ 320kbps MPEG 2 Layer3 16/22.05/24/32/44.1/48 8 ~ 160kbps MPEG 2.5 Layer3 8/11.025/12/16/22.05/24/32/44.1/48 8 ~ 160kbps Wave_Format_MSAudio1 - - Wave_Format_MSAudio2 - - WMA Professional Not Support - *.wav - 8 KHz ~ 192KHz ~ 8.8Mbps *.ogg - 8 KHz ~ 48KHz - *.flac - 8 KHz ~ 192KHz ~ 5.6Mbps *.m4a Alac (Apple lossless Audo codec) 8 KHz ~ 192KHz ~ 1Mbps *.ape MON-KEY Audio 8 KHz ~ 48KHz ~ 1Mbps *.aif Audio Interchange File Format 8 KHz ~ 192KHz ~ 4.4Mbps ● If there are too many folders and files stored in the USB device, reading may take some time. 24 HW-J7500_J7501_XU_ENG_0304- Basic.indd 24 2015-03-19 2:33:38 FUNCTIONS FUNCTIONS INPUT MODE Input mode ENG Press the (Source) button on the main unit’s top panel or the SOURCE button on the remote control to select the mode you want. Display Optical Digital input D.IN ARC (HDMI OUT) input AUX input AUX HDMI input HDMI BLUETOOTH mode BT TV SoundConnect TV USB mode USB The unit turns off automatically in the following situations. ● D.IN / HDMI / BT / TV / USB / ARC Mode - If there is no audio signal for 15 minutes. ● AUX Mode To turn the Auto Power Down function ON or OFF, press and hold the & button for 5 seconds. ON - AUTO POWER DOWN / OFF - AUTO POWER DOWN appears on the display. - If the AUX cable is disconnected for 15 minutes. - If there is no KEY input for 8 hours when the AUX cable is connected. 25 HW-J7500_J7501_XU_ENG_0304- Basic.indd 25 2015-03-19 2:33:38 FUNCTIONS BLUETOOTH You can connect a Bluetooth device to the Soundbar and enjoy music with high quality stereo sound, all without wires! TO CONNECT THE SOUNDBAR TO A BLUETOOTH DEVICE Check if the Bluetooth device supports the Bluetooth compliant stereo headset function. Connect Bluetooth device (Source) button on the main unit’s top panel or the SOURCE button on the remote control to 1. Press the select the BT mode. • You will see BT READY on the front display of the Soundbar. 2. Select the Bluetooth menu on the Bluetooth device you want to connect. (Refer to the Bluetooth device's user manual.) 3. Select "[Samsung] Soundbar" from the list. • When the Soundbar is connected to the Bluetooth device, it will display [Bluetooth device name] BT on the front display. • The device name can only be displayed in English. An underline " _ " will be displayed if the name is not in English. • If the Bluetooth device has failed to pair with the Soundbar, delete the previous "[Samsung] Soundbar" found by the Bluetooth device and have it search for the Soundbar again. 4. Play music on the connected device. • You can listen to the music playing on the connected Bluetooth device over the Soundbar. • In BT mode, the Play / Pause / Next / Prev functions are not available. However, these functions are available in Bluetooth devices supporting AVRCP. ● ● ● ● If asked for PIN code when connecting a Bluetooth device, enter <0000>. Only one Bluetooth device can be paired at a time. The Bluetooth connection will be terminated when you turn the Soundbar off. The Soundbar may not perform Bluetooth search or connection correctly under the following circumstances: - If there is a strong electrical field around the Soundbar. - If several Bluetooth devices are simultaneously paired with the Soundbar. - If the Bluetooth device is turned off, not in place, or malfunctions. - Note that such devices as microwave ovens, wireless LAN adaptors, fluorescent lights, and gas stoves use the same frequency range as the Bluetooth device, which can cause electric interference. 26 HW-J7500_J7501_XU_ENG_0304- Basic.indd 26 2015-03-19 2:33:39 FUNCTIONS The Soundbar supports SBC data (44.1kHz, 48kHz). Connect only to a Bluetooth device that supports the A2DP (AV) function. You cannot connect the Soundbar to a Bluetooth device that supports only the HF (Hands Free) function. Once you have paired the Soundbar to a Bluetooth device, selecting "[Samsung] Soundbar" from the device's scanned devices list will automatically change the Soundbar to BT mode. ● Available only if the Soundbar is listed among the Bluetooth device’s paired devices. (The Bluetooth device and the Soundbar must have been previously paired at least once.) ● Soundbar will appear in the Bluetooth device’s searched devices list only when the Soundbar is displaying BT READY. ● In the TV SoundConnect mode, the Soundbar cannot be paired to another Bluetooth device. ENG ● ● ● ● TO DISCONNECT THE BLUETOOTH DEVICE FROM THE SOUNDBAR You can disconnect the Bluetooth device from the Soundbar. For instructions, see the Bluetooth device's user manual. ● The Soundbar will be disconnected. ● When the Soundbar is disconnected from the Bluetooth device, the Soundbar will display BT DISCONNECTED on the front display. TO DISCONNECT THE SOUNDBAR FROM THE BLUETOOTH DEVICE Press the SOURCE button on the remote control or the from BT to another mode or turn off the Soundbar. (Source) button on the product's top panel to switch ● The connected Bluetooth device will wait a certain amount of time for a response from the Soundbar before terminating the connection. (Disconnection time may differ, depending on the Bluetooth device) ● In Bluetooth connection mode, the Bluetooth connection will be lost if the distance between the Soundbar and the Bluetooth device exceeds 10 meters. ● The Soundbar automatically turns off after 15 minutes in the Ready state. + More About Bluetooth Bluetooth is a technology that enables Bluetooth-compliant devices to interconnect easily with each other using a short wireless connection. ● A Bluetooth device may cause noise or malfunction, depending on usage, when: - A part of your body is in contact with the receiving/transmitting system of the Bluetooth device or the Soundbar. - It is subject to electrical variation from obstructions caused by a wall, corner, or office partition. - It is exposed to electrical interference from same frequency-band devices including medical equipment, microwave ovens, and wireless LANs. ● Pair the Soundbar with the Bluetooth device while they are close together. ● The further the distance between the Soundbar and Bluetooth device, the worse the quality is. If the distance exceeds the Bluetooth operational range, the connection is lost. ● In poor reception areas, the Bluetooth connection may not work properly. ● The Bluetooth connection only works when it is close to the unit. The connection will be automatically cut off if the Bluetooth device is out of range. Even within range, the sound quality may be degraded by obstacles such as walls or doors. 27 HW-J7500_J7501_XU_ENG_0304- Basic.indd 27 2015-03-19 2:33:39 FUNCTIONS USING THE NETWORK STANDBY ON FUNCTION The Network Standby On function becomes available if wireless connection was properly established between the smart device and Soundbar. This function turns on the Soundbar automatically when a smart device attempts to connect to the Soundbar via Bluetooth or Wi-Fi. If the Soundbar was turned on via Bluetooth connection, its input mode is set to BT automatically. Turning on the Soundbar via Wi-Fi is available only by using the App. For further information, refer to the Web manual. 1. Connect the Smart device to your Soundbar. 2. Turn the Network Standby On function on by pressing the $ button on the Soundbar remote for more than 5 seconds. You can turn the function off by pressing the $ button again for more than 5 seconds. ● Available only if the Soundbar is listed among the Smart device’s paired devices. (The Smart device and the Soundbar must have been previously paired at least once.) ● Soundbar will appear in the Smart device’s searched devices list only when the Soundbar is displaying [BT READY] or [WiFi READY]. ● In the TV SoundConnect mode, the Soundbar cannot be paired to another Smart device. ● If Network Standby On function did not work - The Network Standby On is set to Off. ● Wi-Fi connection to the Soundbar will be terminated if its power cord was disconnected or the power was cut off. Turn on the Soundbar and reconnect. USING THE MULTIROOM LINK Once the Soundbar is connected to a smart device with Multiroom App, you can connect multiple Samsung Multiroom devices together wirelessly. BEFORE YOU BEGIN + Communication Basics Smart Device: Android or iOS (App Control) Internet Wireless Router 1. Requirements: Wireless Router, Smart Device 2. The wireless router should be connected to the Internet. 3. The smart device should be connected to the router via a Wi-Fi connection. 28 HW-J7500_J7501_XU_ENG_0304- Basic.indd 28 2015-03-19 2:33:39 FUNCTIONS INSTALLING THE SAMSUNG MULTIROOM APP ENG To use the Soundbar, you must download and then install the Samsung Multiroom App by accessing the app through Google play or the App Store. With the Samsung Multiroom App installed, you can play music stored in your smart device, from connected devices and other content providers, and from Internet radio stations. + Android or iOS Download the Samsung Multiroom app from Google Play or the App Store of your smart device. * Market search : Samsung Multiroom ANDROID APP ON or + Accessing the Samsung Multiroom App To access the Samsung Multiroom app, press the Multiroom app icon on your smart device. CONNECTING THE SOUNDBAR TO YOUR NETWORK On your Smart device, select the Samsung Multiroom app. Follow the directions on your smart device’s screen. ● For further information, refer to the Web Manual. - Web manual : www.Samsung.com Support Product name search HW-J7501 PDF file download. ● When connected to a wired network, try to use the CAT 7 cable to connect. 29 HW-J7501_ZW_ENG(B_XU)_0313.indd 29 2015-03-19 2:35:17 FUNCTIONS AUX IN LAN HDMI IN HDMI OUT OPTICAL IN (TV-ARC) SOFTWARE UPDATE DC 24V Wi-Fi SETUP SPK ADD 5V 0.5A 5V 0.5A UPDATING WITH USB Samsung may offer updates for the Soundbar's system firmware in the future. If an update is offered, you can update the firmware by connecting a USB device with the firmware update stored on it to the USB port on your Soundbar. Note that if there are multiple update files, you must load them onto the USB device singly and use them to update the firmware one file at a time. Please visit samsung.com or contact the Samsung call centre to receive more information about downloading updates files. 1. While the Soundbar is turned off, connect the USB storage device that contains the updating firmware to the Soundbar’s USB port. 2. Turn on the Soundbar UPDATE appears on the display and updating begins within 3 minutes. • Upon completion of updating, the Soundbar turns off and on automatically. + If UPDATE was not displayed 1. Turn off the Soundbar, connect the USB storage device that contains update files to the Soundbar’s USB port. 2. Disconnect the power cord, reconnect it and turn it on. ● Insert a USB device containing the firmware update into the USB port on the main unit. ● Updating firmware may not work properly if audio files supported by the Soundbar are stored in the USB storage device. ● Do not disconnect the power or remove the USB device while updates are being applied. The main unit will turn off automatically after completing the firmware update. 30 HW-J7500_J7501_XU_ENG_0304- Basic.indd 30 2015-03-19 2:33:40 FUNCTIONS ● Do not format the USB device in the NTFS format. The Soundbar does not support the NTFS file system. ENG ● After the update, all settings are reset to their factory default settings. We recommend you write down your settings so that you can easily reset them after the update. Note that updating firmware resets the subwoofer connection too. If connection to the subwoofer is not re-established automatically after the update, refer to page 17. If the firmware fails to update, we recommend formatting the USB device in FAT16 and trying again. ● Depending on the manufacturer, some USB devices may not be supported. AUTO UPDATE Even when the Soundbar is turned off, the Soundbar will automatically check latest software version and continue to update if it was connected to the Internet. ● The Soundbar is configured to run auto update by default. ● To use auto update function, the Soundbar must be connected to the Internet. ● Wi-Fi connection to the Soundbar will be terminated if its power cord was disconnected or the power was cut off. Turn on the Soundbar and reconnect. 31 HW-J7500_J7501_XU_ENG_0304- Basic.indd 31 2015-03-19 2:33:40 TROUBLESHOOTING TROUBLESHOOTING TROUBLESHOOTING Before requesting service, please check the following. The unit will not turn on. • Is the power cord plugged into the outlet? Connect the power plug to the outlet. A function does not work when the button is pressed. • Is there static electricity in the air? Disconnect the power plug and connect it again. Sound is not produced. • Is the Mute function on? Press the • Is the volume set to minimum? Adjust the Volume. (Mute) button to cancel the function. The remote control does not work. • Are the batteries drained? Replace with new batteries. • Is the distance between the remote control and main unit too far? Move closer to the unit. The TV SoundConnect (TV pairing) failed. • Does your TV support TV SoundConnect? TV SoundConnect is supported by some Samsung TVs released from 2012 on. Check your TV to see if it supports TV SoundConnect. • Is your TV firmware the latest version? Update your TV with the latest firmware. • Does an error occur when connecting? Contact the Samsung call centre. • Reset the TV mode and connect again. Press and hold the & button for 5 seconds to reset the TV SoundConnect connection. The red LED on the subwoofer blinks and the subwoofer is not producing sound. • Your subwoofer may not be connected to the main body of the product. Try to connect your subwoofer again. (See Page 17) The subwoofer drones and vibrates noticeably. • Try to adjust the vibration of your subwoofer. Press the WOOFER button on your remote control to adjust its value (between -12, -6 to +6). 32 HW-J7500_J7501_XU_ENG_0304- Basic.indd 32 2015-03-19 2:33:41 APPENDIX APPENDIX SPECIFICATIONS ENG Model name HW-J7501 USB Weight GENERAL Dimensions (W x H x D) 5V / 0.5A Main Unit 4 kg Subwoofer (PS-WJ7501) 7.8 kg Main Unit 1230 x 47.5 x 170 mm Subwoofer (PS-WJ7501) 500 x 332 x 161 mm Operating Temperature Range +5°C to +35°C Operating Humidity Range 10 % to 75 % Main Unit AMPLIFIER 20W/CH x 8, 8ohm, THD=10%, 1KHz Rated Output Subwoofer Power (PS-WJ7501) 160W, 3ohm, THD=10%, 100Hz S/N Ratio (Analogue Input) 65 dB Separation (1kHz) 65 dB * S/N ratio, distortion, separation, and usable sensitivity are based on measurements using AES (Audio Engineering Society) guidelines. * Nominal specification - Samsung Electronics Co., Ltd reserves the right to change the specifications without notice. - Weight and dimensions are approximate. - For the power supply and Power Consumption, refer to the label attached to the product. * HW-J7501 : DC24V, 42W * PS-WJ7501 : AC110~240V ~50/60Hz, 28W a Open Source Licence Notice - To send inquiries and requests regarding open sources, contact Samsung via Email ([email protected]). 33 HW-J7501_ZW_ENG(B_XU)_0313.indd 33 2015-03-19 2:35:17 HW-J7501 使用者手冊 Curved Soundbar 無窮想像,無限可能 感謝您購買三星產品 欲享受更加全面的服務,請到以下網站註冊您的產品: www.samsung.com/register HW-J7501_ZW_CTTW_0313.indd 1 2015-03-13 11:11:47 開始使用 開始使用 特性 音樂串流服務 USB 主機支援 Curved Soundbar 內置了 Wi-Fi 功能,使您能 夠更輕鬆地找到您喜歡的所有音樂。 您只需 存取 Samsung Multiroom 應用程式,即可領略 網際網路訂閱串流音樂服務的妙處。 您可以使用 Soundbar 的 USB HOST(USB 主 機)功能,連接和播放外接 USB 儲存裝置 (例如 MP3 播放機、USB 快閃記憶體等)中 的音樂檔案。 環繞聲擴展 藍牙功能 環繞聲擴展功能增強了聆聽體驗的深度和空靈 感。 您可以將藍牙裝置連接至 Soundbar 並以高品 質立體聲欣賞音樂,並且全部使用無線連線! TV SoundConnect 授權 有了 TV SoundConnect,您可以透過藍牙連接 電視與 Soundbar。 Soundbar 與電視之間不再 需要煩人的接線,一來可以展示出這兩個系統 的輕巧時髦設計,二來可以讓生活環境保持整 潔美觀。 另外,只需一個電視遙控器即可輕 鬆控制 Soundbar 和電視。 音樂來源共用 (= Multiroom Play) 透過 Multiroom Link,您可以輕鬆控制位於不 同位置的多個音訊裝置的一個音樂來源以及在 這些裝置之間共用一個音樂來源。 該行動式 應用程式可在遠端控制您的系統(含有電 視、Soundbar、家庭娛樂設施和 Blu-ray 光碟 播放機)上的音量和音樂。 您可以隨時隨地 欣賞所需的音訊。 HDMI HDMI 可同時傳送視訊和音訊信號,並可提供 更清晰的畫面。 裝置還配備 ARC 功能,可讓您使用 HDMI 纜 線透過 Soundbar 聆聽來自電視機的聲音。 此功能僅在您將本設備連接至 ARC 標準電視 機時可用。 在 Dolby Laboratories 的授權下製造。Dolby 和雙 D 符號是 Dolby Laboratories 的商標。 若要瞭解 DTS 專利,請造訪 http://patents. dts.com。在 DTS Licensing Limited 的授權下 製造。 DTS、符號以及& DTS 和符號一起是 DTS, Inc. 的註冊商標,DTS 2.0 Channel 是 DTS, Inc. 的商標。© DTS, Inc. 保留所有權利。 詞語 HDMI 和 HDMI High-Definition Multimedia Interface 以及 HDMI 標誌是 HDMI Licensing LLC 在美國和其他國家 / 地區的商標或註冊商 標。 2 HW-J7501_ZW_CTTW_0313.indd 2 2015-03-13 11:11:54 開始使用 安全資訊 繁體中文 安全警告 為減少觸電的危險,請勿取下機蓋(或後蓋)。 本裝置內部沒有使用者可自行維修的零件。請讓合格的維修人員進行維修。 此符號表示產品內部存在 「危險電壓 」,會帶來觸電或人身傷 害的危險。 注意 存在觸電的危險, 請勿打開 此符號表示產品隨附重要說明。 警告: 為降低發生火災或觸電的風險,請勿使本裝置淋雨或將其放置在潮濕的環境中。 注意 : 為避免觸電,請將插頭的寬插腳對準寬插槽並將它完全插入。 • 本裝置一律要連接至帶有保護接地連接的交流電源插座。 • 要斷開本裝置的電源,必須從電源插座上拔下插頭,因此電源插頭應該易於操作。 注意 • 請勿使本裝置滴到水或濺到水。請勿在本裝置上放置裝有液體的物件,如花瓶。 • 若要完全關閉本裝置,必須從牆上插座拔下電源插頭。因此,電源插頭必須隨時都可輕鬆快速 拔插。 3 HW-J7501_ZW_CTTW_0313.indd 3 2015-03-13 11:11:54 開始使用 注意事項 68.6 mm 毫米 99.1mm 毫米 99.1mm 毫米 毫米 99.1mm 確保房屋中的交流電源符合產品背面識別標牌上列出的電源需求。產品水平安裝在平台 (傢俱)上,並在周圍留出足夠的空間用於通風 7~10 公分。請確保通風槽沒有被遮擋。 不要將裝置放置在放大器或可能會變熱的裝置上。本裝置設計為可以連續使用。 若要完全關閉裝置,請從牆上插座拔下交流電源插頭。如果您打算長時間不使用裝置, 請拔下裝置的電源插頭。 在雷暴期間,請從牆上插座拔下交流電源轉接 器。閃電造成的電壓尖峰可能會損壞裝置。 不要將裝置放置在陽光直射到的位置或靠近熱 源的位置。這可能導致產品過熱,從而使得裝 置發生故障。 避免產品受潮(例如遠離 花瓶)、遠離高熱 位置(例如壁爐)或會形成強磁場或電場的 裝置。如果裝置發生故障,請從交流電源插座 中拔下電源插頭。本產品並非設計為供工業使 用。僅限個人使用。 如果您的產品貯藏在寒冷的溫度中,則可能會 發生冷凝。如果在冬天運輸裝置,請靜候約 2 小時,直到裝置達到室溫後再使用。 與產品配合使用的電池含有對環境有害的化 學物品。 請勿將電池放入一般家庭垃圾筒中。 請勿將電池置於火中。 不要使電池短路、分解或過熱。 若沒有正確更換電池,將會有爆炸的危險。 請使用相同類型的電池來更換。 警告,請勿吞食電池,會造成化學灼傷危險,[遙控器隨附] 本產品包含鈕扣式電 池。 如果吞食鈕扣式電池,則可能會在兩小時內導致嚴重的內部器官灼傷並導致死 亡。將新電池和使用後的電池置於小孩不能觸及的地方。如果電池盒蓋鬆動,請停 止使用該電池並將其置於小孩不能觸及的地方。如果您認為已吞食電池或已將電池 置於身體某部位內部,請立即就醫。 4 HW-J7501_ZW_CTTW_0313.indd 4 2015-03-13 11:11:55 開始使用 目錄 2 3 6 25 功能 特性 安全資訊 隨附物件 25 26 28 28 30 7 說明 7 8 9 頂端面板 / 前面板 後面板 / 底部面板 遙控器 功能 藍牙 使用 Network Standby On 功能 使用 Multiroom Link 軟體更新 繁體中文 2 開始使用 32 故障排除 32 故障排除 11 安裝 33 附錄 11 安裝 Soundbar 33 規格 11 將 Soundbar 和電視安裝成牆壁安裝類型 14 將 Soundbar 安裝到電視支架上 15 獨立安裝 Soundbar 本使用說明書中的圖片和圖解僅供參 考,可能與實際的產品外觀有所不同。 16 組裝夾線 16 將蓋腳安裝到 Subwoofer 上 17 連線 17 連接低音揚聲器 19 連接至電視 19 使用 HDMI(數位)纜線連接電視 19 使用光纖(數位)纜線連接電視 20 TV SoundConnect 22 連接外部裝置 22 HDMI 纜線 22 光纖或 AUX 纜線 23 USB 5 HW-J7501_ZW_CTTW_0313.indd 5 2015-03-13 11:11:55 開始使用 隨附物件 在閱讀使用者手冊之前 在閱讀使用者手冊之前,請注意下列詞語。 + 在本手冊中使用的圖示 圖示 詞語 定義 注意 表示功能不可用或可能取消設定的情況。 附註 表示頁面上的提示或說明,用於協助您操作功能。 檢查是否隨附了下面所示的配件。 主機 遙控器 / 鋰電池 (3V : CR2032) 電源線 直流轉接器 HDMI 纜線 USB 纜線 USB 轉換器 夾線 使用者手冊 支撐底座 電視安裝支架 支架螺釘 1 : 4 個 支架螺釘 2 : 10 個 固定支架用螺釘 底座腳 : 3 個 重低音音箱 電源線 蓋腳: 4 個 自攻螺釘: 4 個 橡膠腳: 4 個 ● 配件的外觀可能與上面的圖例略有差異。 ● 請使用專用的 USB 纜線將外接 USB 裝置連接至本裝置。 6 HW-J7501_ZW_CTTW_0318.indd 6 2015-03-18 1:11:34 說明 說明 頂端面板 / 前面板 (電源)按鈕 控制音量。 音量的數字值將會出現在前面板 顯示螢幕中。 開啟與關閉電源。 繁體中文 VOL. - / + (來源)按鈕 顯示螢幕 選取 D.IN、AUX、HDMI、BT、 TV、USB 輸入。 顯示目前的模式。 ● 裝置已開啟時,按 (來源)按鈕超過 3 秒可將該 按鈕設定為用作 (靜音)按 鈕。 若要取消 (靜音)按 鈕設定,請再次按 (來源)按鈕超過 3 秒。 ● 若要清潔本裝置,請從牆上插座拔下電源插頭,然後用乾燥的柔布擦拭產品。 由於鋁是正 電荷材料,可能會產生靜電。 ● 您插入交流電源線後,電源鍵會 4 到 6 秒鐘內生效。 ● 當您開啟本裝置時,可能會延遲 4 到 5 秒後,裝置才會發出聲音。 ● 如果您只想從 Soundbar 欣賞聲音,則必須從電視的 音訊設定 選單中關閉電視的揚聲 器。請參閱電視隨附的使用者手冊。 7 HW-J7501_ZW_CTTW_0313.indd 7 2015-03-13 11:11:59 說明 後面板 / 底部面板 OPTICAL IN (D.IN) 連接至外接裝置的數位(光學)輸出。 HDMI OUT (TV-ARC) 使用 HDMI 纜線同時輸出數位視訊和音訊信號。 HDMI IN 使用 HDMI 纜線同時輸出數位視訊及音訊訊號。 在連接受支 援的外接裝置時使用。 LAN 可讓您使用 LAN 纜線連接至網路。 AUX IN AUX IN LAN HDMI IN HDMI OUT OPTICAL IN (TV-ARC) 連接至外接裝置的類比輸出。 DC 24V Wi-Fi SETUP SPK ADD 5V 0.5A 標籤 5V 0.5A Wi-Fi SETUP SPK ADD DC 24V Wi-Fi SETUP SPK ADD 按鈕 按下按鈕可以使用 按下此案妞可以將 Wi-Fi 設定將 Soundbar 連接至 Soundbar 連接至網 HUB。(未提供) 路。 DC 24V (電源輸入) 將直流電源轉接器插入 電源插孔,然後將交流 電源轉接器插頭插入牆 上電源插座。 (USB 連接埠) 在此處連接 USB 裝置 以播放裝置上的檔案。 ● 從牆上插座拔下交流電源轉接器的電源線時,應拔插頭。不要拉電源線。 ● 在元件之間的所有連線均已完成之後,才能將本裝置或其他元件連接至交流電源插 座。 8 HW-J7501_ZW_CTTW_0313.indd 8 2015-03-13 11:12:02 說明 遙控器 繁體中文 SOURCE 按下可選取已連接至 Soundbar 的來源。 靜音 您可以按一下按鈕來將音量下調到 0。 再按一次此按鈕可以將聲音恢復到先前的級別。 重複 正在播放 USB 磁碟機上的音樂時,您可以設定 重複 功能。 OFF - REPEAT : 取消重複播放。 TRACK - REPEAT : 重複播放一首曲目。 ALL - REPEAT : 重複播放所有曲目。 RANDOM - REPEAT : 以隨機順序播放曲目。 (可能會再次播放已播放的曲目。) 向前跳轉 如果您正在播放的裝置上有兩個或以上檔案,並且您按 $ 按鈕,會選取下一個檔案。 SOUND CONTROL (* 使用 #、$ 按鈕調節音量。) 按此按鈕可以選取 TREBLE、BASS 或 AUDIO SYNC。 接著使 用 #、$ 按鈕在 -3 和 +3 之間調節高音或低音的音量。 按住 SOUND CONTRO 按紐 5 秒鐘左右可以調節每個頻段的聲音。 有 150Hz、300Hz、600Hz、1.2KHz、2.5KHz、5KHz 和 10KHz 揚 聲器可供選取,並且每項的設定均可在 -6 和 +6 之間調節。 如果將 Soundbar 連接至數位電視機且視訊似乎與音訊不同步,請 按 SOUND CONTROL 按鈕以使音訊與視訊同步。可以使用 #,$ 按鈕在 0 ms 到 300 ms 之間設定音訊延遲。在 USB 模 式、TV 模式和 BT 模式下,音訊同步功能可能不起作用。 Anynet+ 按 Anynet+ 按鈕可開啟或關閉 Anynet+ 功能。 (預設值:Auto Power Link OFF,ON - ANYNET+ / OFF - POWER LINK 或 OFF - ANYNET+ / ON - POWER LINK)。Anynet+ 功能允 許您使用遙控器從與 Anynet+ 相容的 Samsung 電視機控制 Soundbar。必須使用 HDMI 纜線將 Soundbar 連接至電視機。 * Auto Power Link 使 Soundbar 與透過光學插孔連接的光學來源同步,以便在您 開啟電視機時,它也自動開啟。(請參閱第 20 頁) 您也可以透過按住遙控器上的 Anynet+ 按鈕 7 秒鐘以上,來啟 動 Wi-Fi SETUP 功能。 ● Soundbar 是 Samsung 的一個專利名稱。 ● 使用電視遙控器操作電視。 9 HW-J7501_ZW_CTTW_0313.indd 9 2015-03-13 11:12:04 說明 電源 開啟與關閉電源。 音量 調節裝置的音量。 播放/暫停 按 ► 按鈕可以暫停播放檔案。 再次按 ► 按鈕可以播放所選檔案。 倒轉 如果您正在播放的裝置上有多個檔案,並且您按 # 按 鈕,會選 擇上一個檔案。 SOUND EFFECT 可以選取聲音模式:STANDARD (原始聲音) 、MUSIC、VOICE、SPORTS、CINEMA 和 NIGHT MODE。 如果您要欣賞原始聲音,請選擇 STANDARD 模式。 SOUND 環繞聲可增強聲音深度和空靈感。 不斷地按 SOUND 按鈕可 在各項環繞聲設定之間循環:ON - SURROUND SOUND, OFF - SURROUND SOUND STREAMING MUSIC 按 STREAMING MUSIC 按鈕可已收聽網路。 每次按此按 鈕,Soundbar 都會切換到下一個預設電台,並在 3 個預設電台 之間輪轉。要使用 STREAMING MUSIC 功能,必須將 soundbar 連接至網路。(請參閱第 28 頁) DRC (Dynamic Range Control) * 可讓您將動態範圍控制套用至 Dolby Digital、Dolby Digital Plus 和 Dolby TrueHD 音訊。按住 STREAMING MUSIC 按鈕,DRC (動態範圍控制)功能會在 ON 和 OFF 之間切換。 WOOFER(*使用 #、$ 按鈕調節低音揚聲器音量。) 按 WOOFER 按鈕。 接著使用 #、$ 按鈕在 -12、-6 到 +6 之 間調節低音揚聲器音量。 您也可以透過按住遙控器上的 WOOFER 按鈕 5 秒鐘以上,來啟 動 soundbar 的 SPK ADD 功能。 在遙控器中安裝電池 1. 使用適用的硬幣逆時針轉 2. 裝入一顆 3V 電池。裝入電池時, 3. 使用適用的錢幣順時針 轉動遙控器電池蓋,直 應使正極(+)朝上。放上電池 動遙控器電池蓋以將其取 到它固定到位。 蓋,對準 '●' 標記,如上圖所示。 下,如上圖中所示。 10 HW-J7501_ZW_CTTW_0313.indd 10 2015-03-13 11:12:05 安裝 安裝 安裝 SOUNDBAR 繁體中文 將 SOUNDBAR 和電視安裝成牆壁安裝類型 ● 此型號與 2015 Samsung curved 電視 S8500/S9000 – 55 英吋/65 英吋,S9500 – 65 英吋對應。 請參閱 Samsung Electronics 首頁,以瞭解相應型號預設清單。 ● 將 Soundbar 安裝到 JS9500 系列電視時,請使用 Samsung 微型牆壁安裝支架套件隨 附的 1.6 英吋 Cover-Distance。 ● 若要將 Soundbar 和電視全都安裝到牆壁安裝支架上,請確保先將 Soundbar 安裝在電 視上,再安裝電視。 ● 若要將電視安裝在牆壁上,請參閱您購買電視隨附的使用手冊。 ● 此 Soundbar 不能安裝到電視底座或電視支架形狀的不相容電視中。 檢查是否隨附了下面所示的配件。 用於 S9500 65 英吋電視型 號 支架螺釘 1 : 4 個 支架螺釘 2 : 10 個 電視安裝支架 固定支架用螺釘 支撐底座 AUX IN LAN HDMI IN HDMI OUT OPTICAL IN (TV-ARC) 1. 如圖中所示放置 Soundbar,確保任何按鈕都不會接觸放置裝置的表面。 DC 24V Wi-Fi SETUP SPK ADD AUX IN LAN HDMI IN HDMI OUT OPTICAL IN (TV-ARC) 5V 0.5A DC 24V Wi-Fi SETUP SPK ADD 5V 0.5A 2. 從 Soundbar 中,取下 底座支架(2 個),如圖中所示。 11 HW-J7501_ZW_CTTW_0313.indd 11 2015-03-13 11:12:06 AUX IN LAN HDMI IN HDMI OUT OPTICAL IN (TV-ARC) 安裝 DC 24V Wi-Fi SETUP SPK ADD AUX IN LAN HDMI IN HDMI OUT OPTICAL IN (TV-ARC) 5V 0.5A DC 24V Wi-Fi SETUP SPK ADD 5V 0.5A AUX IN LAN HDMI IN HDMI OUT OPTICAL IN (TV-ARC) AUX IN LAN HDMI IN HDMI OUT OPTICAL IN (TV-ARC) 3. 分別將 4 顆 支架螺釘 1 和 4 顆 支架螺釘 2 固定在 Soundbar 的 4 個孔中,如圖中所示。 DC 24V Wi-Fi SETUP SPK ADD 5V 0.5A 4. 如果已安裝 底座腳,請先將其取下,以便安裝電視安裝支架。 TV 65 英吋 S9500 電視 5. (安裝到 S9500 65 英吋電視型號時。 其他型號請跳過此步驟。) 使用電視導塊將 支撐底座 安裝到電視上,並使用 支架螺釘 2(4 個)固定。將 支撐底座 的 細心孔居中對準電視,不要放偏。 12 HW-J7501_ZW_CTTW_0313.indd 12 2015-03-13 11:12:08 安裝 繁體中文 65 英吋 S9500 電視 6. 如果您將 Soundbar 安裝在配套的 Samsung 電視上,請使用電視導塊將 電視安裝支架 牢牢安 裝在電視上。 7. 使用其餘 4 個 支架螺釘 2 將 電視安裝支架 固定在電視上。 8. 安裝好 電視安裝支架 後,將電視安裝在牆壁上。 Soundbar 底座 電視底座,已安裝 電視安裝支架 9. 將 Soundbar 推入 電視安裝支架 中並推到底,如圖中所示。 10. 將 固定支架用螺釘 固定在 Soundbar 上,以將 Soundbar 固定在 電視安裝支架 上。 13 HW-J7501_ZW_CTTW_0313.indd 13 2015-03-13 11:12:12 安裝 將 SOUNDBAR 安裝到電視支架上 如果 Soundbar 與此型號的電視配套,您可以將 Soundbar 安裝到電視支架上。 檢查是否隨附了下面所示的配件。 底座腳 : 3 個 支架螺釘 2 : 3 個 AUX IN LAN HDMI IN HDMI OUT OPTICAL IN (TV-ARC) 2 Wi Fi SETUP SP AUX IN LAN HDMI IN HDMI OUT OPTICAL IN (TV-ARC) 1 DC 24V Wi-Fi SETUP SPK ADD 5V 0.5A AUX IN LAN HDMI IN HDMI OUT OPTICAL IN (TV-ARC) 1. 如圖中所示放置 Soundbar,確保任何按鈕都不會接觸放置裝置的表面。 2. 從 Soundbar 中取下 底座腳(3 個)和 支架螺釘 2(3 個),如圖中所示。 DC 24V Wi-Fi SETUP SPK ADD AUX IN LAN HDMI IN HDMI OUT OPTICAL IN (TV-ARC) 5V 0.5A DC 24V Wi-Fi SETUP SPK ADD 5V 0.5A 3. 從 Soundbar 中,取下 底座支架(2 個),如圖中所示。 14 HW-J7501_ZW_CTTW_0313.indd 14 2015-03-13 11:12:13 安裝 繁體中文 4. 使 Soundbar 中心與電視基座中心對齊,然後小心謹慎地將它推到盡頭,如圖中所示。 一定 要小心謹慎,否則會導致電視會不平衡。 ● 不要讓重物壓主裝置或踩在裝置上。 獨立安裝 SOUNDBAR 1. 將 Soundbar 居中放置在電視前面的平坦區域。 15 HW-J7501_ZW_CTTW_0313.indd 15 2015-03-13 11:12:16 安裝 HDMI IN AUX IN LAN 夾線 AUX IN LAN HDMI IN HDMI OUT (TV-ARC) HDMI OUT (TV-ARC) OPTICAL IN OPTICAL IN 組裝夾線 如圖中所示,將夾線安裝在裝置上,然後將線纜穿過夾線穩住,免得雜亂無章。 將蓋腳安裝到 SUBWOOFER 上 PO WE R 1 2 3 1. 將 蓋腳 相應放到 4 個孔上,如圖中所示。 2. 將 自攻螺釘(4 個)插入到 蓋腳 的相應孔中。 3. 使用 橡膠腳(4 個)蓋住各孔以完成安裝。 16 HW-J7501_ZW_CTTW_0313.indd 16 2015-03-13 11:12:16 連線 連線 繁體中文 ● 完成元件之間的所有連接之前,切勿將本產品或電視連接到牆上電源插座。 ● 在移動或安裝產品之前,一定要關閉電源並拔下電源插頭。 連接低音揚聲器 自動連接到低音揚聲器 將主裝置與低音揚聲器開機後,主裝置與低音炮應可自動連結(無線連接)。 • 如果已完全連接,低音揚聲器的藍色 LED 會停止閃爍。 手動連接到低音揚聲器 低音揚聲器的連結 ID 已在出廠時預設,當主裝置和低音揚聲器均已開啟時,它們應能自動連結 (無線連接)。如果主裝置和低音揚聲器開啟時 Link 指示燈不亮,請依照下面的步驟設定 ID。 POWER 1. 將主裝置和低音揚聲器的電源插頭插入牆上交流電源插座中。 2. 用小而尖的物件按低音揚聲器背面的 ID SET 按鈕 5 秒鐘。 • STANDBY 指示燈將會熄滅,並且 LINK 指示燈(藍色 LED)將會快速閃爍。 3. 在主裝置已關閉(處於 STANDBY 模式)的情況下,按住遙控器上的 (靜音)5 秒鐘。 4. ID SET 訊息會顯示在 Soundbar 的顯示螢幕上。 5. 若要最終化連結,請在低音揚聲器的藍色 LED 閃爍時,開啟主裝置的電源。 • 現在,主裝置和低音揚聲器應可連結 (連接)。 • 低音揚聲器的 Link 指示燈(藍色 LED)應會長亮。 • 如果 LINK 指示燈不是藍色長亮,則表示連結過程失敗。關閉主裝置,然後從步驟 2 開始 再來一次。 • 選取聲音效果可讓您享受到無線低音揚聲器播送的更高品質的聲音。(請參閱第 10 頁) 17 HW-J7501_ZW_CTTW_0313.indd 17 2015-03-13 11:12:17 連線 ● 在移動或安裝產品之前,一定要關閉電源並拔下電源插頭。 ● 如果主裝置已關閉,無線低音揚聲器將處於待命模式,並且在 Link 指示燈(藍色 LED)閃爍 30 秒鐘後,上方的 STANDBY LED 會亮起。 ● 如果在 Soundbar 附近使用的裝置會使用 Soundbar 所用的頻率(2.4GHz),則干擾可能 會導致一定程度的聲音干擾。 ● 主裝置和低音揚聲器之間的無線訊號傳輸距離約為 10 公尺,並且可能會因您的操作環 境而異。如果主裝置和無線低音揚聲器之間隔有鋼筋混凝土牆或金屬質牆,系統可能 根本無法工作,因為無線訊號無法穿透金屬。 ● 如果主裝置無法建立無線連線,請依照上一頁中的步驟 1-5 操作,重新設定主裝置和 無線低音揚聲器之間的連線。 ● 無線低音揚聲器中內置有無線接收天線。裝置應避免變濕或受潮。 ● 為了取得最佳收聽效果,請確保無線低音揚聲器位置周圍空曠,無障礙物。 18 HW-J7501_ZW_CTTW_0313.indd 18 2015-03-13 11:12:18 連線 連接至電視 繁體中文 使用 HDMI(數位)纜線連接電視 HDMI 纜線 HDMI IN AUX IN LAN HDMI IN HDMI OUT OPTICAL IN (TV-ARC) HDMI OUT (TV-ARC) DC 24V Wi-Fi SETUP SPK ADD 5V 0.5A 1. 將 HDMI 纜線從產品背面的 HDMI OUT (TV-ARC) 插孔連接至電視上的 HDMI IN 插孔。 2. 按主裝置頂端面板上的 (來源)按鈕或遙控器上的 SOURCE 按鈕選取 D.IN 模式。 ● HDMI 是一種介面,它只使用一個接頭即可支援視訊和音訊資料傳輸。 ● 如果電視提供 ARC 連接埠,請將 HDMI 纜連接到 HDMI IN (ARC) 連接埠。 ● 若有可能,建議使用無芯 HDMI 電纜。 如果使用有芯 HDMI 電纜,則直徑不能超過 14 毫米。 ● 必須開啟 Anynet+。 ● 如果 HDMI 纜線不支援 ARC,則此功能不可用。 使用光纖(數位)纜線連接電視 光學纜線 (未提供) OPTICAL OUT AUX IN LAN HDMI IN HDMI OUT OPTICAL IN (TV-ARC) OPTICAL IN DC 24V Wi-Fi SETUP SPK ADD 5V 0.5A 1. 將 Soundbar 上的 OPTICAL IN(音訊)連接到電視的 OPTICAL OUT 插孔。 2. 按主裝置頂端面板上的 (來源)按鈕或遙控器上的 SOURCE 按鈕選取 D.IN 模式。 19 HW-J7501_ZW_CTTW_0313.indd 19 2015-03-13 11:12:19 連線 + Auto Power Link 如果使用數碼光線將主設備連接至電視機,請將 Auto Power 功能設為 開啟,以讓 Soundbar 在您開啟電視機時自動開啟。 AUTO POWER LINK 顯示螢幕 開啟 OFF - ANYNET+ / ON - POWER LINK 關閉 ON - ANYNET+ / OFF - POWER LINK 1. 使用光纖連接 Soundbar 和電視。(未隨附) 2. 按主裝置頂端面板上的 (來源)按鈕或遙控器上的 SOURCE 按鈕選取 D.IN 模式。 3. 按遙控器上的 Anynet+ 以開啟/關閉 Auto Power Link 功能。 ● 根據連接的裝置,自動電源連結 可能無法正常工作。 TV SOUNDCONNECT 您可以透過接至支援「電視聲音連接」功能之 Samsung 電視的 Soundbar,來欣賞電視的聲音。 連接 1. 開啟電視和 Soundbar。 • 開啟電視的選單。 • 移到「聲音」標籤上的揚聲器設定。 • 將「新增裝置」選單設為「開啟」。 (來源)按鈕或遙控器上的 SOURCE 按鈕選取 TV 模式。 2. 按主裝置頂端面板上的 3. 電視上會顯示一則訊息,詢問您是否要允許 TV SoundConnect 功能出現。 4. 用電視遙控器選取 <是>,完成連接電視與 Soundbar。 ● 將 Soundbar 的模式從電視切換至另一種模式會自動終止「電視聲音連接」。 ● 若要將 Soundbar 連接至另一台電視機,必須終止現有連線。 ● 終止與現有電視機的連線,然後按遙控器上的 & 鍵 5 秒鐘以連接至另一台電視機。 20 HW-J7501_ZW_CTTW_0313.indd 20 2015-03-13 11:12:21 連線 繁體中文 ● 從 2012 年開始發行的一些 Samsung 電視支援 TV SoundConnect(SoundShare)功 能。請先檢查電視機是否支援電視聲音連接(SoundShare)功能再開始。(有關更多 資訊,請參閱電視的使用者手冊。) ● 如果 Samsung 電視是 2014 年之前發行的,請檢查 SoundShare 設定選單。 ● 如果電視機與 Soundbar 之間的距離超過 10 公尺,連線可能會不穩定或音訊可能會斷 斷續續。如果出現這種現象,請重新安放電視機或 Soundbar,讓它們在可運作範圍 內,然後重建電視聲音連接連線。 ● 電視聲音連接工作範圍: - 建議的配對範圍:2 公尺 以內 - 建議的工作範圍:10 公尺 以內 ● Soundbar 或 Soundbar 遙控器的「播放/暫停」、「下一首」和「上一首」按鈕無法控 制電視。 21 HW-J7501_ZW_CTTW_0313.indd 21 2015-03-13 11:12:21 連線 連接外部裝置 HDMI 纜線 HDMI 是一種標準數位介面,用於連接至電視、投影儀、DVD 播放機、Blu-ray 播放機、機頂盒 等裝置。 因為 HDMI 可以傳送最高品質的數位訊號,所以您可以享用高品質的視訊和音訊(品質可達到 數位來源中最初製作它時的水平)。 HDMI 纜線 HDMI OUT HDMI IN AUX IN LAN HDMI IN HDMI OUT OPTICAL IN (TV-ARC) 數位裝置 DC 24V Wi-Fi SETUP SPK ADD 5V 0.5A 1. 將 HDMI 纜線從產品背面的 HDMI IN 插孔連接至數位裝置上的 HDMI OUT 插孔。 2. 按主裝置頂端面板上的 (來源)按鈕或遙控器上的 SOURCE 按鈕選取 HDMI 模式。 光纖或 AUX 纜線 本裝置有一個光學輸入數字插孔和一個音訊類比輸入插孔,可讓您以兩種方式將它連接至 外部裝置。 音訊纜線 (未提供) AUX OUT OPTICAL IN OPTICAL OUT AUX IN LAN HDMI IN HDMI OUT OPTICAL IN (TV-ARC) BD/ DVD 播放 機/機頂盒/ 遊戲控制台 AUX IN 光學纜線 (未提供) DC 24V Wi-Fi SETUP SPK ADD 5V 0.5A 22 HW-J7501_ZW_CTTW_0313.indd 22 2015-03-13 11:12:21 連線 + AUX 纜線 (來源)按鈕或遙控器上的 SOURCE 按鈕選取 AUX 模式。 2. 按主裝置頂端面板上的 + 光學纜線 繁體中文 1. 將主裝置上的 AUX IN(音訊)連接至來源裝置的 AUDIO OUT 插孔。 1. 將主裝置上的 OPTICAL IN(音訊)連接至來源裝置的 OPTICAL OUT 插孔。 (來源)按鈕或遙控器上的 SOURCE 按鈕選取 D.IN 模式。 2. 按主裝置頂端面板上的 USB 可以透過 Soundbar 播放位於 USB 儲存裝置上的音樂檔案。 顯示螢幕 AUX IN LAN HDMI IN HDMI OUT OPTICAL IN (TV-ARC) USB 連接埠 DC 24V Wi-Fi SETUP SPK ADD 5V 0.5A 5V 0.5A 1. 將 USB 裝置連接至產品背面的 USB 連接 埠。 2. 按主裝置頂端面板上的 (來源)按鈕或遙控器上的 SOURCE 按鈕選取 USB 模式。 3. USB 顯示在顯示螢幕上。 • 已完成 Soundbar 與 USB 裝置之間的連線。 • 如果超過 15 分鐘未連接 USB 裝置,則 Soundbar 會自動關閉(自動關閉電源)。 + 在連接 USB 裝置之前 請謹記下列要點: ● 如果 USB 裝置上資料夾的檔案名稱超過 10 個字元,它不會顯示在 Soundbar 的 顯示螢幕 上。 ● 本產品可能與某種類型的 USB 儲存媒體不相容。 ● Soundbar 支援 FAT16 和 FAT32 檔案系統。 - 不支援 NTFS 檔案系統。 ● 將 USB 裝置直接連接至產品的 USB 連接埠。否則,可能會發生 USB 相容性問題。 ● 請勿透過多卡讀卡器將多個儲存裝置連接至產品。產品可能無法正常工作。 23 HW-J7501_ZW_CTTW_0313.indd 23 2015-03-13 11:12:23 連線 ● 不支援數位相機 PTP 通訊協定。 ● 當 USB 裝置正在傳輸檔案時,不要將其移除。 ● 無法播放商業網站中受 DRM 保護的音樂檔案(MP3/ WMA)。 ● 不支援外接 HDD。 ● 不支援行動電話裝置。 ● 檔案格式類型相容性清單: 副檔名 轉碼器 取樣率 位元速率 MPEG 1 Layer1 32/44.1/48 32 ~ 448kbps MPEG 1 Layer2 32/44.1/48 32 ~ 384kbps MPEG 1 Layer3 32/44.1/48 32 ~ 320kbps MPEG 2 Layer3 16/22.05/24/32/44.1/48 8 ~ 160kbps MPEG 2.5 Layer3 8/11.025/12/16/22.05/24/32/44.1/4 8 ~ 160kbps 8 Wave_Format_MSAudio1 - - Wave_Format_MSAudio2 - - WMA Professional 不支援 - *.wav - 8 KHz ~ 192KHz ~ 8.8Mbps *.ogg - 8 KHz ~ 48KHz - *.flac - 8 KHz ~ 192KHz ~ 5.6Mbps *.m4a Alac (Apple lossless Audo codec) 8 KHz ~ 192KHz ~ 1Mbps *.ape MON-KEY Audio 8 KHz ~ 48KHz ~ 1Mbps *.aif 音訊交換檔案格式 8 KHz ~ 192KHz ~ 4.4Mbps *.mp3 *.wma ● 如果儲存在 USB 裝置上的資料夾和檔案太多,讀取可能需要一些時間。 24 HW-J7501_ZW_CTTW_0313.indd 24 2015-03-13 11:12:24 功能 功能 功能 (來源)按鈕或遙控器上的 SOURCE 按鈕選取所需模式。 輸入模式 繁體中文 按主裝置頂端面板上的 顯示螢幕 光學數位輸入 ARC (HDMI OUT) 輸入 D.IN AUX 輸入 AUX HDMI 輸入 HDMI BLUETOOTH 模式 BT TV SoundConnect TV USB 模式 USB 在下列情況下,裝置會自動關閉。 ● D.IN / HDMI / BT / TV / USB / ARC 模式 - 如果長達 15 分鐘無音訊信號。 ● AUX 模式 若要將 Auto Power Down 功能設為 ON 或 OFF,按住 & 按鈕 5 秒鐘即可。 ON - AUTO POWER DOWN / OFF - AUTO POWER DOWN 將出現在顯示螢幕上。 - 如果拔下 AUX 纜線長達 15 分鐘。 - 已連接 AUX 纜線時,如果長達 8 小時無按鍵輸入。 25 HW-J7501_ZW_CTTW_0313.indd 25 2015-03-13 11:12:24 功能 藍牙 您可以將藍牙裝置連接至 Soundbar 並以高品質立體聲欣賞音樂,並且全部使用無線連線! 將 SOUNDBAR 連接至藍牙裝置 檢查藍牙裝置是否支援符合藍牙的立體聲耳機功能。 連接 藍牙裝置 1. 按主裝置頂端面板上的 (來源)按鈕或遙控器上的 SOURCE 按鈕選取 BT 模式。 • 將可在 Soundbar 的前顯示螢幕上看到 BT READY。 2. 在要連接的藍牙裝置上選取 Bluetooth 選單。(請參閱藍牙裝置的使用者手冊。) 3. 從清單中選取 "[Samsung] Soundbar"。 • 當將 Soundbar 連接至藍牙裝置時,它會在前面顯示螢幕上顯示 [藍牙裝置名稱] BT。 • 裝置名稱只能以英文顯示。如果名稱不是英文,則會顯示底線 " _ "。 • 如果藍牙裝置無法與 Soundbar 配對,請刪除藍牙裝置發現的上一個 "[Samsung] Soundbar",並讓藍牙裝置再次搜尋 Soundbar。 4. 播放已連接裝置上的音樂。 • 您可以透過 Soundbar 聆聽在已連接的藍牙裝置上播放的音樂。 • 在 BT 模式中,播放 / 暫停 / 下一首 / 上一首 功能無法使用。 不過,在支援 AVRCP 的藍牙裝置中,這些功能可用。 ● ● ● ● 如果在連接藍牙裝置時系統要求您提供 PIN 碼,請輸入 <0000>。 一次只能使一個藍牙裝置配對。 關閉 Soundbar 時,藍牙連線將會終止。 在下列情況下,Soundbar 可能無法正確執行藍牙搜尋或連線: - 如果 Soundbar 周圍存在強電場。 - 如果多個藍牙裝置同時與 Soundbar 配對。 - 如果藍牙裝置已關閉、未備妥或發生故障。 - 請注意,微波爐、無線 LAN 轉接器、螢光燈和煤氣爐等裝置會使用與藍牙裝置相同 的頻率範圍,因此可能會造成電子干擾。 26 HW-J7501_ZW_CTTW_0313.indd 26 2015-03-13 11:12:25 功能 Soundbar 僅支援中等品質 SBC 資料(44.1kHz, 48kHz) 只能連接至支援 A2DP(AV)功能的藍牙裝置。 不能將 Soundbar 連接至僅支援 HF(免提)功能的藍牙裝置。 配對 Soundbar 與藍牙裝置後,如果從裝置的已掃描裝置清單中選取 "[Samsung] Soundbar",則會自動將 Soundbar 切換至 BT 模式。 ● 僅當 Soundbar 列出在藍牙裝置的搜尋到的裝置清單中時才可用。(藍牙裝置 和 Soundbar 先前必須至少已配對 一次。) ● 僅當 Soundbar 顯示 BT READY 時,Soundbar 才會出現在藍牙裝置的搜尋到的裝置清 單中。 ● 在 TV SoundConnect 模式下,Soundbar 不能與另一個藍牙 裝置配對。 繁體中文 ● ● ● ● 從 SOUNDBAR 斷開藍牙裝置的連線 您可以從 Soundbar 斷開藍牙裝置的連線。如需說明,請參閱藍牙裝置的使用者手冊。 ● Soundbar 將斷開連線。 ● 藍牙裝置斷開 Soundbar 的連線時 ,Soundbar 將在前面的顯示螢幕上顯示 BT DISCONNECTED。 從藍牙裝置斷開 SOUNDBAR 的連線 按遙控器上的 SOURCE 按鈕或產品頂端面板上的 或關閉 Soundbar。 (來源)按鈕以從 BT 切換至另一種模式 ● 在終止連線之前,已連接的藍牙裝置將等待特定時間以取得來自 Soundbar 的回應。 (中斷連線時間可能各不相同,具體視藍牙裝置而定) ● 在藍牙連線模式中,如果 Soundbar 與藍牙裝置之間的距離超過 10 公尺,藍牙連線將 會中斷。 ● 保持「備妥」狀態 15 分鐘後,Soundbar 將會自動關閉。 + 藍牙相關詳細資訊 藍牙技術可讓符合藍牙的裝置使用無線連線輕鬆互連。 ● 在下列情況下,藍牙裝置可能導致噪音或發生故障,具體視使用情況而定: - 您身體的某個部位接觸藍牙裝置或 Soundbar 的接收/傳送系統。 - 受來自牆壁、角落或辦公室分隔物形成之障礙的電子變體影響。 - 受相同頻段裝置(包括醫裝置、微波爐和無線 LAN)的電子干擾。 ● 當 Soundbar 與藍牙裝置靠得很近時使兩者配對。 ● Soundbar 與藍牙裝置之間的距離越遠,品質就越差。 如果距離超出藍牙工作範圍,連線將會中斷。 ● 在接收敏感度較差的區域中,藍牙連線可能無法正常工作。 ● 藍牙連線只能在靠近裝置時才能正常工作。如果藍牙裝置超出範圍,則會自動切斷連線。 即使在範圍內,牆壁或門等障礙物也可能導致聲音品質下降。 27 HW-J7501_ZW_CTTW_0313.indd 27 2015-03-13 11:12:25 功能 使用 NETWORK STANDBY ON 功能 如果順利地在智慧型裝置和 Soundbar 之間建立無線了連線,則 Network Standby On 功能便可 用。當智慧型裝置嘗試透過藍牙或 Wi-Fi 連接至 Soundbar 時,此功能可以自動開啟 Soundbar。如果已透過藍牙連線開啟 Soundbar,則其輸入模式會自動設定為 BT。透過 Wi-Fi 開啟 Soundbar 的功能只能透過應用程式使用。如需更多資訊,請參閱 Web 手冊。 1. 將智慧型裝置連接至 Soundbar。 2. 透過是按 Soundbar 遙控器上的 $ 按鈕 5 秒鐘以上,開啟 Network Standby On 功能。 再次按 $ 按鈕 5 秒鐘以上可以關閉此功能。 ● 僅當 Soundbar 列出在智慧型裝置的已配對裝置中時才可用。(智慧型裝置與 Soundbar 以前至少必須曾經配對一次。) ● 僅當 Soundbar 顯示 [BT READY] 或 [WiFi READY] 時,Soundbar 才會出現在智慧型裝 置的搜尋到的裝置中。 ● 在 TV SoundConnect 模式下,Soundbar 無法和其他智慧型裝置配對。 ● 如果 Network Standby On 功能不起作用 - 將 Network Standby On 功能。 ● 如果 Soundbar 的電源插頭被拔下或其電源中斷,則它的 Wi-Fi 連線會終止。 開啟 Soundbar 並重新連接。 使用 MULTIROOM LINK 一旦使用 Multiroom 應用程式將 Soundbar 連接至智慧型裝置,您就可以採用無線方式將多個 Samsung Multiroom 裝置連接在一起。 在開始之前 + 通訊基礎 智慧型裝置: Android 或 iOS (應用程式控制) 網際網路 無線路由器 1. 需求:無線路由器、智慧型裝置 2. 應該將無線路由器連接至網際網路。 3. 應該透過 Wi-Fi 連線將智慧型裝置連接至路由器。 28 HW-J7501_ZW_CTTW_0313.indd 28 2015-03-13 11:12:26 功能 安裝 SAMSUNG MULTIROOM 應用程式 繁體中文 若要使用 Soundbar,必須在 Google Play 或 App Store 存取 Samsung Multiroom 應用程式,以 下載並安裝該應用程式。安裝 Samsung Multiroom 應用程式後,即可播放儲存在智慧型裝置 上、來自已連接裝置、其他內容提供者和網際網路電台的音樂。 + Android 或 iOS 在智慧型裝置上,從 Google Play 或 App Store 中下載 Samsung Multiroom 應用程式。 * Market 搜尋 : Samsung Multiroom ANDROID APP ON 或 + 存取 Samsung Multiroom 應用程式 若要存取 Samsung Multiroom 應用程式,請在智慧型裝置上按 Multiroom 應用程式圖示。 將 SOUNDBAR 連接至網路 在智慧型裝置上,選取 Samsung Multiroom 應用程式。 按照智慧型裝置上的說明操作。 ● 如需更多資訊,請參閱 Web 手冊。 - Web 手冊:www.Samsung.com Support (支援) 產品名稱搜尋 HW-J7501 PDF 檔案下載。 ● 連接至有線網路時,請嘗試使用 CAT 7 電纜來連接。 29 HW-J7501_ZW_CTTW_0313.indd 29 2015-03-13 11:12:26 功能 AUX IN LAN HDMI IN HDMI OUT OPTICAL IN (TV-ARC) 軟體更新 DC 24V Wi-Fi SETUP SPK ADD 5V 0.5A 5V 0.5A 使用 USB 更新 Samsung 以後可能會提供 Soundbar 的系統韌體更新。 如果提供更新,您可以將儲存韌體更新的 USB 裝置連接至 Soundbar 上的 USB 連結埠來更新韌 體。 請注意,如果有多個更新檔案,則必須將它們分別載入到 USB 裝置上,然後逐一使用它們來更 新韌體。 請造訪 Samsung.com 或聯絡 Samsung 呼叫中心,以取得關於下載更新檔案的更多資訊。 1. 在 Soundbar 關閉的情況下,將含有更新韌體的 USB 儲存裝置插入 Soundbar 的 USB 連接 埠。 2. 開啟 Soundbar UPDATE 將會顯示在顯示螢幕上,並且更新將會在 3 分鐘內開始。 • 完成更新時,Soundbar 會自動關閉再開啟。 如果未顯示 UPDATE 1. 關閉 Soundbar,將含有更新檔案的 USB 儲存裝置連接至 Soundbar 的 USB 連接埠。 2. 拔下電源插頭再重新插入,然後開機。 ● 將含有韌體更新的 USB 裝置插入主裝置的 USB 連接埠。 ● 如果 USB 儲存裝置上儲存有 Soundbar 支援的音訊檔案,則更新韌體作業可能無法正 確完成。 ● 套用更新期間,不要斷開電源或移除 USB 裝置。主裝置將在完成韌體更新後自動關 閉。 30 HW-J7501_ZW_CTTW_0313.indd 30 2015-03-13 11:12:26 功能 繁體中文 ● 更新後,會將所有設定重設為其出廠預設設定。建議記下您的設定,以便在更新之後 輕鬆重設。請注意,更新韌體還會重設低音揚聲器連線。如果在更新之後未能自動建 立與低音炮的連線,請參閱第 17 頁。如果韌體更新失敗,建議用 FAT16 格式來格式 化 USB 裝置,然後重試。 ● 不要採用 NTFS 格式來格式化 USB 磁碟機。Soundbar 並不支援 NTFS 檔案系統。 ● 視製造商而定,可能不支援某些 USB 裝置。 自動更新 即使 Soundbar 已關閉,如果 Soundbar 連接至網際網路,它也會自動檢查最新的軟體版本並繼 續更新。 ● 依預設,Soundbar 設定為執行自動更新。 ● 若要使用自動更新功能,必須將 Soundbar 連接至網際網路。 ● 如果 Soundbar 的電源插頭被拔下或其電源中斷,則它的 Wi-Fi 連線會終止。開啟 Soundbar 並重新連接。 31 HW-J7501_ZW_CTTW_0313.indd 31 2015-03-13 11:12:27 故障排除 故障排除 故障排除 在請求服務前,請檢查下列內容。 裝置無法開啟。 • 是否已將電源插頭插入電源插座中? 將電源插頭連接至電源插座。 按按鈕時,功能不起作用。 • 空氣中是否有靜電? 拔下電源插頭並重新連接。 不發出聲音。 • 是否已開啟靜音功能? 按 • 是否已將音量設定為最低音量? 調高音量。 (靜音) 按鈕以取消靜音功能。 遙控器不起作用。 • 電池電量是否已耗完? 更換新電池。 • 遙控器與主裝置之間的距離是否太遠? 離裝置近一些。 電視聲音連接(電視 配對)失敗。 • 電視是否支援「電視聲音連接」? 2012 年後發行的一些 Samsung 電視支 援「電視聲音連接」。檢查電視,瞭解 它是否支援「電視聲音連接」。 • 電視韌體是否為最新版本? 使用最新韌體更新電視。 • 連接時是否發生錯誤? 與 Samsung 呼叫中心聯絡。 • 重設電視模式並再次連接。 按住 & 按鈕 5 秒以重置 TV SoundConnect 連線。 低音揚聲器上的紅色 LED 閃爍,並且低音揚聲器不發出聲音。 • 低音揚聲器可能未連接至產品主機。 再次嘗試連接低音揚聲器。 (請參閱第 17 頁) 低音揚聲器發出嗡嗡聲且明顯震動。 • 嘗試調節低音揚聲器的振動。 按遙控器上的 WOOFER 按鈕可以調節低 音揚聲器的音量(在 -12、-6 到 +6 之 間)。 32 HW-J7501_ZW_CTTW_0313.indd 32 2015-03-13 11:12:27 附錄 附錄 規格 HW-J7501 USB 一般 5V / 0.5A 主機 4 千克 重量 重低音音箱 (PS-WJ7501) 7.8 千克 尺寸 (寬 x 高 x 厚) 主機 1230 x 47.5 x 170 毫米 重低音音箱 (PS-WJ7501) 500 x 332 x 161 毫米 工作溫度範圍 +5 ℃ 到 +35 ℃ 工作濕度範圍 10 % 到 75 % 主機 放大器 繁體中文 型號名稱 20W/CH x 8, 8OHM, THD=10%, 1KHz 額定輸出功 重低音音箱 率 (PS-WJ7501) 160W, 3OHM, THD=10%, 100Hz 訊噪比(類比輸入) 65 dB 間隔(1kHz) 65 dB * 訊噪比、失真度、分離度與可用靈敏度基於使用 AES(音訊工程學會)指導原則的量測。 * 標稱規格 - Samsung Electronics Co., Ltd 保留隨時變更規格的權利,恕不另行通知。 - 重量和尺寸為估計值。 - 電源和消耗功率,請參考本產品上的標籤。 * 低功率電波輻射性電機管理辦法 第十二條 經型式認證合格之低功率射頻電機,非經許可,公司、商號或使用者均不得擅自變 更頻率、加大功率或變更原設計之特性及功能。 第十四條 低功率射頻電機之使用不得影響飛航安全及干擾合法通信;經發現有干擾現象時, 應改善至無干擾時方得繼續使用。前項合法通信,指依電信法規定作業之無線電通信。 低功率射頻電機須忍受合法通信或工業、科學及醫療用電波輻射性電機設備之干擾。 * HW-J7501 : DC24V, 42W * PS-WJ7501 : AC110~240V ~50/60Hz, 28W a 開放式原始碼授權聲明 - 若要傳送有關開放式原始碼的諮詢,請透過電子郵件([email protected]) 與 Samsung 聯絡。 33 HW-J7501_ZW_CTTW_0313.indd 33 2015-03-13 11:12:27 ©2015 Samsung Electronics Co.,Ltd. All rights reserved Contact SAMSUNG WORLD WIDE If you have any questions or comments relating to Samsung products, please contact the SAMSUNG customer care Centre. © 2015 Samsung Electronics Co., Ltd. 保留一切權利。 在全球範圍內聯絡三星 如果您有任何關於三星產品的問題或建議,請聯絡三星客戶服務中心。 Contact Centre Area ` Asia Pacific CHINA 400-810-5858 HONG KONG (852) 3698 4698 MACAU SINGAPORE AUSTRALIA NEW ZEALAND VIETNAM THAILAND MYANMAR 0800 333 1800-SAMSUNG(726-7864) 1300 362 603 0800 726 786 1800 588 889 0-2689-3232, 1800-29-3232 +95-01-2399-888 1800-88-9999 603-77137477 (Overseas contact) 021-56997777 08001128888 1-800-10-7267864 [PLDT] 1-800-8-7267864 [Globe landline and Mobile] 02-4222111 [Other landline] 0800-329999 0120-363-905 1800 3000 8282 - Toll Free 1800 266 8282 - Toll Free 9612300300 94117540540 MALAYSIA INDONESIA PHILIPPINES TAIWAN JAPAN INDIA BANGLADESH SRI LANKA AH68-02820X-00 HW-J7501_ZW_CTTW_0313.indd 34 Web Site www.samsung.com/cn/support www.samsung.com/hk/support (Chinese) www.samsung.com/hk_en/support (English) www.samsung.com/support www.samsung.com/sg/support www.samsung.com/au/support www.samsung.com/nz/support www.samsung.com/vn/support www.samsung.com/th/support www.samsung.com/support www.samsung.com/my/support www.samsung.com/id/support www.samsung.com/ph/support www.samsung.com/tw/support www.samsung.com/jp/support www.samsung.com/in/support www.samsung.com/support AH68-02820X-00 2015-03-13 11:12:27