1
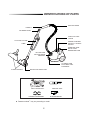
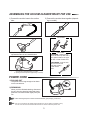
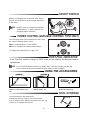
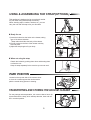
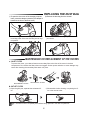
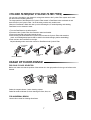
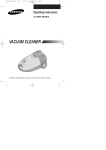
Operating lnstructions
For household use only
Models
VAC-5900 SERIES
VACUUM CLEANER
Before operating this unit, please read the instructions carefully.
IMPORTANT SAFETY INSTRUCTIONS
When using an electrical appliance, basic precautions should always be followed, including the
following:
READ ALL INSTRUCTIONS BEFORE USING THIS
VACUUM CLEANER.
WARNING
To reduce the risk of fire, electric shock, or injury:
1. Do not leave appliance when plugged in. Unplug from outlet when not in use and before servicing.
2. Do not use outdoors or on wet surfaces.
3. Do not allow to be used as a toy. Close attention is necessary when used by or near children.
4. Use only as described in this manual. Use only manufacturer’s recommended attachments.
5. Do not use with damaged cord or plug. If appliance is not working as it should, has been dropped,
damaged, left out door, or dropped into water, return it to a service center.
6. Do not pull or carry by cord, use cord as a handle, close a door on cord, or pull cord around sharp
edges or corners. Do not run appliance over cord. Keep cord away from heated surfaces.
7. Do not unplug by pulling on cord. To unplug, grasp the plug, not the cord.
8. Do not handle plug or appliance with wet hands.
9. Do not put any object into openings. Do not use with any opening blocked; keep free of dust, lint,
hair and anything that may reduce air flow.
10. Keep hair, loose clothing, fingers, and all parts of body away from openings and moving parts.
11. Do not pick up anything that is burning or smoking, such as cigarettes, matches, or hot ashes.
12. Do not use without dust bag and filters in place.
13. Turn off all controls before unplugging.
14. Use extra care when cleaning on stairs.
15. Do not use to pick up flammable or combustible liquids such as gasoline or use in areas where
they may be present.
16. Store your cleaner indoors in a cool dry area.
17. Do not use extension cords or outlet with inadequate current carrying capacity.
18. Unplug electrical appliances before vacuuming them.
19. Hold plug when rewinding onto cord reel. Do not allow plug to whip when rewinding.
SAVE THESE INSTRUCTIONS
To reduce the risk of electric shock, this appliance has a polarized plug (one blade is wider than the
other). This plug will fit in a polarized outlet only one way. If the plug does not fit fully in the outlet,
reverse the plug. If it still does not fit, contact a qualified electrician to install the proper outlet. Do not
change the plug in any way.
1
IDENTIFICATIONS OF PARTS
SUCTION HOSE
HANDLE
AIR REGULATOR
DUST-FULL INDICATOR
CYCLONIC FILTER*
POWER CONTROL
SWITCH* & ON/OFF
SWITCH
TUBE*
CARRYING HANDLE & CORD
REWIND BUTTON
BUTTON FOR
SUCTION HOSE
REMOVAL
CLAMPER FOR
DUST BAG COMPARTMENT
FLOOR NOZZLE*
RUG/FLOOR SELECTOR
*BELT-STRAP ASSY
HANGER ACCESSORY
Features marked * may vary according to model.
2
CREVICE-TOOL
DUSTING BRUSH
ASSEMBLING THE VACUUM-CLEANER READY FOR USE
1) Connect the suction hose to the suction
tube.
2) Connect the suction tubes together (depending on model).
3) Connect the nozzle to the suction tube.
*OPTION➀
4) Grip the body connector with one hand and
squeeze the tube in an inward direction.
*OPTION➁
EXTENDING : Holding narrow
side of the telescopic tube with a
hand, pull the hadle to the opposite side of it with another hand.
SHORTENING : Push the handle to the narrow side
of the tube, hoding
it with another
hand.
* Option ➀ Assemble the CYCLONIC FILTER with the handle
and extension wand(depending on model).
➁ Ajusting the telescopic tubes (depending on model).
POWER CORD
1) PULLING OUT
The power cord is long enough to be drawn
out for convenience.
2) REWINDING
When you have finished cleaning, disconnect
the plug from the electrical outlet and simply
press the cord rewind button lightly with your
toe.
NOTE : When removing the power cord from the electrical outlet, grasp the plug, not the cord.
NOTE : For your convenience, the handle has two functions. It can be used as a “handle” to carry
the unit. It is also the cord rewind button that can be used to rewind the power cord.
3
ON/OFF SWITCH
With the cord plugged into an electrical outlet, start or
stop the vacuum cleaner by pushing lightly downward
on the switch.
NOTE : ON/OFF switch is combined with POWER
CONTROLLER - To start or stop the unit
just lightly press it downward.
POWER CONTROL(VARIABLE CONTROL TYPE ONLY)
The vacuuming power can be adjusted to suit any situation with the electrical power control.
MIN = For delicate fabrics, e.g.net curtains.
MAX = For hard floors and heavily soiled carpets.
-To adjust power output just turn it right or left.
DUST-FULL INDICATOR
If the “Dust-Full” indicator changes to “RED” while you are cleaning, the dust bag requires
replacement.
NOTE : If the “Dust-Full” indicator continues to display “RED” even after changing the dust bag,
turn the cleaner off and check whether the hose, tube or nozzle is clogged.
USING THE ACCESSORIES
CREVICE
Crevice tool for radiators,
crevices, corners, between cushions.
DUSTING
Dusting brush for furniture,
shelves, books, etc.
• Before use, assemble the dusting
brush to the crevice tool
TOOL STORAGE
Your cleaner features a tool storage device.
Assemble the accessory hanger on to the extension tube.
It can be used to store the cleaning tools while they are not in use.
This tool can be separated into two parts.
4
USING & ASSEMBLING THE STRAP(OPTIONAL)
This appliance is designed to be conveniently carried
on your waist using the belt-strap accessory.
When cleaning steps, curtains, shelves, etc, you can
carry the unit with the strap over your shoulder.
1)
Ready for use
1) Insert the lockers into the holes on the cleaner, taking
care of the lockers’ direction.
*Strap-ends should face the body of the cleaner.
2) Pull the lockers to the front of the cleaner until they
click into place.
3) Adjust the strap length to fit your body.
*
Locker
2)
3)
When not using the strap
- Detach the lockers by pushing them down and drawing them
out from the unit.
- Keep the strap separately for the next time you want to use it.
PARK POSITION
Located on the top rear side of the vacuum-cleaner, there is a nozzle support that can be used to
park the nozzle during pauses in cleaning.
TRANSPORTING AND STORING THE VACUUM CLEANER
For easy storage and transportation, this vacuum cleaner has a clip
system built onto the body, which will keep the tube, hose and nozzle in a vertical position.
5
REPLACING THE DUST BAG
1) To open the dust cover of the dust bag compartment, press the clamper upwards.(The clamper is
located at the front of the dust cover)
2) Remove the dust bag from the cleaner.
3) After removing the used dust bag, insert the cardboard bag collar of the new dust bag into its original position.
4) Press the dust cover down gently until the clamper relocks.
MAINTENANCE OR REPLACEMENT OF THE FILTERS
INLET FILTER
To protect the motor, your cleaner features a secondary filter at the front of the motor in the dust
compartment. Do not allow the filter to become clogged. Suction power reduction or motor damage may
result. After cleaning the secondary filter attach it in place.
SECONDARY FILTER
SECONDARY FILTER
OUTLET FILTER
1) Open the grille part, separate the exhausted filter.
2) Reassemble it after cleaning or replacing the filter in the reverse order.
NOTE: The filters must be completely dried before being replaced in the dust compartment.
6
CYCLONIC FILTER(ONLY CYCLONIC FILTER TYPES)
You can use a dust bag in your cleaner for a long time thanks to the Cyclonic Filter system and it maintain the maximum cleaning efficiency.
The larger particle of dust filtered from Cyclonic Filter remain in Dust Barrel when suctioned air and
dust revolves in the Cyclonic Filter. So the dust bag contains only smaller ones.
When the Dust Barrel is filled with dust up to the indicating line, it needs disposing and cleaning.
Dust Barrel can be cleaned in water.
1.Turn the Dust Barrel to the left and pull it.
2.Disconnect the Cyclonic Filter from extension wand and handle.
3.Remove thread and hair tangled around the net.
4.After cleaning the Dust Barrel and Cyclonic Filter,connect the Cyclonic Filter with extension
wand and handle(washed part should be dried in the shade throughly before assembling).
5.Push and turn the Dust Barrel to the right.
Adjust indicating marks each other carved on Dust Barrel and Cyclonic Filter.
CYCLONIC
FILTER
DUST BARREL
CREVICE
TOOL
USAGE OF FLOOR NOZZLE
FOR RUG / FLOOR SELECTOR
Before use make sure that the position of the selector is in the right position for the type of surface to be
cleaned.
Select the carpet indicator ➀ when cleaning carpets.
Select flat surface indicator ➁ when cleaning the floors, tiles, etc.
FOR UNIVERSAL BRUSH
Use the floor nozzle for cleaning all surfaces.
7
NOTE: For optimum efficiency, clean floor brush with crevice tool.
TROUBLE SHOOTING
PROBLEM
CAUSE
REMEDY
Motor does not start
No voltage
Check cable, plug and socket.
Suction force is gradually
reduced
Filter, nozzle, suction hose or
tube is blocked,or bag full.
Remove the obstruction
or replace bag.
Cord does not rewind fully
Check that the cord is
not twisted or wound unevenly
Pull the cord out 6~10ft & push
down the Cord Rewind button.
8
CODE-NO:DJ68-00068U REV(0.1)