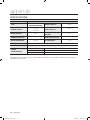
1
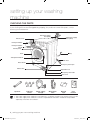
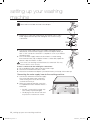
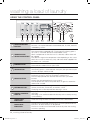
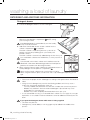
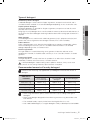
SEW-6HR103J Drum Washing Machine user manual SEW-6HR103J_EN.indd 1 2008-08-05 ¿ÀÈÄ 4:28:01 features of your new samsung washing machine Your new washing machine will change the way you feel about doing laundry. The Samsung washing machine has all the features to turn a mundane chore into a pleasure. • From washing to drying, all-at-once! This (revolutionary) washing machine provides a convenient washing experience which not only helps you to wash, but also spin and dry, all-at-once. • Water saving, Strong spin action The unit only requires a minimum amount of water, as its water saving is excellent and its spin effect is exceptional as it has a strong spin function • Child Lock The Child Lock function ensures that curious little hands are kept out of your washing machine. This safety feature stops your children from playing with the operation of the washing machine, and alerts you when it is activated. • High Temperature Sterilizing Wash at 95˚C The built-in heater boils laundry such as cotton garments, work uniforms and baby clothes at up to 95˚C, resulting in a hygienic and clean wash. Keeping the drum clean When using the machine under humid conditions for an extended time, various airborne bacteria may enter the drum and form a black layer of dirt (fungi), that is harmful to the human body. To keep the drum clean and hygienic at all times, it is recommended using a dedicated or recommended detergent to clean the drum regularly, at least once every one to three months. This product has 1 year free warranty period from the date it was purchased. However; an extra fee may be charged depending on the service. Please read the Product Warranty Statement carefully before using your washing machine. WARNING The shipping bolts (used for delivery) on the back of the unit MUST be dismantled before use. Failing to dismantle the shipping bolts will result in serious damage to the unit as well as personal injury. (Please refer to page 9 for more details.) 2_ features SEW-6HR103J_EN.indd 2 2008-08-05 ¿ÀÈÄ 4:28:02 safety information Throughout this manual, you’ll see Warning and Caution notes. These warnings, cautions, and the important safety instructions that follow do not cover all possible conditions and situations that may occur. It’s your responsibility to use common sense, caution, and care when installing, maintaining, and operating your washing machine. Samsung is not liable for damages resulting from improper use. IMPORTANT SAFETY SYMBOLS AND PRECAUTIONS What the icons and signs in this user manual mean: This product uses 220V rated voltage. WARNING Hazards or unsafe practices that may result in severe personal injury or death. CAUTION Hazards or unsafe practices that may result in minor personal injury or property damage. Explains the details for more effective use of the machine. Unplug the power from the wall socket. Make sure the machine is grounded to prevent electric shock. TERM* Explains technical terminology to help understand the use of product. Do NOT disassemble. Refer to the concerned page. These warning signs are here to prevent injury to you and others. Please follow them explicitly. After reading this section, keep it in a safe place for future reference. WARNING WARNING: Power and installation When the power cord, plug and the outlet are broken, please contact a service center instead of using the broken item. - Failing to do so, may result in electric shock or fire. Do NOT bend the power cord forcefully, or place heavy objects onto it. This may result in a product malfunction. - Failing to do so, may result in electric shock or fire. Ensure that the washing machine is properly grounded. - There may be a risk of electric shock if the machine breaks down or leaks. - The washing machine must be connected to an outlet with an earth terminal . - Please ask your local Samsung Customer Service or refer to the User Manual for the proper grounding method. (Refer to page 10 “Grounding Method.”) Do not pull out the plug holding only the cable when unplugging the power cord, and do not touch the plug with wet hands. Do not use the power plug when it is loose. - May have a risk of electric shock and fire. safety information _3 SEW-6HR103J_EN.indd 3 2008-08-05 ¿ÀÈÄ 4:28:03 safety information Ensure that your power supply offers 220V/15A or more power current. - If the rated current or voltage is different, this may result in electric shock or fire. - Do not use multiple products with one outlet. - Never use an extension cord. - Do NOT use unrated objects such as copper and wire. Use a dry cloth if the contact points of power plug are dusty or exposed to water. - Failing to do so may result in electric shock or fire. Do NOT install the washing machine close to a heating device and do NOT place candles or lit cigarettes on top of the washing machine. - This may result in fire. Do NOT transform to the current to 220V using an 110V electrical booster. - This may result in electric shock or fire. Do NOT install the washing machine in a location exposed to high humidity snow or rain, or on a carpet or inside a bathroom. - This may result in electric shock or fire. Besides of rated fuse, do NOT use non-rated objects such as copper and wire. - May cause risk of electric shock, fire and injury. WARNING WARNING: Use Do NOT enter the room where the washing machine is located when water has leaked and is under the washing machine. - Make sure that the power is off and that the water has been removed as this may result in electric shock. Do NOT add gasoline, kerosene, benzene, thinner, denatured alcohol, or lighter into the product or leave them near the machine. Also, do not place laundry stained with these chemicals into the Drum. - This may result in an explosion or fire. - Do not use dry cleaning solvent directly and do not wash, rinse or spin clothing exposed to cleaning solvent. Do NOT allow children to operate the washing machine or allow them to climb on top or get into the Drum. - This may result in injury or even fatality. Do NOT dismantle, repair or reconstruct the machine yourself. The washing machine may only be repaired by a service technician. - This may result in a malfunction, electric shock, fire or injury. Do NOT spray water onto all of the parts of the main body when cleaning the machine. - This will reduce the life span of the washing machine and increase the risk of fire and electric shock. Do NOT touch the water flowing out of the washing machine as it is very hot. - This may cause injury. Do NOT place your hands or any metal objects under the washing machine while the machine is running. - This may cause injury. Do not let children play near the washing machine and ensure that they do not place their hands inside the machine. - This may cause injury. 4_ safety information SEW-6HR103J_EN.indd 4 2008-08-05 ¿ÀÈÄ 4:28:03 Do NOT open the door with force as it may cause malfunction. - Opening the door with force will cause damage to the product and a possible injury. - May get burn or slip as water will flow out. If there is a power failure or unusual malfunctioning during washing, please close the door manually (use the manual lever). To open, hold the door and operate the lever. - If internal pressure is high, it would be risky as the door would open abruptly. CAUTION CAUTION: Power and installation Make sure to install the washing machine on a flat and solid floor. - Unusual vibrations or noise may result in a malfunction. Make sure to move or unpack the unit using at least two persons as the unit is heavy. - Failing to do so may result in damage to the product or injury. - If the product falls onto its side, please contact Samsung Customer Service as this may result in a malfunction. Install the washing machine in a convenient location so that plugging and unplugging the machine is easy. If the machine is not in use, you MUST unplug the power. - Failing to do so, may result in electric shock or fire. Do NOT place magnetic objects on top of the cover or next to the main body while the machine is running. - The magnetic force could cause a malfunction of the cover open detection switch which may result in injury. If the water supply hose is wet because it slipped out of the water tap, turn off the power and unplug the cord. If the washing machine is wet, it MUST be reported to the Samsung Customer Service. - This may result in electric shock or fire. To reconnect after the water supply has been cut off or if the water supply hose was dismantled, press the Power and Start/Pause buttons and open the water tap slowly. This also applies when the washing machine has not been used for a long time. - Air may be trapped inside the water supply hose and water pipe, and this may damage the main body due to the compressed air pressure, resulting in a leak or injury. CAUTION CAUTION: Other uses Do NOT operate the washing machine with wet hands. - This may result in electric shock or fire. If the washing machine starts generating smoke, odors or unusual sounds, unplug the machine immediately and call a service center. - This may result in electric shock or fire. Do NOT operate the machine when the detergent drawer is removed. - This may cause electric shock and injury if water leaks while the washing machine is operating. The unit is likely to get frozen during the winter season thus please drain out the remaining water completely after washing. - This may cause break down or damage. Check whether the water drain is malfunctioning. - Using the washing machine when it is soaked in water (due to a water drain defect), will result in a leakage, fire or electric shock. - Take care, as the water is hot. safety information _5 SEW-6HR103J_EN.indd 5 2008-08-05 ¿ÀÈÄ 4:28:03 safety information Do NOT wash water proof garments or sheets such as rain coats, vehicle covers and sleeping bags. - If the washing machine is making unusual vibrations due to the laundry, it may result in injury. - The wall, floor or garments may be damaged due to the irregular vibrations during the wash. If the product is stained with detergent and dirt, use a soft wet cloth to wipe it off. - Leaving stains and dirt may deform the product. If the door is opened while drying or when laundry is removed after drying is finished, the window inside the door may be hot, and may cause burns (for dryer models). - Take care to not open or close the door too wide. Make sure to close the water tap after washing is completed. - If the screw is loose around the water supply hose connector, this may result in damage and injury. Do not sit on or place articles on top of the washing machine. - The articles may fall, and be damaged while the machine is running. Do not put your hands inside while opening a detergent drawer. - This may result in injury. Do NOT place pet(s) inside the washing machine. - This may result in injury or death. Do NOT wash laundry stained with chemicals such as lotions, creams or oils used by skin therapists and massage parlors. - The deformed packing will be a factor of dysfunction (leak). Do NOT touch the washing machine or the power plug when gas is leaking. Ventilate immediately. - Failing to do so may result in an explosion or fire. Do NOT use an extension cord. - Heat generation of dysfunction of an outlet will cause fire. - If using an extension cord inevitably, be sure to an extension cord in single, with an earth terminal of more than 250V 15A certified by safety regulation. Do NOT use the washing machine for any other purpose than washing laundry. (such as shoes, potatoes, cabbage, tangle weeds) - Unusual vibrations from the main body will result in damage and injury. Do NOT press the button using sharp objects, fingernails or pins. - This may result in injury or electric shock. A stainless drum is unlikely to rust. However; leaving metal objects (pins or hair pins) inside the drum for considerable amounts of time may result in rust. - Do not leave chlorine such as water and bleach in the drum for a long period. - Do not use water with too much iron for a long period. If you find rust, clean it with a sponge using a soft cleanser (mild detergent). Do not use metal type sponges. 6_ safety information SEW-6HR103J_EN.indd 6 2008-08-05 ¿ÀÈÄ 4:28:04 contents SETTING UP YOUR WASHING MACHINE 8 9 Checking the parts Installing your washing machine WASHING A LOAD OF LAUNDRY 14 16 20 20 Using the control panel Detergent and additives information Basic instructions Using Cycle Selector CLEANING AND MAINTAINING YOUR WASHING MACHINE 28 28 29 30 Cleaning the debris filter Cleaning the exterior Cleaning the detergent drawer and drawer recess Cleaning the water hose mesh filter TROUBLESHOOTING AND INFORMATION CODES 31 34 Check these points if your washing machine Information codes APPENDIX 35 35 35 36 Fabric care chart Disposing of electronic equipment Samsung Electronics’ Green Management Specifications 8 14 28 31 35 contents _7 SEW-6HR103J_EN.indd 7 2008-08-05 ¿ÀÈÄ 4:28:04 setting up your washing machine CHECKING THE PARTS Carefully unpack your washing machine, and make sure you’ve received all of the parts shown below. If your washing machine was damaged during shipping, or if you do not have all of the parts, contact Samsung Customer Service. Hot water supply hose (Red) Release lever Cold water supply hose (Blue) Detergent drawer Detergent drawer handle Control panel Plug Door Transparent window Drain hose Door handle Emergency door open Debris filter Adjustable feet Emergency drain tube Filter cover Spanner Bolt hole covers Water supply hose(2) Water drain hose Nonslip tape User manual • The water supply hose and drain hose (extension) can be purchased at your nearest service center. • The water supply hose and drain hose are not provided for the built-in model but are provided separately at the time of installation. 8_ setting up your new washing machine SEW-6HR103J_EN.indd 8 2008-08-05 ¿ÀÈÄ 4:28:05 INSTALLING YOUR WASHING MACHINE Before you install the washing machine, make sure the location: • • • • • • has a hard, level surface without carpeting or flooring that may obstruct ventilation is away from direct sunlight has adequate ventilation is not exposed to freezing temperatures is away from heat sources such as oil or gas has enough space so that the washing machine doesn’t stand on its power cord 01 SETTING UP STEP 1 Selecting a location STEP 2 Removing the shipping bolts Before installing the washing machine, you must remove the five shipping bolts from the back of the unit. CAUTION When moving the washing machine, please use the disassembled shipping bolts by screwing them in again. Moving the product without fastening the shipping bolts may damage the washing machine, resulting in a malfunction. 1. Loosen all the bolts with the supplied wrench. 2. Hold the bolt with the wrench and pull it through the wide section of the hole. Repeat the step for each bolt. 3. Insert the supplied plastic covers into each of the five holes. setting up your new washing machine _9 SEW-6HR103J_EN.indd 9 2008-08-05 ¿ÀÈÄ 4:28:06 setting up your washing machine STEP 3 Grounding your washing machine Your washing machine must be grounded. If your washing machine malfunctions or breaks down, grounding will reduce the risk of electric shock by providing a path of least resistance for the electric current. Grounding terminal If your outlet has a grounding terminal You do not need to ground it separately. If your outlet does not have a grounding terminal Wind the ground wire (copper wire) 2-3 times around your water tap. OR If you connect the ground wire to a copper plate, please bury it 75 cm underground where there is a lot of moisture. CAUTION Do NOT ground to a gas pipe, a plastic water pipe or telephone line. Connecting to these objects may cause electric shock or an explosion. Purchase the ground wire from a Samsung Service Center and connect it to the back of the unit. STEP 4 Leveling your washing machine 1. Place your washing machine a distance of more than 10 cm away from the wall. 10 cm 10 cm 2. Make sure your washing machine is level by adjusting the leveling feet: - Readjust the leveling feet if the washing machine moves when shaking it, or when pressing the left and right corners. - If the unit shakes, please readjust the leveling feet. 10_ setting up your new washing machine SEW-6HR103J_EN.indd 10 2008-08-05 ¿ÀÈÄ 4:28:07 Adjusting the leveling feet 1. A horizontal level means that the washing machine does not shake or wobble when pressure is applied to any part of it. 01 SETTING UP 2. Lowering the Horizontal Level: 1. Use a spanner. Turn the leveling nut to the left. 2. Turn the leveling feet to the right to adjust the height. 3. Use a wrench. Turn the leveling nut to the right to fix it firmly. Leveling nut Spanner Leveling feet 3. Adjusting the leveling: 1. Use a spanner. Turn the leveling nut to the left to release it. 2. Turn the leveling feet to the left to adjust the height. 3. Use a wrench. Turn the leveling nut to the right to fix it firmly. CAUTION If the locking nut is not completely fixed, the washing machine is likely to make vibration and noise. STEP 5 Connecting the water and drain Connecting the water supply hose to the water tap If the adaptor and the water tap have different sizes, please purchase a water tap that fits the adaptor from a hardware store. 1. First loosen the four screws on the adaptor using a ‘+’ type screwdriver. Adaptor setting up your new washing machine _11 SEW-6HR103J_EN.indd 11 2008-08-05 ¿ÀÈÄ 4:28:08 setting up your washing machine 2. Push the adaptor all the way to the top of the water tap. Please refer to the label attached to the adaptor. 3. Tighten the 4 screws the same amount. Place plastic nuts 1 and 2 inside, tighten them first by hand and tighten nuts 3 and 4 using a screw driver. 2 1 3 4 4. Connect the water supply hose to the adaptor. While pressing the release lever, insert the water supply hose into the adaptor. When you hear a ‘click’ sound, the connection is complete as soon as you release the release lever. 5. Turn on the water supply and ensure that there is no water leaking from the water valve, tap or adaptor. If there is a water leak, repeat the previous steps until there is no leak. CAUTION Do not use your washing machine if there is a water leak. This may result in electric shock or injury. If there is a water leak after making the connections: 1. Re-assemble the water supply hose from the first step. 2. Please check whether the screw is skew. 3. Please check whether the adaptor is pushed all the way to the top of the water tap. Connecting the water supply hose to the washing machine 1. Connect the other end of the water supply hose to the inlet water valve at the back of the washing machine. Screw the hose clockwise all the way in. 2. Open your water tap after the connection is completed and check whether there is a water leak. Cold water/Hot water • Do NOT connect with hot water only. Your laundry may be damaged. • The drying function will not work and may result in a malfunction or error. 12_ setting up your new washing machine SEW-6HR103J_EN.indd 12 2008-08-05 ¿ÀÈÄ 4:28:09 If you want to extend the water supply hose: If your washing machine is some distance from your water tap, please follow the procedures below. 1. Purchase a water supply hose. – A water supply hose extension can be purchased at a Samsung Service Center. The water supply hose and hose connector can be purchased at a Samsung Service Center. 01 SETTING UP 2. Use an extra hose. – If you are using cold water only, you can use the other hose by connecting it to a hose connecter to extend the hose. Connecting the drain hose 1. Press the joint ring grip of the drain hose and insert it into the required position. - Insert the drain hose tightly into the drain outlet, press the joint ring, and push it towards the main body firmly to fix it. 2. Please connect the drain hose firmly so that it cannot come loose from the drain outlet. - If the drain hose is not firmly fixed, bubbles or water may leak in the draining stage. Caution! Drain hose installation 1. Please connect the drain hose firmly. - This may cause a leak around the connecting parts. 2. Please do not let the drain hose be pressed by a heavy object or become entangled. - This may result in a drainage problem. 3. If you plan to use an extended drain hose, please level it when installing it (no curvature). - Any unevenness may result in a drainage problem. 4. Ensure that the tip of the drain hose is not submerged. - This may result in a drainage problem. setting up your new washing machine _13 SEW-6HR103J_EN.indd 13 2008-08-05 ¿ÀÈÄ 4:28:10 washing a load of laundry USING THE CONTROL PANEL 1 3 2 4 5 6 7 8 9 10 WASH SELECTION BUTTON Press this button to add the Pre-wash function. Pre-wash can only be selected in the Standard, Boil, Eco Boil, Intensive and Bedding courses. 2 TEMPERATURE SELECTION BUTTON Standard 40°C course will be displayed when the power is on. Pressing the button repeatedly will cycle through the following options: 40°C, 60°C, cold water. (Based on the Standard course). When a temperature of more than 40°C is selected, cold/hot water will be supplied. The selection range for the temperature varies depending on the course. NOTE: Do not use hot water only. Only cold water will be supplied if the hot water is not connected. 3 RINSE BUTTON Press this button to add additional rinse cycles. The maximum number of rinse cycles is five. 4 SPIN BUTTON The spin speed function can be selected as needed. the following options can be selected: 1200 rpm, 800 rpm and 400 rpm as well as No Spin and Rinse Hold. 5 DELAY BUTTON Press this button repeatedly to cycle through the available Delay options (maximum 24 hours in one hour increments starting from 3). The hour displayed indicates the time when the wash cycle will be finished. Displays the time required from the start to finish. Turn the power OFF and turn the power back on again if a reservation needs to be canceled. 6 DRYING BUTTON Press this button to cycle through the available Drying options: 120 minutes, 90 minutes, 60 minutes, 30 minutes, cancel. The drying time can be adjusted after selecting a course. 7 DIGITAL GRAPHICS DISPLAY Displays the remaining wash cycle time, all cycle information, and error messages. Remaining cycles are illuminated while the lamp of the currently running cycle is blinking. CHILD LOCK INDICATOR A indicator will go off when the Child Lock function is deactivated. DOOR LOCK INDICATOR The indicator is illuminated when the door cannot be opened while the indicator is off when the door can be opened. The Door Lock indicator is illuminated automatically when the washing machine is operating. 1 14_ washing a load of laundry SEW-6HR103J_EN.indd 14 2008-08-05 ¿ÀÈÄ 4:28:11 CYCLE SELECTOR Select a course using the dial. 9 START/PAUSE BUTTON Use this button to temporarily start or stop the washing machine POWER BUTTON Pressing this button will display the On/Off indicator whenever it is is pressed. The power will go off automatically when no button is pressed for 10 minutes. The power will go off automatically when the washing/drying process is completed. 10 02 WASHING A LOAD OF LAUNDRY 8 washing a load of laundry _15 SEW-6HR103J_EN.indd 15 2008-08-05 ¿ÀÈÄ 4:28:12 washing a load of laundry DETERGENT AND ADDITIVES INFORMATION Detergent drawer 1. Pull out the detergent drawer as shown in the figure. 2. Add the recommended amount of laundry detergent directly into the detergent compartment before starting your washing machine. CAUTION If powdered detergent is spread directly onto the laundry, it may cause discoloration. CAUTION X A M 3. Add the recommended amount of fabric softener into the softener compartment as required. The fabric softener is used during the rinse cycle and can prevent static electricity building up on your laundry and provides softness. The fabric softener is automatically added during the last rinse cycle. Do not add fabric softener over the MAX line, as it may result in an CAUTION overflow. Concentrated or thick fabric softener and conditioner must be diluted with a little water before being poured into the dispenser (prevents the overflow from becoming blocked.) 4. When using the Prewash option, add the recommended amount of laundry detergent into the prewash compartment . When washing heavily soiled laundry, use the Prewash option. When using the Prewash option, use less than half a cup of detergent depending on the type. CAUTION CAUTION • Please use the proper amount of detergent according to the type based on the reference index. • Using too much detergent may result in the following problems which may cause a malfunction and shorten the lifespan of the unit. - Too many bubbles will extend the rinse time which hinders the normal rinse process. - Bubbles may overflow in the front where the detergent is placed and may cause leaking due to a rise in pressure. - Bubbles may not be completely eliminated after the last spin cycle. • It is recommended not using a concentrated fabric softener as it is a highly-viscous type liquid which is not soluble in water and therefore cannot be added automatically into the drum. If you open the detergent drawer while water is being supplied CAUTION • The water may flow out. • Detergent may not be added, or a rinsing agent may be added in the middle of the process. 16_ washing a load of laundry SEW-6HR103J_EN.indd 16 2008-08-05 ¿ÀÈÄ 4:28:24 Types of detergent Powdered synthetic detergent Powdered detergent can be used for all types of garments, except for wool and silk, and is classified as either standard or concentrated detergent depending on the concentration ratio. Wool shampoo A mild detergent that is used for wool or delicate garments (acrylic, polyester and nylon) and protects the surface of garments from damage. However, it has a low washability. Fabric softeners Fabric softener prevents static electricity from building up on garments and provides softness when used during the last rinse cycle. It is classified as either standard or concentrated detergent depending on the concentration ratio. Chlorine-type bleach This type of bleach is used for bleaching cotton garments. It bleaches well even at low temperatures. However; it should be used cautiously as it can cause discoloration of colored garments. 02 WASHING A LOAD OF LAUNDRY Liquid synthetic detergent Liquid type detergent can be used for all types of garments, except for wool and silk, and it dissolves even in cold water. Using high-viscosity detergent that is not dissolvable in water may decrease the effectiveness of the rinse function due to detergent remaining inside the drum after washing. Special attention is required. Oxygen-type bleach This type of product is usually in the form of a powder. It can effect clear coloration if used moderately. However, excessive use may cause discoloration. CAUTION If the liquid detergent or bleach being used is spilled on the door, it may cause cause corrosion of the coating. Therefore, special attention is required. Recommended amounts of laundry detergent Please use the measuring cup supplied with your detergent to measure the amount of detergent. AMOUNT OF LAUNDRY TYPE OF DETERGENT Drum washing machine detergent Concentrated detergent Standard detergent More than 7 kg Approx. 80 g Approx. 35 g Approx. 40 g 7 kg ~ 5 kg Approx. 70 g Approx. 30 g Approx. 35 g 5 kg ~ 3 kg Approx. 35 g Approx. 20 g Approx. 25 g Less than 3 kg Approx. 20 g Approx. 15 g Approx. 20 g • When using the Prewash option, use less than half a cup according to the type of detergent. • When using detergent designed for Drum Washing machines only, please refer to the User Manual. • The standard laundry capacity for the Drum Washing Machine is 15~20ℓ. • Use a dedicated detergent, as a regular detergent is likely to develop excessive bubbles. washing a load of laundry _17 SEW-6HR103J_EN.indd 17 2008-08-05 ¿ÀÈÄ 4:28:24 washing a load of laundry LAUNDRY GUIDELINES CAUTION The checkpoints below must be followed to avoid problems with your washing machine or damaging your garments. If one of the problems below is the fault of the customer, a separate service fee will be charged. Types and weight of clothing TYPE WEIGHT(1 ITEM) Towel Approx. 50 g y-shirts TYPE WEIGHT(1 ITEM) Nightclothes, tops and bottoms Approx. 450 g Approx. 200 g Uniforms Approx. 800 g Winter shirts Approx. 220 g Socks Approx. 50 g 1 pair Underwear Approx. 130 g Diapers Approx. 100 g 100% Cotton 65% Polyester 35% Cotton 65% Polyester Mixed 100% Cotton 65% Polyester 35% Cotton 100% Chemical Textile 100% Cotton 100% Cotton Caring for your laundry before washing Remove personal belongings such as hairpins, coins and keys from pockets and turn clothes inside out before washing, as these may cause damage to your clothing and washing machine as well as result in noise and problems with your washing machine. Perform a pre-wash for white socks, sleeves, and collars before the main wash. • For stains and dirt on collars, sleeves, hems, and pockets, apply some detergent to them and apply it lightly with a brush before washing. • Use powdered or liquid detergent. Do not use soap as the drum may become dirty. Make sure to insert brassieres (water washable) into a laundry net (to be purchased additionally). • The metal parts of the brassieres may break through the material and damage the laundry. Therefore make sure to place them inside a fine laundry net. • Small, light clothing such as socks, gloves, stockings and handkerchiefs may become caught around the door. Place them inside a fine laundry net. Do not wash waterproof clothing such as Ski Wear, Diaper Covers, Footboards etc. • This may cause the laundry to be ejected or cause the washing machine to vibrate abnormally, which may result in personal injury or damage the washing machine, the floor or the clothing. (Diapers, waterproof clothing, raincoats, umbrella covers, skiwear, car cover sheets, and sleeping bags, etc.). • When the drum rotates, water may become trapped in the waterproof clothing or fabric and can collect in a corner, causing abnormal vibrations. In addition, the laundry rises and may be ejected and cause personal injury. Remove any metal on clothing, close zippers and hook and turn clothes inside out before washing. • Metal on clothing may cause damage to the clothing and the drum. • Turn clothing with buttons and embroidered clothes inside out before washing them. • Clothing with long strings may become entangled with other clothes, and may cause damage to the clothing. Be sure to fix the strings before washing. 18_ washing a load of laundry SEW-6HR103J_EN.indd 18 2008-08-05 ¿ÀÈÄ 4:28:24 Shake dirt and soil from clothing. • Soil and sand may rub delicate garments and cause damage resulting in an unsatisfactory washing result. Turn fluffy clothing inside out before washing them. • If clothes have too much foreign matter, separate them for washing. Non-washable laundry Clothes that are easily transformable even by simply soaking in water. • Even by soaking in water, neckties, brassieres, jackets, suits and coats can be easily transformed i.e. by shrinking or discoloration as they are mostly made of rayon, polynosic, and other blended fabrics. • Wrinkle-processed, embossed, or resin processed products are easily transformed even by simply soaking in water. • Easily discolored products made of cotton and wool, wrinkled silk, leather products, leather accessories, leather ornamented clothing and accessories. • Do not wash these clothes without referring to the handling guidelines or care label. 02 WASHING A LOAD OF LAUNDRY Other clothes may pick up dirty from these items (dirt, thread). • Wash black colored clothes and cotton towels separately. If they are washed together, towels may pick up dirt. Check before washing. Non-dryable clothing CAUTION The manufacturer is not liable for any accidents that occur due to mishandling of the user manual. Below is a list of laundry items that may not use the drying function. • Starched garments • Wool garments • Products with sponge material: may be damaged. • Leather products: may be distorted. • Silk products: may be distorted. • Products with the following marks: Blankets marked as do not use Drying function • Wool blankets longer than 100 cm. • Wool blankets • Electronic blankets Lingerie marked as do not use Drying function • Wool, silk, mixed lingerie • Lingerie with lots of lace • Slips, stockings, tights washing a load of laundry _19 SEW-6HR103J_EN.indd 19 2008-08-05 ¿ÀÈÄ 4:28:24 washing a load of laundry CAUTION Caution • • • • • • • The water tap MUST be opened to use the dry function. The dry function will not work if the water supply is closed as it uses cold water for cooling and dehumidification. (Areas with low water pressure may not deliver a satisfying drying result.) Depending on the fabric, contractions and distortions may occur after drying. After the drying process is completed, metal objects attached to the laundry may be extremely hot. Please be careful, when unloading the laundry. If you choose to use wash and dry function, load in under 4.5 kg laundry. (More than 4.5 kg laundry will not have good drying result.) Dry function is not available in Wool, Delicate, Bedding and Drum Clean courses. For safety purpose, the door will not open immediately after the drying cycle is completed and the ‘Hot’ LED is displayed, when the Start/Pause button is pressed. Please wait until the ‘Hot’ LED and Door Lock indicator turn off. Do not open the door unless the drying process is fully completed, as this will result in a poor drying result. BASIC INSTRUCTIONS 1. Open the door, place the laundry into the drum and close the door. CAUTION Make sure that laundry is not caught in the door, as this may cause a water leak and damages to clothes and washing machine. 2. Add the recommended amount of detergent, softener, and pre-wash detergent (if necessary) into the appropriate compartments. 3. Press the Power button to turn the washing machine on. (The Standard (the water temperature is selected at 40°C) course will be selected automatically.) 4. Select the appropriate course by turning the Cycle Selector. - When using the dry function, press the Drying button. 5. Press the Start/Pause button. 6. The power will go off automatically upon completion of washing/drying process and the melody sounds. USING CYCLE SELECTOR Standard course You can wash most normal fibers except wool/silk/delicate clothing. When washing the towels that have a high water absorption, make sure to wash less than three (3) kg at a time. 1. Open the door, place the laundry into the drum and close the door. 2. Add the recommended amount of detergent, softener, and pre-wash detergent (if necessary) into the appropriate compartments. - Add the recommended amount of detergent into the detergent compartment and fabric softener into the softener compartment no higher than the MAX line. - When using the Prewash option, add the recommended amount of laundry detergent into the prewash compartment . 3. Press the Power button to turn the washing machine on. - The Standard course will be selected automatically. - The wash temperature is automatically selected at 40°C, the rinse cycle is performed 3 times, and the spin cycle is performed at 800 rpm speed. - The wash temperature, the number of rinse cycles and the spin speed can be changed by pressing each button. - The wash temperature can only be selected as Cold, 40°C or 60°C. - You can select a drying function as needed. 20_ washing a load of laundry SEW-6HR103J_EN.indd 20 2008-08-05 ¿ÀÈÄ 4:28:24 The Pre-wash function A Pre-wash is a preliminary wash that is performed for 15 minutes before the main wash. A Pre-wash is effective for highly soiled laundry. A Pre-wash is only available for the Standard, Intensive, Boil, Eco Boil, Bedding courses. CAUTION Ensure that the laundry is not caught in the door, as this may cause a water leak and damage to the laundry or washing machine. Boil course This course is appropriate for sterilizing underwear or other items changed daily, for bleaching and boils your laundry at 95°C. Washable laundry: cotton underwear, diapers, 100% cotton clothes, etc. 1. Open the door, place the laundry into the drum and close the door. 2. Add the recommended amount of detergent, softener, and pre-wash detergent (if necessary) into the appropriate compartments. 3. Press the Power button to turn the washing machine on. - The Standard course will be selected automatically. 4. Select Boil using the Cycle Selector. - The wash temperature is automatically selected at 95°C, the rinse cycle is performed 3 times, and the spin cycle is performed at 800 rpm speed. - The wash temperature, the number of rinse cycles and the spin speed can be changed by pressing each button. - The wash temperature can only be selected as 75°C or 95°C. - The Delay function can be selected as needed. - A drying function can be selected as needed. 5. Press the Start/Pause button. - Press the Start/Pause button to start the wash. - In the Boil course, cold water will be drained as soon as it is supplied in order to lower the water temperature after the wash. 02 WASHING A LOAD OF LAUNDRY If you want to add the Pre-wash function to your washing settings, press the Wash button once. - Pre-wash functions are optional. - To cancel the Pre-wash function, press the Wash button again. 4. Press the Start/Pause button. - After turning the washing drum when no water is supplied, the washing machine detects the weight of the laundry and adjusts the washing time automatically. • If cold and hot water are supplied at the same time, your wash may be finished in a shorter time. • Do not use hot water only. CAUTION • Make sure to check whether the laundry can be boiled (100% cotton clothes, diapers, etc.), and wash whites or light colored clothing separately from dark clothing that may become discolored • If you open the detergent drawer while washing in the Boil course, hot steam may be generated and fabric softener may be added during the wash. Do not to open the detergent drawer. washing a load of laundry _21 SEW-6HR103J_EN.indd 21 2008-08-05 ¿ÀÈÄ 4:28:25 washing a load of laundry Eco Boil course This is a hygienic and energy saving course for neat and prudent housekeepers and precious, special babies. Washable laundry: 100% cotton, diapers, baby clothes, clothes that do not become discolored, etc. 1. Open the door, place the laundry into the drum and close the door. 2. Add the recommended amount of detergent, softener, and pre-wash detergent (if necessary) into the appropriate compartments. 3. Press the Power button to turn the washing machine on. - The Standard course will be selected automatically. 4. Select Eco Boil using the Cycle Selector. - The wash temperature will be automatically selected at 75°C, the rinse cycle is performed 3 times, the spin cycle is performed at 800 rpm speed. - The wash temperature, the number of rinse cycles and the spin speed can be changed by pressing each button. - The wash temperature can only be selected as 60°C or 75°C. - The Delay function can be selected as needed. - A drying function can be selected as needed. 5. Press the Start/Pause button. - Press the Start/Pause button to start the wash. CAUTION • Make sure to check whether the laundry can be boiled (100% cotton clothes, diapers, etc.), and wash whites or lightly colored clothing separately from dark clothing that may become discolored. • If you open the detergent drawer while washing in the Eco Boil course, hot steam may be generated and fabric softener may be added during the wash. Do not open the detergent drawer. Intensive course This course is useful to remove stubborn soil using the Soak function. 1. Open the door, place the laundry into the drum and close the door. 2. Add the recommended amount of detergent, softener, and pre-wash detergent (if necessary) into the appropriate compartments. 3. Press the Power button to turn the washing machine on. - The Standard course will be selected automatically. 4. Select Intensive using the Cycle Selector. - The wash temperature will be automatically selected at 40°C, the rinse cycle is performed 3 times, and the spin cycle is performed at 800 rpm speed. - The wash temperature, the number of rinse cycles and the spin speed can be changed by pressing each button. - The wash temperature can only be selected as Cold, 40°C or 60°C. - The Pre-wash function can be selected as needed. - A drying function can be selected as needed. 5. Press the Start/Pause button. - Press the Start/Pause button to start the wash. 22_ washing a load of laundry SEW-6HR103J_EN.indd 22 2008-08-05 ¿ÀÈÄ 4:28:25 Quick course Wool/Delicate course 02 WASHING A LOAD OF LAUNDRY This course is used for a small amount (less than 3 kg) of laundry, relatively clean laundry, or frequently used laundry in a short period of time. 1. Open the door, place the laundry into the drum and close the door. 2. Add the recommended amount of detergent, softener, and pre-wash detergent (if necessary) into the appropriate compartments. 3. Press the Power button to turn the washing machine on. - The Standard course will be selected automatically. 4. Select Quick using the Cycle Selector. - The wash temperature will be automatically selected as Cold, the rinse cycle is performed twice and the spin cycle is performed at 800 rpm speed. - The wash temperature, the number of rinse cycles and the spin speed can be changed by pressing each button. - The wash temperature can only be selected as Cold, 40°C or 60°C. - Pre-wash cannot be selected. - A Drying function can be selected as needed. 5. Press the Start/Pause button. - Press the Start/Pause button to start the wash. This course is useful for delicate clothes, such as wool, that is easy to be changed or damaged. 1. Open the door, place the laundry into the drum and close the door. 2. Add the recommended amount of detergent, softener, and pre-wash detergent (if necessary) into the appropriate compartments. 3. Press the Power button to turn the washing machine on. - The Standard course will be selected automatically. 4. Select Wool or Delicate using the Cycle Selector. - The wash temperature will be automatically selected as Cold, the rinse cycle is performed twice and the spin cycle is performed at 400 rpm speed. - The wash temperature, the number of rinse cycles and the spin speed can be changed by pressing each button. - The wash temperature can only be selected as Cold or 40°C. - The spin speed can only be selected No Spin, Rinse Hold, or 400 rpm. - Pre-wash cannot be selected. 5. Press the Start/Pause button. - Press the Start/Pause button to start the wash. Wool course • The proper weight of the Wool course is less than 2 kg. Use a neutral detergent for wool only that is appropriate to the laundry. (It is recommended using the same amount as for a hand wash as described in the user manual regarding detergent usage. • To prevent shrinking, the Drying function cannot be selected. • The Wool course includes an operation that shakes the laundry sideways like rocking a cradle, to prevent the clothing from being damaged. To preserve the wool fiber characteristics, the wash is proceeded with the washing machine gently shaking the laundry sideways. The Wool course can proceed up to one (1) revolution for a minimum of two (2) minutes to prevent the laundry from shrinking. Delicate course • Wash the white or light color clothes separately from the deep color clothes. • To prevent the cloth from being damaged, the Dry cannot be selected. • The proper weight of the Delicate course is less than 2 kg. washing a load of laundry _23 SEW-6HR103J_EN.indd 23 2008-08-05 ¿ÀÈÄ 4:28:25 washing a load of laundry Drying course Use this course for drying only. 1. Open the door, place the laundry into the drum and close the door. 2. Press the Power button to turn the washing machine on. - The Standard course will be selected automatically. 3. Select Drying using the Cycle Selector. - The drying time will be automatically selected at 120 mins. - The drying time can be changed by pressing Drying button. Pressing the button cycles through the following options: 120 min 90 min 60 min 30 min Cancel. 4. Press the Start/Pause button. - Drying will start. To avoid wrinkles from over drying, please reduce the drying time. If more drying is required, please do so by terminating the current process and pressing the Drying button. CAUTION • The drying function will not work if no cold water is supplied. • Selecting a drying course while water is in the drum will automatically proceed to the automatic spinning function. • If the spinning cycle does not start, select spin using the Cycle Selector, and press the Drying button. The spin speed will be set to 1200 rpm automatically. Wash and Dry in one go 1. Open the door, place the laundry into the drum and close the door. 2. Add the recommended amount of detergent, softener, and pre-wash detergent (if necessary) into the appropriate compartments. 3. Press the Power button to turn the washing machine on. - The Standard course will be selected automatically. 4. Select the appropriate cycle using the Cycle Selector. - The Drying function is only available for the Standard, Boil, Eco Boil, Intensive, Quick courses. 5. Press the Drying button. - Pressing the button cycles through the following options: 120 min 90 min 60 min 30 min Cancel. - The spin speed is automatically set to 1200 rpm. - The spin speed can only be selected as 1200 rpm. 6. Press the Start/Pause button. - The optimal process from washing to drying proceeds automatically. 24_ washing a load of laundry SEW-6HR103J_EN.indd 24 2008-08-05 ¿ÀÈÄ 4:28:25 Bedding course • The washable weight may differ depending on the volume of bedclothes. • The Drying function cannot be selected. CAUTION 02 WASHING A LOAD OF LAUNDRY This course is only used for bedding such as small blankets, bedding, counterpanes, tableclothes, curtains, etc. for which water washing is available. 1. Open the door, place the laundry into the drum and close the door. 2. Add the recommended amount of detergent, softener into the appropriate compartments. 3. Press the Power button to turn the washing machine on. - The Standard course will be selected automatically. 4. Select Bedding using the Cycle Selector. - The wash temperature will be automatically selected at 40°C, the rinse cycle is performed three times, and the spin cycle is performed at 800 rpm speed. - The wash temperature, the number of rinse cycles and the spin speed can be changed by pressing each button. - The wash temperature can only be selected as Cold, 40°C or 60°C. - Pre-wash can be selected as required. 5. Press the Start/Pause button. - Press the Start/Pause button to start the wash. • Do not wash electric blankets and carpets. This may cause damage to the washing machine and the laundry. • Make sure to wash only a single item of bedding regardless of its size. If you wash more than one item of bedding, it may cause the washing machine to unbalance. Precautions The following types of bedding that have the hand washing mark are washable with this washing machine. Type • Acrylic blankets: Acrylic 100% (Nylon coating) • Blend blankets: Cotton and polyester • Woolen blankets: Wool blended blankets • Bedding stuffing: Polyester 100%, under about 200 cm x 300 cm Weight • Blankets: Less than 3.5kg • Bedding stuffing: About 3.5kg (Total weight of bedding: 5kg) Drum Clean course When using the machine in humid conditions over an extended period of time, various airborne bacteria may stick to the drum and form a layer of black dirt (fungi), causing harm to the human body. To keep the drum clean and hygienic at all times, it is recommended using a dedicated or recommended detergent to clean the drum regularly at least once every one to three months. 1. Add the recommended amount of bleach into the detergent compartment . - Please refer to the usage method on the back of the powdered bleach and detergent for cleaning the drum. - Liquid bleach should be diluted in 300x with water according to the unit’s water usage. (Use 60mℓ liquid bleach as the usage capacity for washing is 20ℓ.) 2. Press the Power button to turn the washing machine on. - The Standard course will be selected automatically. CAUTION Never place laundry into the drum when cleaning inside the drum, as this can cause discoloration or damage to the laundry. washing a load of laundry _25 SEW-6HR103J_EN.indd 25 2008-08-05 ¿ÀÈÄ 4:28:25 washing a load of laundry 3. Select Drum Clean using the Cycle Selector. - The wash temperature will be automatically selected at 40°C, the rinse cycle is performed twice and the spin cycle is performed at 800 rpm speed. - The wash temperature, the number of rinse cycles and the spin speed cannot be changed. 4. Press the Start/Pause button. - The drum will be cleaned automatically. Performing washing and rinsing only 1. Open the door, place the laundry into the drum and close the door. 2. Add the recommended amount of detergent, softener, and pre-wash detergent (if necessary) into the appropriate compartments. 3. Press the Power button to turn the washing machine on. - The Standard course will be selected automatically. 4. Select the appropriate course using the Cycle Selector. 5. Press the Spin button to select Rinse Hold or No Spin. - When selecting No Spin, no spin cycle is performed after the final drain. - When selecting Rinse Hold, either a Drain or Spin cycle must be performed and no water is drained. - To drain the rest of water, select Spin using the Cycle Selector. 6. Press the Start/Pause button. - Press the Start/Pause button to start washing and rinsing. Rinse+Spin course 1. Open the door, place the laundry into the drum and close the door. 2. Press the Power button to turn the washing machine on. - The Standard course will be selected automatically. 3. Select Rinse+Spin course using the Cycle Selector. - The rinse time will be automatically selected at once, the spin speed is set to 800 rpm. - The rinse time and the spin speed can be changed by pressing the Rinse and Spin buttons. - The maximum number of rinse cycles is five. 4. Press the Start/Pause button. - Pressing the Start/Pause button to start rinsing and spinning. Spin course 1. Open the door, place the laundry into the drum and close the door. 2. Press the Power button to turn the washing machine on. - The Standard course will be selected automatically. 3. Select Spin course by turning the Cycle Selector. - The spin speed is automatically set to 800 rpm. - Select the spin speed by pressing Spin button. - Press the Spin button cycles through the following options: 800 1200 400 800. 4. Press the Start/Pause button. - Press the Start/Pause button to start the spin cycle. 26_ washing a load of laundry SEW-6HR103J_EN.indd 26 2008-08-05 ¿ÀÈÄ 4:28:25 Delay You can set the washing machine to finish your wash automatically at a later time. 1. Open the door, place the laundry into the drum and close the door. 02 WASHING A LOAD OF LAUNDRY 2. Add the recommended amount of detergent, softener, and pre-wash detergent (if necessary) into the appropriate compartments. 3. Press the Power button to turn the washing machine on. - The Standard course will be selected automatically. 3. Select the appropriate cycle using the Cycle Selector. 4. Press the Delay button. - Press this button repeatedly to cycle through the available Delay options (from 3 to 24 hours in one hour increments). - The Delay time may differ depending on the selected course. - The hour displayed indicates the time when the wash cycle will be finished. 5. Press the Start/Pause button. - Press the Start/Pause button and the wash cycle will be finished at the stored time (e.g. 3:00 - the wash cycle will be finished in 3 hours). 6. To cancel a Delay function, press the Power button and then turn the washing machine on again. If the electricity fails, the Delay End function will not work any more. Child lock The Child Lock function allows you to lock the buttons so that the wash cycle you’ve chosen can’t be changed. Activating If you want to activate the Child Lock function, press the Start/Pause button to perform a cycle. Then press the Spin and Delay buttons at the same time for 2~3 seconds. The “Child Lock” indicator will be lit when this feature is activated. Deactivating To deactivate the Child Lock function, press the Start/Pause button for 2~3 seconds. The “Child Lock” indicator will go off when this feature is deactivated. When the Child Lock function is activated, no button will work before the Child Lock function is deactivated. Door Lock PROBLEM SOLUTION When the drum is spinning Wait until spinning is stopped. When the internal temperature is over 55°C Wait until the the internal temperature becomes below 55°C. When water remains in the drum after water is supplied Press the Power button to turn on the washing machine again, and then press the Start/Pause to drain the water. When the electricity fails Open the filter cover at the bottom of the washing machine and pull the emergency door open lever. CAUTION • Do not open the door by force as this may result in injury or damage to the washing machine. • Make sure that laundry is not caught in the door, as this may cause a water leak and damages to the clothes and the washing machine. washing a load of laundry _27 SEW-6HR103J_EN.indd 27 2008-08-05 ¿ÀÈÄ 4:28:25 cleaning and maintaining your washing machine Keeping your washing machine clean improves its performance, wards off unnecessary repairs, and lengthens its life. CLEANING THE DEBRIS FILTER 1. Open the front door. 2. Pull out the hose to remove the remaining water. 3. Remove the stopper at the end of the hose and let the remaining water flow out. Debris filter 4. Turn the debris filter to the left. 5. Clean the debris filter and the inside of the drain hose. 6. Insert the debris filter after cleaning, insert the stopper into the end of the hose to remove the remaining water, insert the hose into the groove, and then close the front door. • If you open the drain filter when water remains inside the drum, water may overflow to the front. • If the drain filter is assembled incorrectly or is not installed, it may cause a water leakage or operating error. Therefore make sure to assemble it correctly. CLEANING THE EXTERIOR 1. Wipe the washing machine surfaces, including the control panel, with a soft cloth using a nonabrasive household detergent. 2. Use a soft cloth to dry the surfaces. 3. Do not pour water onto the washing machine. 28_ cleaning and maintaining your washing machine SEW-6HR103J_EN.indd 28 2008-08-05 ¿ÀÈÄ 4:28:27 CLEANING THE DETERGENT DRAWER AND DRAWER RECESS 03 CLEANING AND MAINTAINING 1. Press the release lever on the inside of the detergent drawer and pull the drawer out. 2. Remove the liquid detergent divider from the detergent drawer. 3. Wash all parts under running water. 4. Clean the drawer recess with an old toothbrush. 5. Replace the liquid detergent divider by pushing it firmly into the drawer. 6. Push the drawer back into place. 7. To remove any remaining detergent, perform a rinse cycle without any laundry in the drum. cleaning and maintaining your washing machine _29 SEW-6HR103J_EN.indd 29 2008-08-05 ¿ÀÈÄ 4:28:28 cleaning and maintaining your washing machine CLEANING THE WATER HOSE MESH FILTER 1. Pull out the filter net. 2. Wash the filter net with water. 3. Insert the filter net and fasten its connector firmly. CAUTION If the filter net is not installed, it may cause a water leakage and an operating error. Make sure to install it. 30_ cleaning and maintaining your washing machine SEW-6HR103J_EN.indd 30 2008-08-05 ¿ÀÈÄ 4:28:28 troubleshooting and information codes CHECK THESE POINTS IF YOUR WASHING MACHINE CHECK SOLUTION Has no power. Is the power ON? Press the Power button. Is the power plug plugged onto the socket? Insert the power plug. Is the leakage breaker OFF? Turn the leakage breaker ON. Is the power 110? The unit is for 220 only. Is the door open or the power off? Press the Power button of the unit. Close the door and press the Start/ Pause button. Is the water being collected? Please wait until the water is filled to the set height. Is the faucet closed? Open the faucet to supply water. Are you using an extended cord (multi-tap)? Do not use this type of cord as it may cause a fire due to the weak supply of power. Does Not Work 04 TROUBLESHOOTING PROBLEM Stopped running and starts Some laundry items absorb more water than other items depending on supplying water. their textile characteristics. Therefore, the purpose of this function is to supplement the water supply accordingly. When a bubble-prone detergent is used more than the recommended amount, the unit activates the water supplying function after draining water in order to remove the bubbles. Has water flowing out of the detergent drawer. Distorts fabrics in the boiling and drying courses. Is too much detergent being used? Using too much detergent will inflate the internal volume due to bubbles and will cause the water within to overflow. Please use the proper amount of detergent as indicated in the reference table. (Page 18) Is the water extremely hot? Using hot water of more than 50°C temperature may generate bubbles and result in overflowing. Is the detergent drawer dirty or open? Close the detergent drawer after cleaning it. Do not open the detergent drawer while supplying water. Check the washing instruction of the garment to see whether it is machine washable or whether the garment is likely to be deformed when machine washing. For proper washing, sort garments according to the garment handling instructions. troubleshooting and information codes _31 SEW-6HR103J_EN.indd 31 2008-08-05 ¿ÀÈÄ 4:28:28 troubleshooting and information codes Is the water faucet closed? Open the cold water faucet and proceed with drying. Did you select the iron option from the Drying cycle or short course? Select a different course or extend the drying time. Has detergent remaining in the detergent drawer after the wash program is complete Make sure the washing machine is running with sufficient water pressure. Without sufficient water pressure, detergent may remain. Add the recommended amount of detergent into the detergent drawer. Is seriously vibrating. Is the unit frozen? Unfreeze the the unit using 10ℓ water at 60 °C. Distorts fabric. Check the washing instruction of a garment whether it is likely to be deformed when washing it in hot water. Sort the garments according to the garment instructions for proper washing. Sort garments according to the garment handling instructions for proper washing. Is changing the remaining time. It is time for adjusting the unit to obtain a better washing result by leveling and eliminating bubbles when an unusual operation is detected during the washing process (unbalanced laundry and bubbles). This not malfunction. - As the water supply may be delayed or may affect the temperature, the time required for washing and drying may vary depending on the water temperature, water pressure and ambient temperature (seasonal). Freezes during winter. 1. Soak a dry towel in hot water and wrap it around the faucet. Do this 5 times every 10 minutes. 2. Dismantle the water hose from the faucet. 3. Immerse the water hose in hot water and defrost the ice inside the hose. 4. Pour about 10ℓ of hot water at a temperature of 60 °C into the laundry tray and leave it for about one hour to defrost the ice inside the unit. 5. Connect the water hose to the faucet. If the remaining water inside the washing machine, the drain hose and the water supply hose is not removed, it may result in a product malfunction. Please refer to the User Manual for the proper cleaning method. Is not supplying water. Check if the filter net in the water supply hose connector is clogged with dirt. Clean the water supply hose connector (see page 30). Has an unusual odor during the drying process. Lint from the laundry may have adhered to the heater during the initial operation. Has a strange odor when used for the first time. The odor is caused by the rubber attached on the door. It is a distinctive rubber odor and will disappear after several uses. Has water flowing out of the drain hose while washing and rinsing. A little water may flow out of the drain hose while washing and rinsing. However, it does not affect the washing and rinsing performances. Has completed Drying but the laundry is not dry. 32_ troubleshooting and information codes SEW-6HR103J_EN.indd 32 2008-08-05 ¿ÀÈÄ 4:28:29 Trembles while spinning and is noisy. Change the location of the washing machine or the laundry tray. Is the unit installed on a wooden or rubber base? The unit is likely to shake while spinning if it is installed on a rubber base. Are the laundry tray and the unit properly connected? Connect the connecting pieces of the laundry tray and the unit. Call a service center for help if needed. The motor is turning at full speed for the strong spin cycle. Is laundry outside of the spinning drum? Put the laundry back inside the drum. Pants and long-sleeve shirts should be folded in half before starting the spinning process. Are wires, coins or buttons inside the drum? Remove all buttons, coins and wires from the drum. Please check the pockets of all garments before washing. Has laundry that is damp even after spinning and it seems that spinning was not properly completed. The spin cycle may cause noise and serious vibrations if anything effects the rotation. Therefore, the unit may decrease the number of spin cycles. Is shaking while spinning, stops momentarily and starts spinning again. If the rotation is affected during the spin cycle, it may result in noise and vibrations. Therefore, the unit adjusts automatically to reduce any eccentricity. Please sort the laundry by type for the spin cycle. Is changing the time frequently while spinning. If the rotation is affected during the spin cycle, it may result in noise and vibrations. Therefore, to reduce any spin eccentricities the unit adjusts the time automatically. The spin time may be delayed by up to 30 minutes. Please sort the laundry by type for the spin cycle. Has water flowing out while spinning. The water flows out to remove any remaining on detergent bubbles the front glass. Door is locked shut or will not open. 1. Open the filter cover using a coin. 2. Drain the water from the washing machine using the debris filter (See page 27). 3. Locate the emergency door open(the orange plastic tab) and pull it forward to open the door. 04 TROUBLESHOOTING Is too noisy while spinning. Is the unit shaking or wobbling when you shake it? Too little laundry may lump the laundry to one side, causing noise and vibrations. Please add more laundry for the spin cycle. Use the emergency door open only when the electricity fails. CAUTION Before opening the door, ensure that the internal temperature is not hot. If the problem persists, contact your local Samsung Customer Service. troubleshooting and information codes _33 SEW-6HR103J_EN.indd 33 2008-08-05 ¿ÀÈÄ 4:28:29 troubleshooting and information codes INFORMATION CODES When your washing machine malfunctions, you may see an information code on the display. If that happens, check this table and try the suggested solution before calling Customer Service. CODE SYMBOL Self-diagnosis countermeasures The door is open. - Please close the door as the unit will not function correctly when the door is left open. The spinning cycle does not work. - Make sure the laundry load is balanced. - Spread out the laundry evenly and start again. - Add more laundry to balance the laundry load for the spin cycle when adding high absorbing laundry such as dolls (1~2), jeans and shower towels. Check whether the faucet is closed, the water supply has been suspended or is frozen. - Check whether the filter net in the water supply hose connector is clogged by dirt. - Check whether the cold water is connected. The display will show 4E when the hot water only is connected. - Press the Start/Pause button and start again. The water does not drain due to a clogged drain hose. - Check whether the drain hose is frozen. - Press the Start/Pause button and start again. - Clean the filter of debris. It is displayed when the inner part of the drum is in high temperature. - The ‘Hot’ sign will disappear soon as the internal temperature drops and door can be open. This could be a sign of a breakdown. Please turn off the power, unplug it, and contact a Samsung Electronics’ Service Center for assistance. For any codes not listed above, or if the suggested solution doesn’t fix the problem, call your Samsung Service Centre or local Samsung dealer. 34_ troubleshooting and information codes SEW-6HR103J_EN.indd 34 2008-08-05 ¿ÀÈÄ 4:28:29 appendix FABRIC CARE CHART Failing to follow the wash temperature may cause discoloration and bleaching. CAUTION Resistant material Can be ironed at 100 ˚C max Delicate fabric Do not iron Item may be washed at 95 ˚C Can be dry cleaned using any solvent Item may be washed at 60 ˚C Dry clean with perchloride, lighter fuel, pure alcohol or R113 only Item may be washed at 40 ˚C Dry clean with aviation fuel, pure alcohol or R113 only Item may be washed at 30 ˚C Do not dry clean Item may be hand washed Dry flat Dry clean only Can be hung to dry Can be bleached in cold water Dry on clothes hanger Do not bleach Tumble dry, normal heat Can be ironed at 200 ˚C max Tumble dry, reduced heat Can be ironed at 150 ˚C max Do not tumble dry 05 APPENDIX The following symbols provide garment care directions. The care labels include four symbols in this order: washing, bleaching, drying and ironing, and dry cleaning when necessary. The use of symbols ensures consistency among garment manufacturers of domestic and imported items. Follow the care label directions to maximize garment life and reduce laundering problems. DISPOSING OF ELECTRONIC EQUIPMENT Dispose of your old electronic equipment in the following way in order to protect the environment and to promote recycling. Free of Charge Service If a new unit is purchased from an agency of Samsung Electronics., we will pick up the old unit on request of the customer, free of charge. Paid Service If you have not purchased a new product you can still dispose of your old electronic equipment by contacting your regional district office. SAMSUNG ELECTRONICS’ GREEN MANAGEMENT Samsung Electronics declared its [Green Management] policy from May 1996 following the announcement of ‘environmental measures’ for the continued improvements and prevention of Environmental Pollution Losses through the establishment of an environment management system in June 1992. Samsung Electronics’ Green Management signifies the company’s active participation in global environment conservation by actively promoting the environment, and safety and health issues as the core factors of the company’s administration. appendix _35 SEW-6HR103J_EN.indd 35 2008-08-05 ¿ÀÈÄ 4:28:32 appendix SPECIFICATIONS MODEL TYPE * The wash capacity in the table is based on dry laundry. FRONT LOADING DRUM WASHING MACHINE POWER SUPPLY Single-phase alternating current 220V/60Hz WASH METHOD Drum SPINNING METHOD Spinning dehydration type WATER PRESSURE 0.05 ~ 0.78 Mpa(0.5 ~ 8 kgf/cm2) WASH CAPACITY 8.0 kg SPIN CAPACITY 8.0 kg STANDARD WATER VOLUME 86 ℓ SPIN REVOLUTIONS 50 rpm DRY CAPACITY 4.5 kg DIMENSIONS W600mm X D600mm X H850mm NET WEIGHT 75 kg POWER CONSUMPTION WASHING 150 W WASH AND HEATING 2150 W DRYING 2150 W The appearance and specifications of the product are subject to change without prior notice for purposes of product enhancement. 36_ appendix SEW-6HR103J_EN.indd 36 2008-08-05 ¿ÀÈÄ 4:28:33 note 05 APPENDIX appendix _37 SEW-6HR103J_EN.indd 37 2008-08-05 ¿ÀÈÄ 4:28:33 note F Am us Cu SEW-6HR103J_EN.indd 38 2008-08-05 ¿ÀÈÄ 4:28:33 WARRANTY The warranty period for the overall quality is one year. The warranty period for the core parts (Washing Motor) is (3 years). The part retention period is 5 years. Free-of-Charge Service About our Service We, Samsung Electronics, perform the following service repairs according to the Consumer Damage Compensation Regulations (Fair Trade Commission, Notice #2008-3). Upon a customer request, Samsung Electronics or a certified partner will carry out the service repairs. Replying to a customer request will be made within 7 days, and compensation will occur within 14 days of the reply. Product Name Model Name Washing Machine Date of Purchase Serial No. Point of Purchase Price (selling) Chargeable Service If a domestic purpose product is used for business purposes, the warranty period is halved. Type of Damage Within the warranty period After the warranty period A malfunction occurred within the parts retaining period under normal usage conditions Other than for a malfunction (Cleaning, fine-tuning, usage guidance, installation, etc) Important repairs required within 10 days of the date of purchase Replacement or refund N/A Important repairs required within one month of the date of purchase Replacement or free-ofcharge repair N/A Replacement N/A Once replaced, an important repair is required within one month of the date of purchase Refund N/A Up to 3 malfunctions due to the same defect Free-of-charge repair Chargeable service Up to 4 malfunctions due to the same defect Replacement or refund Chargeable service Up to 5 malfunctions due to different defects Replacement or refund Chargeable service If the service provider has lost the product brought in by the customer for repairs Replacement or refund Refund with the equivalent of the depreciated sum plus 10 percent addition Replacement or refund Refund with the equivalent of the depreciated sum plus 10 percent addition Replacement or refund Refund with the equivalent of the depreciated sum Damage occurred during transportation or installation If the service provider does not retain the necessary part for the repair within the retaining period If the necessary part is retained, but a repair is not possible Usage guidance / simple tuning with no disassembly If a reinstallation is necessary because of a careless installation by the retailer at the point of purchase Cleaning / washing to remove dust from the inside of the product Relocation of the product due to a house transfer etc. The customer changes his / her mind and asks for a reinstallation. The customer request to add the third party parts inside the product Customer-caused malfunctions Malfunctions caused by a customer mishandling or improperly repairing the product Malfunctions caused by non-conformance to the product’s power specifications Malfunctions or damage caused by an external impact or fall Malfunctions caused by the use of consumables or options not certified by the company Malfunctions caused by service persons other than from Samsung Electronics or its certified partners Malfunctions caused by noncompliance with the User Guide, especially the “Safety Instructions”. Customer-caused malfunction by accident or intentionally Service not available Service available Replacement after a charge of service fee Replace with the equivalent of the depreciated amount, after subtracting the service fee Chargeable service Chargeable service Other Natural disasters (lightning, fire, flood, damage from sea water, freezing, etc) If a consumable part expires (filters etc) We charge a service fee for service requests for reasons other than malfunctions. Therefore, please read the User Guide carefully. This warranty only applies to the Republic of Korea and will not be issued again. Therefore, store it in a safe location for later use. SAMSUNG ELECTRONICS CO.,LTD. http://www.sec.co.kr SEW-6HR103J_EN.indd 39 2008-08-05 ¿ÀÈÄ 4:28:36 This user manual shall be read carefully before using the WASHING MACHINE for a better use. This manual shall be re-purchased if lost. Cautious handling is required. • This product is designed to be used in Korea. The unit is not required to be used in other countries with different power and voltage to Korea. • The water coming out from the drain hose during installation of the WASHING MACHINE for the first time is the water remained in the unit from testing its function at the plant. . • The appearance and specifications of the product can be changed without prior notice for product improvements. • The picture in the manual may not be identical to the unit you purchased as the manual is used in common. Main telephone number for the service centers nationwide 1588-3366 Cyber service center homepage www.samsungsvc.co.kr We strive to provide fast and effective customer service to our customers. Please leave the name of model you purchased, the status of malfunction and your contact number. Samsung is operating a real-time cyber service center and a customized service for their convenience. You can request a service to be scheduled at your convenient time through the cyber service center. SAMSUNG ELECTRONICS CO.,LTD. Manufacturer: Samsung Gwangju Electronics Maker Country: The Republic of Korea Customer Service 02-541-3000 / 080-022-3000 Internet Homepage: www.sec.co.kr / www.hauzen.com Internet Shopping Mall: www.gosamsung.co.kr About Excellent Service Quality (ESQ) A system recognized by Ministry of Knowledge Economy for a company providing precise and rapid measures on complaints, damage and opinions of customers. DC68-02630A SEW-6HR103J_EN.indd 40 2008-08-05 ¿ÀÈÄ 4:28:38