1
Contact SAMSUNG WORLDWIDE
If you have any questions or comments relating to Samsung products, please contact the SAMSUNG customer care
centre.
Country
HONG KONG
Customer Care Centre
(852) 3698-4698
Web Site
www.samsung.com/hk
www.samsung.com/hk_en/
LED TV
user manual
Thank you for purchasing this Samsung product.
To receive more complete service, please register
your product at
www.samsung.com/hk
Model______________ Serial No.______________
© 2012 Samsung Electronics Co., Ltd. All rights reserved.
ENG-Series 5000_4000_Cover.indd 1
BN68-04013E-01
2012-02-14 �� 1:42:17
For more information on “How to use the e-Manual”. (P.13)
Figures and illustrations in this user manual are provided for reference only and may differ from actual
product appearance. Product design and specifications may be changed without notice.
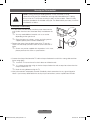
Still Image Warning
Avoid displaying still images (like JPEG picture files) or still image element (like TV programme logo, panorama or 4:3 image format,
stock or news bar at screen bottom, etc.) on the screen. Constant displaying of still picture can cause uneven wear of screen phosphor,
which will affect image quality. To reduce risk of this effect, please follow below recommendations:
• Avoid displaying the same TV channel for long periods.
• Always try do display any image on full screen, use TV set picture format menu for best possible match.
• Reduce brightness and contrast values to minimum required to achieve desired picture quality, exceeded values may speed up the
burnout process.
• Frequently use all TV features designed to reduce image retention and screen burnout, refer to proper user manual section for
details.
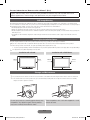
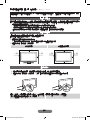
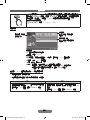
Securing the Installation Space
Keep the required distances between the product and other objects (e.g. walls) to ensure proper ventilation.
Failing to do so may result in fire or a problem with the product due to an increase in the internal temperature of the product.
✎✎ When using a stand or wall mount, use parts provided by Samsung Electronics only.
xx If you use parts provided by another manufacturer, it may result in a problem with the product or an injury due to the product falling.
✎✎ The appearance may differ depending on the product.
Installation with a Stand
Installation with a Wall Mount
10 cm
10 cm
10 cm
10 cm
10 cm
10 cm
10 cm
Storage and Maintenance
✎✎ If you attached some stickers on the TV screen, it remains some debris after removing the sticker. Please clean it to watch TV.
✎✎ The exterior and screen of the product can get scratched during cleaning. Be sure to wipe the exterior and screen carefully
using a soft cloth to prevent scratches.Storage
Storage
and Maintenance
and Maintenance
Do not
spray
notwater
spray
or a cleaning
agent
directly
agent
directly
ontoonto
onto
Clean
the
Clean
product
product
with awith
soft
withacloth
asoft
softdapped
cloth dapped
in a small
ininaasmall
Do
notDo
spray
waterorwater
ora acleaning
cleaning
agent
directly
Clean
thethe
product
cloth
dapped
small
the product.
the product.
Any
Anythat
liquid
goes
thatinto
goes
theinto
product
the
product
may amount
mayamount
amount
of water.
water.
the
product.
Anyliquid
liquid
that
goes
into
the
product
of of
water.
cause acause
failure,
a failure,
fire, or electric
fire, or electric
shock. shock.
may cause a failure, fire or electric shock.
Eng-1
ENG-Series 5000_4000_HK.indd 1
2012-02-14 �� 3:36:41
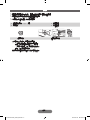
Accessories
✎✎Please make sure the following items are included with your TV. If any items are missing, contact your
dealer.
✎✎The items' colors and shapes may vary depending on the models.
✎✎Cables not included in the package content can be purchased separately.
yy Remote Control & Batteries (AAA x 2)
yy User Manual
Holder-Wire Stand
yy Safety Guide
yy Power Cord
Assembling the Holder-Wire Stand
yy An administration fee may be charged if either
–– (a) an engineer is called out at your request and there is no defect in the product.
(i.e.where you have failed to read this manual.)
–– (b) you bring the unit to a repair centre and there is no defect in the product.
(i.e.where you have failed to read this manual.)
yy The amount of such administration charge will be advised to you before any work or home visit
is carried out.
Eng-2
ENG-Series 5000_4000_HK.indd 2
2012-02-14 �� 3:36:41
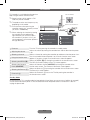
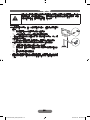
TV Controller
TV Controller is a multi directional button that
helps navigate without remote control.
Function Menu
✎ Some functions which require a PIN
CONTENT
code may not be available.
m
s
✎ The product colour and shape may vary
depending on the model.
Remote Control Sensor
✎ Exits the menu when pressing the
controller more than 1 second. (i.e.when
you access the Source.)
TV Controller
✎ When selecting the function by moving
the controller to the up/down/left/
right directions, be sure not to press
the controller. If you press it first, you
cannot operate it to move the up/down/
left/right directions.
UP/DOWN: Channel
LEFT/RIGHT: Volume
Press: Features
Power on
Adjusting the volume
Selecting a channel
Using the function menu
Press: Select
Press & Hold: Exit
Turns the TV on by pressing the controller in standby mode.
Adjusts the volume by moving the controller from side to side when the power
is on.
Selects a channel by moving the controller up and down when the power is on.
Press the controller when the power is on, then the function menu screen
appears. If you press it again, the function menu screen disappears.
Selects the MENU (m) by moving the controller in the function menu screen.
The OSD (On Screen Display) of your TV’s feature appears.
Selecting the Contents
Selects the Contents Home (CONTENT) by moving the controller in the
Home (CONTENT)
function menu screen. The Contents Home main screen appears.
Selects the Source (s) by moving the controller in the function menu screen.
Selecting the Source (s)
The Source list screen appears.
Selects the Power off (P) to turn the TV off by moving the controller in
Power off (P)
the function menu screen.
Selecting the MENU (m)
Standby Mode
Do not leave your TV in standby mode for long periods of time (when you are away on a holiday, for example).
A small amount of electric power is still consumed even when the power button is turned off. It is best to
unplug the power cord.
Eng-3
ENG-Series 5000_4000_HK.indd 3
2012-02-14 �� 3:36:41
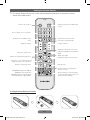
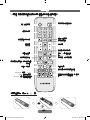
Viewing the Remote Control
✎✎This special remote control for the visually impaired provides braille points on the power, channel,
volume and number buttons.
Displays and selects the available video
sources.
Turns the TV on and off.
Press to directly access to channels.
Returns to the previous channel.
This button is not available in some
areas.
Cuts off the sound temporarily.
Changes channels.
Adjusts the volume.
Displays the channel list on the screen .
Displays the EPG(Electronic Programme
Guide).
Brings up the OSD.
Views the Contents Home.
Quickly select frequently used functions.
Displays information on the TV screen.
Selects the on-screen menu items and
changes the values seen on the menu.
Exits the menu.
Returns to the previous menu.
Use these buttons according to the
direction on screen.
E-MANUAL: Displays the e-Manual.
P.SIZE: Selects the picture size.
AD/SUBT.: Turns the audio description
on and off/Displays the digital subtitles.
Use these buttons in a specific feature.
For more information please refer to the
instructions in the e-Manual.
Installing Batteries (Battery Size: AAA)
Eng-4
ENG-Series 5000_4000_HK.indd 4
2012-02-14 �� 3:36:42
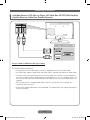
Connecting to Aerial
When the TV is initially powered on, basic settings proceed automatically.
✎✎Preset: Connecting the mains and aerial.
ANT OUT
Initial Setup
When the TV is initially powered on, a sequence of on-screen prompts will assist in configuring basic settings.
Press the POWERP button. Setup is available only when the Source is set to TV.
1
2
Selecting a language
Selecting Store Demo
or Home Use
Press the ▲ or ▼ button, then press the E button. Select the
desired OSD (On Screen Display) language.
Press the ▲ or ▼ button, then press theE button.
Select the Home Use mode. Store Demo Mode is for retail
environments.
✎✎When pressing TV controller, the function menu screen
appears. Select the Menu(m) and press it more than 5
seconds using the controller. The Store Demo mode is
set.
✎✎Cancel the Store Demo by selecting Source(s) and
pressing it more than 5 seconds.
✎✎Store Demo is only for shop display. If you select it, several
3
Selecting an aerial and
a channel
functions are not able to use. Please select Home Use
when you watch at home.
Press the ▲ or ▼ button, select Air or Cable .
and press ◄ or ► to select a channel, then press E button to begin
memorizing all of the available channels.
✎✎Press the E button at any time to interrupt the memorization
4
5
process.
Setting the Clock
Mode
Complete
Set the current time automatically or manually.
Press the E button.
If You Want to Reset this Feature...
Select System - Plug&Play (Initial Setup). Enter your 4 digit PIN number. The default PIN number is “0-0-00.” If you want to change the PIN number, use the Change PIN function.
You should do Setup (MENU → System) again at home although you did in shop.
Eng-5
ENG-Series 5000_4000_HK.indd 5
2012-02-14 �� 3:36:42
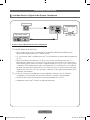
Connecting to AV Device
¦¦ Available Devices: DVD, Blu-ray Player, HD Cable Box, HD STB (Set-Top-Box)
Satellite Receiver, Cable Box, Satellite Receiver
HDMI, HDMI/DVI Connection
DVI OUT
HDMI OUT
Using an HDMI or HDMI/DVI Cable (up to 1080p)
✎✎HDMI IN 1(DVI), HDMI IN 2
xx For better picture and audio quality, connect to a digital device using an HDMI cable.
xx An HDMI cable supports digital video and audio signals, and does not require an audio cable.
xx The picture may not display normally (if at all) or the audio may not work if an external device
that uses an older version of HDMI mode is connected to the TV. If such a problem occurs, ask
the manufacturer of the external device about the HDMI version and, if out of date, request an
upgrade.
xx Be sure to purchase a certified HDMI cable. Otherwise, the picture may not display or a
connection error may occur.
xx A basic high-speed HDMI cable is recommended. This product does not support the ethernet
function via HDMI.
Eng-6
ENG-Series 5000_4000_HK.indd 6
2012-02-14 �� 3:36:42
Contents
Y
R
W
VIDEO OUT
R
W
AUDIO OUT
R -AUDIO- L
R
B
R
B
AUDIO OUT
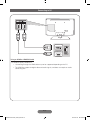
AV Connection
VIDEO
W
W
R -AUDIO- L
COMPONENT/AV IN
R
R
Y
G
G
Component Connection
COMPONENT OUT
PR
PB
Y
Using a Component (up to 1080p) or AV (480i only) Cable
✎✎When connecting to AV IN, the color of the
AV IN [Y/VIDEO] jack (green) will not match the video
cable(yellow).
✎✎For better picture quality, the Component connection is recommended instead of
the AV
connection.
Eng-7
ENG-Series 5000_4000_HK.indd 7
2012-02-14 �� 3:36:42
Connecting to Audio Device
¦¦ Available Devices: Digital Audio System, Headphone
Headphone
Digital Audio System
OPTICAL
Using an Optical (Digital) Connection or Headphone
✎✎DIGITAL AUDIO OUT (OPTICAL)
xx When a digital audio system is connected to the DIGITAL AUDIO OUT (OPTICAL) jack,
decrease the volume of both the TV and the system.
xx 5.1 CH (channel) audio is available when the TV is connected to an external device supporting
5.1 CH.
xx When the receiver (home theater) is set to on, you can hear sound output from the TV’s
OPTICAL jack. When the TV is receiving a DTV signal, the TV will send 5.1 CH sound to the
home theater receiver. When the source is a digital component such as a DVD / Blu-ray player
/ cable box / STB satellite receiver and is connected to the TV via HDMI, only 2 CH audio will
be heard from the home theater receiver. If you want to hear 5.1 CH audio, connect the digital
audio out jack from your DVD / Blu-ray player / cable box / STB satellite receiver directly to an
amplifier or home theater.
✎✎H: You can connect your headphones to the headphones output on your set. While the
headphones are connected, the sound from the built-in speakers will be disabled.
xx Sound function may be restricted when connecting headphones to the TV.
xx Headphone volume and TV volume are adjusted separately.
Eng-8
ENG-Series 5000_4000_HK.indd 8
2012-02-14 �� 3:36:42
Connecting to PC
DVI OUT
HDMI OUT
Using an HDMI or HDMI/DVI Cable
✎✎HDMI IN 1(DVI), HDMI IN 2
xx Connecting through the HDMI cable may not be supported depending on the PC.
xx The HDMI line support for digital video and audio signals, and does not require an audio
connecting wire.
Eng-9
ENG-Series 5000_4000_HK.indd 9
2012-02-14 �� 3:36:43
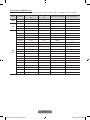
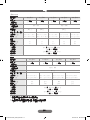
Display Modes (HDMI/DVI Input)
For EH5000/6000 series, optimal resolution is 1920 x 1080 @ 60 Hz. See full available resolution as below.
Mode
IBM
MAC
VESA
DMT
Resolution
Horizontal Frequency
(kHz)
Vertical Frequency
(Hz)
Pixel Clock Frequency (MHz)
Sync Polarity (H / V)
640 x 350
31.469
70.086
25.175
+/-
720 x 400
31.469
70.087
28.322
-/+
640 x 480
35.000
66.667
30.240
-/-
832 x 624
49.726
74.551
57.284
-/-
1152 x 870
68.681
75.062
100.000
-/-
640 x 480
31.469
59.940
25.175
-/-
640 x 480
37.861
72.809
31.500
-/-
640 x 480
37.500
75.000
31.500
-/-
800 x 600
37.879
60.317
40.000
+/+
800 x 600
48.077
72.188
50.000
+/+
800 x 600
46.875
75.000
49.500
+/+
1024 x 768
48.363
60.004
65.000
-/-
1024 x 768
56.476
70.069
75.000
-/-
1024 x 768
60.023
75.029
78.750
+/+
1152 x 864
67.500
75.000
108.000
+/+
1280 x 720
45.000
60.000
74.250
+/+
1280 x 800
49.702
59.810
83.500
-/+
1280 x 1024
63.981
60.020
108.000
+/+
1280 x 1024
79.976
75.025
135.000
+/+
1366 x 768
47.712
59.790
85.500
+/+
1440 x 900
55.935
59.887
106.500
-/+
1600 x 900RB
60.000
60.000
108.000
+/+
1680 x 1050
65.290
59.954
146.250
-/+
1920 x 1080
67.500
60.000
148.500
+/+
Eng-10
ENG-Series 5000_4000_HK.indd 10
2012-02-14 �� 3:36:43
Contents
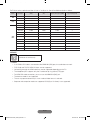
For EH4000 series, optimal resolution is 1366 x 768 @ 60 Hz. See full available resolution as below.
Mode
IBM
MAC
VESA
DMT
Resolution
Horizontal Frequency
(kHz)
Vertical Frequency
(Hz)
Pixel Clock Frequency (MHz)
Sync Polarity (H / V)
640 x 350
31.469
70.086
25.175
+/-
720 x 400
31.469
70.087
28.322
-/+
640 x 480
35.000
66.667
30.240
-/-
832 x 624
49.726
74.551
57.284
-/-
640 x 480
31.469
59.940
25.175
-/-
640 x 480
37.861
72.809
31.500
-/-
640 x 480
37.500
75.000
31.500
-/-
800 x 600
37.879
60.317
40.000
+/+
800 x 600
48.077
72.188
50.000
+/+
800 x 600
46.875
75.000
49.500
+/+
1024 x 768
48.363
60.004
65.000
-/-
1024 x 768
56.476
70.069
75.000
-/-
1024 x 768
60.023
75.029
78.750
+/+
1280 x 720
45.000
60.000
74.250
+/+
1366 x 768
47.712
59.790
85.500
+/+
SERVICE
SERVICE
Connector for service only.
✎✎NOTE
xx If an HDMI to DVI cable is connected to the HDMI IN 1(DVI) port, the audio does not work.
xx PC(D-Sub) and PC/DVI AUDIO IN input are not supported.
xx Connecting through the HDMI cable may not be supported depending on the PC.
xx The headphone jack supports only the 3 conductor tip-ring-sleeve (TRS) type.
xx For HDMI/DVI cable connection, you must use the HDMI IN 1(DVI) jack.
xx The interlace mode is not supported.
xx The set may operate abnormally if a non-standard video format is selected.
xx Separate and composite modes are supported. SOG(Sync On Green) is not supported.
Eng-11
ENG-Series 5000_4000_HK.indd 11
2012-02-14 �� 3:36:43
Changing the Input Source
¦¦ Source
TV / HDMI1/DVI / HDMI2 / AV / Component / USB
Use to select TV or other external input sources such as DVD / Blu-ray players / cable box / STB satellite
receiver connected to the TV.
In the displaying Source list, connected inputs will be highlighted.
✎✎
✎✎ PC(D-Sub) input is not supported. If you want to connect PC to the TV, use HDMI1/DVI input.
✎✎ Press the TOOLS button.
xxEdit Name
You can set an external input sources name you want.
−− When connecting a PC to the HDMI IN 1(DVI) or HDMI IN 2 port with HDMI cable, you should
set the TV to PC mode under Edit Name.
−− When connecting a PC to the HDMI IN 1(DVI) port with HDMI/DVI cable, you should set the
TV to DVI PC mode under Edit Name.
−− When connecting an AV devices to the HDMI IN 1(DVI) port with HDMI/DVI cable, you should
set the TV to DVI Devices mode under Edit Name.
xxInformation
You can see detailed information about the connected external device.
Eng-12
ENG-Series 5000_4000_HK.indd 12
2012-02-14 �� 3:36:43
Contents
How to use the e-Manual
You can find instructions about your TV’s features in the e-Manual in your TV. To
use, press the E-MANUAL button on your remote. Move the cursor using the
u/d/l/r buttons to highlight a category, then a topic, and then press the E
button. The e-Manual displays the page you want to see.
OOMENUm → Support → e-Manual → E
Screen Display
Currently displayed video,
TV programme, etc.
The category list. Press l / r
button to select the category
you want.
Basic Features
Displays the sub-menu list.
Use the arrow buttons on your
remote to move the cursor.
Press E button to select the
submenu you want.
Picture Menu
Sound Menu
Index
Enter
Exit
Operation Buttons:
} Index: Displays the index screen.
E Enter: Selects a category or sub-menu.
e Exit: Exit the e-Manual.
Viewing the Contents:
a Try now: Displays the OSD menu that corresponds to the topic. To return to the e-Manual screen,
press the E-MANUAL button.
b Home: Moves to the e-Manual home screen.
L Page: Moves to previous or next page.
{ Zoom: Magnifies a screen. You can scroll through the magnified screen by using u / d buttons.
–– Select the Zoom, and then press E to magnify the screen. You can scroll through the
magnified screen by using the ▲ / ▼ buttons. To return to the screen to normal size,
press the RETURN button.
How to Toggle between an e-Manual Topic and the Corresponding OSD Menu(s)
✎✎This function is not enabled in some menus.
✎✎You cannot use Try now directly if the TV is set to an external input source.
Method 1
Method 2
1. If you want to use the menu that corresponds to an
e-Manual topic, press the red button to select Try now.
2. To return to the e-Manual screen, press the E-MANUAL
button.
1. Press the E button when a topic is displayed. “Are
you sure?” appears. Select Yes, and then press the E
button. The OSD window appears.
2. To return to the e-Manual screen, press the E-MANUAL
button.
How to Search for a Topic on the Index Page
✎✎This function may not be supported depending on the language.
1. If you want to search a keyword, press the blue button to select Index.
2. Press the ◄ or ► button to select a character order you want.
3. Press the ▲ or ▼ button to select a keyword you want to see, and then press the E button.
4. You can view the corresponding e-Manual instruction screen.
To close the Index screen, press the RETURN button.
✎✎
Eng-13
ENG-Series 5000_4000_HK.indd 13
2012-02-14 �� 3:36:43
Installing the Wall Mount
Preparing before Installing Wall Mount
To install a wall mount from another manufacturer, use the holder-ring.
Installing the Wall Mount Kit
The wall mount kit (sold separately) allows you to mount the TV on the wall.
For detailed information on installing the wall mount, see the instructions provided with the wall mount items.
Contact a technician for assistance when installing the wall mount bracket.
Samsung Electronics is not responsible for any damage to the product or injury to yourself or others if you elect
to install the TV on your own.
Wall Mount Kit Specifications (VESA)
✎✎
The wall mount kit is not supplied, but sold separately.
Install your wall mount on a solid wall perpendicular to the floor. When attaching to other building materials,
please contact your nearest dealer. If installed on a ceiling or slanted wall, it may fall and result in severe
personal injury.
✎✎NOTE
xx Standard dimensions for wall mount kits are shown in the table below.
xx When purchasing our wall mount kit, a detailed installation manual and all parts necessary for
assembly are provided.
xx Do not use screws that do not comply with the VESA standard screw specifications.
xx Do not use screws longer than the standard dimension or do not comply with the VESA standard
screw specifications. Screws that are too long may cause damage to the inside of the TV set.
xx For wall mounts that do not comply with the VESA standard screw specifications, the length of the
screws may differ depending on their specifications.
xx Do not fasten the screws that are too strongly; this may damage the product or cause the product to
fall, leading to personal injury. Samsung is not liable for these kinds of accidents.
xx Samsung is not liable for product damage or personal injury when a non-VESA or non-specified wall
mount is used or the consumer fails to follow the product installation instructions.
xx Do not mount the TV at more than a 15 degree tilt.
Inches
VESA Spec. (A x B)
Standard Screw
26
100 x 100
M4
32~40
200 x 200
M6
46~60
400 x 400
M8
Quantity
4
Do not install your wall mount kit while your TV is turned on. It may result in personal
injury due to electric shock.
Eng-14
ENG-Series 5000_4000_HK.indd 14
2012-02-14 �� 3:36:44
Contents
Securing the TV to the Wall
]
Caution: Pulling, pushing or climbing onto the TV may cause the TV to fall.
In particular, ensure that your children do not hang over or destabilize the TV; doing
so may cause the TV to tip over, resulting in serious injuries or death. Follow all safety
precautions provided in the included safety flyer. For added stability and safety, install the
anti-fall device as follows.
To Avoid the TV from Falling
1. Put the screws into the clamps and firmly fasten them onto the
wall. Confirm that the screws have been firmly installed onto the
wall.
You may need additional material such as an anchor
depending on the type of wall.
✎✎
✎✎ Since the necessary clamps, screws, and string are not
supplied, please purchase these additionally.
2. Remove the screws from the back centre of the TV, put the
screws into the clamps,and then fasten the screws onto the TV
again.
Screws may not be supplied with the product. In this case,
please purchase the screws as specifications.
✎✎
3. Connect the clamps fixed onto the TV and the clamps fixed onto the wall with a strong cable and then
tie the string tightly.
Install the TV near to the wall so that it does not fall backwards.
✎✎
✎✎ It is safe to connect the string so that the clamps fixed on the wall are equal to or lower than the
clamps fixed on the TV.
✎✎ Untie the string before moving the TV.
4. Verify all connections are properly secured. Periodically check connections for any sign of fatigue for
failure. If you have any doubt about the security of your connections, contact a professional installer.
Eng-15
ENG-Series 5000_4000_HK.indd 15
2012-02-14 �� 3:36:44
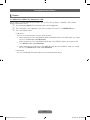
Troubleshooting
Issues
Solutions and Expalations
The TV won’t turn on.
yy Make sure the AC power cord is securely plugged
into the wall outlet and the TV.
yy Make sure the wall outlet is working.
yy Try pressing the P button on the TV to make
sure the problem is not the remote control. If the
TV turns on, refer to “The remote control does not
work." below.
There is no picture/video.
yy Check cable connections (remove and reconnect
all cables connected to the TV and external
devices).
yy Set your external device’s (cable/set top box,
DVD, Blu-ray, etc.) video outputs to match the
connections to the TV input. For example, if an
external device’s output is HDMI, it should be
connected to an HDMI input on the TV.
yy Make sure your connected devices are powered
on.
yy Be sure to select the TV’s correct source by
pressing the SOURCE button on the remote
control.
yy Reboot the connected device by reconnecting the
device’s power cable.
The remote control does not work.
yy Replace the remote control batteries with the
poles (+/–) in the right direction.
yy Clean the sensor’s transmission window on the
remote control.
yy Try pointing the remote directly at the TV from
5~6 feet away.
The cable/set top box remote control doesn’t turn
the TV on or off, or adjust the volume.
yy Programme the cable/set top box remote control
to operate the TV. Refer to the cable/set top box
user manual for the Samsung TV code.
✎✎This LED panel uses a panel consisting of sub pixels which require sophisticated technology to produce.
However, there may be a few bright or dark pixels on the screen. These pixels will have no impact on the
performance of the product.
✎✎You can keep your TV as optimum condition to upgrade the latest firmware on web site by USB.
Eng-16
ENG-Series 5000_4000_HK.indd 16
2012-02-14 �� 3:36:44
Specifications
EH4000/5000
Model Name
UA26EH4000
UA32EH4000
UA32EH5000
UA40EH5000
UA46EH5000
Screen Size
(Diagonal)
26 inches
32 inches
32 inches
40 inches
46 inches
Display
Resolution
(Optimum)
1366 x 768
Sound Output
Dimensions
(WxDxH)
Body (mm)
With Stand (mm)
5W x 2
1920 x 1080
10W x 2
10W x 2
615.1 x 93.3 x 365.6 738.8 x 93.3 x 436.7 738.3 x 93.1 x 444.6 927.6 x 93.0 x 551.0 1059.8 x 94.3 x 625.6
615.1 x 180.7 x 419.2 738.8 x 191.7 x 493.3 738.3 x 191.6 x 498.1 927.6 x 227.6 x 606.4 1059.8 x 227.6 x 680.7
Weight
Without Stand (kg)
With Stand (kg)
4.2
4.7
5.7
6.3
Environmental
Considerations
Operating Temperature
Operating Humidity
Storage Temperature
Storage Humidity
5.7
6.4
9.0
11.0
12.0
14.0
10°C to 40°C (50°F to 104°F)
10% to 80%, non-condensing
-20°C to 45°C (-4°F to 113°F)
5% to 95%, non-condensing
EH6000
Model Name
UA40EH6000
UA46EH6000
UA55EH6000
UA60EH6000
Screen Size
(Diagonal)
40 inches
46 inches
55 inches
60 inches
Display Resolution
(Optimum)
1920 x 1080
Sound Output
Dimensions (WxDxH)
Body (mm)
With Stand (mm)
Weight
Without Stand (kg)
With Stand (kg)
Environmental
Considerations
Operating Temperature
Operating Humidity
Storage Temperature
Storage Humidity
10W x 2
927.6 x 93.0 x 555.2 1059.8 x 94.3 x 629.9 1250.6 x 94.3 x 736.3 1374.1 x 94.5 x 807.0
927.6 x 227.6 x 606.4 1059.8 x 227.6 x 695.4 1250.6 x 227.6 x 788.7 1374.1 x 329.9 x 858.9
9.0
11.0
12.0
14.0
18.0
20.6
23.2
27.3
10°C to 40°C (50°F to 104°F)
10% to 80%, non-condensing
-20°C to 45°C (-4°F to 113°F)
5% to 95%, non-condensing
✎✎Design and specifications are subject to change without prior notice.
✎✎For information about power supply, and more about power consumption, refer to the label attached to
the product.
Eng-17
ENG-Series 5000_4000_HK.indd 17
2012-02-14 �� 3:36:44
License
Eng-18
ENG-Series 5000_4000_HK.indd 18
2012-02-14 �� 3:36:44
Contents
Responsibility for the Pay Service (Cost to Customers)
When the service is requested, in spite of in warranty, we may charge you for a visit from a service technician in
the following cases.
Not a Product Defect
✎✎Cleaning of the product, Adjustment, Explanation, Re-installation and etc.
xx If a service technician gives instructions on how to use TV or simply adjusts options without
disassembling product.
xx If a defect is caused by external environmental factors (Internet, Antenna, Wired Signal, etc.).
xx If a product is reinstalled or devices are connected additionally after installing the purchased product
for the first time.
xx If a product is reinstalled to move to a different spot or to move to a different house.
xx If customer requests instructions on how to use because of another company's product.
xx If customer requests instructions on how to use the network or another company's program.
xx If customer requests software installation and setup for the product.
xx If a service technician removes/cleans dusts or foreign materials inside of the product.
xx If customer requests an installation additionally after purchasing a product through home-shopping or
online.
A Product Damage Caused by Customer's Fault
✎✎Product damage caused by customer's mishandling or wrong repair. If a product damage is caused by;
xx External impact or drop.
xx Use of supplies or separately sold product unspecified by Samsung.
xx Repair from a person who is not an engineer of outsourcing service company or partner of Samsung
Electronics Co., Ltd.
xx Remodeling or repairing the product by customer.
xx Using it with incorrect voltage or non-authorised electrical connections.
xx Not following the "cautions" in User Manual.
Others
xx If product fails by natural disaster (lightning, fire, earthquake, flood damage, etc).
xx If consumable components are all used up (Battery, Toner, Fluorescent Lights, Head, Vibrator, Lamp,
Filter, Ribbon, etc.).
If customer requests a service in case the product has no defect, service fee may be charged. So please read
User Manual first.
Eng-19
ENG-Series 5000_4000_HK.indd 19
2012-02-14 �� 3:36:44
要獲得更詳細的資訊,請參考「如何使用 e-Manual」(P.13)。
本使用手冊中的圖表和插圖僅供參考,可能與實際產品外觀有差別。 產品設計與規格可能出現變更,恕不
另行通知。
靜止影像警告
避免在螢幕上播放靜止影像(如 JPEG 圖檔)或靜止影像項目(如電視節目標誌、全景或 4:3 影像格式、螢幕下方的股票或新聞列
等)。 持續顯示靜止影像可能導致螢幕螢光質不均勻耗損,影響影像品質。 為降低這種效果的風險,請遵循下列建議:
• 避免長時間顯示相同電視頻道。
• 一律以全螢幕顯示所有影像,並使用電視設定圖像尺寸功能表設定最適合的格式。
• 將亮度與對比度值降到顯示希望影像品質所需的最小值,超過此值可能會加速燒毀。
• 經常使用所有電視功能以減少螢幕殘影和螢幕燒毀,如需詳細資訊,請參閱使用手冊的適當章節。
騰出安裝空間
將產品和其他物件(如牆壁)保持必要的距離,以確保通風正常。
否則可能由於產品內部溫度過高而起火,或發生其他問題。
✎✎請僅使用三星電子提供的支架或掛牆托架。
xx若使用其他製造商提供的零件,可能導致產品發生問題,或因產品掉落而受傷。
✎✎產品的外殼和屏幕可能在清潔時被劃傷。
以支架安裝
以掛牆托架安裝
10 公分
10 公分
10 公分
10 公分
10 公分
10 公分
10 公分
儲存和保養
✎✎若您在電視螢幕上黏貼標籤,在撕掉標籤後會有碎屑殘留。請清除殘留碎屑再觀看電視。
✎✎產品的外殼和屏幕可能在清潔時被劃傷。清潔時,請務必使用軟布輕輕擦拭,以防劃傷產品外殼和屏幕。
Storage
Storage
and Maintenance
and Maintenance
Do not Do
spray
notwater
sprayorwater
a cleaning
or a cleaning
agent directly
agent 任何液體
directly
onto onto
Clean
the
Clean
product
the product
with a soft
withcloth
a soft
dapped
cloth dapped
in a small
in a small
請勿將水或清潔劑直接喷洒到本产品上。
用浸有少量水的軟布清潔本產品。
the product.
the product.
Any liquid
Anythat
liquid
goes
thatinto
goes
theinto
product
the product
may amount
may amount
of water.of water.
流入本產品都可能引起故障、火災或觸電。
cause acause
failure,a fire,
failure,
or electric
fire, or electric
shock. shock.
中文-1
TC-Series 5000_4000_HK.indd 1
2012-02-14 �� 3:37:12
附件
✎✎請確認電視隨附以下物件。 若有任何物件遺失,請聯絡經銷商。
✎✎這些物件的顏色和形狀可能因產品型號而異。
✎✎包裝中不包含的纜線,可以單獨購買。
yy 遙控器和電池(AAA,2 顆)
yy 電源線
yy 使用說明
yy 安全指南
線套支架
組裝線套支架
• 下述情況下,要收取一定數量的服務費用:
–– (a) 電視沒有故障,工程師被您電話請出。
(例如:您沒有閱讀本手冊。)
–– (b) 電視沒有故障,您將電視帶到客服中心。
(例如:您沒有閱讀本手冊。)
• 服務費收取數量會在進行任何工作和家訪前告知您。
中文-2
TC-Series 5000_4000_HK.indd 2
2012-02-14 �� 3:37:13
電視控制器
電視控制器是一個多方向的按鈕,它可以幫
助您在沒有遙控器的時候導航。
功能菜單
✎ 一些需要密碼的功能可能不能使用。
✎ 產品顏色和外觀可能隨型號而變。
✎ 當按住控制器超過 1 秒鐘時,將退出菜單
CONTENT
m
(例如:您進入節目源后)。
s
遙控器感應器
✎ 當通過移動控制器上/下/左/右選擇功能
下(前)
時,請務必不要按控制器。如果首先按下了
控制器,您將不能向上/下/左/右方向移動
操作它。
電視控制器
右
左
上(後)
向上/向下:頻道
向左/向右:音量
按下:功能
按下:選擇
按住:退出
開機
在待機狀態下,按控制器打開電視。
調整音量
電視開啟時,左右撥動控制器以調整音量。
選擇頻道
電視開啟時,前後撥動控制器以選擇頻道。
使用功能菜單
電視開啟時,按下控制器屏幕上會顯示功能菜單。如果再次按下,功能菜單會消失。
使用功能表(m)菜單
在功能菜單下撥動控制器并按下選擇 功能表(m)。顯示列有電視功能的 OSD (螢屏
顯示) 。
選擇內容首頁(CONTENT)
在功能菜單下撥動控制器并按下選擇 內容首頁(CONTENT)。屏幕上會顯示內容首頁
主菜單。
選擇節目源(s)
在功能菜單下撥動控制器并按下選擇 節目源(s)。屏幕上會顯示節目源列表。
關機(P)
在功能菜單下撥動控制器并按下選擇 關機(P)以關閉電視。
待機模式
勿讓電視長時間處於待機模式(如外出渡假時)。 即使關閉電源按鈕,仍會消耗少量電源。 最好將電源線
從插座上拔除。
中文-3
TC-Series 5000_4000_HK.indd 3
2012-02-14 �� 3:37:14
檢視遙控器
✎✎這是盲人專用的特殊遙控器,在電源、頻道、音量和數字按鈕上都具有點字。
顯示與選取可用視訊來源。
開啟和關閉電視。
直接進入頻道。
返回上一個頻道。
此按鈕某些地區不可用。
暫時關閉聲音。
調整音量。
變更頻道。
在螢幕上顯示頻道列表。
查看內容首頁。
顯示 EPG(電子節目指南)。
開啟 OSD。
顯示資訊(位於電視螢幕)。
快速選取常用功能。
選取螢幕功能表項目,變更功能表上看
到的值。
返回上一功能表。
退出功能表。
根據螢幕上的顯示使用這些按鈕。
E-MANUAL: 顯示 e-Manual。
P.SIZE: 圖像尺寸選擇。
AD/SUBT.: 開啟或關閉音頻描述
/顯示數位字幕。
在特定功能中使用這些按鈕,更多訊息
請參考 e-Manual 中的說明。
安裝遙控器電池(電池大小:AAA,2顆)
中文-4
TC-Series 5000_4000_HK.indd 4
2012-02-14 �� 3:37:14
連接天線
初次開啟電視後,將自動進行基本設定。
✎✎預設:連接電源和天線。
ANT OUT
初始設定
初次開啟電視電源後,螢幕提示將依序協助您完成基本設定。唯有節目源設為電視,才能使用 設置。
1
2
選擇語言
選擇 商場展示 或
家庭使用
按 ▲ 或 ▼ 按鈕,再按 E 按鈕。
選擇希望的 OSD(螢幕顯示)語言。
按 ▲ 或 ▼ 按鈕,再按 E 按鈕。
選擇 家庭使用 模式。 商場展示 模式適用於零售環境。
✎✎按電視上的控制器,當電視上顯示功能菜單時,選取 功能表(m)并
按住按鈕 5 秒鐘,設定 商場展示 模式。
✎✎選取 節目源(s)并按住按鈕 5 秒鐘,以取消 商場展示。
✎✎商場展示 僅用于商店顯示。如選擇,某些功能可能不能正常使用。當您
3
選擇天線源和頻道源
4
5
設定 時鐘模式
在家觀看時,請選擇 家庭使用。
按 ▲ 或 ▼ 按鈕,選擇 無線 或 有線。
按 ◄ 或 ► 按鈕,選擇頻道來源 ,然後按 E 按鈕,開始搜索記憶
所有可用的頻道來源。
✎✎可隨時按 E 按鈕中斷記憶程序。
完成
手動或自動設置當前時間。
按 E 按鈕。
如果您要重設此功能...
選擇 設置。 請輸入 4 位數的 PIN 碼。 預設 PIN 碼為「0-0-0-0」。 如果想要變更 PIN 碼,請使用
更改密碼 功能。
您可能要在家重新進行 設置 (MENU -> 系统),即使您在商店已完成。
中文-5
TC-Series 5000_4000_HK.indd 5
2012-02-14 �� 3:37:14
連接到 AV 裝置
¦¦ 可用裝置:DVD,藍光播放機,HD 有線電視盒,HD STB(機上盒)衛星接收器,有線電視盒,衛星接收
器
HDMI, HDMI/DVI 連接
'9,䔌ߎ
+'0,䔌ߎ
使用 HDMI 或 HDMI/DVI(高達 1080p)纜線
✎✎HDMI IN 1(DVI) / HDMI IN 2
xx要獲得更好的圖像和音訊質量,請使用 HDMI 纜線連接數碼裝置。
xxHDMI 纜線支持數字視訊和音訊信號,不再需要單獨的音訊纜線。
xx如果連接到電視外部裝置使用的 HDMI 版本低於電視使用的版本,圖像可能顯示異常(或根本不顯
示)或者音訊不能輸出。這種情況發生時,請聯繫外部裝置的供應商,以確定 HDMI 的版本,並要求升
級。
xx請務必購買經認證的
xx推薦使用優質高速的
HDMI 纜線。否則,螢幕可能出現空白或顯示連接錯誤。
HDMI 纜線。本產品不支持通過 HDMI 的以太網功能。
中文-6
TC-Series 5000_4000_HK.indd 6
2012-02-14 �� 3:37:15
Y
R
W
㽪丏䔌ߎ
R
W
R
B
R
䷇丏䔌ߎ
R -AUDIO- L
B
䷇丏䔌ߎ
AV 連接
VIDEO
W
W
R -AUDIO- L
COMPONENT/AV IN
R
R
Y
G
G
分量輸入連接
ߚ䞣䔌ߎ
PR
PB
Y
使用分量輸入纜線(高達 1080p)和 AV(僅480i)纜線
✎✎當連接到 AV IN , AV IN [Y/VIDEO] 端子的顏色(綠色)與視訊纜線的顏色(黃色)不匹配。
✎✎為獲得最好的畫質,建議使用分量輸入連接,而非 AV 連接。
中文-7
TC-Series 5000_4000_HK.indd 7
2012-02-14 �� 3:37:15
連接到音訊裝置
¦¦ 可用裝置: 數位音訊系統,耳機
耳機
數位音訊系統
OPTICAL
使用光纖(數位)連接或耳機
✎✎DIGITAL AUDIO OUT (OPTICAL)
xx若將數位音訊系統連接到
DIGITAL AUDIO OUT (OPTICAL) 插孔,請同時降低電視與系統的音
量。
xx電視連接到支援 5.1 CH(聲道)的外接裝置時,才可以使用 5.1 CH(聲道)聲音。
xx(家庭劇院)接收器設為開啟時,可聽到電視 OPTICAL 插孔輸出的聲音。 電視在接收
DTV 訊號
時,會將 5.1 CH 的聲音傳送至家庭劇院接收器。 若播放來源是 DVD / 藍光播放機 / 有線電視盒
/ STB(機上盒)衛星接收器等數位元件,且通過 HDMI 連接到電視,則只能從家庭劇院的接收器聽
到雙聲道的聲音。 若您希望聽到 5.1 CH 的音訊,請將 DVD / 藍光播放機 / 有線電視盒 / STB
衛星接收器的數位音訊輸出插孔直接接到擴大機或家庭劇院。
✎✎H: 可以將耳機連接至本機的耳機端子。連接耳機後,內置喇叭就不會發出伴音了。
xx將耳機連接至本機後,伴音功能將受到限制。
xx耳機音量和本機音量將獨立調節。
中文-8
TC-Series 5000_4000_HK.indd 8
2012-02-14 �� 3:37:16
連接到 PC
'9,䔌ߎ
+'0,䔌ߎ
使用 HDMI 或 HDMI/DVI 纜線
✎✎HDMI IN 1(DVI), HDMI IN 2
xx可能不支持通過 HDMI 連接線連接,視 PC 情況而定。
xxHDMI 連接線支持數字視頻和音頻信號,並且不需要音頻連接線。
中文-9
TC-Series 5000_4000_HK.indd 9
2012-02-14 �� 3:37:17
顯示模式(HDMI/DVI輸入源)
EH5000/6000 系列最佳解析度為 1920 x 1080 @ 60Hz。詳細支援解析度,請參閱下表。
模式
解析度
水平频率(kHz)
垂直频率(Hz)
像素時脈頻率(MHz)
同步极性(水平/垂直)
640 x 350
31.469
70.086
25.175
+/-
720 x 400
31.469
70.087
28.322
-/+
IBM
MAC
VESA DMT
640 x 480
35.000
66.667
30.240
-/-
832 x 624
49.726
74.551
57.284
-/-
1152 x 870
68.681
75.062
100.000
-/-/-
640 x 480
31.469
59.940
25.175
640 x 480
37.861
72.809
31.500
-/-
640 x 480
37.500
75.000
31.500
-/-
800 x 600
37.879
60.317
40.000
+/+
800 x 600
48.077
72.188
50.000
+/+
800 x 600
46.875
75.000
49.500
+/+
1024 x 768
48.363
60.004
65.000
-/-
1024 x 768
56.476
70.069
75.000
-/-
1024 x 768
60.023
75.029
78.750
+/+
1152 x 864
67.500
75.000
108.000
+/+
1280 x 720
45.000
60.000
74.250
+/+
1280 x 800
49.702
59.810
83.500
-/+
1280 x 1024
63.981
60.020
108.000
+/+
1280 x 1024
79.976
75.025
135.000
+/+
1366 x 768
47.712
59.790
85.500
+/+
1440 x 900
55.935
59.887
106.500
-/+
1600 x 900RB
60.000
60.000
108.000
+/+
1680 x 1050
65.290
59.954
146.250
-/+
1920 x 1080
67.500
60.000
148.500
+/+
中文-10
TC-Series 5000_4000_HK.indd 10
2012-02-14 �� 3:37:17
EH4000 系列最佳解析度為 1366 x 768 @ 60Hz。詳細支援解析度,請參閱下表。
模式
解析度
水平频率(kHz)
垂直频率(Hz)
像素時脈頻率(MHz)
同步极性(水平/垂直)
640 x 350
31.469
70.086
25.175
+/-
720 x 400
31.469
70.087
28.322
-/+
640 x 480
35.000
66.667
30.240
-/-
832 x 624
49.726
74.551
57.284
-/-/-
IBM
MAC
VESA DMT
640 x 480
31.469
59.940
25.175
640 x 480
37.861
72.809
31.500
-/-
640 x 480
37.500
75.000
31.500
-/+/+
800 x 600
37.879
60.317
40.000
800 x 600
48.077
72.188
50.000
+/+
800 x 600
46.875
75.000
49.500
+/+
-/-
1024 x 768
48.363
60.004
65.000
1024 x 768
56.476
70.069
75.000
-/-
1024 x 768
60.023
75.029
78.750
+/+
1280 x 720
45.000
60.000
74.250
+/+
1366 x 768
47.712
59.790
85.500
+/+
服務
SERVICE
僅供服務連接使用。
✎✎注意
xx如果 HDMI/DVI 纜線是連接至 HDMI IN 1(DVI) 連接埠,音訊便沒有作用。
xx不支援 PC(D-Sub) 和 PC/DVI 音頻輸入。
xxPC 可能不支援通過 HDMI 纜線連接。
xx耳機端子僅支援 3 段 (TRS) 類型。
xx使用 HDMI/DVI 纜線連接時,您必須使用 HDMI IN 1(DVI) 插孔。
xx不支援隔行掃描。
xx若選取了非標準視訊格式,電視可能無法正常工作。
xx支援分離和複合模式,不支援 SOG(綠同步訊號)。
中文-11
TC-Series 5000_4000_HK.indd 11
2012-02-14 �� 3:37:18
變更輸入來源
¦¦ 節目源
電視 / HDMI1/DVI / HDMI2 / AV / 分量輸入 / USB
用於選擇電視或連接到電視的其他外部輸入來源,如 DVD / 藍光播放機 / 有線電視盒 / STB 衛星接收器。
✎✎在 節目源 中,會反白顯示已連接的輸出。
✎✎PC(D-Sub) 輸入不支援。如果您要將 PC 連接至電視,請使用 HDMI1/DVI 输入。
✎✎按 TOOLS 按鈕
xx名稱編輯
您可以將外部輸入源設置為您想要的名稱
––若使用 HDMI 纜線,將 PC 連接到 HDMI IN 1 (DVI) 或 HDMI IN 2 連接埠,應於 名稱編輯 下將連
接埠設定為 PC 模式。
––若使用 HDMI/DVI 纜線將 PC 連接到 HDMI IN 1(DVI) 連接埠,應於 名稱編輯 下將連接埠設為
DVI PC模式。
––若使用 HDMI/DVI 纜線將 AV 裝置連接到 HDMI IN 1(DVI) 連接埠,應於 名稱編輯 下將連接埠設
為 DVI 裝置模式。
xx資訊
您可以查看已連接的外部裝置的詳細資訊。
中文-12
TC-Series 5000_4000_HK.indd 12
2012-02-14 �� 3:37:18
如何使用 e-Manual
您可以在電視的 e-Manual 中找到有關電視功能的說明。 若要使用,請按遙控
器上的 E-MANUAL 按鈕。 使用 u/d/l/r 按鈕移動游標,分別醒目顯示類
別和主題,然後按 E 按鈕。e-Manual 就會顯示您想檢視的頁面。
您也可以從功能表進入:
OOMENUm →
支援 → e-Manual → E
螢幕顯示
電視螢幕:顯示當
前的輸入源。
改變目錄。
按l/r 按鈕,選擇您需要
的目錄。
ഗפء౨
顯示子菜單清單。
按 E 按鈕,選擇您需要的
子菜單。
ቹቝפ౨।
ଃயפ౨।
確認
退出
操作按鈕:
E 確認:選擇類別或子功能表。
e 退出: 退出 e-Manual。
檢視內容:
a 立即嘗試: 顯示對應至主題的 OSD 功能表。 若要返回 e-Manual 畫面,請按
E-MANUAL 按鈕。
b 首頁: 移至 e-Manual 首頁畫面。
L 頁: 移至下一頁或上一頁。
{ 放大: 放大畫面。 您可以使用 u/d 按鈕捲動放大的畫面。
––選擇 放大,按下 E 以放大畫面。 您可以使用 u/d 按鈕捲動放
大的畫面。若要將畫面還原為正常大小,請按 RETURN 按鈕。
如何在 e-Manual 主題和對應的 OSD 功能表間切換
✎✎在某些功能表中,此功能未啟用。
✎✎如果電視設定為外部輸入來源,則無法直接使用 立即嘗試。
方法1
方法2
1.如果您要使用對應至 e-Manual 主題的功能表,請按紅
色按鈕以選擇 立即嘗試。
2.若要返回 e-Manual 畫面,請按 E-MANUAL 按鈕。
1.當主題顯示時,按 E 按鈕,“是否要執行此動作?”
信息條將顯示,選擇 是,然後按 E 按鈕。 顯示 OSD
視窗。
2.若要返回 e-Manual 畫面,請按 E-MANUAL 按鈕。
中文-13
TC-Series 5000_4000_HK.indd 13
2012-02-14 �� 3:37:18
安裝掛牆托架
安裝掛牆套件前的準備
使用別的廠商的掛牆套件時,請使用定位環。
安裝掛牆套件
使用掛牆托架(單獨購買)可以將電視安裝到牆上。
有關安裝掛牆托架的詳細資訊,請參閱掛牆托架隨附的說明。安裝掛牆托架時,請聯絡技術人員以取得協
助。
若您選取自行安裝電視,對於由此造成的任何產品損壞或人身傷害,三星電子概不負責。
掛牆托架套件規格 (VESA)
✎✎
掛牆托架套件並未供應,需個別購買。
將掛牆托架安裝在與地板垂直的實牆上。 若要安裝於其他建材,請洽詢您最近的經銷商。 若安裝在天花板
或偏斜的牆,可能會掉落並導致嚴重的人身傷害。
✎✎注意
xx下表顯示掛牆托架套件的標準尺寸。
xx購買我們的掛牆托架套件時,會提供詳細安裝手冊和組裝所需所有零件。
xx請勿使用與 VESA 標準螺絲歸格不相容的螺絲。
xx請勿使用比標準尺寸長,或與 VESA 標準螺絲規格不相容的螺絲。 太長的螺絲可能導致電視機內部損壞。
xx對於不符 VESA 標準螺絲規格的掛牆托架,螺絲長度可能根據掛牆托架規格而有所不同。
xx請勿將螺絲鎖得太緊;這樣可能損壞產品或造成產品掉落,導致人身傷害。 三星對於這類意外不予負責。
xx若使用非 VESA 或非指定掛牆托架,或因消費者未遵守安裝指示而造成的產品損毀或人身傷害,三星不予
負責。
xx電視安裝傾斜角度勿超過
15 度。
英吋
VESA 規格 (A x B)
標準螺絲
26
100 x 100
M4
32~40
200 x 200
M6
46~60
400 x 400
M8
數量
4
切勿在電視開啟時安裝掛牆套件。否則可能會因觸電而導致人身傷害。
中文-14
TC-Series 5000_4000_HK.indd 14
2012-02-14 �� 3:37:19
將電視固定在牆上
]
注意:拉、推或攀爬電視可能會導致電視墜落。尤其禁止兒童攀爬或搖晃電視;否則可能
造成電視翻倒,導致嚴重傷害或死亡。請遵守隨附安全傳單中的所有安全注意事項。要增
強穩定性與安全性,請安裝防墜裝置,如下所述。
避免電視墜落
1. 將螺絲放置於夾具內,並將它們牢牢固定於牆上。 確認螺絲牢牢固定於
牆中。
✎✎根據牆壁類型,您可能需要其他材料,如固定件。
✎✎必要的夾具、螺絲和繩子不隨產品提供,請單獨購買。
2. 將螺絲從電視背面的中心位置移除,再將螺絲放置於夾具內,然後將螺
絲重新固定於電視上。
✎✎螺絲可能不隨產品提供,在這種情況下,請購買符合規格的螺釘。
3. 以結實的纜繩將電視上的夾具與牆上的夾具接起,並繫緊纜繩。
✎✎將電視安裝至靠近牆面的位置,以防向後方墜落。
✎✎連接纜繩時,若牆上夾具位置低於或等於電視夾具,會是最安全的作
法。
✎✎若要搬動電視,請先解開纜繩。
4. 確認所有的連接均牢固到位。定期檢查連接,以瞭解是否有任何可能導
致意外的老化跡象。若您對連接的牢固性有任何疑慮,請聯絡專業安裝
人員。
中文-15
TC-Series 5000_4000_HK.indd 15
2012-02-14 �� 3:37:19
解決疑難
問題
解決方案和解釋
電視不能正常開機。
• 確認 AC 電源線正確連接牆上插座和電視。
• 確認牆上插座功能正常。
• 嘗試按電視上的 P 按鈕,以確定問題並非出在遙控
器上。 若電視已開啟,請參閱下方的“遙控器沒有作
用”。
沒有圖像或視訊。
• 檢查纜線連接(移除並重新連接電視與外部設備間的所有
纜線)。
• 設定外部裝置(有線/機上盒、DVD、藍光等)訊號輸出是
否連接到正確的電視輸入。例如,若外部裝置輸出為
HDMI,應連接到電視的 HDMI 輸入。
• 確認您連接的裝置已開啟。
• 按電視遙控器上的 SOURCE 確認已正確選取電視來源。
• 重新連接外部設備的電源線,重啟所連接的設備。
遙控器沒有作用。
• 重新放置遙控器電池,確保正負極方向正確。
• 清潔遙控器感應器的發送窗口。
• 在 5 到 6 英尺範圍內直接對準電視。
有線/機頂盒遙控器不能打開或關閉電視或調整音
量。
• 編程有線/機頂盒遙控器來控制電視。請參考有線/機頂盒
說明書中三星電視代碼。
✎✎此 LED 面板採用的是需要使用精密技術製造的面板,包含子像素。但是,螢幕上可能出現少數明亮像素或暗色
像素。這些像素不會影響產品的效能。
✎✎要想讓您的電視一直保持最優的性能,請使用 USB 從三星網站下載最新的固件并升級電視程序。
中文-16
TC-Series 5000_4000_HK.indd 16
2012-02-14 �� 3:37:20
規格
EH4000/5000
型號名稱
螢幕大小
(對角尺寸)
UA26EH4000
UA32EH4000
UA32EH5000
UA40EH5000
UA46EH5000
26 英吋
32 英吋
32 英吋
40 英吋
46 英吋
顯示解析度
(最佳解析度)
聲音輸出
1366 x 768
5W x 2
尺寸(長 x 寬 x 高)
不帶支架 (mm)
615.1 x 93.3 x 365.6
帶支架 (mm)
615.1 x 180.7 x 419.2
重量
不帶支架 (kg)
帶支架 (kg)
1920 x 1080
10W x 2
10W x 2
738.8 x 93.3 x 436.7
738.3 x 93.1 x 444.6
927.6 x 93.0 x 551.0
1059.8 x 94.3 x 625.6
738.8 x 191.7 x 493.3
738.3 x 191.6 x 498.1
927.6 x 227.6 x 606.4
1059.8 x 227.6 x 680.7
4.2
5.7
5.7
9.0
12.0
4.7
6.3
6.4
11.0
14.0
環境因素
工作溫度
工作濕度
存放溫度
存放濕度
10°C 至 40°C(50°F 至 104°F)
10% 至 80%,無冷凝
-20°C 至 45°C(-4°F 至 113°F)
5% 至 95%,無冷凝
EH6000
型號名稱
螢幕大小
(對角尺寸)
UA40EH6000
UA46EH6000
UA55EH6000
UA60EH6000
40 英吋
46 英吋
55 英吋
60 英吋
顯示解析度
(最佳解析度)
1920 x 1080
聲音輸出
尺寸(長 x 寬 x 高)
不帶支架 (mm)
帶支架 (mm)
重量
不帶支架 (kg)
帶支架 (kg)
環境因素
工作溫度
工作濕度
存放溫度
存放濕度
10W x 2
927.6 x 93.0 x 555.2
1059.8 x 94.3 x 629.9
1250.6 x 94.3 x 736.3
1374.1 x 94.5 x 807.0
927.6 x 227.6 x 606.4
1059.8 x 227.6 x 695.4
1250.6 x 227.6 x 788.7
1374.1 x 329.9 x 858.9
9.0
11.0
12.0
14.0
18.0
20.6
23.2
27.3
10°C 至 40°C(50°F 至 104°F)
10% 至 80%,無冷凝
-20°C 至 45°C(-4°F 至 113°F)
5% 至 95%,無冷凝
✎✎設計與規格可能隨時變更,恕不提前通知。
✎✎如需電源與耗電量相關資訊,請參閱產品上所貼的標籤。
中文-17
TC-Series 5000_4000_HK.indd 17
2012-02-14 �� 3:37:20
授權
中文-18
TC-Series 5000_4000_HK.indd 18
2012-02-14 �� 3:37:20
有償維修(顧客負擔費用)相關責任
要求維修時,下面的情況即使在無償保修期內, 也要進行有償維修。
非產品故障的情況
✎✎機件清洗, 調整, 使用說明,安裝等。
xx使用方法說明, 不涉及拆卸,只是簡單調整的情況。
xx互聯網, 天線, 有線信號等外部環境導致的問題。
xx購入產品初期安裝後, 連接附加的產品或者再連接的情況。
xx產品的移動, 搬家等造成的再安裝的情況。
xx其他公司產品導致的,邀請使用說明解釋的情況。
xx網絡和其他公司產品連接的邀請、使用說明的情況。
xx產品相關軟件安裝或設定邀請的情況。
xx產品內部灰塵或者隱藏物等的清洗及異物去除的情況。
xx通過家庭購物, 互聯網等購買的產品追加邀請安裝的情況。
消費者過失造成的故障
✎✎消費者拿取時不注意或者非專業修理造成故障的情況。
xx外部撞擊或者跌落等造成的故障損傷的情況。
xx未使用三星指定的消耗品,另賣品導致故障發生的情況。
xx非三星電子公司服務委託站及協力社人員維修造成故障發生的情況。
xx顧客直接改造,修理後造成故障的情況。
xx供電電流錯誤使用造成的故障發生情況。
xx未按照使用說明書中的“注意事項”進行操作造成故障的情況。
其他情況
xx天災(雷電, 火災, 地震, 洪水等)造成故障的情況。
xx消耗品的壽命使用到期的情況(電池,碳粉, 閃光燈, 磁頭,
變換器, 燈管類, 篩檢程式類, 色帶等)。
非產品故障,邀請維修需要收取維修費用,請務必閱讀使用說明書。
中文-19
TC-Series 5000_4000_HK.indd 19
2012-02-14 �� 3:37:20