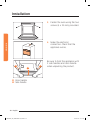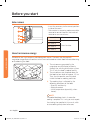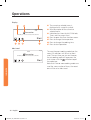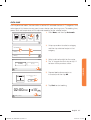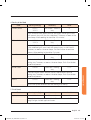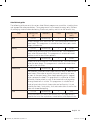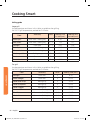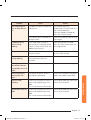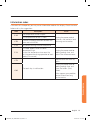
1
Combi MWO Built-in Oven
User manual
NQ50J9530
NQ50J9530_SA_DE68-04354F-00_EN.indd 1
2015-03-13 �� 7:57:42
Contents
Contents
Using this user manual
4
The following symbols are used in this User Manual:
4
Safety instructions
5
Important safety instructions
5
Installation
14
What’s included
Installation instructions
14
16
Maintenance
21
Cleaning21
Replacement (repair)
22
Care against an extended period of disuse
22
Before you start
23
Initial settings
Side runners
About microwave energy
Cookware for microwave
23
24
24
25
Operations
27
Control panel
27
Common settings
29
Oven function
33
MW Combi function
35
Auto cook
37
Auto defrost
38
Special function
39
Favourites40
Timer43
Steam cleaning
44
Settings45
Help46
2 English
NQ50J9530_SA_DE68-04354F-00_EN.indd 2
2015-03-13 �� 7:57:42
47
Auto cooking
Manual cooking
Quick & Easy
47
54
67
Troubleshooting
68
Contents
Cooking Smart
Checkpoints68
Information codes
75
Technical specifications
76
English 3
NQ50J9530_SA_DE68-04354F-00_EN.indd 3
2015-03-13 �� 7:57:43
Using this user manual
Using this user manual
You have just purchased a SAMSUNG microwave oven. Your Owner’s Instructions contains
valuable information on cooking with your microwave oven:
• Safety precautions
• Suitable accessories and cookware
• Useful cooking tips
• Cooking tips
The following symbols are used in this User Manual:
WARNING
Hazards or unsafe practices that may result in severe personal injury or death.
CAUTION
Hazards or unsafe practices that may result in minor personal injury or property damage.
NOTE
Useful tips, recommendations, or information that helps users manipulate the product.
4 English
NQ50J9530_SA_DE68-04354F-00_EN.indd 4
2015-03-13 �� 7:57:43
Safety instructions
IMPORTANT SAFETY INSTRUCTIONS
READ CAREFULLY AND KEEP FOR FUTURE REFERENCE.
BEFORE USING THE OVEN, CONFIRM THAT THE FOLLOWING
INSTRUCTIONS ARE FOLLOWED.
Microwave function only
Safety instructions
MAKE SURE THAT THESE SAFETY PRECAUTIONS ARE OBEYED AT ALL
TIMES.
WARNING: If the door or door seals are damaged, the oven must not be
operated until it has been repaired by a competent person.
WARNING: It is hazardous for anyone other than a competent person to
carry out any service or repair operation that involves the removal of a
cover which gives protection against exposure to microwave energy.
WARNING: Liquids and other foods must not be heated in sealed
containers since they are liable to explode.
This appliance is intended to be used in household only and it is not
intended to be used such as:
•staff kitchen areas in shops, offices and other working environments;
•farm houses;
•by clients in hotels, motels and other residential environments;
•bed and breakfast type environments.
WARNING: Only allow children to use the oven without supervision
when adequate instructions have been given so that the child is able to
use the oven in a safe way and understands the hazards of improper
use.
English 5
NQ50J9530_SA_DE68-04354F-00_EN.indd 5
2015-03-13 �� 7:57:43
Safety instructions
Safety instructions
WARNING: This appliance can be used by children aged from 8 years
and above and persons with reduced physical, sensory or mental
capabilities or lack of experience and knowledge if they have been
given supervision or instruction concerning use of the appliance in
a safe way and understand the hazards involved. Children shall not
play with the appliance. Cleaning and user maintenance shall not be
made by children unless they are aged from 8 years and above and
supervised.
Only use utensils that are suitable for use in microwave ovens.
When heating food in plastic or paper containers, keep an eye on the
oven due to the possibility of ignition.
The microwave oven is intended for heating food and beverages.
Drying of food or clothing and heating of warming pads, slippers,
sponges, damp cloth and similar may lead to risk of injury, ignition or
fire.
If smoke is emitted (observed), switch off or unplug the appliance and
keep the door closed in order to stifle any flames.
WARNING: Microwave heating of beverages can result in delayed
eruptive boiling, therefore care must be taken when handling the
container.
WARNING: The contents of feeding bottles and baby food jars shall be
stirred or shaken and the temperature checked before consumption, in
order to avoid burns.
Eggs in their shell and whole hard-boiled eggs should not be heated
in microwave ovens since they may explode, even after microwave
heating has ended.
The oven should be cleaned regularly and any food deposits removed.
6 English
NQ50J9530_SA_DE68-04354F-00_EN.indd 6
2015-03-13 �� 7:57:44
Failure to maintain the oven in a clean condition could lead to
deterioration of the surface that could adversely affect the life of the
appliance and possibly result in a hazardous situation.
This appliance is not intended for use by persons (including children)
with reduced physical, sensory or mental capabilities, or lack of
experience and knowledge, unless they have been given supervision or
instruction concerning use of the appliance by a person responsible for
their safety.
Safety instructions
The appliance is not intended for installing in road vehicles, caravans
and similar vehicles etc.
Children should be supervised to ensure that they do not play with the
appliance.
If the supply cord is damaged, it must be replaced by the manufacturer,
its service agent or similarly qualified persons in order to avoid a
hazard.
The appliance should not be cleaned with a water jet.
This oven should be positioned proper direction and height permitting
easy access to cavity and control area.
Before using the your oven first time, oven should be operated with the
water during 10 minute and then used.
If the oven generates a strange noise, a burning smell, or smoke is
emitted, unplug the power plug immediately and contact your nearest
service center.
The microwave oven has to be positioned so that plug is accessible.
The microwave oven is intended to be used built-in only.
The microwave oven shall not be placed in a cabinet.
English 7
NQ50J9530_SA_DE68-04354F-00_EN.indd 7
2015-03-13 �� 7:57:44
Safety instructions
Oven function only - Optional
Safety instructions
WARNING: When the appliance is operated in the combination mode,
children should only use the oven under adult supervision due to the
temperatures generated.
During use the appliance becomes hot. Care should be taken to avoid
touching heating elements inside the oven.
WARNING: Accessible parts may become hot during use. Young children
should be kept away.
A steam cleaner is not to be used.
WARNING: Ensure that the appliance is switched off before replacing
the lamp to avoid the possibility of electric shock.
Do not use harsh abrasive cleaners or sharp metal scrapers to clean the
oven door glass since they can scratch the surface, which may result in
shattering of the glass.
WARNING: The appliance and its accessible parts become hot during
use.
Care should be taken to avoid touching heating elements.
Children less than 8 years of age shall be kept away unless
continuously supervised.
This appliance can be used by children aged from 8 years and above
and persons with reduced physical, sensory or mental capabilities or
lack of experience and knowledge if they have been given supervision
or instruction concerning use of the appliance in a safe way and
understand the hazards involved. Children shall not play with the
appliance. Cleaning and user maintenance shall not be made by children
without supervision.
8 English
NQ50J9530_SA_DE68-04354F-00_EN.indd 8
2015-03-13 �� 7:57:44
The temperature of accessible surfaces may be high when the appliance
is operating.
Safety instructions
The door or the outer surface may get hot when the appliance is
operating.
Keep the appliance and its cord out of reach of children less than 8
years.
Appliances are not intended to be operated by means of an external
timer or separate remote-control system.
Please put the bent up frame side
to the back, in order to support
the rest position when cooking
large loads.
Do not use oven rack for microwave oven mode.
General safety
WARNING
Only qualified staff should be allowed to modify or repair the appliance.
Do not heat liquids and other food in sealed containers for microwave function.
For your safety, do not use high-pressure water cleaners or steam jet cleaners.
Do not install this appliance; near heater, inflammable material; in a humid, oily or dusty
location, in a location exposed to direct sunlight and water or where gas may leak; on un
level ground.
This appliance must be properly grounded in accordance with local and national codes.
Remove all foreign substances such as dust or water from the power plug terminals and
contact points using a dry cloth on a regular basis.
Do not pull or excessively bend or place heavy objecton the power cord.
English 9
NQ50J9530_SA_DE68-04354F-00_EN.indd 9
2015-03-13 �� 7:57:44
Safety instructions
In the event of a gas leak (such as propane gas, LP gas, etc.), ventilate immediately without
touching the power plug.
Do not touch the power plug with wet hands.
Do not turn the appliance off by unplugging the power plug while an operation is in progress.
Safety instructions
Do not insert fingers or foreign substances, If any foreign substance such as water has
entered the appliance, unplug the power plug and contact your nearest service centre.
Do not apply excessive pressure or impact to the appliance.
Do not place the oven over a fragile object such as a sink or glass object.
Do not use benzene, thinner, alcohol, steam cleaner or high pressure cleaner to clean the
appliance.
Ensure that the power voltage, frequency and current are the same as those of the product
specifications.
Plug the power plug into the wall socket firmly. Do not use a multiple plug adapter, an
extension cord or an electric transformer.
Do not hook the power cord on a metal object, insert the power cord between the objects or
behind the oven.
Do not use a damaged power plug, damaged power cord or loose wall socket. When the
power plug or power cord is damaged, contact your nearest service centre.
Do not pour or directly spray water onto the oven.
Do not place objects on the oven, inside or on the door of the oven.
Do not spray volatile material such as insecticide onto the surface of the oven.
Do not store flammable materials in the oven. Take special care when heating dishes or
drinks that contain alcohol as alcohol vapours may contact a hot part of the oven.
Keep children away from the door when opening or closing it as they may bump themselves
on the door or catch their fingers in the door.
WARNING: Microwave heating of beverages can result in delayed eruptive boiling, therefore
care must be taken when handling the container; To prevent this situation ALWAYS allow
a standing time of at least 20 seconds after the oven has been switched off so that the
temperature can equalize. Stir during heating, if necessary, and ALWAYS stir after heating.
In the event of scalding, follow these FIRST AID instructions:
• Immerse the scalded area in cold water for at least 10 minutes.
• Cover with a clean, dry dressing.
• Do not apply any creams, oils or lotions.
10 English
NQ50J9530_SA_DE68-04354F-00_EN.indd 10
2015-03-13 �� 7:57:44
Do not put the tray or rack in water shortly after cooking because it may cause breakage or
damage of the tray or rack.
Do not operate the microwave oven for deep fat frying because the oil temperature cannot
be controlled. This could result in a sudden boil over of the hot liquid.
Safety instructions
CAUTION
Only use utensils that are suitable for use in microwave ovens; DO NOT use any metallic
containers, Dinnerware with gold or silver trimmings, Skewers, forks, etc.
Remove wire twist ties from paper or plastic bags.
Reason: Electric arcing or sparking may occur and may damage the oven.
Do not use your microwave oven to dry papers or clothes.
Use shorter times for smaller amounts of food to prevent overheating and burning food.
Do not immerse the power cable or power plug in water and keep the power cable away
from heat.
Eggs in their shell and whole hard-boiled eggs should not be heated in microwave ovens
since they may explode, even after microwave heating has ended; Also do not heat airtight
or vacuum-sealed bottles, jars, containers, nuts inshells, tomatoes etc.
Do not cover the ventilation slots with cloth or paper. They may catch fire as hot air escapes
from the oven. The oven may also overheat and switch itself off automatically, and will
remain off until it cools sufficiently.
Always use oven mitts when removing a dish from the oven to avoid unintentional burns.
Stir liquids halfway during heating or after heating ends and allow the liquid stand at least
20 seconds after heating to prevent eruptive boiling.
Stand at arms length from the oven when opening the door to avoid getting scalded by
escaping hot air or steam.
Do not operate the microwave oven when it is empty. The microwave oven will automatically
shut down for 30 minutes for safety purposes. We recommend placing a glass of water inside
the oven at all times to absorb microwave energy in case the microwave oven is started
accidentally.
Install the oven in compliance with the clearances stated in this manual. (See installing your
microwave oven.)
Take care when connecting other electrical appliances to sockets near the oven.
English 11
NQ50J9530_SA_DE68-04354F-00_EN.indd 11
2015-03-13 �� 7:57:44
Safety instructions
Precautions to avoid possible exposure to excessive microwave
energy. (Microwave function only)
Safety instructions
Failure to observe the following safety precautions may result in harmful exposure to
microwave energy.
A. Under no circumstances should any attempt be made to operate the oven with the door
open or to tamper with the safety interlocks (door latches) or to insert anything into the
safety interlock holes.
B. Do NOT place any object between the oven door and front face or allow food or cleaner
residues to accumulate on sealing surfaces. Ensure that the door and door sealing
surfaces are kept clean by wiping after use first with a damp cloth and then with a soft
dry cloth.
C. Do NOT operate the oven if it is damaged until it has been repaired by a qualified
microwave service technician trained by the manufacturer. It is particularly important
that the oven door closes properly and that there is no damage to the:
1) door (bent)
2) door hinges (broken or loose)
3) door seals and sealing surfaces
D. The oven should not be adjusted or repaired by anyone other than a properly qualified
microwave service technician trained by the manufacturer.
12 English
NQ50J9530_SA_DE68-04354F-00_EN.indd 12
2015-03-13 �� 7:57:44
Safety instructions
Samsung will charge a repair fee for replacing an accessory or repairing a cosmetic defect
if the damage to the unit and/or damage to or loss of the accessory was caused by the
customer. Items this stipulation covers include:
A. A dented, scratched, or broken door, handle, out-panel, or control panel.
B. A broken or missing tray, guide roller, coupler, or wire rack.
• Use this appliance only for its intended purpose as described in this instruction manual.
Warnings and Important Safety Instructions in this manual do not cover all possible
conditions and situations that may occur. It is your responsibility to use common sense,
caution, and care when installing, maintaining, and operating your appliance.
• Because these following operating instructions cover various models, the characteristics
of your microwave oven may differ slightly from those described in this manual and not
all warning signs may be applicable. If you have any questions or concerns, contact your
nearest service centre or find help and information online at www.samsung.com.
• This microwave oven is supposed for heating food. It is intended for domestic home-use
only. Do not heat any type of textiles or cushions filled with grains, which could cause
burns and fire. The manufacturer cannot be held liable for damage caused by improper or
incorrect use of the appliance.
• Failure to maintain the oven in a clean condition could lead to deterioration of the surface
that could adversely affect the life of the appliance and possible result in a hazardous
situation.
English 13
NQ50J9530_SA_DE68-04354F-00_EN.indd 13
2015-03-13 �� 7:57:44
Installation
What’s included
Make sure all parts and accessories are included in the product package.
If you have a problem with the oven or accessories, contact a local
Samsung customer centre or the retailer.
Oven at a glance
01
Installation
02
04
03
05
01 Control panel
02 Side runners
04 Door
05 Door Handle
03 Safety door lock
14 English
NQ50J9530_SA_DE68-04354F-00_EN.indd 14
2015-03-13 �� 7:57:45
Accessories
The oven comes with different accessories that help you prepare
different types of food.
Baking trays
(Do not use for microwave mode.)
Grill insert
(Useful for speed menu and grill
mode.)
Oven rack
(Do not use for microwave mode.)
Installation
Ceramic tray
(Useful for microwave mode.)
NOTE
See the Cooking Smart on page 47 to determine the appropriate
accessory for your dishes.
English 15
NQ50J9530_SA_DE68-04354F-00_EN.indd 15
2015-03-13 �� 7:57:46
Installation
Installation instructions
General Technical Information
Electrical Supply
Dimensions (W × H × D)
240 V ~ 50 Hz
Set size
595 x 454.2 x 570 mm
Built in size
555 x 445 x 548.8 mm
Installation
Disposal of Packaging and Appliance
Packaging is recyclable.
Packaging may consist of the following materials:
•cardboard;
•polyethylene film (PE);
•CFC-free polystyrene(PS rigid foam).
Please dispose of these materials in a responsible manner
in accordance with government regulations.
The authorities can provide information on how to dispose
of domestic appliances in a responsible manner.
16 English
NQ50J9530_SA_DE68-04354F-00_EN.indd 16
2015-03-13 �� 7:57:46
Electrical Connection
•This appliance should only
be connected by a qualified
technician.
•The Oven is NOT designed for
use in a commercial cooking
setting.
•It should be used exclusively for
cooking food in a home setting.
•The appliance is hot during and
after use.
•Exercise caution when young
children are present.
The house mains to which the
appliance is connected should
comply with national and local
regulations.
Appliance should allow to
disconnection of the appliance
from the supply after installation.
The disconnection may be
achieved by having the plug
accessible or by incorporating
a switch in the fixed wiring in
accordance with the wiring rules.
Installation
Safety
English 17
NQ50J9530_SA_DE68-04354F-00_EN.indd 17
2015-03-13 �� 7:57:46
Installation
Install in the Built-in cabinet
Kitchen Built-in cabinets in contact with the oven must be heatresistant
up to 100 °C. Samsung will take no responsibility for damage of Built-in
cabinets from the heat.
Required Dimensions for Installation
Oven (mm)
H
A
Installation
I
B
G
C
F
E
555
F
595
B
445
G
358
C
549
H
85
D
21
I
454.2
E
341
D
Built-in cabinet (mm)
F
A
B
A
E
C
D
H
A
600
B
Min. 564-568
C
Min. 550
D
Min. 445 / Max. 450
E
Min. 50
F
200 cm2
G
200 cm2
H
Space for power outlet
(30 Ø Hole)
G
18 English
NQ50J9530_SA_DE68-04354F-00_EN.indd 18
2015-03-13 �� 7:57:46
Under-sink Built-in cabinet (mm)
A
D
C
B
A
Min. 550
B
Min 564 / Max. 568
C
Min. 446 / Max 450
D
50
E
200 cm2
Installation
E
Mounting the oven
1. Slide the oven partly into the
recess. Lead the connection
cable to the power source.
2. Slide the oven completely into
the recess.
English 19
NQ50J9530_SA_DE68-04354F-00_EN.indd 19
2015-03-13 �� 7:57:47
Installation
3. Fasten the oven using the two
screws (4 x 25 mm) provoded.
Installation
4. Make the electrical
connection. Check that the
appliance works.
02
01
02
Be sure to hold the appliance with
2 side handles and door handle
when unpacking the product.
01 Door handle
02 Side handle
20 English
NQ50J9530_SA_DE68-04354F-00_EN.indd 20
2015-03-13 �� 7:57:48
Maintenance
Cleaning
Clean the oven regularly to prevent impurities from building up on or
inside the oven. Also pay special attention to the door, door sealing,
and turntable and roller ring (applicable models only).
If the door won’t open or close smoothly, first check if the door seals
have built up impurities. Use a soft cloth in soapy water to clean both
the inner and outer sides of the oven. Rinse and dry well.
To remove stubborn impurities with bad smells from inside the oven
3. When the cycle is complete,
wait until the oven cools
down. Then, open the door
and clean the cooking
chamber.
Maintenance
1. With an empty oven, put a
cup of diluted lemon juice on
the centre of the turntable.
2. Heat the oven for 10 minutes
at max power.
CAUTION
•Keep the door and door sealing
clean and ensure the door opens
and closes smoothly. Otherwise,
the oven’s lifecycle may be
shortened.
•Take caution not to spill water
into the oven vents.
•Do not use any abrasive
or chemical substances for
cleaning.
•After each use of the oven, use
a mild detergent to clean the
cooking chamber after waiting
for the oven to cool down.
English 21
NQ50J9530_SA_DE68-04354F-00_EN.indd 21
2015-03-13 �� 7:57:48
Maintenance
Replacement (repair)
WARNING
Maintenance
This oven has no user-removable parts inside. Do not try to replace or
repair the oven yourself.
•If you encounter a problem with
•If you encounter a problem with
hinges, sealing, and/or the door,
the outer housing of the oven,
contact a qualified technician or
first unplug the power cord
a local Samsung service centre
from the power source, and then
for technical assistance.
contact a local Samsung service
•If you want to replace the light
centre.
bulb, contact a local Samsung
service centre. Do not replace it
yourself.
Care against an extended period of disuse
•If you don’t use the oven for an extended period of time, unplug the
power cord and move the oven to a dry, dust-free location. Dust and
moisture that builds up inside the oven may affect the performance of
the oven.
22 English
NQ50J9530_SA_DE68-04354F-00_EN.indd 22
2015-03-13 �� 7:57:48
Before you start
Initial settings
When you turn on the oven for the first time, the Welcome screen appears with the Samsung
logo. Follow the onscreen instructions to complete the initial settings. You can change the
initial settings later by accessing the Settings screen.
STEP 1. Language
Choose a preferred menu language.
1. Select a language.
2. Tap OK.
English (UK)
Français
Nederlands
OK
STEP 2. Time
Set time
OK
To return to the previous screen, tap
.
NOTE
Before you start
0 :00
Specify the current time.
1. Tap any time element to display the
onscreen number pad.
2. Use the number pad to input each time
element (hour and minute).
3. Tap OK.
When done, The display is shown simple
manual.
English 23
NQ50J9530_SA_DE68-04354F-00_EN.indd 23
2015-03-13 �� 7:57:49
Before you start
Side runners
05
04
03
• Insert the accessory to the correct position
inside of the oven.
• Take caution in removing cookware and/or
accessories out of the oven. Hot meals or
accessories can cause burns.
02
01 Level 1
01
02 Level 2
03 Level 3
04 Level 4
Microwave function
Oven function
05 Level 5
About microwave energy
Before you start
Microwaves are high-frequency electromagnetic waves. The oven uses the prebuilt
magnetron to generate microwaves which are used to cook or reheat food without deforming
or discolouring the food.
1. The microwaves generated by the
magnetron are distributed uniformly
through the whirling distribution system.
This is why the food is cooked evenly.
2. The microwaves are absorbed down to
the food up to a depth of approx. 2.5 cm.
Then, the microwaves are dissipated
inside the food as cooking continues.
3. The cooking time is affected by the
following conditions of the food.
• Quantity and density
• Moisture content
• Initial temperature (especially, when
frozen)
NOTE
The cooked food keeps heat in its core after
cooking is complete. This is why you must respect
the standing time specified in this manual, which
ensures cooking evenly down to the core.
24 English
NQ50J9530_SA_DE68-04354F-00_EN.indd 24
2015-03-13 �� 7:57:49
Cookware for microwave
Cookware used for Microwave Mode must allow microwaves to pass through and penetrate
food. Metals such as stainless steel, aluminum and copper reflect microwaves. Therefore, do
not use cookware made of metallic materials. Cookware marked microwave - safe is always
safe for use. For additional information on appropriate cookware refer to the following guide
and place a glass of water or some food on the turntable.
Requirements:
• Flat bottom and straight sides
• Tight-fitting lid
• Well-balanced pan with handles that weigh less than the main pan
Material
Microwavesafe
Description
Crusty plate
Do not use for preheating for more
than 8 minutes.
Bone china or earthenware
Porcelain, pottery, glazed earthenware
and bone china are usually microwavesafe, unless decorated with a metal
trim.
Disposable polyester cardboard
dishes
Some frozen foods are packaged in
these dishes.
Fast-food
packaging
Polystyrene cups
or containers
Overheating may cause these to melt.
Paper bags or
newspaper
These may catch fire.
Recycled paper or
metal trims
These may cause arcing
Before you start
Aluminium foil
Use for a small serving size to protect
against overcooking. Arcing can occur
if the foil is near the oven wall or if
using an excessive amount of foil.
English 25
NQ50J9530_SA_DE68-04354F-00_EN.indd 25
2015-03-13 �� 7:57:49
Before you start
Material
Glassware
Microwavesafe
Description
Oven-to-table
ware
Microwave-safe unless decorated with
metal trims.
Fine glassware
Delicate glassware may break or crack
by rapid heating.
Glass jars
Appropriate for warming only. Remove
the lid before cooking.
Dishes
Metal
Paper
These may cause arcing or fire.
Freezer bag with
twist-ties
Before you start
Plates, cups,
napkins, and
kitchen paper
Use to cook for a short time. These
absorb excess moisture.
Recycled paper
Causes arcing.
Containers
Use thermoplastic containers only.
Some plastics may warp or discolour
at high temperatures.
Cling film
Use to maintain moisture after
cooking.
Freezer bags
Use boilable or ovenproof bags only.
Plastic
Use to maintain moisture and prevent
spattering.
Wax or grease-proof paper
: Microwave safe
: Use caution
: Microwave unsafe
26 English
NQ50J9530_SA_DE68-04354F-00_EN.indd 26
2015-03-13 �� 7:57:49
Operations
The oven offers 10 top-level menus that cover all aspects of using and maintaining the oven,
from which you can access any cooking modes, options, or advanced functions or settings.
Control panel
The front panel comes in a wide range of materials and colours. For improved quality, the
actual appearance of the oven is subject to change without notice.
01
02
03
04
05
Press to turn the oven on. To turn it off, hold down for 1 seconds.
If you encounter poor touching experience, or a blank screen
(system down), hold down for 7 seconds to restart the oven.
02 Menu
Press to display 10 top-level menus:
Oven function, MW Combi function, Auto cook, Auto Defrost,
Special function, Favourites, Steam cleaning, Timer, Setting, and
Help.
03 Touch-enabled
display
For first-time use, it displays the top-level menus. After the first
use, it displays the most used menu.
You can swipe to navigate through the menus, and tap to select a
desired item.
04 Oven light
Press to turn the internal light on or off. The oven light turns on
automatically when the door is open or when the oven operation
starts. And it turns off automatically after a certain period of
inactivity in order to save power.
05 Child lock
To prevent accidents, Child lock disables all controls.
Hold down for 3 seconds to activate, or hold down for 3 seconds
again to deactivate the lock on the control panel.
Operations
01 Power
NOTE
Tapping on the display while wearing plastic or oven gloves may not operate properly.
English 27
NQ50J9530_SA_DE68-04354F-00_EN.indd 27
2015-03-13 �� 7:57:50
Operations
Display
02
01
03
00:05 12:00AM
Convection
For baking on one or more levels at the same time
Start
04
05
06
7
01 The current or selected menu is
displayed with a specific symbol.
02 Brief description of the current or
selected menu.
03 Indication bar: from the left, Child Lock,
Timer, and the current time.
04 Press to open the Oven function screen.
05 Press to change the temperature.
06 Press to change the cooking time.
07 Press to start operation.
Most used
12:00AM
Convection
For baking on one or more levels at the same time
Start
The most frequent cooking mode from the
recent 20 selections will be set as Most
used. The next time you turn on the oven,
the set cooking mode will appear on the
Operations
main screen with the
symbol on top of
the mode icon.
Note that if two or more cooking modes are
used the same number of times, the recent
one will be set as Most used.
28 English
NQ50J9530_SA_DE68-04354F-00_EN.indd 28
2015-03-13 �� 7:57:51
Common settings
It is common to change the default temperature, power level and/or cooking time across all
cooking modes. Follow the steps below to adjust the temperature and/or cooking time for the
selected cooking mode.
Temperature
12:00AM
Convection
1. Tap
to display the thermometer
screen.
For baking on one or more levels at the same time
Start
12:00AM
Adjust temp. 40 °C - 250 °C
150
180°C
2. Swipe to the left or right to change the
temperature by 5 °C.
200
Start
12:00AM
Adjust temp. 40 °C - 250 °C
200
Operations
150
180°C
Alternatively, tap the temperature
element to display the number pad.
Start
12:00AM
Adjust temp. 40 °C - 250 °C
150
180°C
200
1
2
3
4
5
6
7
8
9
0
150
OK
12:00AM
Adjust temp. 40 °C - 250 °C
180°C
Use the number pad to input the
temperature by manually.
3. Tap Start to start cooking, or press
return to the main screen.
to
200
Start
English 29
NQ50J9530_SA_DE68-04354F-00_EN.indd 29
2015-03-13 �� 7:57:52
Operations
Power level
12:00AM
1. Tap
watt
to select power level.
Microwave
For fast efficient cooking without changing the colour or
from of food
30Sec
Start
watt
12:00AM
Adjust power level 100W-900W
100w
180w
300w
600w
750w
900w
450w
2. Select a desired power level from the list
that appears.
30Sec
Start
watt
12:00AM
Adjust power level 100W-900W
100w
180w
300w
600w
750w
900w
watt
450w
3. Tap Start to start cooking, or press
return to the main screen.
to
30Sec
Start
Operations
30 English
NQ50J9530_SA_DE68-04354F-00_EN.indd 30
2015-03-13 �� 7:57:53
Cooking time
12:00AM
Convection
1. Tap
to display the digital clock
screen.
For baking on one or more levels at the same time
Start
12:00AM
Set end time (max 10 h)
0 :00
h
Start at
12:00 AM
min
2. Tap any time element to display the
onscreen number pad. Use the number
pad to set each time element (hour and
minute) to your preference.
Start
12:00AM
Set end time (max 10 h)
Cooking time
1 :00
1 :00 AM
h
min
Start
12:00AM
Set end time (max 10 h)
h
min
1 :00 AM
4. When done, tap OK to confirm your
changes.
5. Tap Start to start cooking, or press
return to the main screen.
to
Start
Operations
1 :00 h
Ready at
3. Optionally, you can delay the end time
of your cooking to a desired point. For
this, tap any time element in the topright panel (Ready at). Follow step 2
above to change the end time. See Delay
End for more information.
NOTE
MW Combi function cannot set End time.
English 31
NQ50J9530_SA_DE68-04354F-00_EN.indd 31
2015-03-13 �� 7:57:55
Operations
Delay End
Delay End is designed to make cooking more convenient.
Real-life case: Suppose you select a one-hour recipe at 14:00 and you want the oven to finish
cooking at 17:00. To set the end time, change the Ready At time to 17:00. The oven will start
cooking at 16:00 and end at 17:00 as you set.
Case 1
Current time: 14:00
Set cooking time: 1 hour
Set Delay End time: 18:00
The oven will start cooking at 17:00 and end at 18:00 automatically.
14:00
15:00
16:00
17:00
18:00
Case 2
Current time: 14:00
Set cooking time: 2 hour
Set Delay End time: 17:00
The oven will start cooking at 15:00 and end at 17:00 automatically.
Operations
14:00
15:00
16:00
17:00
18:00
CAUTION
Do not keep cooked food in the oven too long. The food may spoil.
32 English
NQ50J9530_SA_DE68-04354F-00_EN.indd 32
2015-03-13 �� 7:57:55
Oven function
Convection
1. On the main screen, You can see oven
function. Select a cooking mode.
Conventional
Top heat +
Convection
Bottom heat +
Convection
12:00AM
Convection
For baking on one or more levels at the same time
You can tap the List icon in the bottomleft corner, and select a desired cooking
mode from the list that appears.
Start
Convection
Conventional
Top heat +
Convection
Bottom heat +
Convection
12:00AM
Start
12:00AM
Operations
Convection
For baking on one or more levels at the same time
2. Change the default temperature and/
or cooking time or select options if
preferred.
3. Tap Start.
Convection
For baking on one or more levels at the same time
Start
NOTE
• Availability of settings differ with the
cooking mode.
• You can change the cooking time at any
time during cooking.
• When cooking is complete, a message of
“Your cuisine is ready” appears with a
melody. To extend the cooking time, tap
“+5min” to extend the cooking time by 5
minutes.
• To save the current recipe, tap
to the favourite list.
to add it
English 33
NQ50J9530_SA_DE68-04354F-00_EN.indd 33
2015-03-13 �� 7:57:57
Operations
Cooking modes
Mode
Convection
Temperature range (°C)
Suggested temperature (°C)
40-250
180
The rear heating element generates heat, which is evenly
distributed by the convection fan. Use this mode for baking
and roasting on different levels at the same time.
40-250
Top heat +
Convection
The top heating element generates heat, which is evenly
distributed by the convection fan. Use this mode for roasting
that requires a crispy top (for example, meat or lasagne).
40-250
Conventional
Operations
180
Intensive cook activates all heating elements alternately to
distribute heat evenly inside the oven. Use this mode for large
recipes, such as large gratins or pies.
40-150
Pro-roasting
180
The bottom heating element generates heat, which is evenly
distributed by the convection fan. Use this mode for pizza,
bread, or cake.
40-250
Intensive cook
220
Two top heating elements generate heat, which is distributed
by the fan. Use this mode for grilling meat or fish.
40-250
Bottom heat +
Convection
220
The large-area grill emits heat. Use this mode for browning
the tops of food (for example, meat, lasagne, or gratin).
40-250
Fan grill
200
The heat is generated from the top and bottom heating
elements. This function should be used for standard baking
and roasting for most types of dishes.
150-250
Large grill
180
100
Pro-Roasting runs an automatic pre-heating cycle until the
oven temperature reaches 220 °C. Then, the top heating
element and the convection fan start operating to sear food
such as meat. After searing, the meat will be cooked at low
temperatures. Use this mode for beef, poultry, or fish.
34 English
NQ50J9530_SA_DE68-04354F-00_EN.indd 34
2015-03-13 �� 7:57:59
MW Combi function
1. Press Menu, and then tap MW Combi
function.
AUTO
Oven
function
MW Combi
function
Auto
cook
Microwave
Microwave +
Grill
Microwave +
Convection
Microwave +
Roast
Auto
defrost
2. Select a desired cooking mode from the
list that appears.
12:00AM
Microwave
For fast efficient cooking without changing the colour or
from of food
3. Change the default power level,
temperature and/or cooking time if
preferred.
30Sec
Start
watt
12:00AM
Operations
Microwave + Convection
For all kind of meat and poultry, casseroles, roast beef
and chicken
30Sec
Start
watt
12:00AM
Microwave
4. Tap Start to start cooking, or press
return to the main screen.
to
For fast efficient cooking without changing the colour or
from of food
watt
30Sec
Start
NOTE
• Availability of settings differ with the
cooking mode.
• You can change the cooking time at any
time during cooking.
• When cooking is complete, a message of
“Your cuisine is ready” appears with a
melody. To extend the cooking time, tap “+
30sec” to extend the cooking time by 30
seconds.
• To save the current recipe, tap
to the favourite list.
to add it
English 35
NQ50J9530_SA_DE68-04354F-00_EN.indd 35
2015-03-13 �� 7:58:01
Operations
Cooking modes
Mode
Microwave
Temperature (°C)/
power level (w) range
Suggested temperature (°C)/
power level (w)
-/100-900
-/900
The microwave energy enables food to be cooked or reheated
without changing either the form or the colour.
40-230/ 100-600
Microwave +
Convection
Microwave +
Grill
The heating elements generate heat and the convection fan
distributes the heat inside the oven, which is reinforced by
the microwave energy.
40-200/100-600
200/300
The heating elements generate heat, which is reinforced by
the microwave energy.
40-200/100-600
Microwave +
Roast
180/300
180/300
This mode combines Fan grill and microwave and is therefore
reducing the cooking time while giving the food a brown and
crispy surface.
Operations
36 English
NQ50J9530_SA_DE68-04354F-00_EN.indd 36
2015-03-13 �� 7:58:02
Auto cook
For inexperienced cooks, the oven offers a total of 35 auto cook features in 7 categories. Take
advantage of this feature to save your time or shorten your learning curve. The cooking time,
power level and temperature will be adjusted according to the selected recipe.
1. Press Menu, and then tap Auto cook.
AUTO
Oven
function
MW Combi
function
Auto
cook
Auto
defrost
Auto cook
12:00AM
2. Swipe up or down to select a category,
and then tap a desired recipe in that
category.
12:00AM
3. Select a desired weight for the recipe.
4. Tap “>” to go to the next step, or tap “<”
to return to the previous screen
Auto Reheat (5)
Pizza (2)
Meat (3)
Adjust weight 0.25-0.5 kg
0.25kg
Drink
Operations
Previous
0.5kg
Next
Drink
12:00AM
5. Prepare food and accessories as
instructed, and then tap OK.
12:00AM
6. Tap Start to start cooking.
Use Ceramic tray on the 1st
level
1
OK
Set start time
02:00min
Previous
Drink | 0.25 kg
Ready at
12:02 AM
Start
English 37
NQ50J9530_SA_DE68-04354F-00_EN.indd 37
2015-03-13 �� 7:58:03
Operations
Auto defrost
For inexperienced cooks, the oven offers a total of 5 auto defrost features. Take advantage of
this feature to save your time or shorten your learning curve. The cooking time, power level
and temperature will be adjusted according to the selected recipe.
1. Press Menu, and then tap Auto defrost.
AUTO
Oven
function
MW Combi
function
Auto
cook
Auto
defrost
Auto defrost
12:00AM
2. Swipe up or down to select a category,
and then tap a desired recipe in that
category.
12:00AM
3. Tap the weight element to display the
number pad.
Use the number pad to input the desired
weight by manually.
4. Tap “>” to go to the next step, or tap “<”
to return to the previous screen
Meat
Poultry
Fish
Adjust weight 0.2-2.0 kg
0.2kg
Operations
Previous
Meat
Next
Meat
12:00AM
5. Prepare food and accessories as
instructed, and then tap OK.
12:00AM
6. Tap Start to start cooking.
Use Ceramic tray on the 1st
level
1
OK
Defrosting time
02:34min
Previous
Meat | 0.2 kg
Ready at
12:02 AM
Start
38 English
NQ50J9530_SA_DE68-04354F-00_EN.indd 38
2015-03-13 �� 7:58:04
Special function
Add special or additional functions to improve your cooking experience.
1. Press Menu, and then tap Special
function.
Special
function
Favourites
Steam
cleaning
Special function
Timer
12:00AM
2. Select a desired function.
12:00AM
3. Change the default temperature and/or
cooking time if preferred.
4. Tap Start.
Keep warm
Multi level cook
Keep warm
For keeping food warm before serving
Start
• You can change the cooking time at any
time during cooking.
• When cooking is complete, a message of
“Your cuisine is ready” appears with a
melody. To extend the cooking time, tap
“+5min” to extend the cooking time by 5
minutes.
Operations
NOTE
Special functions
Mode
Temperature
range (°C)
Suggested
temperature (°C)
Instructions
60-100
70
Use this only for keeping foods warm
that have just been cooked.
40-250
180
Keep warm
Multi level cook
Use this for cooking with two multi
levels at the same time.
English 39
NQ50J9530_SA_DE68-04354F-00_EN.indd 39
2015-03-13 �� 7:58:05
Operations
Favourites
Add a frequent recipe to the Favourites list for future reference. This will save your time for
searching for a past recipe that you want to use. The oven provides two ways to do this:
How To 1 – Create a custom recipe
1. Press Menu, and then tap Favourites.
Special
function
Steam
cleaning
Favourites
Timer
Favourites
12:00AM
2. A message of “Create your own recipe”
appears. Tap Next.
3. Follow the onscreen instructions
to manually set the oven mode,
temperature, cooking time and/or
options to your preference.
12:00AM
4. Use the onscreen key pad to rename the
recipe.
5. Tap OK. Your settings will be added to
the Favourites.
Create your own recipe
Next
Favourite 1
1
2
3
4
5
6
7
8
9
0
q
w
e
r
t
y
u
i
o
p
Operations
a
s
d
f
g
h
j
k
z
x
c
v
b
n
m
l
OK
NOTE
Favourite recipes, if you have added, will be
listed in the Favourites in Step 2 above. In
this case, tap Add to favourites to create a
new recipe.
40 English
NQ50J9530_SA_DE68-04354F-00_EN.indd 40
2015-03-13 �� 7:58:06
How To 2 – Add the current recipe to the Favourites
You can use the current recipe to add to the Favourites as a new item.
12:00AM
1. When cooking the current recipe is
complete, tap
Your cuisine is ready
.
Tap ‘+5min’ to prolong your cook
OK
+5min
2. A message of “Save this recipe to
Favourites?” appears. Tap OK to create a
new recipe.
Convection | 180°C | 0:30m
Save this recipe to Favourites?
OK
Cancel
12:00AM
Favourite 1
1
2
3
4
5
6
7
8
9
0
q
w
e
r
t
y
u
i
o
p
a
s
d
f
g
h
j
k
z
x
c
v
b
n
m
l
3. The onscreen key pad appears.
Use the onscreen key pad to rename the
recipe.
4. Tap OK. The current recipe will be added
to the Favourites.
OK
Operations
English 41
NQ50J9530_SA_DE68-04354F-00_EN.indd 41
2015-03-13 �� 7:58:06
Operations
To use a favourite recipe
1. Press Menu, and then tap Favourites.
Special
function
Favourites
Steam
cleaning
Favourites
Timer
12:00AM
2. Tap a desired recipe in the list that
appears. Detailed information on the
selected recipe will be displayed.
12:00AM
3. Tap Start to start cooking.
Favourite 1
+ Create a Favourite
Favourite 1
Convection | 180°C
Start
NOTE
Operations
You can edit or remove recipes in the
Favourites list.
• To edit a recipe name, select the recipe,
and then tap
.
• To remove a recipe from the list, select the
recipe, and then tap
icon.
42 English
NQ50J9530_SA_DE68-04354F-00_EN.indd 42
2015-03-13 �� 7:58:08
Timer
Timer helps you check the time or operating duration while cooking.
1. Press Menu, and then tap Timer.
Special
function
Favourites
Steam
cleaning
Timer
12:00AM
Timer
0 :00:00
Start
2. Tap any time element to display the
onscreen number pad.
3. Use the number pad to set a desired
time.
4. When done, tap Start.
NOTE
When the time has elapsed to a set point,
a message of “Time is up” appears with a
melody. Tap OK to confirm your settings.
Operations
English 43
NQ50J9530_SA_DE68-04354F-00_EN.indd 43
2015-03-13 �� 7:58:09
Operations
Steam cleaning
This is useful for cleaning light soiling with steam.
This automatic function saves you time by removing the need for regular manual cleaning.
Special
function
Favourites
Steam
cleaning
Timer
1. Access Menu > Steam cleaning, and then
tap Start.
2. Remove all accessories as instructed,
and then tap OK.
3. Pour 100 ml of water onto the bottom
of the oven and close the oven door,
and then tap OK. It takes 15 minutes to
complete the cycle.
4. Use a dry cloth to clean inside the oven.
Operations
WARNING
• Do not open the door before the cycle is
complete. The water inside the oven is
very hot, and it can cause a burn.
NOTE
• If the oven is heavily soiled with grease,
for example, after roasting or grilling, it
is recommended to remove stubborn soil
manually using a cleaning agent before
activating Steam cleaning.
• Leave the oven door ajar when the cycle
is complete. This is to allow the interior
enamel surface to dry thoroughly.
• While the oven is hot inside, auto cleaning
is not activated. Wait until the oven cools
down, and try again.
• Do not pour water onto the bottom by
force. Do it gently. Otherwise, the water
overflows to the front.
44 English
NQ50J9530_SA_DE68-04354F-00_EN.indd 44
2015-03-13 �� 7:58:10
Settings
You may want to change the default settings to your preference, or to check the network
connection for diagnosis. The oven offers you with 8 different setting items.
Language
Display
Choose a display language.
• Access Menu > Settings, and then tap a
preferred language.
The oven enters Standby mode after a
certain time of inactivity, which displays the
current time. You can enable or disable the
clock screen that appears in Standby mode.
• Access Menu > Settings, and then tap to
toggle between On and Off.
Volume
Adjust the volume level for beeps and
melodies.
• Access Menu > Settings, and then use the
bar next to Volume to adjust the volume.
Brightness
Change the brightness of the display screen.
• Access Menu > Settings, and then use the
bar next to Brightness to adjust the screen
brightness.
About device
Software
Check the current version of the firmware.
License information
Check the license information of the
firmware.
Select a clock type of the current time that
appears in Standby mode. Two types are
available, Analogue and Digital.
• Access Menu > Settings, and then tap to
toggle between Analog and Digital.
Clock format
Select a time format of the current time that
appears in Standby mode. Two formats are
available, 12-hour and 24-hour.
• Access Menu > Settings, and then tap to
toggle between 24h and AM/PM (12h).
Operations
Check the current version of the firmware
and License information.
• Access Menu > Settings > About device.
Clock type
Set time
Set the current time.
1. Access Menu > Settings > Set time.
2. Tap any time element to display the
onscreen number pad.
3. Use the number pad to enter each
element (hour and minute).
4. Tap to toggle between AM and PM
(avaliable with the 12-hour format).
5. Tap OK to save your changes.
English 45
NQ50J9530_SA_DE68-04354F-00_EN.indd 45
2015-03-13 �� 7:58:10
Operations
Help
Useful tips and explanations on a specific item that you select.
Troubleshooting
Guide for first use
Tap a checkpoint directly on the screen, and
try the suggestions.
You will be provided with simple
instructions on basic use of the oven.
Operations
46 English
NQ50J9530_SA_DE68-04354F-00_EN.indd 46
2015-03-13 �� 7:58:10
Cooking Smart
Auto cooking
Auto cook guide
1. Auto Reheat
Food
Drink
Serving size (kg)
Accessory
Level
0.25
0.5
Ceramic tray
1
Pour the liquid into ceramic mugs and reheat uncovered. Place
one mug in the centre, Place 2 mugs side by side on ceramic tray.
Leave them to stand in the microwave oven. Stir well after 1-2 min
standing. Be careful while taking the cups out (see safety instructions
for reheating liquids).
Plate meal
0.3-0.4
0.4-0.5
Ceramic tray
1
Put on a ceramic plate and cover with microwave cling film. This
programme is suitable for meals consisting of 3 components (e.g.
meat with sauce, vegetables and a side dish like potatoes, rice or
pasta). After cooking stand for 3 min.
Frozen plate meal
0.3-0.4
0.4-0.5
Ceramic tray
1
Soup
0.2-0.3
0.4-0.5
Ceramic tray
1
Cooking Smart
Take frozen ready meal and check if dish is suitable for microwave.
Pierce film of ready meal. Put the frozen ready meal in the centre.
This programme is suitable for frozen ready meals consisting of 3
components (e.g. meat with sauce, vegetables and a side dish like
potatoes, rice or pasta). After cooking stand for 3 min.
Pour into a deep ceramic plate or bowl and cover with plastic lid
during heating. Put soup in the centre of ceramic tray. Stir carefully
before and after 2-3 min standing.
English 47
NQ50J9530_SA_DE68-04354F-00_EN.indd 47
2015-03-13 �� 7:58:10
Cooking Smart
Food
Stew
Serving size (kg)
Accessory
Level
0.2-0.3
0.4-0.5
Ceramic tray
1
Pour into a deep ceramic plate or bowl and cover with plastic lid
during heating. Put soup in the centre of ceramic tray. Stir carefully
before and after 2-3min standing.
2. Pizza
Food
Homemade pizza
Serving size (kg)
Accessory
Level
0.6-1.0
Baking tray
2
Put pizza on the tray. The weight ranges include topping such as
sauce, vegetables, ham and cheese.
Frozen pizza
0.3-0.4
0.4-0.5
Baking tray
3
Put frozen pizza on oven rack.
3. Meat
Food
Beef steak, thin
Serving size (kg)
Accessory
Level
0.3-0.6
Oven rack + Baking
tray
5+2
Cooking Smart
We recommend to preheat the oven to 250 ˚C with grill mode for
5 min. Put beef steaks side by side in the middle of oven rack and
baking tray. Turn over as soon as the oven beeps. Push Start button
to continue process.
Roast pork
0.8-1.0
Grill insert + Ceramic
tray
3
Put marinated roast pork on grill insert rack with ceramic tray. When
beeps, turnover and start again.
Lamb chops
0.3-0.6
Oven rack + Baking
tray
5+2
Marinate lamb chops. Put lamp chops on oven rack and baking tray.
Turnover, as soon as the oven beeps and push the Start button to
continue process.
48 English
NQ50J9530_SA_DE68-04354F-00_EN.indd 48
2015-03-13 �� 7:58:10
4. Poultry & Sea Food
Food
Chicken pieces
Serving size (kg)
Accessory
Level
0.5-0.7
1.0-1.2
Grill insert + Ceramic
tray
5
Brush chilled chicken pieces with oil and spices. Put on grill insert
with ceramic tray with the skin-side down. Turnover, as soon as the
oven beeps. After cooking let stand for 2-3 minutes.
Whole chicken
1.0-1.1
1.2-1.3
Grill insert + Ceramic
tray
5
Brush chilled chicken with oil and spices. Put breast-side-down,
in the middle of grill insert rack with ceramic tray in shelf level 2.
Turnover, as soon as the oven beeps. Put Start button to continue
process. After cooking let stand for 5 minutes.
Fish fillet
0.3-0.6
Oven rack + Baking
tray
5+2
Marinate fish fillet(2 cm) and put side by side on oven rack and
baking tray. Turnover, as soon as the oven beeps. Push Start button
to continue process.
Salmon Steak
0.3-0.6
Oven rack + Baking
tray
5+2
Prawns
0.2-0.5
Oven rack + Baking
tray
5+2
Put the raw prawn on oven rack and baking tray evenly.
Cooking Smart
Marinate salmon steaks and put side by side on oven rack and
baking tray. Turnover, as soon as the oven beeps. Push Start button
to continue process.
5. Pie & Bread
Food
Apple pie
Serving size (kg)
Accessory
Level
1.2-1.4
Oven rack
2
Put apple pie into a round metal dish. Put on the oven rack. The
weight ranges include apple and so on.
English 49
NQ50J9530_SA_DE68-04354F-00_EN.indd 49
2015-03-13 �� 7:58:10
Cooking Smart
Food
Base for fruit pie
Serving size (kg)
Accessory
Level
0.3-0.5
Oven rack
3
Put batter into metal base dish on the oven rack.
Brownies
0.5-0.7
Oven rack
3
Put dough into a round glass pyrex and ceramic dish on the oven
rack.
Croissants
0.2-0.4
Baking tray
3
Use baking paper. Put croissants side by side on the baking tray.
Dutch butter pie
0.5-0.7
Oven rack
2
Put fresh dough into a 22 cm round metal baking dish. Put on the
rack.
Dutch loaf cake
0.7-0.8
Oven rack
3
Put fresh dough into suitable sized rectangular metal baking
dish(length 25 cm). Put dish lengthway to the door on oven rack.
Muffins
0.5-0.6
Oven rack
3
Put muffin dough into metal muffin dish, suitable for 12 muffins. Set
dish in the middle of oven rack.
Rising yeast dough
0.3-0.6
Oven rack
3
Cooking Smart
Prepare yeast dough for pizza, cake or bread. Put into a large round
heat-resistant dish and cover with cling film.
Sponge cake
0.3-0.6
Oven rack
2
Preheat the oven, using the conventional heat mode to 180°C.Put
300 g dough into 18 cm, 400 g into 24 cm and 500 g into 26 cm
diameter round black metal baking dish. Set dish in the middle of
oven rack.
White bread
0.7-0.8
Oven rack
3
Put fresh dough into suitable sized rectangular metal baking
dish(length 25 cm). Put dish lengthway to the door on oven rack.
Puff pastry, filled
apple
0.3-0.5
Baking tray
2
Use baking paper. Put 4 pcs side by side on the baking tray.
50 English
NQ50J9530_SA_DE68-04354F-00_EN.indd 50
2015-03-13 �� 7:58:10
6. Side Dishes
Food
Fresh vegetables
Serving size (kg)
Accessory
Level
0.3-0.4
0.5-0.6
Ceramic tray
1
Weigh the vegetables after washing, cleaning and cutting into
similar size. Put them into a glass bowl with lid. Add 45 ml water (3
tablespoons). Put bowl in the centre of ceramic tray. Cook covered.
Stand 2-3 minutes and stir after cooking.
Peeled potato
0.5-0.6
0.7-0.8
Ceramic tray
1
Weigh the potatoes after peeling, washing and cutting into a
similar size. Put them into a glass bowl with lid. Add 45-60 ml (3-4
tablespoons) water. Put bowl in the centre of ceramic tray. Stand 2-3
minutes and stir after cooking.
White rice
0.3-0.4
Ceramic tray
1
Weigh parboiled white rice and add double quantity of cold water.
For example: when cooking 0.3 kg rice, add 600 ml cold water. Use
glass pyrex bowl with lid. Put bowl in the centre of ceramic tray.
Cook covered. Stand 5 minutes and stir after cooking.
Baked potato
halves
0.4-0.6
0.6-0.8
Grill insert + Ceramic
tray
4
Frozen vegetables
0.3-0.4
0.4-0.5
Ceramic tray
1
Put frozen vegetables, such as broccoli, carrot slices, cauliflower
florets and peas into a glass bowl with lid. Add 1-2 tbsp. water. Put
bowl in the centre of ceramic tray. Cook covered. Stand 2-3 minutes
and stir after cooking.
Cooking Smart
Cut potatoes into halves. Put them in a circle on the rack with the cut
side to the grill. After cooking let stand for 2-3 minutes.
English 51
NQ50J9530_SA_DE68-04354F-00_EN.indd 51
2015-03-13 �� 7:58:10
Cooking Smart
7. Convenience
Food
Frozen lasagne
Serving size (kg)
Accessory
Level
0.4-0.6
Grill insert + Ceramic
tray
3
Put frozen lasagne in a suitable glass pyrex or ceramic dish. After
reheating let stand for 2-3 minutes.
Frozen oven chips
0.2-0.8
Baking tray
3
Distribute frozen oven chips on metal baking tray.
Frozen croquettes
0.4-0.6
Baking tray
3
Put frozen potato croquettes evenly on metal baking tray.
Frozen fish gratin
0.4-0.6
Grill insert + Ceramic
tray
3
Put frozen fish gratin in a suitable glass pyrex or ceramic dish. After
cooking stand for 2-3 minutes. This programme is suitable for frozen
ready products consisting of fillets topped with vegetables and
sauce.
Cooking Smart
52 English
NQ50J9530_SA_DE68-04354F-00_EN.indd 52
2015-03-13 �� 7:58:10
Auto Defrost guide
The following table presents the various Auto Defrost programmes, quantities, standing times
and appropriate recommendations. These programmes use microwave energy only. Remove
all packaging material before defrosting. Place meat, poultry and fish on the ceramic tray.
Food
Meat
Serving size
(g)
Accessory
Level
Standing Time
(min.)
0.2-2.0
Ceramic tray
1
20-90
Shield the edges with aluminium foil. Turn the meat over, when the
oven beeps. This programme is suitable for beef, lamb, pork, steaks,
chops, minced meat.
Poultry
0.2-2.0
Ceramic tray
1
20-90
Shield the leg and wing tips with aluminium foil. Turn the poultry
over, when the oven beeps. This programme is suitable for whole
chicken as well as for chicken portions.
Fish
0.2-2.0
Ceramic tray
1
20-60
Shield the tail of a whole fish with aluminium foil. Turn the fish over,
when the oven beeps. This programme is suitable for whole fishes
as well as for fish fillets.
Bread/Cake
0.1-1.0
Ceramic tray
1
10-30
Fruit
0.1-0.8
Ceramic tray
1
Cooking Smart
Put bread on a piece of kitchen paper and turn over, as soon as the
oven beeps. Place cake on ceramic tray and if possible, turn over,
as soon as the oven beeps. (Oven keeps operating and is stopped,
when you open the door.) This programme is suitable for all kinds
of bread, sliced or whole, as well as for bread rolls and baguettes.
Arrange bread rolls in a circle. This programme is suitable for all
kinds of yeast cake, biscuit, cheese cake and puff pastry. It is not
suitable for short / crust pastry, fruit and cream cakes as well as for
cake with chocolate topping.
5-15
Distribute frozen fruit evenly on ceramic tray. This programme is
suitable for fruits like raspberries, mixed berries, and tropical fruits.
English 53
NQ50J9530_SA_DE68-04354F-00_EN.indd 53
2015-03-13 �� 7:58:10
Cooking Smart
Manual cooking
Microwave cooking guide
• Do not use metal containers with Microwave mode. Always put food containers on the
turntable.
• It is recommended to cover the food for best results.
• After cooking is complete, let the food settle in its own steam.
Frozen vegetables
• Use a glass Pyrex container with a lid.
• Stir vegetables twice during cooking, and once after cooking.
• Add seasoning after cooking.
Food
Spinach
Broccoli
Peas
Cooking Smart
Green Beans
Mixed Vegetables
(Carrots/Peas/Corn)
Mixed Vegetables
(Chinese Style)
Serving size
(g)
Power (W)
Cooking time
(min.)
Standing time
(min.)
150
600
5-6
2-3
8-9
2-3
7-8
2-3
7½-8½
2-3
7-8
2-3
7½-8½
2-3
Add 15 ml (1 tbsp.) of cold water.
300
600
Add 30 ml (2 tbsp.) of cold water.
300
600
Add 15 ml (1 tbsp.) of cold water.
300
600
Add 30 ml (2 tbsp.) of cold water.
300
600
Add 15 ml (1 tbsp.) of cold water.
300
600
Add 15 ml (1 tbsp.) of cold water.
54 English
NQ50J9530_SA_DE68-04354F-00_EN.indd 54
2015-03-13 �� 7:58:11
Fresh vegetables
• Use a glass Pyrex container with a lid.
• Add 30-45 ml of cold water for every 250 g.
• Stir once during cooking, and once after cooking.
• Add seasoning after cooking.
• For faster cooking, it is recommended to cut into smaller, even sizes.
• Cook all fresh vegetables using full microwave power (900 W).
Food
Broccoli
Serving size (g)
Cooking time (min.)
Standing time (min.)
250
500
4-5
5-6
3
Prepare even sized florets. Arrange the stems to the centre
Brussels sprouts
250
500
5-6
7-8
3
Add 60–75 ml (4-5 tbsp.) of water.
Carrots
250
5-6
3
Cut carrots into even sized slices.
Cauliflower
250
500
5-6
7-8
3
Prepare even sized florets. Cut big florets into halves. Arrange
stems to the centre.
Courgettes
250
3-4
3
Egg Plants
250
3-4
3
Cut egg plants into small slices and sprinkle with 1 tablespoon
lemon juice.
Leeks
250
3-4
3
1-2
2-3
3
Cooking Smart
Cut courgettes into slices. Add 30 ml (2 tbsp.) of water or a knob of
butter. Cook until just tender.
Cut leeks into thick slices.
Mushrooms
125
250
Prepare small whole or sliced mushrooms. Do not add any water.
Sprinkle with lemon juice. Spice with salt and pepper. Drain before
serving.
English 55
NQ50J9530_SA_DE68-04354F-00_EN.indd 55
2015-03-13 �� 7:58:11
Cooking Smart
Food
Serving size (g)
Cooking time (min.)
Standing time (min.)
250
4-5
3
Onions
Cut onions into slices or halves. Add only 15 ml (1 tbsp.) water.
250
Peppers
4-5
3
4-5
7-8
3
Cut pepper into small slices.
250
500
Potatoes
Weigh the peeled potatoes and cut them into similar sized halves
or quarters.
250
Turnip cabbage
5-6
3
Cut turnip cabbage into small cubes.
Rice and pasta
Stir from time to time during and after cooking.
Cook uncovered, and close the lid during settling. Then, drain water thoroughly.
• Rice: Use a large glass Pyrex container with a lid against the rice doubling in volume.
• Pasta: Use a large glass Pyrex container.
Food
Cooking Smart
White rice
(parboiled)
Brown rice
(parboiled)
Serving
size (g)
Power
(W)
250
Cooking
time (min.)
Standing
time (min.)
17-18
800
5
Directions
Add 500 ml of cold
water.
375
18-20
Add 750 ml of cold
water.
250
20-22
Add 500 ml of cold
water.
800
375
5
22-24
Add 750 ml of cold
water.
Mixed rice
(rice + wild rice)
250
800
17-19
5
Add 500 ml of cold
water.
Mixed corn
(rice + grain)
250
800
18-20
5
Add 400 ml of cold
water.
Pasta
250
800
10-11
5
Add 1000 ml of hot
water.
56 English
NQ50J9530_SA_DE68-04354F-00_EN.indd 56
2015-03-13 �� 7:58:11
Reheating
• Do not reheat large-sized foods such as joints of meat, which easily overcook.
• It is safer to reheat foods at lower power levels.
• Stir well or turn over during and after cooking.
• Use caution for liquids or baby foods. Stir well before, during, and after cooking with a
plastic spoon or glass stirring stick to prevent eruptive boiling and scalding. Keep them
inside the oven during the standing time. Allow a longer reheating time than other food
types.
• Recommended standing time after reheating is 2-4 minutes. See the table below for
reference.
Liquids and food
Food
Drink
Serving size
Power (W)
250 ml (1 mug)
500 ml (2 mugs)
800 W
Cooking time
(min.)
Standing
time (min.)
1½-2
2-3
1-2
Pour into a ceramic cup and reheat uncovered. Place cup in the
center of ceramic tray. Stir carefully before and after standing time.
Soup (Chilled)
250 g
800 W
3-4
2-3
Pour into a deep ceramic plate. Cover with plastic lid. Stir well after
reheating. Stir again before serving.
Stew (Chilled)
350 g
600 W
5-6
2-3
Pasta with sauce
(Chilled)
Plated meal
(Chilled)
350 g
600 W
5-6
2-3
Pour into a deep ceramic plate. Cover with plastic lid. Stir well after
reheating. Stir again before serving.
350 g
450 g
600 W
5-6
6-7
Cooking Smart
Pour into a deep ceramic plate. Cover with plastic lid. Stir well after
reheating. Stir again before serving.
3
Plate a meal of 2-3 chilled components on a ceramic dish. Cover
with microwave cling film.
English 57
NQ50J9530_SA_DE68-04354F-00_EN.indd 57
2015-03-13 �� 7:58:11
Cooking Smart
Baby foods & milk
Food
Baby Food
(Vegetable + Meat)
Baby Porridge
(Grain + Milk +
Fruit)
Baby Milk
Serving size
Power (W)
Cooking time
(sec.)
Standing time
(min.)
190 g
600 W
30-40
2-3
Empty into ceramic deep plate. Cook covered. Stir after cooking
time. Stand for 2-3 minutes. Before serving, stir well and check the
temperature carefully.
190 g
600 W
20-30
2-3
Empty into ceramic deep plate. Cook covered. Stir after cooking
time. Stand for 2-3 minutes. Before serving, stir well and check the
temperature carefully.
100 ml
200 ml
300 W
30-40
50-60
2-3
Stir or Shake well and pour into a sterilized glass bottle. Place into
the centre of ceramic tray. Cook uncovered. Shake well and stand
for at least 3 minutes. Before serving, Shake well and check the
temperature carefully.
Cooking Smart
58 English
NQ50J9530_SA_DE68-04354F-00_EN.indd 58
2015-03-13 �� 7:58:11
Defrost
Put frozen food in a microwave-safe container without a cover. Turn over during defrosting,
and drain off liquid and remove giblets after defrosting. For faster defrosting, cut the food
into small pieces, and wrap them with aluminum foil before defrosting. When the outer
surface of frozen foods begins to melt, stop defrosting and let stand as instructed in the table
below.
Do not change the default power level (180 W) for defrosting.
Place food on ceramic tray, and then insert ceramic tray in level 1.
Serving size (g)
Defrosting time
(min.)
Standing time
(min.)
Minced meat
250
500
6-7
8-12
15-30
Pork steaks
250
7-8
Food
Meat
Place the meat on the ceramic plate. Shield thinner edges with aluminium foil.
Turn over after half of defrosting time.
Poultry
Chicken pieces
500 (2 pcs.)
12-14
Whole chicken
1200
28-32
15-60
First, put chicken pieces skin - side down, whole chicken breast - side - down
on ceramic plate. Shield the thinner parts like wings and ends with aluminium
foil. Turn over after half of defrosting time.
Fish
200
6-7
Whole fish
400
11-13
10-25
Put frozen fish in the middle of ceramic plate. Arrange the thinner parts under
the thicker parts. Shield narrow ends of fillets and tail of whole fish With
aluminium foil. Turn over after half of defrosting time.
Fruit
Berries
300
6-7
5-10
Cooking Smart
Fish fillets
Spread fruit on a flat, round glass dish with a large diameter.
Bread
Bread rolls
(each ca. 50 g)
2 pcs
4 pcs
1-1½
2½-3
Toast/sandwich
250
500
4-4½
7-9
5-20
Arrange rolls in a circle or bread horizontally on kitchen paper on the ceramic
plate. Turn over after half of defrosting time.
English 59
NQ50J9530_SA_DE68-04354F-00_EN.indd 59
2015-03-13 �� 7:58:11
Cooking Smart
Convection guide
Convection
Use temperatures and times in this table as guidelines for baking.
We recommend to preheat the oven with Convection mode.
Temp. (°C)
Accessory
Level
Cooking time
(min.)
Hazelnut cake
square mould
160-170
Oven rack
2
60-70
Lemon cake ringshaped or bowl
mould
150-160
Oven rack
2
50-60
Sponge cake
150-160
Oven rack
2
25-35
Fruit flan base
150-170
Oven rack
2
25-35
Flat streusel fruit
cake (yeast dough)
150-170
Baking tray
3
30-40
Croissants
170-180
Baking tray
2
10-15
Bread rolls
180-190
Baking tray
2
10-15
Cookies
160-180
Baking tray
3
10-20
Oven chips
200-220
Baking tray
3
15-20
Food
Cooking Smart
Top heat + convection
Use temperatures and times in this table as guidelines for roasting.
We recommend to preheat the oven using Top heat + convection mode.
Put meat on oven rack, follow shelf level advice in the table and use baking tray as oil pan on
level 2.
Temp. (°C)
Accessory
Level
Cooking time
(min.)
Beef roast beef
(1 kg / medium)
170-190
Oven rack +
Baking tray
3+2
60-90
Pork shoulder joint/Roll
(1 kg)
180-200
Oven rack +
Baking tray
3+2
90-120
Food
60 English
NQ50J9530_SA_DE68-04354F-00_EN.indd 60
2015-03-13 �� 7:58:11
Temp. (°C)
Accessory
Level
Cooking time
(min.)
Lamb roast lamb/Leg of
lamb
(0.8 kg)
190-210
Oven rack +
Baking tray
3+2
50-80
Chicken whole chicken
(1.2 kg)
200-220
Oven rack +
Baking tray
3+2
50-70
Fish whole trouts
(2 pcs / 0.5 kg)
180-200
Oven rack +
Baking tray
3+2
30-40
Duck breast (0.3 kg)
180-200
Oven rack +
Baking tray
3+2
25-35
Food
Bottom heat + convection
Use temperatures and times in this table as guidelines for baking.
We recommend to preheat the oven with Bottom heat + convection mode.
Accessory
Level
Cooking time
(min.)
Homemade pizza
180-200
Baking tray
2
20-30
Chilled pre-baked
quiche/Pie
180-200
Oven rack
2
10-15
Frozen self rising pizza
180-200
Baking tray
2
15-20
Frozen pizza
180-200
Baking tray
2
15-25
Chilled pizza
180-200
Baking tray
2
8-15
Apple pie
160-180
Oven rack
2
60-70
Puff pastry, apple filling
180-200
Baking tray
2
10-15
Cooking Smart
Temp. (°C)
Food
English 61
NQ50J9530_SA_DE68-04354F-00_EN.indd 61
2015-03-13 �� 7:58:11
Cooking Smart
Grilling guide
Large grill
Use temperatures and times in this table as guidelines for grilling.
Set 220 °C grill temperature, preheat for 5 minutes.
Accessory
Level
Cooking time
1st side (min.)
Cooking time
2nd side (min.)
Kebab spits
Oven rack + Baking tray
5+2
8-10
6-8
Pork steaks
Oven rack + Baking tray
5+2
7-9
5-7
Oven rack
5+2
6-8
6-8
Chicken pieces
Oven rack + Baking tray
5+2
20-25
15-20
Salmon steaks
Oven rack + Baking tray
5+2
8-12
6-10
Baking tray
5
15-20
-
Toast
Oven rack
5
2-3
1-2
Cheese toasts
Oven rack
5
3-5
-
Food
Sausages
Sliced vegetables
Fan grill
Use temperatures and times in this table as guidelines for grilling.
Set 220 °C grill temperature, preheat for 5 minutes.
Food
Cooking Smart
Accessory
Level
Cooking time (min.)
Sausages
Oven rack
4
8-10
Potato wedges
Oven rack
4
20-25
Frozen oven chips
Baking tray
4
15-20
Frozen croquettes
Baking tray
4
20-25
Frozen nuggets
Baking tray
4
15-20
Salmon steak
Oven rack + Baking tray
4+2
15-20
Fish fillet
Oven rack + Baking tray
4+2
12-17
Whole fish
Oven rack + Baking tray
4+2
15-20
Chicken pieces
Oven rack + Baking tray
4+2
30-40
62 English
NQ50J9530_SA_DE68-04354F-00_EN.indd 62
2015-03-13 �� 7:58:12
Combination cooking guide
• Do not use metal containers with Microwave mode. Always put food containers on the
turntable.
• It is recommended to cover the food for best results.
• After cooking is complete, let the food settle in its own steam.
Microwave + Grill
Use power level with temperatures and times in this table as guidelines for cooking.
Preheating is not needed.
Accessory
Level
Cooking time
1st side
(min.)
Cooking time
2nd side
(min.)
180-200
Ceramic tray+
Grill insert
4
10-15
-
300
160-180
Ceramic tray+
Grill insert
4
05-10
-
Vegetable
gratin
450
180-200
Ceramic tray+
Grill insert
4
10- 20
-
Roast fish
300
180-200
Ceramic tray+
Grill insert
4
04-08
04-06
Chicken
pieces
300
180-200
Ceramic tray+
Grill insert
4
10-15
10-15
Power
level (W)
Temp.
(°C)
Baked
potatoes
600
Grilled
tomatoes
Food
Use power level with temperatures and times in this table as guidelines for cooking.
Preheating is not needed.
Food
Whole
chicken
(1.2 kg)
Power
level (W)
Temp.
(°C)
450
180-200
Accessory
Level
Cooking time
1st side
(min.)
Ceramic tray+
Grill insert
3
25-30
Cooking time
2nd side
(min.)
15 - 25
Cooking Smart
Microwave + Convection
English 63
NQ50J9530_SA_DE68-04354F-00_EN.indd 63
2015-03-13 �� 7:58:12
Cooking Smart
Accessory
Level
Cooking time
1st side
(min.)
180-200
Ceramic tray+
Grill insert
3
15-20
15-20
450
180-200
Ceramic tray+
Grill insert
3
20-25
-
Potato
gratin
450
180-200
Ceramic tray+
Grill insert
3
10-15
-
Fresh fruit
flan
100
160-180
Ceramic tray
3
40-50
-
Power
level (W)
Temp.
(°C)
Roast
beef/
Lamb
(Medium)
300
Frozen
lasagne/
Pasta
gratin
Food
Cooking time
2nd side
(min.)
Microwave + Roast
Use power level with temperatures and times in this table as guidelines for cooking.
Preheating is not needed.
Cooking Smart
Food
Power
level (W)
Temp.
(°C)
Accessory
Level
Cooking time
(min.)
Chicken pieces
300
180-200
Ceramic tray + Grill insert
4
20-30
Potato wedges
300
180-200
Ceramic tray + Grill insert
4
15-20
Whole fish
300
180-200
Ceramic tray + Grill insert
4
15-20
Fish fillet
300
180-200
Ceramic tray + Grill insert
4
10-15
Frozen nuggets
450
180-200
Ceramic tray + Grill insert
4
10-15
Frozen spring
rolls
300
180-200
Ceramic tray + Grill insert
4
05-10
Frozen fish
finger
300
180-200
Ceramic tray + Grill insert
4
15-20
64 English
NQ50J9530_SA_DE68-04354F-00_EN.indd 64
2015-03-13 �� 7:58:12
Conventional guide
Use temperatures and times in this table as guidelines for baking.
We recommend to preheat the oven with Conventional mode.
Temp. (°C)
Accessory
Level
Cooking time
(min.)
Lasagne
200-220
Oven rack
3
20-25
Vegetables gratin
180-200
Oven rack
3
20-30
Potato gratin
180-200
Oven rack
3
40-60
Frozen pizza baguettes
160-180
Baking tray
3
10-15
Marble cake
160-180
Oven rack
2
50-70
Loaf cake
150-170
Oven rack
2
50-60
Muffins
180-200
Oven rack
2
20-30
Cookies
180-200
Baking tray
3
10-20
Food
Intensive cook guide
Use temperatures and times in this table as guidelines for grilling.
Set 220 °C grill temperature, preheat for 5 minutes.
Level
Cooking time
(min.)
180-200
Oven rack
2
20-30
Vegetables gratin (2 kg)
160-180
Oven rack
2
40-60
Potato gratin (2 kg)
160-180
Oven rack
2
60-90
Beef roast beef
(2 kg / medium)
160-180
Oven rack +
Baking tray
3+2
60-90
Duck whole (2 kg)
180-200
Oven rack +
Baking tray
3+2
60-90
2 Chickens whole
(1.2 kg each)
200-220
Oven rack +
Baking tray
3+2
60-90
Temp. (°C)
Lasagne (2 kg)
Cooking Smart
Accessory
Food
English 65
NQ50J9530_SA_DE68-04354F-00_EN.indd 65
2015-03-13 �� 7:58:12
Cooking Smart
Pro-Roasting
Use temperatures and times in this table as guidelines for baking.
Food
Temp. (°C)
Accessory
Level
Cooking time
(hrs.)
Roast beef
60-80
Oven rack +
Baking tray
3+2
3:30 - 4:30
Pork roast
70-90
Oven rack +
Baking tray
3+2
3:30 - 4:00
Duck breast
60-80
Oven rack +
Baking tray
3+2
1:30 - 2:00
Fillet of beef
70-90
Oven rack +
Baking tray
3+2
1:30 - 2:00
Pork fillet
70-90
Oven rack +
Baking tray
3+2
1:30 - 2:00
Accessory
Level
Cooking time
(min.)
Multi level cook (Special)
Use temperatures and times in this table as guidelines for baking.
We recommend to preheat the oven with Multi-Level Cook mode.
Food
Temp. (°C)
Cooking Smart
Small cakes
150-160
2 baking trays
2+5
20-30
Mini pies
160-180
2 baking trays
2+5
20-30
Croissants
160-180
2 baking trays
2+5
20-30
Puff pastry
180-200
2 baking trays
2+5
30-40
Cookies
170-190
2 baking trays
2+5
15-20
Lasagne
160-180
Oven rack +
Baking Tray
2+5
30-45
Frozen oven chips
180-200
2 baking trays
2+5
30-50
Frozen nuggets
180-200
2 baking trays
2+5
20-30
Frozen pizza
200-220
Oven rack +
Baking Tray
2+5
20-30
66 English
NQ50J9530_SA_DE68-04354F-00_EN.indd 66
2015-03-13 �� 7:58:12
Quick & Easy
Melting butter
Put 50 g butter into a small deep glass
dish. Cover with plastic lid. Heat for 30-40
seconds using 900 W, until butter is melted.
Melting chocolate
Put 100 g chocolate into a small deep glass
dish. Heat for 3-5 minutes, using 450 W
until chocolate is melted. Stir once or twice
during melting. Use oven gloves while
taking out!
Meltng crystallized honey
Put 20 g crystallized honey into a small
deep glass dish. Heat for 20-30 seconds
using 300 W, until honey is melted.
Melting gelatine
Lay dry gelatine sheets (10 g) for 5 minutes
into cold water. Put drained gelatine into a
small glass pyrex bowl. Heat for 1 minute
using 300 W. Stir after melting.
Cooking pudding
Mix pudding powder with sugar and milk
(500 ml) by following the manufacturers
instructions and stir well. Use a suitable
sized glass pyrex bowl with lid. Cook
covered for 6 ½ to 7 ½ minutes using
900 W. Stir several times well during
cooking.
Browning almond slices
Spread 30 g sliced almonds evenly on a
medium sized ceramic plate. Stir several
times during browning for 3 ½ to 4 ½
minutes using 600 W. Let it stand for 2-3
minutes in the oven. Use oven gloves while
taking out!
Cooking Smart
Cooking glaze/icing (for cake and gateaux)
Mix instant glaze (approximately 14 g) with
40 g sugar and 250 ml cold water.
Cook uncovered in a glass pyrex bowl for
3 ½ to 4 ½ minutes using 900 W, until
glaze/icing is transparent. Stir twice during
cooking.
Cooking jam
Put 600 g fruits (for example mixed berries)
in a suitable sized glass pyrex bowl with
lid. Add 300 g preserving sugar and stir
well. Cook covered for 10-12 minutes using
900 W. Stir several times during cooking.
Put directly into small jam glasses with
twist-off lids. Stand on lid for 5 minutes.
English 67
NQ50J9530_SA_DE68-04354F-00_EN.indd 67
2015-03-13 �� 7:58:12
Troubleshooting
You may encounter a problem using the oven. In that case, first check the table below and
try the suggestions. If a problem persists, or if any information code keeps appearing on the
display, contact a local Samsung service centre.
Checkpoints
If you encounter a problem with the oven, first check the table below and try the
suggestions.
Problem
Cause
Action
General
Foreign matter may be caught
between the buttons.
Remove the foreign matter and
try again.
For touch models: Moisture is
on the exterior.
Wipe the moisture from the
exterior.
Child lock is activated.
Deactivate Child lock.
The time is not
displayed.
Power is not supplied.
Make sure power is supplied.
The Eco (power-saving) function
is set.
Turn off the Eco function.
The oven does not
work.
Power is not supplied.
Make sure power is supplied.
The door is open.
Close the door and try again.
The door open safety
mechanisms are covered in
foreign matter.
Remove the foreign matter and
try again.
The user has opened the door to
turn food over.
After turning over the food,
press the Start button again to
start operation.
The buttons cannot
be pressed properly.
The oven stops while
in operation.
Troubleshooting
68 English
NQ50J9530_SA_DE68-04354F-00_EN.indd 68
2015-03-13 �� 7:58:12
Problem
Cause
Action
After cooking for an extended
period of time, let the oven cool.
The cooling fan is not working.
Listen for the sound of the
cooling fan.
Trying to operate the oven
without food inside.
Put food in the oven.
There is not sufficient
ventilation space for the oven.
There are intake/exhaust outlets
on the front and rear of the
oven for ventilation.
Keep the gaps specified in the
product installation guide.
Several power plugs are being
used in the same socket.
Designate only one socket to be
used for the oven.
There is no power to
the oven.
Power is not supplied.
Make sure power is supplied.
There is a popping
sound during
operation, and the
oven doesn't work.
Cooking sealed food or using a
container with a lid may causes
popping sounds.
Do not use sealed containers
as they may burst during
cooking due to expansion of the
contents.
The oven exterior
is too hot during
operation.
There is not sufficient
ventilation space for the oven.
There are intake/exhaust outlets
on the front and rear of the
oven for ventilation. Keep the
gaps specified in the product
installation guide.
Objects are on top of the oven.
Remove all objects on the top of
the oven.
Food residue is stuck between
the door and oven interior.
Clean the oven and then open
the door.
The door cannot be
opened properly.
Troubleshooting
The oven has been cooking for
an extended period of time.
The power turns off
during operation.
English 69
NQ50J9530_SA_DE68-04354F-00_EN.indd 69
2015-03-13 �� 7:58:12
Troubleshooting
Problem
Cause
Action
Troubleshooting
The oven does not
heat.
The oven may not work, too
much food is being cooked, or
improper cookware is being
used.
Put one cup of water in a
microwave-safe container and
run the microwave for 1-2
minutes to check whether the
water is heated.
Reduce the amount of food and
start the function again.
Use a cooking container with a
flat bottom.
Heating is weak or
slow.
The oven may not work, too
much food is being cooked, or
improper cookware is being
used.
Put one cup of water in a
microwave-safe container and
run the microwave for 1-2
minutes to check whether the
water is heated.
Reduce the amount of food and
start the function again.
Use a cooking container with a
flat bottom.
The warm function
does not work.
The oven may not work, too
much food is being cooked, or
improper cookware is being
used.
Put one cup of water in a
microwave-safe container and
run the microwave for 1-2
minutes to check whether the
water is heated.
Reduce the amount of food and
start the function again.
Use a cooking container with a
flat bottom.
The thaw function
does not work.
The oven may not work, too
much food is being cooked, or
improper cookware is being
used.
Put one cup of water in a
microwave-safe container and
run the microwave for 1-2
minutes to check whether the
water is heated.
Reduce the amount of food and
start the function again.
Use a cooking container with a
flat bottom.
70 English
NQ50J9530_SA_DE68-04354F-00_EN.indd 70
2015-03-13 �� 7:58:13
Cause
Action
The interior light is
dim or does not turn
on.
The door has been left open for
a long time.
The interior light may
automatically turn off when the
Eco function operates.
Close and reopen the door or
press the "Cancel" button.
The interior light is covered by
foreign matter.
Clean the inside of the oven and
check again.
A beeping sound
occurs during
cooking.
If the Auto Cook function is
being used, this beeping sound
means it’s time to turn over the
food during thawing.
After turning over the food,
press the Start button again to
restart operation.
The oven is not level.
The oven is installed on an
uneven surface.
Make sure the oven is installed
on flat, stable surface.
There are sparks
during cooking.
Metal containers are used
during the oven/thawing
functions.
Do not use metal containers.
When power is
connected, the oven
immediately starts to
work.
The door is not properly closed.
Close the door and check again.
There is electricity
coming from the
oven.
The power or power socket is
not properly grounded.
Make sure the power and power
socket are properly grounded.
There is water
dripping.
There may be water or steam in
some cases depending on the
food.
This is not an oven malfunction.
Let the oven cool and then wipe
with a dry dish towel.
Steam leaks from the
door.
There may be water or steam in
some cases depending on the
food.
This is not an oven malfunction.
Let the oven cool and then wipe
with a dry dish towel.
Troubleshooting
Problem
English 71
NQ50J9530_SA_DE68-04354F-00_EN.indd 71
2015-03-13 �� 7:58:13
Troubleshooting
Problem
Cause
Action
There is water left in
the oven.
There may be water or steam in
some cases depending on the
food.
This is not an oven malfunction.
Let the oven cool and then wipe
with a dry dish towel.
The brightness inside
the oven varies.
Brightness changes depending
on power output changes
according to function.
Power output changes during
cooking are not malfunctions.
This is not an oven malfunction.
Cooking is finished,
but the cooling fan is
still running.
To ventilate the oven, the
cooling fan continues to run for
about 5 minutes after cooking is
complete.
This is not an oven malfunction.
Pressing the +30sec
button operates the
oven.
This happens when the oven
was not operating.
The microwave oven is
designed to operate by pressing
the +30 sec button when it was
not operating.
While turning, the
turntable comes out
of place or stops
turning.
There is no roller ring, or the
roller ring is not properly in
place.
Install the roller ring and then
try again.
The turn table drags
while turning.
The roller ring is not properly
in place, there is too much food,
or the container is too large
and touches the inside of the
microwave.
Adjust the amount of food and
do not use containers that are
too large.
The turn table rattles
while turning and is
noisy.
Food residue is stuck to the
bottom of the oven.
Remove any food residue stuck
to the bottom of the oven.
Turntable
Troubleshooting
72 English
NQ50J9530_SA_DE68-04354F-00_EN.indd 72
2015-03-13 �� 7:58:13
Problem
Cause
Action
During initial operation, smoke
may come from the heating
elements when you first use the
oven.
This is not a malfunction, and if
you run the oven 2-3 times, it
should stop.
Food is on the heating elements.
Let the oven cool and then
remove the food from the
heating elements.
Food is too close to the grill.
Put the food a suitable distance
away while cooking.
Food is not properly prepared
and/or arranged.
Make sure food is properly
prepared and arranged.
The oven does not
heat.
The door is open.
Close the door and try again.
Smoke comes out
during preheating.
During initial operation, smoke
may come from the heating
elements when you first use the
oven.
This is not a malfunction, and if
you run the oven 2-3 times, it
should stop.
Food is on the heating elements.
Let the oven cool and then
remove the food from the
heating elements.
There is a burning or
plastic smell when
using the oven.
Plastic or non heat-resistant
cookware is used.
Use glass cookware suitable for
high temperatures.
There is a bad smell
coming from inside
the oven.
Food residue or plastic has
melted and stuck to the interior.
Use the steam function and then
wipe with a dry cloth.
You can put a lemon slice inside
and run the oven to remove the
odour more quickly.
Grill
Smoke comes out
during operation.
Oven
Troubleshooting
English 73
NQ50J9530_SA_DE68-04354F-00_EN.indd 73
2015-03-13 �� 7:58:13
Troubleshooting
Problem
The oven does not
cook properly.
Cause
Action
The oven door is frequently
opened during cooking.
Do not frequently open the door
unless you are cooking things
that need to be turned. If you
open the door often, the interior
temperature will be lowered
and this may affect the results
of your cooking.
The oven controls are not
correctly set.
Correctly set the oven controls
and try again.
The grill or other accessories
are not correctly inserted.
Correctly insert the accessories.
The wrong type or size of
cookware is used.
Reset the oven controls or use
suitable cookware with flat
bottoms.
Troubleshooting
74 English
NQ50J9530_SA_DE68-04354F-00_EN.indd 74
2015-03-13 �� 7:58:13
Information codes
If the oven fails to operate, you may see an information code on the display. Check the table
below and try the suggestions.
Code
C-20
Description
Action
The temperature sensor is open.
The temperature sensor is short.
C-F0
If there is no communication between the
main and sub MICOM.
C-F1
Only occurs during EEPROM Read/Write
C-21
This code appears when the oven
temperature high.
In case the temperature rises over the
limit temperature during operation of each
mode. (Fire sensed.)
Unplug the power cord of
the oven, and contact a local
Samsung service centre.
Unplug the power cord for
cooling enough time, and
restart the microwave oven.
C-F2
Stop the oven and then try
again.
C-d0
Unplug the power cord for
cooling enough time, and
clean the button. (Dust,
Water)
When appear same problem,
contact a local Samsung
service centre.
The touch key is malfunction.
Troubleshooting
English 75
NQ50J9530_SA_DE68-04354F-00_EN.indd 75
2015-03-13 �� 7:58:13
Technical specifications
specification
SAMSUNG strives to improve its products at all times. Both the design specifications and
these user instructions are thus subject to change without notice.
By right of the common regulation 2/1984 (III.10) BKM-IpM. we as distributors testify,
that the NQ50J9530 oven of Samsung comply with the undermentioned technological
parameters.
240 V ~ 50 Hz
Power Source
Power Consumption
Maximum power
3350 W
Microwave
1650 W
Grill
2750 W
Convection
2700 W
Output Power
100 W / 900 W (IEC - 705)
Operating Frequency
2450 MHz
Magnetron
OM75P (21)
Cooling Method
Cooling fan motor
Dimensions
(W x H x D)
Main unit
595 x 454.2 x 570 mm
Built-in
555 x 445 x 548.8 mm
50 liter
Volume
Weight
Noise Level
Net
39.3 Kg
Shipping
47.8 Kg
44.0 dBA
Technical specification
76 English
NQ50J9530_SA_DE68-04354F-00_EN.indd 76
2015-03-13 �� 7:58:13
Memo
NQ50J9530_SA_DE68-04354F-00_EN.indd 77
2015-03-13 �� 7:58:13
Memo
NQ50J9530_SA_DE68-04354F-00_EN.indd 78
2015-03-13 �� 7:58:13
Memo
NQ50J9530_SA_DE68-04354F-00_EN.indd 79
2015-03-13 �� 7:58:13
Please be advised that the Samsung warranty does NOT cover service calls to explain product
operation, correct improper installation, or perform normal cleaning or maintenance.
QUESTIONS OR COMMENTS?
COUNTRY
CALL
OR VISIT US ONLINE AT
AUSTRALIA
1300 362 603
www.samsung.com/au/support
NEW ZEALAND
0800 726 786
www.samsung.com/nz/support
CHINA
400-810-5858
www.samsung.com/cn/support
HONG KONG
(852) 3698 4698
www.samsung.com/hk/support (Chinese)
www.samsung.com/hk_en/support (English)
INDIA
1800 3000 8282 - Toll Free
1800 266 8282 - Toll Free
BANGLADESH
9612300300
INDONESIA
021-56997777
08001128888
www.samsung.com/id/support
JAPAN
0120-363-905
www.samsung.com/jp/support
MALAYSIA
1800-88-9999
603-77137477 (Overseas contact)
www.samsung.com/my/support
PHILIPPINES
1-800-10-7267864 [PLDT]
1-800-8-7267864 [Globe landline
and Mobile]
02-4222111 [Other landline]
www.samsung.com/ph/support
SINGAPORE
1800-SAMSUNG(726-7864)
www.samsung.com/sg/support
THAILAND
0-2689-3232,
1800-29-3232
www.samsung.com/th/support
TAIWAN
0800-329999
www.samsung.com/tw/support
VIETNAM
1800 588 889
www.samsung.com/vn/support
MACAU
0800 333
MYANMAR
+95-01-2399-888
SRI LANKA
94117540540
www.samsung.com/in/support
www.samsung.com/support
DE68-04354F-00
NQ50J9530_SA_DE68-04354F-00_EN.indd 80
2015-03-13 �� 7:58:13