1
tX^Z]umUGGwGXGG{ SGkGZSGYWWYGG]a\`Gwt
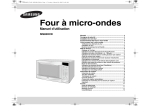
FOUR À MICRO-ONDES
Mode d’emploi
M1736N
Four ...........................................................................................2
Accessoires ...............................................................................2
Panneau de commande ...........................................................2
Utilisez ce mode d’emploi .........................................................3
Précautions d’emploi.................................................................3
Installez votre four à micro-ondes .............................................5
Réglez l’horloge.........................................................................5
Problèmes et solutions..............................................................6
Cuisez et réchauffez un plat par micro-ondes ..........................6
Niveaux de puissance ...............................................................7
Arrêtez la cuisson......................................................................7
Ajustez le temps de cuisson......................................................7
Réchauffez un plat en mode instantané ...................................8
Temps pour le réchauffage en mode instantané ......................8
Décongelez un plat automatiquement ......................................9
Temps pour la décongélation automatique...............................9
Cuisez en plusieurs étapes .....................................................10
Guide des récipients ...............................................................11
Nettoyez votre four à micro-ondes ..........................................12
Spécifications techniques........................................................12
Code No. : DE68-02303G
tX^Z]umUGGwGYGG{ SGkGZSGYWWYGG]a\`Gwt
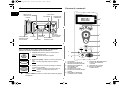
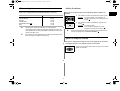
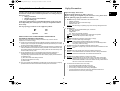
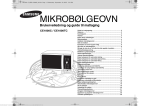
Four
F
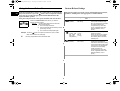
Panneau de commande
ORIFICES DE
VENTILATION
PORTE
AFFICHEUR
ÉCLAIRAGE
PANNEAU DE
COMMANDE
1
2
CROCHETS DE
VERROUILLAGE
DE LA PORTE
BOUTON
ANNEAU DE
D’OUVERTURE
PLATEAU
GUIDAGE
DE LA PORTE
ORIFICES DE
VERROUILLAGE
COUPLEUR
3
4
Accessoires
5
Selon le modèle de four à micro-ondes acheté, vous disposez de
plusieurs accessoires utilisables de diverses manières.
1. Coupleur, déjà placé sur l’axe du moteur situé au
centre du plancher du four.
Objet: le coupleur fait tourner le plateau.
2. Anneau de guidage, à placer au centre du plancher du
four.
Objet: l’anneau de guidage supporte le plateau.
6
9
7
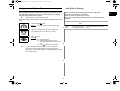
1. AFFICHEUR
2. SÉLECTION DU MODE DE
RÉCHAUFFAGE INSTANTANÉ
3. SÉLECTION DU MODE DE
DÉCONGÉLATION
AUTOMATIQUE
4. SÉLECTION DU POIDS
5. SÉLECTION DU MODE MICROONDES
6. RÉGLAGE DU TEMPS DE
CUISSON ET DE L’HEURE
3. Plateau, à placer sur l’anneau de guidage en adaptant
le centre sur le coupleur.
Objet: ce plateau constitue la principale surface de
cuisson ; il est facile de le retirer pour le
nettoyer.
☛
8
N’utilisez JAMAIS le four à micro-ondes sans l’anneau de guidage
et le plateau.
2
7. BOUTON DE DÉMARRAGE ET
D’AJOUT DE TEMPS DE
CUISSON
8. RÉGLAGE DE L’HEURE
9. BOUTON D’ARRÊT ET
D’ANNULATION
tX^Z]umUGGwGZGG{ SGkGZSGYWWYGG]a\`Gwt
Utilisez ce mode d’emploi
Précautions d’emploi
Vous venez d’acquérir un four à micro-ondes SAMSUNG. Le mode
d’emploi contient de nombreux conseils et instructions sur son
utilisation:
• précautions d’emploi,
• récipients et ustensiles recommandés,
• conseils utiles.
Précautions d'emploi.
Lisez attentivement ce manuel et conservez-le précieusement pour
vous y reporter ultérieurement.
Avant de cuire des aliments ou des liquides dans votre four à microondes, vous devez prendre les précautions suivantes.
1. N’utilisez aucun récipient ou ustensile métallique dans le four à micro-ondes:
• plats métalliques,
• assiettes avec décorations dorées ou argentées,
• brochettes, fourchettes, etc.
Raison: ils provoquent des arcs électriques ou étincelles qui pourraient
endommager les parois du four.
Au début du mode d’emploi, vous trouverez les illustrations des deux
modèles de four et plus particulièrement des panneaux de commande,
pour vous permettre de mieux localiser les boutons.
Les instructions pas-à-pas emploient deux symboles.
☛
✉
Important
Remarque
2. NE réchauffez JAMAIS :
• des bocaux, bouteilles ou récipients fermés hermétiquement ou sous vide.
Exemple : petits pots pour bébé.
• des aliments hermétiques. Exemple : œufs, noix en coquille, tomates.
Raison: l’augmentation de la pression pourrait les faire exploser.
Astuce: retirez le couvercle et percez les peaux, sachets, etc.
PRÉCAUTIONS POUR ÉVITER L’EXPOSITION ÉVENTUELLE À
UNE ÉNERGIE MICRO-ONDES EXCESSIVE
3. NE faites JAMAIS fonctionner le four à vide.
Raison: cela pourrait endommager les parois du four.
Astuce: laissez un verre d’eau en permanence dans le four. Si vous
démarrez le four accidentellement, l’eau absorbera les microondes.
La non-observation des consignes de sécurité suivantes peut se traduire par une
exposition dangereuse à l’énergie micro-ondes.
(a) N’essayez jamais d’utiliser le four avec la porte ouverte, d’intervenir sur les
verrouillages de sécurité (crochets de la porte) ou d’obturer les orifices de
sécurité.
(b) Ne placez aucun objet entre la porte du four et la face avant et ne laissez pas
de résidus, de miettes, ou de produits nettoyants s’accumuler sur les joints
d’étanchéité. Maintenez la porte et les joints d’étanchéité propres, en les
essuyant, après usage, d’abord avec un chiffon humide et ensuite avec un
chiffon sec et doux.
(c) Si le four est endommagé, ne l’utilisez pas tant qu’il n’a pas été réparé par un
spécialiste micro-ondes formé par le fabricant.
Il est impératif que la porte du four ferme correctement et que les éléments
suivants ne soient pas endommagés :
(1) porte, joints de porte et joints d’étanchéité,
(2) charnières de porte (cassées ou lâches),
(3) cordon d’alimentation.
(d) Le four doit être réglé et réparé exclusivement par un technicien micro-ondes
qualifié et formé par le fabricant.
4. Lorsque le four fonctionne à vide, l’alimentation électrique du four est
automatiquement coupée par mesure de sécurité. Après une période d’attente
d’environ 30 minutes, vous pouvez de nouveau faire fonctionner le four
normalement.
5. NE couvrez JAMAIS les orifices de ventilation situés à l’arrière du four avec
des torchons ou des papiers.
Raison: les torchons ou papiers pourraient prendre feu à cause de
l’évacuation de l’air chaud.
6. Utilisez TOUJOURS des gants isolants pour retirer un plat du four.
Raison: certains plats absorbent les micro-ondes et il y a toujours un
transfert de chaleur des aliments au plat. Les plats sont donc très
chauds.
7. NE touchez PAS les parois intérieures du four.
Raison: malgré les apparences, ces parois peuvent vous brûler même
après la cuisson. Ne mettez aucun produit inflammable en contact
avec une zone intérieure du four. Laissez d’abord le four refroidir.
3
F
tX^Z]umUGGwG[GG{ SGkGZSGYWWYGG]a\`Gwt
Précautions d’emploi (suite)
F
13. Un “cliquettement” peut se faire entendre pendant le fonctionnement du four,
et plus particulièrement pendant la décongélation.
Raison: ce bruit indique un changement de puissance. Ce phénomène est
normal.
8. Pour réduire le risque de feu à l’intérieur du four :
• n’y rangez aucun produit inflammable,
• retirez les attaches métalliques des sacs en papier ou en plastique,
• n’utilisez pas votre four à micro-ondes pour sécher des journaux,
• en cas d’apparition de fumée, laissez la porte du four fermée et arrêtez le
four ou débranchez-le de la prise électrique.
INSTRUCTIONS DE SÉCURITÉ IMPORTANTES
Pendant la cuisson, regardez de temps à autres dans le four lorsque les aliments
sont réchauffés ou cuits dans des récipients jetables en plastique, papier ou
autres matériaux combustibles.
9. Faites TOUJOURS très attention lorsque vous chauffez des liquides ou des
aliments pour bébé.
• Attendez au moins 20 secondes après avoir arrêté le four, pour bien
répartir la chaleur.
• Remuez pendant la cuisson si nécessaire et TOUJOURS après.
• Manipulez les récipients avec précaution après la cuisson. Vous risquez
de vous brûler si le récipient est trop chaud.
• Pour empêcher les liquides de continuer à monter en température
longtemps après leur sortie du four et éviter ainsi de vous brûler, remuez
avant, pendant et après la cuisson.
• Nous vous conseillons de laisser une cuillère en plastique dans les
liquides pour permettre à la température de baisser plus rapidement et
éviter les débordements.
Raison: lorsque vous réchauffez des liquides, l’ébullition peut être “à
retardement” ce qui signifie qu’elle peut être atteinte une fois le
récipient sorti du four. Vous risquez de vous ébouillanter par
inattention.
• Si vous vous ébouillantez :
* plongez la partie ébouillantée dans de l’eau froide pendant au moins
dix minutes,
* couvrez avec un pansement sec et propre,
* n’appliquez aucune crème, huile ou lotion.
• NE remplissez JAMAIS complètement le récipient. Choisissez un
récipient évasé pour prévenir tout débordement de liquide. Des bouteilles
à goulot étroit peuvent exploser en cas de surchauffe.
• Vérifiez TOUJOURS la température du lait ou des aliments pour bébé
avant de les servir.
• NE chauffez JAMAIS un biberon avec la tétine, car il pourrait exploser en
cas de surchauffe.
IMPORTANT
NE permettez JAMAIS aux jeunes enfants d’utiliser le four à micro-ondes ou de
jouer avec, et NE les laissez PAS sans surveillance à proximité du four en
fonctionnement. Des objets pouvant attirer l’attention des enfants (bonbons,
jouets, etc.) NE doivent JAMAIS être rangés à l’intérieur ou au-dessus du four.
10. Veillez à ne pas endommager le cordon d’alimentation.
• Ne plongez pas le cordon ou la fiche dans l’eau et tenez le cordon éloigné
des surfaces chaudes.
• N’utilisez pas l’appareil si le cordon ou la fiche sont endommagés.
11. Quand vous ouvrez la porte du four, tenez-vous à une longueur de bras.
Raison: l’air chaud ou la vapeur libérée pourraient vous brûler.
12. Conservez l’intérieur du four propre.
Raison: des particules de nourriture ou des gouttes de graisse collées aux
parois ou au plancher du four peuvent endommager sa peinture et
réduire son efficacité.
4
tX^Z]umUGGwG\GG{ SGkGZSGYWWYGG]a\`Gwt
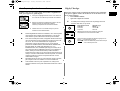
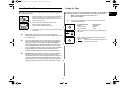
Installez votre four à micro-ondes
Réglez l’horloge
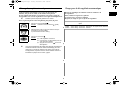
Installez le four sur une surface plane, horizontale et suffisamment
solide pour supporter le poids du four.
Votre four à micro-ondes est équipé d’une horloge grâce à laquelle
vous pouvez afficher l’heure sur 24 heures ou sur 12 heures. Vous
devez régler l’horloge:
• à l’installation initiale,
• après une coupure de courant.
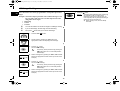
20 cm
audessus
10 cm
derrière
1. Prévoyez un dégagement d’au moins 10 cm autour du
four et de 20 cm au-dessus pour faciliter la ventilation.
10 cm
sur le côté
✉
2. Retirez tout élément d’emballage de l’intérieur du four.
Installez l’anneau de guidage et le plateau.
Vérifiez que le plateau est correctement installé.
1. Pour afficher l’heure
en mode...
24 heures,
12 heures,
3. Installez le four à micro-ondes de façon à pouvoir
accéder à la fiche d'alimentation.
☛
☛
☛
☛
N’oubliez pas de changer l’heure lors du passage de l’heure
d’hiver à celle d’été, et vice-versa.
appuyez sur le
bouton
...
une fois.
deux fois.
2. Sélectionnez l’heure et les minutes en appuyant
respectivement sur les boutons h et min.
N’obstruez jamais les orifices de ventilation, car le four risquerait
de surchauffer et de s’arrêter automatiquement. Vous devrez
alors attendre qu’il ait suffisamment refroidi pour le réutiliser.
Pour votre sécurité personnelle, cet appareil doit être branché sur
une prise murale à 3 broches délivrant une tension de 230 volts
CA, 50 Hz. Si le cordon d’alimentation de l’appareil est
endommagé, il devra être remplacé par un cordon spécial
(références I–SHENG SP022, KDK KKP4819D, MOONSUNG
EP-48E, SAMIL SP-106B, HIGH PROJECT H.P 3 ou
EUROELECTRIC 3410, PENCON (ZD16A) pour l’Israël, SA16
pour l’Afrique du Sud et PENCON (UD13A1) pour le Nigéria, le
Ghana, le Kenya et les Emirats Arabes). Faites effectuer le
remplacement du cordon par un service après-vente agréé par la
marque. La tension d’alimentation doit être respectée. Tout câble
d’extension doit être conforme aux spécifications du cordon
d’alimentation d’origine.
N’installez pas le four dans un environnement chaud ou humide,
par exemple à côté d’un radiateur ou d’un four traditionnel.
Avant d’utiliser votre four pour la première fois, nettoyez les
surfaces intérieures et les joints d’étanchéité à l’aide d’un chiffon
humide.
3. Lorsque l’horloge correcte est affichée, appuyez sur le
bouton
pour démarrer l’horloge.
Résultat: l’heure est affichée en permanence lorsque
vous n’utilisez pas le four.
5
F
tX^Z]umUGGwG]GG{ SGkGZSGYWWYGG]a\`Gwt
F
Problèmes et solutions
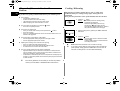
Cuisez et réchauffez un plat par micro-ondes
Si vous êtes confronté à l’un des problèmes énumérés ci-dessous,
essayez les solutions correspondantes.
Suivez les instructions ci-dessous pour cuire ou réchauffer des
aliments. Vérifiez TOUJOURS les réglages de cuisson avant de laisser
les aliments cuire sans surveillance.
Posez le plat au centre du plateau, puis fermez la porte.
◆ Ces phénomènes sont normaux:
• Condensation à l’intérieur du four.
• Flux d’air autour de la porte et du four.
• Réflexion de lumière autour de la porte et du four.
• Vapeur s’échappant du pourtour de la porte et des orifices de ventilation.
◆ Le four ne démarre pas lorsque vous appuyez sur le bouton
• La porte est-elle bien fermée?
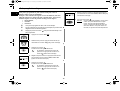
1. Appuyez sur le bouton
.
Résultat: la puissance de cuisson maximale (800 W)
s’affiche par défaut. Réglez le niveau de
puissance approprié en appuyant de
nouveau sur le bouton
jusqu’à ce que la
puissance souhaitée s’affiche. Pour plus de
renseignements, reportez-vous au tableau de
la page suivante.
.
◆ Les aliments ne sont pas du tout cuits.
• Avez-vous sélectionné le temps de cuisson correctement et/ou appuyé
sur le bouton
?
• La porte est-elle bien fermée?
• L’alimentation secteur a-t-elle disjoncté ou le fusible a-t-il fondu à la suite
d’une surcharge de votre prise électrique?
2. Réglez le temps de cuisson en appuyant sur les boutons
10min, 1min et 10s.
◆ Les aliments sont trop ou pas assez cuits.
• Avez-vous indiqué un temps de cuisson correct en fonction du type
d’aliments?
• Avez-vous choisi le niveau de puissance approprié?
3. Appuyez sur le bouton
.
Résultat: l’éclairage du four s’allume, le plateau
commence à tourner et la cuisson démarre.
Lorsqu’elle est terminée, un signal sonore
retentit quatre fois.
◆ Des étincelles et craquements se produisent à l’intérieur du four (arcs
électriques)
• Avez-vous utilisé un plat avec des décorations métalliques?
• Avez-vous laissé une fourchette ou un autre ustensile métallique à
l’intérieur du four?
• Avez-vous mis du papier d’aluminium trop près des parois du four?
☛
✉
◆ Le four provoque des interférences avec des radios ou téléviseurs.
• Une légère interférence peut être provoquée sur un téléviseur ou une
radio lorsque le four fonctionne. C’est normal. Pour remédier à ce
problème, installez le four loin des téléviseurs, radios ou antennes.
• Si le microprocesseur du four détecte une interférence, l’afficheur peut
être réinitialisé. Pour remédier à ce problème, déconnectez le cordon
d’alimentation, puis rebranchez-le. Réglez de nouveau l’horloge.
✉
Si le problème ne peut être résolu à l’aide des instructions cidessus, contactez votre revendeur ou le service après-vente
SAMSUNG le plus proche.
6
Ne mettez jamais le four en route lorsqu’il est vide.
Pour chauffer un plat pendant une courte durée à puissance de
cuisson maximale (800 W), il vous suffit d’appuyer sur le bouton
+30s chaque fois que vous souhaitez ajouter 30 secondes de
cuisson. Le four démarre immédiatement.
tX^Z]umUGGwG^GG{ SGkGZSGYWWYGG]a\`Gwt
Niveaux de puissance
Arrêtez la cuisson
Vous avez le choix parmi les niveaux de puissance ci dessous.
Vous pouvez arrêter la cuisson à tout moment afin d’examiner les
aliments.
Niveau
Puissance
MAXIMUM
MOYEN-ÉLEVÉ
MOYEN
MOYEN-BAS
DÉCONGÉLATION(
BAS
✉
✉
)
1. Pour arrêter la cuisson temporairement, ouvrez la porte.
Résultat: la cuisson s’arrête. Pour redémarrer la
cuisson, refermez la porte et appuyez sur le
bouton
.
800 W
600 W
450 W
300 W
180 W
100 W
2. Pour arrêter la cuisson complètement, appuyez sur le
bouton
.
Résultat: la cuisson s’arrête.
Pour annuler les réglages de cuisson,
appuyez de nouveau sur le bouton ( ).
Les temps de cuisson donnés dans ce mode d’emploi
correspondent aux niveaux de puissance indiqués ci-dessus. Si
vous sélectionnez un niveau de puissance plus élevé, le temps de
cuisson sera plus court.
☛
Vous pouvez également annuler les réglages avant de démarrer la
cuisson en appuyant sur le bouton d’annulation
.
En revanche, si vous sélectionnez un niveau de puissance moins
élevé, le temps de cuisson sera plus long.
Ajustez le temps de cuisson
Vous pouvez augmenter le temps de cuisson en appuyant sur le bouton
+30s chaque fois que vous souhaitez ajouter 30 secondes.
Appuyez sur le bouton +30s chaque fois que vous souhaitez
ajouter 30 secondes.
7
F
tX^Z]umUGGwG_GG{ SGkGZSGYWWYGG]a\`Gwt
F
Réchauffez un plat en mode instantané
Temps pour le réchauffage en mode instantané
Le réchauffage instantané permet de régler automatiquement le temps
de cuisson et de démarrer le réchauffage instantanément sans appuyer
sur le bouton
.
Vous pouvez ajuster le nombre de portions en appuyant autant de fois
que nécessaire sur le bouton de réchauffage instantané approprié.
Le tableau suivant présente les divers programmes de réchauffage en
mode instantané, les quantités, temps de repos et autres
recommandations.
Bouton Aliment
Posez le plat au centre du plateau, puis fermez la porte.
Sélectionnez le type d’aliments et le nombre de portions en
appuyant une ou plusieurs fois sur le bouton de réchauffage
instantané approprié.
Résultat: la cuisson démarre après deux secondes
environ. Lorsqu’elle est terminée
1) un signal sonore retentit quatre fois,
2) un signal de rappel de fin de cuisson est
émis toutes les minutes,
3) l’heure s’affiche de nouveau.
Exemple: appuyez une fois sur le bouton
pour réchauffer une tasse de
café. Pour plus de renseignements, reportez-vous au tableau de la
page suivante.
✉
N’utilisez que des récipients garantis micro-ondes.
Quantité
Temps de Recommandations
repos
Assiette
garnie
(Réfrigérée)
300-350 g
400-450 g
3 min.
Boissons
(café, lait,
thé, eau à
température
ambiante)
150 ml
(1 tasse)
250 ml
(1 bol)
1 à 2 min. Versez la boisson dans une
tasse ou un bol en céramique
sans recouvrir. Placez la tasse
ou le bol au centre du plateau.
Remuez avant et après le temps
de repos.
Plat congelé 300 à 350 g 4 min.
400 à 450 g
8
Mettez les aliments dans une
assiette en céramique et
recouvrez cette dernière d'un
film plastique garanti microondes. Ce programme concerne
des plats composés de trois
aliments différents, tels qu'un
morceau de viande avec de la
sauce, des légumes et des
pommes de terres, des pâtes ou
du riz.
Vérifiez que l'emballage est
garanti micro-ondes, puis percez
le film protecteur. Mettez le plat
dans le four. Ce programme
concerne des plats congelés
composés de trois aliments
différents, tels qu'un morceau de
viande avec de la sauce, des
légumes et des pommes de
terres, des pâtes ou du riz.
tX^Z]umUGGwG`GG{ SGkGZSGYWWYGG]a\`Gwt
Décongelez un plat automatiquement
Temps pour la décongélation automatique
La décongélation automatique vous permet de décongeler des
aliments, tels que de la viande, de la volaille ou du poisson.
Il vous suffit de sélectionner le programme et le poids, le temps de
décongélation et le niveau de puissance étant réglés automatiquement.
Retirez les emballages des aliments avant de commencer la
décongélation.
Placez l'aliment congelé sur le plateau.
Au signal sonore, retournez l'aliment.
Respectez le temps de repos en fin de décongélation.
✉
N’utilisez que des récipients garantis micro-ondes.
Posez le plat congelé au centre du plateau, puis fermez la porte.
1. Appuyez sur le bouton Auto( ).
Résultat: l’indication suivante s’affiche:
(poids)
2. Sélectionnez le poids en appuyant autant de fois que
nécessaire sur le bouton 100g.
Le poids maximal est fixé à 1500 g.
3. Appuyez sur le bouton
.
Résultat:
◆ la décongélation commence,
◆ à mi-parcours, un signal retentit pour que
vous retourniez l’aliment,
◆ appuyez de nouveau sur
pour finir la
décongélation.
✉
Vous pouvez également décongeler des aliments manuellement
en sélectionnant la fonction de cuisson/réchauffage par microondes avec un niveau de puissance de 180 W. Pour plus de
renseignements, reportez-vous à la section intitulée “Cuisez et
réchauffez un plat par micro-ondes”, page 6.
9
Aliment
Quantité
Temps de
repos
Recommandations
Viande
Volaille
Poisson
200 à 1500 g 20 à 60 min. Protégez les extrémités avec du papier
200 à 1500 g 20 à 60 min. d'aluminium. Au signal sonore, retournez
200 à 1500 g 20 à 50 min. l'aliment
F
tX^Z]umUGGwGXWGG{ SGkGZSGYWWYGG]a\`Gwt
Cuisez en plusieurs étapes
F
6. Réglez le temps de cuisson en appuyant autant de fois
que nécessaire sur les boutons 10min, 1min et 10s (cinq
minutes dans l’exemple).
Vous pouvez programmer le four à micro-ondes pour cuire en
plusieurs étapes (trois au maximum).
Exemple: vous souhaitez décongeler et cuire des aliments, sans être
obligé de changer les réglages du four à chaque étape. Vous pouvez
ainsi décongeler et cuire un poisson de 500 g en trois étapes:
• décongélation,
• cuisson I
• cuisson II
✉
✉
Vous pouvez programmer deux, trois ou trois étapes.
✉
N’appuyez pas sur le bouton
pas programmée.
7. Appuyez sur le bouton
.
Résultat: les trois modes (décongélation, cuisson microondes I et II) sont sélectionnés l’un après
l’autre. Selon le mode de décongélation
choisi, un signal peut retentir pour que vous
retourniez l’aliment. Lorsque la cuisson est
terminée, un signal sonore retentit quatre fois.
Si vous choisissez un programme en trois étapes, la première doit
obligatoirement être la décongélation.
tant que la dernière étape n’est
1. Appuyez sur le bouton Auto (
).
2. Sélectionnez le poids en appuyant autant de fois que
nécessaire sur le bouton 100g (500 g dans l’exemple).
3. Appuyez sur le bouton
.
le mode micro-ondes (I) est sélectionné:
;
Si nécessaire, sélectionnez le niveau de
puissance en appuyant de nouveau sur le
bouton
(600 W dans l’exemple).
4. Réglez le temps de cuisson en appuyant autant de fois
que nécessaire sur les boutons 10min, 1min et 10s
(quatre minutes dans l’exemple).
5. Appuyez sur le bouton
.
le mode micro-ondes (II) est sélectionné:
;
Si nécessaire, sélectionnez le niveau de
puissance en appuyant de nouveau sur le
bouton
(450 W dans l’exemple).
10
tX^Z]umUGGwGXXGG{ SGkGZSGYWWYGG]a\`Gwt
Guide des récipients
our cuire des aliments dans le four à micro-ondes, ces dernières
doivent pénétrer la nourriture sans être réfléchies ou absorbées par le
plat utilisé.
Verre
•
✓
•
•
Bocaux
✓
Plats et attaches
pour sacs de
congélation
✗
Risquent de provoquer des arcs
électriques (étincelles) ou du feu.
✓
Pour réchauffer ou cuire avec des
temps de cuisson courts.
✓
Permet d’absorber un excès
d’humidité.
Risquent de provoquer des arcs
électriques (étincelles).
✓
Veillez donc à choisir des récipients garantis four à micro-ondes.
Le tableau suivant énumère différents types de récipients et de plats de
cuisson, en indiquant si et comment ils peuvent être utilisés en mode
micro-ondes.
Récipients
Garantis
Commentaires
micro-ondes
Papier d’aluminium
✓✗
Plat à brunir
✓
Ne dépassez pas huit minutes de
préchauffe.
Céramique et porcelaine
✓
Les récipients en céramique, en terre
cuite et en porcelaine sont
habituellement adaptés à la cuisine au
four à micro-ondes, à condition de ne
pas présenter de décorations
métalliques.
Cartons plastifiés jetables
Emballage “fast-food”
• Gobelets et
barquettes en
polystyrène
• Sachets en papier
ou journaux
• Papier recyclé ou
décorations
métalliques
✓
Certains plats surgelés sont
conditionnés dans ce type
d’emballage.
✓
Permettent de réchauffer des
aliments, mais risquent de se
déformer en cas de surchauffe.
Risquent de brûler.
✗
✗
Métal
•
Peut être utilisé en petites quantités
pour empêcher la surcuisson de
certaines parties. Risque de
provoquer des arcs électriques
(étincelles) si placé trop près des
parois du four ou utilisé en trop grande
quantité.
Papier
• Assiettes,
gobelets,
serviettes
• Papier absorbant
•
Papier recyclé
Plastique
• Barquettes
Risquent de provoquer des arcs
électriques (étincelles).
✗
✓
•
Film plastique
✓
•
Sacs de
congélation
✓✗
Papier sulfurisé ou
paraffiné
✓ : Recommandé
✓✗ :Faire attention
✗ :Peu sûr
11
F
Résistant à la
chaleur
Verres de table
✓
Utilisable, à condition de ne pas
présenter de décorations métalliques.
Utilisables pour réchauffer des
aliments ou des liquides. Du verre fin
peut cependant être fêlé ou brisé par
un changement soudain de
température.
Retirez le couvercle et utilisez
uniquement pour réchauffer.
Surtout les thermoplastiques résistant
à la chaleur. D’autres plastiques
peuvent se déformer ou se décolorer
à hautes températures. N’utilisez pas
de plastique mélaminé.
Permet de conserver l’humidité. Ne
doit pas toucher les aliments. Faites
attention de ne pas vous faire brûler
par la vapeur lorsque vous retirez le
film.
Uniquement des sacs spéciaux pour
cuisson au bain-marie ou au four. Ne
doivent pas être fermés
hermétiquement. Piquez avec une
fourchette, si nécessaire.
Permet de conserver l’humidité et
d’éviter des éclaboussures.
tX^Z]umUGGwGXYGG{ SGkGZSGYWWYGG]a\`Gwt
F
Nettoyez votre four à micro-ondes
Spécifications techniques
Pour empêcher l’accumulation de graisses et de particules d’aliments,
vous devez nettoyer régulièrement les éléments suivants du four à
micro-ondes:
Les descriptions et caractéristiques figurant dans ce mode d’emploi
sont données à titre d’information et sans engagement. Soucieux de la
qualité de ses produits, SAMSUNG se réserve le droit d’effectuer des
modifications sans préavis.
•
•
•
☛
l’intérieur et l’extérieur,
la porte et les joints d’étanchéité,
le plateau et l’anneau de guidage.
Veillez TOUJOURS à ce que les joints de la porte soient propres
et à ce que la porte ferme correctement.
1. Nettoyez l’extérieur avec un chiffon doux et de l’eau savonneuse tiède. Rincez
et séchez.
2. Retirez les éclaboussures ou autres traces tenaces sur les parois ou sur
l’anneau de guidage à l’aide d’une éponge savonneuse. Rincez et séchez.
3. Si votre four est très sale ou si une odeur désagréable se dégage du four,
placez une tasse d’eau citronné sur le plateau et faites-la chauffer pendant dix
minutes à puissance maximale (800 W).
Ne laissez JAMAIS couler d’eau dans les orifices de ventilation.
N’utilisez JAMAIS de produits abrasifs ou de solvants chimiques.
Nettoyez avec un soin tout particulier les joints de la porte, afin
qu’aucune particule:
•
•
M1736N
Source d’alimentation
230V ~ 50 Hz
Puissance absorbée
Micro-ondes
1150 W
Puissance restituée en micro-ondes
100 W / 800 W (IEC-705)
Fréquence de fonctionnement
2450 MHz
Type de magnétron
OM75S(31)
Méthode de refroidissement
Moteur de ventilation
Dimensions (Long. x Haut. x Prof.)
Extérieures
489 x 275 x 361 mm
Cavité du four
306 x 211 x 320 mm
4. Nettoyez le plateau si nécessaire, ce dernier pouvant aller au lave-vaisselle.
✉
Modèle
ne s’accumule,
ne nuise à l’étanchéité de la porte.
12
Capacité
20 litres
Poids
Net
12,5 kg environ
tX^Z]uniUGGwGXGG{ SGkGZSGYWWYGG^aWXGwt
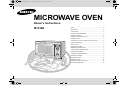
MICROWAVE OVEN
Owner’s Instructions
M1736N
Oven..........................................................................................2
Accessories ...............................................................................2
Control Panel ............................................................................2
Using this Instruction Booklet....................................................3
Safety Precautions ....................................................................3
Installing Your Microwave oven ................................................5
Setting the Time ........................................................................5
What to Do if You are in Doubt or Have a Problem ..................6
Cooking / Reheating..................................................................6
Power Levels.............................................................................7
Stopping the Cooking................................................................7
Adjusting the Cooking Time ......................................................7
Using the Instant Reheat Feature .............................................8
Instant Reheat Settings.............................................................8
Using the Auto Defrost Feature.................................................9
Auto Defrost Settings ................................................................9
Multistage Cooking..................................................................10
Cookware Guide .....................................................................11
Cleaning Your Microwave Oven .............................................12
Technical Specifications..........................................................12
tX^Z]uniUGGwGYGG{ SGkGZSGYWWYGG^aWXGwt
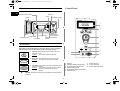
Oven
GB
Control Panel
VENTILATION HOLES
DISPLAY
LIGHT
DOOR
CONTROL PANEL
1
2
ROLLER RING
TURNTABLE
DOOR LATCHES
COUPLER
OPEN DOOR
PUSH BUTTON
3
SAFETY INTERLOCK
HOLES
4
Accessories
5
Depending on the model that you have purchased, you are supplied
with several accessories that can be used in a variety of ways.
8
1. Coupler, already placed over the motor shaft in the
base of the oven.
Purpose: The coupler rotates the turntable.
9
6
7
2. Roller ring, to be placed in the centre of the oven.
Purpose: The roller ring supports the turntable.
1.
2.
3.
4.
5.
6.
3. Turntable, to be placed on the roller ring with the centre
fitting to the coupler.
Purpose: The turntable serves as the main cooking
surface; it can be easily removed for
cleaning.
☛
DO NOT operate the microwave oven without the roller ring and
turntable.
2
DISPLAY
INSTANT REHEAT SELECTION
AUTO DEFROST SELECTION
WEIGHT SELECTION
MICROWAVE MODE SELECTION
TIME SETTING
7. START BUTTON
8. CLOCK SETTING
9. STOP/CANCEL BUTTON
tX^Z]uniUGGwGZGG{ SGkGZSGYWWYGG^aWXGwt
Using this Instruction Booklet
Safety Precautions
You have just purchased a SAMSUNG microwave oven. Your Owner’s
Instructions contain much valuable information on cooking with your
microwave oven:
• Safety precautions
• Suitable accessories and cookware
• Useful cooking tips
At the front of the booklet you will find illustrations of the oven, and
more importantly the control panel, so that you can find the buttons
more easily.
The step-by-step procedures use two different symbols.
Important Safety Instructions.
Read Carefully and keep for future reference.
Before cooking food or liquids in your microwave oven, please check
that the following safety precautions are taken.
☛
✉
Important
Note
1. DO NOT use any metallic cookware in the microwave oven:
• Metallic containers
• Dinnerware with gold or silver trimmings
• Skewers, forks, etc.
Reason: Electric arcing or sparking may occur and may damage the oven.
2. DO NOT heat:
• Airtight or vacuum-sealed bottles, jars, containers
Ex) Baby food jars
• Airtight food.
Ex) Eggs, nuts in shells, tomatoes
Reason: The increase in pressure may cause them to explode.
Tip:
Remove lids and pierce skins, bags, etc.
PRECAUTIONS TO AVOID POSSIBLE EXPOSURE TO
EXCESSIVE MICROWAVE ENERGY
3. DO NOT operate the microwave oven when it is empty.
Reason: The oven walls may be damaged.
Tip:
Leave a glass of water inside the oven at all times.
The water will absorb the microwaves if you accidentally set the
oven going when it is empty.
4. DO NOT cover the rear ventilation slots with cloths or paper.
Reason: The cloths or paper may catch fire as hot air is evacuated from the
oven.
Failure to observe the following safety precautions may result in harmful
exposure to microwave energy.
(a) Under no circumstances should any attempt be made to operate the oven with
the door open or to tamper with the safety interlocks (door latches) or to insert
anything into the safety interlock holes.
(b) Do not place any object between the oven door and front face or allow food or
cleaner residues to accumulate on sealing surfaces. Ensure that the door and
door sealing surfaces are kept clean by wiping after use first with a damp cloth
and then with a soft dry cloth.
(c) Do not operate the oven if it is damaged until it has been repaired by a
qualified microwave service technician trained by the manufacturer.
It is particularly important that the oven door closes properly and that there is
no damage to the:
(1) Door, door seals and sealing surfaces
(2) Door hinges (broken or loose)
(3) Power cable
(d) The oven should not be adjusted or repaired by anyone other than a properly
qualified microwave service technician trained by the manufacturer.
5. ALWAYS use oven gloves when removing a dish from the oven.
Reason: Some dishes absorb microwaves and heat is always transferred
from the food to the dish. The dishes are therefore hot.
6. DO NOT touch heating elements or interior oven walls.
Reason: These walls may be hot enough to burn even after cooking has
finished, even though they do not appear to be so. Do not allow
inflammable materials to come into contact with any interior area of
the oven. Let the oven cool down first.
7. To reduce the risk of fire in the oven cavity:
• Do not store flammable materials in the oven
• Remove wire twist ties from paper or plastic bags
• Do not use your microwave oven to dry newspapers
• If smoke is observed, keep the oven door closed and switch off or
disconnect the oven from the power supply
3
GB
tX^Z]uniUGGwG[GG{ SGkGZSGYWWYGG^aWXGwt
Safety Precautions (continued)
GB
8. Take particular care when heating liquids and baby foods.
• ALWAYS allow a standing time of at least 20 seconds after the oven has
been switched off so that the temperature can equalize.
• Stir during heating, if necessary, and ALWAYS stir after heating.
• Take care when handling the container after heating. You may burn
yourself if the container is too hot.
• A risk of delayed eruptive boiling exists.
• To prevent delayed boiling and possible scalding, you should put a plastic
spoon or glass stick into the beverages and stir before, during and after
heating.
Reason: During the heating of liquids the boiling point can be delayed;
this means that eruptive boiling can start after the container is
removed from the oven. You may scald yourself.
• In the event of scalding, follow these FIRST AID instructions:
* Immerse the scalded area in cold water for at least 10 minutes.
* Cover with a clean, dry dressing.
* Do not apply any creams, oils or lotions.
• NEVER fill the container to the top and choose a container that is wider at
the top than at the bottom to prevent the liquid from boiling over. Bottles
with narrow necks may also explode if overheated.
• ALWAYS check the temperature of baby food or milk before giving it to
the baby.
• NEVER heat a baby’s bottle with the teat on, as the bottle may explode if
overheated.
IMPORTANT SAFETY INSTRUCTIONS
During cooking, you should look into the oven from time to time when food is
being heated or cooked in disposable containers of plastic, paper or other
combustible materials.
IMPORTANT
Young children should NEVER be allowed to use or play with the microwave
oven. Nor should they be left unattended near the microwave oven when it is in
use. Items of interest to children should not be stored or hidden just above the
oven.
9. Be careful not to damage the power cable.
• Do not immerse the power cable or plug in water and keep the power
cable away from heated surfaces.
• Do not operate this appliance if it has a damaged power cable or plug.
10. Stand at arm’s length from the oven when opening the door.
Reason: The hot air or steam released may cause scalding.
11. Keep the inside of the oven clean.
Reason: Food particles or spattered oils stuck to oven walls or floor can
cause paint damage and reduce the efficiency of the oven.
12. You may notice a “Clicking” sound during operation(especially when the oven
is in defrosting).
Reason: This sound is normal when the electrical power output is changing.
13. When the microwave oven is operating without any load, the power will be cut
off automatically for safety. You can operate normally after letting it stand for
over 30 minutes.
4
tX^Z]uniUGGwG\GG{ SGkGZSGYWWYGG^aWXGwt
Installing Your Microwave oven
Setting the Time
Place the oven on a flat, level surface that strong enough to safely bear
the weight of the oven.
Your microwave oven has an inbuilt clock. The time can be displayed
in either the 24-hour or 12-hour notation. You must set the clock:
• When you first install your microwave oven
• After a power failure
20 cm
above
10 cm
behind
10 cm
of the side
1. When you install your oven, Make sure there is adequate
ventilation for your oven by leaving at least 10 cm (4
inches) of space behind, on the sides of the oven and 20
cm (8 inches) of above.
✉
2. Remove all packing materials inside the oven.
Install the roller ring and turntable.
Check that the turntable rotates freely.
1. To display the time
in the...
24-hour notation
12-hour notation
3. This microwave oven has to be positioned so that plug is
accessible.
☛
For your personal safety, plug the cable into a 3-pin, 230 Volt,
50Hz, AC earthed socket. If the power cable of this appliance is
damaged, it must be replaced by a special cable (I-SHENG
SP022, KDK KKP4819D, EUROELECTRIC 3410, SAMIL SP106B, MOONSUNG EP-48E, HIGH PROJECT H.P 3). Contact
your local dealer to have it replaced. The power cable of ISRAEL
is PENCON(ZD16A), S/AFRICA APEX LEADS SA16 and
NIGERIA, GHANA, KENYA and U.A.E is PENCON(UD13A1).
☛
Do not install the microwave oven in hot or damp surroundings
like next to a traditional oven or radiator. The power supply
specifications of the oven must be respected and any extension
cable used must be of the same standard as the power cable
supplied with the oven. Wipe the interior and the door seal with a
damp cloth before using your microwave oven for the first time.
Then press the
button...
Once
Twice
2. Set the hour with the h button and the minutes with the
min button.
Never block the air vents as the oven may overheat and
automatically switch itself off. It will remain inoperable until it has
cooled sufficiently.
☛
Do not forget to reset the clock when you switch to and from
summer and winter time.
3. When the right time is displayed, press the
button
again to start the clock.
Result :
The time is displayed whenever you are not
using the microwave oven
5
GB
tX^Z]uniUGGwG]GG{ SGkGZSGYWWYGG^aWXGwt
What to Do if You are in Doubt or Have a
Problem
Cooking / Reheating
The following procedure explains how to cook or reheat food.
ALWAYS check your cooking settings before leaving the oven
unattended.
First, place the food in the centre of the turntable and close the door.
GB
If you have any of the problems listed below try the solutions given.
◆ This is normal.
• Condensation inside the oven
• Air flow around the door and outer casing
• Light reflection around the door and outer casing
• Steam escaping from around the door or vents
◆ The oven does not start when you press the
• Is the door completely closed?
1. Press the
Result :
button.
◆ The food is not cooked at all
• Have you set the timer correctly and/or pressed the
button?
• Is the door closed?
• Have you overloaded the electric circuit and caused a fuse to blow or a
breaker to be triggered?
2. Set the cooking time by pressing the 10min. 1min and
10s button.
3. Press the
Result :
◆ The food is either overcooked or undercooked
• Was the appropriate cooking length set for the type of food?
• Was an appropriate power level chosen?
◆ Sparking and cracking occur inside the oven (arcing)
• Have you used a dish with metal trimmings?
• Have you left a fork or other metal utensil inside the oven?
• Is aluminium foil too close to the inside walls?
☛
✉
◆ The oven causes interference with radios or televisions
• Slight interference may be observed on televisions or radios when the
oven is operating. This is normal.To solve this problem, install the oven
away from televisions, radios and aerials.
• If interference is detected by the oven’s microprocessor, the display may
be reset. To solve this problem, disconnect the power plug and reconnect
it. Reset the time.
✉
button.
The 800W (maximum cooking power)
indications are displayed:
Select the appropriate power level by
pressing the
button again until the
corresponding wattage is displayed. Refer to
the power level table on the next page.
If the above guidelines do not enable you to solve the problem,
contact your local dealer or SAMSUNG after-sales service.
6
button.
The oven light comes on and the turntable
starts rotating.
Cooking starts and when it has finished the
oven beeps four times.
Never switch the microwave oven on when it is empty.
If you wish to heat a dish for a short period of time at maximum
power (800W), simply press the +30s button once for each 30
seconds of cooking time. The oven starts immediately.
tX^Z]uniUGGwG^GG{ SGkGZSGYWWYGG^aWXGwt
Power Levels
Stopping the Cooking
You can choose among the power levels below.
You can stop cooking at any time to check the food.
Power Level
Output
HIGH
MEDIUM HIGH
MEDIUM
MEDIUM LOW
DEFROST( )
LOW
800 W
600 W
450 W
300 W
180 W
100 W
✉
✉
1. To stop temporarily;
Open the door.
Result :
Cooking stops. To resume cooking, close the
door and press
again.
2. To stop Completely;
Press the
button.
Result :
The cooking stops.
If you wish to cancel the cooking settings,
press the Cancel( ) button.
If you select higher power level, the cooking time must be
decreased.
☛
If you select lower power level, the cooking time must be
increased.
You can cancel any setting before starting cooking by simply
pressing Cancel ( ) button.
Adjusting the Cooking Time
You can increase the cooking time by pressing the +30s button once
for each 30 seconds to be added.
Press the +30s button once for each 30 seconds to be
added.
7
GB
tX^Z]uniUGGwG_GG{ SGkGZSGYWWYGG^aWXGwt
GB
Using the Instant Reheat Feature
Instant Reheat Settings
With the Instant Reheat feature, the cooking time is set automatically
and you do not have to press the button. You can adjust the number
of servings by pressing the appropriate Instant Reheat button the
required number of times.
First, place the food in the centre of the turntable and close the door.
The following table presents the various Instant Reheat Programmes,
quantities, standing times and appropriate recommendations.
Button Food
Press the Instant Reheat button which you want the
required number of times.
Cooking starts after about two seconds.
Result :
When it has finished:
1) The oven beeps four times.
2) The end reminder signal will beep 3 times
(once every minute).
3) The current time is displayed again.
Example: Press the
button once times to reheat one cups of coffee.
Refer to the table on the side page.
✉
Use only recipients that are microwave-safe.
8
Serving Size
Standing
Time
Recommendations
Ready Meal
(chilled)
300-350 g
400-450 g
3 min.
Put on a ceramic plate and
cover it with microwave cling
film. This programme is suitable
for meals consisting of 3
components (e.g. meat with
sauce, vegetables and side
dish like potatoes, rice or
pasta).
Drinks
(coffee, milk,
tea, water
with room
temperature)
150 ml
(1 cup)
250 ml
(1 mug)
1- 2 min. Pour into a ceramic cup and
reheat uncovered.
Place cup(150 ml) or mug(250
ml) in the centre of turntable.
Stir carefully before and after
standing time.
Ready Meal
(frozen)
300 - 350 g
400 - 450 g
4 min.
Take frozen ready meal and
check if dish is suitable for
microwave. Pierce film of ready
meal. Put the frozen ready meal
in the centre. This programme
is suitable for frozen ready
meals consisting of 3
components (e.g. meat with
sauce, vegetables and a side
dish like potatoes, rice or
pasta).
tX^Z]uniUGGwG`GG{ SGkGZSGYWWYGG^aWXGwt
Using the Auto Defrost Feature
Auto Defrost Settings
The Auto Defrost feature enables you to defrost meat, poultry or fish.
The defrost time and power level are set automatically. You simply
select the programme and the weight.
Remove all kinds of packaging material before defrosting.
Place the frozen foods on a turntable.
Turn the food over when the oven beeps.
Keep the corresponding standing time after Auto Defrosting has
finished.
✉
Use only dishes that are microwave-safe.
First, place the frozen food in the centre of the turntable and close the
door.
1. Press the Auto( ) button.
Result :
The following indication is displayed:
2. Select the food weight by pressing the 100g button.
It is possible to set up to a maximum of 1500g.
3. Press
Result :
button.
◆ Defrosting begins.
◆ The oven beeps halfway through
defrosting to remind you to turn the food
over.
◆ Press
again to finish defrosting.
✉
You can also defrost food manually. To do so, select the
microwave cooking/reheating function with a power level of
180W. Refer to the section entitled “ Cooking/Reheating” on page
6 for further details.
9
Food
Portion
Standing
Time
Meat
Poultry
Fish
200-1500g 20-60 min
200-1500g 20-60 min
200-1500g 20-50 min
Recommendation
Shield the edges with aluminium foil.
Turn the food over when the oven
beeps.
GB
tX^Z]uniUGGwGXWGG{ SGkGZSGYWWYGG^aWXGwt
Multistage Cooking
GB
Your microwave oven can be programmed to cook food in up to three
stages.
7. Press the
Result :
Example: You wish to defrost food and cook it without having to reset
the oven after each stage. You can thus defrost and cook a
500g fish in three stages:
• Defrosting
• Cook I
• Cook II
✉
✉
✉
You can set between two and three stages in multistage cooking.
If you set three stage, the first stage must be defrosting.
Don’t press
button until you’ve set the final stage.
1. Press the Auto (
) button.
2. Set the weight by pressing the 100g buttons the
appropriate number of times(500g in the example).
3. Press the
button.
The microwave mode(I):
;
if necessary, set the power level by pressing the
button again one or more times.(600W in
the example)
4. Set the cooking time by pressing the 10min, 1min and 10s
buttons the appropriate number of times (4 minutes in the
example).
5. Press the
button.
The microwave mode(II):
;
if necessary, set the power level by pressing the
button again one or more times.(450W in
the example)
6. Set the cooking time by pressing the 10min, 1min and 10s
buttons the appropriate number of times (5 minutes in the
example).
10
button.
The three modes [defrosting and cooking(I,II)]
are selected on after. According to the
defrosting mode that you have chosen, the
oven may beep half way through defrosting to
remind you to turn the food over.
◆ When cooking is over, the oven beeps
four times.
tX^Z]uniUGGwGXXGG{ SGkGZSGYWWYGG^aWXGwt
Cookware Guide
To cook food in the microwave oven, the microwaves must be able to
penetrate the food, without being reflected or absorbed by the dish
used.
Care must therefore be taken when choosing the cookware. If the
cookware is marked microwave-safe, you do not need to worry.
The following table lists various types of cookware and indicates
whether and how they should be used in a microwave oven.
Cookware
MicrowaveSafe
Comments
Aluminium foil
✓✗
Can be used in small quantities to
protect areas against overcooking.
Arcing can occur if the foil is too close
to the oven wall or if too much foil is
used.
Browning plate
✓
Do not preheat for more than eight
minutes.
China and earthenware
✓
Porcelain, pottery, glazed earthenware
and bone china are usually suitable,
unless decorated with a metal trim.
Disposable polyester
cardboard dishes
✓
Some frozen foods are packaged in
these dishes.
✓
✗
Can be used to warm food.
Overheating may cause the
polystyrene to melt.
May catch fire.
✗
May cause arcing.
✓
Can be used, unless decorated with a
metal trim.
Can be used to warm foods or liquids.
Delicate glass may break or crack if
heated suddenly.
Must remove the lid. Suitable for
warming only.
Fast-food packaging
• Polystyrene cups
containers
•
•
Paper bags or
newspaper
Recycled paper or
metal trims
Glassware
Glassware
• Oven-to-table
ware
• Fine glassware
•
Metal
•
•
✓
Glass jars
✓
Dishes
Freezer bag twist
ties
✗
✗
Paper
•
•
Plates, cups,
napkins and
Kitchen paper
Recycled paper
Plastic
• Containers
11
✗
May cause arcing.
✓
Particularly if heat-resistant
thermoplastic. Some other plastics
may warp or discolour at high
temperatures. Do not use Melamine
plastic.
Can be used to retain moisture.
Should not touch the food. Take care
when removing the film as hot steam
will escape.
Only if boilable or oven-proof. Should
not be airtight. Prick with a fork, if
necessary.
Cling film
✓
•
Freezer bags
✓✗
✓ :Recommended
✓✗ :Use Caution
✗ :Unsafe
May cause arcing or fire.
For short cooking times and warming.
Also to absorb excess moisture.
•
Wax or grease-proof paper
GB
✓
✓
Can be used to retain moisture and
prevent spattering.
tX^Z]uniUGGwGXYGG{ SGkGZSGYWWYGG^aWXGwt
GB
Cleaning Your Microwave Oven
Technical Specifications
The following parts of your microwave oven should be cleaned
regularly to prevent grease and food particles from building up:
SAMSUNG strives to improve its products at all times. Both the design
specifications and these user instructions are thus subject to change
without notice.
•
•
•
☛
Inside and outside surfaces
Door and door seals
Turntable and Roller rings
ALWAYS ensure that the door seals are clean and the door
closes properly.
1. Clean the outside surfaces with a soft cloth and warm, soapy water. Rinse and
dry.
2. Remove any splashes or stains on the inside surfaces or on the roller ring with
a soapy cloth. Rinse and dry.
3. To loosen hardened food particles and remove smells, place a cup of diluted
lemon juice on the turntable and heat for ten minutes at maximum power.
4. Wash the dishwasher-safe plate whenever necessary.
✉
DO NOT spill water in the vents. NEVER use any abrasive
products or chemical solvents. Take particular care when
cleaning the door seals to ensure that no particles:
•
•
Accumulate
Prevent the door from closing correctly
12
Model
M1736N
Power source
230V ~ 50 Hz
Power consumption
Microwave
1150 W
Output power
100 W / 800 W (IEC-705)
Operating frequency
2450 MHz
Magnetron
OM75S(31)
Cooling method
Cooling fan motor
Dimensions (W x H x D)
Outside
Oven cavity
489 x 275 x 361 mm
306 x 211 x 320 mm
Volume
20 liter
Weight
Net
12.5 kg approx