1
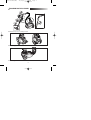
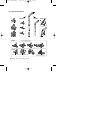
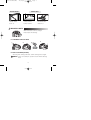
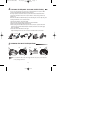
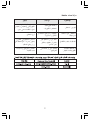
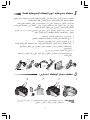
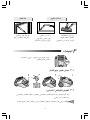
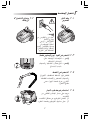
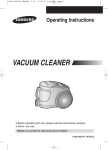
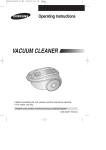
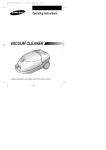
DJ68-00341C(EN) 12/28/06 6:01 AM Page 1 Operating Instructions VACUUM CLEANER ❈ Before operating this unit, please read the instructions carefully. ❈ For indoor use only. Register your product at www.samsung.com/register DJ68-00341C REV(0.5) DJ68-00341C(EN) 12/28/06 6:01 AM Page 2 IMPORTANT SAFEGUARDS 1. Read all instructions carefully. Before switching on, make sure that the voltage of your electricity supply is the same as that indicated on the rating plate on the bottom of the cleaner. 2. WARNING: Do not use the vacuum cleaner when rug or floor is wet. Do not use to suck up water. 3. This appliance is not intended for use by persons (including children) with reduced physical, sensory or mental capabilities, or lack of experience and knowledge, unless they have been given supervision or instruction concerning use of the appliance by a person responsible for their safety. Children should be supervised to ensure that they do not play with the appliance. 4. Do not use the vacuum cleaner without a dust bag. Replace the dust bag before it is full in order to maintain the best efficiency. 5. Do not use the vacuum cleaner to pick up matches, live ashes or cigarette butts. Keep the vacuum cleaner away from stoves and other heat sources. Heat can deform and discolour the plastic parts of the unit. 6. Avoid picking up hard, sharp objects with the vacuum cleaner as they may damage the cleaner parts. Do not stand on the hose assembly. Do not put a weight on the hose. Do not block the suction or the exhaustion part. 7. Switch the vacuum cleaner off at the machine before unplugging from the electrical outlet. Do not pull on the cord to disconnect the plug from the electrical outlet. Ensure that it is disconnected before attending to the filter. 8. The plug must be removed from the socket out-let before cleaning or maintaining the appliance. 9. The use of an extension cord is not recommended. 10. If your vacuum cleaner is not operating correctly, switch off the power supply and consult an authorized service agent. 11. If the supply cord is damaged, it must be replaced by the manufacturer or its service agent or a similarly qualified person in order to avoid a hazard. 12. The vacuum cleaner is provided with a self-resetting thermal cut-out which automatically shuts off on over-heating. Overheating can be caused by blockage in the filter, nozzle, tube or hose. After removing the cause and allowing the motor to cool, the vacuum cleaner will automatically restart. 1 DJ68-00341C(EN) 12/28/06 6:01 AM Page 3 1 ASSEMBLING THE CLEANER OPTION OPTION OPTION ▲ Features may vary according to model. ▲ For storage, park the floor nozzle. ▲ Tool storage 2 DJ68-00341C(EN) 12/28/06 6:01 AM Page 4 2 OPERATING YOUR CLEANER 2-1 POWER CORD 2-2 ON/OFF SWITCH NOTE : When removing the plug from the socket, please take care to grasp the plug, not the cord in order to avoid undue stress. 2-3 POWER CONTROL(VOLUME TYPE ONLY) MIN = For delicate fabrics, e.g. net curtains. MAX = For hard floors and heavily soiled carpets. 2-4 SUCTION CONTROL To reduce suction for cleaning draperies, small rugs and other light fabrics, slide the air vent until the hole is open. 2-5 USING THE BLOWER Located on the left rear side of the cleaner. 1) Disconnect the hose from the body of the cleaner. 2) Connect the hose clamper to the blow hole. 3 MIN MAX DJ68-00341C(EN) 12/28/06 6:01 AM Page 5 2-6 USING FLOOR TOOLS OPTION OPTION OPTION Floor Nozzle Dusting Crevice OPTION Detach transparent drum cover for easy cleaning. OPTION Blanket brush Bedclothes or Blanket ▲ Features may vary according to model. 4 Cut off pet hairs or threads surrounding brush by using scissors. DJ68-00341C(EN) 12/28/06 6:01 AM DUSTING BRUSH - Dusting brush for furniture. shelves, books, etc. Page 6 CREVICE TOOL - Crevice tool for radiators, crevices, corners, between cushions. - For efficiency. clean Floor Nozzle with Crevice Tool. 3 INDICATOR LIGHTS When the indicator color has changed Please replace the dust bag. 3-1 CHANGING THE DUST BAG 1 2 3 4 3-2 FOR CLOTH BAG (OPTION) After using, if the cloth bag is full of dust, clean the cloth bag and use it again. WARNING : Please do not attempt to operate the cleaner without a dust bag fitted. 5 DJ68-00341C(EN) 12/28/06 6:01 AM Page 7 4 CYCLONIC FILTER(ONLY CYCLONIC FILTER TYPES) You can use a dust bag in your cleaner for a long time thanks to the Cyclonic Filter system and it maintain the maximum cleaning efficiency. The larger particle of dust filtered from Cyclonic Filter remain in Dust Barrel when suctioned air and dust revolves in the Cyclonic Filter. So the dust bag contains only smaller ones. When the Dust Barrel is filled with dust up to the indicating line, it needs disposing and cleaning. Dust Barrel can be cleaned in water. 1.Turn the Dust Barrel to the left and pull it. 2.Disconnect the Cyclonic Filter from extension wand and handle. 3.Remove thread and hair tangled around the net. 4.After cleaning the Dust Barrel and Cyclonic Filter,connect the Cyclonic Filter with extension wand and handle(washed part should be dried in the shade throughly before assembling). 5.Push and turn the Dust Barrel to the right. Adjust indicating marks each other carved on Dust Barrel and Cyclonic Filter. CYCLONIC FILTER CREVICE TOOL DUST BARREL 5 CLEANING THE INLET FILTER(OPTION) 1 2 3 4 NOTE : Do not allow the filter to become clogged as this may cause power reduction or may damage the motor. 6 DJ68-00341C(EN) 12/28/06 6:01 AM Page 8 - IF YOU HAVE A PROBLEM PROBLEM CAUSE REMEDY Motor does not start. No power supply. Thermal cut-out. Suction force is gradually decreasing. Nozzle, suction hose or tube is blocked. Cord does not rewind fully. Check that the cord is not twisted or wound unevenly. Pull the cord out 2-3m and push down the cord rewind button. Vacuum cleaner does not pick up dirt. Crack or hole in hose. Check hose and replace if required. 7 Check cable, plug and socket.Leave to cool. Remove the object. إذا ﺣﺪﺛﺖ ﻣﺸﻜﻠﺔاﳌﺸﻜﻼت اﻷﺳﺒﺎب اﳊﻠﻮل اﳌﻮﺗﻮر ﻻ ﻳﻌﻤﻞ. ﻻ ﻃﺎﻗﺔ ﻛﻬﺮﺑﺎﺋﻴﺔ. اﻧﻘﻄﻌﺖ اﻟﻜﻬﺮﺑﺎء. اﻓﺤﺺ ﺳﻠﻚ اﻟﺘﻴﺎر اﻟﻜﻬﺮﺑﺎﺋﻲ واﻟﻘﺎﺑﺲ واﳌﻘﺒﺲ. اﺗﺮك اﳌﻜﻨﺴﺔ ﺣﺘﻰ ﺗﺒﺮد. اﻧﺨﻔﺎض ﻗﻮة اﻟﺸﻔﻂ ﺗﺪرﻳﺠﻴًﺎ. اﻟﻔﻮﻫﺔ أو ﺧﺮﻃﻮم اﻟﺸﻔﻂ أو اﻷﻧﺒﻮب ﻣﺴﺪودة. أزل اﻟﻌﺎﺋﻖ. اﻟﺴﻠﻚ ﻻ ﻳﻠﻒ ﺑﺎﻟﻜﺎﻣﻞ. ﺗﺄﻛﺪ ﻣﻦ أن اﻟﺴﻠﻚ ﻏﻴﺮ ﻣﻠﺘﻮ أو ﻣﻠﻔﻮف ﺑﺸﻜﻞ ﻏﻴﺮ ﻣﺴﺘﻮ. اﺳﺤﺐ اﻟﺴﻠﻚ إﻟﻰ اﳋﺎرج ﺑﻄﻮل ﻣﺘﺮ ٣ -٢واﺿﻐﻂ ﻋﻠﻰ زر إرﺟﺎع اﻟﺴﻠﻚ. ﻻ ﺗﻠﺘﻘﻂ اﳌﻜﻨﺴﺔ اﻟﻜﻬﺮﺑﺎﺋﻴﺔ اﻟﻐﺒﺎر. ﻫﻨﺎك ﺷﻖ أو ﻓﺘﺤﺔ ﻓﻲ اﳋﺮﻃﻮم. اﻓﺤﺺ اﳋﺮﻃﻮم واﺳﺘﺒﺪﻟﻪ ﻋﻨﺪ اﳊﺎﺟﺔ. ٧ ٤ ﻣﺼﻔﺎة ﻣﺨﺮوﻃﻴﺔ )ﻧﻮع اﳌﺼﻔﺎة اﺨﻤﻟﺮوﻃﻴﺔ ﻓﻘﻂ( ﳝﻜﻨﻚ اﺳﺘﺨﺪام ﻛﻴﺲ ﺟﻤﻊ ﻏﺒﺎر ﻓﻲ اﳌﻜﻨﺴﺔ اﻟﻜﻬﺮﺑﺎﺋﻴﺔ ﳌﺪة ﻃﻮﻳﻠﺔ وذﻟﻚ ﺑﻔﻀﻞ ﻧﻈﺎم اﳌﺼﻔﺎة اﺨﻤﻟﺮوﻃﻴﺔ وﻫﺬه ﺗﺘﺴﻢ ﺑﺄﻗﺼﻰ ﻛﻔﺎءة ﻟﻠﺘﻨﻈﻴﻒ. اﳉﺰﺋﻴﺎت اﻷﻛﺒﺮ ﻣﻦ اﻟﻐﺒﺎر اﻟﺬي ﲤﺖ ﺗﺼﻔﻴﺘﻬﺎ ﻣﻦ ﺧﻼل اﳌﺼﻔﺎة اﺨﻤﻟﺮوﻃﻴﺔ ﺗﺒﻘﻰ ﻓﻲ وﻋﺎء اﻟﻐﺒﺎر ﻋﻨﺪ اﻣﺘﺼﺎص اﻟﻬﻮاء وﻳﺪور اﻟﻐﺒﺎر ﻓﻲ اﳌﺼﻔﺎة اﺨﻤﻟﺮوﻃﻴﺔ. ﻓﻜﻴﺲ ﺟﻤﻊ اﻟﻐﺒﺎر ﻳﺤﺘﻮي ﻋﻠﻰ اﻟﻐﺒﺎر اﻷﺻﻔﺮ ﻓﻘﻂ. ﻋﻨﺪ اﻣﺘﻼء وﻋﺎء اﻟﻐﺒﺎر ﺑﺎﻟﻐﺒﺎر ﺣﺘﻰ ﻳﺼﻞ إﻟﻰ اﳌﺴﺘﻮى اﶈﺪد .ﻻ ﺑﺪ ﻣﻦ ﺗﻔﺮﻳﻎ اﻟﻐﺒﺎر واﻟﺘﻨﻈﻴﻒ ،ﳝﻜﻨﻚ ﺗﻨﻈﻴﻒ وﻋﺎء اﻟﻐﺒﺎر ﺑﺎﳌﺎء. .١ﻗﻢ ﺑﺘﺪوﻳﺮ وﻋﺎء اﻟﻐﺒﺎر ﻟﻠﻴﺴﺎر واﺳﺤﺒﻪ. .٢اﻧﺰع اﳌﺼﻔﺎة اﺨﻤﻟﺮوﻃﻴﺔ ﻣﻦ ﻋﺼﺎ اﻻﺳﺘﻄﺎﻟﺔ واﳌﻘﺒﺾ. .٣اﻧﺰع اﳋﻴﻮط واﻟﺸﻌﺮ اﳌﺘﺸﺎﺑﻜﺔ ﺣﻮل اﻟﺸﺒﻜﺔ. .٤ﺑﻌﺪ ﺗﻨﻈﻴﻒ وﻋﺎء اﻟﻐﺒﺎر واﳌﺼﻔﺎة اﺨﻤﻟﺮوﻃﻴﺔ ،ﺻﻞ اﳌﺼﻔﺎة اﺨﻤﻟﺮوﻃﻴﺔ ﺑﻌﺼﺎ اﻻﺳﺘﻄﺎﻟﺔ واﳌﻘﺒﺾ )ﻳﺠﺐ ﲡﻔﻴﻒ اﳉﺰء اﳌﻐﺴﻮل ﻓﻲ اﻟﻈﻞ ﲤﺎﻣًﺎ ﻗﺒﻞ اﻟﺘﺠﻤﻴﻊ(. .٥أدﻓﻊ وﻋﺎء اﻟﻐﺒﺎر ﻟﻠﻴﻤﲔ ﻣﻊ ﺗﺪوﻳﺮه. ﻗﻢ ﺑﻀﺒﻂ ﻋﻼﻣﺎت اﻟﺘﺄﺷﻴﺮ اﳌﻨﻘﻮش ﻛﻞ ﻣﻨﻬﺎ ﻋﻠﻰ وﻋﺎء اﻟﻐﺒﺎر واﳌﺼﻔﺎة اﺨﻤﻟﺮوﻃﻴﺔ. اﳌﺼﻔﺎة اﺨﻤﻟﺮوﻃﻴﺔ أداة ذات ﺷﻘﻮق ٥ وﻋﺎء اﻟﻐﺒﺎر ﺗﻨﻈﻴﻒ ﻣﺪﺧﻞ اﳌﺼﻔﺎة )اﺧﺘﻴﺎري( ٣ ٢ ١ ﻣﻼﺣﻈﺔ: ٤ ﻻ ﺗﺘﺮك اﳌﺼﻔﺎة ﺣﺘﻰ ﺗﺼﺒﺢ ﻣﻠﻴﺌﺔ ﺑﺎﻟﻐﺒﺎر ﻷن اﻷﻣﺮ ﻗﺪ ﻳﺆدي إﻟﻰ اﻧﺨﻔﺎض اﻟﻘﻮة أو إﺣﺪاث اﻟﻀﺮر ﺑﺎﳌﻮﺗﻮر. ٦ أداة اﻟﻐﺒﺎر أداة ذات ﺷﻘﻮق ﻣﻦ أﺟﻞ اﻟﺘﻨﻈﻴﻒاﻟﻔﻌﺎل ،ﻧﻈﻒ ﻓﻮﻫﺔ اﻷرض ﺑﺄداة ذات اﻟﺸﻘﻮق. ٣ - أداة ذات ﺷﻘﻮق ﻟﻠﺮداﻳﺎﺗﻴﺮ واﻟﺸﻘﻮق واﻟﺰواﻳﺎ وﺑﲔ اﻟﺴﺘﺎﺋﺮ. ﻓﺮﺷﺎة ﻏﺒﺎر ﻟﻸﺛﺎثواﻷرﻓﻒ واﻟﻜﺘﺐ ،إﻟﺦ. اﳌﺆﺷﺮات ﻋﻨﺪ ﲢﻮﻳﻞ ﻟﻮن اﳌﺆﺷﺮ ،ﻳﺮﺟﻰ اﺳﺘﺒﺪال ﻛﻴﺲ ﺟﻤﻊ اﻟﻐﺒﺎر. ٣-١ﺗﺒﺪﻳﻞ ﻛﻴﺲ ﺟﻤﻊ اﻟﻐﺒﺎر ١ ٣ ٢ ٤ ٣-٢ﻟﻠﻜﻴﺲ اﻟﻘﻤﺎﺷﻲ )اﺧﺘﻴﺎري( ﺑﻌﺪ اﻻﺳﺘﺨﺪام ،إذا اﻣﺘﻸ اﻟﻜﻴﺲ اﻟﻘﻤﺎﺷﻲ ﺑﺎﻟﻐﺒﺎر ،ﻧﻈﻒ اﻟﻜﻴﺲ اﻟﻘﻤﺎﺷﻲ واﺳﺘﺨﺪﻣﻪ ﻣﺮة أﺧﺮى. ﲢﺬﻳﺮات :ﻳﺮﺟﻰ ﻋﺪم ﻣﺤﺎوﻟﺔ ﺗﺸﻐﻴﻞ اﳌﻜﻨﺴﺔ ﺑﺪون ﺗﺮﻛﻴﺐ ﻛﻴﺲ ﺟﻤﻊ اﻟﻐﺒﺎر. ٥ ٢-٦أدوات اﻷرﺿﻴﺔ اﺧﺘﻴﺎري اﺧﺘﻴﺎري اﺧﺘﻴﺎري ﻓﻮﻫﺔ اﻷرض اﻟﻐﺒﺎر ﺷﻘﻮق اﻓﺼﻞ ﻏﻄﺎء اﻷﺳﻄﻮاﻧﺔ اﻟﺸﻔﺎﻓﺔ وذﻟﻚ ﻟﺴﻬﻮﻟﺔ اﻟﺘﻨﻈﻴﻒ. اﺧﺘﻴﺎري اﺧﺘﻴﺎري اﻗﻄﻊ ﺷﻌﺮ اﳊﻴﻮاﻧﺎت أو اﳋﻴﻮط اﶈﻴﻄﺔ ﺑﺎﻟﻔﺮﺷﺎة ﺑﺎﺳﺘﺨﺪام اﳌﻘﺺ أﻏﻄﻴﺔ اﻟﺴﺮﻳﺮ أو اﻟﺒﻄﺎﻧﻴﺔ ﺗﺨﺘﻠﻒ اﳌﺰاﻳﺎ ﺣﺴﺐ ﻣﻮدﻳﻞ اﳉﻬﺎز. ٤ ﻓﺮﺷﺎة اﳊﺮاﻟﺒﻄﺎﻧﻴﺔ B ٢ ﺗﺸﻐﻴﻞ اﳌﻜﻨﺴﺔ ٢-١ﺳﻠﻚ اﻟﺘﻴﺎر اﻟﻜﻬﺮﺑﻲ ٢-٢ﻣﻔﺘﺎح اﻟﺘﺸﻐﻴﻞ / اﻹﻳﻘﺎف ﻣﻼﺣﻈﺔ : ﻋﻨﺪ ﻧﺰع اﻟﻘﺎﺑﺲ ﻣﻦ ﻣﺨﺮج اﻟﺘﻴﺎر اﻟﻜﻬﺮﺑﺎﺋﻲ ،ﻳﺮﺟﻰ اﺗﺨﺎذ اﳊﻴﻄﺔ ﺑﺄن ﲤﺴﻚ ﺑﺎﻟﻘﺎﺑﺲ وﻟﻴﺲ اﻟﺴﻠﻚ وذﻟﻚ ﻟﺘﺠﻨﺐ اﻟﻀﻐﻂ ﻏﻴﺮ اﻟﻼزم. ٢-٣اﻟﺘﺤﻜﻢ ﻓﻲ اﻟﻘﻮة )ﻧﻮع اﳌﺴﺘﻮى ﻓﻘﻂ( اﻷدﻧﻰ = ﻟﻸﻗﻤﺸﺔ اﻟﺮﻗﻴﻘﺔ ﻣﺜﻞ، اﻟﺴﺘﺎﻳﺮ اﳌﺸﺒﻜﺔ اﻷﻗﺼﻰ = ﻟﻸرﺿﻴﺎت اﻟﺼﻠﺒﺔ واﻟﺴﺠﺎد ﺷﺪﻳﺪ اﻻﺗﺴﺎخ ٢-٤اﻟﺘﺤﻜﻢ ﻓﻲ اﻟﺸﻔﻂ ﳋﻔﺾ ﻗﻮة اﻟﺸﻔﻂ ﻟﺘﻨﻈﻴﻒ اﻷﺟﻮاخ واﻟﺴﺠﺎد اﻟﺼﻐﻴﺮ واﻷﻗﻤﺸﺔ اﳋﻔﻴﻔﺔ اﻷﺧﺮى ،ﺣﺮك ﻓﺘﺤﺔ اﻟﻬﻮاء ﺣﺘﻰ ﻳﻔﺘﺢ اﻟﺜﻘﺐ. ٢-٥اﺳﺘﺨﺪام ﻓﻮﻫﺔ ﻃﺮد اﻟﻐﺒﺎر ﺗﻮﺟﺪ ﻋﻠﻰ ﻳﺴﺎر اﳉﺎﻧﺐ اﳋﻠﻔﻲ ﻣﻦ اﳌﻜﻨﺴﺔ. (١أﻓﺼﻞ اﳋﺮﻃﻮم ﻋﻦ ﻫﻴﻜﻞ اﳌﻜﻨﺴﺔ. (٢ﺻﻞ ﻣﺸﺒﻚ اﳋﺮﻃﻮم ﺑﻔﺘﺤﺔ اﻟﻄﺮد. ٣ MIN MAX ١ ﲡﻤﻴﻊ اﳌﻜﻨﺴﺔ اﺧﺘﻴﺎري اﺧﺘﻴﺎري اﺧﺘﻴﺎري B ﺗﺨﺘﻠﻒ اﳌﺰاﻳﺎ ﺣﺴﺐ ﻣﻮدﻳﻞ اﳉﻬﺎز. B ﻟﻠﺤﻔﻆ ،أوﻗﻒ اﳉﻬﺎز وﻓﻮﻫﺘﻪ ﻟﻸرض. B ﺧﺰان اﻷدوات. ٢ اﺣﺘﻴﺎﻃﺎت أﻣﺎن ﻫﺎﻣﺔ .١أﻗﺮأ ﻛﺎﻓﺔ اﻹرﺷﺎدات ﺑﻌﻨﺎﻳﺔ .وﻗﺒﻞ ﺗﺸﻐﻴﻞ اﳉﻬﺎز ،ﺗﺄﻛﺪ ﻣﻦ أن اﳉﻬﺪ اﻟﻜﻬﺮﺑﻲ )اﻟﻔﻮﻟﺘﻴﺔ( اﳌﻮﺟﻮد ﲟﺰود اﻟﻜﻬﺮﺑﺎء اﳋﺎص ﺑﻚ ﻫﻮ ﻧﻔﺲ اﳉﻬﺪ اﻟﻜﻬﺮﺑﻲ اﳌﺬﻛﻮر ﻋﻠﻰ ﻟﻮﺣﺔ اﻟﺘﺼﻨﻴﻒ اﳌﻮﺟﻮدة ﻋﻠﻰ اﳉﺰء اﻟﺴﻔﻠﻲ ﻣﻦ اﳌﻜﻨﺴﺔ. .٢ ﲢﺬﻳﺮ:ﻻ ﺗﻘﻢ ﺑﺎﺳﺘﺨﺪام اﳌﻜﻨﺴﺔ اﻟﻜﻬﺮﺑﺎﺋﻴﺔ ﻋﻠﻰ ﺳﺠﺎد ذو وﺑﺮه ﻋﺎﻟﻴﺔ أو ﻋﻠﻰ أرﺿﻴﺔ ﻣﺒﻠﻠﺔ. ﻻ ﺗﺴﺘﺨﺪم اﳉﻬﺎز ﻟﺸﻔﻂ اﳌﺎء. .٣ﻟﻢ ﻳﺘﻢ ﺗﺼﻨﻴﻊ ﻫﺬا اﳉﻬﺎز ﻟﻴﺘﻢ اﺳﺘﺨﺪاﻣﻪ ﻣﻦ ﻗﺒﻞ ﺻﻐﺎر اﻟﺴﻦ أو أﻓﺮاد ﻋﺎﺟﺰﻳﻦ دون رﻗﺎﺑﺔ إﻻ ﻓﻲ ﺣﺎﻟﺔ ﻣﺮاﻗﺒﺘﻬﻢ ﺑﺸﻜﻞ ﻛﺎف ﻣﻦ ﻗﺒﻞ ﺷﺨﺺ ﻣﺴﺌﻮل ﻟﻀﻤﺎن اﺳﺘﺨﺪام اﳉﻬﺎز ﺑﺸﻜﻞ آﻣﻦ. ﻳﺠﺐ ﻣﺮاﻗﺒﺔ اﻷﻃﻔﺎل اﻟﺼﻐﺎر وذﻟﻚ ﻟﻀﻤﺎن ﻋﺪم اﻟﻌﺒﺚ ﺑﺎﳉﻬﺎز. .٤ﻻ ﺗﺴﺘﺨﺪم اﳌﻜﻨﺴﺔ اﻟﻜﻬﺮﺑﺎﺋﻴﺔ دون ﻛﻴﺲ ﺟﻤﻊ اﻟﻐﺒﺎر .اﺳﺘﺒﺪل ﻛﻴﺲ ﺟﻤﻊ اﻟﻐﺒﺎر ﻗﺒﻞ أن ﳝﺘﻠﺊ وذﻟﻚ ﻟﻠﺤﻔﺎظ ﻋﻠﻰ أﻛﺒﺮ ﻗﺪر ﻣﻦ اﻟﻜﻔﺎءة ﻟﻠﻤﻨﺘﺞ. .٥ﻻ ﺗﺴﺘﺨﺪم اﳌﻜﻨﺴﺔ اﻟﻜﻬﺮﺑﺎﺋﻴﺔ ﻻﻟﺘﻘﺎط ﻋﻮد اﻟﺜﻘﺎب أو اﻟﺮﻣﺎد اﳌﺸﺘﻌﻞ أو أﻋﻘﺎب ﺑﻌﻴﺪا ﻋﻦ اﳌﻮاﻗﺪ أو أي ﻣﺼﺎدر اﻟﺴﺠﺎﺋﺮ اﳌﺘﻮﻫﺠﺔ .اﺣﺘﻔﻆ ﺑﺎﳌﻜﻨﺴﺔ اﻟﻜﻬﺮﺑﺎﺋﻴﺔ ً ﺣﺮارﻳﺔ أﺧﺮى .ﻓﻘﺪ ﺗﺆدي اﳊﺮارة إﻟﻰ ﺗﺸﻮﻳﻪ وﺗﻐﻴﻴﺮ ﻟﻮن اﻷﺟﺰاء اﻟﺒﻼﺳﺘﻴﻜﻴﺔ اﳋﺎﺻﺔ ﺑﺎﳉﻬﺎز. .٦ﻟﺘﺠﻨﺐ اﻟﺘﻘﺎط أﺟﺴﺎم ﺻﻠﺒﺔ أو ﺣﺎدة ﺑﺎﳌﻨﻜﺴﺔ اﻟﻜﻬﺮﺑﺎﺋﻴﺔ وذﻟﻚ ﻻﺣﺘﻤﺎل إﺗﻼﻓﻬﺎ ﻷﺟﺰاء اﻟﺘﻨﻈﻴﻒ ،ﻻ ﺗﻘﻒ ﻋﻠﻰ ﻣﺠﻤﻮﻋﺔ اﳋﺮﻃﻮم .ﻻ ﺗﻘﻢ ﺑﻮﺿﻊ أي ﺛﻘﻞ ﻋﻠﻰ اﳋﺮﻃﻮم .ﻻ ﺗﻘﻢ ﺑﺴﺪ ﺟﺰء اﻻﻣﺘﺼﺎص أو ﺟﺰء اﻟﻌﺎدم. .٧أوﻗﻒ ﺗﺸﻐﻴﻞ اﳌﻜﻨﺴﺔ اﻟﻜﻬﺮﺑﺎﺋﻴﺔ ﻗﺒﻞ ﻓﺼﻠﻬﺎ ﻣﻦ ﻣﻨﻔﺬ اﻟﺘﻴﺎر اﻟﻜﻬﺮﺑﻲ .ﻻ ﺗﻘﻢ ﲤﺎﻣﺎ ﺑﺸﺪ ﺳﻠﻚ اﻟﺘﻮﺻﻴﻞ ﻋﻨﺪ ﻓﺼﻞ اﻟﻘﺎﺑﺲ ﻣﻦ ﻣﻨﻔﺬ اﳊﺎﺋﻂ .ﺗﺄﻛﺪ ﻣﻦ اﻟﻔﺼﻞ ً ﻋﻦ ﻣﺼﺪر اﻟﺘﻴﺎر اﻟﻜﻬﺮﺑﻲ ﻗﺒﻞ اﻟﻌﻨﺎﻳﺔ ﺑﺎﻟﻔﻠﺘﺮ. .٨ ﻳﺠﺐ إﺧﺮاج اﻟﻘﺎﺑﺲ ﻣﻦ ﻣﻨﻔﺬ اﳊﺎﺋﻂ ﻗﺒﻞ ﺗﻨﻈﻴﻒ وﺻﻴﺎﻧﺔ اﳉﻬﺎز. .٩ﻻ ﻳﻨﺼﺢ ﺑﺎﺳﺘﺨﺪام ﻛﺎﺑﻞ اﺳﺘﻄﺎﻟﺔ. .١٠ﻓﻲ ﺣﺎﻟﺔ ﻋﺪم ﺗﺸﻐﻴﻞ اﳌﻜﻨﺴﺔ اﻟﻜﻬﺮﺑﺎﺋﻴﺔ ﺑﺸﻜﻞ ﺻﺤﻴﺢ ،أوﻗﻒ ﺗﺸﻐﻴﻞ ﻣﺼﺪر اﻟﻄﺎﻗﺔ واﺗﺼﻞ ﺑﻮﻛﻴﻞ اﳋﺪﻣﺔ اﳌﻌﺘﻤﺪ. .١١ﻓﻲ ﺣﺎﻟﺔ ﺗﻠﻒ ﻛﺎﺑﻞ اﳌﺼﺪر ،ﻳﺠﺐ اﺳﺘﺒﺪاﻟﻪ ﻣﻦ ﻗﺒﻞ اﻟﺸﺮﻛﺔ اﳌﺼﻨﻌﺔ أو وﻛﻴﻞ اﳋﺪﻣﺔ اﳋﺎﺻﺔ ﺑﻬﺎ أو ﻓﻨﻲ ﻣﺆﻫﻞ وذﻟﻚ ﻟﺘﺠﻨﺐ أي ﺧﻄﺮ. .١٢ﰎ ﺗﺰوﻳﺪ اﳌﻜﻨﺴﺔ اﻟﻜﻬﺮﺑﺎﺋﻴﺔ ﺑﺠﻬﺎز ﻓﺼﻞ ﺣﺮاري ذاﺗﻲ اﻟﻀﺒﻂ ﻳﻘﻮم ﺑﺈﻳﻘﺎف ﺗﻠﻘﺎﺋﻴﺎ ﻋﻦ ارﺗﻔﺎع درﺟﺔ ﺣﺮارة اﳌﻜﻨﺴﺔ .ﳝﻜﻦ أن ﺗﻨﺘﺞ اﳊﺮارة اﻟﺰاﺋﺪة اﻟﺘﺸﻐﻴﻞ ً ﻧﺘﻴﺠﺔ وﺟﻮد ﺳﺪة ﻓﻲ اﻟﻔﻠﺘﺮ أو اﻟﻔﻮﻫﺔ أو اﻷﻧﺒﻮب أو اﳋﺮﻃﻮم .ﺑﻌﺪ اﻟﺘﺨﻠﺺ ﻣﻦ اﻟﺴﺒﺐ وﺗﺮك اﶈﺮك ﻟﻜﻲ ﻳﺒﺮد ،ﺳﻴﺘﻢ ﺗﺸﻐﻴﻞ اﳌﻨﻜﺴﺔ اﻟﻜﻬﺮﺑﺎﺋﻴﺔ ﺗﻠﻘﺎﺋﻴًﺎ. ١ إرﺷﺎدات اﻟﺘﺸﻐﻴﻞ اﳌﻜﻨﺴﺔ اﻟﻜﻬﺮﺑﺎﺋﻴﺔ ❈ ﻳﺮﺟﻰ ﻗﺮاءة اﻹرﺷﺎدات ﺑﻌﻨﺎﻳﺔ ﻗﺒﻞ ﺗﺸﻐﻴﻞ ﻫﺬا اﳉﻬﺎز. ❈ ﻟﻼﺳﺘﺨﺪام ﻓﻲ اﻟﺪاﺧﻞ ﻓﻘﻂ. ﻗﻢ ﺑﺘﺴﺠﻴﻞ اﳌﻨﺘﺞ ﻋﻠﻰ www.samsung.com/register )DJ68-00341C REV(0.5