1
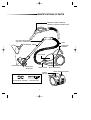
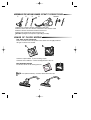
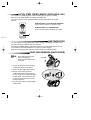
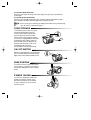
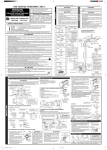
DJ68-40145A-EN-0.3 2005.1.19 10:20 AM
2
Operating
Instructions
VACUUM CLEANER
❈ Before operating this unit, please read the instructions carefully.
Register your product at www.samsung.com/global/register
DJ68-40145A-EN-0.3 2005.1.19 10:20 AM
3
FEATURES
Features include automatic cord rewind and dust indicator.
Remote power control option available.
NOTE :
IMPORTANT SAFEGUARDS
1. Read all instructions carefully. Before switching on, make sure that the voltage of your
electricity supply is the same as that indicated on the rating plate on the bottom of the
cleaner.
2. WARNING:Do not use the vacuum cleaner when rug or floor is wet.
3. Close supervision is necessary when any appliance is used by or near children. Do not
allow the vacuum cleaner to be used as a toy. Do not allow the vacuum cleaner to run
unattended at any time. Use the vacuum cleaner only for its intended use as described
in the instructions.
4. Do not use the vacuum cleaner without a dust bag. Change the dust bag before it is
full in order to maintain best efficiency.
5. Do not use the vacuum cleaner to pick up matches, live ashes or cigarette butts. Keep
the vacuum cleaner away from stoves and other heat sources. Heat can deform and
discolour the plastic parts of the unit.
6. Avoid picking up hard, sharp object swith the vacuum cleaner as they may damage the
cleaner parts. Do not stand on the hose assembly. Do not put a weight on the hose.
Do not block the suction or the exhaustion part.
7. Switch the vacuum cleaner off at the machine before unplugging from the electrical
outlet. Grasp the plug to disconnect from power outlet to avoid damage to cord, plug,
prongs or socket. Always disconnect cord from electrical outlet before changing the
dust bag.
8. The use of an extension cord is not recommended.
9. If your vacuum cleaner is not operating correctly, switch off the power supply and
consult an authorized service agent.
10. Do not attempt to replace a damaged power supply cord. Only the manufacturer or
qualified service personnel can replace power cords. Serious injury may result.
Warning
1. This hose contains electrical connections
2. Do not use to suck up water.
3. Do not immerse in water for cleaning.
4. The hose should be checked regularly and must not be used if damaged.
1
DJ68-40145A-EN-0.3 2005.1.19 10:20 AM
4
IDENTIFICATIONS OF PARTS
REMOTE POWER CONTROL
(REMOTE CONTROL MODEL ONLY)
SUCTION REGULATOR
(ON / OFF CONTROL MODEL ONLY)
HOSE
EXTENSION TUBES
CARRYING
HANDLE
DUST COVER
FLOOR NOZZLE
RUG/FLOOR
SELECTOR
HOSE CLAMP
ON/OFF
SWITCH
ACCESSORY HANGER
CREVICE-TOOL
2
DUST INDICATOR
CORD REWIND BUTTON
DJ68-40145A-EN-0.3 2005.1.19 10:20 AM
5
ASSEMBLING THE VACUUM-CLEANER SO THAT IT IS READY FOR USE
➀
➁
③
④
*OPTION
1. Slide the free end of the extension wand into the nozzle tube.
2. Slide the narrow end of one extension wand into the other extension wand.
3. Slide the extension wand into the handle end of the hose.
4. Slide the hose clamp into the suction inlet of the unit.
*OPTION : Ajusting the telescopic tubes (depending on model).
USAGE OF FLOOR NOZZLE
FOR RUG / FLOOR SELECTOR
Before use make sure that the position of the selector is in the right position for
the type of surface to be cleaned.
Select the carpet indicator ① when cleaning carpets.
Select flat surface indicator ➁ when cleaning the floors, tiles, etc.
FOR UNIVERSAL BRUSH
Use the floor nozzle for all cleaning surfaces.
NOTE : For optimum efficiency, clean floor brush with crevice tool.
3
DJ68-40145A-EN-0.3 2005.1.19 10:20 AM
6
SUCTION POWER CONTROL (REMOTE CONTROL MODEL ONLY)
Your cleaner has variable electronic suction control to give you greater versatility.
Select the most suitable position according to cleaning needs.
The suction capacity can be regulated steplessly by moving the slide to the desired
position
SLIDE THE PART “A” IN THE STOP POSITION
Vacuum cleaner switches off (stand by mode)
SLIDE THE PART “A” TOWARDS MAX
Suction capacity increases steplessly up to MAX.
A
DUST INDICATOR
You may continue cleaning until the dust indicator changes and displays a red colour. This
means the dust bag is full and needs to be replaced.
If the indicator suddenly displays red and the cleaner loses suction power while in use, turn
your cleaner off and check whether the hose, pipe or nozzle is clogged.
When you check bag status by indicator, set motor power on maximum position.
DUST BAG REMOVAL(DUST COVER)
NOTE
N
O T E ::
NOTE :
NOTE :
NOTE :
Hose must be disconnected
before changing bag.
Replace the dust bag as soon
as it is full.
LOCKER
1. To open the dust cover of the dust bag
compartment, lift the cover upward.
2. Remove the dust bag from the cleaner.
3. Dispose of the full bag. Insert the
cardboard bag collar of the dust bag as
far as it can go on the suction inlet along
the slide guide. Press down the locker.
Position the dust bag so that no part of
the bag is pinched.
4. Press the front of dust cover down lightly
until it re-locks.
4
DJ68-40145A-EN-0.3 2005.1.19 10:20 AM
7
IF YOU USE PAPER DUST BAG
After using, if the paper dust bag is full of dust, dispose the paper bag. It should not be
used it again.
IF YOU USE CLOTH FILTER BAG
After using, if the cloth filter bag is full of dust, clean the cloth filter bag and use it again.
After washing, it should be dried thoroughly. Serious injury may result.
NOTE
:
NOTE:There
are two types of dust bag according to the model. One is paper dust bag
type. The other is a cloth filter bag type.
CORD STORAGE
To extend the power cord for use, grasp
the plug and gently pull out from the
vacuum cleaner. When removing the
power cord from the electrical outlet,
switch off the power and grasp the plug.
Your cleaner is equipped with an automatic
rewind button. After cleaning, switch off
power and disconnect the plug from the
electrical outlet then press on the cord
rewind button with your hand.
The cord will be rewound automatically.
Press
ON / OFF SWITCH
With the cord plugged into an electrical outlet,
start or stop the vacuum cleaner by pushing
lightly on the switch downward with your toe.
PARK POSITION
Located on the top rear side of the vacuum
cleaner, there is a support for a convenient
park position during pauses when using the
nozzle.
STANDS ON END
Your cleaner is designed to stand firmly
upright for cleaning or storage. Use in
this manner and it takes up a minimum
of space, and allows you to work in the
narrowest spaces.
5
DJ68-40145A-EN-0.3 2005.1.19 10:20 AM
8
▼
CARE OF FILTERS
SECONDARY FILTER
To protect the motor, your cleaner features a secondary filter at the front of the motor in
the dust compartment.
Do not allow the filter to become clogged. Suction power reduction or motor damage
may result.
After washing the secondary filter in warm water, dry it thoroughly, then attach it in place.
SECONDARY
FILTER
CASE
▼
SECONDARY
FILTER
MICRO FILTER
1) Lift the carrying handle.
2) Separate the exhaust
filter.
3) Reassemble it after
cleaning.
NOTE
NOTE :: The filters must be completely dried before being replaced in the dust
compartment.
TOOL STORAGE
▼
▼
Your cleaner features an tool storage space.
Assemble the accessory hanger on to the
extension tube
It can be used to store the cleaning tool while
they are not in use.
This tool can be separated into two parts.
Dusting brush for funiture, shelves, books,
etc.
Crevice tool for radiators, crevice, corners,
between cushions.
6
DJ68-40145A-EN-0.3 2005.1.19 10:20 AM
1
IF YOU HAVE A PROBLEM
This appliance was inspected thoroughly and was in good operating
condition when it was shipped from the factory.
If a minor problem occurs, it can usually be solved quite easily when the cause is found.
Therefore, this check list is provided for your convenience.
PROBLEM
POSSIBLE CAUSE
POSSIBLE SOLUTION
Cleaner Will Not Run
1. Not firmly plugged in.
2. No voltage in wall plug.
1. Plug in firmly.
2. Check fuse or breaker.
Cleaner Does Not
Pick Up Properly
1. Dust bag is full.
2. Hose clogged with
a large object.
1. Change dust bag.
2. Remove substance.
This Vacuum cleaner is approved the following.
EMC Directive : 89/336/EEC , 92/31/EEC and 93/68/EEC
Low Voltage Safety Directive : 73/23/EEC and 93/68/EEC
DJ68-40145A REV(0.3)