1
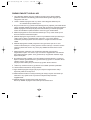
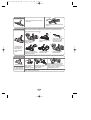
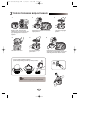
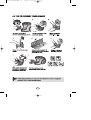
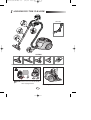
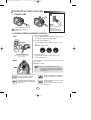
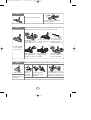
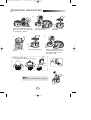
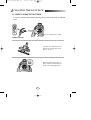
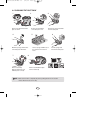
DJ68-00330S(neop)-EN
3/17/06 1:42 AM
Page 2
TR
Kullan›m K›lavuzu
SC8571, SC8581
ELEKTR‹KL‹ SÜPÜRGE
❋ Üniteyi kullanmadan önce lütfen kullanma talimatlar›n› dikkatle okuyunuz.
❋ Sadece dahili alanlarda kullanmak içindir.
DJ68-00330S(neop)-EN
3/17/06 1:42 AM
Page 3
ÖNEML‹ EMN‹YET KURALLARI
1. Tüm talimatlar› dikkatle okuyunuz. Makineyi açmadan önce ebeke elektri¤i
geriliminin makinenin alt›ndaki bilgi plakas›nda belirtilen gerilim de¤eriyle ayn›
oldu¤undan emin olun.
2. UYARI: Elektrik süpürgesini hal› veya zemin ›slak oldu¤unda kullanmay›n›z.
Su vakumlamak için kullanmay›n›z.
3. Bir çocuk taraf›ndan veya yak›nlar›nda kullan›ld›¤›nda bir yetikinin yak›n takibi alt›nda
olmas› gereklidir. Elektrik süpürgesiyle oyuncak gibi oynanmas›na müsaade etmeyiniz.
Elektrik süpürgesini kendi ba›na çal››r durumda b›rakmay›n. Elektrik süpürgesini
sadece bu talimatlarda aç›klanan kullan›m amac›na uygun olarak kullan›n.
4. Elektrik süpürgesini toz kutusu olmadan kullanmay›n. En iyi verimi almak için toz
kutusunu tamamen dolmadan boalt›n.
5. Elektrikli süpürgesini sigara izmariti, s›cak kül veya kibritleri almak için kullanmay›n.
Üniteyi soba ve di¤er ›s› kaynaklar›ndan uzak tutun. Is›ya maruz kalmas›
makinenizin plastik parçalar›n› deforme edebilir ve renginin bozulmas›na neden
olabilir.
6. Elektrikli süpürgenizin temizlik parçalar›n›n zarar görmemesi için sert ve sivri
nesneleri vakumlamay›n›z. Hortum grubunun üzerine basmay›n. Hortumun üzerine
a¤›rl›k koyulmamal›d›r. Emme veya hava ç›k› deliklerinin t›kanmamas›na özen
gösterin.
7. Elektrik prizinden çekmeden önce makinenizi üzerindeki açma kapatma
dü¤mesinden kapat›n. Toz torbas› veya toz kutusunu de¤itirmeden önce ünitenin
fiini elektrik prizinden çekiniz. zarar görmemesi için fii çekerken kablodan de¤il
fiten tutarak çekin.
8. Bu makinenin küçük yatakiler veya sakat kiiler taraf›ndan kullan›m›, sorumlu bir
kiinin makinenin güvenli kullan›m›n› garanti etmek için gözetim ve denetimi alt›nda
olmad›¤› sürece, uygun de¤ildir.
Küçük çocuklar makineyle oynamamalar› için gözlem alt›nda olmal›d›r.
9. Ünitenin fii temizlik ve bak›m› yap›lmadan önce elektrik prizinden çekilmelidir.
10. Uzatma kablosu kullan›lmas› tavsiye edilmez.
11. E¤er elektrik süpürgeniz düzgün çal›m›yorsa kapatma dü¤mesinden üniteyi
kapatarak yetkili servise bavurun.
12. Elektrik besleme kablosu hasarl›ysa herhangi bir kazaya meydan vermemek için
üretici firma veya yetkili servisi veya benzeri ehliyetli bir kii taraf›ndan
de¤itirilmelidir.
13. Elektrikli süpürgeyi hortumundan tutarak ta›may›n›z.
Bunun için elektrik süpürgesini üstündeki ta›ma kolundan tutun.
1TR-1
DJ68-00330S(neop)-EN
3/17/06 1:42 AM
Page 4
ELEKTR‹K SÜPÜRGES‹N‹N KULLANIMA
1 HAZIRLANMASI
Seçenekler
Seçenekler
B Özellikler modele göre de¤iéebilir.
D‹KKAT: Lütfen makineyi toz kutusu
kulpundan tutarak taé›may›n.
Makineyi saklamak için kald›raca¤›n›zda
temizlik baél›¤›n› yerine tak›n.
2
TR-2
DJ68-00330S(neop)-EN
3/17/06 1:43 AM
Page 5
2 ELEKTR‹K SÜPÜRGES‹N‹N KULLANILMASI
2-1 ELEKTR‹K
KABLOSU
NOT
Fii elektrik prizinden
çekerken kablosundan
de¤il fiten tutarak
çekin.
2-2 GÜÇ KUMANDASI (KIZILÖTES‹ KUMANDA)
- HORTUM
VER‹C‹
TUTAMAK KUMANDASI
[Elektrik süpürgesine k›z›lötesi
sinyallerle kumanda edilir]
1. Elektrikli süpürge ON/OFF (AÇMA/KAPAMA)
Elektrikli süpürgeyi çal›t›rmak için ON/OFF
(AÇMA/KAPAMA) dü¤mesine bas›n.
Elektrik süpürgesini durdurmak için tekrar bas›n.
2. Elektrikli süpürge MODU (+/-)
Do¤ru modu seçmek için tekrar tekrar MODE (MODE)
dü¤mesine bas›n.
(ON(MIN) t MID t MAX)
3. Auto modun kullan›lmas›
Elektrikli süpürgeyi otomatik olarak çal›t›rmak için Auto
dü¤mesine bas›n.
- Gövde
Do¤ru modu seçmek için güç kumanda dü¤mesine art
arda bas›n.
(ON(MIN) t OFF)
GÜÇ KUMANDASI
NOT: E¤er tutamak uzaktan kumandas›
çal›m›yorsa elektrik süpürgesi makinenin
üzerindeki kumanda dü¤melerinden de
çal›t›r›labilir.
Toz torbas›n›n kontrol edilmesi veya
boalt›lmas› gerekti¤inde filtre ››¤› yanar.
Ayr›ca sesli bir uyar› da duyulur.
Yandaki, elektrikli süpürge çal››rken negatif
iyonlar›n oluumunu gösterir.
IR ››¤›, saptaki kumandadan k›z›lötesi
sinyali alan bölümü gösterir.
Yandaki, otomatik emme modunun seçili
oldu¤unu gösterir.
Emme seviyesi LED göstergesinde belirtilir.
TR-3
3
DJ68-00330S(neop)-EN
3/17/06 1:43 AM
Page 6
2-4 AKSESUARLARIN KULLANILMASI VE BAKIMI
B Özellikler modele göre de¤iebilir.
BORU
Teleskopik borunun uzunlu¤unu
teleskopik borunun orta k›sm›nda
bulunan uzunluk kontrol ayar›ndan ileri
ve geri kayd›rarak ayarlayabilirsiniz.
T›kan›kl›klar› kontrol etmek için
teleskopik boruyu ay›rarak k›sa duruma
getirin. Bu boruyu t›kayan kirlerin daha
kolay ç›kar›lmas›na imkan sa¤lar.
AKSESUAR
Aksesuar› hortum tutama¤›n›n
sonuna kadar iterek oturtun.
Hassas alanlar› temizlemek için
toz f›rças›n› d›ar› çekerek
döndürün.
Döeme bal›¤›n› kullanmak için
aksesuar› hortum tutama¤›n›n
ucuna takarak ters istikamette
itin.
UZATMA D‹RSE‹ 1
(SEÇENEK )
1.
2.
3.
4.
5.
2
3
4
5
Hortum sap› ve teleskopik borunun ba¤lant› uçlar›na uzatma dirse¤ini ba¤lay›n.
Uzatma dirse¤inin alt k›sm›na teleskopik boruyu tak›n.
PUSH dü¤mesine bas›n.
PUSH dü¤mesine bas›l›yken uzatma dirse¤i katlan›r.
Uzatma dirse¤i kullan›larak eriilmesi güç alanlar (örne¤in mobilyalar›n altlar›)
diz çökmeye gerek olmadan temizlenebilir.
Seçilebilir Özellik
B Hal›
Temizli¤i
B Zemin
Temizli¤i
Ayar mandal›na basarak zemin
yüzeyine göre ayarlay›n.
TR-4
4
Giri t›kal›ysa t›kayan kirleri tümüyle
ç›kart›n.
DJ68-00330S(neop)-EN
3/17/06 1:43 AM
Page 7
Seçilebilir Özellik
Genié bir alandaki tozlar› bir kerede
vakumlay›n.
Girié t›kal›ysa t›kayan kirleri tümüyle
ç›kart›n.
Seçilebilir Özellik
Saç veya evcil hayvanlar›n tüylerinin s›k s›k vakumlanmas› sonucunda döner
tambur etraf›na dolaéan maddeler dönüé performans›n› düéürür. Bu durumda
döner tamburu itinayla temizleyin.
1
2
èeffaf kapa¤›n açma
dü¤mesine basarak
kapa¤› ç›kart›n.
F›rçay› éeffaf kapaktan
ç›kart›n
5
4
Hal›lardaki evcil
hayvan tüyleri ve
liflerin daha iyi
temizlenebilmesi
içindir
Seçilebilir Özellik
Battaniye f›rças›
Evcil hayvan tüyleri
ve liflerin döéemelik
ve yatak örtülerinden
temizlenmesi içindir.
3
F›rça yuvas›ndaki kirleri
tozalma veya köée temizlik
baél›¤›yla temizleyin
Çubuk F›rçan›n etraf›na
sar›l› toz ve saç gibi
maddeleri bir makas
yard›m›yla ç›kart›n.
6
Çubuk f›rçay› döner
kay›élar›na tak›n
èeffaf kapa¤› yerine
takarak kapat›n.
Döner türbinlerdeki t›kan›kl›k f›rçan›n dönmesine engel olur, böyle bir durumda temizleyin.
Girié t›kand›¤›nda
t›kay›n kirleri
tamamen ç›kart›n.
Kilit dü¤mesini ‘UNLOCK’
durumuna getirin ve
kirleri ç›kart›n
Tekrardan monte etmek için kapa¤›
gövdenin ön k›sm›na hizalayarak
kapat›n. Kapa¤› kapatt›ktan sonra kilit
dü¤mesini ‘LOCK’ durumuna
getirdi¤inizden emin olun.
Uyar› :Sadece yatak örtülerinin temizli¤inde kullan›n›z. T›kan›kl›¤› açarken f›rçaya
zarar vermemeye dikkat ediniz.
TR-5
5
DJ68-00330S(neop)-EN
3/17/06 1:43 AM
Page 8
3 TOZ KUTUSUNUN BOALTILMASI
2
1
Biriken tozlar dolu iéaretine
ulaét›¤›nda veya toz torbas› dolu
›é›¤› yand›¤›nda toz kutusunu
boéalt›n.
3
Dü¤mesine basarak toz kutusunu
d›éar› ç›kart›n.
5
4
Kutudaki tozlar› at›n.
6
Toz kutusu kapa¤›n›
yerine tak›n.
- Tozlar› Plastik torbalara boéalt›n
(Ast›m/alerji hastal›¤› olanlar için tavsiye edilir)
NOT
Toz kutusunu so¤uk suyla y›kayabilirsiniz.
TR-6
6
Toz kutusu kapa¤›n›
ç›kart›n.
CLICK
Kullanmadan önce toz kutusunu
süpürgenin gövdesindeki yerine “klik”
sesini duyana kadar iterek oturtun.
DJ68-00330S(neop)-EN
3/17/06 1:43 AM
Page 9
4 TOZ F‹LTRES‹N‹N TEM‹ZLENMES‹
4-1 TOZ F‹LTRES‹N‹ NE ZAMAN TEM‹ZLEMEL‹?
- E¤er makinenin emié gücü temizlik s›ras›nda önemli ölçüde azal›yorsa toz filtresini
aéa¤›da gösterildi¤i éekilde temizleyin.
GÜÇ KUMANDASI
Emié gücünü ‘MAX’ ayar›na getirin.
TUTAMAK KUMANDASI
Filtre kontrol göstergesi emié deli¤i düz
zeminden 10 çm yukar›dayken k›rm›z›y›
gösteriyorsa , temizleyin.
Gösterge ›é›¤› yand›¤›nda Toz filtresini (4-2)
aéa¤›da gösterildi¤i éekilde temizleyin.
TR-7
7
DJ68-00330S(TR+EN)-0.1
8/16/07 4:39 PM
Page 10
TR-8
DJ68-00330S(neop)-EN
3/17/06 1:43 AM
Page 11
5 MOTOR KORUMA F‹LTRELER‹N‹N TEM‹ZLENMES‹
Motor koruma filtresini üniteden ç›kart›n.
Tozlar› silkeleyerek ve hafifçe vurarak
temizleyin ve makinede yerine geri tak›n.
Toz kutusu ve toz filtresinin her ikisini de
ç›kart›n.
6 ÇIKI F‹LTRES‹N‹N TEM‹ZLENMES‹
Sap› kald›r›n.
Ç›k›é filtresini sap›ndan
kavray›n ve ç›karmak için
kald›r›n.
Ç›k›é filtresi kapa¤›n›n
sabit çerçevesini ç›kar›n.
CLICK
Hafifçe vurarak ç›k›é
filtresindeki tozu
temizleyin.
Geri takmadan önce ç›k›é
filtresi kapa¤›n› ve ç›k›é
filtresini do¤ru hizalay›n ve
ç›k›é filtresini klik sesi
duyana kadar itin.
TR-9
9
Ç›k›é filtresini klik sesi
duyana kadar ana
gövdenin içine itin.
DJ68-00330S(TR+EN)-0.2
11/1/07 11:04 AM
Page 12
TR-10
DJ68-00330S(TR+EN)-0.1
8/16/07 4:40 PM
Page 13
DJ68-00330S(TR+EN)-0.1
8/16/07 4:40 PM
EN
Page 14
Operating Instructions
SC8571, SC8581
VACUUM CLEANER
❈ Before
❈ Indoor
operating this unit, please read the instructions carefully.
use only.
Register your product at www.samsung.com/global/register
DJ68-00330S(TR+EN)-0.1
8/16/07 4:40 PM
Page 15
IMPORTANT SAFEGUARDS
1. Read all instructions carefully. Before switching on, make sure that the voltage of your
electricity supply is the same as that indicated on the rating plate on the bottom of the
cleaner.
2. WARNING : Do not use the vacuum cleaner when rug or floor is wet.
Do not use to suck up water.
3. Close supervision is necessary when any appliance is used by or near children. Do not
allow the vacuum cleaner to be used as a toy. Do not allow the vacuum cleaner to run
unattended at any time. Use the vacuum cleaner only for its intended use as described in
these instructions.
4. Do not use the vacuum cleaner without a dust bin. Empty the dust bin before it is full in
order to maintain the best efficiency.
5. Do not use the vacuum cleaner to pick up matches, live ashes or cigarette butts. Keep the
vacuum cleaner away from stoves and other heat sources. Heat can deform and discolour the plastic parts of the unit.
6. Avoid picking up hard, sharp objects with the vacuum cleaner as they may damage the
cleaner parts. Do not stand on the hose assembly. Do not put weight on the hose. Do not
block the suction or the exhaust port.
7. Switch the vacuum cleaner off on the body of the machine before unplugging from the
electrical outlet. Disconnect the plug from the electrical outlet before changing the dust
bag or dust container. To avoid damage, please remove the plug by grasping the plug
itself, not by pulling on the cord.
8. This appliance is not intended for use by young persons or infirm persons without
supervision unless they are adequately supervised by a responsible person to ensure that
they can use the appliance safely.
Young children should be supervised to ensure that they do not play with the appliance.
9. The plug must be removed from the socket outlet before cleaning or maintaining the
appliance.
10. The use of an extension cord is not recommended.
11. If your vacuum cleaner is not operating correctly, switch off the power supply and consult
an authorized service agent.
12. If the supply cord is damaged, it must be replaced by the manufacturer or its service
agent or a similarly qualified person in order to avoid a hazard.
13. Don’t carry the vacuum cleaner by holding the hose.
Use the handle on the vacuum cleaner set.
EN-1
DJ68-00330S(TR+EN)-0.1
8/16/07 4:40 PM
Page 16
1 ASSEMBLING THE CLEANER
OPTION
▼
OPTION
Features may vary according to model.
CAUTION : Please do not use dust bin handle
when carrying machine.
For storage, park the floor nozzle.
EN-2
DJ68-00330S(TR+EN)-0.1
8/16/07 4:40 PM
Page 17
2 OPERATING THE CLEANER
2-1 POWER CORD
NOTE
When removing the
plug from the
electrical outlet, grasp
the plug, not the cord.
Please make sure your
cable is fully extended
before use.
2-2 POWER CONTROL (INFRARED CONTROL)
1. Vacuum cleaner ON/OFF
Press the ON/OFF button to operate the vacuum cleaner.
Press again to stop the vacuum cleaner.
- HOSE
SENDER
HANDLE CONTROL
[The cleaner is controlled by using
infrared signals.]
- BODY
2. Vacuum cleaner MODE (+/-)
Press the MODE button repeatedly to select the correct
mode.
(ON) MIN → MID → MAX
3. Using Auto mode
Press the Auto button to operate the vacuum
cleaner automatically.
Press the power control button repeatedly to select the
correct mode.
(ON(MAX) → OFF)
NOTE : If the remote handle control is not
working, the cleaner can be operated
using the control button on the body of
the machine.
The filter light is illuminated when the dust
pack requires checking or emptying.
An audio signal will also sound.
This shows the generation of negative ions
when the vacuum cleaner is in operation.
The IR light indicates the part that
receives the infra-red signal from the
handle control.
This indicates that the automatic suction
mode is selected.
The level of suction is indicated by the
LED display.
EN-3
DJ68-00330S(TR+EN)-0.1
8/16/07 4:40 PM
Page 18
▼
2-3 HOW TO USE AND MAINTAIN THE ACCESSORIES
Features may vary according to model.
PIPE
Adjust the length of the telescopic pipe
by sliding the length control button located in the center of the telescopic pipe
back and forth.
To check for blockages, separate the telescopic pipe and adjust to shorten. This allows
for easier removal of waste clogging the tube.
ACCESSORY
Push the accessory on to
the end of the hose handle.
Pull out and turn the dusting brush for cleaning delicate areas.
To use the upholstery tool,
push the accessory on to
the end of the hose handle
in the opposite direction.
ELBOW EXTENDING TUBE 1
(OPTION)
2
3
4
5
1. Connect the elbow extending tube to connecting part for hose knob and
telescopic pipe.
2. Fit the telescopic pipe to the lower part of the elbow extending tube.
3. Press the PUSH button.
4. With the PUSH button pressed, the elbow extending tube is folded.
5. Using the elbow extending tube allows hard to reach areas (e.g. under
furniture)to be cleaned without having to kneel down.
OPTION
▲
▲ Carpet
Cleaning
▲
♣ Floor
Cleaning
Adjust the inlet lever according to the
floor surface.
EN-4
Remove waste matter completely if the
inlet is blocked.
DJ68-00330S(TR+EN)-0.1
8/16/07 4:40 PM
Page 19
OPTION
Vacuum dust in wide area at once
Remove waste matter completely
if the inlet is blocked.
OPTION
Frequent vacuuming of hair or pet fur may cause a falling-off of the rotation due to
matters tangled around the drum. In this case, clean the drum with care.
1
2
3
Remove waste matter
Remove the brushbar such as dust and hair
Push the Open button of
from the transparent tangled around the
the transparent screen
brushbar using scissors.
cover to separate the cover. screen.
For improved pickup of pet hair and
fibre on carpets
4
5
Remove dust inside the Insert brushbar into
brush housing using a
rotating belt and
dry duster or crevice tool. assemble.
OPTION
6
Click the transparent
screen cover back into
place to reassemble.
Clogs on turbine keeps brush from turning, and in this case, take care of it.
Remove waste
To reassemble, align the cover to the
Turn the lock button to
matter comfront of the main body and close. After
‘UNLOCK’, and remove
closing the cover, ensure that the lock
For picking up pet hair pletely when
inlet is blocked. waste matter.
button is turned to the ‘LOCK’ position.
and fibre on upholstery
Warning : Use for bedclothes only. Be cautious not to damage brush during unclogging.
and bed linen.
Brush for blanket
EN-5
DJ68-00330S(TR+EN)-0.1
8/16/07 4:40 PM
Page 20
3 EMPTYING THE DUST BIN
1
2
Once dust reaches the dust full
mark, or once the filter check light
is on, empty the dust bin.
4
3
Take the dust bin out by
pressing the button.
5
Throw away dust in
the bin.
6
Close the dust bin cover.
CLICK
Before use, push the dust bin
into the main body of the vacuum cleaner until you hear
the "click" sound.
- Empty into a plastic bag
(recommended for asthma/allergy sufferers)
NOTE
You may rinse the dust bin with cold water
EN-6
Separate the dust
bin cover.
DJ68-00330S(TR+EN)-0.1
8/16/07 4:40 PM
Page 21
4 CLEANING THE DUST PACK
4-1. WHEN TO CLEAN THE DUST PACK
- If suction is noticeably reduced during cleaning, please check the dust pack as indicated
below.
Suction is significantly weakened during cleaning.
Shaking sound of inlet stuck to the floor (soft mats, blankets, etc.) is heard.
Turn the vacuum power to 'MAX'
HANDLE CONTROL
If the filter check indicator turns red
with the inlet floating 10 cm above
flat floor, clean it.
When the indicator light comes on,
please empty the Dust Pack(4-2) as
shown in the following illustrations.
EN-7
DJ68-00330S(TR+EN)-0.1
8/16/07 4:40 PM
Page 22
4-2 CLEANING THE DUST PACK
1
3
2
Remove the dust bin and dust
pack as shown.
Remove the fixed frame
of the dust pack cover.
Remove the sponge and filter
from the dust pack
5
4
Wash the sponge and the filter
of the dust pack with water.
7
6
Let the sponge and filter dry in
the shade for more than 12
hours.
Put the sponge and
filter into the dust pack.
8
Before reassembly,
align the dust pack cover
and dust pack correctly.
Put the assembled dust pack
into the main body.
NOTE : Make sure the filter is completely dry before putting it back into the vacuum
cleaner. Allow 12 hours for it to dry.
EN-8
DJ68-00330S(TR+EN)-0.1
8/16/07 4:40 PM
Page 23
5 CLEANING THE MOTOR PROTECTION FILTER
Remove the motor protection filter from
the vacuum cleaner.
Shake and tap the dust from it and put
back in machine.
Take out both the dust bin and the
dust pack.
6 CLEANING THE OUTLET FILTER
CLICK
Lift the handle.
Hold the handle of the
outlet filter and lift
to remove.
Remove the fixed
frame of the outlet filter
cover.
CLICK
CLICK
Dust off the outlet filter
by gently tapping.
CLICK
Before reassembly,
align the outlet filter
cover and the outlet filter
correctly, and push the
outlet filter until you hear
a click sound.
Push the outlet filter
into the main body
until you hear a click
sound.
EN-9
CLICK
DJ68-00330S(TR+EN)-0.1
8/16/07 4:40 PM
Page 24
7 CHANGE THE BATTERY(OPTIONAL)
BATTERY TYPE : AA Size
NOTE
1. When the vacuum cleaner does not work, replace the batteries.
If the problem persists, please contact our authorized dealer.
2. Use 2 batteries of size AA.
WARNING
1. Never disassemble or recharge the batteries.
2. Never heat up the batteries or throw them into fire.
3. Do not reverse (+),(-) poles.
4. Dispose of the batteries properly.
- IF YOU HAVE A PROBLEM
PROBLEM
Motor does not start.
CAUSE
REMEDY 0
No power supply.
Thermal cut-out.
Nozzle, suction hose or tube
is blocked.
Check cable, plug and socket.
Leave to cool.
Check for blockage and
remove it.
Check that the cord is not
twisted or wound unevenly.
Pull the cord out 2-3m and
push the cord rewind button.
Vacuum cleaner does not
pick up dirt.
Crack or hole in hose.
Check hose and replace if
required.
Low or decreasing suction
Filter is full of dust.
Please check filter and, if
necessary, clean as illustrated in the instructions.
Suction force is gradually
decreasing.
Cord does not rewind fully.
This Vacuum cleaner is approved the following.
EMC Directive : 89/336/EEC, 92/31/EEC and 93/68/EEC
Low Voltage Safety Directive : 73/23/EEC and 93/68/EEC
EN-10
DJ68-00321N (EN+TR) (0.0)
12/23/05 11:36 AM
Page 24
DJ68-00330S REV(0.2)