1
Managing Computer Accounts
Module 5
Managing Computer Accounts
Contents:
Lesson 1: Create Computers and Join the Domain
5-4
Lab A: Create Computers and Join the Domain
5-24
Lesson 2: Administer Computer Objects and Accounts
5-31
Lab B: Administer Computer Objects and Accounts
5-45
Lesson 3: Offline Domain Join
5-49
Lab C: Perform an Offline Domain Join
5-54
5-1
5-2 Configuring and Troubleshooting Windows Server® 2008 Active Directory® Domain Services
Module Overview
Computers in a domain are security principals, like users. They have an account with a logon name and
password that Windows® changes automatically every 30 days or so. They authenticate with the domain.
They can belong to groups, have access to resources, and be configured by Group Policy. In addition, like
users, computers sometimes lose track of their passwords, require a reset, or have accounts that need to
be disabled or enabled.
Managing computers—both the objects in Active Directory® and the physical devices—is one of the dayto-day tasks of most IT professionals. New systems are added to your organization, computers are taken
offline for repairs, machines are exchanged between users or roles, and older equipment is retired or
upgraded, leading to an access of replacement systems. Each of these activities requires managing the
identity of the computer represented by its object, or account, and Active Directory.
Unfortunately, most enterprises do not invest the same kind of care and process in the creation and
management of computer accounts as they do for user accounts, even though both are security
principals. In this module, you will learn how to create computer objects, which include attributes that are
required for the objects to be accounts. You will learn how to support computer accounts through their
life cycle, including configuring, troubleshooting, repairing, and de-provisioning computer objects. You
will also deepen your understanding of the process through which a computer joins a domain, so that you
can identify and avoid potential points of failure. In the third lesson of this module, you will be introduced
to a new feature of Windows Server® 2008 R2 Active Directory, called Offline Domain Join. This feature
enables administrators to join computers to a domain even if the computers do not have a connection to
the corporate network.
Objectives
After completing this module, you will be able to:
•
Create computer accounts and join them to a domain.
Managing Computer Accounts
5-3
•
Administer computer objects and accounts by using the Windows Interface and command-line tools.
•
Describe and perform the Offline Domain Join process.
5-4 Configuring and Troubleshooting Windows Server® 2008 Active Directory® Domain Services
Lesson 1
Create Computers and Join the Domain
The default configuration of Windows Server 2008—and of all other versions of Windows server and client
operating systems—is that the computer belongs to a workgroup. Before you can log on to a computer
with a domain account, that computer must belong to the domain. To join the domain, the computer
must have an account in the domain, which, like a user account, includes a logon name (the
sAMAccountName attribute), a password, and a security identifier (SID) that uniquely represents the
computer as a security principal in the domain. Those credentials allow the computer to authenticate
against the domain and to create a secure relationship that then allows users to log on to the system with
domain accounts. In this lesson, you will learn the steps to prepare the domain for a new computer
account, and you will explore the process through which a computer joins the domain.
Objectives
After completing this lesson, you will be able to:
•
Understand the relationship between a domain member and the domain, in terms of identity and
access.
•
Identify the requirements for joining a computer to the domain.
•
Prestage a computer account.
•
Join a computer to the domain.
•
Redirect the default computer container.
•
Prevent nonadministrative users from creating computers and joining the domain.
•
Use command-line tools to import, create, and join computers.
Managing Computer Accounts
5-5
Workgroups, Domains, and Trusts
In a workgroup, each system maintains an identity store of user and group accounts against which users
can be authenticated and access can begin. The local identity store on each computer is called the
Security Accounts Manager (SAM) database. If a user logs on to a workgroup machine, the system
authenticates the user against its local SAM database. If a user connects to another system to access a
shared folder, the user is reauthenticated against the identity store of the remote system and will probably
be prompted to enter a new set of credentials for the remote system. From a security perspective, a
workgroup computer is, for all intents and purposes, a stand-alone system.
When a computer joins a domain, it delegates the task of authenticating users to the domain. Although
the computer continues to maintain its SAM database to support local user and group accounts, user
accounts will typically be created in the central domain directory. When a user logs on to the computer
with a domain account, the user is authenticated by a domain controller, rather than by the SAM. In other
words, the computer now trusts another authority to validate a user's identity. Trust relationships are
generally discussed in the context of two domains, as you will learn in another module, but there is also a
trust between each domain member computer and its domain that is established when the computer
joins the domain. Because all domain member computers trust the domain, they also trust each account
that is authenticated by that domain. This allows users with an account in Active Directory to access
resources on various servers with only one set of credentials.
5-6 Configuring and Troubleshooting Windows Server® 2008 Active Directory® Domain Services
Requirements for Joining a Computer to the Domain
Three conditions are required for you to join a computer to an Active Directory domain:
•
A computer object should be created in the directory service.
•
You must have appropriate permissions to the computer object. The permissions allow you to join a
computer with the same name as the object to the domain.
•
You must be a member of the local Administrators group on the computer to change its domain or
workgroup membership.
The remainder of this lesson examines each of these requirements.
Note It is not mandatory to create a computer object in the directory service, but it is
highly recommended. However, many administrators join computers to a domain without
first creating a computer object. When you do this, Windows attempts to join the domain to
an existing object. When Windows does not find the object, it fails back and creates a
computer object in the default computer container. The step of creating a computer object,
either by an administrator before the join or by Windows during the join, is necessary before
the computer can join the domain. It is still a requirement. It uses a different set of
permissions in Active Directory (your permission to create a computer object) than the join
itself, and if you do not happen to have permissions to create computer objects in the
default computer container, the join will fail. The bottom line is that it is a requirement for
the computer object to exist prior to the join, but Windows helps meet that requirement
automatically.
Managing Computer Accounts
5-7
The Computers Container and Organizational Units
Before you create a computer object in the directory service, you must have a place to put it.
The Default Computers Container
When you create a domain, the Computers container is created by default (CN=Computers). This
container is not an organizational unit (OU); it is an object of the Container class. There are subtle but
important differences between a container and an OU. You cannot create an OU within a container, so
you cannot subdivide the Computers OU; and you cannot link a Group Policy object to a container.
Therefore, we highly recommend that you create custom OUs to host computer objects, instead of using
the Computers container.
OUs for Computers
Most organizations create at least two OUs for computer objects: one to host computer accounts for
client computers—desktops, laptops, and other user systems—and another for servers. These two OUs are
in addition to the Domain Controllers OU created by default during the installation of Active Directory. In
each of these OUs, computer objects are created. There is no technical difference between a computer
object in a client's OU and a computer object in a server's or domain controller's OU: computer objects
are computer objects. However, separate OUs are typically created to provide unique scopes of
management, so that you can delegate management of client objects to one team and management of
server objects to another.
Your administrative model might necessitate further dividing your client and server OUs. Many
organizations create sub-OUs beneath a server OU to collect and manage specific types of servers—for
example, an OU for file and print servers and an OU for database servers. By doing so, the team of
administrators for each type of server can be delegated permissions to manage computer objects in the
appropriate OU. Similarly, geographically distributed organizations with local desktop support teams
often divide a parent OU for clients into sub-OUs for each site. This approach enables each site’s support
team to create computer objects in the site for client computers, and join computers to the domain using
those computer objects. This is an example only. What is most important is that your OU structure reflects
5-8 Configuring and Troubleshooting Windows Server® 2008 Active Directory® Domain Services
your administrative model so that your OUs provide single points of management for the delegation of
administration.
Additionally, separate OUs allow you to create different baseline configurations using different Group
Policy objects (GPOs) linked to the client and the server OUs. Group Policy, discussed in detail in another
module, allows you to specify configuration for collections of computers by linking GPOs that contain
configuration instructions to OUs. It is common for organizations to separate clients into desktop and
laptop OUs. GPOs specifying desktop or laptop configuration can then be linked to appropriate OUs.
If your organization has decentralized, site-based administration and wants to manage unique
configurations for desktops and laptops, you face a design dilemma. Should you divide your clients OU
based on administration and then subdivide desktops and laptops, or should you divide your clients OU
into desktop and laptop OUs, and then subdivide based on administration? The options are illustrated as
follows.
Because the primary design driver for Active Directory OUs is the efficient delegation of administration
through the inheritance of access control lists (ACLs) on OUs, the design on the left would be
recommended.
Delegating Permission to Create Computers
By default, the Enterprise Admins, Domain Admins, Administrators, and Account Operators groups have
permission to create computer objects in any new OU. However, as discussed in the module about
groups, we recommend that you tightly restrict membership in the first three groups, and that you do not
add administrators to the Account Operators group.
Instead, you should delegate the permission to create computer objects to appropriate administrators or
support personnel. The permission required to create a computer object is Create Computer Objects. This
permission, assigned to a group for an OU, allows members of the group to create computer objects in
that OU. For example, you might allow your desktop support team to create computer objects in the
clients OU, and allow your file server administrators to create computer objects in the file servers OU.
The permissions required to perform computer management tasks are listed in the topic, "Secure
Computer Creation and Joins." Module 8 details the process of delegation.
Managing Computer Accounts
5-9
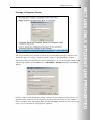
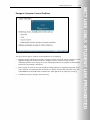
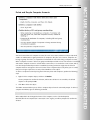
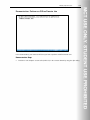
Prestage a Computer Account
You can and should create a computer account in the correct OU before joining the computer to the
domain. This process of creating a computer account in advance is called prestaging a computer.
After you have been given permission to create computer objects, you can do so by right-clicking the OU
and choosing Computer from the New menu. The New Object – Computer dialog box, shown below,
appears:
Enter the computer name, following the naming convention of your enterprise, and select the user or
group that will be allowed to join the computer to the domain with this account. The two computer
names—Computer Name and Computer Name (Pre-Windows 2000)—should be the same: There is very
rarely, if ever, a justification for configuring them separately.
5-10 Configuring and Troubleshooting Windows Server® 2008 Active Directory® Domain Services
Note The permissions that are applied to the user or group you select in the wizard are
more than necessary simply to join a computer to the domain. The selected user or group is
also given the ability to modify the computer object in other ways. For guidance regarding a
least privilege approach to delegating permission to join a computer to the domain, see
Windows Administration Resource Kit: Productivity Solutions for IT Professionals by Dan
Holme (Microsoft® Press, 2008).
The process you complete to create a computer account before joining the computer to the domain is
called prestaging the account.
There are two major advantages of prestaging a computer:
•
The account is in the correct OU and is therefore delegated according to the security policy defined
by the access control list (ACL) of the OU.
•
The computer is within the scope of GPOs linked to the OU, before the computer joins the domain.
Managing Computer Accounts
5-11
Join a Computer to the Domain
By prestaging the computer object, you fulfill the first two requirements for joining a computer to a
domain: the computer object exists, and you have specified who has permissions to join a computer with
the same name to the domain. Now, a local administrator of the computer can change the computer’s
domain membership and enter the specified domain credentials to successfully complete the process.
To join a computer to the domain, perform the following steps:
1.
Log on to the computer with credentials that belong to the local Administrators group on the
computer.
Only local administrators can alter the domain or workgroup membership of a computer.
2.
Open the System Properties dialog box by using one of the following methods:
In Windows XP, Windows Server 2003:
•
Open the System properties dialog box by doing one of the following:
•
Right-click My Computer, and then click Properties.
•
Press Windows Logo+Pause.
In Windows Vista®, Windows 7, Windows Server 2008, and Windows Server 2008 R2:
a.
Open the System properties dialog box by doing one of the following:
•
Right-click Computer, and then click Properties.
•
Press Windows Logo+Pause.
b.
In the Computer name, domain, and workgroup settings section, click Change Settings.
c.
If prompted by User Account Control, click Continue or enter administrative credentials as
appropriate.
5-12 Configuring and Troubleshooting Windows Server® 2008 Active Directory® Domain Services
3.
Click the Computer Name tab.
4.
Click Change.
5.
Under Member Of, click Domain.
6.
Type the name of the domain you want to join.
Note Use the full DNS name of the domain. Not only is this more accurate and more likely
to succeed, but if it does not succeed, it indicates that there could be a problem with DNS
name resolution that should be rectified before joining the machine to the domain.
7.
Click OK.
8.
Windows prompts for the credentials of your user account in the domain.
The domain checks to see if a computer object already exists with the name of the computer. One of
the following three things happens:
•
If the object exists and a computer with that name has already joined the domain, an error is
returned, and you cannot join the computer to the domain.
•
If the object exists and it is prestaged—a computer with the same name has not joined the
domain—the domain confirms that the domain credentials you entered have permission to join
the domain using that account. These permissions were discussed in the section, “Prestaging a
Computer Account.”
•
If the computer account is not prestaged, Windows checks to see if you have permissions to
create a new computer object in the default computer container. If you do have permissions to
create a new computer object in the default computer container, the object is created with the
name of the computer. This method of joining a domain is supported for backwards
compatibility, but is not recommended. We recommend that you prestage the account as
indicated earlier, and as detailed in the next section, “Secure Computer Creation and Joins.”
The computer then joins the domain by assuming the identity of its Active Directory object. It configures
its SID to match the domain computer account’s SID and sets an initial password with the domain. The
computer then performs other tasks related to joining the domain. It adds the Domain Admins group to
the local Administrators group and the Domain Users group to the local Users group.
9.
You are prompted to restart the computer. Click OK to close this message box.
10. Click Close (in Windows Vista) or OK (in Windows XP) to close the System Properties dialog box.
11. You are prompted again to restart the computer, after which the system is fully a member of the
domain, and you can log on by using domain credentials.
Managing Computer Accounts
5-13
Secure Computer Creation and Joins
Creating computer accounts and joining computers to a domain are security-sensitive operations.
Therefore, it is very important that these steps are as secure as possible.
Prestage Computer Objects
The best practice is to prestage a computer account prior to joining the machine to the domain. However,
Windows allows you to join a computer to a domain without following this best practice. You can log on
to a workgroup computer as a local administrator and change the computer membership to the domain.
On demand, Windows creates a computer object in the default computer container, gives you permission
to join a computer to that object, and then proceeds to join the system to the domain.
There are three problems with this Windows process:
•
First, the computer account created automatically by Windows is placed in the default computer
container, which is not where the computer object belongs in most enterprises.
•
Second, you must move the computer from the default computer container into the correct OU,
which is an extra step that is often forgotten.
•
Third, any domain user can also do this—no domain-level administrative permissions are required.
Any user can join any computer to the domain if you don't manage and secure the process. Because a
computer object is a security principal, and because the creator of a computer object owns the object
and can change its attributes, this exposes a potential security vulnerability. The next sections detail
these disadvantages.
Configuring the Default Computer Container
When you join a computer to the domain and the computer object does not already exist in Active
Directory, Windows automatically creates a computer account in the default computer container, which is
called, Computers (CN=Computers,DC=domain) by default. The problem with this relates to the
discussion of OU design earlier in the lesson. If you have implemented the best practices described there,
5-14 Configuring and Troubleshooting Windows Server® 2008 Active Directory® Domain Services
you have delegated permissions to administer computer objects in specific OUs for clients and servers.
Additionally, you might have linked GPOs to those OUs to manage the configuration of these computer
objects. If a new computer object is created outside of those OUs, in the default computer container, the
permissions and configuration it inherits from its parent container will be different than what it should
have received. You will then need to remember to move the computer from the default container to the
correct OU after joining the domain.
There are two recommended steps to reduce the likelihood of this problem. First, you should attempt to
always prestage computer accounts. If an account is prestaged for a computer in the correct OU, when
the computer joins the domain, it will use the existing account and will be subject to the correct
delegation and configuration.
Second, to reduce the impact of systems being joined to the domain without a prestaged account, you
should change the default computer container so that it is not the Computers container itself, but instead
is an OU that is subject to appropriate delegation and configuration. For example, if you have an OU
called New Clients, you can instruct Windows to use that OU as the default computer container, so that if
computers are joined to the domain without prestaged accounts, the objects are created in the New
Clients OU.
The redircmp.exe command is used to redirect the default computer container with the following syntax.
redircmp "DN of OU for new computer objects"
Now, if a computer joins the domain without a prestaged computer account, Windows creates the
computer object in the specified organizational unit. On this OU, you can apply some baseline GPO
settings that affect all computers in the domain.
Note The same concepts apply to the creation of user accounts. By default, if a user
account is created by using a legacy practice that does not specify the OU for the account,
the object is created in the default user container (CN=Users,DC=domain, by default). The
redirusr.exe command can be used to redirect the default container to an actual OU that is
delegated and configured appropriately. Redirusr, like redircmp, takes a single option: the
distinguished name (DN) of the OU that will become the default user container.
Restricting the Ability of Users to Create Computers
When a computer account is prestaged, the permissions on the account determine who is allowed to join
that computer to the domain. When an account is not prestaged, Windows will, by default, allow any
authenticated user to create a computer object in the default computer container. In fact, Windows will
allow any authenticated user to create 10 computer objects in the default computer container. The
creator of a computer object, by default, has permission to join that computer to the domain. It is through
this mechanism that any authenticated user can join 10 computers to the domain without any explicit
permission to do so.
The 10-computer quota is configured by the ms-DS-MachineAccountQuota attribute of the domain. It
allows any authenticated user to join a machine to the domain, no questions asked. This is problematic
from a security perspective because computers are security principals, and the creator of a security
principal has permission to manage that computer’s properties. In a way, the quota is like allowing any
domain user to create 10 user accounts, without any controls.
We highly recommend that you close this loophole, so that nonadministrative users cannot join machines
to the domain. To change the ms-DS-MachineAccountQuota attribute, perform the following steps:
Managing Computer Accounts
1.
Open the ADSI Edit MMC console from the Administrative Tools folder.
2.
Right-click ADSI Edit, and then click Connect To.
3.
In the Connection Point section, click Select A Well Known Naming Context, and then select
Default Naming Context from the drop-down list.
4.
Click OK.
5.
In the console tree, expand Default Naming Context.
6.
Right-click the domain folder—“dc=contoso,dc=com”, for example—and then click Properties.
7.
Click ms-DS-MachineAccountQuota, and then click Edit.
8.
Type 0.
9.
Click OK.
5-15
The Authenticated Users group is also assigned the user right to add workstations to the domain, but you
do not have to modify this right if you have changed the default value of the ms-DSMachineAccountQuota attribute.
After you have changed the ms-DS-MachineAccountQuota attribute to 0, you can be assured that the
only users who can join computers to the domain are those who have been specifically delegated
permission to join prestaged computer objects or to create new computer objects.
After you’ve eliminated this loophole, you must ensure you have given appropriate administrators explicit
permission to create computer objects in the correct OUs, as described in the "Delegating Permission to
Create Computers" section, otherwise the following error message will appear.
Delegating Computer Management
The fourth task to improve the security of computer accounts is to delegate computer management tasks
at the OU level. Delegation is discussed in Module 8. The following dsacls commands can be used to
delegate computer management tasks:
•
Create a computer.
dsacls "DN of OU" /I:T /G "DOMAIN\group":CC;computer
•
Delete a computer.
dsacls "DN of OU" /I:T /G "DOMAIN\group":DC;computer
•
Join a computer to the domain.
5-16 Configuring and Troubleshooting Windows Server® 2008 Active Directory® Domain Services
dsacls "DN of OU" /I:S /G "DOMAIN\group":
"Validated write to DNS host name";computer
dsacls "DN of OU" /I:S /G "DOMAIN\group":
"Validated write to service principal name";computer
dsacls "DN of OU" /I:S /G "DOMAIN\group":
CA;Reset Password;computer
dsacls "DN of OU" /I:S /G "DOMAIN\group":
WP;Account Restrictions;computer
The preceding four commands should be entered at the command prompt with no space after the colon.
•
Move a computer.
Requires permissions to delete computers in the source OU and create computers in the destination
OU. Even though a move does not actually delete or create the account, this is the permission that is
used by the Access Check.
Question: What two factors determine whether you can join a computer account to the
domain?
Managing Computer Accounts
5-17
Automate Computer Account Creation
The steps you have learned for creating a computer account become burdensome if you are tasked with
creating dozens or even hundreds of computer accounts at the same time. Commands such as Comma
Separated Value Directory Exchange (CSVDE), Lightweight Directory Access Protocol (LDAP) Data
Interchange Format Directory Exchange (LDIFDE), and DSAdd can import and automate the creation of
computer objects. Scripts can also allow you to provision computer objects, that is, to perform business
logic such as the enforcement of computer naming conventions. Also, if you are using Windows Server
2008 R2, you can use Windows PowerShell with Active Directory Module to automate the creation of
computer accounts.
5-18 Configuring and Troubleshooting Windows Server® 2008 Active Directory® Domain Services
Import Computers with CSVDE
CSVDE is a command-line tool that imports or exports Active Directory objects from or to a commadelimited text file (also known as a comma-separated value text file, or .csv file). The basic syntax of the
CSVDE command is.
csvde [-i] [-f "Filename"] [-k]
The -i option specifies import mode—without it, the default mode of CSVDE is export. The -f option
identifies the file name to import from or export to. The -k option is useful during import operations,
because it instructs CSVDE to ignore errors, including “object already exists,” “constraint violation,” and
“attribute or value already exists.”
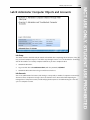
Comma-delimited files can be created, modified, and opened with tools as familiar as Notepad and
Microsoft Office Excel®. The first line of the file defines the attributes by their LDAP attribute names. Each
object follows, one per line, and must contain exactly the attributes listed on the first line. A sample file is
shown in Excel as follows.
When importing computers, be sure to include the userAccountControl attribute, and set it to 4096. This
attribute ensures that the computer will be able to join the account. Also include the pre-Windows 2000
logon name of the computer, the sAMAccountName attribute, which is the name of the computer
followed by a dollar sign ($), as shown in the preceding sample.
Managing Computer Accounts
5-19
Import Computers with LDIFDE
LDIFDE.exe imports data from files in the LDAP Data Interchange Format (LDIF) format. LDIF files are text
files within which operations are specified by a block of lines separated by a blank line. Each operation
begins with the DN attribute of the object that is the target of the operation. The next line, changeType,
specifies the type of operation: add, modify, or delete.
The following listing is an LDIF file that will create a computer account in the Servers OU.
dn: CN=FILE25,OU=File,OU=Servers,DC=contoso,DC=com
changetype: add
objectClass: top
objectClass: person
objectClass: organizationalPerson
objectClass: user
objectClass: computer
cn: FILE25
userAccountControl: 4096
sAMAccountName: FILE25$
The basic syntax of the LDIFDE command is similar to that of the CSVDE command.
ldifde [-i] [-f "Filename"] [-k]
5-20 Configuring and Troubleshooting Windows Server® 2008 Active Directory® Domain Services
By default, LDIFDE is in export mode. The -i option specifies the import mode. You must specify -f to
identify the file you are using for import or export. LDIFDE will stop when it encounters errors, unless you
specify the -k option, in which case, LDIFDE continues processing.
Managing Computer Accounts
5-21
Create Computer Accounts with DSAdd and PowerShell
The DSAdd command is used to create objects in Active Directory. To create computer objects, simply
type the following command.
dsadd computer ComputerDN
where ComputerDN is the distinguished name (DN) of the computer, such as
CN=DESKTOP123,OU=NYC,OU=Client Computers,DC=contoso,DC=com.
If the computer’s DN includes a space, surround the entire DN with quotation marks.
The DSAdd Computer command can take the following options after the DN option:
•
-samid ComputerName
•
-desc Description
•
-loc Location
Note
Content in the following section is specific to Windows Server 2008 R2.
You can also use the Active Directory module for Windows PowerShell® to create a computer account in
AD DS. The following example demonstrates how to create a new computer, DESKTOP123, in the Client
Computers OU in the contoso.com domain.
New-ADComputer -SamAccountName DESKTOP123 –Path ‘OU=Client Computers,DC=contoso,DC=com'
For a full explanation of the parameters that you can pass to New-ADComputer, at the Active Directory
module command prompt, type Get-Help New-ADComputer –detailed, and then press Enter.
5-22 Configuring and Troubleshooting Windows Server® 2008 Active Directory® Domain Services
Create and Join Computers with NetDom and PowerShell
The NetDom command is also able to perform a variety of domain account and security tasks from the
command prompt. You can also use NetDom to create a computer account, by typing the following
command.
netdom add ComputerName /domain:DomainName [/ou:"OUDN"]
[/UserD:DomainUsername /PasswordD:DomainPassword]
This command creates the computer account for ComputerName in the domain indicated by the /domain
option, using the credentials specified by /UserD and /PasswordD. The /ou option causes the object to be
created in the OU specified by the organizational unit distinguished name (OUDN) following the option. If
no OUDN is supplied, the computer account is created in the default computer container. The user
credentials must, of course, have permissions to create computer objects.
Using NetDom.exe
The NetDom.exe command allows you to join a computer to the domain from the command prompt. The
basic syntax of the command is as follows.
netdom join MachineName /Domain:DomainName [/OU:"OUDN"]
[/UserD:DomainUsername] [/PasswordD:{DomainPassword|*} ]
[/UserO:LocalUsername] [/PasswordO:{LocalPassword|*} ]
[/SecurePasswordPrompt]
[/REBoot[:TimeInSeconds]]
It can be useful to join a machine to a domain from the command prompt. The first reason this is useful is
because the join can be included in a script that performs other actions. For example, you could create a
batch file that creates the computer account by using NetDom or DSAdd—the latter of which allows you
to specify other attributes, including description—and then joins the machine to that account by using
NetDom. Second, NetDom.exe can be used to remotely join a machine to the domain. Third, NetDom.exe
Managing Computer Accounts
5-23
allows you to specify the OU for the computer object. The command’s options are, for the most part, selfexplanatory. /UserO and /PasswordO are credentials that are members of the workgroup computer’s local
Administrators group. Specifying * for the password causes NetDom.exe to prompt for the password at
the command prompt. /UserD and /PasswordD are domain credentials with permission to create a
computer object, if the account is not prestaged, or to join a computer to a prestaged account. The
/reboot option causes the system to reboot after joining the domain. The default timeout is 30 seconds.
The /SecurePasswordPrompt option displays a popup for credentials when * is specified for either
/PasswordO or /PasswordD.
Note If you want to use NetDom remotely, the Windows Firewall configuration on the
computer that will be joined to the domain must allow Network Discovery and Remote
Administration.
Using Windows PowerShell
Note
Content in the following section is specific to Windows Server 2008 R2.
Beside the netdom command, you can also use Windows PowerShell with Active Directory Module to
perform a domain join for a local machine. In PowerShell, you should use the Add-Computer cmdlet to
perform a domain join.
The following example demonstrates how to add the local computer on which this command is being run,
to the contoso.com domain. The local computer is added to the OU in the directory that is specified by
the OUPath parameter, using the current logged-on user credentials. You must run this command on the
local computer.
Add-Computer -DomainOrWorkgroupName Contoso -OUPath OU=Client
Computers,DC=contoso,DC=com
For a full explanation of the parameters that you can pass to Add-Computer, at the Active Directory
Module command prompt, type Get-Help Add-Computer –detailed, and then press Enter.
5-24 Configuring and Troubleshooting Windows Server® 2008 Active Directory® Domain Services
Lab A: Create Computers and Join the Domain
Lab Setup
For this lab, you will use the available virtual machine environment. Before you begin the lab, you must
complete the following steps:
1.
On the host computer, click Start, point to Administrative Tools, and then click Hyper-V Manager.
2.
In Hyper-V™ Manager, click 6425C-NYC-DC1 and 6425C-NYC-DC2, and in the Actions pane,
click Start.
3.
In the Actions pane, click Connect. Wait until the virtual machine starts.
4.
Log on by using the following credentials:
•
User name: Pat.Coleman_Admin
•
Password: Pa$$w0rd
•
Domain: Contoso
5.
Open Windows Explorer on 6425C-NYC-DC1 and then browse to D:\Labfiles\Lab05a.
6.
Run Lab05a_Setup.bat with administrative credentials. Use the account Pat.Coleman_Admin, with
the password, Pa$$w0rd.
7.
The lab setup script runs. When it is complete, press any key to continue.
8.
Close the Windows Explorer window, Lab05a.
9.
In Hyper-V™ Manager, click 6425C-NYC-SVR2, and in the Actions pane, click Start.
10. In the Actions pane, click Connect. Wait until the virtual machine starts. Do not log on to NYC-SVR2
until directed to do so.
Managing Computer Accounts
5-25
Lab Scenario
You are an administrator for Contoso, Ltd. During a security audit, it was identified that there is no control
over the creation of new computer accounts: both clients and servers are being added to the domain with
no assurance that process is being followed. In fact, a number of computer accounts were discovered in
the Computers container. These computer objects were for active computer accounts, but the computers
had not been created in or moved to the correct OUs within the Client Computers or Servers OUs
according to standard procedures. You’ve been tasked with improving the procedures.
5-26 Configuring and Troubleshooting Windows Server® 2008 Active Directory® Domain Services
Exercise 1: Join a Computer to the Domain with the Windows Interface
In this exercise, you will join a computer to the domain using the Windows interface, and then you will
remove the machine from the domain.
The main tasks for this exercise are as follows:
1.
Identify and correct a DNS configuration error.
2.
Join NYC-SVR2 to the domain.
3.
Verify the location of the NYC-SVR2 account.
4.
Remove NYC-SVR2 from the domain.
5.
Delete the NYC-SVR2 account.
Task 1: Identify and correct a DNS configuration error.
1.
Log on to NYC-SVR2 as Administrator, with the password, Pa$$w0rd.
2.
Open System Properties by using one of the following methods:
3.
•
Click Start, right-click Computer, and then click Properties.
•
Open System from Control Panel.
•
Press the Windows logo key and the Pause key.
Attempt to join the computer to the domain, contoso.com, being sure to use the fully qualified
domain name (contoso.com) rather than the NetBIOS name for the domain (contoso).
Doing so tests that DNS is configured correctly on the client for locating the domain.
4.
Change the DNS Server configuration on the client to 10.0.0.10.
Question: Why might the join have succeeded if you had used the domain name contoso,
instead of contoso.com? What might go wrong after the domain was successfully joined but
with DNS incorrectly configured?
Answer: The use of the fully qualified name forced the name resolution process to use DNS,
and because DNS failed, the domain join failed. The domain name, “contoso”, is a flat
domain name that could be resolved through NetBIOS name resolution. Even though the
domain join would be successful, the client would likely have problems locating domain
controllers in other sites, and locating other resources in the domain. Performing the join
with a fully qualified domain name ensures that DNS is functioning before joining the
domain.
Task 2: Join NYC-SVR2 to the domain.
1.
Join NYC-SVR2 to the domain. When prompted for domain credentials, enter the user name,
Aaron.Painter, and the password, Pa$$w0rd.
2.
Note that Aaron.Painter is a standard user in the contoso.com domain. He has no special rights or
permissions, and yet he is able to join a computer to the domain. He does have to be logged on to
the computer with an account that is a member of the computer's Administrators group.
3.
Allow the system to restart.
Managing Computer Accounts
5-27
Task 3: Verify the location of the NYC-SVR2 account.
1.
On NYC-DC1, run Active Directory Users and Computers as an administrator, with the user name,
Pat.Coleman_Admin, and the password, Pa$$w0rd.
2.
Locate the NYC-SVR2 account.
Question: In which OU or container does the account exist?
Answer: The Computers container.
Task 4: Remove NYC-SVR2 from the domain.
1.
Log on to NYC-SVR2 as Administrator, with the password, Pa$$w0rd.
2.
Change NYC-SVR2's domain/workgroup membership to a workgroup named, WORKGROUP.
3.
Restart the server.
Task 5: Delete the NYC-SVR2 account.
Question: On NYC-DC1, refresh the view of the Computers container and examine the NYCSVR2 account. What is its status?
Answer: The status is Disabled.
Question: You were not prompted for domain credentials in Task 4, and yet a change was
made to the domain: the computer account was reset and disabled. What credentials were
used to do this? What credentials were used to change the workgroup/domain membership
of NYC-SVR2?
Answer: This is a tricky question. Domain credentials with appropriate permissions are
required to make a change to the domain, such as resetting and disabling a computer
account; and credentials that are in the local Administrators group on the client are required
to change the computer’s workgroup/domain membership.
You were logged on to NYC-SVR2 as the local Administrator, so you were able to change the
computer’s workgroup/domain membership. Normally, you would have been prompted for domain
credentials, but it just so happens that the local Administrator account’s user name, Administrator,
and password, Pa$$w0rd, are identical to those of the domain Administrator account, which of course
has permission to modify objects in the domain. Windows attempts to authenticate you behind the
scenes, and only prompts you for domain credentials if that authentication fails. In this case, because
of the similarity in credentials, you were actually authenticated as the domain’s Administrator.
In a production environment, the domain’s Administrator account should have a very long, complex,
secure password that is different from the passwords used for Administrator accounts in the domain
member computer.
•
Delete the NYC-SVR2 computer object.
Result: In this exercise, you became familiar with typical legacy practices used to join computers to a
domain.
5-28 Configuring and Troubleshooting Windows Server® 2008 Active Directory® Domain Services
Exercise 2: Secure Computer Joins
In this exercise, you will implement best practices to secure the joining of machines to the domain.
The main tasks for this exercise are as follows:
1.
Redirect the default computer container.
2.
Restrict unmanaged domain joins.
3.
Validate the effectiveness of ms-DS-MachineAccountQuota.
Task 1: Redirect the default computer container.
1.
On NYC-DC1, run a command prompt as an administrator with the user name, Pat.Coleman_Admin,
and the password, Pa$$w0rd.
2.
Use the RedirCmp command to redirect the default computers container to the New Computers OU
in the contoso.com domain.
Task 2: Restrict unmanaged domain joins.
1.
Run the ADSI Edit console as an administrator with the user name, Pat.Coleman_Admin, and the
password, Pa$$w0rd.
2.
Connect to the domain and, in the properties of the domain, change the ms-DSMachineAccountQuota to zero (0).
Task 3: Validate the effectiveness of ms-DS-MachineAccountQuota.
•
Log on to NYC-SVR2 as Administrator and attempt to join NYC-SVR2 to the contoso.com domain
just as you did in Exercise 1. When prompted for domain credentials, enter the user name,
Aaron.Painter, and the password, Pa$$w0rd.
In Exercise 1, Aaron Painter was able to join the domain. Now, he is unable to join the domain.
Question: What message do you receive when a user is no longer able to create a computer
object because of the ms-DS-MachineAccountQuota?
Results: In this exercise, you redirected the container for creating computer accounts to the New
Computers OU, and restricted the users from joining computers to the domain without explicit
permissions to do so.
Managing Computer Accounts
5-29
Exercise 3: Manage Computer Account Creation
In this exercise, you will implement several best practices for creating computer accounts and joining
machines to the domain.
The main tasks for this exercise are as follows:
1.
Prestage a computer account.
2.
Join a computer remotely to a prestaged account by using NetDom.
Task 1: Prestage a computer account.
1.
On NYC-DC1, run Active Directory Users and Computers as an administrator with the user name,
Pat.Coleman_Admin, and the password, Pa$$w0rd.
2.
In the Servers\File OU, create a new computer object for NYC-SVR2 and give the AD_Server_Deploy
group permission to join the computer to the domain.
Task 2: Join a computer remotely to a prestaged account by using NetDom.
In this task, you will join NYC-SVR2 to the domain remotely, using credentials that are in the local
Administrators group of NYC-SVR2 and domain credentials that are in the AD_Server_Deploy group.
1.
Run the command prompt as an administrator, with the user name, Aaron.Painter_Admin, and the
password, Pa$$word.
Note Aaron.Painter_Admin is not an administrator. The Run as an administrator
command allows you to run a process with any credentials, as long as those credentials have
sufficient privilege to run the process itself.
2.
Type the command, whoami /groups, to list the group memberships of the current account
(Aaron.Painter_Admin). Note that the user is a member of AD_Server_Deploy and is not a member
of any other administrative group.
3.
Using the NetDom command, join NYC-SVR2 to the domain. Use the local Administrator account
credentials for NYC-SVR2 and the domain credentials for Aaron.Painter_Admin, who is a member
of AD_Server_Deploy and therefore has permission to join the computer to the domain. Configure
the server to reboot automatically in 5 seconds.
Type the following command, and then press Enter.
netdom join NYC-SVR2 /domain:contoso.com
/UserO:Administrator /PasswordO:*
/UserD:CONTOSO\Aaron.Painter_Admin /PasswordD:*
/REBoot:5
Note The NYC-SVR2 firewall exceptions are configured for ports 135, 139, and for Network
Discovery (NB-Name-In). These exceptions allow NetDom Join to be used to remotely join
NYC-SVR2 to the domain.
4.
The server restarts.
5-30 Configuring and Troubleshooting Windows Server® 2008 Active Directory® Domain Services
5.
Log on to NYC-SVR2 as Contoso\Pat.Coleman, with the password of Pa$$w0rd. This confirms that the
server has successfully joined the domain.
6.
Log off from NYC-SVR2.
Results: After completing this exercise, NYC-SVR2 will be joined to the domain with an account in the
Servers\File OU.
Important Do not shut down the virtual machines after you finish this lab because the
settings you have configured here will be used in Lab B.
Lab Review Questions
Question: What did you learn about the pros and cons of various approaches to creating
computer accounts in an AD DS domain?
Question: What are the two credentials that are necessary for any computer to join a
domain?
Managing Computer Accounts
5-31
Lesson 2
Administer Computer Objects and Accounts
A computer account begins its life cycle when it is created and when the computer joins the domain. Dayto-day administrative tasks include configuring computer properties; moving the computer between OUs;
managing the computer itself; and renaming, resetting, disabling, enabling, and eventually deleting the
computer object. This lesson looks closely at the computer properties and procedures involved with these
tasks, and will equip you to administer computers in a domain.
Objectives
After completing this lesson, you will be able to:
•
Configure computer account properties.
•
Move a computer between OUs.
•
Recognize computer account problems.
•
Reset a computer account.
•
Rename a computer.
•
Disable and enable a computer.
5-32 Configuring and Troubleshooting Windows Server® 2008 Active Directory® Domain Services
Configure Computer Attributes
When you create a computer object by using Active Directory Users and Computers, you are prompted to
configure only the most fundamental attributes, including the computer name and the delegation to join
the computer to the domain. Computers have several properties that are not visible when you are
creating the computer object; you should configure these properties as part of the process of staging the
computer account.
Open a computer object’s Properties dialog box to set its location and description, configure its group
memberships and dial-in permissions, and link it to the user object of the user to whom the computer is
assigned. The Operating System tab is read-only. The information will be blank until a computer has
joined the domain using that account, at which time the client publishes the information to its account.
Several object classes in Active Directory support the managedBy attribute that is shown on the Managed
By tab. This linked attribute creates a cross-reference to a user object. All other properties—the addresses
and telephone numbers—are displayed directly from the user object. They are not stored as part of the
computer object itself. Some organizations use the Managed By tab to link the computer to the primary
user of the computer. Alternatively, you might choose to link the computer to a group that is responsible
for the support of a computer. For example, this as an option might be attractive for computer accounts
that represent servers.
On the Member Of tab of a computer’s Properties dialog box, you can add the computer to groups. The
ability to manage computers in groups is an important and often underutilized feature of Active
Directory. A group to which computers belong can be used to assign resource access permissions to the
computer, to filter the application of a GPO, or as a collection for a software management tool, such as
Microsoft® System Center Configuration Manager 2007.
As with users and groups, it is possible to select more than one computer object and subsequently
manage or modify properties of all selected computers simultaneously.
Managing Computer Accounts
5-33
Configuring Computer Attributes with DSMod
You can use the DSMod command to modify the description and the location attributes of a computer
object. It uses the following syntax.
dsmod computer "ComputerDN" [-desc "Description"] [-loc "Location"]
Note
Content in the following section is specific to Windows Server 2008 R2.
Attributes of a computer account can also be managed by using Windows PowerShell with Active
Directory Module.
The following example demonstrates how to modify the ManagedBy attribute of the computer LONSRV1.
Set-ADComputer LON-SRV1 -ManagedBy 'CN=SQL Administrator
01,OU=UserAccounts,OU=Managed,DC=contoso,DC=com'
5-34 Configuring and Troubleshooting Windows Server® 2008 Active Directory® Domain Services
Move a Computer
Many organizations have multiple OUs for computer objects. Some domains, for example, have computer
OUs based on geographic sites, as shown earlier in this module. If you have more than one OU for
computers, it is likely that someday you will need to move a computer between OUs.
To move a computer by using the Active Directory Users and Computers snap-in, you can use one of the
following options:
•
Click the computer and then drag and drop the computer to the desired location.
•
Right-click the computer, and then click Move.
The DSMove command allows you to move a computer object or any other object. The syntax of
DSMove is as follows.
dsmove ObjectDN [-newname NewName] [-newparent ParentDN]
The -newname option allows you to rename an object. The -newparent option allows you to move an
object. To move a computer named, DESKTOP153, from the Computers container to the NYC OU, you
would type the following command.
dsmove "CN=DESKTOP153,CN=Computers,DC=contoso,DC=com" -newparent
"OU=NYC,OU=Client Computers,DC=contoso,DC=com"
Using Windows PowerShell
Note
Content in the following section is specific to Windows Server 2008 R2.
You can also perform the move process for a computer by using Windows PowerShell with Active
Directory Module. This is performed by using pipelined cmdlets, Get-ADComputer and Move-ADObject.
Managing Computer Accounts
The following example demonstrates how to move the computer, Workstation1, to the
ManagedComputers OU in the contoso.com domain.
Get-ADComputer Workstation1 | Move-ADObject -TargetPath
'OU=ManagedComputers,DC=contoso,DC=com'
5-35
5-36 Configuring and Troubleshooting Windows Server® 2008 Active Directory® Domain Services
Computer Account and Secure Channel
Every member computer in an Active Directory domain maintains a computer account with a user name
(sAMAccountName) and password, just like a user account does. The computer stores its password in the
form of a local security authority (LSA) secret and changes its password with the domain every 30 days or
so. The NetLogon service uses the credentials to log on to the domain, which establishes the secure
channel with a domain controller.
Computer accounts and the secure relationships between computers and their domain are robust.
However, certain scenarios might arise in which a computer is no longer able to authenticate with the
domain. Examples of such scenarios include the following:
•
After reinstalling the operating system on a workstation, the workstation is unable to authenticate,
even though the technician used the same computer name. Because the new installation generated a
new SID and because the new computer does not know the computer account password in the
domain, it does not belong to the domain and cannot authenticate to the domain.
•
A computer is completely restored from backup and is unable to authenticate. It is likely that the
computer changed its password with the domain after the backup operation. Computers change their
passwords every 30 days, and Active Directory remembers the current and previous password. If the
restore operation restored the computer with a significantly outdated password, the computer will
not be able to authenticate.
•
A computer’s LSA secret gets out of synchronization with the password known by the domain. You
can think of this as the computer forgetting its password; although it did not forget its password, it
just disagrees with the domain over what the password really is. When this happens, the computer
cannot authenticate and the secure channel cannot be created.
Managing Computer Accounts
5-37
Recognize Computer Account Problems
The most common signs of computer account problems are the following:
•
Messages at logon indicate that a domain controller cannot be contacted, that the computer account
might be missing, that the password on the computer account is incorrect, or that the trust
relationship (another way of saying “the secure relationship”) between the computer and the domain
has been lost. An example is shown here.
•
Error messages or events in the event log indicate similar problems or suggest that passwords, trusts,
secure channels, or relationships with the domain or a domain controller have failed. One such error
is NETLOGON Event ID 3210: Failed To Authenticate, which appears in the computer's event log.
•
A computer account is missing in Active Directory.
5-38 Configuring and Troubleshooting Windows Server® 2008 Active Directory® Domain Services
Reset a Computer Account
When the secure channel fails, you must reset the secure channel. Many administrators do so by removing
the computer from the domain, putting it in a workgroup, and then rejoining the domain. This is not a
good practice because it has the potential to delete the computer account altogether, which loses the
computer’s SID, and more importantly, its group memberships. When you rejoin the domain, even though
the computer has the same name, the account has a new SID, and all the group memberships of the
previous computer object must be re-created.
Do not remove a computer from the domain and rejoin it.
If the trust with the domain has been lost, do not remove a computer from the domain and rejoin it.
Instead, reset the secure channel.
To reset the secure channel between a domain member and the domain, use the Active Directory Users
and Computers snap-in, DSMod.exe, NetDom.exe, or NLTest.exe. If you reset the account, the computer’s
SID remains the same and it maintains its group memberships.
To reset the secure channel by using the Active Directory Users and Computers snap-in:
1.
Right-click a computer, and then click Reset Account.
2.
Click Yes to confirm your choice.
3.
Rejoin the computer to the domain, and then restart the computer.
To reset the secure channel by using DSMod:
1.
Type the following command.
dsmod computer "ComputerDN" –reset.
2.
Rejoin the computer to the domain, and then restart the computer.
Managing Computer Accounts
5-39
To reset the secure channel by using NetDom:
•
Type the following command,
netdom reset MachineName /domain DomainName /UserO UserName /PasswordO {Password | *}
where the credentials belong to the local Administrators group of the computer.
This command resets the secure channel by attempting to reset the password on both the computer
and the domain, so it does not require rejoining or rebooting.
To reset the secure channel by using NLTest, on the computer that has lost its trust, type the following
command.
NLTEST /SERVER:SERVERNAME /SC_RESET:DOMAIN\DOMAINCONTROLLER
For example, the following command, like NetDom, attempts to reset the secure channel by resetting the
password on both the computer and in the domain, so it does not require rejoining or restarting.
nltest /server:NYC-SVR2 /sc_reset:CONTOSO\NYC-SVR2
Because NLTest and NetDom reset the secure channel without requiring a reboot, you should try those
commands first. Only if those are not successful should you use the Reset Account command or DSMod to
reset the computer account.
Note
Content in the following section is specific to Windows Server 2008 R2.
You can also use Windows PowerShell with Active Directory Module to reset a computer account. The
following example demonstrates how to reset the secure channel between the local computer and the
domain to which it is joined. You must run this command on the local computer.
Test-ComputerSecureChannel –Repair
For a full explanation of the parameters that you can pass to Test-ComputerSeureChannel, at the Active
Directory Module command prompt, type Get-Help Test-ComputerSecureChannel –detailed, and then
press Enter.
5-40 Configuring and Troubleshooting Windows Server® 2008 Active Directory® Domain Services
Rename a Computer
When you rename a computer, you must be careful to do it correctly. Remember that the computer uses
its name to authenticate with the domain, so if you rename only the domain object, or only the computer
itself, they will be out of synch. You must rename the computer in such a way that both the computer and
the domain object are changed.
You can rename a computer correctly by logging on to the computer, either locally or with a remote
desktop session.
1.
Open System Properties from Control Panel.
2.
In the Computer name, domain, and workgroup settings section, click Change Settings.
3.
If you are prompted by User Account Control, click Continue.
4.
Click the Computer Name tab.
5.
Click the Change button.
6.
Type the new name and click OK twice to close the dialog boxes.
7.
Restart the computer to allow the change to take effect.
From the command prompt, you can use the NetDom command, with the following syntax.
netdom renamecomputer MachineName /NewName:NewName
[/UserO:LocalUsername] [/PasswordO:{LocalPassword|*} ]
[/UserD:DomainUsername] [/PasswordD:{DomainPassword|*} ]
[/SecurePasswordPrompt] [/REBoot[:TimeInSeconds]]
In addition to specifying the machine to rename (MachineName) and the desired new name (NewName),
you must have credentials that are a member of the local Administrators group on the computer and
credentials that have permission to rename the domain computer object. By default, NetDom will use the
Managing Computer Accounts
5-41
credentials with which the command is run. You can specify credentials by using /UserO and /PasswordO
for the credentials in the computer’s local Administrators group, and /UserD and /PasswordD for the
domain credentials with permission to rename the computer object. Specifying * for the password causes
NetDom.exe to prompt for the password at the command prompt. The /SecurePasswordPrompt option
displays a popup for credentials when * is specified for either /PasswordO or /PasswordD. After you
rename a computer, you must reboot the computer. The /REBoot option causes the system to reboot
after 30 seconds, unless otherwise specified by TimeInSeconds.
When you rename a computer, you can adversely affect services running on the computer. For example,
Active Directory Certificate Services (AD CS) relies on the server’s name. Be certain to consider the impact
of renaming a computer before doing so. Do not use these methods to rename a domain controller.
Note
The content in the following section is specific to Windows Server 2008 R2.
It is also possible to use Windows PowerShell with Active Directory Module to rename a computer. You
can use this approach to change the local computer name and to change the Active Directory computer
object name. The following example demonstrates how to rename the local domain-joined computer on
which the command is being run. This command must be run on the local computer.
ReName-Computer -NCN MyComputer
The second example shows how to change the name of computer object named, Server1, in the
ManagedComputers OU in the contoso.com domain.
Rename-ADObject ‘CN=fabrikamsrv1,OU=ManagedComputers,DC=Fabrikam,DC=com’ –NewName
fabrikamsrv3
5-42 Configuring and Troubleshooting Windows Server® 2008 Active Directory® Domain Services
Disable and Enable a Computer
If a computer is taken offline or is not to be used for an extended period of time, you should consider
disabling the account. This recommendation reflects the security principle that an identity store should
allow authentication only of the minimum number of accounts required to achieve the goals of an
organization. Disabling the account does not modify the computer’s SID or group membership, so when
the computer is brought back online, the account can be enabled.
To disable a computer in the Active Directory Users and Computers snap-in, right-click the computer, and
then click Disable Account.
A disabled account appears with a down-arrow icon in the Active Directory Users And Computers snap-in,
as shown here:
While an account is disabled, the computer cannot create a secure channel with the domain. The result is
that users who have not previously logged on to the computer, and who therefore do not have cached
credentials on the computer, will be unable to log on until the secure channel is reestablished by enabling
the account.
To enable a computer account, right-click the computer, and then click Enable Account.
To disable or enable a computer from the command prompt, use the DSMod command. The syntax used
to disable or enable computers is as follows.
dsmod computer ComputerDN -disabled yes
dsmod computer ComputerDN -disabled no
Managing Computer Accounts
5-43
Delete and Recycle Computer Accounts
You have learned that each computer account, like each user account, maintains a unique SID, which
enables an administrator to grant permissions to computers. Also, like user accounts, computers can
belong to groups. Therefore, it is important to understand the effect of deleting a computer account.
When a computer account is deleted, its group memberships and SID are lost. If the deletion is accidental,
and another computer account is created with the same name, it is nonetheless a new account, with a
new SID. Group memberships must be reestablished, and any permission assigned to the deleted
computer must be reassigned to the new account. Delete computer objects only when you are certain
that you no longer require those security-related attributes of the object.
To delete a computer account by using Active Directory Users and Computers, perform the following
steps:
1.
Right-click the computer object, and then click Delete.
You are prompted to confirm the deletion, and because deletion is not reversible, the default
response to the prompt is No.
2.
Click Yes to delete the object.
The DSRm command allows you to delete a computer object from the command prompt. To delete a
computer with DSRm, type the following command.
dsrm ObjectDN
Where ObjectDN is the distinguished name of the computer, such as “CN=Desktop154,
OU=NYC,OU=Client Computers,DC=contoso,DC=com.” Again, you will be prompted to confirm the
deletion.
5-44 Configuring and Troubleshooting Windows Server® 2008 Active Directory® Domain Services
Recycling Computers
If a computer account’s group memberships and SID, and the permissions assigned to that SID, are
important to the operations of a domain, you do not want to delete that account. So what would you do
if a computer was replaced with a new system, with upgraded hardware? That is another scenario in which
you would reset a computer account.
Resetting a computer account resets its password, but maintains all of the computer object’s properties.
With a reset password, the account becomes, in effect, available for use. Any computer can then join the
domain using that account, including the upgraded system. In effect, you’ve recycled the computer
account, assigning it to a new piece of hardware. You can even rename the account. The SID and group
memberships remain the same.
As you learned earlier in this lesson, the Reset Account command is available in the context menu when
you right-click a computer object. The DSMod command can also be used to reset a computer account,
when you type dsmod computer "ComputerDN" -reset.
Managing Computer Accounts
5-45
Lab B: Administer Computer Objects and Accounts
Lab Setup
The virtual machines should already be started and available after completing Lab A. However, if they are
not, you should complete steps 1 to 3 and then step through exercises 1 to 3 in Lab A before continuing.
You will be unable to successfully complete Lab B unless you have completed Lab A.
1.
Start 6425C-NYC-DC1.
2.
Log on to NYC-DC1 as Pat.Coleman.admin, with the password, Pa$$w0rd.
3.
Start 6425C-NYC-SVR2. Do not log on until directed to do so.
Lab Scenario
You are an administrator for Contoso, Ltd. During a security audit, a number of computer accounts were
discovered. Those computers no longer exist in the domain. You’ve been tasked with improving the
management of computer accounts, and identifying the best practices for administering the entire life
cycle of a computer account.
5-46 Configuring and Troubleshooting Windows Server® 2008 Active Directory® Domain Services
Exercise 1: Administer Computer Objects Through Their Life Cycle
In this exercise, you will configure common attributes of computer objects, including description and
ManagedBy. You will also manage the group membership of computers and move computers between
OUs.
The main tasks for this exercise are as follows:
1.
Configure computer object attributes.
2.
Add computers to software management groups.
3.
Move a computer between OUs.
4.
Disable, enable, and delete computers.
Task 1: Configure computer object attributes.
1.
On NYC-DC1, run Active Directory Users and Computers as an administrator, with the user name,
Pat.Coleman_Admin, and the password, Pa$$w0rd.
2.
In the Client Computers\SEA OU, use the Managed By tab of computer objects to assign LNO8538
to Linda Mitchell and LOT9179 to Scott Mitchell.
3.
Because Scott and Linda Mitchell will occasionally use each other's computer, use multiselect to
change the description of both LNO8538 and LOT9179 to Scott and Linda Mitchell.
Task 2: Add computers to software management groups.
Microsoft Office Project is required on both Scott's and Linda's computers. Contoso, Ltd. uses security
groups as collections for scoping the deployment of software. You will add each of their computers to
the group, APP_Project, by using two different methods.
Method 1
1.
In the Client Computers\SEA OU, right-click LOT9179, and then click Add to a group.
2.
Type APP_ and press Enter.
The Multiple Items Found dialog box appears.
3.
Click APP_Project, and then click OK.
A message appears: “The Add to Group operation was successfully completed.”
4.
Click OK.
Method 2
1.
In the console tree, expand the Groups OU, and then click Application.
2.
Right-click APP_Project, and then click Properties.
3.
Click the Members tab.
4.
Click Add.
5.
Type LNO8538 and press Enter.
The Name Not Found dialog box appears.
By default, the Select Users, Computers, or Groups interface does not search for computer objects.
6.
Click Object Types.
Managing Computer Accounts
7.
Select the check box next to Computers, and then click OK.
8.
Click OK to close the Name Not Found dialog box.
5-47
Both computers can now be seen on the Members tab.
9.
Click OK.
Task 3: Move a computer between OUs.
Scott and Linda are relocating to the Vancouver office. You will move their computers to the new OU by
using two different methods.
Method 1
1.
In the Client Computers\SEA OU, click LOT9179.
2.
Drag LOT9179 into the VAN OU, visible in the console tree.
A message appears that reminds you to be careful about moving objects in Active Directory.
3.
Click Yes.
Method 2
4.
Right-click LNO8538, and then click Move.
The Move dialog box appears.
5.
In the console tree, expand Client Computers, and then click VAN.
6.
Click OK.
Task 4: Disable, enable, and delete computers.
1.
In the Client Computers\SEA OU, disable, and then enable the account for DEP6152.
2.
Delete the account for DEP6152.
Result: In this exercise, you added computers to software management groups, moved a computer
between OUs, and deleted a computer..
5-48 Configuring and Troubleshooting Windows Server® 2008 Active Directory® Domain Services
Exercise 2: Administer and Troubleshoot Computer Accounts
In this exercise, you will administer and troubleshoot computer accounts and the secure channel.
The main tasks for this exercise are as follows:
1.
Reset a computer account.
2.
Experience a secure channel problem.
3.
Reset the secure channel.
Task 1: Reset a computer account.
Recently, Scott Mitchell's computer required reinstallation. The naming convention at Contoso, Ltd. is to
use the name of a computer object as its asset tag, assigned by the IT inventory team. Because Scott
reinstalled his computer on the same piece of hardware, the computer name is the same: LOT9179. He
now wants to join the machine to the domain, but there is already an account for LOT9179, and the
account is a member of groups that ensure the correct software (including Microsoft Office Project) and
configuration are applied to the system. Therefore, it is important that the account not be deleted, so that
group memberships can be retained.
•
In the Client Computers\VAN OU, reset the account for LOT9179.
You could now join Scott's reinstalled computer to the domain.
Task 2: Experience a secure channel problem.
1.
Log on to NYC-SVR2 as Pat.Coleman, with the password, Pa$$w0rd. After the desktop appears, log
off.
2.
To "break" the secure channel, use Active Directory Users and Computers on NYC-DC1 to reset the
account for NYC-SVR2.
3.
Attempt to log on to NYC-SVR2 as Pat.Coleman, with the password, Pa$$w0rd.
Task 3: Reset the secure channel.
To solve a broken trust relationship between a domain member and the domain, you can reset the
computer's account, move the computer into a workgroup, and then rejoin the domain.
•
Reset the computer account for NYC-SVR2.
After resetting the secure channel, you could move NYC-SVR2 into a workgroup, and then rejoin
the domain. It will join its reset account, thereby retaining its group memberships. Do not
perform that step at this time.
Result: In this exercise, you resolved secure channel issues..
Lab Review Question
Question: What insights did you gain into the issues and procedures regarding computer
accounts and administering computer accounts through their life cycle?
Managing Computer Accounts
5-49
Lesson 3
Offline Domain Join
Offline Domain Join is a new functionality specific to Windows Server 2008 R2. This functionality enables
administrators to join computers to domain without network connectivity. In this lesson you will learn how
Offline Domain Join works and how to use it.
Objectives
After completing this lesson you will be able to:
•
Describe Offline Domain Join.
•
Describe the process for performing an Offline Domain Join.
•
Perform an Offline Domain Join.
Note
The content in this lesson is specific to Windows Server 2008 R2.
5-50 Configuring and Troubleshooting Windows Server® 2008 Active Directory® Domain Services
What Is an Offline Domain Join?
In earlier Windows versions, it was mandatory to have a network connection to a domain controller to join
a computer to the Active Directory domain. In some scenarios, this can be a limitation. For example, if you
need to perform a full provision of computers that are currently not connected to a network, or not
located in the same place as domain controllers, you cannot complete the process unless you join the
computers to a domain, and restart them once more after network connections are established.
Offline Domain Join is a new functionality in Windows Server 2008 R2 and Windows 7 that allows you to
join a computer to domain without actually being connected to the network where the domain controller
resides. In fact, all preparation steps are performed on a domain controller and a computer while it is still
offline. After it gets connected to a network, a trust relationship with the domain is established without
any user intervention. No additional restart is necessary to complete the domain join. This helps reduce
the time and effort required to complete a large-scale computer deployment in places such as data
centers.
You can also benefit from the Offline Domain Join feature if you are deploying virtual machines. Offline
Domain Join makes it possible for you to join the virtual machines to the domain when they initially start
following the operating system installation. No additional restart is required to complete the domain join.
This can significantly reduce the overall time required for wide-scale virtual machine deployments.
To perform an Offline Domain Join, you do not have to have domain controllers running on Windows
Server 2008 R2, It is also not mandatory to have the domain or forest in the Windows Server 2008
functional mode. The only essential requirement for using this method is that the machine used for
provisioning and the machine being provisioned must have Windows 7 or Windows Server 2008 R2.
.
Managing Computer Accounts
5-51
Process for Performing an Offline Domain Join
To perform an Offline Domain Join, you must use a new command-line utility named, Djoin.exe. This
utility is used to both provision computer accounts into AD DS and for inserting domain data into the
operating system of the computer that is being joined to the domain by using this method.
Performing an Offline Join by Using Djoin.exe
Djoin.exe performs the following tasks:
•
Provisions a new computer account into AD DS. This pre-creates a computer account and sets it up to
be connected at a later date.
•
Generates a text file (a blob) that contains information that is necessary for an Offline Domain Join.
The blob contains the machine account password and other information about the domain, including
the domain name, the name of a domain controller, the SID of the domain, and so on
•
Inserts the data provided in the blob into the operating system of the computer being joined to the
domain
Prerequisites for Performing an Offline Join
The computer on which you run Djoin.exe to provision computer account data into AD DS must be
running Windows 7 or Windows Server 2008 R2. The computer that you want to join to the domain must
also be running Windows 7 or Windows Server 2008 R2.
It is not mandatory that you perform an Offline Domain Join right after you provision a computer account
into AD DS. You can do it at any time later.
To perform an Offline Domain Join, you must have the rights that are necessary to join workstations to
the domain and to create computer accounts in the domain. Members of the Domain Admins group have
these rights by default. If you are not a member of the Domain Admins group, a member of the Domain
Admins group must delegate you the right to join computers to the domain by using Group Policy or by
editing an ACL of the container where the computer account will be stored.
5-52 Configuring and Troubleshooting Windows Server® 2008 Active Directory® Domain Services
Djoin.exe should be run at an elevated command prompt to provision the computer account metadata.
When you run the provisioning command, the computer account metadata is created in a .txt file that you
specify as part of the command. After you run the provisioning command, you can either run Djoin.exe
again to request the computer account metadata and insert it into the Windows directory of the
destination computer, or you can save the computer account metadata in the Unattend.xml file and then
specify the Unattend.xml file during an unattended operating system installation of the destination
computer.
Offline Domain Join Process
The Offline Domain Join process includes the following steps:
1.
Run the djoin.exe /provision command to create the computer account metadata for the destination
computer (the computer that you want to join to the domain). As part of this command, you must
specify the name of the domain that you want the computer to join and the name of the computer,
as follows.
djoin /provision /domain contoso.com /machine DESKTOP123 /savefile C:\desktop123.txt
After performing this step, a computer account named, DESKTOP123, will be provisioned to AD DS, and a
blob file named desktop123.txt will be created. Now you have to transfer this file to the computer that is
being joined to the domain.
Note The base64-encoded metadata blob that is created by the provisioning command
contains very sensitive data. It should be treated just as securely as a plaintext password.
2.
Run the djoin.exe /requestODJ command to insert the computer account metadata into the Windows
directory of the destination computer, as follows.
djoin /requestODJ /loadfile desktop123.txt /windowspath %SystemRoot% /localos
3.
When you start the destination computer, either as a virtual machine or after a complete operating
system installation, the computer will be joined to the domain that you specify.
The switch /localos from the previous command is used only if you perform a djoin operation on the
computer that you are joining to the domain. However, if during the provisioning process, you are
mounting system hard drives (virtual or physical) from the computers that you are provisioning, you
should not use the /localos switch.
Note Using deployment tools such as Windows System Image Manager, you can perform
an unattended domain join during an operating system installation by providing information
that is relevant to the domain join in an Unattend.xml file. Using the same Unattend.xml file,
you can supply the information that is necessary for the computers that run Windows 7 and
Windows Server 2008 R2 to perform an Offline Domain Join.
Question: What is the content of the text file that is created during a djoin provisioning
process?
Managing Computer Accounts
5-53
Demonstration: Perform an Offline Domain Join
In this demonstration, your instructor will show you how to perform an Offline Domain Join.
Demonstration Steps
•
Provision a new computer account called, NYC-CL2, in the contoso domain by using the djoin utility.
5-54 Configuring and Troubleshooting Windows Server® 2008 Active Directory® Domain Services
Lab C: Perform an Offline Domain Join
Lab Setup
For this lab, you will use the available virtual machine environment. Before you begin the lab, you must:
1.
On the host computer, click Start, point to Administrative Tools, and then click Hyper-V Manager.
2.
Ensure that the 6425C-NYC-DC1 virtual machine is running.
3.
Log on to 6425C-NYC-DC1 by using the following credentials:
4.
•
User name: Pat.Coleman_Admin
•
Password: Pa$$w0rd
•
Domain: Contoso
Start the 6425C-NYC-CL2 virtual machine. Do not log on to the client machine until directed to do
so.
Lab Scenario
You are an administrator for Contoso, Ltd. You must provision a large number of new computers in a
short period of time. Not all computers can have network connectivity, so you have decided to leverage
the Offline Domain Join functionality. In this lab, you will test this functionality on one virtual machine.
Managing Computer Accounts
5-55
Exercise: Perform an Offline Domain Join
In this exercise, you will perform an Offline Domain Join.
The main tasks for this exercise are as follows:
1.
Ensure that the client computer is not joined to the domain.
2.
Provision a computer account and perform an Offline Domain Join.
Task 1: Ensure that the client computer is not joined to the domain.
1.
Log on to NYC-CL2 as Admin, with the password, Pa$$w0rd.
2.
Open System Properties and ensure that the computer is joined to a workgroup, instead of a
domain
Task 2: Provision a computer account and perform an Offline Domain Join
1.
On NYC-DC1, open a command prompt using administrative credentials and use djoin.exe to
provision a new computer account to AD DS by typing the following command.
djoin /provision /domain contoso.com /machine NYC-CL2 /savefile C:\NYC-CL2.txt
2.
Open Active Directory Users and Computers and verify that the NYC-CL2 machine has been
provisioned in the Computers container.
3.
On NYC-CL2, create a folder called C:\DJOIN. Use Windows Explorer and browse to \\NYC-DC1\C$.
4.
Copy NYC-CL2.txt to the C:\DJOIN folder.
5.
Open a Command Prompt using administrative privileges, type the following command, and then
press Enter.
djoin /requestodj /loadfile C:\DJOIN\NYC-CL2.txt /windowspath %SystemRoot% /localos
6.
After the command is completed, restart NYC-CL2.
7.
Log on as Contoso\Pat.coleman and ensure that NYC-CL2 is joined to the contoso.com domain.
Result: In this exercise, you joined the NYC-CL2 computer to the domain by using Offline Domain Join
technology.
To prepare for the next module
When you finish the lab, revert the virtual machines to their initial state. To do this, complete the
following steps:
1.
On the host computer, start Hyper-V Manager.
2.
Right-click 6425C-NYC-DC1 in the Virtual Machines list, and then click Revert.
3.
In the Revert Virtual Machine dialog box, click Revert.
4.
Repeat these steps for 6425C-NYC-SVR2 and 6425C-NYC-CL2.
5-56 Configuring and Troubleshooting Windows Server® 2008 Active Directory® Domain Services
Module Review and Takeaways
Review Questions
1.
What is the main difference between the Computers container and an OU?
2.
When should you reset a computer account? Why is it better to reset the computer account than to
disjoin and rejoin it to the domain?
3.
In an Offline Domain Join, what should you do after you provision a new computer account to the
domain by using the djoin.exe utility?
Common Issues Related to Computer Account Management
Issue
Troubleshooting tip
The computer cannot be joined to
the domain.
Group Policy is not applied to the
computer after it is joined to the
domain.
The Offline Domain Join is not
working as expected.
Real-World Issues and Scenarios
1.
You are working as an IT technician in Contoso, Ltd. You are managing the Windows Server based
infrastructure. You have to find a method for joining new Windows 7 based computers to a domain
during the installation process without intervention of a user or an administrator.
Managing Computer Accounts
5-57
Best Practices Related to Computer Account Management
•
Always provision a computer account before joining computers to a domain and place them in
appropriate OUs.
•
Redirect the default Computer container to another location.
•
Reset the computer account, instead of just doing a disjoin and rejoin.
•
Integrate the Offline Domain Join functionality with unattended installations.
Tools
Tool
Use for
Where to find it
Windows PowerShell
with Active Directory
Module
Computer account management Administrative Tools
CSVDE,LDIFDE
Importing computer accounts in
AD DS
Windows Server 2008 command prompt
Djoin.exe
Offline domain join
Windows Server 2008 command prompt
Windows Server 2008 R2 Features Introduced in this Module
Windows Server 2008 R2 feature
Description
Windows PowerShell with Active
Directory Module
New administration utility for Active Directory, based on Windows
PowerShell
Offline Domain Join
New feature in Windows Server 2008 R2 and Windows 7 that
allows you to join machines to domain even when they don't have
network connection to domain controller
5-58 Configuring and Troubleshooting Windows Server® 2008 Active Directory® Domain Services