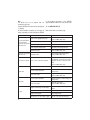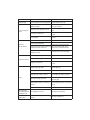
1
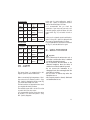
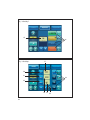
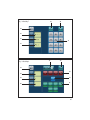
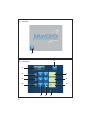
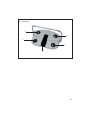
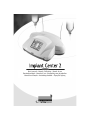
User’s manual • Manuel d’utilisation • Manual de uso
Benutzerhandbuch • Manuale d’uso • Handleiding voor de gebruiker
Manual de utilização • Användningshandbok • Εγχειρίδιο χρήσης
2
English
4
3
ENGLISH
1
INTRODUCTION
2
WARNINGS
3
DESCRIPTION
Physical description
Technical description
4
INSTALLATION / FIRST USE
Unpacking the device
Recommendations
Installation
First use
CONTENTS
5
5-7
7
7
7-11
11
11
11
11-12
12
5
IRRIGATION SOLUTION
12
6
IRRIGATION LINES
12
7
ADJUSTMENTS / SETTINGS / MODES / INTERFACE
Startup
12
Settings
12
Irrigation function
13
Light function
13
I-SURGE function
13-16
PIEZOTOME function
16-17
17
NEWTRON function
Toolbox
17-19
8
SAFETY
9
USING THE DEVICE
19
19-21
10 SHUTTING DOWN THE DEVICE
21
11 ROUTINE MAINTENANCE / STERILIZATION
Irrigation line maintenance
Contra-angle maintenance
Rotary instruments maintenance
Device maintenance
Micromotor cord and scaler
cord maintenance
I-SURGE micromotor maintenance
21
22
22
22
22
4
23
23
Ultrasonic handpiece maintenance
Tip maintenance
12 MONITORING/ MAINTENANCE
Monitoring
Maintenance
Fuse replacement
Operation faults
13 ELECTROMAGNETIC COMPATIBILITY
Electromagnetic emissions
Electromagnetic immunity
Electromagnetic immunity /
Radiofrequency mobile equipment
Recommended separation distances
Cable lengths
24
24-25
25
25
25-26
26-27
28
29
29-30
30
31
14 DISPOSAL AND RECYCLING
31
15 MANUFACTURER'S LIABILITY
31
16 REGULATIONS
31
17 SYMBOLS
256-257
18 CUSTOMER RELATIONS
Manufacturer identification
Addresses of subsidiaries
260
260-261
The list of accessories referred to in this manual is non
exhaustive. Consult your local dealer for further
details.
I - INTRODUCTION
II - WARNINGS
Congratulations! You have just taken possession
of your IMPLANT CENTER 2.
CAUTION:
United States Federal Law restricts the use of
this device solely to qualified, trained and
competent dental health practitioners or under
their supervision.
Designed by SATELEC®, the IMPLANT CENTER 2 is a
multifunction device intended for:
• dental implantology, with its I-SURGE micromotor.
• surgical procedures (osteotomy, osteoplasty,
periodontal and implant surgery) with its
PIEZOTOME or PIEZOTOME LED handpiece.
• mechanical ultrasonic treatment (prophylaxis,
periodontics, endodontics) with its NEWTRON or
NEWTRON LED ultrasonic handpiece.
The I-SURGE micro-motor coupling developed by
SATELEC means that the IMPLANT CENTER can be
used with most contra-angles (without internal
spray or light) found on the market.
In order to get the most out of this hightechnology device and ensure it has a long
working life, please read this manual carefully
before installing, using or maintaining it.
Points preceded by the symbol
particular attention.
should be given
The tips designed for PIEZOTOME 2 and IMPLANT
CENTER 2 are not compatible with PIEZOTOME and
IMPLANT CENTER, and vice versa.
To reduce the risk of accidents, the precautions
stipulated below must be taken:
Device users:
- Use of the IMPLANT CENTER 2 is restricted solely to
qualified, trained and competent dental health
practitioners in the normal context of their
work.
- If you have received this device by error, please
contact the supplier so that it can be removed.
Interactions:
- The IMPLANT CENTER 2 must not be used if the
patient and/or the operator has a cardiac
stimulator (pacemaker) or any other active
implant (e.g. a cochlear implant).
- The device complies with applicable
electromagnetic compatibility standards. The
user should nevertheless ensure that any
potential electromagnetic interference does
not cause an additional risk (presence of
radiofrequency emitters, electronic devices,
etc.).
- The device is not designed to withstand shocks
delivered by an electric defibrillator.
- Do not attempt to connect to the IMPLANT CENTER
2 any other accessories than those supplied by
SATELEC.
5
Electrical connection:
- Your IMPLANT CENTER 2 must be connected to the
electric power supply by a certified dental
installation technician.
- Warning: To avoid any risk of electric shock, this
device must be connected to an electrical
power supply with a protective ground.
- The electric supply to which the device is
connected must comply with the standards in
force in your country.
- If loss of electrical power during use is likely to
generate an unacceptable risk, the device must
be connected to a suitable power source (e.g.
UPS).
Using the device:
- Do not use the device if it appears to be
damaged or faulty.
- Turn the device off before unplugging the power
cord.
- To unplug the power cord, grip the cord plug
and hold the wall socket.
- Never use any other irrigation solution
containers than those intended for suspension
from the supplied brackets.
- The device must only be used with bottles or
bags of physiological saline or sterile water.
- The capacity of the irrigation solution
containers used must not exceed one litre.
- When the device is not to be used for a long
period of time, unplug the device from the
electric supply.
- Do not exert excessive force on the screen.
- Do not move IMPLANT CENTER 2 during use.
Environment:
- Do not cover the device or obstruct the
ventilation vents.
- Do not immerse the device in liquid, and do not
use it outdoors.
- Do not tilt the device at an angle greater than
5°.
- Do not place the device near a heat source.
- Make sure that the cords are not in a traffic
path.
- The device must be stored in its original
packaging in an appropriate and safe place.
- The device is not designed for use in the
presence of anesthetic gases or any other
flammable gas.
- Do not expose the device to water vapor, or
splashes.
- Any condensation inside an electrical device is
potentially dangerous.
- If the device is to be moved from a cold
environment to a hot one, it must not be used
until it has reached room temperature.
- The device is not designed to work near ionizing
radiation.
- Do not insert metal objects into the device (risk
of electric shock, short-circuit or projection of
hazardous substances).
Maintenance:
- Before and after each use, your IMPLANT CENTER 2
must be disinfected with SATELEC-approved
agents.
- Before each procedure, it is essential to make
sure that the accessories to be used have been
cleaned, disinfected and sterilized.
Accessories:
- The device has been designed and developed
for use only with SATELEC accessories to ensure
maximum safety and performance.
6
- Use of accessories from other manufacturers is
a potential hazard for you or your patients.
Repair:
- Warning: Do not repair or modify the device
without prior authorization from SATELEC.
- Warning: If the device is modified or repaired,
specific checks and tests must be performed to
ensure that the device can still be used safely.
- In the case of a fault, contact the supplier of
your device. Do not use unauthorized repairers,
who might make your device dangerous for you
and your patients.
If in any doubt, contact an approved dealer or our
customer support department:
- www.acteongroup.com
- E-mail: [email protected].
III - DESCRIPTION
3. 1 PHYSICAL DESCRIPTION
The IMPLANT CENTER 2 has the following
components:
- a control unit (Fig. 1),
- a multifunction footswitch (Fig. 11),
- a micro-motor cord with connectors (Fig. 1-2),
- two brackets for irrigation solution (Fig. 1-3),
- an I-SURGE micro-motor (Fig. 1-4) without
contra-angle,
- a grounded power cord (Fig. 1-5),
- an LCD (Liquid Crystal Display) touch screen
(Fig. 1-6),
- a motor cord connector (Fig. 1-7),
- two peristaltic pump housings (Fig. 1-8),
- a cord connector for the two ultrasonic
functions (Fig. 1-9),
- a NEWTRON scaler cord or PIEZOTOME 2 LED
handpiece with cord (Fig. 1-10) (according to
option),
- a NEWTRON LED handpiece or a PIEZOTOME 2 LED
handpiece with its cord (Fig. 1-11) (according to
option).
Located at the back of the unit are:
- 1 power cord socket with ground pin (Fig. 2-1),
- 1 footswitch connector (Fig. 2-2),
- 1 fan (Fig. 2-3),
- 2 bracket holders (Fig. 2-4),
- 1 power switch (Fig. 2-5).
3. 2 TECHNICAL DESCRIPTION
a) LCD touch screen
The LCD touch screen (Fig. 3) is used to define
the settings of your IMPLANT CENTER 2.
The IMPLANT CENTER 2 is adjusted by applying
moderate pressure to the screen keys.
Identification of key areas common to all modes
(Fig. 3):
- 4: Reduce irrigation flow rate.
- 5: Increase irrigation flow rate.
- 6: Reduce value.
- 7: Increase value.
Identification of information display areas
common to all modes (Fig. 3)
- 2: Irrigation flow rate value.
- 9: Operating fault indicator.
Identification of key areas common to all modes
that also display information (Fig. 3)
- 1: Flush/prime.
- 3: Irrigation ON/OFF.
- 8: Save, store data.
- 10: Select footswitch mode.
7
- 11: ON/OFF of light function on handpiece
- 12: Select mode (according to connected
handpiece type).
Key areas and displays specific to the selected
mode
PIEZOTOME mode:
Identification of information display areas (Fig. 4)
- 13: Selected program power level.
Identification of key areas that also display
information (Fig. 4)
- 14: Select program: D1, D2, D3, D4.
NEWTRON mode:
Identification of information display areas (Fig. 5)
- 15: Selected program power level.
Identification of key areas that also display
information (Fig. 5)
- 16: Select program: Soft, Medium, High, Boost.
I-SURGE mode:
Identification of information display areas (Fig. 6)
- 17: Contra-angle ratio.
- 18: Motor speed value.
- 19: Motor delivered torque value.
Identification of key areas (Fig. 6)
- 20: Adjust contra-angle ratio.
- 21: Adjust motor speed.
- 22: Adjust motor delivered torque.
8
Identification of key areas that also display
information (Fig. 6)
- 23: Select micro-motor rotation (clockwise or
counterclockwise).
- 24: Select program: P1, P2, P3, P4.
Contra-angle, speed and torque setting
adjustment page
Identification of common information display
areas (Fig. 7)
- 25: Contra-angle ratio.
- 26: Maximum delivered speed.
- 27: Maximum delivered torque.
Identification of common key areas (Fig. 7)
- 28: Exit from the page without changes.
- 29: Delete last character entered.
- 30: Return to main page and save settings to
screen memory.
- 31: Numeric keypad.
Preprogrammed contra-angle adjustment page
Identification of information display areas (Fig. 8)
- 38: Contra-angle ratio.
- 39: Motor speed value.
- 40: Motor delivered torque value.
Identification of key areas (Fig. 8)
- 32: Exit from the page without changes.
- 33: Select custom contra-angle.
- 34: Return to main page and save settings to
screen memory.
Identification of key areas that also display
information (Fig. 8)
- 35: Select a multiplier contra-angle.
- 36: Select direct contra-angle.
- 37: Select a divider contra-angle.
Startup page
Identification of key areas (Fig. 9)
- 41: Enter TOOLBOX mode.
c) Control unit sides
The pump housings (Fig. 1-8) are designed to
accommodate SATELEC irrigation line cassettes.
Toolbox
Identification of information display areas (Fig.
10)
- 43: Audio volume symbol.
- 44: Screen brightness symbol.
- 45: Light off time-out symbol.
- 48: Relative audio volume value.
- 49: Relative brightness level value.
- 50: Selected time-out value.
- 51: Software version.
The irrigation cassettes are installed by lifting
the pump covers and inserting the cassettes
horizontally into the cassette housings.
Identification of key areas (Fig. 10)
- 42: Reset factory configuration.
- 46: Reduce value.
- 47: Increase value.
- 52: Validate the configuration.
b) Control unit back panel
The power receptacle (Fig. 2-1) with its
grounding pin is used to connect the IMPLANT
CENTER 2 to the power supply using a plug-in
power cord.
The footswitch connector (Fig. 2-2) is used to
connect the IMPLANT CENTER 2 to the multifunction
control footswitch.
The fan (Fig. 2-3) protected by a metal grille,
keeps the IMPLANT CENTER 2 at its optimal
performance level.
The bracket holders (Fig. 2-4) are used to install
the brackets.
d) Front panel
- The left connector is designed to accept the
connector of the I-SURGE micro-motor cord. Only
a SATELEC micro-motor cord must be used.
- The right-hand connector is designed to accept
the connector of the NEWTRON / NEWTRON LED cord
or the connector of the PIEZOTOME 2 / PIEZOTOME 2
LED handpiece cord.
e) Control footswitch
Having access to a large number of functions on
the control footswitch allows the practitioner to
work in a perfectly sterile environment, avoiding
the risk of cross-contamination.
Once the various settings have been adjusted,
the user has no further need to touch the keypad.
Depending on the mode, the control footswitch
buttons have different functions.
I-SURGE mode:
Footswitch button definitions (Fig. 11):
- 1: I-SURGE motor control (ON/OFF
progressive).
- 2: Rotation direction.
- 3: Change program (P1 to P4).
- 4: Irrigation ON/OFF.
- 5: Select active handpiece.
or
The power switch (Fig. 2-5) is used to switch the
device ON or OFF.
9
PIEZOTOME mode:
Footswitch button definition (Fig. 11):
- 1: Ultrasonics control (ON/OFF or progressive).
- 2: Flush/prime.
- 3: Change program (D1 to D4).
- 4: Irrigation ON/OFF.
- 5: Select active handpiece.
NEWTRON mode:
Footswitch button definition (Fig. 11):
- 1: Ultrasonics control (ON/OFF or progressive).
- 2: Flush/prime.
- 3: Change program (Soft to Boost).
- 4: Irrigation ON/OFF.
- 5: Select active handpiece.
f) Technical characteristics
Manufacturer: SATELEC
Device name: IMPLANT CENTER 2
Electrical power supply:
- Voltage: 100 VAC to 230 VAC.
- Frequency: 50 Hz/60 Hz.
- Rated power: 250 VA at 230 VAC.
I-SURGE function
Operation:
Intermittent service: 20 sec. ON / 30 sec. OFF at
2 N.cm
Output characteristics:
I-SURGE micro-motor speed: 100 rpm to
40 000 rpm
I-SURGE micro-motor torque: max. 6 N.cm
Irrigation flow rate: 10 to 120 ml/min. (nominal
value).
Adjustment in 10 ml/min. steps
Flush/prime flow rate: 120 ml/min.
10
PIEZOTOME function
Operation:
Intermittent service: 10 min. ON / 5 min OFF
Output characteristics:
No-load voltage: 250 volts (nominal value without
handpiece)
Min. ultrasonic frequency: 28 kHz
Irrigation flow rate: 10 to 120 ml/min. (nominal
value)
Adjustment in 10 ml/min. steps (nominal value)
Flush flow rate: 120 ml/min. (nominal value)
NEWTRON function
Operation:
Intermittent service: 10 min. ON / 5 min. OFF
Output characteristics:
No-load voltage: 150 volts (nominal value without
handpiece)
Min. ultrasonic frequency: 28 kHz
Irrigation flow rate: 10 to 40 ml/min. (nominal
value)
Adjustment in 1 ml/min. steps (nominal value)
Flush flow rate: 120 ml/min. (nominal value)
Protection
Electrical equipment class: Class 1
Electrical safety class:
Type BF in I-SURGE mode
Type BF in PIEZOTOME mode
Type BF in NEWTRON mode
Safety devices
Thermal safety shut off to avoid overheating of
the I-SURGE micro-motor
Safety shut off if internal malfunction
2 fuses (power cord receptacle): 5 mm x 20 mm 2 AT for 100 VAC to 230 VAC
1 internal fuse not accessible to the user
reference F1: 5 mm x 20 mm – 10 AT / 250 VAC
Overall dimensions
Control unit:
Width: 472.9 mm
Height: 149.5 mm
Height with bracket: 471.1 mm
Depth: 339.9 mm
Weight: 5 kg without accessories
Footswitch:
Width: 311 mm
Depth: 209 mm
Height: 181 mm
Weight: approximately 3.5 kg
LCD screen:
Height: 86 mm
Width: 115 mm
Micro-motor cord: 2 000 mm (2 900 mm optional)
Scaler handpiece cord: 2 000 mm (2 900 mm
optional)
PIEZOTOME handpiece cord: 2 000 mm (2 900 mm
optional)
I-SURGE micro-motor:
Length: 99 mm
Diameter: 21 mm
Weight: 120 g
Coupling type: according to standard ISO 3964
Temperatures
Operation: +10°C to +40°C
Storage: -20°C to +70°C
Humidity
Operation: 30% to 75%
Storage: 10% to 100% including condensation
Atmospheric pressure
Between 500 hPa and 1060 hPa
Measuring units displayed and meaning
Ncm = torque (N.cm)
Rpm = speed (r/min.)
IV - INSTALLATION / FIRST
USE
4. 1 UNPACKING THE DEVICE
Upon receipt of the device, check for any damage
caused in transit.
Contact your supplier if necessary.
4. 2 RECOMMENDATIONS
Have your IMPLANT CENTER 2 connected to the
power electricity supply by a certified dental
installation technician.
The electrical connection of the IMPLANT CENTER 2
must comply with the applicable standards in
your country.
Warning:
To avoid any risk of electric shock, this device
must be connected to an electrical power
supply with a protective ground.
4. 3 INSTALLATION
Important:
Do not place the IMPLANT CENTER 2 close to or on
top of another device.
Do not place the power cord and the footswitch
cord in a wire cover or in a cable gland.
- Place the control unit in position on a fixed
surface, horizontal or with a slope of no more
than 5°.
11
- Check that the power switch (Fig. 2-5) is in
position O (OFF).
- Connect the power cord to the receptacl of the
device.
- Connect the power cord to a power socket with
a ground pin.
- Connect the control footswitch to the
footswitch connector (Fig. 2-2).
- Position the footswitch so that it is easily
accessible for your feet.
- Insert the brackets into the bracket holders
(Fig. 2-4).
- Connect the micro-motor cord to the connector
(Fig. 1-7).
- Align the I-SURGE micro-motor and cord
connector electrical contacts, then screw the
motor onto the connector.
- Connect the NEWTRON scaler cord or the PIEZOTOME
2 handpiece cord to the connector (Fig. 1-9)
(according to option).
- Connect the NEWTRON handpiece to the scaler
cord (delivered according to option).
- Check that the device is close enough to the
work area to be used without pulling on the
cords. If it is not, move the device closer.
- Place the I-SURGE micro-motor on its rest.
- Place the NEWTRON or PIEZOTOME 2 handpiece on
the handpiece support.
- Suspend the bottles or bags of physiological
saline or sterile water from the brackets.
- Adjust the position of your device to suit your
angle of view.
V - IRRIGATION SOLUTION
IMPLANT CENTER 2 is not designed to administer
drugs. It must be used only with bottles or bags
of physiological saline or sterile water with an
individual capacity not exceeding one litre.
VI - IRRIGATION LINES
IMPLANT CENTER 2 must be used exclusively with
SATELEC irrigation lines.
VII - ADJUSTMENTS /
SETTINGS / MODES /
INTERFACE
7. 1 STARTUP
Important:
After stopping the device, wait four seconds
before restarting it.
Each time the device is switched on, the screen
displays program P1 of the I-SURGE function after
displaying the welcome page.
4. 4 FIRST USE
7. 2 SETTINGS
Before using the IMPLANT CENTER 2 for the first
time, all the equipment must be given routine
maintenance and/or sterilized according to the
procedures defined in chapter 11.
The settings are saved when each program is
configured and are retrieved whenever that
program is selected.
12
7. 3 IRRIGATION FUNCTION
7. 4 LIGHT FUNCTION
a) Flush / prime
The flush / prime function is available on the LCD
screen and on the footswitch.
The light function is displayed on the LCD screen.
Press button
(Fig. 3-1) or the footswitch
button (Fig. 11-2) (PIEZOTOME and NEWTRON modes)
to switch on the flush / prime function.
The flush / prime function stays on as long as the
button is pressed.
The flush can be switched on while the device is
being used.
b) Flow rate adjustment
The irrigation flow rate is adjusted using buttons
and
(Fig. 3-4 and 5).
Each time the corresponding button is pressed,
the flow rate is adjusted.
The adjusted value is displayed on the LCD screen
(Fig. 3-2) and stored in the current program.
The flow rate can be adjusted while the device is
being used.
Pressing button
(Fig. 3-11) switches the light
function available for the NEWTRON and PIEZOTOME
functions ON or OFF.
The light function has a default light-off time-out
of nine seconds.
Switching off the light function becomes
effective when the time-out has elapsed.
If necessary, you can lengthen the time-out (refer
to 7.7).
7. 5 I-SURGE FUNCTION
a) Selecting the rotation direction
The rotation direction of the I-SURGE micro-motor
is controlled by the control footswitch button
(Fig. 11-2).
When clockwise rotation is selected, the symbol
is displayed on the LCD screen (Fig. 6-23).
When counterclockwise rotation is selected, an
c) Irrigation ON/OFF
The irrigation is switched ON or OFF by pressing
audible signal is emitted and the symbol
displayed on the LCD screen (Fig. 6-23).
button
(Fig. 11-4).
b) Program setting adjustment
Important:
When programming the maximum instrument
end speed, the entered value cannot exceed
the pre-programmed value.
Do not go below the minimum motor speed
value (100 rpm, 1:1 contra-angle).
Do not exceed the maximum pre-programmed
value of the instrument end torque, and do not
go below 10% of this value.
(Fig. 3-3) or the footswitch button
When irrigation is selected, the symbol
is
highlighted.
When irrigation is not selected, the symbol
is darkened.
is
13
When setting the torque, please refer to the
contra-angle
and
implant
system
manufacturers’ recommendations.
Button
(Fig. 8-32) is used to return to the
main screen without saving the changes.
Confirm the selected contra-angle by pressing
Select the I-SURGE function by pressing button
button
displayed.
(Fig. 3-12).
On the LCD screen, the I-SURGE tab must be
highlighted.
Select the program for which settings are to be
adjusted using buttons
,
,
or
(Fig. 6-24) or using the footswitch button (Fig.113); the various programmed parameter settings
are displayed.
The contra-angle
displayed (Fig. 6-17).
(Fig. 6-20) value is
(Fig. 8-34); the main screen is
Programming a user-defined contra-angle:
IMPLANT CENTER 2 enables specific contra-angles to
be used. A contra-angle value can be
programmed.
On the main screen press button
(Fig. 6-20);
the preprogrammed contra-angle options are
displayed (Fig. 8).
Press button
highlighted.
(Fig. 8-33); the button is
The speed
6-18).
(Fig. 6-21) value is displayed (Fig.
Press button
(Fig. 8-34); the contra-angle
adjustment screen is displayed (Fig. 7).
The torque
6-19).
(Fig. 6-22) value is displayed (Fig.
Program the contra-angle using the numeric
keypad (Fig. 7-31).
The programmed contra-angle value is displayed
(Fig. 7-25).
c) Selecting a contra-angle
Selecting a pre-programmed contra-angle:
Press button
(Fig. 6-20): the preprogrammed
contra-angle options are displayed (Fig. 8).
Select a multiplier contra-angle using the red
buttons (Fig. 8-35) or a direct contra-angle using
the blue button (Fig. 8-36) or a divider contraangle using the green buttons (Fig. 8-37).
The value of the selected contra-angle is
displayed (Fig.8-38).
The maximum permitted speed (Fig.8-39) and
torque (Fig.8-40) are displayed for each contraangle.
14
Press button
digit.
(Fig. 7-29) to delete the last
Press button
(Fig. 7-28) to return to the main
screen without saving the changes.
Confirm your customization of the contra-angle
by pressing button
(Fig. 7-30); the main
screen is displayed.
The maximum permitted speed (Fig. 6-18) and
torque (Fig. 6-19) are displayed for the
programmed contra-angle.
d) Speed adjustment
e) Torque adjustment
On the main screen, press button
(Fig. 6-21);
the speed adjustment screen is displayed (Fig. 7).
Program the speed using the numeric keypad
(Fig. 7-31).
The programmed speed is displayed (Fig. 7-26).
On the main screen, press button
(Fig. 6-22);
the torque adjustment screen is displayed (Fig.
7).
Program the torque using the numeric keypad
(Fig. 7-31).
The programmed torque is displayed (Fig. 7-27).
Press button
digit.
(Fig. 7-29) to delete the last
Press button
(Fig. 7-28) to return to the main
screen without saving the changes.
Confirm the speed adjustment by pressing button
(Fig.7-30); the main screen is displayed.
Note: The instrument speed can be adjusted
directly using buttons
or
(Fig. 3-6 and 3-
7) for programs
,
or
even when the
multifunction footswitch is switched on.
To obtain a stable speed adjustment result, it is
recommended to press the footswitch fully (Fig.
11-1).
Press button
digit.
(Fig. 7-29) to delete the last
Press button
(Fig. 7-28) to return to the main
screen without saving the changes.
Confirm the torque adjustment by pressing
button
displayed.
(Fig. 7-30); the main screen is
Note: The instrument torque can be adjusted
directly using buttons
or
(Fig. 3-6 and 3-
7) for program
, even when the multifunction
footswitch is switched on.
Pressing buttons
or
(Fig. 3-6 and 3-7)
increases or reduces the speed value.
f) Selecting footswitch type
Change the footswitch type if necessary by
Pressing and holding buttons
or
(Fig. 3-6
and 3-7) for longer than 3 seconds causes faster
increase or reduction of the speed value.
If a torque or speed value outside the permitted
range is entered, !min! or !max! is displayed. The
maximum or minimum permitted value is then
displayed, depending on the case.
pressing button
ON/OFF
(Fig. 3-10) to toggle between
and progressive
.
15
g) Completion of setting adjustment
Confirm the new settings by pressing button
(Fig. 3-8).
The storing of the various settings is confirmed by
an audible signal.
Repeat this sequence if necessary in order to
adjust all the programs.
7. 6 PIEZOTOME FUNCTION
Important:
The PIEZOTOME function settings can be
customized by the user.
The PIEZOTOME function settings can be adjusted
when no PIEZOTOME 2 handpiece is connected to
the device.
The program giving the highest power is D1.
Very powerful
Powerful
Medium
Low
Program
Main functions
D2
Osteotomy, osteoplasty
D4
Soft tissue detachment
D1
D3
Select the Piezotome function by pressing button
(Fig. 3-12) or by pressing the footswitch
button (Fig. 11-5).
On the LCD screen, the PIEZOTOME tab must be
highlighted.
Select the program to be used by pressing button
,
,
or
(Fig. 4-14) or
using the footswitch button (Fig. 11-3); the
selected program is highlighted on the LCD
screen.
16
Adjust the programs and the power level
according to the tip data sheet
recommendations.
If necessary, modify the irrigation function (flow
rate value, etc.) (refer to 7.3).
If necessary, modify the program power level (1 to 5)
using buttons
(Fig. 3-6) and
(Fig. 3-7).
The power level of the program concerned is
shown as a number and a bar-graph
(Fig.
4-13).
Modify the footswitch type if necessary by
pressing button
ON/OFF
(Fig. 3-10) to toggle between
and progressive
.
Important:
In progressive mode, for programs D1 to D3,
the delivered power ranges between power
level 1 of program D3 and the configuration
defined by the user (program and power level).
In progressive mode, the power delivered by
program D4 ranges only between levels 1 and 5,
according to the value defined by the user.
If necessary, select handpiece light function
ON/OFF by pressing button
(Fig. 3-11).
Confirm the new settings by pressing button
(Fig. 3-8).
The saving of the various settings is confirmed by
an audible signal and a visual signal (button
flashing).
Repeat this sequence if necessary in order to
adjust all the programs.
Caution: The tips designed for PIEZOTOME 2 and
IMPLANT CENTER 2 are not compatible with
PIEZOTOME and IMPLANT CENTER, and vice versa.
Modify the footswitch type if necessary by
pressing button
(Fig. 3-10) to toggle between
ON/OFF and progressive.
If necessary, select handpiece light function
7. 7 NEWTRON FUNCTION
ON/OFF by pressing button
Important:
A scaler cord and its NEWTRON handpiece must
be connected to the device in order to be able
to configure the various settings.
The NEWTRON function settings can be
customized by the user.
Confirm the new settings by pressing button
(Fig. 3-8). The saving of the various settings is
confirmed by an audible signal and a visual signal
(flashing button).
Select the NEWTRON function by pressing button
(Fig. 3-12) or by pressing the footswitch
button (Fig. 11-5).
On the LCD screen, the NEWTRON tab must be
highlighted.
Select the program for which settings are to be
adjusted by pressing buttons
,
,
(Fig. 3-11).
Repeat this sequence if necessary in order to
adjust all the programs.
7. 8 TOOLBOX
Important:
IMPLANT CENTER 2 has a TOOLBOX function used to
make various adjustments, including
brightness, light off time-out, audio volume
and factory configuration reset.
or
(Fig. 5-16) or by pressing the
footswitch button (Fig. 11-3).
Adjust the power level according to the TipBook
recommendations.
If necessary, modify the program power level (1
To access the TOOLBOX function, switch OFF the
device, wait four seconds, switch the device ON
to 10) using buttons
(Fig. 3-6) and
(Fig.
3-7).
The power level of the program concerned is
a) Audio volume adjustment
shown as a number and a bar-graph
5-15).
using buttons
and
(Fig. 10-46 and 47).
The audio volume is adjustable from 0% to 100%.
(Fig.
again, then press button
welcome screen (Fig. 9).
(Fig. 9-41) on the
Adjust the audio volume value
(Fig. 10-43)
17
The relative value of the audio volume is
displayed (Fig. 10-48).
b) Screen brightness adjustment
Adjust the brightness value
(Fig. 10-44)
using buttons
and
(Fig. 10-46 and 47).
The brightness is adjustable from 30% to 100%.
The brightness level setting is displayed (Fig. 1049).
c) Light off time-out adjustment
Adjust the time-out length value
by pressing buttons
47).
and
(Fig. 10-45)
(Fig. 10-46 and
The length of the adjustable time-out (from nine
seconds to 18 seconds) is displayed (Fig. 10-50).
Program
P1
P2
P3
P4
18
d) Storing the settings
To store the modified settings, press button
(Fig. 10-52). The screen shown in Fig. 9
reappears.
e) Factory configuration reset
Press button
(Fig. 10-42) to restore the
factory configuration settings.
The factory configurations for the PIEZOTOME and
NEWTRON functions are effective when button
(Fig. 10-52) is pressed. The screen shown in Fig.
9 reappears.
f) Software version
The version of the software is displayed at the
bottom of the screen (Fig. 10-51).
IMPLANT CENTER 2 is configured in the factory with
the following settings:
I-SURGE mode:
Contra-angle
ratio
Speed at
instrument
end
Torque at
instrument
end
20:1
800 rpm
80 N.cm
100 ml/min.
20 N.cm
0
20:1
20:1
20:1
1200 rpm
15 rpm
30 rpm
80 N.cm
20 N.cm
Irrigation
Functions
80 ml/min.
Implant site marking
100 ml/min.
Boring / tapping
Pilot drilling
Screwing
PIEZOTOME mode:
Very
powerful
Program Power Irrigation Main functions
D1
3
Powerful
D2
3
Medium
D3
3
Low
D4
3
NEWTRON mode:
Program
60
ml/min.
60
ml/min.
60
ml/min.
60
ml/min.
Osteotomy,
osteoplasty
Soft tissue
detachment
Power Irrigation Main functions
Green
Soft
P=5
Yellow
Medium
P=5
Blue
High
P=5
Orange
Boost
P=5
VIII - SAFETY
15
ml/min.
15
ml/min.
15
ml/min.
15
ml/min.
Periodontics
Endodontics
Scaling
Loosening
The IMPLANT CENTER 2 is equipped with a selfdiagnosis system to detect malfunctions.
When an excessively high temperature of the ISURGE micro-motor is detected, symbol 1 (chap.
XVII - Symbol) is displayed in the error zone (Fig.
3-9) and the device beeps four times.
The device switches to degraded mode so that it
can complete the dental procedure.
The available torque value is set at 25% in order
to protect the I-SURGE micro-motor.
It is recommended that the I-SURGE micro-motor
be allowed to cool down until symbol 1 (chap.
XVII - Symbol) disappears.
In the case of a motor malfunction, symbol 2
(chap. XVII - Symbol) is displayed in the error
zone and the device beeps four times.
It is recommended that you check the
connections of your motor and your motor cord.
If the fault persists, switch the device off at the
power switch (Fig. 2-5) and switch it back on
again.
In the case of an internal operation malfunction,
symbol 3 (chap. XVII - Symbol) is displayed in the
error zone and the device beeps four times.
It is recommended that the device be switched
off (Fig. 2-5) and switched back on again.
IX - USING THE DEVICE
Important:
- Do not disconnect the micro-motor cord or
the scaler cord when the device is switched
on and the footswitch is pressed.
- Do not disconnect the micro-motor or the
ultrasonic handpieces when the device is
switched on and the footswitch is pressed.
- Do not connect the instrument to, or
disengage it from, the contra-angle when the
micro-motor is running.
- Do not screw or unscrew tips when the
handpieces are on.
- All accessories must be cleaned, disinfected
and sterilized before use.
19
- For your safety and that of your patient,
IMPLANT CENTER 2 must not be used with
accessories other than those supplied or
recommended by SATELEC.
- Check the integrity of the device and its
accessories before and after each use in order
to detect any problem.
- If necessary, do not use the device and
replace any faulty component.
The IMPLANT CENTER 2 is prepared for use as
follows:
- Make sure that the device is connected
correctly and properly insulated.
- Switch the power switch (Fig. 2-5) to position I
(ON).
- Suspend the bottles or bags of physiological
saline or sterile water from the brackets.
- Raise the irrigation pump covers.
- Insert the irrigation line cassettes horizontally
into their housings.
- Close the covers.
- Insert the irrigation line perforating pins into
the bottles or pouches of physiological saline
and open the cap on the pins.
- Make any necessary setting adjustments
(irrigation flow rate, speed, torque, power,
power mode, program, etc.) (refer to chapter
7).
Note: This sequence must be completed under
conditions of controlled asepsis for the safety of
your patients. An operating assistant may be
needed.
Note: The data is saved automatically, in order to
maintain the display parameters as previously
used upon switchover from the various modes.
I-SURGE function
- Check that there are no traces of moisture on
the I-SURGE micro-motor or micro-motor cord
connections. If there are, remove by wiping and
drying with the multifunction syringe fed with
20
medical-quality filtered air.
- Connect the micro-motor cord to the lefthand
connector of the device (Fig. 1-7).
- Align the micro-motor and cord connector
electrical contacts, then screw the motor onto
the connector.
- Connect a contra-angle to the I-SURGE micromotor.
- Fit an instrument (drill, bur, etc.) to the contraangle.
- Fasten the irrigation line to the cord using line
clips.
- Connect the end of the irrigation line to the
contra-angle.
- Run the motor fitted with its contra-angle and
its instrument without irrigation at moderate
speed for 10 to 15 seconds in order to diffuse
the lubricant and eliminate excess.
- Prime the irrigation circuit by pressing the
control keypad flush/prime button (Fig. 3-1).
- When the irrigation solution reaches the end of
the contra-angle, release the footswitch.
- Use IMPLANT CENTER 2 in accordance with good
dental practice.
PIEZOTOME function
- Connect the PIEZOTOME 2 handpiece cord to the
righthand connector of the device (Fig. 1-9).
- Screw the selected tip onto the handpiece using
a tip wrench (according to the
recommendations of the clinical booklets).
- Fasten the irrigation line to the cord using line
clips.
- Connect the end of the irrigation line to the
PIEZOTOME 2 handpiece.
- Prime the irrigation circuit by pressing the
flush/prime button on the screen (Fig. 3-1) or
the multifunction footswitch (Fig. 11-2).
- When the irrigation solution reaches the end of
the tip, release the footswitch.
- Use the IMPLANT CENTER 2 in accordance with good
dental practice.
NEWTRON function
- Check that there are no traces of moisture on
the NEWTRON handpiece or the scaler cord
connections. Remove any moisture by wiping
and by drying with the multifunction syringe fed
with medical-quality filtered air.
- Connect the scaler cord to the righthand
connector of the device (Fig. 1-9).
- Align the electrical contacts of the NEWTRON
handpiece and the scaler cord, then plug the
handpiece into the cord.
- Screw the selected tip onto the handpiece using
a tip wrench (according to the TIPBOOK
recommendations).
- Fasten the irrigation line to the cord using line
clips.
- Connect the end of the irrigation line to the
scaler cord.
- Prime the irrigation circuit by pressing the
flush/prime button on the screen (Fig. 3-1) or
the multifunction footswitch (Fig. 11-2).
- When the irrigation solution reaches the end of
the tip, release the footswitch.
- Use the IMPLANT CENTER 2 in accordance with good
dental practice.
X - SHUTTING DOWN THE
DEVICE
Upon completion of the dental procedure:
- Remove the bottles or bags of physiological
saline or sterile water from the brackets.
- Remove the irrigation line perforating pins from
the bottles or bags.
- Immerse the irrigation line perforating pins in a
vessel containing distilled water.
- Rinse each irrigation line alternately, along with
the contra-angle and the handpiece, by running
the flush/prime function until the vessel and
the irrigation lines are completely empty.
- Remove the irrigation line clips.
- Disconnect the single-use irrigation lines from
the contra-angle and from the handpieces and
dispose of them in a safety container for soiled
medical items.
- Remove the rotary instruments fastened to the
contra-angle and the tip screwed onto the
handpiece.
- Disconnect the contra-angle from the I-SURGE
micro-motor.
- Disconnect the micro-motor cord from the
I-SURGE.
- Disconnect the PIEZOTOME 2 handpiece or the
NEWTRON handpiece and the scaler cord.
- Switch the device OFF (O).
XI - ROUTINE
MAINTENANCE /
STERILIZATION
Important:
The device must be switched OFF during
cleaning and disinfection procedures.
The only irrigation lines that can be sterilized
are those identified as sterilizable.
During sterilization, items made of different
metals must not come into contact. Any contact
would establish galvanic couples and cause
localized damage.
To avoid this happening, place the items in
individual sterilizable bags or in a sterilization
box.
To maintain the sterility or asepsis of the
accessories
(contra-angle,
micromotor,
micromotor cord, cords, handpieces, etc.),
21
store them in sealed bags or containers suitable
for medical practice.
The maintenance and/or sterilization
instructions below must be applied before each
use of the device.
11. 2 CONTRA-ANGLE MAINTENANCE
Refer to the manufacturer's instructions for your
contra-angle.
11. 3 ROTARY INSTRUMENT MAINTENANCE
Avoid using cleaning and disinfection agents
containing flammable substances.
Please refer to the manufacturer's instructions
for your instruments (burs, drills, etc.).
If this is not possible, make sure that all the
agent has evaporated and that there is no
combustible matter on the device or its
accessories before it is switched on.
11. 4 DEVICE MAINTENANCE
Sterilized items must be allowed to dry and
cool to room temperature before they are
reused.
Before sterilization, check that your autoclave
is clean and that the water used is of adequate
quality.
After each sterilization cycle, remove the
items from the autoclave immediately in order
to minimize the risk of metal corrosion.
11. 1 IRRIGATION LINE MAINTENANCE
Sterile irrigation line
The irrigation lines supplied by SATELEC are
disposable and must always be discarded after
use. Re-use of an irrigation line may result in
contamination of your patients and expose you to
de facto liability. Do not attempt to resterilize
the single-use irrigation lines. Do not attempt to
modify the irrigation lines.
Sterilizable irrigation line
Refer to the user's manual delivered with the
equipment.
22
Important:
Never use an abrasive cleaning agent on the
device.
Do not use sprays or liquids to clean and
disinfect the IMPLANT CENTER 2 control unit.
The device, the brackets and the multifunction
footswitch are not sterilizable.
The IMPLANT CENTER 2 control unit, the control
footswitch and the bracket must always be
cleaned and disinfected after each procedure,
using alcohol, disinfectant agents or disinfectant
wipes for dental practices, such as SEPTOL™ wipes.
Regular monitoring of the IMPLANT CENTER 2 unit is
necessary in order to detect any problem.
It is important to keep the control unit
ventilation vents clean in order to avoid
abnormal heating.
11. 5 MICROMOTOR CORD AND SCALER CORD
MAINTENANCE
The I-SURGE micro-motor must not be cleaned in
an ultrasonic bath or disassembled.
Important:
Never use an abrasive cleaning agent on the
cords.
The cords must not be immersed or disinfected
using agents containing acetone, chlorine or
bleach.
The cords must not be cleaned in an ultrasonic
bath.
The I-SURGE micro-motor is a high-technology
device. To maintain optimal performance, the
following recommendations must be complied
with.
a) Cleaning and disinfection
The cords must always be cleaned, disinfected
and sterilized after each procedure, using
alcohol, disinfectant agents or disinfectant wipes
for dental practices, such as SEPTOL™ wipes.
b) Sterilization
The cords can be sterilized in an autoclave under
the following conditions:
- Autoclave: Class B
- Sterilization temperature: 134°C at 2 Bar.
- Time at sterilization temperature: 18 minutes.
CAUTION: Not all autoclaves can reach 134°C.
Not all autoclaves draw a pre-vacuum. Please
refer to your autoclave manufacturer for
specific sterilization instructions.
11. 6 I-SURGE MICRO-MOTOR MAINTENANCE
Important:
Never use an abrasive cleaning agent on the
I-SURGE micro-motor.
The I-SURGE micro-motor must not be immersed
or disinfected using agents containing acetone,
chlorine or bleach.
a) Cleaning and disinfection
Use cleaning and disinfection agents compatible
with the I-SURGE micro-motor (such as SPRAYNET®).
When using a spray, spray the outside and inside
of the I-SURGE micro-motor moderately to expel
residues.
Clean and disinfect the surfaces using a clean,
lint-free cloth impregnated with the agent.
b) Lubrication
Lubricate before each sterilization or at least
twice a day.
Use lubricants compatible with the I-SURGE micromotor (such as LUBRIFLUID®).
Place a clean cloth over the I-SURGE micro-motor
ventilation vents to absorb the surplus lubricant.
Inject the lubricant through the nose of the
micro-motor using an oilcan of lubricant (or a
spray) for one-half to one second.
c) Sterilization
The I-SURGE micro-motor can be sterilized in an
autoclave under the following conditions:
- Autoclave: Class B.
- Sterilization temperature: 134°C.
- Time at sterilization temperature: 18 minutes.
23
11. 7 ULTRASONIC HANDPIECE MAINTENANCE
After each use, the handpiece irrigation circuit
must be rinsed with distilled or demineralized
water for 20 to 30 seconds.
Disconnect the NEWTRON handpiece from its cord
before cleaning, disinfection and sterilization.
Cleaning and disinfection:
The handpieces must always be cleaned,
disinfected and sterilized after each procedure,
using alcohol, disinfectant agents or disinfectant
wipes for dental practices, such as SEPTOL™ wipes.
For handpiece sterilization, refer to the manual
for each product.
11. 8 TIP MAINTENANCE
a) Lifetime
Tip shape and weight are the determining
characteristics for obtaining maximal efficiency
of the ultrasonic generator.
Careful monitoring of these two characteristics
by the user will ensure that optimal performance
of the device is maintained.
Consequently, you are strongly advised not to
alter the structure of the tips by filing or twisting
them or modifying them in any other way.
Similarly, through normal wear, tip aging leads to
alteration of its characteristics. Always replace a
tip that has been damaged by wear or by
accidental impact (dropped, bent, etc.).
Use the TIPCARD to check scaler tip wear. Replace
routinely-used tips at least once a year.
24
b) Pre-disinfection / chemical cleaning
To be carried out immediately after treatment,
wearing thick gloves. Immerse in an ultrasonic
bath (enzymatic, quaternary ammonium base
detergent / disinfectant solution), carefully
respecting the concentration and contact time
recommended by the manufacturer of the
solution.
Use a solution that bears the EC marking or that
is in compliance with any standard required by
the national regulations.
Rinse under running water for at least 30
seconds.
c) Mechanical / chemical cleaning
To be carried out immediately after predisinfection/chemical cleaning, wearing thick
gloves. Scrub the products in a new bath of
enzymatic, quaternary ammonium base
detergent / disinfectant solution, for at least 30
seconds, and in any case until all remaining
traces of contamination have been removed.
Rinse again under running water for at least 30
seconds.
d) Drying
Dry with a clean, non-woven single-use cloth, so
as to remove any traces of liquid.
Pack in single-use sterilization pouches or bags in
compliance with the specifications defined in
standard EN ISO 11607-1 or in any equivalent
standard required by the national regulations.
e) Sterilization
The tips must be sterilized individually in an
autoclave, according to the following
parameters:
- autoclave: type B, compliant with standard EN
13060;
- sterilization temperature: 134°C;
- sterilization stabilization time: 18 minutes;
- pressure: 2 Bars min.
12. 1 MONITORING
f) Storage
Store the sterilized products in a dry place
protected from dust. Before re-use, if the
integrity of the packaging is not certain,
repackage then re-sterilize in accordance with
the defined protocol.
If contamination is visible inside the bag, destroy
the product.
12. 2 MAINTENANCE
g) Disposal of the product
Dispose of the product in receptacles for waste
materials of healthcare activities involving
infectious risks.
CAUTION: Not all autoclaves can reach 134°C.
Not all autoclaves draw a pre-vacuum. Please
refer to your autoclave manufacturer for
specific sterilization instructions.
XII - MONITORING /
MAINTENANCE
Important:
In the case of a fault, you are advised to
contact the supplier of your device. Do not use
unauthorized repairers, who might make your
device dangerous for you and your patients.
Regular monitoring of the device and its
accessories is necessary in order to detect any
insulation fault or damage. Replace them if
necessary.
It is important to keep the control unit
ventilation vents clean in order to avoid
abnormal heating.
I-SURGE micro-motor inspection/overhaul:
SATELEC recommends inspection or overhaul of
the I-SURGE micro-motor at least once a year.
12. 3 FUSE REPLACEMENT
IMPLANT CENTER 2 is protected by two fuses located
in the power receptacle (Fig. 2-1).
The replacement procedure is as follows:
- Switch the device OFF (position O).
- Unplug the power cord from the electricity
supply.
- Unplug the power cord from the receptacle
(Fig. 2-1). Insert the tip of a flat screwdriver
into the notch above the fuse drawer to release
it.
- Remove the old fuses.
- Replace the old fuses with fuses of the same
type and rating.
- Push the fuse drawer back into its housing until
it clicks to indicate the correct position.
- Plug the power cord into the receptacle (Fig. 21). Plug the power cord into the electrical
supply.
25
Note:
The device also has an internal fuse not
accessible to the user.
Contact SATELEC after-sales service (see Chapter
2 - Repairs).
All the information necessary for the repair of
faulty components is made available by SATELEC
Fault
to the technical personnel of the SATELECapproved dealer network who carry out the work.
12. 4 OPERATION FAULTS
Refer to the tables on the next page:
Possible cause
Power cord not plugged in properly.
Aucun fonctionnement
Power switch in position O (OFF).
(Ecran LCD éteint)
Device does not operate No power voltage.
(LCD screen off)
Power receptacle fuse(s) blown.
Internal fuse blown
Device does not operate
Transmission fault.
(LCD screen on)
Motor does not operate Motor or motor connections problem.
Thermal cut-out.
Torque fault
Incorrect torque adjustment.
Wrong contra-angle.
Speed fault
Incorrect speed adjustment.
Wrong contra-angle.
Irrigation solution bag or bottle empty.
No spray
26
Irrigation off.
Irrigation line clogged.
Remedy
Check the electric socket.
Return to SATELEC after-sales.
Place the power switch in position I (ON).
Call an electrician.
Replace the power receptacle fuses.
Return to SATELEC after-sales.
Switch the device OFF then ON again.
Return to SATELEC after-sales.
Check the motor cord connector.
Check that the cord connector is properly
plugged into the motor connector of the
device.
Return to SATELEC after-sales.
Allow the micro-motor to cool down.
Adjust the torque in accordance with good
dental practice.
Change the contra-angle.
Return to SATELEC after-sales.
Adjust the speed in accordance with good
dental practice.
Change the contra-angle.
Return to SATELEC after-sales.
Replace the bag or bottle of irrigation
solution.
Press the irrigation ON/OFF button.
Change irrigation line.
Line end piece on contra-angle clogged. Clear the contra-angle line end piece.
Fault
Inadequate spray
Micro-motor does not
operate
Possible cause
Incorrect irrigation flow rate adjustment. Adjust the irrigation flow rate.
Faulty micro-motor cord connector
electrical contacts.
Clean the electrical contacts of the micromotor cord connectors.
Micro-motor cord wires cut.
Return to SATELEC after-sales to replace
the cord.
Faulty micro-motor electrical contacts.
Motor damaged.
Tip worn or distorted.
Power fault
weak tip vibration
No ultrasonic function
No light
Remedy
Incorrect power adjustment.
Clean the electrical contacts of the micromotor.
Return to SATELEC after-sales to replace
the motor.
Replace the tip.
Refer to the TIPBOOK and the clinical
booklet for the necessary information.
Incorrect use: incorrect angle of attack or Refer to the TIPBOOK and the clinical
inadequate pressure on the tooth.
booklet for the necessary information.
Liquid or moisture present between
handpiece and cord.
Dry the electrical contacts thoroughly.
Faulty connector contact.
Clean the connector contacts.
Incorrect tip tightening.
Retighten the tip with the wrench.
Handpiece cord wire cut.
Return to SATELEC after-sales to replace
the cord.
Handpiece light ring absent.
Install the light ring.
Faulty light ring.
Replace the light ring.
Faulty light ring connector contacts.
Clean the light ring connector contacts.
Light ring the wrong way around.
Position the light ring according to the
foolproofing stud.
Faulty handpiece and/or cord connector Clean the handpiece and/or cord connector
contacts.
contacts.
Leak between the
NEWTRON handpiece and
the handpiece cord
Liquid leak in the
irrigation pump
Other.
Contact your installer-fitter.
Worn handpiece 1.15x1 seal
Replace the seal (kit F12304).
Broken tube in the irrigation line
cassette.
Replace the irrigation line.
27
XIII - ELECTROMAGNETIC COMPATIBILITY
Important:
The power cord, the ultrasonic handpiece cords and the multifunction footswitch cord must be
kept away from each other.
IMPLANT CENTER 2 requires special precautions to be taken with regard to electromagnetic compatibility.
It must be installed and prepared for use as described in chapter 4.
Certain types of mobile telecommunication devices such as mobile telephones are likely to interfere
with the IMPLANT CENTER 2.
The recommended separation distances in this paragraph must therefore be complied with.
IMPLANT CENTER 2 must not be used near or on top of another device.
If this cannot be avoided, its operation under the conditions of use must be checked beforehand.
The use of accessories other than those specified or sold by SATELEC as replacement parts may have
the consequence of increasing the emissions or decreasing the immunity of the IMPLANT CENTER 2.
13. 1 ELECTROMAGNETIC EMISSIONS
IMPLANT CENTER 2 is intended for use in the electromagnetic environment specified in the table below.
The user and/or installer must ensure that the IMPLANT CENTER 2 is used in such an environment.
Emission test
Compliance
RF emission - CISPR 11.
Group 1
RF emission - CISPR 11.
Class A
Harmonic current emission
IEC 61000-3-2.
Voltage fluctuation and flicker
IEC 61000-3-3.
28
Class A
Complies
Electromagnetic environment - guidance
IMPLANT CENTER 2 uses RF energy for internal operation.
Therefore, its radiofrequency emissions are very low and are not likely
to cause any interference in nearby equipment.
IMPLANT CENTER 2 is suitable for use in all establishments, except
domestic establishments and those directly connected to the public
low voltage power supply network that supplies buildings used for
domestic purposes.
13. 2 ELECTROMAGNETIC IMMUNITY
IMPLANT CENTER 2 is intended for use in the electromagnetic environment specified in the table below.
The user and/or installer must ensure that the device is used in such an electromagnetic environment.
Immunity test
IEC 60601 test level
Compliance level
Electromagnetic environment - guidance
Electrostatic
discharge (ESD)
IEC 61000-4-2.
± 6KV contact
± 8KV air
± 6KV contact
± 8KV air
Floors must be wood, concrete, cement or tiled.
If floors are covered with synthetic material
(carpet, etc.), the relative humidity must be at
least 30%.
Electrical fast
transients
IEC 61000-4-4.
± 2KV for power supply lines
± 2KV for power supply lines
Mains power quality should be that of a typical
commercial or hospital environment (hospital,
clinic).
Surges
IEC 61000-4-5.
± 1KV differential mode
± 2KV common mode
± 1KV differential mode
± 2KV common mode
Mains power quality should be that of a typical
commercial or hospital environment.
Voltage dips, short
interruptions and
voltage variations
IEC 61000-4-11.
<5% UT (>95% dip in UT) for 0.5
cycles.
<5% UT (>95% dip in UT) for 0.5
cycles.
40% UT (60% dip in UT) for 5
cycles
40% UT (60% dip in UT) for 5
cycles
70% UT (30% dip in UT) for 25
cycles
70% UT (30% dip in UT) for 25
cycles
<5% UT (>95% dip in UT) for 250
cycles
<5% UT (>95% dip in UT) for 250
cycles
Mains power quality should be that of a typical
commercial or hospital environment.
If the use of the IMPLANT CENTER 2 requires continued
operation during power mains interruption, it is
recommended that the product be powered from a
separate power supply (UPS, etc.).
13. 3 ELECTROMAGNETIC IMMUNITY / RADIOFREQUENCY MOBILE EQUIPMENT
The IMPLANT CENTER 2 is intended for use in the electromagnetic environment specified in the table
below. The user and/or installer must ensure that the device is used in such an electromagnetic
environment.
Immunity test
IEC 60601 test level
Compliance level
Electromagnetic environment - guidance
Portable and mobile radiofrequency communications devices must not be used near the IMPLANT CENTER 2 (including its cables) at a distance less
than that recommended and calculated according to the frequency and power of the emitter.
Conducted
Recommended separation distance:
disturbance,
3 V/m
3 V/m
radiofrequency fields.
150 KHz to 80 MHz
d = 1.2
IEC61000-4-6
Radiated
radiofrequency
electromagnetic
field.
IEC61000-4-3
3 V/m
80 MHz to 2.5 GHz
d = 1.2
80MHz to 800MHz.
d = 2.3
800MHz to 2.5GHz.
Where P is the maximum power rating of the emitter in watts
(W) according to the manufacturer's specifications and d is the
recommended minimum separation distance in meters (m).
The electromagnetic field strengths of fixed radiofrequency emitters, as determined by an electromagnetic environment measurement (a),
must be less than the compliance level in each frequency range (b).
Interference may occur near equipment marked with the symbol below:
3 V/m
29
Note 1: At 80 MHz and 800 MHz, the higher frequency range applies.
Note 2: These specifications may not be applicable in all situations. Electromagnetic propagation is
affected by absorption and reflection from structures, objects and persons.
(a): The electromagnetic field strengths of fixed radiofrequency emitters, such as base stations for
mobile telephones (cellular/cordless), mobile radios, amateur radio, AM/FM radio broadcasts and
TV broadcasts cannot be determined exactly by theory. To assess the electromagnetic
environment due to fixed radiofrequency emitters, an electromagnetic environment
measurement must be made. If the measured radiofrequency field strength in the immediate
environment where the product is used exceeds the compliance level specified above, the
performance of the product must be tested to verify whether it conforms to the specification. If
abnormal performance is observed, additional measures may be necessary, such as reorienting or
relocating the product.
(b): In the 150 kHz to 80 MHz frequency range, the electromagnetic field strengths must be less than
3 V/m.
13. 4 RECOMMENDED SEPARATION DISTANCES
IMPLANT CENTER 2 is intended for use in an electromagnetic environment in which radiated
radiofrequency disturbances are controlled.
The IMPLANT CENTER 2 user and/or installer can help prevent electromagnetic interference by
maintaining a minimum distance between portable and mobile radiofrequency communications
equipment emitters and the IMPLANT CENTER 2, according to the maximum output power of the
equipment, as recommended in the table below.
Rated max. power
of the emitter (W)
0,01
0,1
1
10
Separation distance in metres (m) according to emitter frequency
150 KHz to 80 MHz
80 MHz to 800 MHz
800 MHz to 2,5 GHz
0.38 m
0.38 m
0.73 m
d = 1.2
0.12 m
1.2 m
3.8 m
d = 1.2
0.12 m
1.2 m
3.8 m
d = 2.3
0.23 m
2.3 m
7.3 m
100
12 m
12 m
23 m
For emitters rated at max. power not listed above, the recommended separation distance d in meteres (m) can be estimated
using the equation applicable to the frequency of the emitter, where P is the max. power rating of the emitter in watts (W)
according the manufacturer.
Note 1: At 80 MHz and 800 MHz, the higher frequency range applies.
Note 2: These specifications may not be applicable in all situations. Electromagnetic propagation is
affected by absorption and reflection from structures, objects and persons.
30
13. 5 CABLE LENGTHS
Cables and accessories Maximum length
Handpiece cords
Footswitch cord
Power supply cord
Complies with:
RF emission, CISPR 1 - Class A/Group 1
Harmonic current emission: IEC61000-3-2
Voltage fluctuation: IEC61000-3-3
Immunity to electrostatic discharge: IEC61000-4-2
Immunity to electrical fast transients/bursts: IEC61000-4-4
Less than 3m Immunity to surges: IEC61000-4-5
Immunity to voltage dips, short interruptions and voltage variations:
IEC61000-4-11
Immunity to conducted disturbances induced by radiofrequency fields: IEC61000-4-6
Immunity to radiated radiofrequency electromagnetic fields: IEC61000-4-3
XIV - DISPOSAL AND
RECYCLING
As electrical and electronic equipment, the
device must be disposed of according to a
specialized procedure for collection, pick-up and
recycling or destruction (in particular on the
European market, with reference to Directive
2002/96/EC of 27/01/2003).
When your device reaches the end of its life, we
consequently recommend that you contact your
dental equipment dealer (or, failing this, the
ACTEON Group website, the address of which is
given in chapter 18), for information on how to
proceed.
XV - MANUFACTURER'S
LIABILITY
The manufacturer is not liable if:
- the manufacturer's installation recommendations
have not been followed (supply voltage,
electromagnetic environment, etc.)
- repairs or other work have been done on the
device by persons not authorized by the
manufacturer
- the device has been used connected to an
electrical system that does not comply with
current regulations
- the device has been used in ways other than
those specified in this manual
- accessories (tips, handpiece, irrigation lines,
etc.) other than those supplied by SATELEC have
been used
- the instructions in this document have not been
followed.
Note: The manufacturer reserves the right to
modify the device and/or the user’s manual
without notice.
XVI - REGULATIONS
This medical device is classified as class IIa
according to European Directive relevant to
Medical Devices currently in force.
This equipment is manufactured in compliance
with the current IEC 60601-1 standard.
This equipment has been designed and
manufactured according to an ISO 13485-certified
quality assurance system.
31
Audio level / Niveau sonore / Nivel sonoro / Lautstärke / Livello acustico / Geluidsterkte / Nível sonoro /
Ljudnivå / Ένταση ήχου
Brightness / Luminosité / Luminosidad / Kontrast / Luminosità / Helderheid / Luminosidade / Ljusstyrka /
Φωτεινότητα
Time-out length / Durée de temporisation / Duración del temporizador / Abschaltzeit / Durata di
temporizzazione / Wachttijd / Duração de temporização / Fördröjningstid / ∆ιάρκεια χρονοµέτρου
Factory configuration / Configuration usine / Configuración de fábrica / Werksseitige Konfiguration /
Configurazione di default / Fabrieksinstellingen / Configuração de fábrica / Fabriksinställning /
Εργοστασιακές ρυθµίσεις
Refer to the accompanying documentation / Se référer à la documentation d’accompagnement /
Consultar documentación que acompaña / Siehe Begleitunterlagen / Fare riferimento alla
documentazione allegata / Meegeleverde documenten raadplegen / Consultar a documentação de
acompanhamento / Se medföljande dokumentation / Ανατρέξτε στα συνοδευτικά έγγραφα
Class BF / Classe BF / Clase BF / Niederfrequenz / Classe BF / Klasse BF / Classe BF / Κλάση BF
I
Class 1 / Classe 1 / Clase 1 / Klasse 1 / Classe 1 / Klasse 1 / Classe 1 / Klass BF / Klass 1 / Κλάση 1
Sterilization at 134°C in an autoclave / Stérilisation à 134°C dans un autoclave / Esterilización a 134°C
en autoclave / Sterilisation im Autoklav bei 134°C / Sterilizzazione a 134°C in autoclave / Sterilisatie op
134°C in een autoclaaf / Esterilização a 134°C numa autoclave / Sterilisering vid 134°C i autoklav /
Αποστείρωση στους 134°C σε αυτόκλειστο
EC marking / Marquage CE / Marca CE / CE-Kennzeichnung / Marcatura CE / CE-markering / Marcação CE /
CE-märkning / Σήµανση CE
Do not dispose of in household waste / Ne pas jeter dans les poubelles domestiques / No tirar en los
contenedores domésticos / Nicht mit Hausmüll entsorgen / Non gettare nei cassonetti dei rifiuti domestici
/ Niet bij het huishoudelijke afval zetten / Não deitar no lixo doméstico / Ej hushållsavfall / Μην
απορρίπτετε σε κάδους για οικιακά απορρίµµατα
XXXX
Year of manufacture / Année de fabrication / Año de fabricación / Baujahr / Anno di fabbricazione /
Bouwjaar / Ano de fabrico / Tillverkningsår / Έτος κατασκευής
Alternating current / Courant alternatif / Corriente alterna / Wechselstrom / Corrente alternata /
Wisselstroom / Corrente alternativa / Växelström / Εναλλασσόµενο ρεύµα
Control footswitch / Pédale de commande / Pedal de mando / Fußpedalkabel / Pedale di comando /
Bedieningspedaal / Pedal de comando / Kontrollpedal / Εξωτερικό κοµβίο ελέγχου
O
I
Device power OFF / Appareil hors tension / Equipo sin tensión / Gerät AUS / Apparecchio fuori tensione /
Apparaat Uit / Aparelho fora de tensão / Apparat ur spänning / Απενεργοποιηµένη συσκευή
Device power ON / Appareil sous tension / Equipo con tensión / Gerät EIN / Apparecchio sotto tensione /
Apparaat Aan / Aparelho sob tensão / Apparat under spänning / Ενεργοποιηµένη συσκευή
Motor ON / Partie active moteur / Pieza activa motor / Aktives Motorteil / Parte attiva motore / Actieve
motordeel / Parte activa do motor / Aktiv del motor / Ενεργό µέρος µοτέρ
258
Ultrasound part ON / Partie active ultrasons / Pieza activa ultrasonido / Aktives UItraschallteil / Parte
attiva ultrasuoni / Actieve ultrasone deel / Parte activa ultra-sons / Aktiv del ultraljud / Ενεργό µέρος
υπέρηχοι
XVIII CUSTOMER RELATIONS /
RELATIONS CLIENTELE /
RELACIÓN CON EL CLIENTE /
ANSCHRIFTEN / RELAZIONI
CON I CLIENTI /
KLANTENBETREKKINGEN /
RELAÇÕES COM OS CLIENTES
KUNDRELATIONER /
ΕΠΙΚΟΙΝΩΝΙΑ ΠΕΛΑΤΩΝ
18. 1 MANUFACTURER IDENTIFICATION /
IDENTIFICATION DU FABRICANT /
IDENTIFICACIÓN DEL FABRICANTE /
IDENTIFIKATION DES HERSTELLERS /
IDENTIFICAZIONE DEL PRODUTTORE /
IDENTIFICATIE VAN DE FABRIKANT /
IDENTIFICAÇÃO DO FABRICANTE /
IDENTIFIERING AV TILLVERKAREN
/ΣΤΟΙΧΕΙΑ ΤΟΥ ΚΑΤΑΣΚΕΥΑΣΤΗ
SATELEC
A Company of Acteon Group
17, avenue Gustave Eiffel - BP 30216
33708 MERIGNAC cedex - FRANCE
Tél. +33 (0) 556.34.06.07
Fax. +33 (0) 556.34.92.92
E.mail : [email protected]
www.acteongroup.com
www.piezotome.com
260
18. 2 SUBSIDIARIES / ADRESSE FILIALES /
DIRECCIÓN FILIALES / ADRESSEN DER
TOCHTERGESELLSCHAFTEN / INDIRIZZI
DELLE FILIALI / ADRESSEN VAN FILIALEN /
MORADA
DAS
FILIAIS
/
DOTTERBOLAGSADRESSER / ∆ΙΕΥΘΥΝΣΕΙΣ
ΘΥΓΑΤΡΙΚΩΝ
FRANCE
SATELEC ACTEON GROUP
17 av. Gustave Eiffel - B.P. 30216 – 33708
MERIGNAC cedex - FRANCE
Tel. +33 (0) 556 34 06 07
Fax. +33 (0) 556 34 92 92
e-mail : [email protected]
U.S.A.
ACTEON NORTH AMERICA
124 Gaither Drive, Suite 140
Mt Laurel, NJ 08054 - USA
Tel. +1 856 222 9988
Fax. +1 856 222 4726
e-mail : [email protected]
GERMANY
ACTEON GERMANY
Industriestrasse 9 – 40822 METTMANN - GERMANY
Tel. +49 21 04 95 65 10
Fax. +49 21 04 95 65 11
e-mail : [email protected]
SPAIN
ACTEON IBERICA
Avda Principal n°11 H - Poligono Industrial Can
Clapers - 08181 SENTMENAT (BARCELONA) SPAIN
Tel. +34 93 715 45 20
Fax. +34 93 715 32 29
e-mail : [email protected]
U.K.
SATELEC (UK) LIMITED
Unit 1B - Steel Close – Eaton Socon, St Neots
CAMBS PE19 8TT - UK
Tel. +44 1480 477 307
Fax. +44 1480 477 381
e-mail : [email protected]
KOREA
ACTEON KOREA
8F Hanil B/D - 132-4 1Ga Bongrae-dong JOONG-GU – SEOUL - KOREA
Tel. +82 2 753 41 91
Fax. +82 2 753 41 93
e-mail : [email protected]
MIDDLE EAST
ACTEON MIDDLE EAST
Numan Center - 1st Floor N°111 - Gardens
Street - PO Box 468 - AMMAN 11953 - JORDAN
Tel. +962 6 553 4401
Fax. +962 6 553 7833
e-mail : [email protected]
INDIA
ACTEON INDIA
E-145, G.I.D.C. Electronic Estate - Sector 26 –
GANDHINAGAR 382028 (Gujarat) - INDIA
Tel. +91-79-2328 7473
Fax. +91-79-2328 7480
e-mail : [email protected]
CHINA
ACTEON CHINA
Office 401 - 12 Xinyuanxili Zhong Street Chaoyang District - BEIJING 100027 - CHINA
Tel. +86 10 646 570 11/2/3
Fax. +86 10 646 580 15
e-mail : [email protected]
COSTA RICA
ACTEON LATIN AMERICA
Apdo. Postal 978/2070 - Sabanilla - COSTA RICA
Tel./Fax.: +506 2273 4033
Celular: +506 8981 5815
e-mail : [email protected]
PHILIPPINES
ACTEON PHILIPPINES
4th Floor Alco Building – No. 391 Sen. Gil Puyat
Avenue - Makati City 1200 - PHILIPPINES
Tel. +632 899 78 66 or 67
Fax. +632 899 78 43
e-mail : [email protected]
THAILAND
ACTEON (THAILAND) LTD
23/45 Sorachai Building 16th floor - Sukumvit 63
Road, Klongton Nua - Wattana, BANGKOK 10110
- THAILAND
Tel. +66 2 714 3295
Fax. +66 2 714 3296
e-mail : [email protected]
RUSSIA
ACTEON RUSSIA
Valdajski Proezd 16 – Building 1 - office 253 125445 Moscow - RUSSIA
Tel./Fax. +7 495 451 80 50
e-mail : [email protected]
AUSTRALIA/NEW ZEALAND
ACTEON AUTRALIA/NEW ZEALAND
L3, Suite 23, 6-8 Crewe Place, 2018 Rosebery,
NSW AUSTRALIA
Tel. +612 966 24400
Fax. +612 966 24600
e-mail : [email protected]
261
Fig. / Afbeelding 1
3
5
8
8
6
1
7
2
9
10
4
11
Fig. / Afbeelding 2
2
1
3
4
262
5
Fig. / Afbeelding 3
12
1
11
2
10
3
9
4
8
5
6
7
Fig. / Afbeelding 4
13
14
263
Fig. / Afbeelding 5
15
16
Fig. / Afbeelding 6
17
20
21
24
22
18 19
264
23
Fig. / Afbeelding 7
29
30
28
25
26
31
27
Fig. / Afbeelding 8
33
34
32
35
38
39
36
40
37
265
Fig. / Afbeelding 9
41
Fig. / Afbeelding 10
52
42
43
48
44
49
45
50
46
266
47
51
Fig. / Afbeelding 11
4
5
3
2
1
267
I27160 - T8 - V4
A Company of Acteon Group • 17 av. Gustave Eiffel • BP 30216 • 33708 MERIGNAC cedex • France • Tel. +33 (0) 556 34 06 07
Fax. +33 (0) 556 34 92 92 • E.mail : [email protected] • www.acteongroup.com • www.piezotome.com