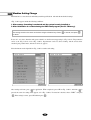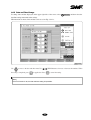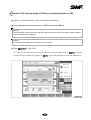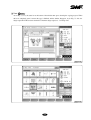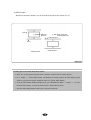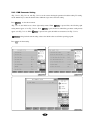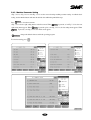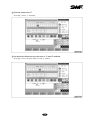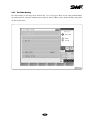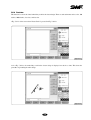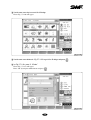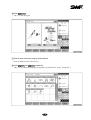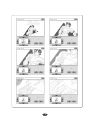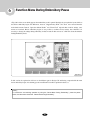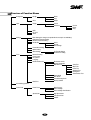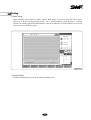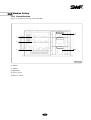
1
USER ’S MANUAL
Operating Manual
•2/4/6/8/6C Tubular
E-series
•4/6 Flat E-series
SunStar CO., LTD.
MEE-090929
1. THIS IS AN INSTRUCTION FOR SAFE USE OF
AUTOMATIC
EMBROIDERY MACHINES. READ THOROUGHLY BEFORE USE.
2. CONTENTS IN THIS INSTRUCTION MAY CHANGE, WITHOUT
PRIOR NOTICE, FOR IMPROVEMENT OF MACHINE QUALITY AND
THUS MAY NOT CORRESPOND TO THE MACHINE YOU
PURCHASED. CONTACT YOUR SALES AGENT FOR INQUIRIES.
3. THIS IS DESIGNED AND MANUFACTURED AS AN INDUSTRIAL
MACHINE. IT SHOULD NOT BE USED FOR OTHER THAN
INDUSTRIAL PURPOSE.
Table of Contents
1.0
Structure of Operation Box ........................................................................................................................................ 1-1
1.1
2.0
Preparation for Embroidery ........................................................................................................................................2-1
2.1
2.2
3.0
3.2.0
SWF Install Program ........................................................................................................................................... 3-2
3.1.1
Install ...................................................................................................................................................... 3-2
3.1.2
Backup ................................................................................................................................................... 3-4
3.1.3
Memory ................................................................................................................................................. 3-5
3.1.4
System .................................................................................................................................................... 3-6
Machine Setting Change ...................................................................................................................................... 3-8
3.2.1
Specifications Setting ............................................................................................................................ 3-9
3.2.2
Machine and Signal Setting ................................................................................................................ 3-12
Screen Layout of Operating Program .................................................................................................................... 4-1
4.1
4.2
4.3
4.4.0
5.0
Turn on the Power ................................................................................................................................................ 2-1
Basic Operation Procedure .................................................................................................................................. 2-2
Operating Program Install .......................................................................................................................................... 3-1
3.1.0
4.0
Part Names and Functions ................................................................................................................................... 1-1
Embroidery Screen ............................................................................................................................................... 4-1
Work Information Screen .................................................................................................................................... 4-2
Function Menu ..................................................................................................................................................... 4-3
Work Progress Messages and Clock Screen ...................................................................................................... 4-4
4.4.1
Work Progress Messages ...................................................................................................................... 4-4
4.4.2
Date and Time Change ......................................................................................................................... 4-5
Function Menu Before Embroidery ......................................................................................................................... 5-1
5.1
5.2
5.3.0
5.4.0
Function Menu Layout Before Embroidery ....................................................................................................... 5-2
EMB Call .............................................................................................................................................................. 5-3
Input .................................................................................................................................................................... 5-11
5.3.1
FDD Input............................................................................................................................................. 5-12
5.3.2
USB Input ............................................................................................................................................ 5-17
5.3.3
CF Card Input ...................................................................................................................................... 5-19
5.3.4
Serial Input .......................................................................................................................................... 5-21
Setting ..................................................................................................................................................................5-23
5.4.1
Basic Setting ........................................................................................................................................ 5-25
5.4.2
EMB Parameter Setting ....................................................................................................................... 5-31
5.4.3
Machine Parameter Setting ................................................................................................................ 5-34
5.4.4
Needle Setting (Color) ........................................................................................................................ 5-38
5.4.5
Frame Offset Setting ........................................................................................................................... 5-49
5.4.6
Options Setting .................................................................................................................................... 5-51
5.4.7
The Other Setting ................................................................................................................................ 5-54
5.5.0
5.6.0
5.7.0
6.0
Function Menu During Embroidery Pause ........................................................................................................... 6-1
6.1
6.2
6.3
6.4
6.5
7.0
Tools ................................................................................................................................................................... 5-58
5.5.1
Manual Trim .........................................................................................................................................5-59
5.5.2
Frame Center ........................................................................................................................................5-59
5.5.3
Hoop Select ......................................................................................................................................... 5-60
5.5.4
Language ............................................................................................................................................. 5-60
5.5.5
Machine ............................................................................................................................................... 5-61
Ready ................................................................................................................................................................5-66
5.6.1
Position ................................................................................................................................................ 5-67
5.6.2
Gauge ................................................................................................................................................... 5-68
5.6.3
Exclude ................................................................................................................................................ 5-69
5.6.4
Fastview.................................................................................................................................................5-70
5.6.5
Trace .................................................................................................................................................... 5-73
Design ...............................................................................................................................................................5-74
5.7.1 Repeat .....................................................................................................................................................5-75
5.7.2 Edit ..........................................................................................................................................................5-94
Structure of Functions Menus ............................................................................................................................. 6-3
EMB Call ............................................................................................................................................................. 6-4
Setting ....................................................................................................................................................................6-5
................................................................................................................................................................. 6-6
Float
.................................................................................................................................................................
Frame
6-7
............................................................................................................................................
6.5.1
Frame Feed
6-7
6.5.2
Speed Code ............................................................................................................................................ 6-8
Troubleshooting ............................................................................................................................................................. 7-1
7.1.0
Error Messages and Handling ............................................................................................................................. 7-1
7.1.1
Main Shaft Motor and Others .............................................................................................................. 7-1
7.1.2
X, Y Motor-related Errors .................................................................................................................... 7-1
7.1.3
Color Change ......................................................................................................................................... 7-2
7.1.4
Encoder .................................................................................................................................................. 7-2
7.1.5
Consecutive Work ................................................................................................................................. 7-2
7.1.6
Floppy Diskette and Communications ................................................................................................ 7-3
7.1.7
Memory ................................................................................................................................................. 7-4
7.2.0
Machine Setting .................................................................................................................................................... 7-5
7.2.1
Control Box Front ................................................................................................................................. 7-5
7.2.2
X/Y Driver and Main Driver Switches Setting ................................................................................... 7-6
7.2.3
Fuse Install and Replacement ............................................................................................................... 7-8
System Block Diagram ........................................................................................................................................ 7-9
7.3
1
Structure of Operation Box
1.1 Part Names and Functions
The OP Box of the small-head E-series embroidery machine, which is an LCD monitor, is displayed in <Fig. 1.1-1>.
On the right side and the rear, there are a cable and a port respectively.
▶ Front Side
⑤
⑥
①
⑦
⑧
⑪
⑨
⑩
⑪
②
③
④
[Fig 1.1-1]
① LCD Screen
As 6.4-inch color LCD monitor, it shows all information necessary for operation.
② Function Menu Buttons
They help choose the functions on the screen.
③ Start Button
It begins embroidery work.
④ Stop Button
It stops embroidery work in progress.
⑤ Number Buttons
They are used to enter numbers upon parameter setting and to manually move the needle bar.
※
: It is used as the upper thread holding solenoid operation key.
※
: In case where the laser device is equipped, it is used to turn on/off the laser pointer.
1-1
⑥ All-head Use Menu Key
It is used to operate all heads.
⑦ ORG/ESC
It brings the needle bar to the original position or helps escape from the menu.
⑧ SET/ENT
It sets up parameters and selects the menu.
⑨ Frame Move Buttons
They are used to move the embroidery frame in four directions including left, right, up, and down and to move around
the menu.
⑩ Frame Speed Button
It adjusts the embroidery frame speed from low to medium to high.
⑪ Main Shaft Speed Change Key
It is used to change the main shaft speed during embroidery work. To increase the speed, use the ‘UP’ key. To decrease
the speed, use the ‘DOWN’ key.
▶ Right Side
①
②
③
[Fig 1.1-2]
[Fig 1.1-3]
To provide protection against dusts, it is covered with the connector cover. When pressing the cover, it will open.
① USB Port (Master)
It is used to export designs from the embroidery machine or import it into the machine using the USB memory.
② USB Port (Slave)
It serves as a standby port for communications with PC using the USB memory.
③ Serial Port
It serves as a port for serial communications.
1-2
▶ Back Side
①
②
[Fig 1.1-4]
① Power and CAN Communications Cable Connection
② Connected to floppy drive cable
As the external floppy drive, it can be used after cable connection.
1-3
2
Preparation for Embroidery
2.1 Turn on the Power
※ Small-Head E-Series Automatic Embroidery Machine
I/O Switch
NFB Switch
[Fig 2.1-1]
① Insert the power plug into the outlet.
② Check the NFB switch location as in <Fig. 2.1-1> and lift the NFB switch (make it ‘ON’).
③ Check the I/O switch location and press the I/O switch.
④ The LCD screen is on, and the embroidery operation program is displayed on the screen.
⑤ Use the frame move keys to check the normal operation of the frame. See ‘5.5.5(3) Operation Test’ to check the basic
operations.
[Caution]
Make sure that the power plug is pulled off before conducting A/S activities.
2-1
2.2 Basic Operation Procedure
TURN ON THE MAIN POWER
NO
IS THE OPERATIONG SYSTEM IN MEMORY?
YES
DOES THE START BUTTON REMAIN PRESSED?
YES
INSTALL OPERATING SYSTEM
NO
ARE THERE PREVIOUSLY WORKED DESIGNS?
NO
NO
ARE THERE DESIGNS IN MEMORY?
YES
YES
READ DESIGN FROM DISK OR USB
AUTOMATIC DESIGN CALL
CALL DESIGN
AUTOMATIC CALL OF PREVIOUS SETTINGS
SET-UP PARAMETERS FOR OPERATION
CHANGE SETTING?
NO
YES
SELECT NEEDLE BAR
DO YOU WANT REPETITION?
YES
REPETITION
NO
DO YOU WANT AUXILIARY WORK (GAUGE, ETC.)
NO
YES
AUXILIARY WORK
SET WORK POSITION
DO YOU WANT FRAME OFFSET?
NO
PUSH BAR SWITCH TO START
2-2
YES
SET-UP FRAME OFFSET
3
Operating Program Install
When the machine is shipped out from the factory, the machine is already installed with the operating program and
default setups. However, if the program is defective or the set values need to be changed or upgraded, the program shall
be reinstalled. In this case, we offer the functions to re-install the programs and initialize the set values.
■How to Find SWF Install Program
1. If the machine operating program is not installed, the install menu automatically appears. <Fig. 3.0-2>
2. When the machine is booted, the logo appears for two seconds as in <Fig. 3.0-1>. Press the START button,
and the install screen appears. <Fig. 3.0-3>
Frame Move Button
Frame Move Button Status
When the START button is pressed
Motion Description
It moves to the SWF Install Program.
[Fig 3.0-1]
[Fig 3.0-2]
3-1
[Fig 3.0-3]
3.1.0 SWF Install Program
As in <Fig. 3.0-3>, SWF Install Program has the functions, such as install, backup, memory management, and system
setting.
3.1.1 Install
This function installs the embroidery machine operating program and necessary data files to the OP Box through input
devices (floppy diskette, USB).
■How to select the install menu
1. Use the hot key (number button) to select the menu.
2. Use the direction buttons (frame move buttons) to move the cursor (red) and press the set button to select the
menu.
1) Program: embroidery machine operating program
In <Fig. 3.0-3>, select
and <Fig. 3.1.1-1> appears on the screen.
To use a floppy diskette, insert a floppy diskette containing the operating program and select
USB memory, insert a USB memory into the USB port and select
can be installed. If you desire to cancel, select
. To use a
. In either one of the ways, the program
.
[Fig 3.1.1-1]
3-2
[Fig 3.1.1-2]
2) Data: Necessary to use the embroidery machine operating program.
In <Fig. 3.0-3>, select
, and <Fig. 3.1.1-2> appears on the screen.
To install data by using a floppy diskette, insert the floppy diskette containing the data file and select
install data by using a USB memory, insert the USB memory into the USB Port, and select
cancel the data installation, select
. To
. If you want to
.
.
[Caution]
To use a USB memory, its file system shall be FAT16, not FAT32.
3) Program : Machine control program
<Fig. 3.1.1-3> is automatically created when the operating program and data are installed through a floppy diskette or
USB. If
program, select
is selected as in <Fig. 3.0-3>, <Fig. 3.1.1-3> appears as well. To upgrade the machine control
. To cancel the upgrade, select
.
[Fig 3.1.1-3]
3-3
3.1.2 Back up
To the contrary to installation, backup is to save the embroidery machine operating program and data files in a floppy
diskette in preparation for emergency. The backup function cannot be used, if there are no operating program or data
files or if the memory is formatted.
1) Program
Select
in <Fig. 3.0-3> and then <Fig. 3.1.2-1> appears.
To perform backup using a floppy diskette, insert a floppy diskette and select
USB memory, connect the USB memory to the USB port and select
. To perform backup using a
. Select
, if you desire to
cancel it.
[Fig 3.1.2-1]
[Fig 3.1.2-2]
2) Data : It is necessary for embroidery operating program.
Select
in <Fig. 3.0-3>, and then <Fig. 3.1.2-2> appears.
To back up data using a floppy diskette, insert an empty floppy diskette and select
USB memory, insert the USB memory into the port and select
[Caution]
The file system of the USB memory shall be FAT16, not FAT32.
3-4
. To backup data using a
. If you desire to cancel it, select
.
3.1.3 Memory
There are two functions regarding memory. They include memory formatting and setting initialization.
1) Formating
In <Fig. 3.0-3>, select
Select
, and then <Fig. 3.1.3-1> appears.
once, and it will format the memory, so that the program and data saved in the memory will be
deleted. If you desire cancel it, select
.
2) Program Setting Initialization
In <Fig. 3.0-3>, select
, and then <Fig. 3.1.3-2> appears. Select
settings made by the operating program. If you desire to cancel it, select
once, and it will initialize all
.
3) Machine Setting Initialization
In <Fig. 3.0-3>, select
and then <Fig. 3.1.3-3> appears. Select
and it initializes the machine
setting and the screen for making a new machine setting appears. If you desire to cancel it, select
. (See
<Fig. 3.2-1>.)
[Fig 3.1.3-1]
[Fig 3.1.3-2]
3-5
[Fig 3.1.3-3]
3.1.4 System
The system supports the function of entering the Lock key.
The embroidery machine operating program has the lock function. If the lock function is enabled, the operating program
can be used for a certain time. But after the time passes, it will take more time to start the program, thereby causing
inconvenience.
If the lock function is enabled, <Fig. 3.1.4-1> will appear instead of <Fig. 3.0-1>. The program can be used for ten days
without any problems, and the logo screen will stay for two seconds and disappear. However, after ten days, the program
activation takes more time, causing inconvenience. After performing a round of embroidery works, more time delay will
occur.
To solve the problem, new lock keys shall be received from Agent and enter it to the machine. If not, time delay will
become longer over time, causing more severe inconvenience.
[Fig 3.1.4-1]
[Fig 3.1.4-2]
[Caution]
There are two types of lock keys: with designated number of days for use and indefinite use. For the lock key,
please consult with the sales agent.
3-6
[Exercise] Re-entry of lock key
Press the START button as in <Fig. 3.1.4-2>.
<Fig. 3.0-3> will appear.
Press
as in <Fig. 3.0-3>. <Fig. 3.1.4-3> will appear.
Call the selling agency to give the old code information (ex: 0 1 2 9 4 6 1 0) appearing on the screen.
Then the selling agency will provide the new lock code.
Enter the new lock code by using the number buttons.
Press the direction buttons to select OK and then press
.
[Fig 3.1.4-3]
3-7
3.2.0 Machine Setting Change
This function is to create the basic embroidery machine specifications and make the mechanical settings.
<Fig. 3.2.0-1> appears under the following conditions:
1. After memory formatting is conducted and the system is newly installed; or
2. After initialization is conducted using the SWF install program (See 3.1.3 Memory).
The moving around on the menu can be done using the direction keys. Press
to cancel.
to choose, and press
In case of 1 or 2 above, when the main power switch is on, the first screen appearing is <Fig. 3.2.0-1>. Ten parameters
can be set in <Fig. 3.2.0-1>. As in <Fig. 3.2.0-1>, 10 parameters can be set. Select “Setting” and the screen, where
encoder signal, potentio meter, and sensor can be set, appears.
Select the buttons on the right side in <Fig. 3.2.0-1> to make each setting.
[Fig 3.2.0-1]
After setting each item, press
[Fig 3.2.0-2]
for application. When completed, press OK in <Fig. 3.2.0-1> and when
is
pressed, the screen for setting check appears as in <Fig. 3.2.0-2>. If correction is desired, choose“PREV”and press
. If the setting is correct, press OK and then press
.
3-8
3.2.1 Specifications Setting
Ten specifications for embroidery machine can be set.
① HEAD Setting
② Color Number Setting
[Fig 3.2.1-1]
③ Trimming Method Setting
[Fig 3.2.1-2]
④ Y-Frame Size Setting
[Fig 3.2.1-3]
3-9
[Fig 3.2.1-4]
⑤ X-frame Size Setting
⑥ X-space Extension Setting
[Fig 3.2.1-5]
⑦ Wheel Type Setting
[Fig 3.2.1-6]
⑧ Sequin Type Setting
[Fig 3.2.1-7]
3-10
[Fig 3.2.1-8]
⑨ X Satin Default Setting
⑩ Y Satin Default Setting
[Fig 3.2.1-9]
3-11
[Fig 3.2.1-10]
3.2.2 Machine and Signal Setting
Select “Setting” on the menu in <Fig. 3.2.0-1> and press
. <Fig. 3.2.2-1> will appear on the screen.
1) Main Shaft Encoder Signal Setting
Press “Select” and set it at 100 degrees. Adjust the encoder until a beep sound is heard and “On” appears on the
screen. Press “Select” again to complete the setting.
2) Needle Bar Position Setting
Press“Select”and move it to the highest number needle bar (ex: 9 color → No.9). Adjust the potentio meter until a
beep sound is heard and then“On”appears on the screen. Press“Select”to complete the setting.
3) X, Y Limit Setting
Press“Select”and manually move the X,Y frames. Check On/Off of the sensors and press“Select”to complete the
setting.
4) Wiper Signal Setting
Press“Select”and manually move the wiper. Check the conditions of the sensors with a beep sound and press
“Select”to complete the setting.
[Fig 3.2.2-1]
[Warning]
If setting is incorrect, it may cause abnormality to the machine. Unless the information is accurate, do not
change the setting.
3-12
4
Screen Layout of Operating Program
<Fig. 4.0-1> is the initial screen of the operating program. The screen is mainly divided into (1) embroidery screen, (2)
work information, and (3) main function buttons.
Work Screen
Embroidery
Screen
Function Buttons
[Fig.4.0-1] Initial Screen of SWF Operating Program
4.1 Embroidery Screen
This shows the embroidery design called. If the operating program is installed or no design is called, the SWF logo is
displayed.
4-1
4.2 Work Information Screen
This shows all information relevant to the design currently called.
Subject
Description
- # : Design name / memory #
- ST. : Total # of stitches made for the design chosen
- X, Y lengths from the design starting position (central line)
- X, Y lengths of the design chosen (Unit: mm)
- # of colors for the design chosen
- # of jumps for the design chosen
- P : Reverse effects (X, Y, XY reverse)
- 0 ANG : Rotation degree by angle of the design chosen
- X 100% : X enlargement value
- Y 100% : Y enlargement value
- Current needle bar / Next needle bar
- Frame move speed: Low / Mid / High
- Frame has returned to the origin.
※ According to 5.4.2 Parameter Setting, when the function is
enabled, the icon is green. When it is disabled, it is gray.
- Shows the stop position of the main shaft. During embroidery
work or if it is not 100 degree, the icon is gray.
※ <Warning> When changing the needle bar, the degree shall be 100.
- Displays the embroidery work time (HH/MM)
- ST : accumulative # of stitches so far
- WK : total # of works finished.
- X : current X-axis position
- Y : current Y-axis position
- ST : # of stitches progressed
- % : Progress rate
- Set embroidery speed
- Current embroidery speed
4-2
Remarks
4.3 Function Menu
There are six function menus related to embroidery work. When each menu button is pressed, the sub-menu appears.
According to the operation of the embroidery machine, there are two types of menus:“Function menu before
embroidery”as in <Fig. 4.3-1> and“Function menu during embroidery”as in <Fig. 4.3-2>. For more information, see
the below.
[Fig 4.3-1]
[Fig 4.3-2]
■Frequently used buttons on the menu
Menu Move Buttons : Move the cursor on the menu to make a selection.
ESC/PRE : Ends the execution command.
Closes the window where the command is executed.
Cancels the command.
SET : Checks or executes the command.
Function keys : Buttons for function choice. Functions matching each function key are different depending
on screen.
4-3
4.4.0 Work Progress Messages and Clock Screen
At the bottom part of <Fig. 4.4.0-1>, there is a section displaying messages. On the upper right side, there is a window
displaying a clock. The message display window shows the status of work progress. The clock window shows the
current time.
[Fig 4.4.0-1]
4.4.1 Work Progress Messages
Messages
Event
“Stop by stop switch”
The machine is stopped by pressing the stop switch.
“Stop due to the upper thread break”
The machine is stopped after the thread break is detected.
“Stop due to color code and stop code”
The machine is stopped due to the stop code.
“Stop due to the beyond-frame limit movement”
The frame moved beyond the movement limit.
“Design close”
The embroidery is finished.
“Stop due to back stitch”
The machine is stopped after back stitch.
“Frame in motion”
The frame is moving.
“Stop during frame feed!”
The frame is stopped while feeding.
“Stop at offset position!”
The machine is stopped at the offset point.
“Needle bar replace”
The needle bar is replaced.
“Selection of non-stitching operation feed unit”
During non-stitching operation
“Start switch → Machine in operation”
Testing is conducted in the test mode.
“Loading embroidery data!”
Embroidery design is called.
4-4
4.4.2 Date and Time Change
To change time and date displayed on the upper right side of the screen, select
date/time setting menu under other settings.
When the menu is chosen, time and date can be set as in <Fig. 4.4.2-1>.
F3 SETTING
and then select the
[Fig 4.4.2-1]
Use
to move to the date and time menu. Use
the setting is completed, press
UP/DN buttons to increase or decrease the numbers. When
for application. Press
to cancel the setting.
[Note]
If the lock function is set, the date and time setting is impossible.
4-5
5
Function Menu Before Embroidery
Before starting the embroidery work, various settings shall be made. In particular, if the operating program is installed
first, various parameters shall be set from the design call. Of course, there is no problem in conducting embroidery
based on the basic setting. To learn more about diverse functions and to produce better-quality embroidery, it is better to
know the functions.
The most basic way to use the function menu buttons is to press
F1 EMBCALL
F2 INPUT
F3 SETTING
F4 TOOLS
F5 READY
F6 DESIGN
5-1
F1
~
F6
on the OP Box.
5.1 Function Menu Layout Before Embroidery
★ Design Call
Design
★ Input
FDD Input
Setting
Delete
Copy
Output
Select
Format
File Select
USB Input
CF Card Input
Serial Input
★ Basic Setting
Embroidery Parameter Setting
Machine Parameter Setting
Needle Setting
★ Frame Offset Setting
Options Setting
The Others Setting
Tools
Manual Trim
Frame Center
Hoop Select
Language
Machine
Preview
Delete
Copy
Needle Select
Needle Convert
Needle Color
CUT Needle Set
Sensing Head Set
Trim Set
Sound Volume
Head Select
Thread Select
Time/Date Setting
Machine Service
Machine Information
Machine Test
Jump
Wire
Picker
Trimming
Holding
Thread Sensing
Frame Origin
Error Information
Thread Break Information
Memory Initial
Ready
Design
Position
Gauge
Exclude
Fastview
Trace
Repeat
General Repeat
Special Repeat
Repeat Load
Stitch Edit
Design Divide
Design Filtering
Design Zoom In
Edit
※ [Caution] : The menus marked with‘★’on the main menu cannot be used when consecutive work is set.
5-2
5.2 EMB Call
- This function is to call back the embroidery designs saved in the memory. The function can be
used to copy and delete designs or export them to the external devices.
<Fig. 5.2-1> is the screen where no designs are stored in the memory or there is no design called out. If there is a design
called out previously, the previous work’s design is displayed as in <Fig. 5.2-2>.
[Fig 5.2-1]
[Fig 5.2-2]
If there are no designs called as in <Fig. 5.2-1>, several function buttons cannot be used. The buttons whose letters are
pale cannot be used until the designs are called later.
If
F1 EMBCALL
is pressed on the screen as in <Fig. 5.2-2>, embroidery designs stored in the memory appear as in
<Fig. 5.2-3>. Up to 100 designs can be stored in the memory. Up to 20 designs can be displayed on one screen. Let’s get
to know more about embroidery design call through [Exercise 5.2-1].
5-3
[Exercise 5.2-1] Call out the design from #35 Room.
Press
F1 EMBCALL
.
When the design call button is pressed, the designs stored at each room are displayed as in <Fig. 5.2-3>. The screen
displays the room numbers and embroidery designs. Each screen shows up to 20 designs. The design we would like
to call out is located at the #35 room, so we have to move to the next screen.
[Fig 5.2-3]
Use the Menu Move buttons
to move to the screen where #35 room is displayed.
As in <Fig. 5.2-4> below, 20 designs are displayed.
[Fig 5.2-4]
[Note]
The number of stitches unused indicates the memory space currently unused.
[Note]
is the button for refreshing the screen. Sometimes, when embroidery design is called, it is
displayed all in black and white instead of in colors. In this case, go to setting - needle bar setting - color
setting, and press F3 RESET . Come back to the design call screen and press F6 UPDATE . Then the screen
will be displayed in colors.
F6 UPDATE
5-4
Go to # 35 room in <Fig. 5.2-4> and press
.(the square room with slashes)
Then a new window appears as in <Fig. 5.2-5>. On the left-hand side, the chosen design is displayed.
On the right-hand side of the screen, the information on the design is displayed. On the screen, such buttons as
F1 DELETE
,
F2 COPY , F3 EXPORT
,
F4 SELECT
are enabled.
[Fig 5.2-5]
Press
F4 SELECT
.
The selected embroidery design will be called out and displayed on the initial screen as in <Fig. 5.2-6>.
[Fig 5.2-6]
[Note]
On the embroidery information section,“OPTION NORMAL”might been seen.“Normal”refers to common
embroidery data. Sometimes,“Sequin”might be displayed. It means that it is the embroidery design including
the sequin code.
5-5
[Exercise 5.2-2] Copy the design from #35 Room to #69 Room.
Repeat ① ~ ③ of [Exercise 5.2-1]“Call out the design from #35 Room”.
Press
F1 COPY
in <Fig. 5.2-5>.
As in <Fig. 5.2-7>, message windows will appear, and the empty room numbers and the up/down, copy, and cancel
buttons are displayed. Empty rooms are the space where new embroidery data can be saved. It is possible to move to
the target room number by using the direction buttons on the right-hand side.
Use
to move to #69 Room and press
F1 COPY
.
[Fig 5.2-7]
The embroidery data in #35 Room was copied in #69 Room. As in <Fig. 5.2-8>, the design was moved to
#69 Room.
[Fig 5.2-8]
[Note]
If it is desired to cancel the copy, press
F2 CANCEL
or
5-6
.
[Exercise 5.2-3] Delete the design in #69 Room.
Repeat ①~③ of [Exercise 5.2-1]“Call out the design from #35 Room”.
Use the menu move buttons to go to #69 Room and press
Press
F1 DELETE
.
in <Fig. 5.2-5>.
As in <Fig. 5.2-9>, the message window appears asking“Do you want to delete the design data?”
[Fig 5.2-9]
Press
F1 YES
.
When compared with <Fig. 5.2-8>, the design in #69 Room was deleted as in <Fig. 5.2-10>. #69 Room becomes
available for design storage.
[Fig 5.2-10]
[Note]
If you do not want to delete it, press
F2 NO
or
.
5-7
[Exercise 5.2-4] Copy the design in #35 Room using floppy diskette or USB.
Repeat ①~③ of [Exercise 5.2-1]“Call out the design from #35 Room”.
Insert a floppy diskette into the floppy drive or a USB memory into the USB port.
[Caution]
If a floppy diskette is removed from the disk drive while being used, the data in the diskette might be deleted
or the diskette itself can be damaged.
[Caution]
The file system of the USB memory shall be FAT16, not FAT32.
Press
F3 EXPORT
in <Fig. 5.2-5>.
As in <Fig. 5.2-11>, the message window appears asking for selecting the output device. If.
the design will be saved in the floppy diskette. If
F2 USB
F1 FDD
is pressed,
is pressed, the design will be saved in the USB memory.
[Fig 5.2-11]
5-8
Press
F1 FDD
or
F2 USB
.
The message asking for the saving method appears as in <Fig. 5.2-12>. If
floppy diskette in the SWF method. If
F2 T-CODE
F1 SWF
is pressed, it is saved in the
is pressed, it is saved in the Tajima method.
[Fig 5.2-12]
Press
F2 T-CODE
.
The green bar at the bottom of the message shows the progress as in <Fig. 5.2-13>. When the copy is completed, the
entire bar becomes green.
[Fig 5.2-13]
5-9
<Fig. 5.2-14> shows the status of the floppy diskette where the design was copied. To check the status, see 5.3.0)
Input -“Floppy”. When saving designs in a floppy diskette, the file is saved as SWF000.SST. The files copied to a
floppy diskette are given names such as SWF000.SST, SWF001.SST, etc. or SWF000.DST, SWF001.DST, etc.
[Fig 5.2-14]
5-10
5.3.0 Input
- This function is to enter designs from external devices to the OP Box. The designs can be copied
from such external devices as a floppy diskette, USB memory, CF (Compact Flash) card, and
serial communications.
On the initial screen, press
F2 INPUT
and the sub-menu appears as in <Fig. 5.3.0-1>. The sub-menu buttons include
Floppy Diskette, USB, CF Card, and Serial.
[Fig 5.3.0-1]
5-11
5.3.1 FDD Input
When the Floppy Diskette button is pressed, the brief information on the designs saved in the floppy diskette is
displayed. Diskette formatting, design preview, design input, and design deletion can be performed.
Insert the floppy diskette containing embroidery design files into FDD.
Select “Floppy” in <Fig. 5.3.0-1>, and <Fig. 5.3.1-1> appears on the screen.
[Fig 5.3.1-1]
[Caution]
If a floppy diskette is removed from the disk drive while being used, the data in the diskette might be deleted
or the diskette itself can be damaged.
Up to 10 designs can be displayed on one screen. If the total number of designs saved is over 10, scroll bar and
scroll up/down buttons can be used to see next screens. Such information as file name, # of stitches, and creation
date is displayed for each design. As in <Fig. 5.3.1-1>, use the menu move buttons
Room
and press
and select #63
. Then <Fig. 5.3.1-3> appears, and such functions as preview, delete, and
copy can be performed.
5-12
[Exercise 5.3.1-1] Conduct the design preview for “63.SST” saved in the floppy diskette
and copy it in #12 Room.
In <Fig. 5.3.1-2>, select
and press
.
Then, the window appears as in <Fig. 5.3.1-3>.
[Fig 5.3.1-2]
Press
F1 PREVIEW
[Fig 5.3.1-3]
.
As in <Fig. 5.3.1-4>, the design is displayed on the pre-view window.
[Fig 5.3.1-4]
Select the room number.
Use the Room
Up/Down buttons to select the room number. When the buttons are pressed, the empty
rooms are displayed in order. Select #12 Room.
5-13
Press
F3 COPY
.
As in <Fig. 5.3.1-5>, the status bar at the bottom of the window turns green, showing the copying progress. When
the bar is completely green, it means that copy is finished, and the window disappears. As in <Fig. 5.3.1-6>, the
design copied in #12 Room can be checked. To check the design copied, see“5.2 Design Call.”
[Fig 5.3.1-5]
[Fig 5.3.1-6]
5-14
[Exercise 5.3.1-2] Delete “63.SST” in a floppy diskette.
Select
Press
as in <Fig. 5.3.1-2> and press
F2 DELETE
.
.
Then, <Fig. 5.3.1-7> appears. The message asking “Do you want to delete the design data?” appears on the screen.
If you want to delete it, press
F1 YES
. If you do not want to delete it, press
F2 NO
.
[Fig 5.3.1-7]
Press
F1 YES
.
As in <Fig. 5.3.1-8>, the files are deleted.
[Fig 5.3.1-8]
5-15
[Exercise 5.3.1-3] Floppy Diskette Format
Press
F1 FORMAT
in <Fig. 5.3.1-1>.
[ Caution]
If a floppy diskette is removed from the disk drive while being used, the data in the diskette might be deleted
or the diskette itself can be damaged.
5-16
5.3.2 USB Input
This function is to enter embroidery designs saved in the USB memory to the OP Box.
Insert the USB memory containing embroidery design files into the USB port.
[Caution]
The file system of the USB memory shall be FAT16, not FAT32.
When “USB” is selected in <Fig. 5.3.0-1>, <Fig. 5.3.2-1> appears.
[Fig 5.3.2-1]
You can move around by pressing
F1 Folder
,
F2 File
,
F3 Drive
as in <Fig. 5.3.2-1>. <Fig. 5.3.2-2> shows the
design files contained in the chosen folder. To move to the upper-level folder, press the“
”folder on the left-
hand side.
[Fig 5.3.2-2]
5-17
When a design is selected in <Fig. 5.3.2-2>, <Fig. 5.3.2-3> appears.
[Fig 5.3.2-3]
When a USB memory is used, the preview function is directly performed. Input and Delete function keys appear at the
bottom. Preview, Delete, and Copy function can be used in the same way as in “5.3.1 Floppy”.
5-18
5.3.3 CF Card Input
This function is to import the embroidery design files saved in the C/F card to the OP Box.
Connect a C/F card containing embroidery design files to the C/F card reader and insert the USB plug of the C/F card
reader into the USB port of the OP Box.
When ‘C/F Card’ is chosen in <Fig. 5.3.0-1>, <Fig. 5.3.2-1> appears.
[Fig 5.3.3-1]
Use
F1 Folder
,
F2 File
,
F3 Drive
in <Fig. 5.3.3-1> to move around, and the design files in the chosen folder are
displayed as in <Fig. 5.3.3-2>. To move to the upper-level folder, select the “
” folder on the left-hand side.
[Fig 5.3.3-2]
5-19
When a design is chosen in <Fig. 5.3.3-2>, <Fig. 5.3.3-3> appears.
[Fig 5.3.3-3]
CF Card supports the preview function. Copy and Delete buttons also exist at the bottom. Preview, Delete, Copy
functions can be used in the same way as in “5.3.1 Floppy.”
5-20
5.3.4 Serial Input
This function is to import embroidery designs from embroidery design program Wings to the OP Box.
Use the serial cable to connect to the OP Box. Call embroidery designs from Wings after establishing the connection.
When the screen appears, press ‘File’ on the menu and select ‘Output’ on the file menu. When selecting ‘Other’ on the
export menu, the Design Output window appears. If driver has not been installed, press ‘Add Driver.’ When the ‘Add
Wings I/O Driver’ window appears, open the Sunstar.wio file, the Sunstar-dedicated driver. Select the driver newly
added to the Design Output window and press OK. Select the desired format and press OK.
While designs are exported from the Wings program, select ‘Serial’ in <Fig. 5.3.0-1> and press SET, and then <Fig.
5.3.4-1> appears. Preview and Delete functions cannot be used. Select a room number by using
buttons and press
F3 COPY
PAGE Up/Dn
. Then <Fig. 5.3.4-2> appears.
[Fig 5.3.4-1]
5-21
[Fig 5.3.4-2]
To check the designs copied after design loading, see “5.7 Design Call.”
5-22
5.4.0 Setting
- On the setting menu, overall setups regarding embroidery can be made. There are seven submenus under the setting menu, which include basic setting, embroidery parameter, machine
parameter, needle bar parameter, frame offset, options, and the other settings.
On the initial screen, press
F3 SETTING
among main function buttons, and <Fig. 5.4.0-1> appears.
[Fig 5.4.0-1]
Basic setting : Sets zoom-out, zoom-in, and angle.
Embroidery parameter setting: Sets parameters related to embroidery.
Machine parameter setting: Sets parameters related to machine.
Needle setting: Selects or changes the needle bar.
Frame offset setting: Designates the off-set point on designs.
Options setting: Sets option devices such as coding and boring.
The others setting : Determines needle type and sets thread sensing.
5-23
※ Setting Tips
To conduct basic, embroidery parameter, machine parameter, frame off-set, and options setting, press each button, and
<Fig. 5.4.0-2> appears to enter values for setting.
- <Fig. 5.4.0-2> is the screen where X scale can be set using the basic setting.
- On the very top, there is title “X Zoom-out/in” and the line below displays the setting scope of X Scale in red print.
- The next line is the space to enter a desired value.
- Use the number buttons to enter a desired value.
- Press
CL to correct the entered value.
- Press
to apply the entered value.
- Press
to cancel the entered value.
Item
Scope
Value
[Fig 5.4.0-2]
5-24
5.4.1 Basic Setting
Press the basic setting button in <Fig. 5.4.0-1>, and the nine basic settings appear on the screen as in <Fig. 5.4.1-1>.
Press F2 NEXT to see the next menu.
When
F1 DEFAULT
is pressed, the existing setting becomes initialized, and the default values saved in the operating
program are recovered. If the setting exit is desired, press
.
[Fig 5.4.1-1]
5-25
① X Scale : Enlarges or reduces a design in the X-axis direction.
<100%>
<X-axis 200%>
The default is 100%, and the value can be adjusted from 50% to 200% by the unit of 1% .
② Y Scale : Enlarges or reduces a design in the Y-axis direction.
<100%>
<Y-axis 200%>
The default is 100%, and the value can be adjusted from 50% to 200% by the unit of 1% .
[Enlarge both X and Y]
<100%>
<X, Y-axis 200%>
5-26
③ Angle : Turns around the embroidery design according to the rotation angle value set.
<0°>
<90°>
The default is 0°, and the value can be adjusted from 0° to 359° by the unit of 1°.
④ Mirror : Reverses a design based on X, Y, or X_Y axises.
<No>
<X-axis>
<No>
<Y-axis>
<No>
<X_Y -axis>
The default is “0” or “normal work.”
Value
Description
0
Basic setting
1
X-axis reverse
2
Y-axis reverse
3
X_Y-axis reverse
5-27
⑤ X Satin
In case where the embroidery design is a satin stitch, this function can set the satin width.
[Fig 5.4.1-2]
[Fig 5.4.1-3]
This function determines the satin stitch length in the X-axis direction. The value can be increased by the unit of
0.1mm.
⑥ Y Satin
This function sets the Y-axis satin width.
⑦ Start stitch
This function sets the starting stitch number for the embroidery design to be worked. It enables skipping as many
as stitches desired for embroidery work. For instance, there is a design with a total of 10,000 stitches below. The
design on the left side has entire stitches embroidered. On the right side, the design has only 5,000 stitches since
the starting stitch number was set at 5,000.
Start Point
The part whose
stitches are skipped
among the entire
number of stitches
of the design
(5000 stitches)
Start Point
End Point
Basic shape
(Number of entire stitch-10000)
End Point
Set number of
stitches at 5000
[Fig 5.4.1-4]
5-28
⑧ Offset Function
This function determines whether to use the automatically designated off-set function or not.
Frame
Embroidery
Start Point
Needle Position after
Completing Embroidery
Frame Movement
Frame
<Embroidery End>
<Embroidery Start>
[Fig 5.4.1-5]
★ Setting Tips to Use Frame Offset Work Function
1. Select ‘Yes’ for the question asking the frame coordinates setting in the basic setting situation.
2. Go to ‘Setting’ → ‘Frame Offset Setting’ and determine the starting position, the offset middle position,
and the stop position after design completion (offset) (5.4.5 Frame Offset Setting)
3. To use the offset function during embroidery work, go to ‘Main Function Menu’ → ‘Setting’ → ‘5.4.5 Note
for Frame Offset Setting’, and enter the desired value to ‘Frame Offset Position.’
※ The above three settings shall be made to carry out the frame offset work.
5-29
⑨ Jump Convert
This function is to move the frame after trimming, in the case where consecutive jumps take place and they occur
more than the set value.
For instance, let’s assume that the set value is 5. Then, the machine conducts jump stitches without trimming
until 4 stitches. If the consecutive jump with over 5 stitches is found, conduct trimming first and move 5 stitches
back and start embroidery again. The default is 3 stitches and the value can be adjusted from 1 to 10 by the unit
of 1 stitch.
In case the length of the stitches is 4
( Thread connects to next design )
In case the length of the stitches is 5
( More to next design after thread trim )
[Fig.5.4.1-6] ‘Trimming by Jump Frequency’ When Value is 5
[Caution]
If ‘0[st]’ is chosen, when consecutive jump takes place, there will be no trimming regardless of the number of
stitches for the number of consecutive jump.
5-30
5.4.2 EMB Parameter Setting
<Fig. 5.4.2-1>, <Fig. 5.4.2-2>, and <Fig. 5.4.2-3> are the screens showing the parameter circulation setting. For setting,
use the number keys to enter the desired values within the scope same to the basic setting.
Press F2 NEXT to view the next menu.
<Fig. 5.4.2-1>, the initial screen, shows eight setting menus. When F2 NEXT is pressed first, the following eight
setting menus appear as in <Fig. 5.4.2-2>. Press F2 NEXT again and the last embroidery parameter setting menus
appear as in <Fig. 5.4.2-3>. When F2 NEXT is pressed once again, the initial screen returns as in <Fig. 5.4.2-1>.
F1 DEFAULT
Press
brings back the current setting values to the default values saved in the operating program.
to exit from setting.
[Fig 5.4.2-1]
[Fig 5.4.2-2]
[Fig 5.4.2-3]
5-31
① Total stitch clear
“
ST”as in“4.2.0 Work Information Screen”is the function to accumulate the total number of stitches
worked so far from the beginning of machine use or from the information initialization. This function initializes the
total stitch number into zero.
② Total work clear
“
WK”as in“4.2.0 Work Information Screen”is the function to accumulate the total number of embroidery
works produced so far from the beginning of machine use or from the information initialization. This function
initializes the total work number into zero.
(When initialization is desired, press“0”and then press
. If initialization is not desired, press
.)
③ Auto origin return
This function makes the frame return to the origin after embroidery work is completed.
– The default is“Yes (1)”. If the return to the origin is not desired, enter“No (0)”.
④ Jump change data
This function sets the needle width to change the regular code to the jump code.
– The default is 8.0 mm, and the scope of adjustment is from 5.0 to 12.7 mm and it can be set by the unit of 0.1 mm.
For instance, if the distance between two needles is longer than the set value when the frame moves from one
needle to the other needle, it becomes a jump stitch.
⑤ Auto backtack
The function sets the backtack performance to create stitch for embroidery beginning (thread release prevention).
– The default is“All”. It can be changed to“No(0)”,“Start Backtack(1)”,“End Backtack(2)”, and“All(3)”.
⑥ Jump convert(length)
If the total stitch length of the consecutive jump code is above the set value, trimming is primarily performed before
carrying out the next work. This function can set the maximum jump stitch length.
– The default is“No”. The scope of adjustment is from 1mm to 50mm by the unit of 1mm.
⑦ Applique
This function is used to set up the needle bar. If the needle bar is consecutively entered for needle bar setting, and
applique is“Yes”, the machine automatically stops without trimming when the needle bars overlap.
– The default is“Yes”.
⑧ Auto back stitch
When thread break is sensed, this function sets the number of backward stitches.
– The default is 2 and the scope of adjustment is from 0 to 5 by the unit of 1 stitch.
⑨ Auto start after trimming
The function sets up whether embroidery automatically begins after jump code and trimming or trimming by
suspension code.
– The default is“Yes”. If automatic start is not desired, enter“0”to choose“No”.
5-32
⑩ Auto start after frame back
This function sets whether the machine will automatically start when reaching“12) the previous needle position
after backstitch in case where the frame moves backward from the stop position and resume working.
– The default is“Yes”. If automatic start is not desired, enter“0”to set“No”.
⑪ All Head Swing After Stitch Back
When the machine stops, move the frame backward. Use the bar switch to decide whether to operate the heads with
broken thread or whether to operate all heads.
– The default is ‘Each’ To operate all heads’ needle bars, enter ‘0’ to select ‘all.’
⑫ All Head Start Point After F.B
If the machine stops operating after detecting that one of the needle bars has a problem (ex. thread break), while all
or multiple needle bars are simultaneously operating, conduct the back-stitching to correct the part where
embroidery was not conducted due to the problem. Select to operate the needle bars which have a problem and make
them move from the position prior to the problem area. This way the unwanted embroidery which inevitably occurs
due to the lower thread’s dragging can be corrected with the overlapping embroidery. This function is to set the
relative position where all needle bars start moving from the machine stop point. The default is 3[st] and the setting
range is from 1 to 20[st].
⑬ Frame forward / Back moving unit
This function sets the number of stitches which are fed by the once time operation of the bar switch with an aim to
move the frame forward or backward.
– The default is one stitch and the value can be set at the range from one to ten by the unit of one stitch.
⑭ Optimize method
The section where embroidery is conducted in running stitch at the place certain distance away from the outline of
design is called gauge. This function sets the distance value between the gauge and the design outline.
– The default is 1mm and can be adjusted at the range from 1 to 9 mm.
⑮ Software limit setting
The function sets whether to use the virtual frame limit or not.
– The default is“No.”
⒃ Thread break moving
⒔ Lock stitch
The function is to conduct backtack several times to prevent thread release.
– The default is one stitch and the value can be adjusted at the range from one to five stitches by the unit of one
stitch.
5-33
5.4.3 Machine Parameter Setting
<Fig. 5.4.3-1>, <Fig. 5.4.3-2> and <Fig. 5.4.3-3> are the screens showing machine parameter setting. As with the basic
setting, use the number buttons and enter the desired value within the permissible range.
Press F2 NEXT to view the next menu.
<Fig. 5.4.3-1> shows eight setting menus on the first screen. When F2 NEXT is pressed, as in <Fig. 5.4.3-2>, the next
eight setting menus appear. When F2 NEXT is pressed again, as in <Fig. 5.4.3-3>, the last setting menu appears. When
F2 NEXT
is pressed, as in <Fig.5.4.3-1>, the initial screen appears.
F1 DEFAULT
changes the default values stored in the operating program.
To exit from setting, press
.
[Fig 5.4.3-1]
[Fig 5.4.3-2]
[Fig 5.4.3-3]
5-34
① Max. Speed
This function sets the maximum embroidery speed.
- The default is 1000[rpm], and the value can be adjusted at the range from the minimum speed to 1000[rpm] by
the unit of 10[rpm].
② Min. speed
This function sets the minimum embroidery speed.
- The default is 300[rpm], and the value can be adjusted at the range from 300 [rpm] to the maximum speed by
the unit of 10[rpm].
③ Embroidery speed
This function sets the embroidery speed.
- The default is 800[rpm], and the value can be adjusted at the range from the maximum speed to the minimum
speed by the unit of 10[rpm].
④ Inching speed
This function sets the starting speed for embroidery work.
- The default is 100[rpm], and the value can be adjusted at the range of 50[rpm] to 200[rpm] by the unit of
10[rpm].
⑤ Jump speed
This function sets the range of the jump stitch speed, which is characterized by frame move without sewing.
- The default is 900[rpm], and the value can be adjusted at the range from 300[rpm] to 900[rpm] by the unit of
10[rpm].
⑥ Slow speed
This function sets the embroidery speed during slow operation.
- The default is 650[rpm], and the value can be adjusted at the range from the minimum speed to the maximum
speed by the range of 10[rpm].
⑦ After trimming inching stitch
When the color change signal is issued or when embroidery work for one design is completed, the closing is
conducted. At this time, the function sets the number of stitches to be made during slow operation.
- The default is three stitches, and the value can be adjusted at the range from three to ten stitches by the unit of
one.
⑧ Auto trimming
This function determines whether to enable the automatic trimming function.
- The default is “Yes”, and To turn off the automatic trimming function, choose “No”.
5-35
⑨ Automatic color change
This function determines whether to enable the automatic color change function.
- The default is “Yes”, and to turn off the automatic color change function, choose “No.”
⑩ Bottom dead point stop
⑪ Frame setting
This is to set the types of embroidery frame.
- The default is “FLAT(0)”. To select CAP, enter “1”. When a new design is called after CAP is set, the design
rotation is automatically set at 180 degrees.
⑫ Frame speed setting
This is to set the frame move speed during frame feeding, such as automatic return to origin and offset move.
- The default is “High Speed(1)”. To set low speed, enter “Low Speed (0)”.
⑬ Frame move method(trimming)
This is to shake the frame left or right to separate the thread from embroidery materials after trimming.
- The default is X(1). To set the move direction along the Y-axis direction, select Y(2). If no direction is selected,
choose “NO(0)”.
⑭ Inching stitch
When starting embroidery, the machine starts operation at the inching speed. This function is to set the number of
stitches to be made during inching operation.
- The default is 2 stitches, and the value can be adjusted at the range from 2 to 10 stitches by the unit of 1 stitch.
⑮ Needle move function(offset)
⒃ Power-on auto origin
This function is to automatically find the origin after the power is on.
- The default is “No”. If “Yes” is chosen, but the origin setting is wrong or the machine develops problems, all
settings shall be initialized. For setting initialization, see “2) Program setting Initialization of 3.1.3 Memory”.
5-36
⒔ Start / end filter
This function is to prevent thread break by conducting automatic filtering for the stitch of 0.5mm or shorter,
when starting or closing embroidery.
- The default is 0.0[mm], and the value can be adjusted from 0.0[mm] to 0.5[mm] by the unit of 0.1[mm].
⒕ Speed switching data
If the embroidery material is so heavy as to make normal embroidery work impossible, this function slows down
the overall embroidery speed.
- The default is “High Speed(1)”. The embroidery speed is reduced by 30~50rpm.
⒖ Thread break sensor
If the sensor detects the consecutive breaks of the upper thread at the set length, the machine will stop its
operation. This is to prevent false detection associated with sensor’s malfunction.
- The default is 3[st], where the thread sensing function is enabled. The value can be adjusted from 0 to 10[st] by
the unit of 1[st]. If the thread sensing function is not desired, enter“0”
⒗ Thread break method
This function is to set the sensitivity of the sensor when it detects thread.
- The default is Low(0), and the other options to choose include High(2) and Medium(1).
(21) Thread length trimmed
(22) Frame start angle for ‘A’ area
When the embroidery width is 1.9mm or below, this function sets the rotation
angle of the main shaft when the frame starts moving.
- The default is 240˚, and the value can be adjusted from 230˚ to 250˚ by the unit of 1˚.
(23) Frame start angle for ‘B’ area
When the embroidery width is 2.0mm or above, this function sets the rotation angle of the main shaft when the
frame starts moving.
- The default is 240˚, and the value can be adjusted from 230˚ to 250˚ by the unit of 1˚.
[Note]
Selection of polyester yarn mode:If the frame feed starting angles (A) and (B) are set at 250。, the polyester
yarn mode will be selected and the looping, which occurs during embroidery, can be prevented.
(24) Picker Off Time (Trimming)
This function is to set the length of the remaining upper thread at the needle when automatic trimming is
conducted.
- The default is 13[ang]. If the value set is smaller than the default, the remaining upper thread will be short, and
vice versa. The value can be adjusted from 0 to 60[ang] by the unit of 1[ang].
5-37
5.4.4 Needle Setting (Color)
This function is to enable automatic exchange of needle bars when the thread color change code appears. It is also able
to change the colors of the embroidery design displayed on the screen.
<Fig.5.4.4-1> and <Fig.5.4.0-1> appear when the needle bar setting button is pressed to set the needle bars.
The needle bar setting is divided into three parts: needle bar choice, needle bar change, and color change.
Select : This is the menu where the order of changing needle bars is set when the color change code appears
during embroidery. Up to 300 color change codes can be applied.
Change : This enables the user to change the 1 or 1 match between the needle bar table and the needle bar at
the his/her discretion.
Color change : This function is to change the colors of each needle bar.
[Fig 5.4.4-1]
[Fig 5.4.4-2]
■To understand the above, let’s look at the head section of the SWF multi-head embroidery machine as in
<Fig. 5.4.4-2>.
As in <Fig. 5.4.4-2>, the multi-head embroidery machine has needle bars for each of which unique number is
designated. Each number is matched one or one to the standard needle bar as in <Fig. 5.4.4-1>. If the standard needle
bar and the changed needle bar are same, the needle bar with a unique number on the head section as in <Fig. 5.4.42> will operate. The unique numbers can be virtually changed by pressing the change button. Here is an example for
clearer understanding.
5-38
■The following is the button used for needle bar setting. Use the direction buttons and
menu. To enter the desired value, use the number buttons.
to select a
NEEDLE BAR CHOICE
NEEDLE BAR CHANGE
COLOR CHANGE
F1 INSERT
: This function is to insert needle bars when there are needle bars already entered in between them.
F2 DELETE
: This function is to delete needle bars among the already entered needle bars.
F3 RESET
: This function is to initialize the needle bar setting.
F5 Simulation
F6 OK
: This function is to virtually display the completed view.
: This function is to apply the set value.
5-39
(1) Needle Bar Choice
This function is to determine the changing order of needle bars when the color change signal appears during
embroidery. Press “Needle Bar Choice” in <Fig. 5.4.4-1>, and the necessary buttons for needle bar choice are
enabled as in <Fig. 5.4.4-3>. Let’s take an example to explain how to use the function.
[Fig 5.4.4-3]
[Note]
Once the needle bar setting is made, the setting is continuously applied even after the machine is turned off
and on. When other embroidery design is called, the needle bar setting values are unchanged. As such, when
the design is changed or other setting is desired, the needle bar setting shall be reset.
5-40
[Exercise 5.4.4-1] Needle bar choice
Call the design in #37 Room and set the order of needle bars like
7-3-5-1-6-4-2-1.
Call the design in #37 Room as in <Fig. 5.2-6>.
(For design call, see “5.2 Design Call”.)
Press
F3 SETTING
.
Use the up/down buttons on the setting menu to move to “Needle Bar Parameter setting” and press
.
Move to the needle bar choice menu.
As in <Fig. 5.4.4-4>, Add, Delete, Initialize, and Simulation functions become enabled. The cursor is located on
No. 1 for order choice.
[Fig 5.4.4-4]
5-41
Use the number buttons and enter 7.
As in <Fig. 5.4.4-5>, 7 is entered in No. 1, and the cursor moves to No. 2 for entry.
[Fig 5.4.4-5]
Repeat the above method and enter 3, 5, 1, 6, 4, 2, 1 in order by using the number buttons.
Make sure for accurate setting and press
F6 OK
.
5-42
[Exercise 5.4.4-2] Add, Delete needle bars
The order of needle bar is 7-3-5-1-6-4-2-1. Insert #9 needle bar
(between #1 and #6) and delete #4 needle bar.
The precondition of this exercise is that [Exercise 5.4.4-1] shall be conducted first.
Move to the needle bar choice menu.
Use the direction buttons to move to #5 needle bar position.
As in <Fig. 5.4.4-6>, the cursor is located at the place which is taken by “6”.
[Fig 5.4.4-6]
Press
F1 INSERT
.
As in <Fig. 5.4.4-7>, “6” is copied, and the needle bars increase by one.
[Fig 5.4.4-7]
5-43
Press the number button “9”.
As in <Fig. 5.4.4-8>, “9” is inserted.
[Fig 5.4.4-8]
Use the direction buttons and move the cursor to “4” under #7 needle bar.
As in <Fig. 5.4.4-9>, the cursor will move to the “4” position.
[Fig 5.4.4-9]
5-44
Press
F2 DELETE
.
As in <Fig. 5.4.4-10>, number “4” is deleted, and number “2” is placed under #7 needle bar.
[Fig 5.4.4-10]
Press
F6 OK
to apply the setting.
5-45
(2) Bar Change
This function is to virtually change the needle bar numbers fixed as in <Fig. 5.4.4-2>.
Let’s assume that the needle bar numbers are set as 1, 2, 1, 2, 1, 2, 1, 2, 1, 2 according to the order of color change. If
it is desired to change the needle bars designated as No. 2 into No. 1, this function enables making the change all at
once. Press the needle bar change button, and change No. 2 to No. 1. Then, with one-time operation, all needle bar
colors can be changed.
<Fig. 5.4.4-11> shows the screen when the needle bar change button is pressed. Let’s get to know more about how to
use the function via an exercise.
[Fig 5.4.4-11]
5-46
[Exercise 5.4.4-3] Needle bar change
No. 1 needle has brown thread, and No. 2 needle has blue thread.
The order of color is 1-2-1-2-1-2-1-2-1-2. It is needed to change all
embroidery colors to brown by using the needle bar change function.
First of all, call a design.
(For design call, see “5.2 Design Call”.)
Use the select buttons as in <Fig. 5.4.4-12> to set the order of colors as 1-2-1-2-1-2-1-2-1-2. ( See
[Exercise 5.4.4-1] ‘Needle bar select’.)
Move to the needle bar change menu.
Use the menu move buttons to go to No. 2 needle bar.
[Fig 5.4.4-12]
Press 1 on the number key pad.
In <Fig. 5.4.4-13>, confirm that the needle bar is changed at No. 2 position.
[Fig 5.4.4-13]
Press
F6 OK
.
5-47
(3) Color Change
This function is to easily show the needle bar (color) change-related information on the design by marking colors on
each needle bar. It does not affect the actual embroidery work.
<Fig. 5.4.4-14> appears when the needle bar color is pressed.
[Fig 5.4.4-14]
Use the number buttons to select the desired needle bar, and then <Fig. 5.4.4-15> appears where colors can be
chosen. Use the direction buttons to locate the cursor on the desired color and press
F6 OK
.
[Fig 5.4.4-15]
On the color change window in <Fig. 5.4.4-15>, use the frame speed key to adjust the cursor move speed.
5-48
5.4.5 Frame Offset Setting
The function is to decide the starting position of the embroidery design, the offset position, and the stop position after
work completion to ensure more convenient embroidery work.
<Fig. 5.4.5-1> appears when selecting the offset setting button on the
F3 SETTING
menu.
[Fig 5.4.5-1]
The sub-menus for frame coordinates are as below:
(DESIGN START POSITION) : It decides the frame’s start position for the called design. When the
starting position is pre-determined, regardless of the current frame locations, the frame automatically moves to the
start position when the embroidery work begins.
F1 START
(OFFSET MIDDLE POSITION) : It decides the middle position between the design starting position
and the stop position when the design is completed to prevent the needle bar from contacting the embroidery materials.
If the function is unnecessary, the same value can be entered for the design starting position and the stop position after
design is completed. It does not adversely affect the machine operation.
F2 MIDDLE
(STOP POSITION AFTER DESIGN IS COMPLETED) : It decides the frame position where
design is completed or the offset frame position. This function is useful for applique work and frame change.
F3 OFFSET
[Caution]
1. If the frame coordinates setting (offset) is not set as ‘Yes’ in the basic setting, the setting of the frame
coordinates is not applied during embroidery.
2. If the frame origin is incorrect, it is difficult to find the frame coordinates.
5-49
[Exercise 5.5.5-1] Design start position - X : 500, Y : 300
Offset middle position - X : 1000, Y : 1000
Stop position after design completion (offset) - X : 1500, Y : 1700
Make the above settings.
Press “Frame Offset Setting” on the setting menu.
Then <Fig. 5.4.5-1> appears.
Press
F1 START
.
The start position of the design becomes enabled.
Sets the X, Y values for the frame location by using the frame move buttons.
Press
F2 MIDDLE
.
The offset middle position becomes enabled.
Set the X, Y values for the frame location by using the frame move buttons.
Press
F3 OFFSET
.
When the embroidery of the design is completed, the stop position becomes enabled.
Set the X, Y values for the frame location by using the frame move buttons.
Press
F6 OK
.
5-50
5.4.6 Options Setting
This function is to set the options for the embroidery machine. Among the options, there are coding and boring. <Fig.
5.4.6-1> shows the screen for option setting.
[Fig 5.4.6-1]
5-51
(1) Coding setting
① Press
F3 SETTING
from the main function menu.
② Select Options Setting and press
③ Select “1. Coding Setting” and press
.
.
<Fig. 5.4.6-2> appears for setup.
[Fig 5.4.6-2]
④ Use the number buttons and press “1(Yes)”. (<Fig. 5.4.6-3>)
To correct the entered data, press
. To cancel, press
.
[Fig 5.4.6-3]
⑤ Press
.
It completes the coding setting.
5-52
(2) Boring setting
① Press
F3 SETTING
on the main function menu.
② Select Options Setting on the setting screen and press
③ Select “7. Boring Needle Bar” and press
.
.
<Fig. 5.4.6-4> appears for setup.
[Fig 5.4.6-4]
④ Enter the number of the needle bar equipped with the boring within the range of permissible values.
To correct the entered data, press
⑤ Press
. To cancel, press
.
This completes the boring setting.
5-53
.
5.4.7 The Other Setting
Press Other Settings on the setting menu, and then <Fig. 5.4.7-1> will appear. There are four setting menus including
the cutting needle bar setting, the trimming-related setting, the thread condition setting, and the date/time setting under
the other settings menu.
[Fig 5.4.7-1]
5-54
(1) Cut needle set
This function is to set the needle bar equipped with the specially designed cutting needle to cut the embroidery fabric
in the desired shape. To use this function, during embroidery, thread detection and trimming functions shall be
suspended. The cutting needle bar setting is the function to automatically suspend the unnecessary functions, when
the cutting function is used. <Fig. 5.4.7-2> is the screen where the “Cutting Needle Bar Setting” is pressed in <Fig.
5.4.7-1>. Pink means that the concerned needle bars were chosen for embroidery, and bright yellow means that the
needle bars were set for cutting.
<Fig. 5.4.7-2> shows that No. 4 Head is set as cutting needle bar.
[Fig 5.4.7-2]
(2) Sensing head set
This function is unavailable for this type of machine.
5-55
(3) Trim set
There are three trimming-related settings: Trimming start angle setting, main-shaft start acceleration speed setting,
and backtack length setting for trimming.
[Fig 5.4.7-3]
① Trim angle setting - This is unavailable in this machine type.
② Accelating
This function is to set the time taken for the machine to reach the embroidery speed after the machine started
operating at the inching speed.
- The default is Normal. Either Normal(0) or Slow(1) can be chosen.
Embroidery Speed
Inching Speed
Time
start
t
③ Start or end B/T length
This function is to set the length of a stitch while backtack is performed.
For thin or wool fabric, set the value at 0.8[mm], and the first stitch plaiting and trimming can be effectively
performed.
- The default is 0.8[mm], and the value can be adjusted from 0.6 to 0.8[mm] by the unit of 0.1[mm].
5-56
(4) Sound volume
It is not available in this type of machine.
(5) Head select
It is not available in this type of machine.
(6) Thread select
This function is to select appropriate threads by conditions.
- The default is Normal(0). For wool, select Wool(1).
(7) Date/time setting
This function is to change the date and time displayed on the upper right side of the screen.
on the Other Settings menu, select No. 7, and the screen where date and time can be set appears as in <Fig. 5.4.74>.
[Fig 5.4.7-4]
Use the menu move buttons and the number UP/DN buttons for setting.
For date and time setting, see “4.4.2 Date/Time Change”.
5-57
5.5.0 Tools
- This is a setup menu to prepare for actual embroidery work. Under the tools menu, there are six
setting menus including Manual Trim, Frame Center, Hoop Select, Language, and Maintenance.
On the main screen, press F4 TOOLS , and the sub-menus appear as in <Fig. 5.5.0-1>.
[Fig 5.5.0-1]
MANUAL TRIM : It enables the user to conduct trimming at desired time except for automatic trimmings
conducted by the design code.
FRAME CENTER : It sets the origin and the frame center.
HOOP SELECT : It is possible to set the virtual frame limits depending on the shape and size of the hoop.
LANGUAGE : It selects one of the nine languages for user’s convenience.
MACHINE : It conducts seven settings related to machine, including machine service, machine information,
machine operation test, frame origin, error check, thread sensing check, and memory
initialization.
5-58
5.5.1 Manual Trim
This function is to enable the user to conduct trimming when it is desired except for automatic trimmings activated by
the design code during embroidery.
When
F4 TOOLS
is pressed, <Fig. 5.5.0-1> appears. Use the menu move keys, select Manual Trim and press
Then as in <Fig. 5.5.1-1>, the message box appears asking “Do you want manual trimming?” When
pressed, automatic trimming is conducted. When manual trimming is not desired, press F2 NO or
F1 YES
.
is
.
[Fig 5.5.1-1]
5.5.2 Frame Center
This function is to make the needle bar move to the center of the frame.
In <Fig. 5.5.0-1>, use the menu move buttons and choose Frame Center. When
appears asking “Move to the Frame Center?” as in <Fig. 5.5.2-1>. When
F1 START
is pressed, the message box
is pressed, the machine checks
the origin and the needle bar moves to the center of the frame. When the move is not desired, press F2 CANCEL or
.
[Fig 5.5.2-1]
5-59
5.5.3 Hoop Select
This function is to select the hoop of desired size. Select the size of a hoop and press
. Then, the frame
automatically moves to the origin, and checks the X, Y frame limit by considering the offset location. When finding all
the locations, return the frame to the original position.
[Fig 5.5.3-1]
5.5.4 Language
This function is to enable users to choose a language among nine languages including Korean, English, Spanish,
Germany, Danish, Italian, Indonesian, Chinese, and Turkish for easier understanding.
Use the menu move buttons to move to the desired language and press
for selection.
[Fig 5.5.4-1]
5-60
5.5.5 Machine
Machine Maintenance has seven sub-menus including machine service, machine information, machine operation test,
frame origin, error check, thread sensing check, and memory initialization.
Use the menu move buttons in <Fig. 5.5.0-1> and select Machine Maintenance. When
is pressed, the sub-menus
of machine maintenance appear as in <Fig. 5.5.5-1>.
[Fig 5.5.5-1]
MACHINE SERVICE : It conducts the initial setting for jump motor and sequin motor.
MACHINE INFORMATION : It lists up the SWF machine information.
MACHINE TEST : It checks normal operation of all solenoids, thread sensors, etc.
FRAME ORIGIN : It finds the frame origin.
ERROR INFORMATION : It saves and displays the recently occurred errors by up to ten.
THREAD BREAK INFORMATION : It shows thread break information by head.
MEMORY INITIALIZE : It erases all designs.
5-61
(1) Machine Service
This function is to check wrong machine settings and help create right settings.
(2) Machine Information
This function is to show the embroidery machine’s mechanical information when initially setting up the embroidery
operating program (For initial setting methods, see “3.2 Machine Setting Change”.)
[Fig 5.5.5-2]
5-62
(3) Machine test
This function is to test whether the embroidery machine is properly operating by part.
<Fig. 5.5.5-3> will appear when the operation test button is pressed in <Fig. 5.5.5-1>.
[Fig 5.5.5-3]
Jump Test: Check the normal operation of the jump motor and the jump solenoid.
Wiper Test: Check the normal operation of the wiper solenoid.
Picker Test: Check the normal operation of the picker solenoid.
Trimming Test: Check the normal operation of the trimming solenoid.
Holding Test: Check the normal operation of the main shaft holding solenoid.
Upper Thread Detection: Check the normal operation of the upper thread sensor.
① Jump Test
Select the jump test as in <Fig. 5.5.5-3> and press the start button. Then all jump motors attached to each head
start operating. When other operation tests are selected, they will be conducted after the previously selected test
is completed.
② Wiper Test
Select the wiper test as in <Fig. 5.5.5-3> and press the start button. Then the head wiper motor operates once.
③ Picker Test
Select the picker test as in <Fig. 5.5.5-3> and press the start button. Then the picker solenoid installed near the
hook operates for some 0.5 second.
5-63
④ Trimming Test
Select the trimming test as in <Fig. 5.5.5-3> and press the start button. Then the trimming solenoid operates for
some 0.5 second.
⑤ Holding Test
Select the holding test as in <Fig. 5.5.5-3> and press the start button. Then the holding solenoid installed on each
head will operate for some 0.5 second.
⑥ Upper Thread Detection
Select the thread sensing test as in <Fig. 5.5.5-3> and press the start button. Then the beep sound is issued. When
the thread sensor is rotated, the lamp blinks. To finish the test, select “Thread Sensor Test” or press the stop
button again. Then the beep sound is stopped, and the test is finalized.
(4) Frame Origin
When the frame origin button is pressed in <Fig. 5.5.5-1>, the frame will automatically move to the origin. In other
words, when seeing the embroidery machine from the front, the frame will move to the most left and most front
place to find the origin and then move to the opposite position to find the X,Y limits. When all the positions are
found, the frame will be brought to the place when the function is activated. While the function is performed, if
ORG/ESC is pressed, the message box appears asking whether to stop the frame move as in <Fig. 5.5.5-4>. If
you desire to stop the frame move, press
F2 CANCEL .
[Fig 5.5.5-4]
5-64
[Caution]
Since the frame moves to the X,Y limits, the frame might strike them if some objects are placed on the table
and it might damage the frame. Therefore, make sure that you do not place any objects on the table during
embroidery.
(5) Error Information
[Fig 5.5.5-5]
SWF system can save up to 10 error messages for the errors which occurred during operation. This function displays
the details of the errors saved in the memory. By reading the details of errors, the causes of problems can be easily
found.
(6) Thread break Information
This function is to show the number of thread sensing detected.
(7) Memory Initial
This function is to initialize the embroidery designs stored.
5-65
5.6.0 Ready
- This function is to check whether the machine is prepared to conduct embroidery before work.
There are five functions including work position, gauge, outline, route check, and scope check.
Press
F5 READY
Supplementary Work on the main menu and then sub-menus will appear as in <Fig. 5.6.0-1>.
[Fig. 5.6.0-1]
Position : It shows whether the called design contacts the X, Y limits without actually carrying out embroidery
work.
Gauge : It automatically generates gauges for the embroidery outline in accordance with the values set in“14.
Distance between embroidery outline and gauge line”under“Embroidery parameter setting”.
Exclude : It is used to embroider the outline of the called design.
Fastview : It virtually shows the embroidery work for each stitch to display the progressing direction of the
design or the stage of color changes.
Trace : It briefly checks whether the frame moves beyond the X, Y limits, if the embroidery work begins from
the current position of the frame.
5-66
5.6.1 Position
This function is to set the desired position to begin embroidery.
① Select the work position in <Fig. 5.6.0-1>, and then <Fig. 5.6.1-1> will appear.
[Fig. 5.6.1-1]
② The dotted lines within the frame in <Fig. 5.6.1-1> is the maximum horizontal and vertical sizes. The plus (+) mark
within the dotted lines indicates the starting point of embroidery and the position of the frame where the current
needle bar will begin embroidery.
③ When the desired position within the frame is pressed, the embroidery design will move to the desired position. If
there is a red part in the dotted lines, which indicate a design, errors will occur in the X, Y limits during embroidery.
Therefore, make sure to select a position where the entire dotted lines are positioned within the frame.
[ Caution ]
When the main power is off, and the frame is pushed by hand, the frame’s origin will change. Likewise, when
the frame’s origin is changed, the work position function does not properly perform. (For frame’s origin, see
“5.5.5 (4)Frame’s Origin.”)
5-67
5.6.2 Gauge
This function is to automatically create the gauge of the design outline.
① Use the menu move buttons in <Fig. 5.6.0-1>, select gauge, and press
. And then <Fig. 5.6.2-1> will appear.
[Fig. 5.6.2-1]
② Press
F1 SAVE
in <Fig. 5.6.2-1>, and as in <Fig. 5.6.2-2>, the menu for design save will appear. Select the room
to save the design and press
F1 COPY
, and the design will be saved in the memory. To cancel the saving, press
F2 CANCEL .
[Fig. 5.6.2-2]
[ Note ]
The distance between the called design and the gauge line can be set in “14. Distance between design
outline and gauge line”of“5.4.2 Embroidery Parameter Setting.”
in <Fig. 5.6.2-1> is the function to check whether the gauge line moves beyond the frame by moving
the frame along the gauge line.
F2 FRAME
5-68
5.6.3 Exclude
This function is to embroider the outline of the called design.
① Use the menu move buttons in <Fig. 5.6.0-1> to select Outline and press
. And <Fig. 5.6.3-1> will appear.
[Fig. 5.6.3-1]
② Press
F1 SAVE
in <Fig. 5.6.3-1>, and then the menu for design saving will appear as in <Fig. 5.6.3-2>. Select the
room for design saving and press
press
F1 COPY
. Then the design will be saved in the memory. To cancel the saving,
F2 CANCEL .
[Fig. 5.6.3-2]
in <Fig. 5.6.3-1> is the function aimed to check whether the frame moves beyond the outline by
moving the frame along the outline.
F2 FRAME
5-69
5.6.4 Fastview
This function is to show the virtual embroidery work for the chosen design. There are such sub-menus such as color, 100
stitches, 1000 stitches, slow view, and fast view.
<Fig. 5.6.4-1> is the screen when “Route Check” is pressed in <Fig. 5.6.0-1>.
[Fig. 5.6.4-1]
As in <Fig. 5.6.4-2>, the embroidery work for the chosen design is displayed one stitch at a time. This shows the
procedures of producing the entire design.
[Fig. 5.6.4-2]
5-70
■The following is the description for each button.
: Ends the route check function.
+Color : Shows the increase of stitches until the next color.
-Color : Shows the decrease of stitches until the previous color.
+100 : Shows the design after adding 100 stitches each time .
-100 : Shows the design after subtracting 100 stitches each time.
+1000 : Shows the design after adding 1000 stitches each time.
-1000 : Shows the design after subtracting 1000 stitches.
F1 START
: Press this button after selecting High speed or Low speed. And then, the embroidery work virtually
begins on the screen.
F2 STOP
: Stops the display work when pressed while the drawing is in progress.
F3 FAST
: Displays the design embroidery at faster or slower speed on the screen. When Fast is seen on the button,
it means that low speed function is set. When the slow button is pressed to set it as high speed, the
button name will be changed to Slow. This is the condition where high speed function is set. If the
button is pressed once again, Fast appears on the button again, and the slow mode comes back.
F4 RESTART
: Initializes the screen where virtual embroidery is being conducted.
5-71
The following screens show the embroidery by color after pressing
for #35 Room.
This design has 17 color change codes. The following screens show 9 steps of embroidery work.
5-72
5.6.5 Trace
① This function is to briefly check whether the design size goes beyond the X, Y limits, if the embroidery of chosen
design begins from the current frame position.
(3)
(4)
Embroidery starting point
(2)
(1)
(6)
(5)
[Fig. 5.6.5-1]
② The arrow marks in <Fig. 5.6.5-1> show the feed route of the frame. While the frame moves fast between the
maximum X,Y range and the minimum X,Y range, the function checks whether the design goes beyond the frame
limits. If so, the frame operation will be stopped, and the message“Frame Limit Error”will appear on the screen.
5-73
5.7.0 Design
- The design menu supports the consecutive work function and the design edit function.
<Fig. 5.7.0-1> will appear when
F6 DESIGN
is pressed on the main function menu.
[Fig. 5.7.0-1]
Repeat : It uses the same embroidery designs consecutively.
Edit : It is used to edit designs.
5-74
5.7.1 Repeat
This function is to embroider a single or various designs within one frame consecutively at the same time.
<Fig. 5.7.1-1> appears when Consecutive Work is selected in <Fig. 5.7.0-1>.
[Fig. 5.7.1-1]
General Repeat : It can embroider a single design called consecutively up to 99 times horizontally and
vertically.
Special Repeat : It calls various designs saved in the memory and supports up to 64 times of consecutive
work. Angle, X-axis reverse, enlargement, reduction and other various editings can be freely
made.
Repeat Load : It calls out the consecutive work saved in the memory.
5-75
(1) General Repeat
This function is to embroider one design repeatedly along the X and Y axes.
<Fig. 5.7.1-2> will appear when General Consecutive is selected in <Fig. 5.7.1-1>.
Use the menu move key and press
for making a choice. If the setting is undesired, press
.
[Fig. 5.7.1-2]
① X Repeat : Sets the number of repetitions along the X axis. The range of repetition settings is from 1 to 99 times.
② Y Repeat : Sets the number of repetition along the Y axis. The range of repetition settings is from 1 to 99 times.
[ Note ]
The range of repetition setting [(X repetition frequency) × (Y repetition frequency)] shall be smaller than 99.
③ X Design Interval : It sets the distances between the starting points of the repeated design along the X axis.
The signs of move(+/-) determines the direction of repetition.
+ : Repeat in the right direction
-: Repeat in the left direction
Move volume set at +30mm
Move volume set at -30mm
Starting Point
Starting Point
Move Volume
(+30mm)
Move Volume
(-30mm)
5-76
④ Y Design Interval : It sets the distances between the starting points of the repeated design along the Y axis.
The signs of move(+/-) determines the direction of repetition.
+ : Repeat in the right direction
- : Repeat in the left direction
Move Volume Set at +20mm
Move Volume Set at -20mm
Starting Point
Move Volume (-20mm)
Move Volume (+20mm)
Starting Point
⑤ X/Y Design Priority : It determines the priority in the X or Y direction.
In <Fig. 5.7.1-3>, the X direction is priority. In <Fig. 5.7.1-4>, the Y direction is priority.
6
←
5
←
4
6
2
←
1
5
[Fig. 5.7.1-3]
3
2
↙
←
←
↙
←
←
3
4
1
[Fig. 5.7.1-4]
⑥ Design Interval Mode : This function is to set the moving methods between repeated designs. To move a
design, Stop Code and Jump Code can be used.
Stop code : It moves to the position of the next design and stops.
Jump code : It moves to the position of the next design and automatically begins work.
5-77
⑦ Mirror Convert : This function is to set the design to look like the one reflected on the mirror.
NO
X
Starting Point
Starting Point
Move Volume
(+30mm)
Move Volume
(+30mm)
Y
XY
Starting Point
Move Volume
(+30mm)
(+20mm)
Starting Point
When entering the values as below, the following settings will be made.
Value
Setting
0
NO
1
X
2
Y
3
X_Y
5-78
Move
Volume
Move
Volume
(+20mm)
[Exercise 5.7.1-1] Call No. 35 design, conduct the following consecutive work, and
save it.
X-axis repetition : 3
Y-axis repetition : 3
X-axis design gap : 200 mm
Y-axis design gap : -200 mm
X/Y design priority : Y first
Design move method : Jump code
Reverse effect : Normal
Save method : Data saving
Call No. 35 design.
(For design call, refer to“5.2 Design Call”.)
Press F6 DESIGN on the main function menu, select Consecutive Work, and then <Fig. 5.7.1-1> appears.
If General Consecutive is selected, <Fig. 5.7.1-2> will appear.
Press“1. X Repeat”
<Fig. 5.7.1-5> will appear for setting.
Use the number buttons to press “3” and then press
.
[Fig. 5.7.1-5]
5-79
Press“2. Y Repeat”.
<Fig. 5.7.1-6> will appear for setting.
Use the number buttons to press “3” and then press
.
[Fig. 5.7.1-6]
“3. X Design Interval”.
<Fig. 5.7.1-7> appears for setting.
Press 200 by using the number buttons, and press
.
[Fig. 5.7.1-7]
5-80
Press“4. Y Design Interval”.
<Fig. 5.7.1-8> will appear for setting.
Use the number buttons to enter “-200” and press
.
[Fig. 5.7.1-8]
Press“5. X/Y Design Priority”.
<Fig. 5.7.1-9> will appear for setting.
Press 1 by using number buttons, and then press
.
[Fig. 5.7.1-9]
5-81
Press“6. Design Interval Mode”.
<Fig. 5.7.1-10> will appear for setting.
Press 1 by using number buttons, and then press
.
[Fig. 5.7.1-10]
Press“7. Mirror Convert”.
<Fig. 5.7.1-11> will appear for setting.
Press “0” by using the number buttons, and then press
.
(The default of , is normal so that it is unnecessary to work on this exercise. However, it was described just for
the purpose of showing an example.)
[Fig. 5.7.1-11]
5-82
Press F6 OK Apply when all settings are completed.
<Fig. 5.7.1-12> is the screen when all the settings are completed.
[Fig. 5.7.1-12]
<Fig. 5.7.1-13> is the screen asking for how to save repetition work.
[Fig. 5.7.1-13]
5-83
Press
F1 DATA
.
[Fig. 5.7.1-14]
<Fig. 5.7.1-14> is the screen where the room number for saving is selected. Currently, all ten rooms are empty.
Press“Section 1”.
As in <Fig. 5.7.1-15>, the repeated work can be seen on the scree. If work repetition is set, the design call and
supplementary functions cannot be used. The design button color will change to blue.
[Fig. 5.7.1-15]
[ Note ]
During consecutive work, the design call and input/output functions cannot be performed.
[ Note ]
When consecutive work is saved, it overwrites the existing consecutive work. Therefore, consecutive work is
not necessary to be deleted.
5-84
[Exercise 5.7.1-2] Cancel the consecutive work setting
(Caution: This function is applicable only when consecutive work was previously set.
Press
F6 DESIGN
which is printed in blue on the main function menu.
<Fig. 5.7.0-1> will appear, and then press
<Fig. 5.7.1-16> will appear, and then press
.
. This will cancel the consecutive work.
[Fig. 5.7.1-16]
5-85
(2) Special Repeat
This function is to synthesize designs. It can synthesize various designs saved in the memory and produce 64 types
of design.
<Fig. 5.7.1-17> will appear when Special Consecutive is pressed in <Fig. 5.7.1-1>.
Eight designs can be set on one screen. To synthesize more designs, use the menu move key to go to the next screen.
[Fig. 5.7.1-17]
5-86
[Exercise 5.7.1-1] Synthesize No. 51, No. 81 designs as in <Fig. 5.7.1-16> by using
Special Consecutive function.
No. 46 design: X_Scale 150%, Y_Scale 150%
No. 81 design: X_Scale 200%, Y_Scale 200%
[Fig. 5.7.1-18]
Press “Special Repeat” in <Fig. 5.7.1-1>.
Then, <Fig. 5.7.1-17> will appear.
Use the menu move key in <Fig. 5.7.1-17>, select No. 1 section, and press
<Fig. 5.7.1-19> will appear for setting.
.
[Fig. 5.7.1-19]
Select“1. Design”in <Fig. 5.7.1-19>, and press
The design call screen will appear.
5-87
.
Use the menu move key to move to No. 46 design.
Then, <Fig. 5.7.1-20> will appear.
[Fig. 5.7.1-20]
Use the menu move buttons in <Fig. 5.7.1-20> to go to No. 46 design, and press
In <Fig. 5.7.1-19>, press“2. X Scale”.
Then, <Fig. 5.7.1-21> will appear.
Enter “150” by using the number buttons and press
.
.
[Fig. 5.7.1-21]
5-88
Select“3. Y Scale”and enter “150”.
(For“4. Angle”,“5. Mirror”, their settings shall be left as default.)
For“6. X Space”, set the value at “0”.
For“7. Y Space”, set the value at “10”.
[ Note ]
For the first design to be synthesized, do not make settings for“6. X Space”and“7. Y Space”. Based on the
first design, the positions of the second design’s X Space and Y Space will be changed. It is difficult to set X
Space and Y Space of the second design at the same time. To find appropriate positions, the position setting
shall be conducted several times.
The first design was set as in <Fig. 5.7.1-22>.
⑨ Press
F6 OK
after setting as in <Fig. 5.7.1-22>.
[Fig. 5.7.1-22]
5-89
As in <Fig. 5.7.1-23>, the first design setting has been completed.
[Fig. 5.7.1-23]
Use the menu move buttons in <Fig. 5.7.1-23> and move to No. 2 item, and then press
As in <Fig. 5.7.1-19>, the screen for setting appears.
In“1. Design”, select No. 11 design.
Enter “200” for“2. X Scale.”
Enter “200” for“3. Y Scale”
(For“4. Angle”,“5. Mirror”, leave their setting as default.)
Enter “0” for“6. X Space”.
Enter “-10” for“7. Y Space”.
5-90
.
The second design was set as in <Fig. 5.7.1-24>.
Use the menu move buttons in <Fig. 5.7.1-24>. Move the cursor to“Apply”, and then press
.
[Fig. 5.7.1-24]
As in <Fig. 5.7.1-25>, the setting has been completed.
[Fig. 5.7.1-25]
5-91
Press F6 OK on the upper side of the screen in <Fig. 5.7.1-25>.
As in <Fig. 5.7.1-26>, the screen asking for the saving method will appear.
[Fig. 5.7.1-26]
Press F6 DESIGN .
As in <Fig. 5.7.1-27>, Room 1 is occupied by the general consecutive design which was created in [Exercise 5.7.1-1].
[Fig. 5.7.1-27]
In <Fig. 5.7.1-27>, select Room 2 and press
.
As in <Fig. 5.7.1-18>, the special consecutive setting screen appears.
5-92
(3) Repead Data Load
This function is to call the designs where consecutive work was saved as data.
In <Fig. 5.7.1-1>, press Consecutive Work Call, and then <Fig. 5.7.1-28> will appear.
<Fig. 5.7.1-28> has two consecutive works saved. Use the menu move buttons to select a desired consecutive work,
and press
for design call.
[Fig. 5.7.1-28]
5-93
5.7.2 Edit
This function is to edit designs.
<Fig. 5.7.2-1> is the screen, which appears when Consecutive Work is chosen in <Fig. 5.7.0-1>.
[Fig. 5.7.2-1]
Stitch Edit : It shows needle data of the called design, and based on those, code change for each needle and
needle number change can be conducted.
Design Devide : It saves two different designs for the selected part of the design.
Design Filtering : It automatically deletes unnecessary needle data during design creation.
Design Zoom in : It enlarges the chosen part of the design, and checks the needle gap.
5-94
(1) Stitch Edit
This function is to change codes and needle numbers by needle based on the called design data.
<Fig. 5.7.2-2> is the first screen for Stitch Edit in <Fig. 5.7.2-1>.
[Fig. 5.7.2-2]
<Fig. 5.7.2-2> is the screen where needle numbers can be edited.
Use the menu move buttons
to move to the needle data or needle code which is desired for correction.
Enter values by using number buttons, and then press F1 INSERT and F2 DELETE .
To move to the next page, press
.
5-95
As in <Fig. 5.7.2-3>, when X data or Y data is selected, the data is open to correction. Use the number buttons for
entry. To move to the next data, use the menu move buttons.
[Fig. 5.7.2-3]
As in <Fig. 5.7.2-4>, while the function code is selected, change the number key values from 0:Normal to 5:SQend.
It has six codes and they can be set as value.
[Fig. 5.7.2-4]
5-96
In <Fig. 5.7.2-2>, press the FUNCTION button. As in <Fig. 5.7.2-5>, the menu, which enables the arrangement by
code, appears. Press the JUMP button, and as in <Fig. 5.7.2-6>, only jump codes appear.
[Fig. 5.7.2-5]
[Fig. 5.7.2-6]
Press the COLOR button. Then, as in <Fig. 5.7.2-7>, the color code data will appear. When the SEQUIN button is
pressed, only sequin codes are displayed on the screen. However, in <Fig. 5.7.2-9>, no data is displayed, since no
sequin code data is stored. If the design contains sequin code, it might have displayed the data.
To cancel the code search, press the PRESVIOUS button.
[Fig. 5.7.2-7]
5-97
[Fig. 5.7.2-8]
[Exercise 5.7.2-1] Call the design in Room #35 and conduct the editing as below.
1] Delete the 3000th stitch data.
2] Change the 3500th stitch function code to the color change code.
3] Create and insert function code and jump code with X : 2mm, Y : -5mm composed of
10000th or 10001st stitch.
1] Delete the 3000th stitch data
Press
F6 DESIGN
on the main function menu and select Edit.
Press Stitch Edit in <Fig. 5.7.2-1>.
Use the menu move buttons and Page Up/Dn buttons to go to the 3000th needle.
Then, <Fig. 5.7.2-9> will appear.
[Fig. 5.7.2-9]
Select the 3000th stitch line and press
F2 1ST DELETE
.
[Fig. 5.7.2-10]
As in <Fig. 5.7.2-10>, the 3000th stitch is deleted, and the stitches from below have moved up by one
line respectively.
5-98
2] Change the function code to color change code of 3500th stitch
Use the menu move buttons and page Up/Dn buttons to move to the 3500th stitch.
As in <Fig. 5.7.2-11>, select the 3500th stitch line and use the menu move buttons to go to the function
code.
[Fig. 5.7.2-11]
Enter“1”.
[Fig. 5.7.2-12]
As in <Fig. 5.7.2-12>, the function code is changed to the color code.
5-99
-5mm, function code: jump code”
”between 5000th and 5001st stitch.
3] Create and insert“ X:2mm, Y:-
Use the menu move buttons and the page up/dn buttons to go to the 5000th stitch.
<Fig. 5.7.2-13> will appear.
[Fig. 5.7.2-13]
Select the 5000th line and press F2 1ST INSERT .
Then, as in <Fig. 5.7.2-14>, the 5001st needle has been inserted.
[Fig. 5.7.2-14]
Enter“2”to X Data.
Enter“-5”to Y Data.
Change the function code to 2. jump code.
5-100
As in <Fig. 5.7.2-15>, the entered values are set.
[Fig. 5.7.2-15]
Press
F6 SAVE
and <Fig. 5.2.7-16> appears.
Press F1 YES . The entered value is saved in the 5001st line.
[Fig. 5.7.2-16]
5-101
(2) Design Devide
This function is to save two different designs of the desired part of the design chosen. The designs can be divided by
color or needle number.
<Fig. 5.7.2-17> will appear when stitch separation is pressed in <Fig. 5.7.2-1>. The design on the left side is the
design chosen during design call. The screen on the right is to show the remaining part of the design, which was
separated from the chosen design.
[Fig. 5.7.2-17]
F1 STITCH
F2
: It sets the number of stitches to be separated from the design.
COLOR : This button can be used after the + color button is pressed, and has the opposite function of the +
color button. When this button is pressed, color is added to the original design.
(Same to
as in 5.6.4 Route Check.)
F3
+ COLOR : When this button is pressed, only one color is left on the left, and all colors are moved to the
right side.
(Same to
F4 SELECT
as in 5.6.4 Route Check.)
: The separate two designs are saved in the memory.
5-102
[Exercise 5.7.2-2] Separate the called design based on the 5000th stitch, and
separately save the remaining part.
Press
F4 DESIGN
, and use the direction buttons to select“Edit Menu”in the design sub-menus.
Press “Design Separate” on the edit menu.
Press F1 STITCH in <Fig. 5.7.2-17>.
As in <Fig. 5.7.2-18>, the screen for setting will appear.
[Fig. 5.7.2-18]
Press “5000” by using the number buttons.
Press
.
As in <Fig. 5.7.2-19>, 5000th stitch was set as the divide line, and the design was divided into two.
[Fig. 5.7.2-19]
5-103
Press F4 SELECT .
<Fig. 5.7.2-20> will appear.
[Fig. 5.7.2-20]
Enter the room numbers by using the number buttons.
Room 72 and Room 73 have been chosen.
Press F1 SAVE and F3 SAVE respectively. ,
<Fig. 5.7.2-21> shows that the designs are separately saved in Room 72, 73 (See“Design Call”.)
[Fig. 5.7.2-21]
5-104
[Exercise 5.7.2-3] Extract one color of the called design, and separately save the
remaining part
Press
F4 DESIGN
and select“Edit”on the sub-menus.
Press“Design Separate”on the edit menu.
Press F3 + COLOR in <Fig. 5.7.2-17>.
When it is pressed once, only one color remains on the left side as in <Fig. 5.7.2-22>, and the remaining colors
move to the right side for color separation.
[Fig. 5.7.2-22]
Press F4 SELECT .
<Fig. 5.7.2-23> will appear.
[Fig. 5.7.2-23]
5-105
Enter room numbers for saving by using the number buttons.
The separated designs are saved in Room 74 and Room 75.
Press
F1 SAVE
and
F3 SAVE
.
[Fig. 5.7.2-24]
As in <Fig. 5.7.2-24>, the two divided designs are separately saved (See“Design Call”.)
5-106
(3) Design Filtering
If the distance from one stitch to the other stitch is too short (0.1 ~ 0.3mm), the thread might break very often during
embroidery work. This function is to put together short stitches which are under the set value for optimization and
enhance the entire number of stitches above the set value, so that it can prevent thread break.
The below screen <Fig. 5.7.2-25> appears when Optimize is pressed.
[Fig. 5.7.2-25]
[Fig. 5.7.2-26]
[Exercise 5.7.2-4] If there are stitches of 0.3mm or below in the called design, set the
machine to embroider the stitches above the length
Press
F6 DESIGN
on the main function menu.
Use the direction buttons on the DESIGN menu to select Edit, and press
.
Check whether there are stitches of 0.3mm or below.
If so, optimize the stitch length to 0.4mm by pressing the up/dn buttons, and press
.
Check the room number for saving and press Save.
<Fig. 5.7.2-26> is the screen for confirming optimization after calling the optimized design.
[ Note ]
In <Fig. 5.7.2-26>, not all stitches were optimized. Likewise, all stitches cannot be optimized.
5-107
(4) Design Zoom In
When Design Enlarge is pressed, <Fig. 5.7.2-27> appears.
The screen is divided into the design enlarge section and the location adjust section. The enlarge section magnifies
the design, and if the desired part is pressed on the location adjust section, the chosen part will be enlarged. The
location adjust buttons can be used to set the desired location as well.
Whenever pressed, the magnification increases 1 times. The maximum magnification is 100 times.
Design
Enlarge
Screen
Magnification
Location Adjust
Screen
[Fig. 5.7.2-27]
The figures below are the 2x, 4x, 6x, 10x, 20x, 50x enlarged images of the design in <Fig. 5.7.2-27>.
Use to
Use to
choose the part for desired enlargement.
decide the magnification increase or decrease.
5-108
5-109
6
Function Menu During Embroidery Pause
<Fig. 6.0-1> is the screen which appears when embroidery work is paused. Basically, the screen has the layout similar to
that before embroidery begins. For differences, however,“Supplementary Work”and“Tools”were removed from the
main function menu. Instead,“Operation without Needle”and“Frame Feed”replaced them. And for settings, some
menus are restricted. Before embroidery begins, it was possible to conduct various settings, but sometimes it is
necessary to change the settings during embroidery for better results. In this context, let’s find more about the functions
During Embroidery Pause.
[Fig. 6.0-1]
In this section, the explanation will focus on the different parts in Design Call and Setting compared with the menu
before embroidery begins. non-stitching operation and Frame Feed will be explained in detail, too.
[ Note ]
To conduct the non-stitching operation by using the “Pause Menu During Embroidery”, press the pause
switch, and the screen shows the“Pause Menu during Embroidery”.
6-1
※ Changes in the main function menu
F1 EMBCALL
F2 INPUT
(Slightly different from the pre-embroidery function menu)
(Same to the pre-embroidery function menu)
F3 SETTING
(Same to the pre-embroidery function menu except for "Basic Setting" and "Options Setting")
F4 TOOLS
(Same to the pre-embroidery function menu)
F5 FLOAT
(Change in the menu)
F6 FRAME
(Change in the menu)
6-2
6.1 Structure of Function Menus
Design Call
Design
Delete
Copy
Output
Close
Input
Floppy
Format
File Select
Preview
Delete
Copy
USB
CF Card
Serial
Settings
Tools
Basic Setting (two changes compared with the menu prior to embroidery)
Embroidery Parameter Setting
Machine Parameter Setting
Needle Bar
Select
Change
Color Change
Frame Offset Setting
Option Setting
Other Settings
CUT Needle Setting
Head Sensor Setting
Manual Trimming
Frame Center
Hoop Select
Language
Machine Maintenance
Mechanical Service
Machine Information
Operation Test
Jump Test
Wiper Test
Picker Test
Trimming Test
Holding Test
Thread Sensor Test
Frame Origin
Error Check
Thread Sensing Check
Memory Initialize
Date/Time
Non-stitching operation
Frame Feed
Frame Feed
Data Recovery
Return to Origin
Return to Origin After Blackout
Speed Code
High Speed Code
Low Speed Code
Initialize
6-3
6.2 EMB Call
During the pause of embroidery work, when
F1 EMBCALL
is pressed, the message asking“Do you want to cancel the
work?”appears as in <Fig. 6.2-1>. If F1 YES is pressed, the embroidery work will be stopped, and the main function
menu will be changed to the main function menu before embroidery begins. If
F2 NO
is pressed, the embroidery
work will not be stoped, and as in <Fig.6.2-2>, the Design Call before embroidery begins appear. Although the delete
and select function of the currently called design are limited, and the select function for the remaining designs are
limited, it is possible that the designs can be displayed. Previously, to copy a design while embroidery is in progress, the
embroidery work had to be completed. However, thanks to this function, now it is possible to copy designs in the
middle of embroidery.
[Fig. 6.2-1]
[Fig. 6.2-2]
The usage method is same to that for the menu before embroidery begins.
6-4
6.3 Setting
(1) Basic Setting
While embroidery work is paused, if“Setting”and then“Basic Setting”are pressed in order, <Fig. 6.3-1> appears.
Except for“8. Frame Coordinates Setting (offset)”and“9. Thread Trimming by Jump Frequency”, all setting
functions are limitedly applied. The limited functions cannot be used. But the two enabled functions can be used in
the same way before embroidery begins.
[Fig. 6.3-1]
(2) Options Setting
The Options Setting function cannot be used during embroidery work.
6-5
6.4 Float
This function is to conduct the embroidery work while skipping the embroidery for the desired part of the design.
<Fig. 6.4-1> is the screen for non-stitching operation, and it appears when F5 FLOAT is pressed <Fig. 6.0-1>.
As in <Fig. 6.4-1>, non-stitching operation can be set using the set number of stitches such as ±1, ±100, ±1000, ±
10000 or the ±COLOR button. As in <Fig. 6.4-2>, values can be directly entered by using number buttons. To enter
numbers, press F6 STITCH
press
in <Fig. 6.4-1> and the setting screen appears. Use the number buttons to enter values and
.
[Fig. 6.4-1]
[Fig. 6.4-2]
※ Tips for non-stitching operation
① Press F5 FLOAT .
② Check current stitch and set the desired number of stitches.
③ Press the start button on the OP Box for operation.
Then the non-stitching operation embroidery will be conducted according to the set value.
To cancel, press
.
6-6
6.5 Frame
6.5.1 Frame Feed
This function is to remember the position of the frame when embroidery work is stopped in the middle of embroidery
work (stop switch, thread break sensing, etc.), and make the frame move to the last position when the frame moves to
other positions or when the power is turned off.
<Fig. 6.5-1> appears when F6 FRAME is pressed and the frame feed button is pressed.
[Fig. 6.5-1]
① Data origin : It remembers the stop position of the frame when it is paused during embroidery work. Therefore,
when the user desires to move the frame by using the frame move buttons or resumes embroidery after conducting
other jobs, the frame could return to the last stop position.
② Design origin : It makes the frame return to the embroidery starting position.
③ Power origin : It remembers the last stop position although the power is out during embroidery work. Therefore,
when the power is on, and the return to origin after blackout function is pressed, the frame moves to the last stop
position. However, before embroidery work starts, the frame origin shall be accurately set.
Press the desired function buttons, and then the frame automatically returns to the desired position.
6-7
6.5.2 Speed Code
This function is to change the work speed from high speed to low speed for a particular part of embroidery work. While
embroidering a design, the speed will change for the previously set part. When conducting an embroidery work of the
same design, embroidery speed will change for a particular section as previously set.
Low speed setting can be made in“⑥ Low Speed Embroidery”under“5.4.3 Mechanical Parameter Setting”.
<Fig. 6.5-1> appears when F6 FRAME of the menu during embroidery pause is pressed and the ‘speed code’ menu is
selected.
[Fig. 6.6-1]
(1) Low Speed
This function is to change the embroidery speed from high speed to low speed.
Pause the high-speed embroidery work and select“Low Sped”and press“Set”. Then when embroidery work is
resumed, its speed becomes slow.
(2) High Speed
This function is to change the embroidery speed from low speed to high speed. Pause the low-speed embroidery
work and select“High Speed”and press“Set”. When the start button is pressed, the embroidery speed becomes fast.
(3) Reset
This function is to initialize the speeds set for particular sections to default speed.
6-8
7
Troubleshooting
7.1.0 Error Messages and Handling
7.1.1 Main Shaft Motor and Others
No.
100
101
Error Name
Main shaft motor stop position
error
Main shaft motor driver error
Main shaft motor overload error
102
No trimming system recovery
103
104
Start switch error
105
Stop switch error
107
Valve error
Air pressure error
108
Pulley ratio error
109
110
AC Line error
Error Description
When it is stopped, the main
shaft’s angle is not 100˚
Main shaft motor driver develops
an error.
When a thread tangles the hook,
when the needle bar’s control
body is bad, and when the thread
becomes tangled during
trimming, the error occurs.
When the trimming sensor is not
recovered upon trimming.
When the power is on, the start
button is pressed.
When the power is on, the stop
button is pressed.
When the valve is opened.
When the air pressure is below
the standard (Sequin)
When the set pulley ratio is
wrong
When a problem occurs on the
joint board.
Correction
Use the lever to set the main
shaft’s angle at 100˚.
Turn off and on the main switch.
Check the hook of the front head,
and turn off and on the main
switch.
Check and respond to the
abnormality of the trimming
system.
Check whether the start button
contacts the connector.
Check whether the stop button
contacts the connector.
Change the driver setting after
checking the main shaft pulley
ratio.
Replace the joint board
7.1.2 X, Y Motor-related Errors
No.
Error Name
200
(+X) frame limit detection
201
(-X) frame limit detection
202
(+Y) frame limit detection
203
(-Y) frame limit detection
204
X-axis driver error
205
Y-axis driver error
206
207
Wiper return error
Trimmer return error
Error Description
The frame feed system reaches
the +X limit.
The frame feed system reaches
the -X limit.
The frame feed system reaches
the +Y limit.
The frame feed system reaches
the -Y limit.
Problems occur in the X-axis
driver.
Problems occur in the Y-axis
driver.
Wiper solenoid does not return.
Trimmer motor does not return.
7-1
Correction
Move the frame in the -X
direction.
Move the frame in the +X
direction.
Move the frame in the -Y
direction.
Move the frame in the +Y
direction.
Turn off and on the main switch.
Turn off and on the main switch.
Repairs the wiper mechanism.
Repair the trimmer mechanism.
7.1.3 Color Change
No.
300
Error Name
Needle bar stop position error
Error Description
When replacing the needle bar,
the needle bar fails to reach the
proper position.
Correction
Manually turns the needle bar to
check the load of the needle bar,
and place the needle bar at the stop
position.
7.1.4 Encoder
No.
Error Name
Error Description
400
Error in the main shaft encoder A
Problems in signaling occurred in
the main shaft’s encoder A.
Check the connection of the
encoder cable, and turn off and
then on the main switch.
Error in the main shaft encoder Z
Problems in signaling occurred in
the main shaft’s encoder Z.
Check the encoder’s cable
connection, and turn off and again
the main switch.
Error Name
Error Description
Correction
Error in consecutive work setting
As in (X-axis number)×(Y-axis
number)>99, the limit of
consecutive work was passed.
401
Correction
7.1.5 Consecutive Work
No.
501
7-2
Make sure that consecutive work
should be set as (X-axis number)
×(Y-axis number)<99.
7.1.6 Floppy Diskette and Communications
No.
Error Name
Error Description
Correction
No diskette.
There is no diskette inside the
FDD.
Insert a diskette into the FDD.
No sectors on the diskette
A floppy diskette is not formatted
or the format is different.
Format a diskette or replace it with
other diskette.
No design data in the diskette
There is no embroidery design
saved in a floppy diskette.
Replace the diskette.
Remove the write protect tap.
When copying embroidery
designs, the diskette write protect
tap is enabled.
Disable the write protect tap.
Diskette damaged
A floppy diskette is damaged.
Format a diskette or replace it.
Insufficient memory capacity
There is unoccupied space for
copying in a floppy diskette.
Replace the diskette with a new
one.
Diskette removed from FDD
A floppy diskette is removed in
the middle of FDD operation.
Insert the diskette and start are
work again.
607
Bad sector error during floppy
reading
The floppy diskette’s sector is
bad.
Format the diskette or replace it.
608
Bad sector error during floppy
writing
The floppy diskette’s sector is
bad.
Format the diskette or replace it.
Diskette error whose cause is
unknown
Errors are developed whose
cause is unknown while the
floppy diskette is in operation.
Format the diskette or replace it
with another one.
Diskette error
Errors are developed whose
cause is unknown, while the
floppy diskette is in operation.
Format the diskette or replace it
with another one.
600
601
602
603
604
605
606
609
610
611
ZSK design error
612
BARUDAN design error
613
Bad sector error
Operating program install error
When the operating program is
installed, the operating program
file name does not match or does
not exist.
Error found in the read data
The data read through the tape
reader develops errors.
Enter data through the tape reader
again.
Network device error
The network devices are not
connected.
Check the status of the network
devices.
USB error
The USB driver is not ready
Check whether the memory
system of the USB memory is
FAT16.
614
630
640
650
7-3
7.1.7 Memory
No.
Error Name
700
No embroidery data found in the
memory
The embroidery data does not
exist in the memory.
Use a floppy diskette or a USB to
save embroidery data.
Insufficient memory capacity
The data desired to copy in the
memory failed to be copied due
to the lack of memory capacity.
Delete unnecessary data.
100 memory rooms are full.
The 100 memory rooms are all
saved with designs.
Delete unnecessary data.
Error in design memory system
Errors have occurred during
copying or deleting data between
memory devices.
Press Reset or turn off and on the
main switch.
Bad memory battery
The battery is exhausted when
the power is off.
The status of saving the number
of stitches and the x, y position
information is unstable.
Call the A/S center at the nearest
to your place and replace the
battery.
If this error frequently occurs,
need to replace the CPU board.
Sequin design error
There is an error in the sequin
design.
Amend the design.
MC1 communications error
The CAN communications do not
regularly occur.
Check the cable and turn off and
on the power.
MC2 communications error
When the CAN communications
do not regularly occur.
Check the cable and turn off and
on the power.
701
702
703
704
801
901
902
Error Description
7-4
Correction
7.2.0 Machine Setting
7.2.1 Control Box Front
[Fig. 7.2.1-1] shows the front side of the Control Box.
IO MC ASSY
④
①
SMPS ASSY
②
DDC ASSY
⑤
③
[Fig. 7.2.1-1]
① X Driver
② Y Driver
③ Main Driver
④ IO Ass’y Rack
⑤ DDC Ass’y Rack
7-5
7.2.2 X/Y Driver and Main Driver Switches Setting
(1) X/Y Driver Rotary Switch (RSW3) Setting
① Position of X/Y Driver Board Switch
CN1
CN2
CN3
RSW3
Rotary Switch
[Fig. 7.2.2-1]
② X/Y Driver Rotary Switch Setting
Machine Type
Rotary Switch
X
Y
2-Head
8
F
4-Head
4
C
6-Head
8
F
Current
2A
2.5A
Take caution to set properly, since the setting values are different by machine type. For other machine types
which are not covered, please contact the distributor’s shop for inquiry.
7-6
(2) Main Driver’s Dip Switch (SW1) Setting
① Main driver board’s switch position
J5
J6
SW1
Dip Switch
J9
J10
J11
J7
[Fig. 7.2.2-2]
② Dip switch setting
ON
OFF
1
2
3
4
5
6
7
8
S/W
OFF
8
○
7
○
6
○
5
○
4
○
3
2
1
7-7
ON
○
○
○
7.2.3 Fuse Install and Replacement
After inserting the power plug into the outlet, turn on the power switch. If the power is not supplied, take actions
following the directions below:
Check the lamp board position from the control box as in <Fig. 7.2.1-1> and replace the fuse on the board.
Fuse Specifications: AC250V/2A
Fuse Quantity: 1
20mm Fuse Holder
※ 250V/2A Fuse Insertion
CN2
FUSE1
CN5
CN3
CN4
CN1
LAMP Board
[Fig. 7.2.3-1]
Even after turning off the power switch, there is still the risk of having an electric shock. Before replacing the
main board or conducting the A/S activities, make sure to pull off the power plug.
7-8
7.3 System Block diagram
※ Small-Head E-Series Automatic Embroidery Machine
[Fig. 7.3-1]
7-9