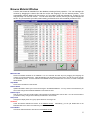
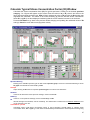
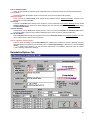
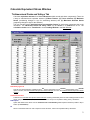
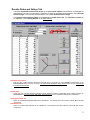
1
User Manual
Information in this document is subject to change without notice. No part of this document may be reproduced
or transmitted in any form or by any means, electronic or mechanical, for any purpose, without the express
permission of ViDa Inc.
Copyright ©1996-2002 ViDa Inc. All rights reserved.
ViDa is a registered trademark of ViDa Inc.
Windows is a registered trademark of Microsoft Corporation
This software is provided 'as is' and any expressed or implied warranties, including, but not limited to, the
implied warranties of merchantability and fitness for a particular purpose are disclaimed. In no event shall the
author or his contributors be liable for any direct, indirect, incidental, special, exemplary, or consequential
damages (including, but not limited to, procurement of substitute goods or services; loss of use, data, or profits;
or business interruption) however caused and on any theory of liability, whether in contract, strict liability, or tort
(including negligence or otherwise) arising in any way out of the use of this software, even if advised of the
possibility of such damage. Any liability of ViDa Inc will be limited exclusively to product replacement or refund.
2
_____________________________________________________________________________________
Contents
Chapter 1 Welcome ............................................................................................................................................. 5
ViDa Main Features................................................................................................................................................. 6
ViDa at a Glance ..................................................................................................................................................... 6
Making your First Damage Calculation with ViDa............................................................................................. 6
Loading a History .............................................................................................................................................. 7
Changing the Material....................................................................................................................................... 7
Calculating Life of Welded Structures............................................................................................................... 7
Drawing Elastoplastic Hysteresis Loops ........................................................................................................... 8
Calculating Crack Growth ................................................................................................................................. 8
Bidimensional Crack Growth............................................................................................................................. 8
Chapter 2 Installing ViDa .................................................................................................................................... 9
Before You Begin .................................................................................................................................................. 10
Running ViDa Setup .............................................................................................................................................. 10
Registering ViDa.................................................................................................................................................... 12
Chapter 3 Using ViDa Windows ....................................................................................................................... 13
Main Window ......................................................................................................................................................... 14
Handling all ViDa Graphs ...................................................................................................................................... 22
Standard Open/Save File Window ........................................................................................................................ 24
Open CSV/Excel File Window............................................................................................................................... 25
Material Window .................................................................................................................................................... 26
Open Material window .................................................................................................................................... 33
Find Material Window ..................................................................................................................................... 34
Browse Material Window ................................................................................................................................ 35
Calculate b and c for SN Window ................................................................................................................... 36
Equations Database Window ................................................................................................................................ 37
Calculate Life (SN) Extended Window .................................................................................................................. 39
Calculate Life (SN) Simplified Window ........................................................................................................... 43
Calculate Effective Diameter Window............................................................................................................. 44
Calculate Typical Stress Concentration Factor (Kt) Window.......................................................................... 45
Calculating Stored Stress Concentration Factors (Kt) .................................................................................... 47
Calculate Notch Sensitivity (q) for Steels and Alumina Window..................................................................... 48
Calculate Life of Welded Structures Window ........................................................................................................ 49
Calculate Life (eN) Extended Window................................................................................................................... 51
Calculate Life (eN) Simplified Window............................................................................................................ 55
Crack Growth (da/dN) Extended Window ............................................................................................................. 56
Typical da/dN Curves Window........................................................................................................................ 62
Typical Stress Intensity Factor Window.......................................................................................................... 63
Crack Growth (da/dN) Simplified Window ...................................................................................................... 65
Bidimensional Crack Growth (da/dN and dc/dN) Window..................................................................................... 66
Calculation Logbook Window ................................................................................................................................ 72
Calculate Equivalent Stress Window..................................................................................................................... 73
Smart Calculator Window ...................................................................................................................................... 78
Options Window .................................................................................................................................................... 80
Multimedia Window ............................................................................................................................................... 84
Tip of the Day Window .......................................................................................................................................... 84
3
Chapter 4 ViDa Tutorials................................................................................................................................... 86
How do I Calculate Damage using the SN method ?............................................................................................ 87
How do I Calculate Damage of Welded Structures ?............................................................................................ 89
How do I Calculate Damage using the eN Method ? ............................................................................................ 90
How do I Calculate Unidimensional Crack Growth ? ............................................................................................ 92
How do I Calculate Bidimensional Crack Growth ?............................................................................................... 94
How do I Use the Materials Database ?................................................................................................................ 96
How do I Handle Experimental Data Points ? ....................................................................................................... 97
How do I Use the Equations Database ? .............................................................................................................. 98
How do I Handle Tridimensional Stress Histories / Rosette Data? ....................................................................... 98
How do I Use the Smart Calculator ? .................................................................................................................... 99
Useful Tips about ViDa........................................................................................................................................ 100
General Tips................................................................................................................................................. 100
Material Database Tips ................................................................................................................................ 101
SN Method and Welded Structures Tips...................................................................................................... 102
eN Method Tips ............................................................................................................................................ 104
Crack Growth Calculation Tips..................................................................................................................... 104
Other Tips..................................................................................................................................................... 106
Chapter 5 Advanced Issues ........................................................................................................................... 107
Troubleshooting................................................................................................................................................... 108
Database Information .......................................................................................................................................... 109
Input File Formats................................................................................................................................................ 110
References ......................................................................................................................................................... 112
4
_____________________________________________________________________________________
CHAPTER
1
Welcome
Welcome to ViDa, the Fatigue Damage Calculator.
Fatigue and Fracture Mechanics calculations can be a very laborious task without a powerful software like
ViDa, mainly when we need to calculate the accumulated damage or the remaining life of a structure or
equipment which work under complex loading. In these cases, all we really wish is just specify the material,
the applied stresses or strains and the appropriate stress concentration factor, and let the computer do (fast
and accurately!) the dog work.
However, most powerful computational tools are written by software-oriented people: their terminology is
normally so strange, not to mention how non-intuitive most of the user interfaces are, that you first have to
learn how they internally work before being able to reliably perform even the most simple calculation. But
ViDa is different. It has been developed by fatigue engineers to satisfy our design needs. Having a basic
fatigue training, anyone can learn how to use its basic features in a glance. Take the one minute challenge!
See how fast you can make a full calculation of fatigue damage with ViDa!
Contents
ViDa Main Features
ViDa at a Glance
Making your First Damage Calculation with ViDa
Loading a History
Changing the Material
Calculating Life of Welded Structures
Drawing Elastoplastic Hysteresis Loops
Calculating Crack Growth
Bidimensional Crack Growth
5
ViDa Main Features
ViDa is a powerful software for calculating the fatigue damage caused by complex loading. It includes all
the traditional fatigue design methods, and introduces a series of improvements to enhance the speed and
the accuracy of the numerical results, e.g.:
- Calculates the Fatigue Damage by the SN, eN and the da/dN Methods
- Plots the Correct Elastoplastic Hysteresis Loops calculated by the eN Method
- Solves the Neuber System for Stress Concentration
- Rainflow Counts and Racetrack Filters Complex Loading Histories
- Predicts the Uni and Bidimensional Growth of Fatigue Cracks, Including Retardation Effects
- Calculates Kt, q, KI and Other Constants Required by the Various Design Methods
- Automatically Adjusts Experimental Curves
- Has Friendly and Expandable Data Banks of Materials Properties, Stress Intensity Factors, and More!
ViDa at a Glance
Making your First Damage Calculation with ViDa
This is a quick step-by-step tutorial that'll show you how to work with ViDa. Even if you're not a fast typist
you'll take close to the minute to make your first calculation.
Scenario
You’ve applied 100,000 cycles at 10 Hz of a pulsating 200 MPa stress on a specimen. We want to calculate
the damage done to the specimen (0 being no damage and 1 being failure) and its remaining life in days
(considering that the same rate of loading will be applied).
Are you ready? Check your clock, off we go!
1. In the Main Window, click on the cell right below ‘Alternate’ in the Loading Window. Type ‘100’. Press
the right arrow key (‘->’) and type ‘100’ below the ‘Mean’ heading (the load is pulsating, therefore it has
equal alternate and mean components). Now press the right arrow key (‘->’) and type ‘200000’ (meaning
200000 ½ cycles, equal to 100000 cycles). We are on the first of three steps.
2. Click on the box next to ‘Loading Time’ and type ‘10000’ (which is the duration in seconds of your
loading history). Also check if the ‘Table’ option (above the Loading Window) is set for Stress(MPa).
3. Select Life | SN Method… from the menu. The SN Method window will appear. Check if the stress
concentration factor Kt (on the bottom of the window) is set to 1. Click on the OK Button.
You’re done ! The damage and remaining life time are almost instantly displayed on the 2 bottom rows of
the Loading Window as predicted by the Soderberg, the Goodman, the Gerber and even by a custom
model!
How long did that take you? Even if you didn't break the one minute barrier first time around, consider this:
you have just completed a full SN Method fatigue life calculation, all in about a minute! Now that wasn't
hard was it?
6
Loading a History
In addition to typing the loading history, with ViDa you can import files from other software. It is possible to
load comma separated value files (e.g. generated from the Instron’s Wavemaker software), previously
saved Alternate/Mean or Peak/Valley files or even experimentally generated files by the Kyowa RHS-500A
histogrammer.
1. On the Main Window, choose the File | Open command. A standard load file window will appear.
2. Click on the complex.alt file and press OK.
Done ! The Datasheet is now loaded with Alternate and Mean components of your loading history. These
values represent stresses since the Table Option is set to ‘Stress’ (refer to the Tools | Options command
to define if these stress values are in MPa or ksi). Now you can proceed to calculate life in the same way
you did on the previous example.
Note also that you can view these Alternate/Mean components as a sequence of Peaks and Valleys by
clicking on Peak/Valley in the Sequencing Option. You can also add or delete rows by using the Edit
menu. Refer to the Edit menu for more information on data handling in the Loading Window.
Changing the Material
ViDa has a complete Materials Database with stress-strain curves, SN, eN and da/dN data and many other
properties of over 1500 materials. This database can be expanded by the user with no storage limits and all
the materials can be searched by user defined criteria (e.g. searching for Alumina with Su between 400
and 500 MPa and sorting by their price). The next example will show you how to choose the material you’re
working with.
1. From the Main Window, choose the Data | Material command. The Material Window will appear with
the properties of the current material.
2. Choose the File | Open command. A list with all the materials in the database will appear.
3. Click on the name of the desired material.
It’s done. All the stored properties for that material will appear in the Material Window. Even experimentally
measured points for this material (if any) will be loaded and available through the Experimental Points
tab.
If you want you can change some of the properties, but you’ll need to use the File | Save command in
order to be able to use these changes in the calculations. Note that some values are written in red in the
Material Window. The red color denotes properties that were calculated/estimated from others, without
having been directly measured. This color can be toggled by pressing the space bar on the desired value.
When you return to the Main Window by using the File | Exit command the name of the selected material
will be displayed in the Material field and any further calculations will use its properties.
Calculating Life of Welded Structures
ViDa calculates the damage associated to the loading history for welded structures. This calculation is
independent of the current Material since it depends only on the Weld Joint class.
1. From the Main Window, click on the Life | Welded Structures command. The Calculate Life of Welded
Structures window will appear.
2. Click on the drawing of the desired weld joint. Its class and description will be shown on the bottom
of the window, and press OK.
The damage and remaining life time are almost instantly displayed on the 2 bottom rows of the Loading
Window. Also, Damage x Event and Accumulated Damage x Event graphs are plotted to better display
the results.
7
Drawing Elastoplastic Hysteresis Loops
To achieve reliable results when calculating fatigue damage under complex loading by the eN strain-life
method, it is necessary to draw the correct elastoplastic hysteresis loops which act at the critical notch root.
1. In the Main Window, make sure that the Extended Modeling option is chosen using the Tools |
Options command. This option is required to let ViDa calculate and plot hysteresis loops.
2. Choose the Life | eN Method command, and the Calculate Life (eN) window will appear.
3. Turn on the Calculate Hysteresis Loops option and check if the Loop Corrections option is checked
as well.
4. Press the OK button.
The hysteresis loops for the loading history are calculated and plotted. The damage and remaining life time
are almost instantly displayed on the 2 bottom rows of the Loading Window. Also, Damage x Event and
Accumulated Damage x Event graphs are plotted to better display the results
Calculating Crack Growth
To quantify fatigue damage in cracked structures, ViDa calculates crack growth using any da/dN equation
specified by the user, recognizing retardation and even crack arrest effects.
1. From the Main Window choose the Life | Crack Growth command, and the Crack Growth (da/dN)
window will appear.
2. Type the initial crack size and the specimen width.
3. Choose which da/dN equations you want to use in the calculations and press the OK button.
The total and average crack growth are almost instantly displayed on the 2 bottom rows of the Loading
Window.
Bidimensional Crack Growth
Surface cracks grow bidimensionally, i.e, both sideways and in depth. Certainly we cannot rely in pure
unidimensional crack growth calculations. ViDa handles these bidimensional cracks and calculates crack
growth in both directions, considering the changes in crack shape and retardation and crack arrest effects.
1. In the Main Window, make sure that the Extended Modeling option is chosen using the Tools |
Options command. This option is required to let ViDa calculate bidimensional crack growth.
2. From the Main Window choose the Life | Bidimensional Crack Growth command, and the
Bidimensional Crack Growth (da/dN and dc/dN) window will appear.
3. Choose the type of the crack in your specimen among (Semi-)Elliptic, Corner, Internal crack or even
surface cracks on a cylinder wall under pressure.
4. Type the initial crack size dimensions a and c and the specimen width and its other dimensions.
5. Choose which da/dN equations you want to use in the calculations and press the OK button.
The total and average crack growth in both directions are almost instantly displayed on the 2 bottom rows
of the Loading Window.
What’s next ?
ViDa still has many other features: Rainflow counters, Tridimensional Stress handling, Rosettes, Stress
Concentration Factor tables, and much more! To know more about ViDa, refer to ‘Working with ViDa
Windows’ (see the Contents).
8
_____________________________________________________________________________________
CHAPTER
2
Installing ViDa
It is quick and easy to install ViDa in your computer. The ViDa CD-ROM features autorun and a setup
wizard, making the installation process easier than ever.
Contents
Before You Begin
Running ViDa Setup
Installing ViDa
Viewing the Book "Fatigue Design under Complex Loading"
Registering ViDa
9
Before You Begin
Before you install ViDa, make sure your computer meets the following minimum requirements:
•
486DX/66 MHz or higher processor; Pentium or higher processor recommended
•
Microsoft Windows 95 or later operating system or Microsoft Windows NT® operating system version 4.0
with Service Pack 3 or later
•
16 MB of RAM for Windows 95 or later (32 MB recommended); 24 MB for Windows NT 4.0 (32 MB
recommended)
•
Hard-disk space required for typical installation: 45 MB
•
CD-ROM drive
•
VGA or higher-resolution monitor; Super VGA recommended
• A mouse or other suitable pointing device
To run Setup, you need to have the ViDa CD or network access to ViDa files.
Running ViDa Setup
You can only install ViDa if you have Windows 95 or later, or Windows NT 4.0 or later.
Installing ViDa
•
Insert the ViDa disc into the CD-ROM drive.
•
If autorun doesn’t start, double-click AUTORUN.EXE in Explorer.
•
Click ‘Install’ on your screen and follow the instructions.
•
When you run ViDa for the first time, you’ll see the screen below. Just click on the idiom of your choice and
ViDa starts running (NOTE: you must register ViDa to make it fully functional).
If you have installation problems, please refer to the Troubleshooting section.
Once you have installed ViDa, read the License Agreement in the LICENSE.TXT file. You must accept the
terms of the License Agreement before you can use this product.
The following files are installed in the application directory (ViDa2002 by default):
ViDa.exe - the main program.
ViDa.ini - contains all user settings since the last time ViDa was loaded.
ViDa.mdb - ViDa database file.
ViDa.hlp and ViDa.cnt - ViDa help file and table of contents file.
Data directory - sub-directory containing examples of loading history files.
Media directory - sub-directory containing all sounds, videos and slides from ViDa.
Figures directory - sub-directory containing all KI, da/dN and Kt figures.
The remaining files are Windows resources files which are installed in the Windows\System directory.
10
Viewing the Textbook "Fatigue Design under Complex Loading"
The textbook "Fatigue Design under Complex Loading" can be from your hard-disk after the ViDa installation.
•
To access the Textbook "Fatigue Design under Complex Loading" from the ViDa program, click ‘Multimedia’ from
the Help menu, and choose ‘Slide Show’.
11
Registering ViDa
ViDa must be registered to become fully functional. If not registered, ViDa expires after 21 days.
To register ViDa :
•
Once you have installed ViDa, click 'Register' from the Help menu.
•
Send us by fax or e-mail the Software Code shown on the screen of each computer you've installed ViDa,
and we'll send you the Liberation Key(s).
•
In the ‘Register’ window, type in the Liberation Key, your Name, and click ‘Register’. ViDa becomes fully
functional after registering.
Read the REGISTER.TXT file for more information on registering.
12
_____________________________________________________________________________________
CHAPTER
3
Using ViDa Windows
It is fast and easy to make calculations of fatigue damage with ViDa. ViDa has been developed by fatigue
engineers to satisfy our design needs. Having a basic fatigue training, anyone can learn how to use its
basic features in a glance.
Contents
Main Window
Handling all ViDa Graphs
Standard Open/Save File Window
Open CSV/Excel File Window
Material Window
General Tab
Fatigue and Fracture Tab
Experimental Data Tab
Open Material window
Find Material Window
Browse Material Window
Calculate b and c for SN Window
Equations Database Window
Calculate Life (SN) Extended Window
Calculate Life (SN) Simplified Window
Calculate Effective Diameter Window
Calculate Typical Stress Concentration Factor (Kt) Window
Calculating Stored Stress Concentration Factors (Kt)
Calculate Notch Sensitivity (q) for Steels and Alumina Window
Calculate Life of Welded Structures Window
Calculate Life (eN) Extended Window
Calculate Life (eN) Simplified Window
Crack Growth (da/dN) Extended Window
Typical da/dN Curves Window
Typical Stress Intensity Factor Windows
Crack Growth (da/dN) Simplified Window
Bidimensional Crack Growth (da/dN and dc/dN) Window
Calculation Logbook Window
Calculate Equivalent Stress Window
Tridimensional Peaks and Valleys Tab
Rosette Peaks and Valleys Tab
Smart Calculator Window
Options Window
Multimedia Window
Tip of the Day Window
13
Main Window
The ViDa Main Window is where the user inputs the loading history (in the Loading Windows) and where
the calculation results and plots are shown.
Standard Toolbar
Main Toolbar of the ViDa Main Window, with buttons for the most common commands. To see the ToolTip of each
button, just point at it with the mouse and wait for 2 seconds.
Edit Toolbar
Toolbar with buttons for editing the current Loading Window. You can, for instance, Add or Delete one or more rows
from the Loading Window. This Toolbar has essentially the same functionality as the Edit menu. To see the ToolTip
of each button, just point at it with the mouse and wait for 2 seconds. You can hide this toolbar using the View menu.
Material Toolbar
Toolbar with shortcuts for the Material Window, Equation Window, and the Find Material and Browse Material
Windows. This toolbar also contains a list with all available Materials (see below). To see the ToolTip of each button,
just point at it with the mouse and wait for 2 seconds. You can hide this toolbar using the View menu.
Material List
Name of the material that will be used in the calculations (except for welded structures, which depend only on the IIW
weld class). To change the material, use the Data | Material command or just click on the list box to change it.
Status Bar
Shows a Progress bar on how long it takes to perform a calculation. To stop a calculation in progress just press ESC.
14
Loading Window
One of the windows from the Main Window containing the loadings for each event, which can be either typed or loaded
from a file. The first column shows the number of the event (each event can consist of many cycles). When the
Alternate/Mean option is chosen at the Sequencing Option, the next 3 columns show the alternate and mean
components of the loading and the number of ½ cycles that it is applied. If the Peak/Valley option is chosen at the
Sequencing Option then these 3 columns are replaced by a single one containing the peaks and valleys of the
loading.
After the calculations, the table also shows the damage (or crack growth) associated with each model. The 2 bottom
rows contain the total damage and the residual life of the specimen (considering that the loading history continues to be
applied on the specimen at the same rate defined in ‘Loading Time’). For crack growth calculations, the 2 bottom rows
show instead the average da/dN and the total crack growth.
In order to edit the datasheet, just click on the desired cell and start typing. Other keyboard commands are:
[Enter - move down one cell] [Arrows - move along cells] [Ctrl+Arrows - jumps to the beginning or end of table]
[Shift+Arrows - selects group of cells, for copying, etc.] [Ctrl+dragging the mouse - copies current cell value to all your
selection] [Shift+Delete - deletes the selected rows] [Shift+Ins - inserts rows].
Table Option
Option that defines if the values from the Loading Window represent stresses (in MPa or ksi) or strains (in
microstrains).
Sequencing Option
Defines the data format from the Loading Window: either alternate/mean components or peak/valley counts. The
loadings in the Loading Window are automatically converted from one to the other format.
Loading Time
Duration in seconds of ALL events in the Loading Window. It is used in the residual life estimate calculation.
Filter
Amplitude filter that can be automatically used when calculating Rainflow or Sequential Rainflow of a Peak/Valley
history. Note that you need to enter its value prior to the Rainflow calculation. You can also Filter the history by using
the Edit | Filter command. Set the Filter to zero in order not to filter the loading datasheet.
Loading Graph
Plots the loading history from the datasheet. To redraw it, right-click with the mouse and select Redraw. You can also
paste almost any previous data copied in Windows. For instance, you can select a group of cells in Excel, copy them,
right-click on this graph and select Paste. You can also copy the contents of the graph in order to paste in almost any
other application. To expand or shrink the graph, just double-click on it. This graph is shown only if the Show Loading
Graph option is checked on the Options window.
Loading Histogram Graph
Plots a 3D bar-chart of a loaded bidimensional histogram. Bidimensional histograms are loaded by opening a CSV
(*.csv) or Excel (*.xls) file and turning on both the Histogram and the Mean Interval options. To expand or shrink the
graph, just double-click on it. This graph is shown only if the Show Loading Histogram Graph option is checked on
the Options window.
Damage Graph
For the SN, IIW and eN Methods shows the damage, and for the da/dN Method the crack growth associated with each
event. To expand or shrink the graph, just double-click on it.
Accumulated Damage Curve / 2D Crack Graph
For the SN, IIW and eN Methods shows the accumulated damage, whereas for the da/dN shows the total crack growth
(since the first event) after each event. For Bidimensional Crack Growth calculations, this graph shows one of the
several plots that can be chosen by the user. To expand or shrink the graph, just double-click on it.
Hysteresis Loops / Elliptic Cracks Graph
Shows the elastoplastic hysteresis loops calculated by the eN Method, or one of the several plots that can be chosen
by the user in the Bidimensional Crack Growth window. To expand or shrink the graph, just double-click on it. This
graph is shown only if the Show Hysteresis Loops Graph option is checked on the Options window.
15
File Menu
New
Open…
Close
_____________
Save
Save As…
Save All
_____________
Print Preview
Print
_____________
Export…
_____________
(Recent Files)
_____________
Exit
File | New Command
Creates a new Loading Window for entering a new loading history.
File | Open Command
Opens a loading file. It can be:
•
a file in which the loading is described by a series of alternate and mean components, and by the number of half
cycles they act (*.alt).
•
a file in which the loading is described by a series of peaks and valleys (*.pic).
•
a comma separated value file (*.csv) or an Excel file (*.xls). First a Standard Load File window asks you to choose
the CSV (or Excel) file and then the Open File window asks you to choose which data field you want to load to the
Loading Window.
•
output files from the Kyowa RHS-500A histogrammer (*.1*).
•
A Tridimensional Peak/Valley (*.p3d) or Rosette Peak/Valley (*.ros) file. In this case, ViDa automatically goes to
the Equivalent Stress Window and loads the chosen file.
•
Calculation Logbook (*.log) files, containing the results of previous life calculations. These files are loaded to the
Calculation Logbook Window.
ADINA output files (*.port), loaded as a Peak/Valley history of the chosen node.
•
File | Close Command
Closes the current window. It is the same as clicking on the close button on the title bar of each window (the ‘X’ mark
on the top right of any window).
File | Save Command
Saves the loading history (*.alt or *.pic) to a file.
File | Save As Command
Saves the loading history (*.alt or *.pic) as a new file.
File | Save All Command
Saves ALL open windows to their respective files.
File | Print Preview Command
Prints the current Loading Window Datasheet.
File | Print Command
Prints the current Loading Window Datasheet.
File | Export Command
Saves the loading history (*.alt or *.pic) as a CSV (Comma Separated Values, *.csv) file.
File | (Recent Files) Command
Opens one of the 4 most recent loading files that you’ve been working on. A list of these 4 files are shown on the
menu, will their full path.
File | Exit Command
Asks if you want to save your changes from all modified Loading Windows and exits ViDa.
16
Edit Menu
Cut
Copy
Paste
Insert Paste
____________________
Delete Rows
Insert Rows
Replicate Block
Fill Cells…
____________________
Reset
Number of Rows…
Filter
Check Peaks/Valleys
____________________
Convert
Multiply by Constant…
Add Constant…
Edit | Cut Command
Copies to the Clipboard and clears the values of a group of cells from the Loading Window. The cells to be cut are
defined by the highlighted cells in the table. To highlight them, just drag the mouse while pressing the left button, or
press the SHIFT key while using the keyboard arrows. You can Paste these values, for instance, on an Excel
worksheet.
Edit | Copy Command
Copies to the Clipboard the values of a group of cells from the Loading Window. The cells to be copied are defined
by the highlighted cells in the table. To highlight them, just drag the mouse while pressing the left button, or press the
SHIFT key while using the keyboard arrows. You can Paste these values, for instance, on an Excel worksheet.
Edit | Paste Command
Pastes the contents of the Clipboard on a group of cells of the Loading Window. The cells where the values will be
pasted are defined by the highlighted cells in the table. To highlight them, just drag the mouse while pressing the left
button, or press the SHIFT key while using the keyboard arrows. If the size of the copied selection was greater than
the current selected cells, than only some of the Clipboard data is pasted. On the other hand, if only one cell is
selected, then ALL Clipboard values are pasted, filling this cell and the ones to the right and below it. In this case, if the
pasted values reach the bottom of the table, new rows are added accordingly to fit ALL the Clipboard data. These
pasted values can be, for instance, cells copied from an Excel worksheet.
Edit | Insert Paste Command
Inserts new rows on the Loading Window and pastes the contents of the Clipboard on them. The rows are inserted
above the first selected cell on the table. These pasted values can be, for instance, cells copied from an Excel
worksheet.
Edit | Delete Rows Command
Deletes one or more rows from the Loading Window. The rows to be deleted are defined by the highlighted cells in
the table. To highlight them, just drag the mouse while pressing the left button.
Edit | Insert Rows Command
Inserts one or more rows to the Loading Window. The number of rows to be added is defined by the highlighted cells
in the table. To highlight them, just drag the mouse while pressing the left button.
Edit | Replicate Block Command
Copies a group of rows of the Loading Window as many times as desired. Use this command to enter repetitive
blocks in your history. First select the rows you want to copy by dragging the mouse on them while clicking the left
button. Then click on this command and enter the number of times you want to copy this block. The copied blocks will
be inserted below the last selected row.
Edit | Fill Cells Command
Sets the value of a group of cells of the Loading Window. First select the rows you want to set by dragging the mouse
on them while clicking the left button. Then click on this command and enter the value you want to set for them.
Edit | Reset Command
Deletes all rows and data from the current Loading Window.
17
Edit | Number of Rows Command
Asks the user to enter the number of rows of the current Loading Window. If the users enter a smaller number of
rows than the current one, the corresponding rows are deleted. If it’s greater, the extra rows are added on the bottom
of the table.
Edit | Filter Command
Filters a peak/valley or alternate/mean history from the Loading Window within a fixed amplitude, previously defined in
the Filter text box on the Loading Window.
Edit | Check Peaks/Valleys Command
Checks the coherence of a peak/valley history from the Loading Window, eliminating the incoherent events.
Edit | Convert | MPa->ksi Command
Converts ALL the values of the Alternate and Mean (or Peak/Valley) columns of the Loading Window from MPa
(mega Pascals) to kpsi (kilo pounds per square inch) by multiplying them by 0.145. Note that this command only
changes numerically the values of the Loading Window. To use English instead of SI units for the whole program, use
the Tools | Options command.
Edit | Convert | ksi->MPa Command
Converts ALL the values of the Alternate and Mean (or Peak/Valley) columns of the Loading Window from kpsi (kilo
pounds per square inch) to MPa (mega Pascals) by dividing them by 0.145. Note that this command only changes
numerically the values of the Loading Window. To use SI instead of English units for the whole program, use the
Tools | Options command.
Edit | Convert | Alt/Med -> Max/Min Command
Converts ALL the values of the Alternate and Mean columns of the Loading Window to a sequence of Maximum and
Minimum values, where Alternate=(Maximum-Minimum)/2 and Mean=(Maximum+Minimum)/2.
Edit | Convert | Max/Min -> Alt/Med Command
Converts ALL the values of a Maximum and Minimum history of the Loading Window to a sequence of Alternate and
Mean components, where Alternate=(Maximum-Minimum)/2 and Mean=(Maximum+Minimum)/2.
Edit | Multiply by Constant Command
Multiplies ALL the values of the Alternate and Mean (or Peak/Valley) columns of the Loading Window by a constant
value. An input window will ask the user to enter this constant value.
Edit | Add Constant Command
Adds a constant value to ALL the values of the Alternate and Mean (or Peak/Valley) columns of the Loading Window.
An input window will ask the user to enter this constant value.
View Menu
Toolbars
Standard
Edit
Material
Status Bar
____________
Refresh
Logbook
Options…
View | Toolbars | Standard Command
Shows/hides the Standard toolbar.
View | Toolbars | Edit Command
Shows/hides the Edit toolbar.
View | Toolbars | Material Command
Shows/hides the Material toolbar.
View | Status Bar Command
Shows/hides the Status Bar.
View | Refresh Command
Refreshes the active window, redrawing its graphs, tables, and other components.
View | Logbook Command
18
Shows the Calculation Logbook window, which keeps track of all previous calculations storing the total damage and
residual life of the specimen for each SN, IIW and eN calculation, or the average da/dN and the total crack growth for
each crack growth calculation. By filling out the ‘Calculation Title‘ field in the calculation windows it is possible to
easily compare the results of different calculations in the Calculation Logbook window. This command has the same
functionality as the Life | Logbook command.
View | Options Command
Shows the Options window, where the user can set the ViDa general options regarding Editing of the Loading histories,
the Modeling option used for all calculations (Extended or Simplified), the Units used (SI or English) and the idiom used
on the user interface (among English, Portuguese, French, German, Italian, Spanish, and more). This command has
the same functionality as the Tools | Options command.
Data Menu
Material
Equation
____________________
Find Material…
Browse Material…
Data | Material Command
Goes to the Material window to select a different material for the calculations.
Data | Equation
Goes to the Equation Database window, where you can work with:
stress concentration factor (Kt) to add, delete or change Kt equations that will be available for future SN, IIW and
•
eN calculations.
•
stress intensity factor (KI) database to add, delete or change KI equations that will be available for future da/dN
and Bidimensional Crack Growth calculations.
•
crack growth equations (da/dN) database to add, delete or change da/dN equations that will be available for future
da/dN calculations.
Data | Find Material Command
Goes to the Find Material window, where the user can search for materials by their type (steels, alumina, etc.) or by
any property ranges (e.g. materials with Su between 600 and 800 MPa) or combinations of them. You can also sort the
matching materials by any property.
Data | Browse Material Command
Goes to the Browse Material window, where the user can browse all materials from the database, showing all their
properties. You can rearrange the columns by dragging the column title with the mouse and dropping it over the
desired position. ViDa automatically sorts the table by the first column, so if you want to order the materials e.g. by
their Su, just drag and drop it on the first column. You can also resize the columns, and all your layout changes are
saved. So, just customize your table, start browsing, and double-click on the Materials table on the name of the
material you want to load to the Material window.
Life Menu
Rainflow
Sequential Rainflow
___________________________
SN Method
Welded Structures
eN Method
Crack Growth
Bidimensional Crack Growth
___________________________
Logbook
Life | Rainflow Command
Calculates the Alternate and Mean components of a Peak/Valley history using a Rainflow counter and the amplitude
Filter value.
Life | Sequential Rainflow Command
Calculates the Alternate and Mean components of a Peak/Valley history using a Sequential Rainflow counter and the
amplitude Filter value. The Sequential Rainflow is a variation of the Rainflow that preserves as much as possible the
loading order, which is very useful with the eN method and crack growth calculations.
Life | SN Method Command
Goes to the Calculate Life (SN) window for damage calculation using the current material and Loading Window load
values.
19
Life | IIW Method (welded structures) Command
Goes to the IIW window for damage calculation of welded structures using the current Loading Window values. Note
that the material properties will not be used in this calculation since it is sufficient to know the class of the weld.
Life | eN Method Command
Goes to the Calculate Life (eN) window for damage calculation using the current material and Loading Window load
values.
Life | da/dN Method Command
Goes to the da/dN Method window for unidimensional crack growth calculation using the current material and Loading
Window values.
Life | Bidimensional Crack Growth Command
Goes to the Bidimensional Crack Growth window for (elliptical) crack growth calculation using the current material and
Loading Window values.
Life | Logbook Command
Shows the Calculation Logbook window, which keeps track of all previous calculations storing the total damage and
residual life of the specimen for each SN, IIW and eN calculation, or the average da/dN and the total crack growth for
each crack growth calculation. By filling out the ‘Calculation Title‘ field in the calculation windows it is possible to
easily compare the results of different calculations in the Calculation Logbook window.
Tools Menu
Equivalent Stress
Stress Concentration Factor (Kt)
Notch Sensitivity (q)
Smart Calculator
_____________________________
Options…
Tools | Equivalent Stress Command
Goes to the Rosette and 3D Equivalent Stress window for converting 3D loadings or Rosette measurements into 1D
components using Mises or Tresca criteria.
Tools | Stress Concentration Factor (Kt) Command
Goes to the Calculate Stress Concentration Factor (Kt) window, where Kt and also the notch sensitivity q (for steels or
alumina) can be calculated for typical notched and filleted bars and shafts, given its dimensions.
Tools | Notch Sensitivity (q) Command
Goes to the Calculate Notch Sensitivity (q) for Steels and Alumina window, where the notch sensitivity can be
calculated for steels or alumina given Su and the notch radius.
Tools | Smart Calculator Command
Shows the Smart Calculator window, where the user can use an alphanumeric calculator to compute any formula using
the material properties and user-defined variables. Some basic Mechanics of Solids equations are also embedded in
the calculator and computed results can be used to multiply the loadings in the Loading Window.
Tools | Options Command
Shows the Options window, where the user can set the ViDa general options regarding Editing of the Loading histories,
the Modeling option used for all calculations (Extended or Simplified), the Units used (SI or English) and the idiom used
on the user interface (among English, Portuguese, French, German, Italian, Spanish, and more).
Help Menu
Contents
Search For Help On…
Multimedia
____________________
Register…
Tip of the Day…
About ViDa…
Help | Contents Command
Loads the ViDa Help file and shows its Contents.
Help | Search For Help On Command
Loads the ViDa Help file and shows its Search engine.
Help | Multimedia Command
20
Loads the Multimedia window, with links to the Textbook "Fatigue Design under Complex Loading", Published
Papers, and video/animations.
Help | Register Command
Loads the ViDa Registration window. This window shows the Software Code associated to your computer, which
you’ll need to inform in order to receive the Liberation Key. After receiving your key, you should type in the Liberation
Key, your Name, and click ‘Register’. ViDa becomes fully functional after registering.
Help | Tip of the Day Command
Loads the Tip of the Day window, which shows tips on working with ViDa. This window is loaded every time you run
ViDa if the Show Tips at Startup option is selected in the Options window.
Help | About ViDa Command
Shows the About window with the credits and version of the program.
21
Handling all ViDa Graphs
With these commands you can work with any graph shown in ViDa. This applies to the graphs on the Loading
windows, on the Material window, on the SN, eN and da/dN calculation windows, on the Equivalent Stress
window, and on the Calculate Kt and q windows.
1.
2.
3.
4.
You can expand or shrink almost any graph by double-clicking on it.
You can select individual points of the graph by clicking the mouse on it. The values of its coordinates will
automatically appear on the Main Window Status Bar, as well as on the graph ToolTip (the little yellow
box that appears by the mouse cursor after 2 seconds).
For 3D graphs, you can rotate the angle of view by pressing the CTRL key while moving the mouse.
If you right-click with the mouse on any graph, a ‘pop-up’ menu appears with some of these commands
(depending on which graph):
Graphs Pop-Up Menu
Zoom
Log-Log
Thin Lines
Engineering
Define Life
Define R
___________
Copy
Paste
Redraw
Save
Print
Zoom Command
Lets the user set the minimum and maximum values of the y-axis of the graph or a range of points to be plotted.
After setting the Zoom, a check mark is placed on the Pop-Up menu. To return the Zoom settings to the original
values, just click again on this command to uncheck it.
Log-Log Command
If this option is checked, the graph is plotted in Log-Log format. Uncheck it to plot in Linear-Linear format.
Thin Lines Command
Toggles the line thickness of the Hysteresis Loops / Elliptic Cracks graph between thick and thin. Setting thin lines is
especially useful when too many hysteresis loops are plotted in the same graph.
Engineering Command
Plots the Engineering (instead of True) stress-strain curves in the Hardening Curve Graph of the Material window.
If you uncheck this option, the True stress-strain curve is plotted instead.
Define Life (for SaSm Graph) Command
Redraws the SaSm diagram of the SN Method window for a user defined life (in number of cycles) for reference
purpose. The default life for plotting the SaSm diagram is 1,000,000 cycles.
Define R (Kmin/Kmax) Command
Plots the da/dN equation shown in the da/dN Formula field for different values of R=Kmin/Kmax. The user is asked to
input the range of R values to be considered and the number of curves to be plotted. This command is useful to
visualize the influence of R (and Kmin and Kmax) in the da/dN equations that include these variables.
22
Copy Command
Copies ALL points from the graph to the Clipboard. You can then paste it to another graph, paste into any other
application, or even paste it directly to an Excel worksheet. If you paste it to an imaging software (like Paint), you’ll be
get the picture image of the graph.
Paste Command
Pastes the data from the Clipboard into the current graph. You can paste a group of cells copied from any ViDa
Loading window or from an Excel worksheet. If more than 1 column was copied, then the graph pairs consecutive
columns to plot one against another. So, if you paste 5 columns into the graph, columns 1 and 2 will determine a set of
points (coordinates X and Y respectively), 3 and 4 will form another, and column 5 will be ignored (since it can’t be
paired). If you paste only 1 column, its values are plotted in the Y axis (and the X axis will contain the row number of
each point).
Redraw Command
Redraws the graph updating any changes from the user. Tip: for the da/dN graph in the Crack Growth window, you
can easily tune in the coefficients of the da/dN Formula by interactively editing the Variables Table and using this
Redraw command until the curve is visually compatible with the Paris and Elber curves in the da/dN graph.
Save Command
Saves the graph data as a Comma Separated Value (CSV). The first row contains the legend titles of each set in the
graph and the following rows contain the respective data for each curve.
Print Command
Prints the graph.
23
Standard Open/Save File Window
This is the standard interface window for all Open and Save File commands from ViDa.
File name
Name of the file to be read.
Found Files
Files found in the current directory (defined in ‘Folders’) of the extension chosen in ‘List files of type’. Just doubleclick on the desired file to choose it.
Files of type
List with the desired file extensions.
Look in
Shows the current directory.
OK Button
Confirms loading/saving the file.
Cancel Button
Cancels loading/saving and returns to the previous window.
24
Open CSV/Excel File Window
This window shows the fields from the chosen comma separated value (CSV) file or from an Excel file
(*.xls), chosen from a Standard Load File window. The user is then asked to choose which field he wants to
load to the Loading Window and allows him to enter an optional conversion factor to multiply these
values. You can also Amplitude-Filter these converted values, and even choose to load just a histogram of
the file, useful for very large loading histories.
Fields List
Fields from the chosen comma separated value (CSV) or Excel (*.xls) file. Just click on the desired field and press OK
to load it in the Loading Window.
Conversion Factor
Optional conversion factor to multiply the loaded values. For instance if your CSV field contains forces and you know
the cross sectional area, you can type its inverse value in the Conversion Factor and then obtain stresses in your
Loading Window (be careful with the units!).
Filter
Optional amplitude filter that can be used to filter the loading history. Useful for files with long histories.
Histogram Option
Option to load just a histogram of the file being read. Useful for files with long histories.
Alternate Interval
Discretization interval used on the Histogram of the Alternate components of the loading history being read.
Mean Interval
Discretization interval used on the Histogram of the Mean components of the loading history being read. If this option
is checked, a bidimensional histogram counting is performed on the Alternate and Mean components. If not checked,
all Mean components are set to zero, and only the Alternate components are evaluated.
OK Button
Reads the selected field on the Fields list and returns to the Main Window.
Cancel Button
Cancels the loading of the file and returns to the Main Window.
25
Material Window
In the Material window it is possible to manipulate the Materials database, adding, deleting, changing or
just selecting a specific material. You can alter the material properties by clicking on the respective field
and entering the new data. Note that this new value will only be effective after you save it using the
Material | Save command.
You can also store experimental points for the currently selected material. SN, eN and da/dN (Paris or
Elber) curves can be automatically fitted to the experimental points, and the calculated properties data
can be used in future life calculations.
Values in black represent measured properties, while the values in red reflect estimated properties (which
are less reliable). To toggle the black/red colors, press the space bar while typing on the desired field (don’t
forget to save the changes after).
General Tab
Name
Name and comments to tell apart similar materials (each material name+comment must be unique).
Material
Material type (steel, aluminum, etc.).
Code
Sequencing code for the material (automatically administered by ViDa).
Source
Reference source for this material data.
26
Composition
Chemical composition of the material.
Condition
Consists of 2 fields: (i) the mechanical treatment applied to the material and (ii) the grain direction resulting from the
rolling direction (L = longitudinal, T = transversal, W = width).
Cost Range
Minimum and maximum market prices for this material.
T Operating
Operating Temperature, in which the properties were measured.
T Melting
Melting Temperature of the material.
Thermal Expansion
Thermal Expansion Coefficient of the material.
Specific Weight
Specific weight of the material.
Charpy
Amount of energy absorbed by the Charpy specimen.
Poisson
Poisson coefficient.
E (Young)
Young modulus (be careful with the units!).
BHn
Brinnell Hardness.
Su
Ultimate Strength.
Sy
Yielding Strength.
Sy’
Cyclical Yielding Strength (used in hysteresis loops).
Sigmaf
True Ultimate Strength.
epsilonf
True Ultimate Elongation.
R.A.
Reduction in cross sectional area after failure (in %).
n, n'
Hardening exponents of the monotonic and cyclic curves (using Ramberg-Osgood equation).
k
Hardening coefficient of the monotonic curve (using Ramberg-Osgood equation).
k’
Hardening coefficient of the cyclical curve (using Ramberg-Osgood equation).
Memo
Additional information about the material.
Estimates Help Button
Shows (just for reference) a window with all the equations used by the Calculate | Estimate using Nominal Values
command to estimate properties from Nominal Values. These estimates are used by the ViDa program to try to fill out
all the material properties that have not been measured or are not available.
Hardening Curve
Shows the monotonic (tension test) and cyclic true hardening curves of the material. Note the change in color marking
on the graph the values of Sy and Sy’. The graph is only updated after the property changes are saved. To expand
or shrink the graph, just double-click on it.
27
Fatigue and Fracture Tab
Standard Estimated SN Curve
Shows the estimated SN curve of the material (this plot ignores the values of the endurance limit modifiers ka, kb, kc,
kd and ke). The graph is only updated after the property changes are saved. To expand or shrink the graph, just
double-click on it.
Sf’
Uncorrected Endurance Limit (set it to zero if you don’t want any elbow in the SN Curve).
b (SN)
Exponent of the SN Curve (N*S^b = c).
c (SN)
Coefficient of the SN Curve (N*S^b = c).
Nf
Location of the SN curve elbow.
belb
Value of the b exponent of the SN Curve after the elbow (set belb=0 to ignore this option).
Calculate b, c Button | Experimental Points Command
Loads the values of the parameters b and c of the SN curve N*S^b=c from the Experimental Points Window directly
into the current window.
Calculate b, c Button | From eN Curve Elastic Component Command
Calculates the constants of the SN Curve (N*S^b = c) by making it coincident with the elastic part of the eN Curve
(defined by the eN Curve parameters Sigmaf’ and b). This estimate is based on the principle that both SN and eN
methods should predict the same damage for high cycle calculations. After the calculation the estimated b and c values
are color coded in red.
28
Calculate b, c Button | For Steels and Alumina Command
Activates the Calculate b and c for SN window that lets the user calculate the constants of the SN curve (N*S^b = c)
from the material properties Su and Sf’. After the calculation the estimated b and c values are color coded in red.
eN Curve
Shows the eN curve of the material and also its elastic and plastic components separately. The SN curve is also plotted
in order to make a comparison with the elastic component of the eN curve. The graph is only updated after the
property changes are saved. To expand or shrink the graph, just double-click on it.
Sigmaf’
Elastic coefficient used in Coffin-Manson’s eN Curve equation (de/2 = Sigmaf’/E*(2N)^b+epsilonf’*(2N)^c).
epsilonf’
Plastic coefficient used in Coffin-Manson’s eN Curve equation (de/2 = Sigmaf’/E*(2N)^b+epsilonf’*(2N)^c).
b (eN)
Elastic exponent used in Coffin-Manson’s eN Curve equation (de/2 = Sigmaf’/E*(2N)^b+epsilonf’*(2N)^c).
c (eN)
Plastic exponent used in Coffin-Manson’s eN Curve equation (de/2 = Sigmaf’/E*(2N)^b+epsilonf’*(2N)^c).
Calculate b, c Button | Experimental Points Command
Loads the values of the parameters b, c, Sigmaf’ and epsilonf’ of the eN curve
Sigmaf’/E*(2N)^b+epsilonf’*(2N)^c from the Experimental Points tab directly into the current tab.
de/2
=
da/dN Curve
Shows the da/dN curves of the material using Paris and Elber laws. Note that the value of deltaKth substantially
affects the Elber law curve. The graph is only updated after the property changes are saved. To expand or shrink the
graph, just double-click on it.
KIc
Critical Stress Intensity Factor (fracture toughness).
deltaKth (dKth)
Threshold Stress Intensity Factor (if deltaK < deltaKth the crack does not propagate).
A (Paris)
Coefficient A used in Paris law (da/dN = A*deltaK^m).
m (Paris)
Exponent m used in Paris law (da/dN = A*deltaK^m).
A (Elber)
Coefficient A used in Elber law (da/dN = A*(deltaK-deltaKth)^m).
m (Elber)
Exponent m used in Elber law (da/dN = A*(deltaK-deltaKth)^m).
p (Walker)
Exponent p used in Walker law da/dN = A*(deltaK)^m / (1-R)^p and also in the Modified Walker law da/dN = A*(deltaKdeltaKth)^m / (1-R)^p.
CTOD
Value of the critical CTOD (Crack Tip Opening Displacement).
Calculate Paris Button | Experimental Points Command
Loads the values of the A and m coefficients of the Paris da/dN equation da/dN=A*deltaK^m from the Experimental
Points tab in the Materials Database directly into the current window.
Calculate Paris Button | From eN Curve Command
Calculates the constants of the Paris law (da/dN = A*dK^m) from the eN Curve parameters by using the assumption
that crack growth is caused by the successive breaking of tiny eN specimens (see the Textbook "Fatigue Design under
Complex Loading"). After the calculation the estimated A and m values are color coded in red.
Calculate Paris Button | Rolfe-Barson Command
Sets the constants of the Paris law (da/dN = A*dK^m) depending on the microstructure of the material. These values
are tabulated referencing Rolfe-Barson rough estimates. After the calculation the estimated A and m values are color
coded in red.
Calculate Elber Button | Experimental Points Command
Loads the values of the A and m coefficients of the Elber da/dN equation da/dN=A*(deltaK-deltaKth)^m from the
Experimental Points tab in the Materials Database directly into the current window.
29
Experimental Data Tab
Experimental Points Tables
Tables where the user can input experimental points.
SN, eN, da/dN Tabs
Switches tab to the SN, eN or da/dN curve experimental points table.
Hardening Tab
Switches tab to the hardening curves experimental points table.
SN Graph
Log(S) x Log(N) curve graph, plotting the experimental points and/or the fitted curves from the calculated properties
data. Note that the graph is only updated after you save the data using the File | Save command.
eN Graph
Log(e) x Log(N) curve graph, plotting the experimental points and/or the fitted curves from the calculated properties
data. Note that the graph is only updated after you save the data using the File | Save command.
da/dN Graph
Log(da/dN) x Log(deltaK) curve graph, plotting the experimental points and/or the fitted curves from the calculated
properties data. Note that the graph is only updated after you save the data using the File | Save command.
Hardening Graph
Stress-strain curve graph, plotting the experimental points and/or the fitted curves from the calculated properties
data. Note that the graph is only updated after you save the data using the File | Save command.
30
Calculated Properties Data
Properties calculated from the curve fittings from the experimental points.
Fit SN Button
Fits the SN experimental data points (using a least squares method) for a Wohler equation (N*S^b = c). The b and c
constants are calculated and the fitted curve is plotted on the SN graph. To use these calculated b and c in life
calculations, you need to copy them to their respective field in the Fatigue and Fracture tab and use File | Save.
Fit eN Button
Fits the eN experimental data points (using a least squares method) for a Coffin-Manson equation. The 4 eN curve
constants are calculated and the fitted curve is plotted on the eN graph (the Young modulus E comes from the
monotonic data). Note that since there are 4 constants in the eN curve (instead of only 2) you need data with not only
the number of reversions (2N) and the strain variation (de/2) but also with the corresponding stress variation dS/2. To
use these calculated constants in life calculations, you need to copy them to their respective field in the Fatigue and
Fracture tab and use the File | Save command.
Fit Paris Button
Fits the da/dN experimental data points (using a least squares method) for the Paris law (da/dN = A*deltaK^m). The A
and m constants are calculated and the fitted curve is plotted on the da/dN graph. To use these calculated A and m in
life calculations, you need to copy them to their respective field in the Fatigue and Fracture tab and use File | Save.
Fit Elber Button
Fits the da/dN experimental data points (using a least squares method) for the Elber law (da/dN = A*(deltaKdeltaKth)^m). The user then inputs the value of deltaKth that will be used in the curve fitting (the default value is the
one from the Material window). The A and m constants are calculated and the fitted curve is plotted on the da/dN
graph. To use these calculated A and m in life calculations, you need to copy them to their respective field in the
Fatigue and Fracture tab and use the File | Save command.
Fit Monotonic/Cyclic Button
Fits the hardening experimental data points (using a least squares method) for a Ramberg-Osgood equation. To use
these calculated n, n', k and k' in life calculations, you need to copy them to their respective field in the General tab
and use the File | Save command.
File Menu
Open…
Save
Save as New
____________
Find…
Browse…
____________
Delete
____________
Exit
File | Open Command
Goes to the Open Material window, which shows a list of all available materials. Just click on the name of the desired
material to load it.
File | Save Command
Saves all the material properties to the database and updates all 7 graphs in the Material window. The black-red
(measured-estimated properties) color coding is also saved in the database. It also saves the experimental points and
calculated properties data for this material in the database. Note that you need to save the changed properties for
them to become effective and available for further calculations.
File | Save as New Command
Creates a new material in the database with all the current properties and experimental data, and updates the 7 graphs
in the Material window. Note that each material must have an unique name, so you must change the Name field
before saving as new.
File | Find Command
Goes to the Find Material window, where the user can search for materials by their type (steels, alumina, etc.) or by
any property ranges (e.g. materials with Su between 600 and 800 MPa) or combinations of them. You can also sort the
matching materials by any property.
File | Browse Command
Goes to the Browse Material window, where the user can browse all materials from the database, showing all their
properties. You can rearrange the columns by dragging the column title with the mouse and dropping it over the
desired position. ViDa automatically sorts the table by the first column, so if you want to order the materials e.g. by
31
their Su, just drag and drop it on the first column. You can also resize the columns, and all your layout changes are
saved. So, just customize your table, start browsing, and double-click on the Materials table on the name of the
material you want to load to the Material window.
File | Delete Command
Deletes the current material permanently from the database. The default material is then automatically loaded.
File | Exit Command
Exits the Material Window and returns to the Main Window. Note that you need to save the changed properties for
them to become effective for further calculations.
Edit Menu
Clear All Properties
Clear Estimated Values
____________________________
Estimate using Nominal Values
Edit | Clear All Properties Command
Sets ALL the material properties to zero. Note that the changes are only effective after you click on File | Save or File |
Save as New commands. Use the Edit | Clear All Properties command and then File | Save As New to create a
new material from scratch.
Edit | Clear Estimated Values Command
Sets the estimated (color coded in red) material properties to zero. Note that the changes are only effective after you
click on File | Save or File | Save as New commands. Use this command to discard the estimated (non reliable)
properties, either to estimate them again by using the Edit | Estimate using Nominal Values command or to replace
them with measured properties. Note that to change the color coding (black-red) you need to press the space bar on
the desired property field.
Edit | Estimate using Nominal Values Command
Estimates the currently null material properties. To see the estimating formulas that ViDa uses click on the Estimates
button. All estimated properties are color coded in red.
Table Menu
Number of Rows…
_________________
Save As…
Import…
_________________
MPa->ksi
ksi->MPa
Table | Number of Rows Command
Asks the user to enter the number of rows of the selected experimental data table (SN, eN or da/dN). If the users enter
a smaller number of rows than the current one, the corresponding rows are deleted. If it’s greater, the extra rows are
added on the bottom of the table.
Table | Save As Command
Saves the selected experimental data table (SN, eN or da/dN) as a CSV (Comma Separated Values, *.csv) file.
Table | Import Command
Loads a Comma Separated Values (CSV) file into the selected experimental data table (SN, eN or da/dN). Note that
ViDa ignores the first row of the CSV file (since it assumes that the first row contains the column titles) and the number
and order of the columns in the file must be compatible with the respective table (2 columns for the SN or the da/dN
tables and 3 columns for the eN table).
Table | MPa -> ksi Command
Converts the numerical values of all the 3 Experimental Points Tables from SI to English units (MPa -> ksi, MPa\/m ->
ksi\/in, mm/cycle -> in/cycle). Note however that only the numerical values are changed, so if you want to perform
calculations in English units you need to select the Tools | Options command from the Main Window, and choose
English Units from the Units tab.
Table | ksi -> MPa Command
Converts the numerical values of all the 3 Experimental Points Tables from English to SI units (ksi -> MPa, ksi\/in ->
MPa\/m, in/cycle -> mm/cycle). Note however that only the numerical values are changed, so if you want to perform
calculations in SI units you need to select the Tools | Options command from the Main Window, and choose SI Units
from the Units tab.
32
Open Material window
Shows a list of all materials in the database (or the ones that matched a query from the Find Material
window). Just click on the desired material to load the data.
Materials List
List of all materials in the database (or the ones that matched a query from the Find Material window). Just click on the
desired material to load the data.
Found
Total number of materials found in the materials database (or the ones that matched a query).
Cancel Button
Cancels the material selection and returns to the Material window.
33
Find Material Window
Lets the user search for materials by their type (steels, alumina, etc.) or by any property ranges (e.g.
materials with Su between 600 and 800 MPa) or combinations of them. You can also sort the matching
materials by any property. The results of your query are shown in the Open Material window.
Material
Type of material to be searched (steels, alumina, etc.).
Property
Choose here the properties that you want to set ranges in your query.
Range
Set the minimum and maximum value of the corresponding material property to be used in your query.
Order by
Choose here the properties that you want to use to sort the results from your query.
Descending/Ascending
Choose the sorting order (descending or ascending) of the results from your query.
OK Button
Evaluates your query and show the results in the Open Material window.
Cancel Button
Cancels your query and returns to the Material window.
34
Browse Material Window
Lets the user browse all materials from the database, showing all their properties. You can rearrange the
columns by dragging the column title with the mouse and dropping it over the desired position. ViDa
automatically sorts the table by the first column, so if you want to order the materials e.g. by their Su, just
drag and drop it on the first column. You can also resize the columns, and all your layout changes are
saved. So, just customize your table, start browsing, and double-click on the material you want to load.
Materials Table
Shows all available materials in the database. You can customize the table layout by dragging and dropping the
columns, as well as resizing them. ViDa automatically sorts the table by its first column, and all your layout changes
are automatically saved. To load a material to the Material window, just double-click on its name, or select it and press
the OK button.
Help Button
Shows more information on this window.
Refresh Button
Updates the table to reflect your most recent changes in the Material database. You only need to use this button if you
have made changes to the Material database in this session of ViDa.
Default Layout
Sets the column order and column widths of all properties to the default value used in ViDa. You can use this button if
you made too many changes in the table layout and want to revert it back.
Group Cells
Changes the display mode so to group equal values into one larger cell.
OK Button
Loads the selected material and returns to the Material window .
Materials table on the name of the material you want to load.
Cancel Button
Alternatively, you can just double-click on the
Cancels the material selection and returns to the Material window.
35
Calculate b and c for SN Window
Calculates the b and c constants of the SN curve (N*S^b = c) using the user data and returns to the
Material window.
SN Graph Interpolation Data
Values of 2 points of the SN curve to be interpolated. The default values are 1000 cycles for 0.9*Su and 1,000,000
cycles for Sf, but the user can change any of these values before pressing OK.
OK Button
Calculates the b and c constants of the SN curve (N*S^b = c) using the user data and returns to the Material Window
or to the SN Method Window.
Cancel Button
Cancels the calculation and returns to the Material Window or to the SN Method Window.
36
Equations Database Window
Database of Kt, KI or da/dN equations that can be used in calculations. In this window you can add, delete
or change data of a specific equation. You can alter the equations by clicking on the desired field and
entering the new data. Note that this new data will only be effective after you save it.
Name
Name of the equation (each equation name must be unique).
Code
Sequencing code for the equations (automatically administered by ViDa).
Source
Reference source for this equation.
Formula
Contains the equation itself. Click on the Equation Interpreter Help button to get more information about the
equations syntax.
Equation Interpreter Help Button
Shows (just for reference) a window with the equations syntax and all the material properties that can be literally used.
Memo
Additional information about the equation.
Figure
Name of the graphic file containing the selected equation (located in the directory Vida2002\Figures).
Delete Button
Deletes the selected equation permanently from the database.
Update Button
Updates all the equation data from the current Tab to the database. Note that you need to use this command for the
changes to become effective for further calculations.
37
Undo All Button
Returns all unsaved equation data to its original values.
Edit Button
Edits the selected figure using the graphical software defined in the File Locations tab of the Options window.
Exit Button
Exits the Equations Database window and returns to the Main Window. Note that you need to update the changed
equations for them to become effective for further calculations.
38
Calculate Life (SN) Extended Window
Calculates the damage and remaining life using the SN Method and the loading history from the Main
Window. (The SN method is recommended only if the stress/strain history at the critical point – normally a
notch root – is elastic). The user can input the specimen characteristics to determine the values of ka, kb,
kc, kd and ke, the fatigue strength modifiers due to surface finish, size, loading, temperature and other
effects, alter the material SN curve equation, calculate and input stress concentration factors, define user
SaSm diagrams and many other options.
Some of the default data in this window comes from the Materials database and the rest is maintained from
your last calculation. A simplified Calculate Life (SN) window (recommended for beginners) is also available
by using the Tools | Options | Simplified command in the Main Window prior to calculating life.
After tuning the desired properties, just click on the OK button to return to the Main Window and perform
the calculations.
SN Curve Tab
Calculation Title
Title of the calculation that is about to be performed. This is an optional field, useful to identify and compare results
from different calculations in the Calculation Logbook Window.
Type of SN Curve Option
ViDa considers 3 ways of obtaining the SN curve N*S^b=c:
(i) Automatic: calculates b and c from the pair of points (N,S) = (1000cycles, 0.9*Su) and (1,000,000cycles,
Sf=ka*kb*kc*kd*ke*Sf’) for steels (for alumina the 1,000,000 cycles is switched to 500,000,000). For steels an elbow is
placed in the SN curve at N=1,000,000.
39
(ii) b-Sf-Nf: determines the SN curve using the point (N,S) = (Nf, Sf=ka*kb*kc*kd*ke*Sf’) and the exponent b.
(iii) b-c-Nf: the SN curve is determined from the user supplied values of b, c and the elbow location Nf. Note that only
in this option the Calculate b, c Button is enabled.
b
c
Nf
Exponent of the SN Curve (N*S^b = c).
Coefficient of the SN Curve (N*S^b = c).
Location of the elbow in the SN curve (there is no fatigue damage for N > Nf).
Calculate b, c Button | For Steels or Alumina Command
Goes to the Calculate b and c for SN Window, where the user can calculate the parameters b and c of the SN curve
N*S^b=c.
Calculate b, c Button | Materials Database Values Command
Loads the values of the parameters b and c of the SN curve N*S^b=c from the Materials Database directly into the
current window.
Calculate b, c Button | Experimental Points Command
Loads the values of the parameters b and c of the SN curve N*S^b=c from the Experimental Points Window directly
into the current window.
Consider SN Curve Elbow Option
Option to consider the elbow in the SN curve, which defines no fatigue damage for stresses smaller than
Sf=ka*kb*kc*kd*ke*Sf’ (or number of cycles greater than Nf). If this option is off then the elbow is ignored.
belb
Value of the b exponent of the SN Curve after the elbow (set belb = 0 to ignore this option).
Surface Finish
Surface finish of the specimen, used to automatically calculate the endurance limit modifying factor ka.
Type of Loading
Main type of loading applied to the specimen, used to automatically calculate the endurance limit modifying factor kc.
Equivalent Diameter
Specimen cross-section diameter (or equivalent diameter), used to automatically calculate the endurance limit
modifying factor kb.
Calculate d (Equivalent Diameter) Button
Goes to the Calculate Effective Diameter Window, where the user can calculate the effective diameter of various cross
section profiles under bending. This diameter is used to calculate the size factor kb (used to correct the fatigue
endurance limit Sf’).
Su
Ultimate strength of the current material, used to automatically calculate the endurance limit modifying factor ka. The
default value of Su is loaded from the Materials Database, but it can be changed by the user.
Operating Temperature
Specimen operating temperature, used to automatically calculate the endurance limit modifying factor kd.
Sf’
ka
Uncorrected endurance limit of the material (alternate stress below which there is no fatigue damage).
Surface finish factor that modifies the endurance limit (a better surface finish increases the endurance limit).
kb
Size factor that modifies the endurance limit (smaller specimens have greater endurance limit than larger ones).
kc
Loading factor that modifies the endurance limit (depends on the main type of loading applied to the specimen).
kd
Temperature factor that modifies the endurance limit (greater temperatures bring down Sf).
ke
Miscellaneous factors that modify the endurance limit (e.g. corrosion). Be careful not to include the stress
concentration factor Kt or Kf in the value of ke, since Kt and Kf are already taken care of in the stress calculation.
SN Graph
SN curve of the material, considering the endurance limit modifiers ka, kb, kc, kd and ke. The graph is updated after
changes in its parameters only when the Graph | Redraw command is used. To expand or shrink the graph, just
double-click on it.
40
Damage Curve Tab
User Damage Curve
Curve relating combinations of alternate (Sa) and mean stresses (Sm) that lead to a same life. This equation has the
form (Sa/Sf)^m+(Sm/Sref)^n=1, Sf being the corrected endurance limit (Sf=ka*kb*kc*kd*ke*Sf’), and the user can
define any values for m, n and Sref. In the Goodman curve for instance the values are m=n=1 and Sref is the ultimate
strength Su.
User Damage Curve Name
Name of the user defined SaSm damage curve.
Alternate Stress Exponent
Alternate stress exponent m of the user defined SaSm damage curve (Sa/Sf)^m+(Sm/Sref)^n=1.
Mean Stress Exponent
Mean stress exponent n of the user defined SaSm damage curve (Sa/Sf)^m+(Sm/Sref)^n=1.
Reference Mean Strength
Reference mean strength Sref of the user defined SaSm damage curve (Sa/Sf)^m+(Sm/Sref)^n=1. In general its value
is chosen as Su or Sy.
Sm < 0
Slope of the SaSm curve when the mean stress is negative. This slope is measured as a percentage of the Goodman
curve slope. If 0% is chosen then the SaSm curve is flat for negative mean stresses. When this percentage is
increased the user is valorizing the beneficial influence of compressive mean stresses (which can extend life).
User Damage Curve Help Button
Shows a help window with some basic explanations about the User Damage Curve.
41
SaSm Graph
Graph showing the damage curve relating alternate and mean stresses (Sa and Sm pairs that cause the same
damage) for different models: Goodman, Gerber, Soderberg and the user defined damage curve. Since these curves
can be plotted for any reference life in cycles, ViDa by default plot them for a life associated with the elbow of the SN
curve (1,000,000 cycles for most steels). By clicking on the menu command Graph | Define Life for SaSm the user
can change this default plotting value to see the damage curves for any desired life.
Use Kt in Smean Option
Option to apply the stress concentration factor on the mean stress (not only on the alternate component). Some
theories suggest that the Kt value should only be applied to the alternate stress and ignored for the mean, so in this
case just turn this option off.
Plot Soderberg Option
Option to plot or not to plot the data calculated using the Soderberg damage curve. Since Soderberg is very
conservative it calculates damages much greater than the other curves would predict, which makes difficult the
visualization in the graphs. In this case just turn this option off and only the Goodman, Gerber and user damage curve
results are plotted.
Initial Damage
Initial damage value, before the loading history, using the Palmgreen-Miner rule.
End of Life at Damage
Total damage value that characterizes failure of the specimen. The Palmgreen-Miner rule suggests a total damage
value of 1 for the end of life, but other values can be chosen by the user.
Consider Residual Stresses Option
Option that considers residual stresses in the SN life calculation. The program needs to draw hysteresis loops in order
to consider residual stresses accurately, which increases the complexity of the calculations. The user can also enter an
initial residual stress value.
Initial Residual Stress
Initial value of the residual stress on the specimen (use negative values for compressive residual stresses). Residual
stresses are only considered in the life calculation if the Consider Residual Stresses Option is on.
Plot Loops
Range of hysteresis loops that the user wants to plot for visualization purposes. This range doesn’t affect the
calculations (the program needs to calculate ALL the hysteresis loops in order to consider residual stresses accurately).
Note that residual stresses are only considered in the life calculation if the Consider Residual Stresses Option is on.
Points for Calculation and Plotting
Resolution in number of points of each hysteresis loop, for calculation accuracy and plotting purposes. For calculation,
40 points is in general a good choice. If you’re plotting too many hysteresis loops you might have to reduce the number
of plotting points for each loop.
Linear / Neuber Option
Strain concentration theory used when considering stress concentration factors on hysteresis loops. Linear theory
considers Ke=Kt (strain concentration Ke is equal to Kt), while Neuber theory uses Ke*Ks=Kt^2.
Kt
Stress concentration factor of the specimen (relating the nominal loading to the stresses at the notch root). Its value
can also be calculated using the Calculate | Kt | Typical or Calculate | Kt | Stored commands.
q
Notch sensitivity factor, which is used to calculate the fatigue or effective stress concentration factor Kf=1+q*(Kt-1).
Calculate Kt Button | Typical Command
Goes to the Calculate Typical Stress Concentration Factor (Kt) Window, where the user can calculate the value of Kt
for Notched/Filleted Bars or Shafts of any dimensions.
Calculate Kt Button | Stored Command
Goes to the Smart Calculator window, where the user can calculate the value of Kt using the equations from the Kt
Equations Database (or any other equation defined by the user).
Calculate q (Notch Sensitivity) Button
Goes to the Calculate Notch Sensitivity (q) for Steels and Alumina Window, where the user can calculate q for steels or
alumina given the notch radius and Su.
OK Button
Calculates the damage using the SN Method for the Loading Window loadings using the material properties and the
chosen options, and goes back to the Main Window.
Cancel Button
Cancels the SN Method calculation and goes back to the Main Window.
42
Calculate Life (SN) Simplified Window
Calculates the damage and remaining life using the SN Method and the loading history from the Main
Window. (The SN method is recommended only if the stress/strain history at the critical point – normally a
notch root – is elastic). The user can input the specimen characteristics (such as surface finish or
equivalent diameter to determine the values of ka, kb, kc, kd and ke), alter the material SN curve
equation, calculate and input stress concentration factors and some other options.
Some of the default data in this window comes from the Materials database and the rest is maintained from
your last calculation. Many more options are available in the extended Calculate Life (SN) window, which is
available by using the Tools | Options command in the Main Window and choosing Extended in the
Modeling tab, prior to calculating life.
After tuning the desired properties, just click on the OK button to return to the Main Window and perform
the calculations.
To check information on the available commands, please refer to the correspondent extended window.
43
Calculate Effective Diameter Window
Calculates the effective diameter of different cross sectional profiles for bending. This diameter is used in
the Calculate Life window for SN or eN methods to calculate the size factor kb (used to correct the fatigue
endurance limit Sf’).
Click on the corresponding button and enter the profile dimensions to calculate the effective diameter and
press the OK button to return to the previous window with the calculated value.
Cross Section Tabs/Drawings
Drawings of the cross section profiles of the available bending effective diameter equations.
Axis fields
Calculated effective diameter under bending on each axis of the chosen cross section. To copy any of these values to
the Effective Diameter field, click on the desired Axis field.
Effective Diameter
Shows the calculated effective diameter for the chosen cross section profile.
OK Button
Returns to the previous window and copies the Calculated Diameter value to the Equivalent Diameter field in the
previous window.
Cancel Button
Returns to the previous window without carrying the Calculated Diameter value.
44
Calculate Typical Stress Concentration Factor (Kt) Window
Calculates the stress concentration factor (Kt) for typical specimens. Clicking on the desired specimen
category, 3 or 4 figures will appear on the screen. Enter the values of w (or D), d and r and click on the
figure with the desired specimen type. ViDa will then calculate the value of Kt and plot the Kt equation that
originated this calculation. The values of the notch sensitivity (q) and the effective stress concentration
factor Kf=1+q*(Kt-1) are also displayed considering that the current material is a steel or an aluminum.
Press the OK button to go back to the previous window bringing and updating the calculated values of Kt
and q (or Cancel to return without carrying these values).
Specimen Drawing
Drawing of the available specimen types for that chosen specimen group. Just click on the desired drawing to see its
Kt graph and calculate the values of Kt, q and Kf.
Kt Graph
Graph showing the Kt values for a specific specimen type as a function of its dimensions.
Variables
Values of the dimensions of the specimen drawings, used to calculate Kt.
Radius (r)
Value of r on the specimen drawings, used to calculate Kt, q and Kf.
Su
Ultimate strength of the material, used to calculate q. The default value is loaded from the Materials Database, but it
can be changed by the user.
Calculated Kt, q and Kf
Calculated values of Kt (stress concentration factor), q (notch sensitivity) and Kf (fatigue or effective stress
concentration factor, Kf=1+q*(Kt-1)). These values are automatically calculated for the chosen specimen drawing using
45
the variables values, r and Su. The value of q is calculated from r and Su and taking into account if the current material
is a steel or an aluminum (for other types of material the steel values are used).
OK Button
Returns to the previous window and copies the Calculated Kt value to the Kt field in the previous window. If the
previous window is the Calculate Life (SN) window, then the value of q is also carried.
Cancel Button
Returns to the previous window without carrying the Calculated Kt value.
46
Calculating Stored Stress Concentration Factors (Kt)
You can calculate the stress concentration factor (Kt) from stored Kt equations in the database, just choose
the desired equation name from a list. You can also set the variable values in the Variables Table by
clicking on the desired cell, or edit the equation in the Formula box. ViDa automatically calculates the
value of Kt for the chosen equation.
Kt list
List of names of the available Kt equations from the Equations Database. Just click on the desired name to load its
Formula.
Formula
Formula of the Kt equation loaded from the Equations Database through the Name list. The formula can also be edited
by the user.
Save As New Button
Adds the Kt equation present in the Kt Formula field to the Equations Database. The user will be asked to enter a
name for this new equation.
Variables Table
Table containing variables that can be set by the user. To set a variable, just click on it and type its new value. If these
variables are present in the Kt Formula then their values are used in the calculations.
Open (Variables) Button
Loads a previously saved Variables Table file (*.var) containing the values of all variables from the Variables Table.
Save (Variables) Button
Saves the values of the variables from the Variables Table to a Variables Table file (*.var).
Calculated Kt
Calculated value of Kt (stress concentration factor). This value is automatically calculated for the chosen equation
using the Variables Table values.
OK Button
Returns to the previous window and copies the Calculated Kt value to the Kt field in the previous window.
Cancel Button
Returns to the previous window without carrying the Calculated Kt value.
47
Calculate Notch Sensitivity (q) Window
Calculates the notch sensitivity (q). Type the value of the notch radius and ViDa will automatically
calculate the value of q depending on your choice of material type in the Material option.
Press the OK button to go back to the previous window bringing and updating the calculated value of q
(or Cancel to return without carrying this value).
q Graph
Shows the notch sensitivity values as a function of the Notch Radius and Su.
Su
Ultimate strength of the material, used to calculate q. The default value is loaded from the Materials Database, but it
can be changed by the user.
Notch Radius
Radius of the notch on the specimen, used to calculate q.
Material Option
Option of material type for calculating q. Note that q doesn’t depend on Su for Alumina.
q
Calculated value of the Notch Sensitivity for steels or alumina given the Notch Radius and Su.
OK Button
Returns to the Calculate Life (SN) window carrying the Calculated q value.
Cancel Button
Returns to the previous window without carrying the Calculated q value.
48
Calculate Life of Welded Structures Window
Calculates the damage and remaining life of welded structures using the IIW (International Institute of
Welding) Method and the loading history from the Main Window. The user can input the weld joint class
(which is the stress range in MPa that leads to a 2,000,000 cycle life to that specific weld type), the
exponent m from the IIW equation N(cycles)=2,000,000*([weld class]/[applied stress])^m, the number of
cycles above which there is no fatigue damage, and even a reliability factor for the calculations.
This window also contains the weld joint class values for many typical weld joints. Just click on the
drawing of the desired weld joint to load its class and description.
After tuning the desired properties, just click on the OK button to return to the Main Window and perform
the calculations.
Calculation Title
Title of the calculation that is about to be performed. This is an optional field, useful to identify and compare results
from different calculations in the Calculation Logbook Window.
Exponent m
Exponent m from the International Institute of Welding (IIW) equation N(cycles)=2,000,000*([weld class]/[applied
stress])^m. The default value of m is 3.0.
Fatigue Limit N
Number of cycles above which there is no fatigue damage for the Weld Joint. The default value of N is 5,000,000.
Initial Damage
Initial damage value, before the loading history, using the Palmgreen-Miner rule.
End Life at Damage
Total damage value that characterizes failure of the weld. The Palmgreen-Miner rule suggests a total damage value of
1 for the end of life, but other values can be chosen by the user.
49
Reliability Factor R
Reliability of the calculation. ViDa uses by default a 97.7% reliability (as defined by the IIW) for the
Welded Structures calculations, but the user can also choose another reliability factor.
Consider SN Curve Elbow Option
Option to consider the elbow in the SN curve, which defines no fatigue damage for number of cycles greater than the
fatigue limit N. If this option is off then the elbow is ignored.
melb
Value of the m exponent of the Weld SN Curve after the elbow (set melb = 0 to ignore this option).
Weld Joint Class
Class of the Weld Joint to be used in the life calculation according to the International Institute of Welding (IIW) data.
The class is defined as the alternated stress applied to the specimen associated to a 2,000,000 cycles life for the weld.
Click on the Weld Joint buttons to retrieve the class values of common Weld Joints.
Weld Joint Description
Description of the chosen Weld Joint.
Weld Joint Buttons
Buttons showing typical weld joints. Just click on each Weld Joint Button to load its class and description.
OK Button
Calculates life for the chosen specimen and weld joint using the IIW Method for the Loading Window loadings and the
chosen options, and goes back to the Main Window.
Cancel Button
Cancels the Weld Joint life calculation and goes back to the Main Window.
50
Calculate Life (eN) Extended Window
Calculates the damage and remaining life using the eN Method (recommended in the presence of plastic
deformations at the critical point, normally a notch root) and the loading history from the Main Window.
The user can input specimen characteristics (such as surface finish or equivalent diameter to determine the
values of ka, kb, kc, kd and ke to alter the elastic component of the eN curve), alter the material eN curve
equation, calculate and input stress concentration factors, choose to or not to calculate by following and
plotting the hysteresis loops and many other options.
Some of the default data in this window comes from the Materials database and the rest is maintained from
your last calculation. A simplified Calculate Life (eN) window (recommended for beginners) is also available
by using the Tools | Options command in the Main Window and selecting Simplified in the Modeling
tab, prior to calculating life.
After tuning the desired properties, just click on the OK button to return to the Main Window and perform
the calculations.
eN Curve Tab
Calculation Title
Title of the calculation that is about to be performed. This is an optional field, useful to identify and compare results
from different calculations in the Calculation Logbook Window.
Sigmaf’
Elastic coefficient from Coffin-Manson’s equation (de/2 = Sigmaf’/E*(2N)^b+epsilonf’*(2N)^c).
Epsilonf’
b
Plastic coefficient from Coffin-Manson’s equation (de/2 = Sigmaf’/E*(2N)^b+epsilonf’*(2N)^c).
Elastic exponent from Coffin-Manson’s equation (de/2 = Sigmaf’/E*(2N)^b+epsilonf’*(2N)^c).
51
c
Plastic exponent from Coffin-Manson’s equation (de/2 = Sigmaf’/E*(2N)^b+epsilonf’*(2N)^c).
Calculate b, c Button | For Steels or Alumina Command
Calculates the values of the parameters b, c, Sigmaf’ and epsilonf’ of the eN curve de/2 =
Sigmaf’/E*(2N)^b+epsilonf’*(2N)^c by loading them from the Materials Database and also correcting the elastic
exponent b using the value of Sf=ka*kb*kc*kd*ke*Sf’ (the same approach used in the SN Curve).
Calculate b, c Button | Materials Database Values Command
Loads the values of the parameters b, c, Sigmaf’ and epsilonf’ of the eN curve de/2 =
Sigmaf’/E*(2N)^b+epsilonf’*(2N)^c from the Materials Database directly into the current window.
Calculate b, c Button | Experimental Points Command
Loads the values of the parameters b, c, Sigmaf’ and epsilonf’ of the eN curve de/2 =
Sigmaf’/E*(2N)^b+epsilonf’*(2N)^c from the Experimental Points tab directly into the current tab.
Consider SN Curve Elbow Option
belb
Option to consider the elbow of the SN curve (which defines no fatigue damage for stresses smaller than the corrected
endurance limit Sf=ka*kb*kc*kd*ke*Sf’) in the elastic portion of the eN curve. If this option is off then the elbow is
ignored.
Value of the b exponent of the SN Curve after the elbow (set belb = 0 to ignore this option).
Initial Damage
Initial damage value, before the loading history, using the Palmgreen-Miner rule.
End of Life at Damage
Total damage value that characterizes failure of the specimen. The Palmgreen-Miner rule suggests a total damage
value of 1 for the end of life, but other values can be chosen by the user.
Surface Finish
Surface finish of the specimen, used to automatically calculate the endurance limit modifying factor ka (the endurance
limit from the SN method is used to correct the elastic component of the eN curve).
Type of Loading
Main type of loading applied to the specimen, used to automatically calculate the endurance limit modifying factor kc
(the endurance limit from the SN method is used to correct the elastic component of the eN curve).
Effective Diameter
Specimen cross-section diameter (or effective diameter), used to automatically calculate the endurance limit modifying
factor kb (the endurance limit from the SN method is used to correct the elastic component of the eN curve).
Calculate d (Effective Diameter) Button
Goes to the Calculate Effective Diameter Window, where the user can calculate the effective diameter of various cross
section profiles under bending. This diameter is used to calculate the size factor kb (used to correct the fatigue
endurance limit Sf’, affecting the elastic component of the eN curve).
Su
Ultimate strength of the current material, used to automatically calculate the endurance limit modifying factor ka (the
endurance limit from the SN method is used to correct the elastic component of the eN curve). The default value of Su
is loaded from the Materials Database, but it can be changed by the user.
Operating Temperature
Specimen operating temperature, used to automatically calculate the endurance limit modifying factor kd (the
endurance limit from the SN method is used to correct the elastic component of the eN curve).
Sf’
ka
kb
kc
Uncorrected endurance limit of the material (alternate stress below which there is no fatigue damage). Note that the
endurance limit is a concept normally used in the SN method, but in ViDa it can also be used to correct the elastic
component of the eN curve.
Surface finish factor that modifies the endurance limit (a better surface finish increases the endurance limit). Note that
the endurance limit and its modifying factors are originally from the SN method, but in ViDa they can also be used to
correct the elastic component of the eN curve.
Size factor that modifies the endurance limit (smaller specimens have greater endurance limit than larger ones). Note
that the endurance limit and its modifying factors are originally from the SN method, but in ViDa they can also be used
to correct the elastic component of the eN curve.
Loading factor that modifies the endurance limit (depends on the main type of loading applied to the specimen). Note
that the endurance limit and its modifying factors are originally from the SN method, but in ViDa they can also be used
to correct the elastic component of the eN curve.
52
kd
ke
Temperature factor that modifies the endurance limit (greater temperatures tend to bring down the endurance limit).
Note that the endurance limit and its modifying factors are originally from the SN method, but in ViDa they can also be
used to correct the elastic component of the eN curve.
Miscellaneous factors that modify the endurance limit (e.g. corrosion). Be careful not to include the stress
concentration factor Kt or Kf in the value of ke, since Kt and Kf are already taken care of in the stress calculation. Note
that the endurance limit and its modifying factors are originally from the SN method, but in ViDa they can also be used
to correct the elastic component of the eN curve.
eN Graph
eN curve of the material and also its elastic and plastic components. The SN curve is also plotted in order to make a
comparison with the elastic component of the eN curve. The graph is updated after changes in its parameters only
when the Graph | Redraw command is used. To expand or shrink the graph, just double-click on it.
Hysteresis Loops Tab
n'
Hardening exponents of the cyclic curve (using Ramberg-Osgood equation).
k’
Hardening coefficient of the cyclic curve (using Ramberg-Osgood equation).
53
Hardening Curve
Shows the cyclic true hardening curve of the material. Note the change in color marking on the graph the value of Sy’.
To expand or shrink the graph, just double-click on it.
Strain Concentration Option
Strain concentration theory used when considering stress concentration factors on the hysteresis loops. Linear theory
considers Ke=Kt (strain concentration Ke is equal to Kt), while Neuber theory uses Ke*Ks=Kt^2.
Elastoplastic Nominal Stress
Solves the Neuber system considering that the nominal stress is elastoplastic. This option gives more accurate results
if the nominal stress is higher than Sy, but increases the computation time.
Calculate Hysteresis Loops Option
Option to or not to calculate the hysteresis loops. This option is a critical one in eN life calculations. If the option is off
then the calculations are made without calculating and constructing the hysteresis loops, just directly applying the
traditional eN equations (which can result in significant and probably non-conservative calculation errors). Especially if
you have a complex loading history, then it is strongly recommended to set this option on in addition to the Loop
Corrections Option, in order to obtain an accurate result.
Loop Corrections Option
Option to or not to correct the hysteresis loops using some experimentally proven criteria. It is highly recommended to
set this option on because uncorrected hysteresis loops (taken directly from the hysteresis loops equations) can lead to
unrealistic and probably non-conservative stress-strain predictions (see the Textbook "Fatigue Design under Complex
Loading" for more information).
Plot Cyclic S-e Curve over the Loops Option
Option to or not to plot the stress-strain cyclic curve together with the hysteresis loops, just for visualization purposes.
This curve is useful to visually compare the corrected and uncorrected hysteresis loops (set in the Loop Corrections
Option).
Rainflow of Calculated Strains Option
Option to rainflow count the calculated strains. After the strains are calculated and the correct hysteresis loops are
plotted, this option counts the peaks and valleys of the strain history using the rainflow method prior to the eN curve life
calculation. The user can also input a strain amplitude filter (in microstrains), to discard the small events that cause no
damage.
Define Loops to Plot Option
Option to define a range of hysteresis loops that the user wants to plot for visualization purposes. This range doesn’t
affect the calculations (the program needs to calculate ALL the hysteresis loops in any circumstances).
Number of Calculation Points
Resolution in number of points of each hysteresis loop for calculation accuracy purposes. In general 40 points is a good
choice.
Number of Plotting Points
Resolution in number of points of each hysteresis loop for plotting purposes. If you’re plotting too many hysteresis
loops, you might have to reduce the number of plotting points for each loop. This number does not affect the calculation
accuracy.
Hysteresis Loops Help Button
Shows a window with some useful information about hysteresis loops calculations.
Kt
Stress concentration factor of the specimen (relating the nominal loading history and the most stressed point). Its value
can also be calculated using the Calculate Kt Button | Typical or the Calculate Kt Button | Stored commands.
Calculate Kt Button | Typical Command
Goes to the Calculate Typical Stress Concentration Factor (Kt) Window, where the user can calculate the value of Kt
for Notched/Filleted Bars or Shafts of any dimensions.
Calculate Kt Button | Stored Command
Goes to the Smart Calculator window, where the user can calculate the value of Kt using the equations from the Kt
Equations Database (or any other equation defined by the user).
OK Button
Calculates damage by the eN Method, using the Loading Window loadings, the material properties and the chosen
options, and goes back to the Main Window.
Cancel Button
Cancels the eN Method calculation and goes back to the Main Window.
54
Calculate Life (eN) Simplified Window
Calculates the damage and remaining life using the eN Method (recommended in the presence of plastic
deformations at the critical point, normally a notch root) and the loading history from the Main Window.
The user can alter the material eN curve equation and calculate and input stress concentration factors. The
default eN curve data in this window comes from the Materials database and the Kt value is maintained
from your last calculation. Many more options are available in the extended Calculate Life (eN) window,
using the Tools | Options command in the Main Window and the Extended option in the Modeling tab,
prior to calculating life.
After tuning the desired properties, just click on the OK button to return to the Main Window and perform
the calculations.
To check information on the available commands, please refer to the correspondent extended window.
55
Crack Growth (da/dN) Extended Window
Calculates unidimensional crack growth using the da/dN Method and the loading history from the Main
Window. The user can input specimen characteristics (such as its total width and crack initial size), alter
the material Paris or Elber law constants or include a new da/dN or stress intensity factor equation
(which can be stored in the da/dN or KI Equations Database), input crack growth retard effects, choose to
use the RMS approach in the calculation and many other options.
Some of the default data in this window comes from the Materials database and the rest is maintained from
your last calculation. A simplified Crack Growth (da/dN) window (recommended for beginners) is also
available by using the Tools | Options command in the Main Window and choosing the Simplified option
in the Modeling tab, prior to calculating the crack growth. After tuning the desired properties, just click on
the OK button to return to the Main Window and perform the calculations.
da/dN Curve Tab
Calculation Title
Title of the calculation that is about to be performed. This is an optional field, useful to identify and compare results
from different calculations in the Calculation Logbook Window.
deltaKth (dKth)
KIc
Threshold Stress Intensity Factor of the material (value of deltaK below which the crack does not propagate). The
default value of deltaKth is loaded from the Materials Database, but it can be changed by the user (be careful with the
Elber da/dN equation since it’s very sensitive to deltaKth).
Critical (Rupture) Stress Intensity Factor of the material. The default value of KIc is loaded from the Materials
Database, but it can be changed by the user.
56
Paris Option
Option that let the user choose the Paris equation (da/dN = A*deltaK^m) among the da/dN equations he wants to use in
the crack growth calculation. Checking all options makes the program calculate crack growth independently using all
da/dN equations, but the calculation takes longer.
A (APa)
Coefficient A from the Paris equation (da/dN = A*deltaK^m). The default value of A is loaded from the Materials
Database, but it can be changed by the user.
m (mPa)
Exponent m from the Paris equation (da/dN = A*deltaK^m). The default value of m is loaded from the Materials
Database, but it can be changed by the user.
Calculate Paris Button | Materials Database Values Command
Loads the values of the A and m coefficients of the Paris da/dN equation da/dN=A*deltaK^m from the Materials
Database directly into the current window.
Calculate Paris Button | Fitted from Experimental Points Command
Loads the values of the A and m coefficients of the Paris da/dN equation da/dN=A*deltaK^m from the Experimental
Points tab in the Materials Database directly into the current window.
Calculate Paris Button | Rolfe-Barson Command
Calculates the A and m coefficients of the Paris da/dN equation da/dN=A*deltaK^m from Rolfe-Barson’s estimates that
depend only on the steel microstructure.
Elber Option
Option that let the user choose the Elber equation (da/dN = A*(deltaK-deltaKth)^m) among the da/dN equations he
wants to use in the crack growth calculation. Checking all options makes the program calculate crack growth
independently using all da/dN equations, but the calculation takes longer.
A (AEl)
Coefficient A from the Elber equation (da/dN = A*(deltaK-deltaKth)^m). The default value of A is loaded from the
Materials Database, but it can be changed by the user.
m (mEl)
Exponent m from the Elber equation (da/dN = A*(deltaK-deltaKth)^m). The default value of m is loaded from the
Materials Database, but it can be changed by the user.
Calculate Elber Button | Materials Database Values Command
Loads the values of the A and m coefficients of the Elber da/dN equation da/dN=A*(deltaK-deltaKth)^m from the
Materials Database directly into the current window.
Calculate Elber Button | Fitted from Experimental Points Command
Loads the values of the A and m coefficients of the Elber da/dN equation da/dN=A*(deltaK-deltaKth)^m from the
Experimental Points tab in the Materials Database directly into the current window.
Walker Option
Option that let the user choose the Walker equation (da/dN = A*deltaK^m / (1-R)^p) among the da/dN equations he
wants to use in the crack growth calculation. Checking all options makes the program calculate crack growth
independently using all da/dN equations, but the calculation takes longer.
Modified Walker Option
Option that let the user choose the Modified Walker equation (da/dN = A*(deltaK-deltaKth)^m / (1-R)^p) among the
da/dN equations he wants to use in the crack growth calculation. Checking all options makes the program calculate
crack growth independently using all da/dN equations, but the calculation takes longer.
p (pWa)
Exponent p from the Walker (da/dN = A*deltaK^m / (1-R)^p) and Modified Walker (da/dN = A*(deltaK-deltaKth)^m /
(1-R)^p) equations. The default value of p is loaded from the Materials Database, but it can be changed by the user.
Other Equation Option
Option that let the user choose the da/dN equation shown in the da/dN Formula field among the da/dN equations he
wants to use in the crack growth calculation. Checking all options makes the program calculate crack growth
independently using all da/dN equations, but the calculation takes longer.
Typical / Database Option
Option to use typical da/dN equations (faster computation time) or equations retrieved from the Equations Database.
Open da/dN Button
Shows the typical da/dN equation window, where the user can choose from different equations.
Fit Button
Automatically adjusts the constants of the Typical da/dN equation to the database values of Paris and Elber of the
current material.
57
da/dN Equation Name
List of names of the available da/dN equations from the Equations Database. Just click on the desired name to load its
Formula.
da/dN Formula
Formula of the da/dN equation loaded from the Equations Database through the da/dN Equation Names list. The
formula can also be edited by the user and even added to the Equations Database (by using the Add button). You can
also easily tune in the coefficients of the da/dN Formula by interactively editing the Variables Table and using the
Graph | Redraw command until the curve is visually compatible with the Paris and Elber curves in the da/dN graph.
Calculate da/dN Button
Calculates the value of da/dN for the current Formula and Variables Table values. The user is asked to input the
stress intensity factor range deltaK and the ratio R=Kmin/Kmax for which he wants to calculate the da/dN value.
Save As New da/dN Button
Adds the da/dN equation present in the da/dN Formula field to the Equations Database. The user will be asked to
enter a name for this new equation.
Equation Interpreter Help Button
Shows (just for reference) a window with the equations syntax and all the material properties that can be literally used
in the equations.
Variables Table
Table containing variables that can be set by the user. To set a variable, just click on it and type its new value. If these
variables are present in the da/dN (or KI) Formula then their values are used in the calculations.
Open (Variables) Button
Loads a previously saved Variables Table file (*.var) containing the values of all variables from the Variables Table.
Save (Variables) Button
Saves the values of the variables from the Variables Table to a Variables Table file (*.var).
da/dN Graph
da/dN curves of the material using Paris and Elber laws (and a third da/dN equation chosen by the user when using
the Extended Modeling option). Note that the value of deltaKth substantially affects the Elber law curve. The graph is
updated after changes in its parameters only after the Graph | Redraw command is used. To expand or shrink the
graph, just double-click on it.
Crack Tab
58
Initial Crack (a)
Initial size of the crack length a.
Final Value (a)
Size of the crack length a above which the calculation stops. This is one of the criteria to stop the calculations, and it
can be used for instance to calculate the number of cycles that it takes to reach a certain crack size. If you don’t want to
use this criterion, just set it to a very high value (for unidimensional crack growth, set it to greater than the specimen
width w value).
Width (w)
Width of the considered specimen (specimen dimension in the crack growth direction for unidimensional crack growth),
used in the calculation of the stress intensity factor.
Typical / Database / Charted Option
Option to use typical KI, KII or KIII equations (faster computation time), equations retrieved from the Equations
Database, or values interpolated using a chart containing the geometry factor beta for each crack size.
Open KI Button
Shows the typical KI equation window, where the user can choose from different KI equations.
Open KII,KIII Button
Shows the typical KII and KIII equation window, where the user can choose from different equations.
KI Equation Name
List of names of the available KI (stress intensity factor) equations from the Equations Database. Just click on the
desired name to load its Formula.
KI Formula
Formula of the KI (stress intensity factor) equation loaded from the Equations Database through the KI Equation
Names list. The formula can also be edited by the user and even added to the Equations Database (using the Save
As New button).
Calculate KI Button
Calculates the value of KI (stress intensity factor) for the current Formula and Variables Table values. The user is
asked to input the stress variation deltaSigma (S) for which he wants to calculate the KI value.
Save As New Button
Adds the KI (stress intensity factor) equation present in the KI Formula field to the Equations Database. The user will
be asked to enter a name for this new equation.
KI Chart
Chart containing the geometry factor beta for each crack size, which will be interpolated to calculate KI.
New / Open / Save / Number of Rows Buttons
Commands to create a new, open, save or define the number of rows of the charted KI table. The KI charts can be
loaded from *.ki files or from files generated by the Quebra Finite Element software.
View Button
Views the drawing of the specimen generated by the Quebra Finite Element software.
59
Retardation/Options Tab
Retardation Effect
Option of retardation effects due to overloads.
Retardation Effect Help Button
Shows a window with some information about the Retardation Effect models used by ViDa.
No Retardation Option
Option not to consider crack retardation effects.
Wheeler Option
Option to use the Wheeler retard effect correction. Here da/dN is multiplied by the factor (PZi/(PZol+aol-ai))^wh, where
wh is the Wheeler exponent. PZol and aol are the plastic zone and crack sizes on the overload, and PZi and ai are the
current plastic zone and crack sizes.
Modified Wheeler Option
Option to use the Modified Wheeler retard effect correction. Here deltaK is multiplied by the factor (PZi/(PZol+aolai))^whm, where whm is the Modified Wheeler exponent. PZol and aol are the plastic zone and crack sizes on the
overload, and PZi and ai are the current plastic zone and crack sizes.
da/dN Factor Option
Generalization of the Wheeler Option, where da/dN is multiplied by an arbitrary equation defined by the user. To
choose from some pre-defined equations, press the Open button next to this option.
deltaK Factor Option
Generalization of the Modified Wheeler Option, where deltaK is multiplied by an arbitrary equation defined by the user.
To choose from some pre-defined equations, press the Open button next to this option.
Effective R Option
Option to model crack retardation effects by changing the value of the load ratio R (=Kmn/Kmx) to an effective value.
To choose from some pre-defined equations (including the Willemborg model), press the Open button next to this
option.
60
Minimum Overload
Minimum overload percentage that activates the calculation with retardation effects. If the overload percentage is
smaller than this value, the retardation effects are neglected. Use the value 0% to always consider the retardation
effects.
Retardation Resolution
Percentage of (PZol-PZi) on the crack growth for which the retardation factor is recalculated (PZol is the plastic zone
on the overload and PZi is the current plastic zone). In order to speed up the calculations, the program only
recalculates the retardation factor when the crack has grown more than this percentage of the distance between the
overload and current plastic zones.
Retardation Graphs
Graphs of the retardation equations. The top graph plots the Wheeler, Modified Wheeler, da/dN Factor and deltaK
Factor, while the bottom graph plots the Effective R for different load ratios R.
Plastic Zone
Equation used to calculate the size of the plastic zone ahead of the crack tip (for retardation calculations). The user
can choose among plane stress, plane strain, or define a different factor for the equation of the plastic zone size.
Sequential Option
Option for sequential crack growth calculations. Click on this option to let ViDa calculate crack growth sequentially from
the loading history (instead of using the Root Mean Square approach).
Krms Option
Option for crack growth calculations using the Root Mean Square approach. Click on this option to let ViDa calculate a
RMS stress value of all the loading history and then integrate the da/dN equation to calculate the crack growth (instead
of sequentially calculating the crack growth for each loading). Note that this option cannot consider retardation
effects.
Resolution
For the Sequential option, this is the increase percentage of the square root of the crack size for which the Stress
Intensity Factor KI is recalculated. In order to speed up the calculations, the program only recalculates KI when the
square root of the crack size has grown more than this percentage. Typical values are in the 0.1 – 1.0% range. For the
Krms option, this resolution is the integration step of Simpson's integral rule.
Help Button
Shows a window with some information about the square root of the crack size criterion.
OK Button
Calculates crack growth using the da/dN Method for the Loading Window loadings using the material properties and
the chosen options, and goes back to the Main Window.
Cancel Button
Cancels the crack growth calculation and goes back to the Main Window.
61
Typical da/dN Curves Window
Lets the user choose from typical da/dN equations. To select the desired equation, just click on the respective
figure.
62
Typical Stress Intensity Factor Window
Lets the user choose from typical stress intensity factor equations, including KI, KII, KIII and KI 2D (for
bidimensional crack growth) equations. To select the desired equation, just click on the desired specimen.
KI Equations
63
KII and KIII Equations
KI 2D Equations
64
Crack Growth (da/dN) Simplified Window
Calculates unidimensional crack growth using the da/dN Method and the loading history from the Main
Window. The user can input specimen characteristics (such as its total width and crack initial size), alter
the material Paris or Elber law constants and choose a stress intensity factor equation (loaded from the
KI Equations Database).
Some of the default data in this window comes from the Materials database and the rest is maintained from
your last calculation. Many more options are available in the extended Crack Growth (da/dN) window,
which is available by using the Tools | Options | Simplified command in the Main Window prior to
calculating the crack growth.
After tuning the desired properties, just click on the OK button to return to the Main Window and perform
the calculations.
To check information on the available commands, please refer to the correspondent extended window.
65
Bidimensional Crack Growth (da/dN and dc/dN) Window
Calculates bidimensional crack growth using the da/dN Method (combined with elliptical cracks stress
intensity factor equations) and the loading history from the Main Window. The cracks are assumed
elliptical in shape, with semi-axis a and c. The corner crack is assumed to be a quart ellipsis, the surface
crack a semi ellipsis and the internal crack a full ellipsis. The cracks can change the a/c ratio during their
propagation, but remain elliptical.
The user can input specimen dimensions and 2D-crack characteristics (such as its initial type and
dimensions), alter the material Paris or Elber law constants or include a new da/dN equation (which is
stored in the da/dN Equations Database), input crack growth retard effects, choose to use the RMS
approach in the calculation, define desired output graphs to be plotted after the calculation and many other
options.
Some of the default data in this window comes from the Materials database and the rest is maintained from
your last calculation. This window is only available with the Extended Modeling option from the Options
Window. After tuning the desired properties, just click on the OK button to return to the Main Window and
perform the calculations.
da/dN Curve Tab
Calculation Title
Title of the calculation that is about to be performed. This is an optional field, useful to identify and compare results
from different calculations in the Calculation Logbook Window.
deltaKth (dKth)
Threshold Stress Intensity Factor of the material (value of deltaK below which the crack does not propagate). The
default value of deltaKth is loaded from the Materials Database, but it can be changed by the user (be careful with the
Elber da/dN equation since it’s very sensitive to deltaKth).
66
KIc
Critical (Rupture) Stress Intensity Factor of the material. The default value of KIc is loaded from the Materials
Database, but it can be changed by the user.
Elber Option
Option that let the user choose the Elber equation (da/dN = A*(deltaK-deltaKth)^m) among the da/dN equations he
wants to use in the crack growth calculation. Checking all options makes the program calculate crack growth
independently using all da/dN equations, but the calculation takes longer.
A (AEl)
Coefficient A from the Elber equation (da/dN = A*(deltaK-deltaKth)^m). The default value of A is loaded from the
Materials Database, but it can be changed by the user.
m (mEl)
Exponent m from the Elber equation (da/dN = A*(deltaK-deltaKth)^m). The default value of m is loaded from the
Materials Database, but it can be changed by the user.
Calculate A, m (Elber) Button | Materials Database Values Command
Loads the values of the A and m coefficients of the Elber da/dN equation da/dN=A*(deltaK-deltaKth)^m from the
Materials Database directly into the current window.
Calculate A, m (Elber) Button | Fitted from Experimental Points Command
Loads the values of the A and m coefficients of the Elber da/dN equation da/dN=A*(deltaK-deltaKth)^m from the
Experimental Points tab in the Materials Database directly into the current window.
Modified Walker Option
Option that let the user choose the Modified Walker equation (da/dN = A*(deltaK-deltaKth)^m / (1-R)^p) among the
da/dN equations he wants to use in the crack growth calculation. Checking all options makes the program calculate
crack growth independently using all da/dN equations, but the calculation takes longer.
p (pWa)
Exponent p from the Modified Walker (da/dN = A*(deltaK-deltaKth)^m / (1-R)^p) equations. The default value of p is
loaded from the Materials Database, but it can be changed by the user.
Other Equation Option
Option that let the user choose the da/dN equation shown in the da/dN Formula field among the da/dN equations he
wants to use in the crack growth calculation. Checking all options makes the program calculate crack growth
independently using all da/dN equations, but the calculation takes longer.
Typical / Database Option
Option to use typical da/dN equations (faster computation time) or equations retrieved from the Equations Database.
Open da/dN Button
Shows the typical da/dN equation window, where the user can choose from different equations.
Fit Button
Automatically adjusts the constants of the Typical da/dN equation to the database values of Paris and Elber of the
current material.
da/dN Equation Name
List of names of the available da/dN equations from the Equations Database. Just click on the desired name to load its
Formula.
da/dN Formula
Formula of the da/dN equation loaded from the Equations Database through the da/dN Equation Names list. The
formula can also be edited by the user and even added to the Equations Database (by using the Add button). You can
also easily tune in the coefficients of the da/dN Formula by interactively editing the Variables Table and using the
Graph | Redraw command until the curve is visually compatible with the Paris and Elber curves in the da/dN graph.
Calculate da/dN Button
Calculates the value of da/dN for the current Formula and Variables Table values. The user is asked to input the
stress intensity factor range deltaK and the ratio R=Kmin/Kmax for which he wants to calculate the da/dN value.
Save As New (da/dN) Button
Adds the da/dN equation present in the da/dN Formula field to the Equations Database. The user will be asked to
enter a name for this new equation.
Equation Interpreter Help Button
Shows (just for reference) a window with the equations syntax and all the material properties that can be literally used
in the equations.
67
Variables Table
Table containing variables that can be set by the user. To set a variable, just click on it and type its new value. If these
variables are present in the da/dN (or KI) Formula then their values are used in the calculations.
Open (Variables) Button
Loads a previously saved Variables Table file (*.var) containing the values of all variables from the Variables Table.
Save (Variables) Button
Saves the values of the variables from the Variables Table to a Variables Table file (*.var).
da/dN Graph
da/dN curves of the material using Paris and Elber laws (and a third da/dN equation chosen by the user when using
the Extended Modeling option). Note that the value of deltaKth substantially affects the Elber law curve. The graph is
updated after changes in its parameters only after the Graph | Redraw command is used. To expand or shrink the
graph, just double-click on it.
Crack Tab
Initial Crack (a)
Initial size of the crack length a.
Final Value (a)
Size of the crack length a above which the calculation stops. This is one of the criteria to stop the calculations, and it
can be used for instance to calculate the number of cycles that it takes to reach a certain crack size. If you don’t want to
use this criterion, just set it to a very high value.
Initial Crack (c)
Initial size of the crack length c (see the Crack Type Drawings).
Final Value (c)
Size of the crack length c above which the calculation stops. This is one of the criteria to stop the calculations, and it
can be used for instance to calculate the number of cycles that it takes to reach a certain crack size. If you don’t want to
use this criterion, just set it to a very high value (e.g. greater than the specimen width w value).
68
Typical / Database Option
Option to use typical KI 2D equations (faster computation time) or equations retrieved from the Equations Database.
Open KI Button
Shows the typical KI 2D equation window, where the user can choose from different KI equations.
KI Equation Name
List of names of the available KI 2D (stress intensity factor) equations from the Equations Database. Just click on the
desired name to load its Formula.
KI Formulas
Formulas of the KI 2D (stress intensity factor) equation in a and c loaded from the Equations Database through the KI
Equation Names list. The formula can also be edited by the user and even added to the Equations Database (using
the Save As New button).
Calculate KI Button
Calculates the value of KI 2D (stress intensity factor) in a and c for the current Formula and Variables Table values.
The user is asked to input the stress variation deltaSigma (S) for which he wants to calculate the KI value.
Save As New Button
Adds the KI 2D (stress intensity factor) equation present in the KI Formula fields to the Equations Database. The user
will be asked to enter a name for this new equation.
Tension / Bending / Pressure Factor
Factor by which the loadings of the Loading Window are multiplied and considered as Tension / Bending / Pressure
Stresses applied to the specimen (see the red arrows in the Crack Type Drawings). If this factor is 1 then the loading
history is used as these stresses, if it’s zero then these stresses are not considered. Use these values to combine
Tension / Bending and Pressure loadings.
Retardation/Options Tab
69
Retardation Effect
Option of retardation effects due to overloads.
Retardation Effect Help Button
Shows a window with some information about the Retardation Effect models used by ViDa.
No Retardation Option
Option not to consider crack retardation effects.
Wheeler Option
Option to use the Wheeler retard effect correction. Here da/dN is multiplied by the factor (PZi/(PZol+aol-ai))^wh, where
wh is the Wheeler exponent. PZol and aol are the plastic zone and crack sizes on the overload, and PZi and ai are the
current plastic zone and crack sizes.
Modified Wheeler Option
Option to use the Modified Wheeler retard effect correction. Here deltaK is multiplied by the factor (PZi/(PZol+aolai))^whm, where whm is the Modified Wheeler exponent. PZol and aol are the plastic zone and crack sizes on the
overload, and PZi and ai are the current plastic zone and crack sizes.
da/dN Factor Option
Generalization of the Wheeler Option, where da/dN is multiplied by an arbitrary equation defined by the user. To
choose from some pre-defined equations, press the Open button next to this option.
deltaK Factor Option
Generalization of the Modified Wheeler Option, where deltaK is multiplied by an arbitrary equation defined by the user.
To choose from some pre-defined equations, press the Open button next to this option.
Effective R Option
Option to model crack retardation effects by changing the value of the load ratio R (=Kmn/Kmx) to an effective value.
To choose from some pre-defined equations (including the Willemborg model), press the Open button next to this
option.
Minimum Overload
Minimum overload percentage that activates the calculation with retardation effects. If the overload percentage is
smaller than this value, the retardation effects are neglected. Use the value 0% to always consider the retardation
effects.
Retardation Resolution
Percentage of (PZol-PZi) on the crack growth for which the retardation factor is recalculated (PZol is the plastic zone
on the overload and PZi is the current plastic zone). In order to speed up the calculations, the program only
recalculates the retardation factor when the crack has grown more than this percentage of the distance between the
overload and current plastic zones.
Retardation Graphs
Graphs of the retardation equations. The top graph plots the Wheeler, Modified Wheeler, da/dN Factor and deltaK
Factor, while the bottom graph plots the Effective R for different load ratios R.
Plastic Zone
Equation used to calculate the size of the plastic zone ahead of the crack tip (for retardation calculations). The user
can choose among plane stress, plane strain, or define a different factor for the equation of the plastic zone size.
Sequential Option
Option for sequential crack growth calculations. Click on this option to let ViDa calculate crack growth sequentially from
the loading history (instead of using the Root Mean Square approach).
Krms Option
Option for crack growth calculations using the Root Mean Square approach. Click on this option to let ViDa calculate a
RMS stress value of all the loading history and then integrate the da/dN equation to calculate the crack growth (instead
of sequentially calculating the crack growth for each loading). Note that this option cannot consider retardation
effects.
Resolution
For the Sequential option, this is the increase percentage of the square root of the crack size for which the Stress
Intensity Factor KI is recalculated. In order to speed up the calculations, the program only recalculates KI when the
square root of the crack size has grown more than this percentage. Typical values are in the 0.1 – 1.0% range. For the
Krms option, this resolution is the integration step of Simpson's integral rule.
Help Button
Shows a window with some information about the square root of the crack size criterion.
70
Graph 1 Option
Option to plot or not the Damage Curve / 2D Crack Graph in the Main Window.
Graph 1 Data
List of the fields that can be plotted in the Damage Curve / 2D Crack Graph in the Main Window after the
bidimensional crack growth calculations.
Graph 1 Sampling
Sampling rate of the events (or ½ cycles) to be plotted in the Damage Curve / 2D Crack Graph in the Main Window
after the bidimensional crack growth calculations.
Graph 2 Option
Option to plot or not the Elliptic Cracks Graph in the Main Window.
Graph 2 Data
List of the fields that can be plotted in the Hysteresis Loops / Elliptic Cracks Graph in the Main Window after the
bidimensional crack growth calculations. If the ‘Cracks’ value is chosen from the list, then the semi-elliptical crack
fronts are plotted.
Graph 2 Sampling
Sampling rate of the events (or ½ cycles) to be plotted in the Hysteresis Loops / Elliptic Cracks Graph in the Main
Window after the bidimensional crack growth calculations.
OK Button
Calculates bidimensional crack growth using the da/dN Method for the Loading Window loadings using the material
properties and the chosen options, and goes back to the Main Window.
Cancel Button
Cancels the bidimensional crack growth calculation and goes back to the Main Window.
71
Calculation Logbook Window
Stores the total damage and the residual life of the specimen (or the average da/dN and the total crack
growth for crack growth calculations) for all the calculations performed by ViDa in the current session. The
Calculation Title field in the calculation windows such as the Calculate Life (SN) window is also stored in
order to easily compare the results of different calculations. Note that if the Loading Time is not set in the
Main Window then the residual life is not added to the Calculation Logbook (since it cannot be
calculated).
This window is a very useful tool to compare similar calculations with different option settings from the
life/crack growth calculation windows. The tables can also be saved or loaded from a file (as a *.log file)
or printed by the user, using the menu commands of the Main Window when the Logbook window is
focused.
Table
Tables that store the total damage and the residual life of the specimen (or the average da/dN and the total crack
growth for crack growth calculations) for all the calculations performed by ViDa in the current session. Just double-click
on the title cells to edit its contents. Double-click on the internal cells to see the Memo of each calculation (the
calculation parameters used in each case).
Print Memo
Option to print the Memo column of the table. To print the table, use the File | Print command from the main menu.
SN Tab
Tab containing the Table with the SN Method life calculation results.
IIW/ECCS Tab
Tab containing the Table with the Welded Structures life calculation results.
eN Tab
Tab containing the Table with the eN Method life calculation results.
da/dN Tab
Tab containing the Table with the unidimensional crack growth calculation results.
da/dN (2D) Tab
Tab containing the Table with the bidimensional crack growth calculation results.
72
Calculate Equivalent Stress Window
Tridimensional Peaks and Valleys Tab
Calculates equivalent stresses for a list of 3D-stresses (with normal and shear components). There are
4 ways to calculate these equivalent stresses: (i) Mises criterion, (ii) Tresca criterion, (iii) Maximum
Stress (considering changes in sign for alternating stresses) and (iv) Maximum Absolute Stress
(neglecting changes in sign for the stresses).
The user can also include individual stress concentration factors for each stress component prior to the
calculation. The 3D-stresses Peak and Valley Table can be saved to or loaded from a file. The
calculation results can be Transferred to a new Loading Window in the Main Window.
Peak/Valley Type Tab
Lets the user choose between calculations from 3D tensor components or from Rosette measurements. If the Rosette
option is chosen, then the Calculate 3D Equivalent Stress Window ‘turns into’ the Calculate Rosette Equivalent Stress
Window.
Tridimensional Table
Table from the Calculate 3D Equivalent Stress Window containing Peak/Valley stress or strain loading histories for all 6
tensor components XX, YY, ZZ, XY, XZ and YZ. This table is the input for equivalent loading history calculations.
Table Option
Option that defines if the values from the Tridimensional and Peak/Valley tables represent stresses (in MPa or ksi) or
strains (in microstrains).
Kt
Stress concentration factor for each component of the 3D tensor, used in the equivalent history calculation.
73
Input / Output Graph
Graph that shows the input 3D tensor components and the output equivalent Peaks and Valleys. The values are
plotted only after the calculation.
New Button
Clears the Tridimensional Table.
Open Command
Loads a Peak/Valley file (*.pic) into one or more of the columns of the Tridimensional Table (for XX, YY, ZZ, XY, XZ
or YZ) or Rosette Table (for A, B or C). Just select any cells from the columns where you want to load the history and
press the Open Button. You can also load a Tridimensional Peak/Valley file (file extension *.p3d), which contains all
the Tridimensional Table columns XX, YY, ZZ, XY, XZ and YZ. You can also load a Rosette Peak/Valley file (file
extension *.ros), which contains all the Rosette Table columns A, B and C (see the Calculate Rosette Equivalent
Stress Window).
Save Button
Saves the Tridimensional Table as a Tridimensional Peak/Valley file (file extension *.p3d), which contains all the
Tridimensional Table columns XX, YY, ZZ, XY, XZ and YZ. In the Calculate Rosette Equivalent Stress tab this
command saves the Rosette Table as a Rosette Peak/Valley file (*.ros) instead.
Edit Button
Shows a Pop-up menu with commands to edit the Tridimensional Table. For more information on the Edit
commands, se the Edit menu in the Main Window.
Calculate Button
Shows a Pop-up menu with the following commands:
Mises
Tresca
Maximum Principal Stress
Maximum Absolute Principal Stress
Calculate Button | Mises Command
Calculates an equivalent Peak/Valley history from the Tridimensional Table values using the distortion-energy
(Mises) criterion. Note that even though the Mises criterion calculates absolute values, ViDa includes a sign in the
equivalent Peak/Valley history. This sign is fundamental when calculating fatigue life, otherwise the tensioncompression information would be lost.
Calculate Button | Tresca Command
Calculates an equivalent Peak/Valley history from the Tridimensional Table values using the maximum shear-stress
(Tresca) criterion.
Calculate Button | Maximum Principal Stress Command
Calculates the Maximum Principal Stresses from the Tridimensional Table values and puts the result in the
Equivalent Peak/Valley Table. The Maximum Principal Stress is the greatest value among the 3 principal stresses
(e.g. if Sx=-20, Sy=-5, Sz=10 then the MPS is 10). This command is very useful for crack growth calculations, since the
crack tends to grow in the maximum tensile stress direction (the magnitude of compressive stresses doesn’t influence
crack growth).
Calculate Button | Maximum Absolute Principal Stress Command
Calculates the Maximum Absolute Principal Stresses from the Tridimensional Table values and puts the result in
the Equivalent Peak/Valley Table. The Maximum Absolute Principal Stress is the greatest value among the
absolute values of the 3 principal stresses (e.g. if Sx=-20, Sy=-5, Sz=10 then the MPS is -20).
Equivalent Peak / Valley Table
Peak/Valley table containing the output from equivalent loading history calculations. The components of the
Tridimensional table are combined (using Mises, Tresca, ...) and the resulting history is shown here.
Transfer Button
Copies the calculated Equivalent Peak / Valley Table values to a new Loading Window on the Main Window.
Exit Button
Exits the Calculate 3D Equivalent Stress Window and goes back to the Main Window.
74
Rosette Peaks and Valleys Tab
Calculates equivalent stresses and strains for a list of strain triplets measured from a rectangular or
delta Rosette. The user can calculate the maximum or minimum equivalent stresses/strains, their principal
direction angle or the projected stresses/strains onto a user defined direction angle.
The Rosette Peak and Valley Table can be saved to or loaded from a file. The calculation results can
be copied to a new Loading Window in the Main Window.
Peak/Valley Type Option
Lets the user choose between calculations from 3D tensor components or from Rosette measurements. If the
Tridimensional option is chosen, then the Calculate Rosette Equivalent Stress Window turns into the Calculate 3D
Equivalent Stress Window.
Rosette Table
Table from the Calculate Rosette Equivalent Stress Window containing Peak/Valley strain loading histories (in
microstrains) for all 3 components A, B and C. This table is the input for equivalent loading history calculations.
Rectangular Rosette Tab
Option to consider Rectangular Rosettes in the calculations. The drawing shows the locations of the A, B and C strain
components.
Delta Rosette Tab
Option to consider Delta Rosettes in the calculations. The drawing shows the locations of the A, B and C strain
components.
75
Poisson
Poisson coefficient of the current material, used to transform the Rosette strain history into an equivalent history.
The default Poisson coefficient is loaded from the Materials Database, but it can be changed by the user prior to the
calculations.
E (Young)
Young modulus of the current material, used to transform the Rosette strain history into an equivalent history. The
default Young modulus is loaded from the Materials Database, but it can be changed by the user prior to the
calculations (be careful with the units!).
Direction
Direction to which the stresses or strains will be projected using the Calculate Button | Projected Strain (or Stress)
commands from the menu. The direction is measured counter-clockwise in degrees, starting from the X axis (see
Rectangular and Delta Rosette drawings).
Output Graph
Graph that shows the calculated equivalent Peaks and Valleys.
New Button
Clears the Rosette Table.
Open Command
Loads a Peak/Valley file (*.pic) into one or more of the columns of the Tridimensional Table (for XX, YY, ZZ, XY, XZ
or YZ) or Rosette Table (for A, B or C). Just select any cells from the columns where you want to load the history and
press the Open Button. You can also load a Rosette Peak/Valley file (file extension *.ros), which contains all the
Rosette Table columns A, B and C, or you can load a Tridimensional Peak/Valley file (file extension *.p3d), which
contains all the Tridimensional Table columns XX, YY, ZZ, XY, XZ and YZ (see the Calculate 3D Equivalent Stress
Window).
Save Button
Saves the Rosette Peak/Valley file (file extension *.ros), which contains all the Rosette Table strains A, B and C. In
the Calculate 3D Equivalent Stress Window this command saves the Tridimensional Table as a Tridimensional
Peak/Valley file (*.p3d) instead.
Edit Button
Shows a Pop-up menu with commands to edit the Rosette Table. For more information on the Edit commands, se the
Edit menu in the Main Window.
Calculate Button
Shows a Pop-up menu with the following commands:
Maximum Strain
Minimum Strain
Projected Strain
________________
Maximum Stress
Minimum Stress
Projected Stress
________________
Principal Direction
Calculate Button | Maximum Strain Command
Calculates the Maximum Principal Strain for a Rectangular (or Delta) Rosette using the measured strain values from
the Rosette Table.
Calculate Button | Minimum Strain Command
Calculates the Minimum Principal Strain for a Rectangular (or Delta) Rosette using the measured strain values from
the Rosette Table.
Calculate Button | Projected Strain Command
Calculates the Projected Principal Strain in the direction defined by the Direction field for a Rectangular (or Delta)
Rosette using the measured strain values from the Rosette Table.
Calculate Button | Maximum Stress Command
Calculates the Maximum Principal Stress for a Rectangular (or Delta) Rosette using the measured strain values from
the Rosette Table, the Poisson coefficient and the Young modulus (E) of the current material.
Calculate Button | Minimum Stress Command
Calculates the Minimum Principal Stress for a Rectangular (or Delta) Rosette using the measured strain values from
the Rosette Table, the Poisson coefficient and the Young modulus (E) of the current material.
76
Calculate Button | Projected Stress Command
Calculates the Projected Principal Stress in the direction defined by the Direction field for a Rectangular (or Delta)
Rosette using the measured strain values from the Rosette Table, the Poisson coefficient and the Young modulus
(E) of the current material.
Calculate Button | Principal Direction Command
Calculates the direction of the Maximum Principal Strains (in degrees) for a Rectangular (or Delta) Rosette using
the measured strain values from the Rosette Table. Use this command to get an idea of the average direction of the
main loadings in your history. You might want after to project the strains or stresses in this average direction using the
Direction field and the Calculate | Rectangular (or Delta) | Projected Strain or Calculate | Rectangular (or Delta) |
Projected Stress commands.
Equivalent Peak / Valley Table
Peak/Valley table containing the output from equivalent loading history calculations. The components of the Rosette
table are combined and the resulting history is shown here.
Transfer Button
Copies the Equivalent Peak / Valley Table values to a new Loading Window on the Main Window.
Exit Button
Exits the Calculate Rosette Equivalent Stress Window and goes back to the Main Window, without transferring the
Equivalent Peak/Valley Table.
77
Smart Calculator Window
Alphanumeric and RPN calculator that computes any formula using the material properties and userdefined variables. Some basic Mechanics of Solids equations are also embedded in the calculator and
computed results can be used to multiply the loadings in the Loading Window. The Smart Calculator
also has direct links to the Calculate Stress Concentration Factor (Kt) window to compute and import the
values of Kt, q and Kf=1+q*(Kt-1) into the calculations, and you can load any equation from the Kt, KI and
da/dN Equations Database.
Numeric Option
Sets the Smart Calculator as a RPN (Reversed Polish Notation) numeric calculator, with 4 registers X, Y, Z and T.
Symbolic Option
Sets the Smart Calculator as a Symbolic calculator, with a Formula field where the user can enter any symbolic
equation. By using the Calculate (SI or ksi) buttons, the Formula is evaluated and the result is shown in the X field.
78
Material Tab
Tab containing buttons associated with the properties of the current material. Click on each button to show its
numerical value (for the Numeric option) or to write the property name on the Formula field (for the Symbolic option).
User and Values Tabs (Variables Table)
Table containing variables that can be set by the user. To set a variable, just click on it and type its new value. If these
variables are present in the Formula field then their values are used in the calculations.
Formula
Equation that will be computed in the Smart Calculator. This equation may include any variable from the Variables
Table, any material property or even mathematical functions (click on the Equation Interpreter Help Button for more
information).
X (Result)
Result of the calculation using the equation in the Formula field, material properties and Variables Table values.
Equation Interpreter Help Button
Shows a help window with all the variables, material properties and mathematical functions that can be used in the
Formula field of the Smart Calculator.
C (Clear) Button
Clears the Formula field (for the Symbolic option), or the X, Y, Z and T registers (for the Numeric option).
Kt / Kf Button
Goes to the Calculate Typical Stress Concentration Factor (Kt) Window, where the user can calculate the value of Kt
(or Kf) for Notched/Filleted Bars or Shafts of any dimensions. After pressing OK the program returns to the Smart
Calculator Window carrying the Kt (or Kf) value and typing it in the Formula field on the cursor position (if some letters
are highlighted, then they’re deleted and replaced by the value).
q Button
Goes to the Calculate Notch Sensitivity (q) for Steels and Alumina Window, where the user can calculate q for steels or
alumina given the notch radius and Su. After pressing OK the program returns to the Smart Calculator Window carrying
the q value and typing it in the Formula field on the cursor position (if some letters are highlighted, then they’re deleted
and replaced by the q value).
Normal / Bending / Torsion / Shear Button
Writes the basic formula of Normal (or Bending or Torsion or Shear) stress in the Formula field on the cursor
position (if some letters are highlighted, then they’re deleted and replaced by the formula).
Mises / Tresca Button
Writes the basic formula of the Mises (or Tresca) criterion in the Formula field on the cursor position (if some letters
are highlighted, then they’re deleted and replaced by the formula).
Open Kt / KI / da/dN Button
Shows a list of all available equations to be loaded. Just click on the name of the desired equation to load it to the
Formula field.
Calculate SI Button
Calculates the value of the equation in the Formula field using the material properties in SI units (e.g. using a
SAE1020 steel, KIc in the Formula field would result in the value 250, corresponding to 250 MPa\/m).
Calculate ksi Button
Calculates the value of the equation in the Formula field using the material properties in English units (e.g. using a
SAE1020 steel, KIc in the Formula field would result in the value 227.5, corresponding to 227.5 ksi\/in).
Multiply Loading Window Button
Multiplies ALL the loadings in the Loading Window by the value shown in the Result field. This command is useful for
instance to transform force histories into equivalent stresses histories.
So, if for instance the Loading Window contains forces transversally applied to a beam, the user should compute the
bending term 32*L/(Pi*d^3) by setting the beam length (L) and diameter (d) in the Variables Table, pressing the
Calculate SI Button and finally pressing the Multiply Loadings Button. Now the Loading Window contains the
bending stresses (note that ViDa only handles Stresses or Strains, not Forces, so the described conversion would be
necessary).
The user can even consider combined bending and torsion stresses in the above example. If the torque is
proportional to the applied force by a constant R, then you could use the Torsion expression and Mises criterion,
calculating the value of ((32*L/(Pi*d^3))^2 + 3*(16*R/(Pi*d^3))^2 )^.5
79
Options Window
Window with ViDa general options. In order to make the changes effective, press the Apply or the OK
buttons. To cancel the alterations, press Cancel. This window has 4 tabs:
Editor Tab
Show Loading Graph Option
Lets ViDa show a Peak/Valley graph of the Loading History on each Loading Window. This option is useful to
visualize the loading history, but it may slow down ViDa if the history is too long.
Show Loading Histogram Graph Option
Lets ViDa show a 3D bar-chart of loaded bidimensional histograms. Bidimensional histograms are loaded by opening a
CSV (*.csv) or Excel (*.xls) file and turning on both the Histogram and the Mean Interval options.
Show Hysteresis Loops Graph Option
Lets ViDa show the Hysteresis Loops plot for eN calculations. Note that, even if this option is turned off, the Loops
are still calculated (but not plotted) if you chose the Calculate Hysteresis Loops option on the eN Method Window.
Number Format
Formatting mask to define the number of significant digits of all calculation results.
Open Rainflow Results in New Window Option
ViDa creates a new Loading Window when you use the Rainflow or Sequential Rainflow commands. If this option
is turned off, the resulting Alternate/Mean component history is shown on the same window, replacing the original
Peak/Valley data (in this case, ViDa asks if you want to save the Peak/Valley history before replacing it).
Open Rainflow of Calculated Strains in New Window Option
ViDa creates a new Loading Window when you choose the Rainflow of Calculated Strains option on the eN
Method window. If this option is turned off, the resulting Alternate/Mean strain history is shown on the same window,
replacing the original data (in this case, ViDa asks if you want to save the original history before replacing it).
Show Tips at Startup Option
Lets the program show the Tip of the Day window every time you run ViDa.
80
Modeling Tab
Lets the user choose between Simplified or Extended modeling. The SN, IIW, eN and da/dN windows will be
significantly simplified if the Simplified Modeling is chosen, presenting much less options for the user. These hidden
options are set to default values that reflect either the simplest or the traditional fatigue design techniques. Thus the
Simplified option is recommended for beginners, whereas the full windows are for experts. Note also that the
Bidimensional Crack Growth window is not available in the Simplified Modeling.
Units Tab
Lets the user choose between SI and English units. All the calculations and stress data from the Loading Window will
be considered to be in MPa or ksi accordingly. Note that the Material window will also show the material properties in
the desired units (even though the database actually saves the data in SI units).
81
Database Tab
Lets the user choose the databse used in all ViDa calculations. The Remote option allows the user to connect to a
remote database file, which could be stored on a different computer, such as a server. In this case, the databse is
considered read-only (the user cannot change locally the data of the remote database). Note that once you change the
database you need to exit and restart the ViDa program in order to make the changes effective.
File Locations Tab
Locations of a Graphic editor program (used to edit the figures in the Equations Database) and of the Quebra Finite
Element software.
82
Idiom Tab
Lets the user choose the desired idiom used by the entire program. The options are English, Portuguese, French,
German, Italian, Spanish. Note that once you change the idiom you need to exit and restart the ViDa program in order
to make the changes effective.
83
Multimedia Window
Window with links to the Textbook "Fatigue Design under Complex Loading", Published Papers, and
video/animations.
The Slide Show and ViDa Papers buttons go to the PowerPoint Presentation Viewer, where you can
choose among the book Fatigue Design under Complex Loadings, or the Published Papers pertaining to
ViDa.
The Chain button shows a small animation about the principles of structural integrity evaluation.
Tip of the Day Window
Show tips on working with ViDa at the startup. You can see more tips by pressing the Next Tip button, or
you can view all tips using the Show All button. If you don’t want to see the Tip of the Day window every
time you run ViDa, just disable the Show Tips at Startup option and press OK.
84
85
_____________________________________________________________________________________
CHAPTER
4
ViDa Tutorials
This chapter presents some detailed tutorials on using ViDa to perform fatigue and fracture mechanics
calculations. After working on these tutorials you’ll be more familiar with the necessary calculation steps,
and even use some of the advanced options in ViDa.
Contents
How do I Calculate Damage using the SN method ?
How do I Calculate Damage of Welded Structures ?
How do I Calculate Damage using the eN Method ?
How do I Calculate Unidimensional Crack Growth ?
How do I Calculate Bidimensional Crack Growth ?
How do I Use the Materials Database ?
How do I Handle Experimental Data Points ?
How do I Use the Equations Database ?
How do I Handle Tridimensional Stress Histories / Rosette Data?
How do I Use the Smart Calculator ?
Useful Tips about ViDa
General Tips
Material Database Tips
SN Method and Welded Structures Tips
eN Method Tips
Crack Growth Calculation Tips
Other Tips
86
How do I Calculate Damage using the SN method ?
To calculate the fatigue damage and the remaining crack initiation life of a piece which critical point works
under elastic stresses, you can (and probably should) use the SN method. Below there is a complete list of
all steps you might need to go through to perform this calculation using ViDa. Note that some of these
steps can be skipped in some cases and also that some of the options are not available in the Simplified
Modeling option (the symbol (*) will denote options only available in the Extended Modeling option).
1. Load a Loading History or type it in the Loading Window. Fill out the Loading Time field with the
duration (in seconds) of ALL the loading history, in order to calculate the estimated residual life (in days) of
the piece.
2. If the loading is a sequential history, you might want first to Check or Filter it. Unless your loading
history comes from an histogrammer as a set of Alternate/Mean/no. of half cycle components (thus not
keeping order or sequencing information), it is recommended to use a rainflow counter. Make sure that the
history in the Loading Window is expressed as a Peak/Valley sequence (by clicking on Peak/Valley in the
Sequencing Option), enter a value for the amplitude Filter (optional), and then click Life | Rainflow. The
Loading Window will then contain the Rainflow-filtered Peak/Valley history.
3. If you want to use a different material from the one shown in the Loading Window, go to the Materials
database window and choose the desired material or query for materials with certain desired
properties (in which case the Find Material window will appear). Note that you can alter the material
properties, but you’ll need to save the changes using the File | Save command prior to any calculations. It
is possible to estimate properties or calculate them from experimental data, please refer to the How do I
Use the Materials Database topic for more information. After choosing the desired Material, click on the
File | Exit command to return to the Main Window.
4. Click on Life | SN Method to enter the Calculate Life (SN) window.
5. Enter the Calculation Title in order to further identify this calculation in the Calculation Logbook window.
6. Choose the Surface Finish, Type of Loading and enter the Equivalent Diameter, Ultimate Strength
Su (the default value is loaded from the Materials Database) and the Operating Temperature of the
specimen. These choices are used to automatically calculate the values of the endurance limit modifying
factors ka, kb, kc and kd. Note that you can calculate the effective diameter for circular, rectangular,
channel or I-beam cross sections under bending using the Calculate d (Effective Diameter) button. In
this case, the Calculate Effective Diameter window will appear. You should click on the associated tab of
the desired cross section and bending axis, enter the cross section dimensions and click on the desired
value. The resulting equivalent diameter will be displayed. By pressing OK you’ll return to the Calculate
Life (SN) window carrying the calculated value.
7. You can alter directly the values of ka, kb, kc, kd and ke (and the value of the uncorrected endurance
limit Sf’) prior to the calculations. Note that the next time you call the Calculate Life (SN) window the ka,
kb, kc and kd values will retain the options chosen in step 6, meaning that altering their values directly will
only affect the current calculation.
8. Choose the type of SN curve you want to use among Automatic, b-Sf-Nf or b-c-Nf and enter the
appropriate values for these parameters of the SN curve. Note that in general you don’t need to change
these values, since they’re automatically loaded from the Materials Database and corrected when you alter
any ka, kb, kc, kd or ke values. You can also calculate the values of b and c, or retrieve them from the
Materials Database, by using the Calculate b, c button. If you want, you can right-click on the SN curve
graph and choose Redraw to see the changes in it.
9.(*) Enter the value of the b exponent after the SN curve elbow, belb. If this value is set to zero then the
SN curve is horizontal after the elbow (if any), otherwise you’ll obtain a SN curve with 2 different slopes.
You can also right-click on the SN curve graph and choose Redraw to see the changes in it.
87
10.(*) Enter the value of the End of life at damage field. This is the total damage value that characterizes
failure of the specimen. The Palmgreen-Miner rule suggests a total damage value of 1 for the end of life,
but any other value can be chosen by the user.
11.(*) Enter the name and parameters of a user-defined damage curve that will be used in the
calculations in addition to the Goodman, Gerber and Soderberg curves. These 4 curves can be visualized
in the SaSm graph for any reference life by right-clicking on it and choosing the Define Life for SaSm
command.
12.(*) Choose if you want (i) to Consider the SN Curve Elbow, (ii) to Use the Stress Concentration
Factor (Kt) in the mean components of the loading history and (iii) to plot the results for the Soderberg
curve calculations.
13.(*) Choose if you want to consider Residual Stresses in the SN calculation. In this case you’ll have
to enter the Initial Residual Stress. The program needs to draw hysteresis loops in order to consider
residual stresses accurately, so you can also specify (i) the range of hysteresis loops you want to plot,
(ii) the accuracy of the calculations and plotting resolution and (iii) which Strain concentration
theory is to be used when stress concentration factors are present. Note that in order to consider
residual stresses effects, ViDa changes from the SN to the eN method every time the local (at the notch
root) stresses reach the cyclic yield strength (e.g., due to an overload), calculates the appropriate
elastoplastic hysteresis loop by the eN method, and goes back to the SN method carrying on the damage
and the residual stress caused by the elastoplastic event. The residual stress is added to the subsequent
loads, and its effects are quantified by the SaSm rules. The main benefit of this technique is to decrease
the computational effort as compared to the eN method.
14. Enter the values of the Stress Concentration Factor (Kt) and of the Notch Sensitivity (q). These
values can also be calculated using the Calculate Kt button | Typical (which goes to the Calculate Typical
Stress Concentration Factor window and calculates both Kt and q, given a desired geometry and Su), the
Calculate Kt button | Stored (which goes to the Smart Calculator window and calculates Kt from
previously stored equations in the Kt Equations Database) or the Calculate q (Notch Sensitivity) (which
goes to the Calculate Notch Sensitivity for Steels and Alumina window and calculates q for steels or
alumina given Su and the notch radius) commands.
15. Check if all options are set as desired and press the OK Button.
The damage and residual life will be calculated and shown in the Loading Window. Note that the residual
life (in days) depends on the Loading Time value from the Main Window.
88
How do I Calculate Damage of Welded Structures ?
To calculate the fatigue damage and the remaining crack initiation life of a welded structure which works
under elastic stresses, you should use the IIW method. Below there is a complete list of all steps you might
need to go through to perform this calculation.
1. Load a Loading History or type it in the Loading Window. Fill out the Loading Time field with the
duration (in seconds) of ALL the loading history, in order to calculate the estimated residual life (in days) of
the piece.
2. If the loading is a sequential history, you might want first to Check or Filter it. Unless your loading
history comes from an histogrammer as a set of Alternate/Mean/no. of half cycle components (thus not
keeping order or sequencing information), it is recommended to use a rainflow counter. Make sure that the
history in the Loading Window is expressed as a Peak/Valley sequence (by clicking on Peak/Valley in the
Sequencing Option), enter a value for the amplitude Filter (optional), and then click Life | Rainflow. The
Loading Window will then contain the Rainflow-filtered Peak/Valley history.
3. Click on Life | Welded Structures to enter the Calculate Life of Welded Structures window.
4. Enter the Calculation Title in order to further identify this calculation in the Calculation Logbook window.
5. Enter the values of the Weld Joint class and the exponent m from the International Institute of Welding
(IIW) equation N(cycles)=2,000,000*([weld class]/[applied stress])^m. Enter also the values of the Fatigue
Limit N (which is the number of cycles above which there is no fatigue damage for the Weld Joint) and the
End of life at damage field (which is the total damage value that characterizes failure of the specimen).
The Palmgreen-Miner rule suggests a total damage value of 1 for the end of life, but any other value can be
chosen by the user. You can also choose a value for the reliability of the calculations (the default value
defined by the International Institute of Welding is 97.7%). The default values of m and N are 3.0 and
5,000,000, and the class value depends on the weld joint detail.
6. Click on the button of the desired weld joint, and the chosen weld joint class and description will be
shown on the bottom right of the window. Press the OK button.
The damage and residual life will be calculated and shown in the Loading Window. Note that the residual
life (in days) depends on the Loading Time value from the Loading Window.
89
How do I Calculate Damage using the eN Method ?
To calculate the fatigue damage and the remaining crack initiation life of a piece which critical point works
under elastoplastic stresses, you should use the eN method. This method can also be used for elastic
stresses, but its computational effort is higher than the one required by the SN method. Below there is a
complete list of all steps you might need to go through to perform this calculation. Note that some of these
steps can be skipped in some cases and also some of the options are not available in the Simplified
Modeling option (the symbol (*) will denote options only available in the Extended Modeling option).
1. Load a Loading History or type it in the Loading Window. Fill out the Loading Time field with the
duration (in seconds) of ALL the loading history, in order to calculate the estimated residual life (in days) of
the piece.
2. If the loading is a sequential history, you might want first to Check or Filter it. If your loading history
consists of deformation Peak/Valleys, it is recommended to use a rainflow counter. Make sure that the
history in the Loading Window is expressed as a Peak/Valley sequence (by clicking on Peak/Valley in the
Sequencing Option), enter a value for the amplitude Filter (optional), and then click Life | Rainflow. The
Loading Window will then contain the Rainflow-filtered Peak/Valley history. Note that the rainflow
counting of the loading alters its sequencing and, in consequence, the calculated damage. It is strongly
recommended that the eN method be applied to the original sequence of the loading if it consists of
stresses. In the Extended Modeling option you can choose to rainflow count the calculated strains,
which is the recommended method to guaranty the accuracy of the calculations, see the Textbook "Fatigue
Design under Complex Loading".
3. If you want to use a different material from the one shown in the Loading Window, go to the Materials
database window and choose the desired material or query for materials with certain desired
properties (in which case the Find Material window will appear). Note that you can alter the material
properties, but you’ll need to save the changes using the File | Save command prior to any calculations. It
is possible to estimate properties or calculate them from experimental data, please refer to the How do I
Use the Materials Database topic for more information. After choosing the desired Material, click on the
File | Exit command to return to the Loading Window.
4. Click on Life | eN Method to enter the Calculate Life (eN) window.
5. Enter the Calculation Title in order to further identify this calculation in the Calculation Logbook window.
6.(*) Choose the Surface Finish, Type of Loading and enter the Equivalent Diameter, Ultimate Strength
Su (the default value is loaded from the Materials Database) and the Operating Temperature of the
specimen. These choices are used to automatically calculate the values of the endurance limit modifying
factors ka, kb, kc and kd. Note that the endurance limit is a concept originally used in the SN method, but
in ViDa it can also be used to correct the elastic component of the eN curve. Note also that you can
calculate the effective diameter for circular, rectangular, channel or I-beam cross sections under bending
using the Calculate d (Effective Diameter) button. In this case, the Calculate Effective Diameter window
will appear and you click on the effective diameter of the desired cross section and bending axis. The
resulting effective diameter will be copied to the result field, and by pressing OK you’ll return to the
Calculate Life (eN) window carrying the calculated value.
7.(*) You can alter directly the values of ka, kb, kc, kd and ke (and the value of the uncorrected endurance
limit Sf’) prior to the calculations. Note that the next time you call the Calculate Life (eN) window the ka,
kb, kc and kd values will reflect the options chosen in step 6, meaning that altering their values directly will
affect only the current calculation.
8. Enter the parameters of the eN curve you want to use. Note that in general you don’t need to change
these values, since they’re automatically loaded from the Materials Database and the value of the elastic
exponent b is corrected when you alter any ka, kb, kc, kd or ke values. You can also calculate the
values of the eN Curve parameters or retrieve them from the Materials Database, by using the Calculate
b, c button commands. Right-click on the eN curve graph and choose Redraw to see the changes in it.
90
9.(*) Enter the value of the End of life at damage field. This is the total damage value that characterizes
failure of the specimen. The Palmgreen-Miner rule suggests a total damage value of 1 for the end of life,
but other values can be chosen by the user.
10.(*) Choose which Strain concentration theory is to be used when stress concentration factors are
present. Linear theory considers Ke=Kt (strain concentration Ke is equal to Kt), while Neuber theory uses
Ke*Ks=Kt^2.
11.(*) Choose if you want to Consider the SN Curve Elbow applied to the elastic component of the eN
Curve. This option lets the user neglect the damage associated to loadings under the endurance limit Sf
(Sf=ka*kb*kc*kd*ke*Sf’) from the SN theory. Right-click on the eN curve graph and choose Redraw to
see the changes in it due to the elbow.
12.(*) Choose if you want to calculate hysteresis loops in the eN calculations with the Calculate
Hysteresis Loops option. This option is highly recommended for complex loadings, since not
calculating the hysteresis loops in general leads to unrealistic and probably non conservative calculated
strains. Choose also the Loop Corrections option, in order to make the program correct the wrong
hysteresis loops that classical theory would predict. You can also choose to plot the Cyclic StressStrain curve together with the loops, in order to better visualize the importance of these loop corrections.
Note that if the Show Hysteresis Loops Graph option from the Options window is not checked, the loops
are not plotted on the screen, but they are calculated and corrected anyway.
13.(*) Once the Calculate Hysteresis Loops option is chosen, you can choose to calculate the Rainflow
of the calculated strains, which is the recommended method (instead of performing Rainflow before
drawing the hysteresis loops). If you use step 2 and calculate Rainflow before drawing the loops (instead
of using the Rainflow of Calculated Strains option) you’ll end up with different hysteresis loops than the
actual ones, therefore you will calculate a wrong damage. Once you choose to calculate the Rainflow of
the calculated strains, you can also choose (i) an amplitude filter in microstrains, (ii) to specify the
range of hysteresis loops you want to plot, (iii) the accuracy of the calculations and (iv) the plotting
resolution.
14. Enter the value of the Stress Concentration Factor (Kt). This value can also be calculated using the
Calculate Kt button | Typical (which goes to the Calculate Typical Stress Concentration Factor window
and calculates Kt given a desired geometry) or the Calculate Kt button | Stored (which goes to the Smart
Calculator window and calculates Kt from previously stored equations in the Kt Equations Database)
commands.
15. Check if all options are set as desired and press the OK Button.
The damage and residual life will be calculated and shown in the Loading Window. Note that the residual
life (in days) depends on the Loading Time value from the Loading Window.
91
How do I Calculate Unidimensional Crack Growth ?
To quantify fatigue damage in cracked structures, ViDa calculates crack growth using any da/dN equation
specified by the user, recognizing retardation and even crack arrest effects. Below there is a complete
list of all steps you might need to go through to perform this calculation. Note that some of these steps can
be skipped in some cases and also some of the options are not available in the Simplified Modeling
option (the symbol (*) will denote options only available in the Extended Modeling option).
1. Load a Loading History or type it in the Loading Window.
2. If the loading is a sequential history, you might want first to Check or Filter it. Unless your loading
history comes from an histogrammer as a set of Alternate/Mean/no. of half cycle components (thus not
keeping order or sequencing information), it is recommended to use a rainflow counter. Make sure that the
history in the Loading Window is expressed as a Peak/Valley sequence (by clicking on Peak/Valley in the
Sequencing Option), enter a value for the amplitude Filter (optional), and then click Life | Rainflow. The
Loading Window will then contain the Rainflow-filtered Peak/Valley history. Note that the rainflow
counting of the loading alters its sequencing and, in consequence, the calculated crack growth. It is
strongly recommended that the sequential rainflow counter is used instead of the traditional rainflow
because sequencing is a fundamental issue in crack growth calculations, see the Textbook "Fatigue Design
under Complex Loading".
3. If you want to use a different material from the one shown in the Loading Window, go to the Materials
database window and choose the desired material or query for materials with certain desired
properties (in which case the Find Material window will appear). Note that you can alter the material
properties, but you’ll need to save the changes using the File | Save command prior to any calculations. It
is possible to estimate properties or calculate them from experimental data, please refer to the How do I
Use the Materials Database topic for more information. After choosing the desired Material, click on the
File | Exit command to return to the Loading Window.
4. Click on Life | Crack Growth to enter the Crack Growth (da/dN) window.
5. Enter the Calculation Title in order to further identify this calculation in the Calculation Logbook window.
6. You can alter the values of deltaKth, KIc, A and m (from Paris law), A and m (from Elber law) and p
(from Walker and Modified Walker laws) prior to the calculations. In general you don’t need to change
these values, since they’re automatically loaded from the Materials Database for the current material. Note
that the next time you call the Crack Growth (da/dN) window these properties will be loaded again from the
Materials database, meaning that altering their values will only affect the current calculation. You can also
calculate or retrieve the values of A and m from either Paris or Elber laws from the Materials Database, by
using the Calculate A, m (Paris or Elber) buttons. Right-click on the da/dN curve graph and choose
Redraw to see the changes in it.
7.(*) Choose other da/dN equation that can be used in the crack growth calculation (besides Paris, Elber,
Walker and Modified Walker equations) from a list of equation names (loaded from the da/dN equations
database). The chosen equation will be displayed in the Formula field. Right-click on the da/dN curve
graph and choose Redraw to see the changes in it.
8.(*) You can directly alter the formula for the chosen equation in the Formula field (click on the ? button
for information on the available functions from the equation interpreter). Note that the next time you call the
Crack Growth (da/dN) window this formula will be loaded again from the equations database, meaning that
directly altering the formula will only affect the current calculation. In order to save an edited formula as a
new equation you should use the Save As New button (or go to the da/dN Equations Database Window).
Right-click on the da/dN curve graph and choose Redraw to see the changes in it.
9.(*) Alter the values from the Variables Table in order to adjust the parameters of the chosen da/dN
equation. Just click on the desired variable and enter its new value (you can also load a previously saved
Variables file (*.var), which contains all values from the Variables Table). You can visually adjust the
chosen da/dN equation in order to be compatible with Paris and Elber equations by interactively altering
92
the variables values and right-clicking on the da/dN graph and choosing Redraw in order to see the
changes in it. You can also calculate the da/dN value for a specific deltaK and R (=Kmin/Kmax) by
clicking on the Calculate button.
10. Enter the values of the specimen width w (measured in the direction of the crack growth), the initial
crack size a and also a reference final crack size for which the calculations should stop (in order to
ignore this final value criterion, just set the final value to zero).
11.(*) Choose a stress intensity factor (KI) equation that will be used in the crack growth calculation from
a list of KI equation names (loaded from the KI equations database). Note that the Sigma*\/(pi*a) term is
already built in, so the equations are actually the geometry factors (beta).
12.(*) After choosing KI from the list, the corresponding equation will be displayed in the Formula field.
You can directly alter the formula for the chosen equation in the Formula field (click on the ? button for
information on the available functions from the equation interpreter). Note that the next time you call the
Crack Growth (da/dN) window this formula will be loaded again from the equations database, meaning that
directly altering the formula will only affect the current calculation. In order to save an edited formula as a
new equation you should use the Save As New button (or go to the KI Equations Database Window).
13.(*) Alter the values from the Variables Table in order to adjust the parameters (if any, besides a and w)
of the chosen KI equation. Just click on the desired variable and enter its new value (you can also load a
previously saved Variables file (*.var), which contains all values from the Variables Table). You can also
calculate the KI value for a specific stress variation deltaSigma by clicking on the Calculate button.
14.(*) Choose the calculation procedure to be used: Sequential calculation or the Root Mean Square
(RMS) approach. If you chose the RMS approach, jump to step 16.
15.(*) Enter the Wheeler Retard Effect exponent beta (or gamma) of the retard effect due to overloads
(enter zero in order to neglect retard effects) and choose between the Wheeler (corrects da/dN) or the
Modified Wheeler (corrects deltaK) retard effect corrections. Choose also the percentage precision
in the Retard Effect calculation. Click on the Retard Effect Help button for additional information. Go to
step 17.
16.(*) Choose if you want to use the Simpson Integral in the RMS crack growth calculation. If this
option is off, then the numerical integration of the da/dN equation is done with a 1 cycle integration step. If
the Simpson Integral option is on, then the user may input a value for the integration step which is a
percentage of the crack size. If you chose the Simpson Integral option then you can skip step 17.
17.(*) Enter the Percentage value of the Increase in \/a Criterion (increase percentage of the square root
of the crack size for which the Stress Intensity Factor KI is recalculated, used to speed up the calculations).
Typical values are in the 0.1 – 1.0% range. Click on the Increase in \/a Criterion Help button for
additional information.
18.(*) Choose to or not to use logarithmic interpolation to iterate within each step in the numerical
integration (only applicable for the Sequential calculations). Since the value of da/dN varies within an
integration step, setting this option on makes the program iterate once for each integration step. Slightly
better accuracy is achieved with this option on.
19. Choose which equations you want to use in the crack growth calculation, among Paris law, Elber
law, Walker law, Modified Walker law, and another da/dN equation (only available for the Extended
Modeling option).
20. Check if all options are set as desired and press the OK Button.
The total crack growth and average da/dN will be calculated for all the chosen da/dN equations and
shown in the Loading Window.
93
How do I Calculate Bidimensional Crack Growth ?
Surface cracks grow bidimensionally, i.e, both sideways and in depth. Certainly we cannot rely in pure
unidimensional crack growth calculations. ViDa handles these bidimensional cracks and calculates crack
growth in both directions, considering the changes in crack shape using any da/dN equation specified by
the user, recognizing retardation and crack arrest effects. The cracks are assumed elliptical in shape,
with semi-axis a and c. The corner crack is assumed to be a quart ellipsis, the surface crack a semi
ellipsis and the internal crack a full ellipsis. The cracks can change the a/c ratio during their propagation,
but remain elliptical.
1. Load a Loading History or type it in the Loading Window.
2. If the loading is a sequential history, you might want first to Check or Filter it. Unless your loading
history comes from an histogrammer as a set of Alternate/Mean/no. of half cycle components (thus not
keeping order or sequencing information), it is recommended to use a rainflow counter. Make sure that the
history in the Loading Window is expressed as a Peak/Valley sequence (by clicking on Peak/Valley in the
Sequencing Option), enter a value for the amplitude Filter (optional), and then click Life | Rainflow. The
Loading Window will then contain the Rainflow-filtered Peak/Valley history. Note that the rainflow
counting of the loading alters its sequencing and, in consequence, the calculated crack growth. It is
strongly recommended that the sequential rainflow counter is used instead of the traditional rainflow
because sequencing is a fundamental issue in crack growth calculations, see the Textbook "Fatigue Design
under Complex Loading".
3. If you want to use a different material from the one shown in the Loading Window, go to the Materials
database window and choose the desired material or query for materials with certain desired
properties (in which case the Find Material window will appear). Note that you can alter the material
properties, but you’ll need to save the changes using the File | Save command prior to any calculations. It
is possible to estimate properties or calculate them from experimental data, please refer to the How do I
Use the Materials Database topic for more information. After choosing the desired Material, click on the
File | Exit command to return to the Loading Window.
4. Make sure that the Extended Modeling option is chosen using the Tools | Options command. This
option is required to let ViDa calculate bidimensional crack growth. Click on Life | Bidimensional Crack
Growth to enter the Bidimensional Crack Growth (da/dN and dc/dN) window.
5. Enter the Calculation Title in order to further identify this calculation in the Calculation Logbook window.
6. You can alter the values of deltaKth, KIc, A and m (from Paris law), A and m (from Elber law) and p
(from Walker and Modified Walker laws) prior to the calculations. In general you don’t need to change
these values, since they’re automatically loaded from the Materials Database for the current material. Note
that the next time you call the Bidimensional Crack Growth (da/dN and dc/dN) window these properties will
be loaded again from the Materials database, meaning that altering their values will only affect the current
calculation. You can also calculate or retrieve the values of A and m from either Paris or Elber laws from
the Materials Database, by using the Calculate A, m (Paris or Elber) buttons. Right-click on the da/dN
curve graph and choose Redraw to see the changes in it.
7. Choose another da/dN equation that can be used in the crack growth calculation (besides the Elber
and Modified Walker equations) from a list of equation names (loaded from the da/dN equations
database). The chosen equation will be displayed in the Formula field. Right-click on the da/dN curve
graph and choose Redraw to see the changes in it.
8. You can directly alter the formula for the chosen equation in the Formula field (click on the ? button for
information on the available functions from the equation interpreter). Note that the next time you call the
Bidimensional Crack Growth (da/dN and dc/dN) window this formula will be loaded again from the
equations database, meaning that directly altering the formula will only affect the current calculation. In
order to save an edited formula as a new equation you should use the Save As New button (or go to the
da/dN Equations Database Window). Right-click on the da/dN curve graph and choose Redraw to see
the changes in it.
94
9. Alter the values from the Variables Table in order to adjust the parameters of the chosen da/dN
equation. Just click on the desired variable and enter its new value (you can also load a previously saved
Variables file (*.var), which contains all values from the Variables Table). You can visually adjust the
chosen da/dN equation in order to be compatible with the Elber equation by interactively altering the
variables values and right-clicking on the da/dN graph and choosing Redraw in order to see the changes
in it. You can also calculate the da/dN value for a specific deltaK and R (=Kmin/Kmax) by clicking on the
Calculate button.
10. Enter the values of the specimen dimensions w and ti (and di for Internal cracks and Ri for cracks in
cylinders under pressure) beside the crack drawing (note that the Variables Table is not used here).
Enter also the crack initial dimensions a and c and also a reference final crack size for a and c for which
the calculations should stop (to ignore this final value criterion, just set the final values to zero).
11. Choose which type of bidimensional crack will be considered in the calculations by clicking on the
Elliptic, Corner, Internal, or Cylinder tabs. The crack type will define the built-in stress intensity factor
(KI) equations that will be used in the crack growth calculation.
12. For the Elliptic and Corner cracks, enter the Tension and Bending factors by which the loadings of
the Loading Window are multiplied and considered as Tension and/or Bending Stresses applied to the
specimen (see the arrows in the Crack Type Drawings).
13. Beside the Graph 1 option, choose the field (and sampling rate) to be plotted in the Damage Curve /
2D Crack Graph in the Main Window.
14. Beside the Graph 2 option, choose the field (and sampling rate) to be plotted in the Hysteresis
Loops / Elliptic Cracks Graph in the Main Window.
15. Choose the calculation procedure to be used: Sequential calculation or the Root Mean Square
(RMS) approach. If you chose the RMS approach, jump to step 17.
16. Enter the Wheeler Retard Effect exponent beta (or gamma) of the retard effect due to overloads
(enter zero in order to neglect retard effects) and choose between the Wheeler (corrects da/dN and
dc/dN) or the Modified Wheeler (corrects deltaK) retard effect corrections. Choose also the
percentage precision in the Retard Effect calculation. Click on the Retard Effect Help button for
additional information. Go to step 18.
17. Choose if you want to use the Simpson Integral in the RMS crack growth calculation. If this option
is off, then the numerical integration of the da/dN and dc/dN equations is done with a 1 cycle integration
step. If the Simpson Integral option is on, then the user may input a value for the integration step which
is a percentage of the crack dimensions a and c. If you chose the Simpson Integral option then you can
skip step 18.
18. Enter the Percentage value of the Increase in \/a (and \/c) Criterion (increase percentage of the
square root of the crack size for which the Stress Intensity Factor KI is recalculated, used to speed up the
calculations). Typical values are in the 0.1 – 1.0% range. Click on the Increase in \/a (and \/c) Criterion
Help button for additional information.
19. Choose to or not to use logarithmic interpolation to iterate within each step in the numerical
integration (only applicable for the Sequential calculations). Since the value of da/dN and dc/dN vary
within an integration step, setting this option on makes the program iterate once for each integration step.
Slightly better accuracy is achieved with this option on.
20. Choose which equations you want to use in the crack growth calculation, among Elber law, Modified
Walker law, and another da/dN equation, and press the OK Button.
The total crack growth in the a and c directions and average da/dN and dc/dN will be calculated for the
chosen da/dN equations and shown in the Loading Window.
95
How do I Use the Materials Database ?
In the Material window it is possible to manipulate the Materials database, adding, deleting, changing or
just selecting a specific material. You can alter the material properties by clicking on the respective field
and entering the new data. Note that this new value will only be effective after you save it using the File |
Save command.
Values in black represent measured properties, while the values in red reflect estimated properties (which
are less reliable). To toggle the black/red colors, press the space bar while editing the desired field (don’t
forget to save the changes after).
The following are some common procedures in the Material window. After choosing the desired material
and setting the property values click on File | Exit to go back to the Main Window.
Selecting a material: click on the File | Open command to go to the Open Material window, which shows
a list of all available materials. Just click on the name of the desired material to load it.
Searching a material with certain properties: click on the File | Find command to go to the Find
Material window. There you can search for materials by their type by choosing from steels, alumina, etc. in
the Materials list. You can set any property ranges to look for, just click on one of the Property lists and
set the range of the chosen property on the two fields on the right, in the same row. Multiple criteria can
be used in your search, ViDa will look only for the materials that match ALL the desired property ranges.
You can also sort the matching materials by any property, just click on one of the Order by lists and
choose between Descendent (to sort from the highest to the lowest values) or Ascendant sorting order.
Browsing all material properties: click on the File | Browse command to go to the Browse Material
window. There you can see all properties of all materials on a single table. You can customize the table
layout, change the order of the columns, and the materials are automatically sorted by the property on the
first column of the table. Double-click on the name of the desired material to load it to the Material Window.
Altering material properties: just type the new value of the property and click on the File | Save
command. Before saving you can also press the space bar on the value in order to toggle between black
or red coding colors (black for measured, more reliable properties and red for estimated properties). Note
that you need to save the changes for them to become effective and available for further calculations.
Only after saving the properties the graphs in the window are updated.
Creating a new material: click on the Edit | Clear All Properties command to clear all properties. Now
enter the name of the new material, which must be different from all other ones (since all materials must
have an unique name in the database). You can also enter some comments in the Name field (such as
the Brinnell hardness) in order to tell apart materials with the same name. Be sure to choose the material
type (steel, aluminum, etc.) from the Material list and enter the values of the material properties. You can
press the space bar on any value in order to toggle between black or red coding colors (black for
measured, more reliable properties and red for estimated properties). After entering the known properties
you can use the Edit | Estimate using Nominal Values command to estimate the remaining properties
from Nominal Values and the known properties. Finally, click on the File | Save As New command to
create the new material.
Estimating properties: you can estimate material properties from Nominal Values and the known
properties. Just click on the Edit | Estimate using Nominal Values command to let ViDa estimate the
missing properties (the ones with null values). If you want to clear the previously estimated properties (the
ones color coded in red) you can use the Edit | Clear Estimated Values command prior to the new
estimation. For more information on the estimates, click on the Estimates Help button, which shows (just
for reference) a window with all the equations used to estimate properties from Nominal Values. You can
also interactively estimate the values of b and c from the SN curve or the values of A and m from the Paris
law using the Calculate buttons. Don’t forget to use the File | Save command to save the estimated
properties and make them effective and available for further calculations.
Entering experimental data points: to enter experimental data points, which can be used to fit SN, eN or
da/dN curves and estimate their parameters, use the Experimental Points tab. Refer to the topic How do
I Handle Experimental Data Points ?.
96
How do I Handle Experimental Data Points ?
The user can store experimental data points for the currently selected material. SN, eN and da/dN (Paris or
Elber) curves can be automatically fitted to the experimental points, and the calculated properties data
can be used for future calculations.
The following example shows how to store eN Curve data points and how to calculate the eN Curve
parameters using a least squares fitting.
1. Go to the Experimental Points tab on the Material Window.
2. Click on the eN Tab to switch tab to the eN curve experimental points table.
3. With the help of the Table menu, type in the eN table the number of reversions (2N) and associated
strain and stress amplitudes de/2 and dS/2. ViDa needs the value of the stress amplitudes dS/2 in the
least squares fit because the eN Curve contains 4 parameters to be calculated. You can also load a CSV
(Comma Separated Values) file into the table by using the Table | Import command. Note that ViDa
ignores the first row of the CSV file (assuming that it just contains the column titles) and the file must have
exactly 3 columns (for the eN table only, for the SN or da/dN tables it must contain 2 columns).
4. The user can convert the values from ALL 3 tables from SI to English units or vice-versa by using the
Table | MPa -> ksi or the Table | ksi -> MPa commands. Since ViDa only saves the numerical values
from each table, the user must be careful about which units the table values represent.
5. Choose the Fit eN button to fit the eN experimental data points (using a least squares method) for a
Coffin-Manson equation. The 4 eN curve constants are calculated and the fitted curve is plotted on the eN
graph as Log(e) x Log(N) (the Young modulus E comes from the monotonic data).
6. Choose the File | Save command if you want to save the experimental data points and the calculated
constants to the Materials database. These points will be associated to the current material.
7. If you want to use the calculated eN curve constants in further calculations, you need to copy them from
the Experimental Points tab and paste on the eN curve parameters on the Fatigue and Fracture tab.
8. If you copied any fitted parameters as described in step 7, you need to save the changes for them to
become effective and available for further calculations. Use the File | Save command to save the
changes.
97
How do I Use the Equations Database ?
In the Kt, KI or da/dN Equations Database window it is possible to add, delete or change data of a specific
equation. You can alter the equations just by clicking on the desired field and entering the new data. Note
that this new data will only be effective after you save it using the Update button.
The following are some common procedures in the Equations Database window.
Editing an current equation: just type the alterations in the equation and click on the Update button,
making the changes effective and available for further calculations.
Creating a new equation: on the last row of the table, enter the name of the new equation, which must
be different from all others (since all equations must have an unique name in the database). Type in the
equation Formula (click on the Equation Interpreter Help button to get more information about the
equations syntax) and the optional Source and Memo fields. Finally, click on the Update button to create
the new equation.
Deleting an equation: click on the row of the equation you want to delete, and click on the Delete button.
How do I Handle Tridimensional Stress Histories / Rosette Data?
ViDa lets you calculate equivalent stresses (or strains) for a list of 3D-stresses (with normal and shear
components) or for a list of strain triplets measured from a rectangular or delta Rosette in the Calculate
Tridimensional Equivalent Stress and Calculate Rosette Equivalent Stress windows. Use the Calculation
Type tabs to toggle between 3D or Rosette components. These equivalent stresses can then be used in
the Loading Window for damage and crack growth calculations.
1. For 3D stresses, go to the Calculate Tridimensional Equivalent Stress window and type in the stress (or
strain) tensor components XX, YY, ZZ, XY, XZ and YZ in the Tridimensional Table. You can choose
between Stress or Strain loadings using the Table option. You can also enter stress concentration
factors for each component of the 3D tensor, used in the equivalent history calculation.
2. For Rosettes, go to the Calculate Rosette Equivalent Stress window and type in the Peak/Valley strain
(in microstrains) loading histories for all 3 Rosette components A, B and C in the Rosette Table. You can
also alter the Poisson coefficient and the Young modulus E of the current material and even define a
direction on which you want to project the calculated stresses/strains.
3. You can also load a Peak/Valley file into one or more of the columns of the Tridimensional or
Rosette Tables (selecting the desired column(s) and loading a *.pic file), load a Tridimensional
Peak/Valley file (file extension *.p3d) or load a Rosette Peak/Valley file (file extension *.ros).
4. Choose the desired equivalent stress (or strain) calculation from the Calculate button. The result of the
calculation is shown in the Equivalent Peak / Valley table and in the Input / Output graph.
5. The resulting stresses (or strains) shown in the Equivalent Peak / Valley table can be transferred to a
new Loading Window of the Main Window using the Transfer button, returning to the Main Window.
Done. A new Loading Window has been created containing an equivalent Peak/Valley history. You can
now calculate fatigue damage or crack growth using these loadings.
98
How do I Use the Smart Calculator ?
ViDa has an alphanumeric calculator that computes any formula using the material properties and userdefined variable values. Some basic Mechanics of Solids equations are also embedded in the calculator
and computed results can be used to multiply the loadings in the Loading Window. The Smart
Calculator also has direct links to the Calculate Typical Stress Concentration Factor (Kt) and Calculate
Notch Sensitivity (q) for Steels and Alumina windows to compute the values of Kt, q and Kf.
The following example will show how to convert a force history from the Loading Window that causes
bending and torsion stresses on a filleted shaft into a history of equivalent stresses. This conversion is
fundamental since ViDa only deals with stresses or strains in its calculations (not forces).
1. Choose the Symbolic option and type in the Formula field the equation that will be computed in the
Smart Calculator Window. This equation may include any variable from the Variables Table, any material
property or even mathematical functions (click on the Equation Interpreter Help Button for more
information). To calculate equivalent stresses, you can click on the Mises button in order to automatically
type the equivalent stress equation ( (s*Kf)^2 + 3*(t*Kf)^2 )^.5
2. Highlight the letter s in the equation using the mouse (by clicking the mouse button and dragging over
the letter) and press the Bending button. The letter s will be replaced by the bending stress equation for a
circular shaft, 32*M/(Pi*d^3). Assuming that the bending moment M is equal to the applied force times the
beam length L, replace the letter M by the letter L (you don’t need to include the force since this expression
will multiply the force history in the Loading Window at the end of the calculation).
3. Highlight the expression Kf that is beside the bending stress expression and click on the Kf button. The
Calculate Typical Stress Concentration Factor (Kt) window will appear. Type in the specimen dimensions
and click on the filleted shaft group and on the figure corresponding to bending on a filleted shaft.
The values of Kt and q will be calculated and the resulting fatigue stress concentration factor Kf will be
displayed. Click on the OK button to return to the Smart Calculator and automatically replace the
expression Kf in the Formula field by the value of the calculated Kf.
4. Highlight the letter t in the equation using the mouse (by clicking the mouse button and dragging over the
letter) and press the Torsion button. The letter t will be replaced by the torsion stress equation for a
circular shaft, 16*T/(Pi*d^3). Assuming that the torsion T is linearly related to the applied forces by a
constant t, replace the letter T by the letter t (you don’t need to include the force since this expression will
multiply the force history in the Loading Window at the end of the calculation).
5. Highlight the expression Kf that is beside the torsion stress expression and click on the Kf button.
Repeat step 3, but now choose the figure representing torsion on a filleted shaft. Click on the OK
button to return to the Smart Calculator and replace the expression Kf in the Formula field by the value of
the calculated Kf. The resulting expression should be similar to ((32*L/(Pi*d^3)*1.41)^2 +
3*(16*t/(Pi*d^3)*1.21)^2)^.5
6. In the Variables Table, click on the L, t and d variables and enter the values of the shaft length L, the
constant t relating the forces and torsion stresses and the shaft diameter d.
7. Click on the Calculate SI button to calculate the value of the expression using SI units (or Calculate
ksi button for English units). Note that in this specific example we didn’t use any of the material properties
in the Formula field, so it doesn’t matter if we click on the Calculate SI or Calculate ksi buttons. The
calculated value is a constant that can multiply the force history to convert it into an equivalent stress
history (see step 8). Watch out for the units: if the forces in the Loading Window are in Newtons and the
values of L, t and d are in meters than you need to type 1E6* on the left of the formula prior to calculation
(since the stresses should be calculated in MPa, not Pa).
8. Click on the Multiply Loadings button to multiply ALL the loadings from the Loading Window by the
value shown in the Result field. The Loading Window will now contain an equivalent stress history (with
stress concentration factors already included).
9. Close the Smart Calculator window to return to the Main Window.
99
Useful Tips about ViDa
General Tips
1.
ViDa has Rainflow counters, Tridimensional Stress handling, Rosettes, Stress Concentration Factor
tables, and much more! To know more about ViDa, click Contents on the Help menu, and refer to
'Working with ViDa Windows'.
2.
To change the current material without needing to go to the Material Database window, just select its
name from the Material dropdown list on the Main Window.
3.
The Calculation Logbook is a very useful tool to compare the results of similar fatigue calculations
performed under different option settings. To save to a file (*.log), open or print the Logbook tables, click
Save, Open or Print on the File menu.
4.
By filling out the 'Calculation Title' field on the calculation windows, it is possible to easily compare the
results of different calculations in the Calculation Logbook window.
5.
ViDa accounts for the damage (or crack growth) in a sequential manner, from the first to the last event.
Therefore, it can quantify sequence effects, such as overload-induced residual stresses, which can
significantly alter the fatigue life of the piece.
6.
To stop a calculation in progress, press the ESC key.
7.
To select the Simplified modeling option, recommended for beginners, click Options on the Tools menu
and click the Simplified option on the Modeling tab. All life calculation windows are then significantly
simplified, and the hidden options are set to default values which are either the simplest or the traditionally
used by the fatigue design techniques.
8.
To change the idiom used in ViDa among English, Portuguese, French, German, Italian or Spanish, click
Options on the Tools menu and select the Idiom tab. You'll need to exit and restart ViDa to make the
changes effective. You can even add a 7th idiom if you have a Windows Resource editor to edit the
'Vida.res' file.
9.
To choose between SI or English units, click Options on the Tools menu and select the Units tab. All the
calculations and stress data in ViDa are then considered to be in MPa or ksi accordingly (even though the
Material database physically saves the data in SI units).
10.
To add one or more rows on the Loading Datasheet, highlight the number of rows to be added (by
dragging the mouse while pressing the left button), and click Add Rows on the Edit menu. The rows are
added above the selection.
11.
To delete one or more rows from the Loading Datasheet, highlight the rows to be deleted (by dragging the
mouse while pressing the left button), and click Delete Rows on the Edit menu.
12.
To replicate a group of rows of the Loading Datasheet (in order to enter repetitive blocks), select the rows
you want to copy (by dragging the mouse on them while clicking the left button), click Clone Block on the
Edit menu, and enter the number of times to copy this block. The copied blocks are inserted below the last
selected row.
13.
To assign a value to a group of cells of the Loading Datasheet, select the cells to be set (by dragging the
mouse), click Fill on the Edit menu, and enter the desired numerical value. Alternatively, try dragging one
cell with the mouse while pressing CTRL, to copy its value to all your selection.
14.
To multiply ALL the values of the Alternate and Mean (or Peak/Valley) columns of the Loading Datasheet
by a constant value, click Multiply by Constant on the Edit menu and enter the value of this constant.
15.
To convert the numerical values of ALL stresses on the Loading Datasheet from MPa to ksi (or ksi to
MPa), click MPa->ksi (or ksi->MPa) on the Edit menu. Note that this only changes the Loading Datasheet.
To choose English or SI units for the whole software, select Options on the Tools menu and the Units tab.
16.
To check the coherence (to avoid two successive peaks or valleys) of a Peak/Valley history, click Check
Peak/Valley on the Edit menu. The incoherent events are automatically eliminated from the Loading
Datasheet.
100
17.
To automatically convert the Loading Datasheet entries from Alternate/Mean to Peak/Valley components
(or vice-versa), click on the Peak/Valley (or Alternate/Mean) option above the Datasheet.
18.
The loading time is the duration in seconds of ALL events in the Loading Datasheet. Use it to estimate
how long it would take to end the life of the specimen, provided that the same loading rates would
continue to be applied.
19.
The Sequential Rainflow is a variation of the Rainflow that partially retains the loading order, which is very
useful both with the eN method and with the crack growth calculations (which are very sensitive to the
loading order). To perform it on a Peak/Valley history, click Sequential Rainflow on the Life menu.
20.
Be careful when using the amplitude filter (above the Loading Datasheet), since greater filter values can
significantly decrease the computational effort, but also can lead to non-conservative damage
calculations. To use it, type in a value different than zero and click Filter (Edit menu), Rainflow or
Sequential Rainflow (Life menu).
21.
Some keyboard commands for editing the Loading Datasheet: [Enter - move down one cell] [Arrows move along cells] [Ctrl+Arrows - jumps to the beginning or end of table] [Shift+Arrows - selects group of
cells, for copying, etc.] [Ctrl+dragging the mouse - copies current cell value to all your selection].
22.
To import a CSV file (*.csv) to the Loading Datasheet, click Open on the File menu and choose which
column to load. ViDa automatically eliminates points that are not peaks nor valleys. You can also specify a
conversion factor to multiply the loaded values and even use a Racetrack Filter to limit the size of the
history.
23.
To import output files from the Kyowa RHS-500A histogrammer into the Loading Datasheet, click Open on
the File menu and select the files of type 'Kyowa Files (*.1*)'.
24.
To import porthole files (*.port) from the ADINA Finite Element software into the Loading Datasheet, click
Open on the File menu and select the files of type 'ADINA Porthole Files (*.port; *.por)'.
25.
To expand or shrink any graph in ViDa, double-click on it with the mouse.
26.
To view the coordinates of a point in any graph, click on it with the mouse, and its coordinates will appear
in the Main Window status bar.
27.
To import CSV files (*.csv) to the Hysteresis Loops / Elliptic Cracks graph, right-click on the graph with the
mouse and select Import CSV File. You'll have the option to select 2 columns from the file to be plotted
against each other.
28.
To save the Hysteresis Loops / Elliptic Cracks graph values as a CSV file (*.csv), right-click on the graph
with the mouse and select Save As CSV File. You can later Import this CSV file to review old calculation
plots.
29.
To save most graphs in ViDa as a CSV file (*.csv), right-click on it with the mouse and select Save As
CSV File. The first row in the saved file will contain the legend titles of each set in the graph, and the
following rows will contain the respective data for each set.
30.
To print any graph in ViDa, change its axes scale (useful to keep the aspect ratio of plotted elliptical
cracks fronts) or even export its values as a CSV file (*.csv), right-click on it with the mouse and select the
appropriate command.
31.
To redraw the Hysteresis Loops graph using thin lines, right-click on it with the mouse and select Change
Curve Thickness. Making the curves thinner helps in visualizing graphs with too many lines.
32.
To toggle between Log-Log or Linear representations of any SN, eN and da/dN graphs, right-click the
respective graph with the mouse and choose the desired option.
Material Database Tips
33.
ViDa has a complete Material Database with stress-strain curves, SN, eN and da/dN data and many other
properties of over 400 materials! This database can be expanded by the user with no storage limits and all
the materials can be searched by user defined criteria. To enter the database, click Data | Material.
34.
If you change properties in the Material Database, you need to click Save on the File menu to be able to
use these changes in the life calculations. To create a new material, click Save As New on the File menu.
101
35.
To search for materials by their type (steels, alumina, etc.), by any property ranges (e.g. steels with Su
between 600 and 800 MPa), or any combinations of properties, click Search on the File menu of the
Material window. You can also sort the matching materials by any property.
36.
ViDa has a read-only table where you can browse through all available materials and property values, and
easily group or sort them by any property. To access the Browser Table you can either click Material
Browser on the Data menu, or go to the Material window and click Browser on its Tools menu.
37.
The simplest way to create a new material on the Material window is to click Clear All Properties on the
Edit menu, type in the material name, type and known properties, click Estimate Using Nominal Values on
the Tools menu (to estimate the unknown properties), and click Save As New on the File menu.
38.
The properties in red on the Material Database denote properties that were calculated/estimated from
others, without having been directly measured or imported from a reliable reference. This color can be
toggled by pressing the Space bar on the desired field (don't forget to save after).
39.
To estimate unknown material properties on the Material window, click Estimate Using Nominal Values on
the Tools menu. Each missing property is estimated from nominal values and the remaining known
properties, and it is color coded in red. For more information on the estimates, click on the Estimates Help
button.
40.
To toggle between True or Engineering stress-strain hardening curves on the Material window, right-click
the graph with the mouse and choose the desired option.
41.
You can store experimental data points for the each material on the Material window. SN, eN and da/dN
(Paris or Elber) curves can be automatically fitted to these points, and the calculated properties data can
be used in future calculations.
42.
To import a CSV file (*.csv) into an experimental data table (SN, eN or da/dN) of the Material window,
select the tab containing it and click Import on the Table menu.
43.
To fit the eN experimental data points on the Material window to a Coffin-Manson equation, click Fit eN on
the Tools menu. Note that since there are 4 constants in the eN curve, you need not only the values of 2N
and de/2, but also the corresponding stress variation dS/2.
44.
Steels x Alumina: Steels have in general a fatigue endurance limit (the SN curve elbow) associated to a
1,000,000 cycle life. Alumina, on the other hand, do not have an endurance limit. Also, the Notch
Sensitivity q doesn't depend on Su for Alumina, while for Steels it does depend.
SN Method and Welded Structures Tips
45.
The SN method is recommended only if the stress/strain history at the critical point - normally a notch root
- is elastic. If the loading induces plastic deformations at the critical point, then the eN method should be
used instead.
46.
It is recommended to use the Sequential Rainflow counter (which preserves most ordering information)
before any SN calculations on long loading histories. Fill in the Filter field (above the Loading Datasheet)
to enable the removal of small events that cause no damage, and click Sequential Rainflow on the Life
menu.
47.
The SN curve shown on the Material window is the Standard Estimated SN Curve, which ignores the
values of the endurance limit modifiers ka, kb, kc, kd and ke. These modifiers are then used to estimate
the Piece SN Curve, which is shown on the SN method window.
48.
ViDa lets you define the SN curve (N*S^b=c) in 3 ways: Automatic (interpolates the points [N,S]=[1000,
0.9*Su] and [1E6, Sf] for steels), b-Sf-Nf (uses [N,S]=[Nf, Sf] and the supplied value of b), and b-c-Nf
(uses the supplied values of b, c and the elbow location Nf, also enabling the 'Calculate b and c' buttons).
49.
To use a SN curve with 2 different slopes in fatigue calculations, enter a value different than zero for belb
(the b exponent after the elbow) either on the Material window or on the SN method window.
50.
Since both SN and eN methods should predict the same damage for high cycle calculations, it is possible
to estimate the SN curve parameters from the elastic part of the eN curve. On the SN method window,
click on the 'Calculate b and c (SN) from eN Curve' button.
102
51.
To automatically calculate the values of the endurance limit modifying factors ka, kb, kc and kd on the SN
(or eN) method window, enter the Surface Finish, the Type of Loading, the Effective Diameter, the
Ultimate Strength (Su) and the Operating Temperature of the piece. You can also alter these modifying
factors manually.
52.
To calculate the effective diameter of circular, rectangular, channel or I-beam cross sections under
bending, click on the Effective Diameter button on the SN (or eN) method window. ViDa uses this
diameter to automatically calculate the fatigue endurance limit modifying factor kb (the size factor).
53.
A better surface finish (ka) increases the fatigue endurance limit of a piece (less imperfections). Note that
it is the surface finish of the critical point (where the damage calculation is made) that matters. Note also
that the surface finish does not affect the fatigue life when significant plastic deformation is involved (eN).
54.
The endurance limit modifier kb (the size factor), despite being widely used, can be questioned under the
argument that since size effects are caused by stress gradients, the size that matters should be the notch
root, which is already considered by the notch sensitivity q. ViDa lets you choose to or not to use kb.
55.
Small specimens (high fatigue limit modifier kc) at lower temperatures (high kd) have greater fatigue
endurance limit than large ones (which have greater surface area subject to imperfections and high
stresses) at higher temperatures (easier dislocation propagation).
56.
Be careful not to include the stress concentration factor Kt or Kf in the value of the endurance limit
modifier ke. Remember that Kt is a parameter related to the applied stresses, while ke is related to the
specimen resistance, they're two different concepts.
57.
ViDa considers the mean load effect in the SN method calculations, as predicted by the Soderberg,
Goodman and Gerber damage models, and even by a custom model.
58.
For calculations using the SN method, some theories suggest that the stress concentration factor Kt
should only be applied to the alternate stress and ignored for the mean. To consider these theories, clear
the Use Kt in Smean option on the SN method window.
59.
For compressive mean stresses, the SaSm damage curve is modeled in ViDa as a straight line with a
slope ranging from 0% (flat) to 100% of the Goodman curve slope. The beneficial influence of
compressive mean stresses (which can extend life) can then be valorized by increasing this percentage
on the SN method window.
60.
To view the SaSm diagram for a user defined life (in number of cycles), right-click on it with the mouse on
the SN method window and choose Define Life for SaSm. The default plotting life is 1E6 cycles, but it can
be drawn for any other value. Note that this command doesn't influence at all the life calculation.
61.
To define the total damage value that characterizes failure of the piece, type the desired value on the 'End
of Life at Damage' field on the SN, IIW or eN method window. The Palmgreen-Miner rule suggests a total
damage value of 1, but you can enter any other value.
62.
To calculate Stress Concentration Factors (Kt) on the SN (or eN) method window, click either on the
Calculate Typical Kt button (which lets you calculate both Kt and q given a desired geometry and Su), or
on the Calculate Database Kt button (which lets you calculate Kt from previous entries in the Equation
Database).
63.
To easily calculate the stress concentration factor (Kt) and the notch sensitivity (q) of typical notched and
filleted bars and shafts, click Calculate Kt on the Tools menu (or on the SN method window), select the
desired specimen, and enter its dimensions.
64.
To add your own Stress Concentration Factor (Kt), Stress Intensity Factor (KI) or Crack Growth (da/dN)
equations, which will be available for future life calculations, click Equation on the Data menu.
65.
To easily calculate the notch sensitivity (q) for steels or alumina, given Su and the specimen notch radius,
click Calculate q on the Tools menu (or on the SN method window).
66.
To consider plasticity-induced sequence effects in SN, check 'Consider Residual Stress' on the SN
method window. When yielding occurs at the notch root, ViDa automatically switches to the eN method,
calculates the damage and induced residual stresses (later added to the mean stress component), and
switches back to the SN method.
103
67.
Fatigue design for welded structures is actually a simplified form of the SN method, based on full-sized
structures instead of small specimens. The methodology has been normalized by the International
Institute of Welding (IIW) and the American Welding Society (AWS), among others.
68.
Welded structures fatigue calculations do NOT depend on the material properties. They only depend on
the IIW Weld Joint Class.
69.
Welded structures are relatively insensitive to the mean component of the applied stresses, because a
large amount of residual stresses has already been introduced by the welding process, which is already
taken into account by the Weld Joint Class.
70.
The value of the Weld Joint Class, defined by the International Institute of Welding (IIW), is actually the
fatigue strength (in MPa) of the weld joint associated with a life of at least 2,000,000 cycles, within a 97%
reliability.
eN Method Tips
71.
To achieve reliable results by the eN strain-life method, it is highly recommended to calculate the correct
elastoplastic hysteresis loops which act at the critical notch root. To enable corrected hysteresis loops
calculations, click eN Method on the Life menu and check both the Calculate Hysteresis Loops and Loop
Corrections options.
72.
To calculate hysteresis loops in the eN calculations, check Calculate Hysteresis Loops on the eN method
window. Since not calculating the loops in general leads to unrealistic and probably non conservative
calculated strains, this option (combined with the Loop Corrections option) is highly recommended.
73.
The eN curve of any material should converge to its SN curve for high cycle lives, where elastic
deformations dominate. The eN method window lets you consider an elbow on the elastic component of
the eN curve (derived from the SN's fatigue endurance limit), and also plots together both SN and eN
curves for comparison purposes.
74.
When considering strain concentration factors on the hysteresis loops, two main theories are commonly
used: Linear theory, which considers Ke=Kt (strain concentration Ke is equal to Kt), and Neuber theory,
which uses Ke*Ks=Kt^2. ViDa lets you choose any of these theories on the eN method window.
75.
The eN method window lets you automatically correct the eN curve elastic exponent b using
Sf=ka*kb*kc*kd*ke*Sf' (the SN curve approach), introduce an elbow (with the Consider SN Curve Elbow
option), and even set a value of the eN curve slope after this elbow (by setting the SN curve's exponent
belb).
76.
Since all plastic events induce memory, it is strongly recommended that the eN method be applied to the
original sequence of the loading stresses. You should not rainflow count the loading before eN
calculations, it is recommended that you select the option to rainflow count the calculated strains (on the
eN method window) instead.
77.
Rainflow counting the calculated strains is the recommended method for eN calculations (available on the
eN method window). Rainflow counting the stress history before drawing the hysteresis loops alters the
loading order, ending up with wrong hysteresis loops and wrong calculated damage!
78.
When Rainflow counting the calculated strains (on the eN method window), the hysteresis loops are
calculated following the original loading order, the resulting calculated strain history is Rainflow counted,
and finally the eN life calculation is performed. The user can also input a strain amplitude filter, in
microstrains.
Crack Growth Calculation Tips
79.
To obtain the A and m coefficients of the Paris da/dN equation (da/dN=A*deltaK^m) from the Rolfe-Barson
estimates, click the 'Rolfe-Barson' button on the da/dN method window. These estimates are only valid for
steels, and they depend only on its microstructure.
104
80.
To obtain the constants of the Paris law (da/dN = A*dK^m) from the eN curve parameters, click the 'From
eN Curve' button on the da/dN method window. These estimates use the assumption that the crack
growth is caused by the successive breaking of tiny eN specimens, each with a width da, which fail when
they achieve their critical damage.
81.
To adjust almost any da/dN curve to your experimental data, fit them to the Paris and Elber laws on the
Material window, and select any da/dN formula on the Crack Growth window. Finally, tune in its
coefficients by interactively editing the variables and redrawing the da/dN graph until it is visually
compatible with the fitted Paris and Elber curves.
82.
To plot a da/dN equation on the Crack Growth window for different values of R=Kmin/Kmax, right-click on
the da/dN graph with the mouse, choose Vary R, and input the range of the R values and the number of
curves to be plotted. This plot is very useful to visualize the influence of R on crack growth for each da/dN
equation.
83.
The Critical Stress Intensity Factor (KIc), the amount of energy absorbed during a standard Charpy test,
and the value of the critical CTOD (Crack Tip Opening Displacement) are all measures of fracture
toughness.
84.
Traditional Rainflow counting of the loading history alters its original sequencing and, in consequence, the
calculated crack growth. It is strongly recommended to use instead the Sequential Rainflow counter
before any crack growth calculations.
85.
To calculate crack growth sequentially (instead of the RMS approach), click on the Sequential tab on the
Crack Growth window. The crack increment per half-cycle is then assumed to be: dai = f(deltaKi,Ri)/2,
where deltaKi and Ri are the respective stress intensity range and loading ratio, and f is the crack growth
law.
86.
To calculate crack growth using the Root Mean Square approach, click on the Krms tab on the Crack
Growth window. A RMS stress value of all the loading history is calculated and then used to integrate the
da/dN equation (instead of sequentially calculating the crack growth for each loading).
87.
To calculate the number of cycles it takes to reach a certain crack size, set a value different than zero to
the 'Final Value' field on the Crack Growth window. This value is the maximum allowable crack length,
after which the calculation stops. The Bidimensional Crack Growth window also has this feature, and you
can set both a and c Final Values.
88.
ViDa recognizes retardation and even crack arrest effects in crack growth calculations. To consider
retardation effects, go to any crack growth window and type the Wheeler exponent of the material on the
Retard Effect field. To consider crack arrest effects, check as well the M.W. (Modified Wheeler) option.
89.
Crack growth retardation effects are modeled using the Wheeler approach, where each instantaneous
crack growth rate da/dNi is multiplied by a retardation factor (which is a function of eventual stress
overloads). The Modified Wheeler (M.W.) approach is very similar, except that it corrects deltaKi, which
can predict crack arrest.
90.
ViDa predicts the behavior of surface cracks by calculating crack growth both sideways and in depth,
considering the changes in crack shape and the retardation and crack arrest effects. Click Bidimensional
Crack Growth on the Life menu, and choose among Semi-Elliptic, Corner or Internal cracks.
91.
The bidimensional crack model in ViDa assumes corner cracks to be a quart ellipsis, surface cracks a
semi ellipsis and internal crack a full ellipsis, recognizing that these cracks normally change their shape
ratio during the propagation, i.e., despite remaining elliptical they can vary the a/c ratio at each loading
cycle.
92.
You can choose among several different plots in the Bidimensional Crack Growth calculations. For
instance, you can plot KI in depth against KI in the width direction, or even plot the shape of the crack
fronts.
93.
It is possible to consider the loading history as a superposition of Normal and Bending stresses on some
of the pieces of the Bidimensional Crack Growth window. Use the Tension and Bending Factor fields to
set the values (from 0 to 1) by which the loadings are multiplied.
105
Other Tips
94.
You can calculate equivalent stresses (or strains) for a 3D-stress history (with normal and shear
components, each with its own stress concentration factor) using Mises or Tresca criteria on the
Equivalent Stress window. Click Equivalent Stress on the Tools menu to enter it. The resulting 1D
components can then be used for life calculations.
95.
When working with a 3D-stress history that will be used in crack growth calculations, choose Maximum
Principal Stress on the Calculate menu. This option is most appropriate for crack growth since cracks tend
to grow perpendicular to the maximum tensile stress direction, not being influenced by compressive
stresses.
96.
You can calculate equivalent stresses (or strains) for a list of strain triplets measured from a rectangular or
delta Rosette on the Equivalent Stress window. Click Equivalent Stress on the Tools menu to enter it. The
resulting 1D components can then be used for life calculations.
97.
When working with strain triplets from a Rosette, click Principal Direction on the Calculate menu to view
the principal directions. If these directions significantly vary along the history, using the Maximum Stress
values could be too conservative. Instead, type an average value on the Direction field and click Projected
Stress (or Strain).
98.
An alphanumeric calculator that computes any formula using the material properties and user-defined
variables is available by clicking Smart Calculator on the Tools menu. It features some basic Mechanics of
Solids equations, and computed results (in SI or English units) can be multiplied to the loadings in the
Loading Datasheet.
99.
The Smart Calculator can easily convert force histories on known geometries into stresses. It has built-in
Mechanics of Solids equations (e.g. bending, torsion, Mises), it is linked to the Kt database, and it lets you
multiply forces on the Loading Datasheet by the calculated conversion factor, obtaining the associated
stress history.
100. The Input File Formats recognized by ViDa are: Peak/Valley (*.pic), Alternate/Mean (*.alt), 3D Peak/Valley
(*.p3d), Rosette Peak/Valley (*.ros), CSV (*.csv), Excel (*.xls), ADINA porthole (*.port; *.por), Kyowa
histogrammer (*.1*), Calculation Logbook (*.log) and Variables Table (*.var) files.
101. The main files installed in the ViDa directory are: Vida.exe (the main program), vida.ini (keeps all user
settings since the last time ViDa was loaded), vida.mdb (material and equation database file), vida.res
(resource file with all the strings in ViDa, in up to 7 different idioms), vida.hlp and vida.cnt (ViDa help and
table of contents files).
102. The word 'fatigue' originated from the Latin expression 'fatigare' which means 'to tire'. Even though it has
become a terminology in engineering vocabulary a long time ago, its first descriptive definition was
published in 1964 in the 'General Principles for Fatigue Testing of Metals', in Geneva.
103. Griffith's pioneering work in 1921 with brittle materials, such as glass, originated all modern theories of
fracture in metals. However, Griffith was fired because his employer never understood why a metal
researcher was working with glass specimens!
104. Paris, one of the fathers of LEFM, was the first to suggest that crack growth could be related to the stress
intensity factor, but his original paper was not accepted by any leading journal in his field. He ended up
publishing his famous paper in 1961 on his university's news bulletin, 'The Trend in Engineering'!
105. The fatigue failures of the jet aircraft Comet, which led to several accidents in the 1950s, heavily
obstructed the prominent role played by the British aircraft industry. It is widely believed that this fatigue
problem served as a catalyst in the emergence of the rival Boeing in USA as a world leader in commercial
aviation!
106. To see who's behind ViDa, click the authors' names on the About window!
106
_____________________________________________________________________________________
CHAPTER
5
Advanced Issues
This chapter covers a variety of topics, ranging from troubleshooting most common problems to viewing
details on the ViDa input files.
Contents
Troubleshooting
Database Information
Input File Formats
107
Troubleshooting
This topic shows frequently asked questions and troubleshooting of ViDa.
Problems During ViDa Installation
My CD-ROM can’t read the ViDa CD.
ViDa comes in a recordable CD media (called CD-R), requiring a CD-ROM drive with Multiread capability.
Most CD-ROM drives are Multiread compatible, however older ones may not be fast enough to run the
ViDa CD. If you have access to a computer with a Multiread CD-ROM, you can copy the files in the
Setup2002 directory to 1.44 MB diskettes, and then install ViDa on the original computer.
I inserted the ViDa CD, but nothing happened.
The ViDa CD features autorun, so a few seconds after being inserted it should display a welcome window.
If autorun doesn’t start, double-click on the AUTORUN.EXE file in the Windows Explorer.
The setup program is interrupted in the beginning of the installation process.
Check if you have previously run the ViDa setup and canceled the installation. Sometimes Windows
‘forgets to delete’ temporary files in your computer (especially in the c:\Windows and c:\Windows\Temp
directories) that may cause problems in future installations. To correct this problem, search and delete all
vida*.cab files that you might find in your Windows (or Winnt) folder. Delete also the folder Msftqws.pdw
(if any) from the Windows\Temp folder. Finally, if any of the files \Windows\System\Vb6stkit.dll or
\Windows\St6unst.exe has a size of 0 bytes, delete them. Then retry installing ViDa.
I received an ‘access violation’ error message.
Access violation errors occur when you try to install files that are already running in your computer. Just
choose ‘Ignore’ and then confirm by pressing ‘Yes’. This message is very common with the mfc40.dll file.
To prevent these messages, it is recommended to close all open applications before installing, or even
restart your computer before installation.
I received a ‘path/file access’ error message at the end of the installation.
Just click ‘Retry’ and the installation will proceed. This error may occur if you previously tried to install ViDa
and aborted the installation process. To avoid this message, search and delete all vida*.cab files that you
might find in your hard-disk before installation.
When I run ViDa for the first time, I receive a message that some file is missing.
The ViDa CD contains copies of all installed files in the AllFiles directory. Copy the missing file to the
hard-disk and retry running ViDa. You might need to uncheck the ‘Read-Only’ attribute of the copied file in
your hard-disk.
If the missing file is nslock15vb6.ocx, you’ll also need to register it. Copy this file from the AllFiles
directory in the CD to your Windows\System directory. Then register the control by clicking on Start
menu, selecting ‘Run’ and typing:
regsvr32 c:\windows\system\nslock15vb6.ocx
If you still have problems, run the \AllFiles\Vbrun60.exe file from your CD, and retry the above.
108
Problems While Running ViDa
The numbers after the decimal point in any text box are disappearing after I type them.
Check if the Decimal Symbol from the Regional Settings (Windows Control Panel) is set to a point (.).
ViDa may not work properly if the decimal point is set to comma (,).
Data from a CSV (comma separated value) file is not properly loaded to ViDa.
Check if the List Separator from the Regional Settings (Windows Control Panel) is set to a comma (,).
I can’t load an Excel file into ViDa.
You need to have Microsoft Excel 97 or later installed in your machine to open Excel files in ViDa.
I can’t see the ViDa papers.
ViDa installs all necessary files to display the slides in your machine. However, if you still have a problem,
you can install Microsoft PowerPoint Viewer by running the installation file Vueo6k1o.exe, located in the
Media sub-directory of ViDa.
When I run ViDa, I receive a message that some file is missing.
The ViDa CD contains copies of all installed files in the AllFiles directory. Copy the missing file to the harddisk and retry running ViDa. You might need to uncheck the ‘Read-Only’ attribute of the copied file in your
hard-disk.
Database Information
The ViDa database contains properties of all materials used in the program and also the Kt, KI and da/dN
equations database. It is a Microsoft Access 97 database consisting of the ViDa.mdb file. Make sure that
this file is present in the same directory as the ViDa.exe file.
The user doesn’t need to have Microsoft Access since all data can be entered through the ViDa program.
109
Input File Formats
This topic shows a description of the 8 file formats used by ViDa. These files are:
Peak/Valley files (*.pic)
Alternate/Mean files (*.alt)
3D Peak/Valley files (*.p3d)
Rosette Peak/Valley files (*.ros)
CSV files (*.csv)
Kyowa histogrammer output files (*.1*)
Calculation Logbook files (*.log)
Variables Table files (*.var)
Peak/Valley files (*.pic)
ASCII files containing a sequence of peaks and valleys. The first row contains the number of remaining
rows in the file (the number of events), the value of the Table Option (0 for Stress values and 1 for Strain
values) and the Loading Time in seconds (duration of ALL the loading history).
The remaining rows contain the values of the peaks and valleys.
Example of a (*.pic) file for 4 loadings expressed in strains and duration of 6 seconds:
4
1
6
0
1000
500
1800
Alternate/Mean files (*.alt)
ASCII files containing a sequence of alternate and mean components. The first row contains the number
of remaining rows in the file (the number of events), the value of the Table Option (0 for Stress values and
1 for Strain values) and the Loading Time in seconds (duration of ALL the loading history).
The remaining rows contain the values of the alternate and mean components and the number of half
cycles in which they were applied.
Example of an (*.alt) file for 2 loading events (10000 cycles of 0 to 100 to 0 and 4000 cycles of -70 to 70 to
-70) expressed in stresses and duration of 3600 seconds:
2
0
3600
50
50
20000
70
0
8000
3D Peak/Valley files (*.p3d)
ASCII files containing a sequence of peaks and valleys for all 6 tensor components XX, YY, ZZ, XY, XZ
and YZ . The first row contains the number of remaining rows in the file (the number of events), the value of
the Table Option (0 for Stress values and 1 for Strain values) and the values of the stress concentration
factors for each of the 6 tensor components.
The remaining rows contain the values of the peaks and valleys for each of the tensor components XX,
YY, ZZ, XY, XZ and YZ.
Example of a (*.p3d) file for 5 loadings expressed in stresses and stress concentration factor of 2 in the ZZ
and YZ directions:
5
0
1
1
2
1
1
2
100
50
200
0
0
0
-50
-100
0
0
0
0
200
200
200
0
0
0
50
50
40
10
15
25
0
0
0
-10
15
-25
110
Rosette Peak/Valley files (*.ros)
Files containing a sequence of strain peaks and valleys for all 3 Rosette direction components A, B and
C. The first row contains only the number of remaining rows in the file (the number of events). Note that all
Rosette data represent Strain values, expressed in microstrains.
The remaining rows contain the values of the strain peaks and valleys for each of the rectangular (or
delta) Rosette components A, B and C.
Example of a (*.ros) file for 4 loadings:
4
1000
500
2000
-500
-1000
0
2000
2000
2000
500
500
400
CSV (Comma Separated Value) files (*.csv)
Files containing a list of data separated by commas. These files can be automatically generated from many
other software such as the Instron’s Wavemaker or Microsoft Excel. One of the columns of these files
can be loaded to the Loading Window.
The first row contains the titles describing each of the columns of the following rows. The next rows have
sequential data corresponding to the fields described in the first row.
Note: in order to load these files to ViDa, check if the List Separator from the Regional Settings
(Windows Control Panel) is set to a comma (,).
Example of a (*.csv) file with 4 values:
Time, Sequence, Block, Cycle, Position mm, Load kN, Strain
0,
1,
1,
1,
0.087,
0.37,
-0.0034
0.006, 1,
1,
1,
0.096,
1.51,
-0.0019
0.008, 1,
1,
1,
0.10,
3.06,
-0.0024
0.01, 1,
1,
1,
0.11,
4.97,
-0.0028
Kyowa histogrammer output files (*.1*)
Output file generated from the Kyowa RHS-500A histogrammer. These are rather specific files that ViDa
recognizes and therefore won’t be described here in this help. Refer to the Kyowa RHS-500A
histogrammer Manual for more information on these files.
Calculation Logbook files (*.log)
Files containing data from all 5 tables of the Calculation Logbook window.
The first row contains the number of rows of each of the tables SN, eN, da/dN, IIW and da/dN 2D (in that
order). Let these numbers be a, b, c, d and e. Then the next 6*(a-1) rows in the file contain data from the
SN table (counting from left to right for each row in the table). Then the next 7*(b-1) rows contain data from
the eN table, the next 5*(c-1) from the da/dN table, the next 4*(d-1) from the IIW table and finally the last
6*(e-1) rows contain data from the da/dN (2D) table. When a cell doesn’t contain any data then a minus (-)
character is saved.
Variables Table files (*.var)
Contains the values of all variables of the Variables Table.
Each row contains one of the values. The 22 rows contain respectively the values of a, A, b, B, c, d, D, h,
H, I, L, m, n, p, r, s, t, v, w, x, y and z.
111
_____________________________________________________________________________________
References
Papers:
1 - Meggiolaro, M.A. & Castro, J.T.P., "ViDa - Software for Fatigue Life Prediction under Complex
Loadings", III Symposium on Experimental Stress Analysis, pp.7-10, ABCM (Brazilian Society of Mech.
Eng.) 95 (in Portuguese).
2 - Meggiolaro, M.A. & Castro, J.T.P., "Advances in Fatigue Design Automation under Complex Loadings",
II Fracture Mechanics Seminar, pp.99-118, ABM 96 (in Portuguese).
3 - Meggiolaro, M.A. & Castro, J.T.P., "Remarks on Fatigue Design under Complex Loadings using the eN
Method", IX SIBRAT (COTEQ 96), pp.157-160, IBP & ABCM 96 (in Portuguese).
4 - Meggiolaro, M.A. & Castro, J.T.P., "Comments on Fatigue Crack Propagation under Complex
Loadings", IX SIBRAT (COTEQ 96), pp.145-148, IBP & ABCM 96 (in Portuguese).
5 - Castro, J.T.P. & Meggiolaro, M.A., "Residual Life Prediction of Cracked Structures", Proceedings of
COTEQ 97, pp.263-268, IBP and ABCM, 97 (in Portuguese).
6 - Meggiolaro, M.A & Castro, J.T.P., "Equationing of Fatigue Crack Growth Curves”, Proceedings of the II
International Congress of Metallurgic and Material Technology, ABM, 97 (in Portuguese).
7 - Meggiolaro, M.A & Castro, J.T.P., "Sequencing Effect Modeling in Fatigue Crack Growth", Proceedings
of the II International Congress of Metallurgic and Material Technology, ABM, 97 (in Portuguese).
8 - Meggiolaro, M.A & Castro, J.T.P., "Sequencing Effects in Hysteresis Loop Prediction using the eN
Method", Proceedings of the II International Congress of Metallurgic and Material Technology, ABM,
97 (in Portuguese).
9 - Meggiolaro, M.A. & Castro, J.T.P., "ViDa 96 - Visual Damagemeter to Automate Fatigue Design under
Complex Loading", submitted to RBCM, 97 (in Portuguese).
10 - Castro, J.T.P. & Meggiolaro, M.A., "Remarks on the Automation of the eN Method for Fatigue Design
under Complex Loading", submitted to RBCM (in Portuguese).
11 - Castro, J.T.P. & Meggiolaro, M.A., "A Note on the Modeling of the Fatigue Crack Growth Curve",
submitted to RBCM (in Portuguese).
12 - Castro, J.T.P. & Meggiolaro, M.A., "A Note on the Automation of Fatigue Crack Propagation
Reckoning under Complex Loading", submitted to RBCM (in Portuguese).
Courses:
1 - "Advances in Fatigue Design Automation" - Marco A. Meggiolaro and Prof. Jaime Tupiassú P. de
Castro, Ph.D. - August 7-9, 1996 - PUC-Rio, Rio de Janeiro - RJ, Brasil.
2 - "ViDa - Visual Damagemeter to Automate Fatigue Design under Complex Loading" - Marco A.
Meggiolaro and Prof. Jaime Tupiassú P. de Castro, Ph.D. - November 12, 1996 at M.I.T. and
November 13, 1996 at UConn.
112