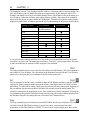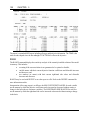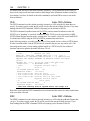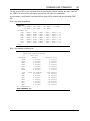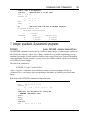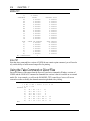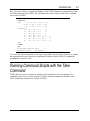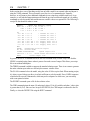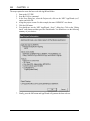
1
LINDO User’s Manual LINDO Systems, Inc. 1415 North Dayton Street, Chicago, Illinois 60622 Phone: (312)988-7422 Fax: (312)988-9065 E-mail: [email protected] WWW: http://www.lindo.com COPYRIGHT LINDO software and its related documentation are copyrighted. You may not copy the LINDO software or related documentation except in the manner authorized in the related documentation or with the written permission of LINDO systems, Inc. TRADEMARKS LINGO is a trademark, and LINDO and What’sBest! are registered trademarks, of LINDO Systems, Inc. Other product and company names mentioned herein are the property of their respective owners. DISCLAIMER LINDO Systems, Inc. warrants that on the date of receipt of your payment, the disk enclosed in the disk envelope contains an accurate reproduction of the LINDO software and that the copy of the related documentation is accurately reproduced. Due to the inherent complexity of computer programs and computer models, the LINDO software may not be completely free of errors. You are advised to verify your answers before basing decisions on them. NEITHER LINDO SYSTEMS, INC. NOR ANYONE ELSE ASSOCIATED IN THE CREATION, PRODUCTION, OR DISTRIBUTION OF THE LINDO SOFTWARE MAKES ANY OTHER EXPRESSED WARRANTIES REGARDING THE DISKS OR DOCUMENTATION AND MAKES NO WARRANTIES AT ALL, EITHER EXPRESSED OR IMPLIED, REGARDING THE LINDO SOFTWARE, INCLUDING THE IMPLIED WARRANTIES OF MERCHANTABILITY, FITNESS FOR A PARTICULAR PURPOSE OR OTHERWISE. Further, LINDO Systems, Inc. reserves the right to revise this software and related documentation and make changes to the content hereof without obligation to notify any person of such revisions or changes. ACKNOWLEDGMENTS We gratefully acknowledge Mr. Fritz Raffensperger for his contributions to the LINDO Systems, Inc. user’s manuals. Copyright © 2003 by LINDO Systems, Inc. All rights reserved. Published by LINDO SYSTEMS INC. 1415 North Dayton Street Chicago, Illinois 60622 Technical Support: (312)988-9421 E-mail: [email protected] WWW: http://www.lindo.com iii Table Of Contents Table of Contents ........................................................................................ iii Preface........................................................................................................... v Ch 1 Getting Started with LINDO................................................................. 1 A Note About This Manual....................................................................................... 2 Installing .................................................................................................................. 3 Entering a Model in Windows .................................................................................. 4 Entering a Model from the Command Line.............................................................. 8 Model Syntax......................................................................................................... 12 A Staff Scheduling example .................................................................................. 21 Ch 2 LINDO for Windows ........................................................................... 25 LINDO for Windows Commands in Brief ............................................................... 25 The Commands in Depth....................................................................................... 28 File Menu ........................................................................................................... 29 Edit Menu ........................................................................................................... 41 Solve Menu ........................................................................................................ 58 Reports Menu..................................................................................................... 71 Window Menu................................................................................................... 102 Help Menu ........................................................................................................ 110 Ch 3 LINDO for Command-line Environments ....................................... 115 Commands in Brief .............................................................................................. 115 The Commands in Depth..................................................................................... 118 Information Commands .................................................................................... 118 Input Commands .............................................................................................. 120 Display Commands .......................................................................................... 127 File Output Commands .................................................................................... 144 Solution Commands ......................................................................................... 151 Problem Editing Commands............................................................................. 159 Integer, Quadratic, & Parametric Programs Commands.................................. 167 Conversational Parameters Commands .......................................................... 180 User Supplied Subroutines .............................................................................. 182 Miscellaneous Commands ............................................................................... 183 Quit................................................................................................................... 189 Ch 4 Integer Programming....................................................................... 191 Branch-and-Bound Solution Method ................................................................... 192 Solving Difficult Integer Programs ....................................................................... 193 Setting an Optimality Tolerance ....................................................................... 194 iv TABLE OF CONTENTS Exploiting a Known Good Solution to an IP...................................................... 194 Benders Decomposition ................................................................................... 194 Tightening Loose IP Formulations ................................................................... 194 Ch 5 Quadratic Programming .................................................................. 197 Debugging Quadratic Programs and the POSD Command ................................ 201 Parametric Analysis of Quadratic Programs........................................................ 202 Ch 6 Analyzing & Debugging a Model..................................................... 205 Model Statistics ................................................................................................... 205 Perusing a Model for Errors................................................................................. 206 Debug Command ................................................................................................ 209 Ch 7 Interfacing with the Outside World................................................. 211 Using External Editors with LINDO...................................................................... 211 Running Command Scripts with the Take Command.......................................... 217 Integrating LINDO Into Other Applications .......................................................... 219 Conclusion........................................................................................................... 229 Ch 8 LINDO Callable Libraries ................................................................. 231 LINDO Callable Library Routines ........................................................................ 231 General Application Requirements...................................................................... 244 Sample Matrix Generators................................................................................... 245 Calling LINDO from Other Languages................................................................. 264 Integer Programming User Interface ................................................................... 264 Monitoring the Solver........................................................................................... 265 Ch 9 Numerical Considerations............................................................... 267 Appendix A Error Messages (List) ......................................................... 271 INDEX......................................................................................................... 291 v Preface We have been busy adding a number of features to LINDO since the manual was last published. The most significant new features include: Windows version with pull down menus, full editing capabilities, graphics, and numerous additional user-friendly features. Improved performance and robustness of the linear and integer solvers. Windows DLL version of the callable library. Model debugging capability for finding a minimal set of constraints (variables) leading to an infeasible (unbounded) model. Additional callable routines in the programming library. Lexico optimization feature for performing goal programming. Improved basis save and retrieve functions. Permuted nonzero picture for viewing models in (as close as possible to) lower triangular form. MPSX compatible solution reports. We hope you enjoy this new release of the LINDO software. Please feel free to contact us at any time regarding questions or suggestions at: LINDO Systems, Inc. 1415 N. Dayton Chicago, IL 60622 Tel: 312/988-7422 Fax: 312/988-9065 E-mail: [email protected] WWW: http://www.lindo.com vi PREFACE 1 1 Getting Started with LINDO What Is LINDO? LINDO (Linear, INteractive, and Discrete Optimizer) is a convenient, but powerful tool for solving linear, integer, and quadratic programming problems. These problems occur in areas of business, industry, research and government. Specific application areas where LINDO has proven to be of great use would include product distribution, ingredient blending, production and personnel scheduling, inventory management... The list could easily occupy the rest of this chapter. The guiding design philosophy for LINDO has been that, if a user wants to do something simple, then there should not be a large setup cost to learn the necessary features of LINDO. If, for example, a user wishes to: Maximize 2X + 3Y Subject to 4X + 3Y < 10 3X + 5Y < 12 then that is exactly what the user types into LINDO immediately after starting the program.1 At the other extreme, LINDO has been used to solve real industrial linear, quadratic, and integer programs of respectable size. For commercial applications, LINDO is frequently used to solve problems with tens of thousands of constraints and hundreds of thousands of variables. There are three basic styles of using the LINDO software. For small to medium sized problems, LINDO is simple to use interactively from the keyboard. Entering a model is quite easy to do. It’s also possible to use LINDO with externally created files, which contain scripts of commands and input data, to produce files for reporting purposes. Finally, custom-created subroutines may be linked directly with LINDO to form an integrated program containing both your code and the LINDO optimization libraries. The LINDO software is designed to be simple to learn and use. This is particularly true for small problems. In the remainder of this chapter, we’ll look at the basic commands and syntax necessary to enter and solve a small problem. Then, take a quick look at one larger real-world problem. 1 The strict inequality < is interpreted to mean the loose inequality ≤. Most keyboards do not have the latter, so LINDO allows the former to be used in its place. 2 CHAPTER 1 A Note About This Manual The commands in this manual are separated into Windows and Command-line sections. Although they are presented separately, the Windows version of LINDO does have a Command Window with all the command-line commands available. This manual is intended to be a comprehensive manual for both Windows and Command-line users. Please refer to the Table of Contents or Index for reference to sections on the two versions. There are a few conventions used in this manual that, although they may be the standard for many user's manuals, it would be good to take note of. First, in all interactive examples of LINDO commands, the characters to be entered by the user are in boldface lettering and the output by LINDO is interspersed throughout in regular type. Second, the Command-line commands and all Windows commands not available in the menus are displayed in boldface, capital letters. The arguments to be entered by the user with these commands are in italics and surrounded by the "<" and ">" signs. Finally, when there is a choice between using one of two arguments for a command, the arguments are shown as follows: <argument1|argument2> with the "|" character signifying the decision. This manual also uses certain terms interchangeably to help the user understand how the LINDO internal solver transforms a linear programming model into a matrix the computer can comprehend. Variables in a linear programming model appear to the internal solver as columns in a matrix. The constraints appear as the rows of this matrix. Therefore, throughout this user's manual, variables are referred to as columns, constraints are referred to as rows, and vice versa. One last distinction to make about this manual is the meaning of the term "external editor". An editor includes any application that has the capability to read an ASCII text file and make changes to the characters in that file. This includes applications that are commonly referred to as wordprocessors, such as MS Word. However, wordprocessors tend to have many more capabilities than just text editing that are not required to edit a LINDO text file. MS Notepad is a text editor that is generally included with new PCs. Any of these applications would qualify as an external editor as defined in this manual. The underlying algorithm used by LINDO's internal engine is the Revised Simplex Method with Product form Inverse. However, the intent of the LINDO User’s Manual is to focus on the mechanics of using the LINDO software. Perhaps the most challenging and rewarding aspect of mathematical programming is the ability to develop a concise and accurate model of a particular problem. A well crafted model can be solved in a short amount of time, whereas a model that is not as well thought out might take more than a reasonable amount of time on the fastest hardware available. Although we touch on the topic of modeling briefly in this manual, it will not be our primary focus. For the interested reader, an in-depth discussion of modeling in an array of application areas and the details on the variations of the Simplex method algorithm are contained in the companion LINDO textbook, Optimization Modeling with LINDO, by Linus Schrage. Users who do not already have a copy of the textbook might wish to consider acquiring one as well. Please refer to the cover page for information on how to contact LINDO for technical support and acquiring other products. GETTING STARTED 3 Installing LINDO Installing the LINDO software is straightforward on most platforms. To run LINDO for Windows, we recommend a computer with at least a 386 processor and coprocessor capabilities running Windows 3.1, Windows 95 or Windows NT. In general, you will need at least 16Mb of RAM and 10Mb of free disk space. A faster processor and additional memory may allow LINDO to solve tougher problems and/or improve performance. It should be noted that these are minimums and there may be higher requirements needed to solve models that approach the limits of the various versions. To install a PC Windows version of LINDO under Windows 3.1 and Windows NT, simply insert the LINDO CD, double-click on the LINDO folder to open it, and then double-click on the Setup icon to run LINDO's setup program. Setup will do all the required work to install LINDO on your system and will prompt you for any required information. Once you exit LINDO's Setup program, you can run LINDO by double-clicking on the LINDO icon in the LINDO folder, which should open on your desktop. Some versions of LINDO require you to enter a password the first time LINDO is run. If you need to enter a password, LINDO will display the following dialog box: If you don't know your password, check for it on the back of the CD sleeve. Carefully enter your password into the edit field, including hyphens, making sure that each character is correct. Click the OK button and, assuming the password was entered correctly, LINDO will display the Help|About box listing the features of your license. Verify that these features correspond to the license you intended to install. Note: If you were e-mailed your password, then you have the option of cutting and pasting it into the password dialog box. Cut the password from the e-mail that contains it and paste it directly into the LINDO password dialog box with the Ctrl-V shortcut. 4 CHAPTER 1 LINDO users on platforms other than Windows should refer to the installation instructions that came with your copy of LINDO for platform specific instructions. Now, let’s illustrate how to get started using LINDO by entering a small model. Entering A Model in Windows This next section illustrates how to input and solve a small model in the Windows version of LINDO. If you are running LINDO on a platform other than Windows, please jump ahead to the next section: Entering a Model from the Command Line. When you start LINDO, your screen should resemble the following: The outer window labeled LINDO is the main frame window. All other windows will be contained within this window. The main frame window also contains all the command menus and the command toolbar. The smaller child window labeled <untitled> is a new, blank Model Window. We will type our sample model directly into this window. For our sample model, let us assume XYZ Corporation produces two models of computer: Standard and Deluxe. At the XYZ facilities, the Standard can be produced at 10 computers per day, while the Deluxe exceeds that at 12 computers per day. Furthermore, XYZ has a limited supply of labor. In particular, there are a total of 16 units of labor. Standard computers require one unit of labor, while Deluxe computers are relatively more labor intense with a requirement of 2 units of labor A LINDO model has a minimum requirement of three things. It needs an objective, variables, and constraints. GETTING STARTED 5 The first requirement, an objective, is just what it sounds like: a goal. You have the choice of two goals, MAX or MIN, which stand for maximize and minimize. In a typical business situation, for instance, you might want to maximize profit or minimize cost. The first word in a LINDO model must be either MAX or MIN. The formula you enter after the MAX or MIN is called the objective function. In this example, XYZ wants to maximize profit achievable with the limited labor and production facilities available. We will let STD and DLX be our variables, which are things you want LINDO to adjust to reach your maximum. In this sample model, STD has a profit contribution of 10 and DLX has a profit contribution of 15. The important thing is that they are variable. In LINDO, the minute you use a variable in your model, it exists. You don’t have to do anything other than enter it in a formula. You enter: MAX 10 STD + 15 DLX followed by a return. Now, let’s look at constraints. In some ways, constraints are the most important part of your model and they require some real thinking. In the little example we’re considering, if you were to maximize 10 STD + 15 DLX now, there’s no limit to how many Standard and Deluxe computers you could produce. Of course, there must be some limit. In this example, the limit is the factory output and the labor supply. So, let’s constrain both STD and DLX to be less than the factory capacity available per day of 10 and 12, respectively. You do this by entering the words SUBJECT TO on the next line of your model (or just the letters ST), pressing the return key, and entering STD < 10 and DLX < 12 on the following two lines. Note that LINDO interprets the < symbol as meaning “less-than-or-equalto” rather than strictly “less than”. If you prefer, you may alternatively enter <= in place of the < character. Very well, we’ve constrained the variables by computer production available at the factories. We now add the labor constraint of 16 units of labor by entering: STD + 2 DLX < 16 on the next line. Finally, on the line after that, we designate the end of the constraints by adding: END 6 CHAPTER 1 After entering the above, your screen should look like this: Your model has now been entered and it’s ready to be solved. To begin solving the model, select the ) on the toolbar at the top of the Solve command from the Solve menu, or press the Solve button ( window. LINDO will begin by trying to compile the model. This means LINDO will determine whether the model makes mathematical sense, and whether it conforms to syntactical requirements. If the model doesn’t pass these tests, you’ll be informed with the following error message: An error occurred during compilation on line: n LINDO will then jump to the line where the error occurred. You should examine this line for any syntax errors and correct them. If there are no formulation errors during the compilation phase, LINDO will then begin to actually solve the model. When LINDO’s internal solver initiates, it displays a Status Window on your screen that looks like the following: GETTING STARTED 7 This Status Window is useful for monitoring the progress of the solver. A description of the various fields and controls within the Status Window appear in the table below. Field/Control Status Iterations Infeasibility Objective Best IP IP Bound Branches Elapsed Time Update Interval Interrupt Solver Close Description Gives status of current solution. Possible values include: Optimal, Feasible, Infeasible, and Unbounded. Number of solver iterations. Amount by which constraints are violated. Current value of the objective function. Objective value of best integer solution found. Only relevant in integer programming (IP) models. Theoretical bound on the objective for IP models. Only relevant in integer programming (IP) models. The number of integer variables “branched” on by LINDO’s IP solver. Only relevant in integer programming (IP) models. Elapsed time since the solver was invoked. The frequency (in seconds) the Status Window is updated. You can set this to any non-negative value desired. Setting the interval to zero will tend to increase solution times. Press this button to interrupt the solver at any point and have it return the current best solution found. Press this button to close the Status Window. Optimization will continue. Selecting the Status Window command from the Window menu will reopen the Status Window. When the solver is finished, it will prompt you to determine if you wish to do sensitivity and range analysis. Eventually, you’ll be able to make use of this information, but for now, just press the “No” button and then close the Status Window. There will now be a new window on your screen titled “Reports Window”. The Reports Window is where LINDO sends all text based reporting output. The window can hold up to 64,000 characters of information. If you have a lengthy solution report that you need to examine in its entirety, you can log all information sent to the Report Window in a disk file using the File|Log Output command. This file can then be examined using an external text editor or using the File|View command. Refer to the File menu section in Chapter 2, LINDO for Windows, for details on how to use these commands. Note: If required, LINDO will erase output from the top of the Reports Window in order to make room for new output at the bottom of the window. 8 CHAPTER 1 Getting back to our example, the Reports Window now contains the solution to our model and should resemble the following: Taken in order, this tells you first, that LINDO took 2 iterations to solve the model; second, that the maximum profit attainable from the two variables as you’ve constrained them is 145; and third, the variables STD and DLX take the values 10 and 3, respectively. What’s interesting to note is that we make less of the relatively more “profitable” Deluxe computer due to it’s intensive use of our limited supply of labor. We’ll explain REDUCED COSTS, SLACK OR SURPLUS and DUAL PRICES a little later in this chapter. The next section deals with versions of LINDO running on platforms other than Windows. At this point, the Windows user will want to skip ahead to the section titled: Model Syntax. Entering A Model from the Command Line If you are running LINDO on a platform other than a Windows based PC, then you will interface with LINDO through the means of a command line prompt. Specifically, all instructions are issued to LINDO in the form of text command strings. When you start LINDO, you’ll see the copyright notice and a colon prompt on the last line. This means that LINDO is waiting for you to start entering commands. Your screen should resemble the following: LINDO COPYRIGHT (C) LINDO SYSTEMS. LICENSED MATERIAL. ALL RIGHTS RESERVED. : _ GETTING STARTED 9 First, a word about LINDO’s prompts. When you see the colon prompt, LINDO is expecting a command. When you see the question mark prompt, you have already initiated a command and LINDO is asking you to supply additional information related to this command such as a number or a name. If you wish to “back out” of a command that you’ve already started, you may enter a blank line in response to the question mark prompt and LINDO should return you to the command level colon prompt. For our sample model, let us assume the XYZ Corporation produces two models of computer: the Standard and the Deluxe. At the XYZ facilities, the Standard can be produced at 10 computers per day, while the Deluxe exceeds that at 12 computers per day. Furthermore, XYZ has a limited supply of labor. In particular, there are a total of 16 units of labor and Standard computers require one unit of labor, while Deluxe computers are relatively more labor intense and require 2 units of labor. A LINDO model has a minimum requirement of three things. It needs an objective, variables, and constraints. The first requirement, an objective, is just what it sounds like: a goal. You have the choice of two goals, MAX or MIN, which stand for maximize and minimize. In a typical business situation, for instance, you might want to maximize profit or minimize cost. The first word in a LINDO model must be either MAX or MIN. The formula you enter after the MAX or MIN is called the objective function. In this example, XYZ wants to maximize profit achievable with the limited labor and production facilities available. We will let STD and DLX be our variables, which are things you want LINDO to adjust to reach your maximum profit. In this sample model, STD has a profit contribution of 10, and DLX has a profit contribution of 15. These will be the coefficients. Coefficients are any non-variable numbers that appear before a variable. The important thing is that, because STD and DLX are not explicitly defined, they are variable. In LINDO, the minute you use a variable in your model, it exists. You don’t have to do anything other than enter it in a formula. At the colon prompt for a new model, you enter: MAX 10 STD + 15 DLX followed by a return. Your screen will look like the screen below. LINDO COPYRIGHT (C) LINDO SYSTEMS. LICENSED MATERIAL. ALL RIGHTS RESERVED. : MAX 10 STD + 15 DLX ? _ LINDO is waiting for further input from you. Now, let’s look at constraints. In some ways, constraints are the most important part of your model and they require some real thinking. 10 CHAPTER 1 In the little example we’re considering, if you were to maximize 10 STD + 15 DLX now, there’s no limit to how many Standard and Deluxe computers you could produce. Of course, there must be some limit. In this example, the limit is the factory output and the labor supply. So, let’s constrain both STD and DLX to be less than the factory capacity available per day of 10 and 12, respectively. You do this by entering the words SUBJECT TO at the question mark prompt (or just the letters ST), pressing the return key, and entering STD < 10 and DLX < 12 on the following two lines. Note that LINDO interprets the < symbol as meaning “less-than-or-equalto” rather than strictly “less than”. If you prefer, you may alternatively enter <= in place of the < character. Very well, we’ve constrained the variables by computer production available at the factories. We now add the labor constraint of 16 units of labor by entering: STD + 2 DLX < 16 on the next line. Finally, on the line after that, we designate the end of the constraints by adding: END Now, your screen should look like this: LINDO COPYRIGHT (C) LINDO SYSTEMS. LICENSED MATERIAL. ALL RIGHTS RESERVED. : ? ? ? ? ? : MAX 20 STD + 15 DLX SUBJECT TO STD < 10 DLX < 12 STD + 2 DLX < 16 END _ The model is in memory and LINDO is waiting for a command from you. As each line is entered, LINDO checks these entries for correct syntax and mathematical sense. If there is a syntax or logic mistake, an error message will appear and LINDO will prompt you to correct that line of the model. Use the LOOK ALL command at the colon prompt to check the internal representation of the model currently in memory for errors. The internal representation of this sample model is shown below: : LOOK ALL MAX 10 STD + 15 DLX SUBJECT TO STD < 10 DLX < 12 STD + 2 DLX < 16 END : _ GETTING STARTED 11 The ALTER command can be used to change a line of the model, which may have been typed incorrectly. To do this on any platform, enter the following at the colon prompt: ALTER <Row> <VarName | DIR | NAME| RHS > where <Row> is the name or index of the row where you wish to make the alteration and <VarName> is the name of the variable to be altered. Please refer to the Problem Editing section of Chapter 3, Command-line Commands, for details on the syntax and use of the ALTER command. Once the model is typed correctly, you can solve the problem by typing GO followed by a return at the colon prompt. The answer will come back, and LINDO will ask you whether or not you want sensitivity analysis on the model. Eventually, you’ll be able to make use of that information, but for now just type N at the question mark prompt. Now, let’s look at the solution report LINDO delivered. LP OPTIMUM FOUND AT STEP 2 OBJECTIVE FUNCTION VALUE 1) 145.0000 VARIABLE VALUE REDUCED COST STD 10.000000 0.000000 DLX 3.000000 0.000000 ROW SLACK OR SURPLUS DUAL PRICES 2) 0.000000 2.500000 3) 9.000000 0.000000 4) 0.000000 7.500000 NO. ITERATIONS= 2 Taken in order, this tells you first, that LINDO took 2 iterations to solve the model; second, that the maximum profit attainable from the two variables, as you’ve constrained them, is 145; and third, the variables STD and DLX take the values 10 and 3, respectively. What’s interesting to note is that we make less of the relatively more “profitable” Deluxe model due to it’s intensive use of our limited supply of labor. We’ll explain REDUCED COSTS, SLACK OR SURPLUS and DUAL PRICES a little later in this chapter. Printing the Model and Solution Command line versions of LINDO do not contain a facility for directly printing models and their solutions. This may be accomplished quite easily, however, using the DIVERT command to send screen output to a file, which can then be printed either from the operating system or a word processing package. To do this on any platform, enter the following command at the LINDO colon prompt: DIVERT <FileName> where <FileName> is the name of the file to which you want output sent. If you have a solved model in memory, entering the command LOOK ALL followed by the command SOLUTION will send the model formulation and its solution report to <FileName>. You close the file, and return to screen output, with the RVRT command. 12 Note: CHAPTER 1 The SAVE command in LINDO saves the formulation only in a compressed format. Use DIVERT as shown above to save the model or solution in a format your word processor can make use of. For more detailed information about the syntax and use of the DIVERT command, please refer to the File Output section of Chapter 3, Command-line Commands. Model Syntax This section details the syntax required in a LINDO model. Fortunately, the list of rules is rather short and easy to learn. As shown in the example above, a LINDO model has a minimum requirement of three things: an objective, variables, and constraints. The objective function must always be at the start of the model and is initiated with either MAX (for maximize) or MIN (for minimize). The end of the objective function and the beginning of the constraints is signified with any of the following: SUBJECT TO SUCH THAT S.T. ST The end of the constraints is signified with the word END. LINDO has a limit of eight characters in a variable name. Names must begin with an alphabetic character (A to Z), which may then be followed by up to seven additional characters. These additional characters may include anything with the exception of the following: ! ) + - = < >. So, as an example, the following names would be considered valid: XYZ MY_VAR A12 SHIP.LA whereas the following would not: THISONEISTOOLONG A-HYPHEN 1INFRONT The first example contains more than eight characters, while the second contains a forbidden hyphen, and the last example does not begin with an alphabetic character. You may, optionally, name constraints in a model. Constraint names make many of LINDO’s output reports easier to interpret. Constraint names must follow the same conventions as variable names. To name a constraint, you must start the constraint with its name terminated with a right parenthesis. After the right parenthesis, you enter the constraint as before. As an example, the following constraint is given the name XBOUND: XBOUND) X < 10 LINDO recognizes only five operators: plus (+), minus (-), greater than (>), less than (<), and equals (=). When you enter the strict inequality operators greater than (>) or less than (<), LINDO will interpret them as the loose inequality operators greater-than-or-equal-to () and less-than-or-equal-to (), respectively. This is because many keyboards do not have the loose inequality operators. On systems that do have the loose operators, LINDO will not recognize them. However, if you prefer, you may enter “>=” (and “<=”) in place of “>” (and “<”). GETTING STARTED 13 LINDO will not accept parentheses as indicators of a preferred order of precedence. All operations in LINDO are ordered from left to right. Comments may be placed anywhere in a model. A comment is denoted by an exclamation mark. Anything following the exclamation mark on the current line will be considered a comment. For example, the small example discussed earlier in this chapter is recast below using comments: MAX 10 STD + 15 DLX ! Max profit SUBJECT TO ! Here are our factory capacity constraints ! for Standard and Deluxe computers STD < 10 DLX < 12 ! Here is the constraint on labor availability STD + 2 DLX < 16 END Command-line versions of LINDO allow you to input comments, but they will not be stored with the model. Comments are preserved in Windows versions of LINDO as long as the file is saved in text format. Saving the file in either compressed (*.LPK) or MPS format (*.MPS) will cause comments and any special formatting to be stripped from the model. Note: Comments will not be preserved by command line versions of LINDO or when a file is saved in compressed formats (See above). Constraints and objective functions may be split over multiple lines or combined on single lines. You may split a line anywhere except in the middle of a variable name or a coefficient. The following would be mathematically equivalent to our example (although not quite as easy to read): MAX 10 STD + 15 DLX STD < 10 dlx < 12 STD + 2 dlx < 16 end SUBJECT TO However, if the objective function appeared as follows: MAX 10 ST D + 1 5 DLX SUBJECT TO LINDO would give a syntax error message because the variable STD is split between lines and the coefficient 15 is also. 14 CHAPTER 1 LINDO is not case sensitive. All input is converted to upper case internally by LINDO. For example, the following model is valid: Max x st X < 1 eNd and contains a single variable X rather than the two variables x and X. Only constant values, not variables, are permitted on the right-hand side of a constraint equation. Thus, an entry such as: X > Y would be rejected by LINDO. Such an entry could be made as: X - Y > 0 Conversely, only variables and their coefficients are permitted on the left-hand side of constraints. For instance, the constraint: 3X + 4Y - 10 = 0 is not permitted due to the constant term of -10 on the left-hand side. Of course, the constraint may be recast as: 3X + 4Y = 10 in order to comply with LINDO syntax. GETTING STARTED 15 Optional Modeling Statements In addition to the three required model components of an objective function, variables, and constraints, LINDO also has a number of other optional modeling statements, which may appear after the END statement in a model. In command-line versions of LINDO, you enter these statements as system commands to the command level prompt (:) after the END statement terminating the model’s constraints. In Windows versions of LINDO, the statements should be entered as part of the model text after the END statement in the Model Window. These statements and their functions appear in the table below: Model Statement FREE <Variable> GIN <Variable> INT <Variable> SLB <Variable> <Value> SUB <Variable> <Value> QCP <Constraint> TITLE <Title> Function Removes all bounds on <Variable>, allowing <Variable> to take on any real value, positive or negative. Makes <Variable> a general integer (i.e., restricts it to the set of non-negative integers). Makes <Variable> binary (i.e., restricts it to be either 0 or 1). Places a simple lower bound on <Variable> of <Value>. Use in place of constraints of form X ≥ r. Places a simple upper bound on <Variable> of <Value>. Use in place of constraints of form X ≤ r. Marks the beginning of the “real” constraints in a quadratic programming model. Makes <Title> the title of the model. Next, we will briefly illustrate the use of each of these statements. FREE STATEMENT The default lower bound for a variable is 0. In other words, unless you specify otherwise, LINDO will not let a variable be negative. The FREE statement allows you to remove all bounds on a variable, so it may take on any real value, positive or negative. 16 CHAPTER 1 The following small examples illustrate the use of the FREE statement for the Windows version and command-line versions of LINDO: : ? ? ? ? : : MIN 5X + Y ST X+Y>5 X-Y>7 END FREE Y LOOK ALL MIN 5 X SUBJECT TO 2) 3) END FREE Windows + Y X + Y >= X - Y >= 5 7 Y Command-Line Note that, in the Windows version, FREE appears as part of the model’s text in the Model Window. In command-line versions of LINDO, FREE is entered as a system command after the model has been entered. Had we not set Y to be a free variable in this example, LINDO would not have found the optimal solution of X = 6 and Y = -1. Instead, given the default lower bound of 0 on Y, LINDO would have returned the solution X = 7 and Y = 0. For more information and examples on FREE, please refer to page 166. GIN STATEMENT By default, LINDO assumes that all variables are continuous. In other words, unless told otherwise, LINDO assumes variables can be any non-negative fractional number. In many applications, fractional values may be of little use (e.g., 2.5 employees). In these instances, you will want to make use of the general integer statement (GIN). GIN followed by a variable name restricts the value of the variable to the non-negative integers (0,1,2,…). GETTING STARTED 17 The following small examples illustrate the use of the GIN statement for Windows versions and command-line versions of LINDO: : ? ? ? ? : : : MAX 11X + 10Y ST 2X + Y < 12 X - 3Y > 1 END GIN X GIN Y LOOK ALL MAX 11 X + 10 Y SUBJECT TO 2) 2 X + Y <= 12 3) X - 3 Y >= 1 END GIN 2 : Windows Command-Line Note that, in the Windows version, the GIN statements appear as part of the model’s text in the Model Window. In command-line versions of LINDO, GIN is entered as a system command to the command level colon prompt after the model's objective and constraints have been entered. Had we not specified X and Y to be general integers in this model, LINDO would not have found the optimal solution of X = 6 and Y = 0. Instead, LINDO would have treated X and Y as continuous and returned the solution of X = 5.29 and Y = 1.43. Note also, that simply rounding the continuous solution to the nearest integer values does not yield the optimal solution in this example. In general, rounded continuous solutions may be non-optimal and, at worst, infeasible. Based on this, one can imagine that it can be very time consuming to obtain the optimal solution to a model with many integer variables. This is typically true, and you are best off utilizing the GIN feature only when absolutely necessary. As a final note, the GIN command also accepts an integer value argument in place of a variable name. The number corresponds to the number of variables you want to be general integers. These variables must appear first in the formulation of the model. Thus, in this simple example, we could have replaced our two GIN statements with the single statement: GIN 2. For more details and examples on the use of the GIN, please refer to page 170. INT STATEMENT Using INT restricts a variable to being either 0 or 1. These variables are often referred to as binary variables. In many applications, binary variables can be very useful in modeling all-or-nothing situations. Examples might include such things as taking on a fixed cost, building a new plant, or buying a minimum level of some resource to receive a quantity discount. For more information on the many useful applications of binary variables, you can refer to the companion LINDO textbook, Optimization Modeling with LINDO, by Linus Schrage. 18 CHAPTER 1 The following small examples illustrate the use of the INT statement for Windows versions and command-line versions of LINDO: : ? ? ? ? ? : : MAX -100X + 20A + 12B ST A - 10X < 0 A + B < 11 B < 7 END INT X !Make X 0/1 LOOK ALL MAX - 100 X + 20 A + 12 B SUBJECT TO 2) - 10 X + A <= 0 3) A + B <= 11 4) B <= 7 END INTE 1 : Windows Command-Line Note that, in the Windows version, the INT statements appear as part of the model’s text in the Model Window. In command-line versions of LINDO, INT is entered as a system command to the command level colon prompt after the model has been entered. Had we not specified X to be binary in this example, LINDO would have returned a solution of X = .4, A = 4, and B = 7 for an objective value of 124. Forcing X to be binary, you might guess that the optimal solution would be for X to be 0 because .4 is closer to 0 than it is to 1. If we round X to 0 and optimize for A and B, we get an objective of 84. In reality, a considerably better solution is obtained at X = 1, A = 10, and B = 1 for an objective of 112. In general, rounded continuous solutions may be non-optimal and, at worst, infeasible. Based on this, one can imagine that it can be very time consuming to obtain the optimal solution to a model with many binary variables. This is typically true and you are best off utilizing the INT feature only when absolutely necessary. As a final note, the INT command also accepts an integer value argument in place of a variable name. The number corresponds to the number of variables you want to be general integers. These variables must appear first in the formulation of the model. For more details and examples on the use of the INT, please jump to page 167. SUB and SLB STATEMENTs If you do not specify otherwise, LINDO assumes that variables are continuous, bounded below by zero and unbounded from above. That is, variables can be any non-negative fractional number increasing indefinitely. In many applications, this assumption may not be realistic. Suppose your facilities limit the quantity produced of an item. In this case, the variable that represents the quantity produced is bounded from above. Or, suppose you want to allow for backordering in a system. An easy way to model this is to allow an inventory variable to go negative. In which case, you would like to circumvent the default lower bound of zero. The SUB and SLB statements are used to alter the GETTING STARTED 19 bounds on a variable. SLB stands for Simple Lower Bound and is used to set lower bounds. Similarly, SUB stands for Simple Upper Bound and is used to set upper bounds. The following small examples illustrate the use of the SUB and SLB statements for Windows versions and command-line versions of LINDO: : ? ? ? : : : : : MAX 20X + 30Y ST X + 2Y < 120 END SLB X 20 SUB X 50 SLB Y 40 SUB Y 70 LOOK ALL MAX 20 X + 30 Y SUBJECT TO 2) X + 2 Y <= 120 END SLB X 20.00000 SUB X 50.00000 SLB Y 40.00000 SUB Y 70.00000 : Windows Command-Line Note that, in the Windows version, the SUB/SLB statements appear as part of the model’s text in the Model Window. In command-line versions of LINDO, SUB and SLB are entered as actual system commands to the command level colon prompt after the model's objective and constraints have been entered. In this example, we could have just as easily used constraints to represent the bounds. Specifically, we could have entered our small model as follows: max 20x + 30y st x + 2y < 120 x > 20 x < 50 y > 40 y < 70 end Of course, this formulation would yield the same results, but there are two points to keep in mind. First off, SUBs and SLBs are handled implicitly by the solver, and, therefore, are more efficient from a performance point of view than constraints. Secondly, SUBs and SLBs do not count against the constraint limit in LINDO, allowing you to solve larger models within the limits of your version of LINDO. For more details and examples on the use of SUBs and SLBs, refer to pages 163-166. 20 CHAPTER 1 QCP STATEMENT The QCP statement is used in quadratic programming models to indicate the first “real” constraint, as opposed to the first order condition constraints. In the Windows version, the QCP statement appears as part of the model’s text in the Model Window. In command-line versions of LINDO, QCP is entered as an actual system command to the command level colon prompt after the model has been entered. The details of formulating a quadratic program are somewhat involved, and the reader is asked to refer to page 196 for more information on formulating quadratic programs. TITLE STATEMENT This statement is used to associate a title with a model. The title may be any alphanumeric string of up to 74 characters in length. The title of the current model may be displayed using the File|Title command in Windows versions or the TITLE command in command-line versions. Unlike all the other statements that must appear after the END statement, the Title statement may appear before the objective or after the END statement of a model. Here is an example of a small model with a title in a Windows version of LINDO: When we issue the Title command from the File menu, the model’s title is sent to the Reports Window as follows: GETTING STARTED 21 In this following example, we are using a command-line version of LINDO to input a small model with a title, display the model with the LOOK ALL command, and view the title using the TITLE command. : : ? ? ? ? ? : TITLE Your Title Here MAX 20X + 30Y ST X < 50 Y < 60 X + 2Y < 120 END LOOK ALL TITLE YOUR TITLE HERE MAX 20 X + 30 Y SUBJECT TO 2) X <= 50 3) Y <= 60 4) X + 2 Y <= END 120 : TITLE TITLE YOUR TITLE HERE : A Staff Scheduling Example In this next section, we develop a small staff scheduling example and delve a little more deeply into the details of the LINDO solution report. Although this model is still quite small, it is, perhaps, our first example in this user’s manual of a potential real-world application. Let’s say you operate a retail business. You want to know how many clerks you need to hire and what days to assign them in order to minimize your labor cost while meeting your needs at the store. There are two limiting factors that govern how many people you hire and what days they work. First, each of your workers receives $300 per week for a regular schedule, with $25 extra for Saturday work and $35 extra for Sunday work. Each worker can work only five days a week and must have two consecutive days off. Second, you have minimum staffing needs, which must be met. In table form, that requirement looks like this: DAY REQ M 20 T 13 W 10 Th 12 F 16 S 18 Su 20 22 CHAPTER 1 Under the restrictions outlined above, the following schedules are available, with varying weekly pay rates, where the symbol (■) denotes a day worked and the symbol (❑) denotes a day off: Schedule Start Day Mon Tue Wed Thu Fri Sat Sun Mon ■ ❑ ❑ ■ ■ ■ ■ Tue ■ ■ ❑ ❑ ■ ■ ■ Wed ■ ■ ■ ❑ ❑ ■ ■ Thu ■ ■ ■ ■ ❑ ❑ ■ Fri ■ ■ ■ ■ ■ ❑ ❑ Sat ❑ ■ ■ ■ ■ ■ ❑ Sun ❑ ❑ ■ ■ ■ ■ ■ Weekly Pay $ 300 325 360 360 360 360 335 Here’s how this information translates into a LINDO model. First, let’s determine what the objective will be. If you want to minimize your cost, that means minimizing the sum of all weekly salaries paid. If you have a variable called MWORK that represents the number of workers who start on Monday and the salary for that shift is $300, then 300 * MWORK is the amount paid to those Monday-Start workers. Similarly, TWORK can represent Tuesday-Start workers and 325 * TWORK, according to the table above, is the amount paid to the those workers. Proceeding through the week, you can formulate your objective like this: MIN 300 MWORK + 325 TWORK + 360 WWORK + 360 THWORK + 360 FWORK + 360 SWORK + 335 SUWORK However, if you were to solve the model right now, the solution would minimize to zero. Obviously, everything else being equal, it’s cheapest to hire nobody at. So, you have to constrain each day’s labor force to meet the daily staffing requirement. We indicate the beginning of our constraint set by typing: SUBJECT TO Each day, the number of workers on each shift that covers the day will have to be at least as great as the minimum required for that day. On Monday, for instance, 20 workers are the minimum, so: MON)MWORK + THWORK + FWORK + SWORK + SUWORK >= 20 Notice the variables TWORK and WWORK do not appear in this constraint. This is because workers who start on Tuesday and Wednesday are not on duty on Monday. Note, also, we have made use of the row naming feature and have assigned this row the name MON. Moving down through the week, the rest of the constraints are: TUE) WED) THU) FRI) SAT) SUN) MWORK+TWORK +FWORK+SWORK+SUWORK MWORK+TWORK+WWORK +SWORK+SUWORK MWORK+TWORK+WWORK+THWORK +SUWORK MWORK+TWORK+WWORK+THWORK+FWORK TWORK+WWORK+THWORK+FWORK+SWORK WWORK+THWORK+FWORK+SWORK+SUWORK > > > > > > 13 10 12 16 18 20 GETTING STARTED 23 Finally, we denote the end of the model by typing: END. In its entirety, the model is as follows: MIN 300 MWORK+325 TWORK+360 WWORK+360 THWORK + 360 FWORK + 360 SWORK + 335 SUWORK SUBJECT TO MON) MWORK+ THWORK+FWORK+SWORK+SUWORK TUE) MWORK+TWORK +FWORK+SWORK+SUWORK WED) MWORK+TWORK+WWORK +SWORK+SUWORK THU) MWORK+TWORK+WWORK+THWORK +SUWORK FRI) MWORK+TWORK+WWORK+THWORK+FWORK SAT) TWORK+WWORK+THWORK+FWORK+SWORK SUN) WWORK+THWORK+FWORK+SWORK+SUWORK END >= 20 > 13 > 10 > 12 > 16 > 18 > 20 Now, you’re ready to solve the model. In Windows versions of LINDO, press the Solve button ( ) on the toolbar at the top of the frame window. In command-line versions, give the GO command at the colon prompt. LINDO will solve the model and return the following solution: OBJECTIVE FUNCTION VALUE 1) 7750.000 VARIABLE VALUE MWORK 2.000000 TWORK 0.000000 WWORK 2.000000 THWORK 7.000000 FWORK 5.000000 SWORK 4.000000 SUWORK 2.000000 ROW SLACK OR SURPLUS MON) 0.000000 TUE) 0.000000 WED) 0.000000 THU) 1.000000 FRI) 0.000000 SAT) 0.000000 SUN) 0.000000 NO. ITERATIONS= 8 REDUCED COST 0.000000 100.000000 0.000000 0.000000 0.000000 0.000000 0.000000 DUAL PRICES -100.000000 0.000000 -100.000000 0.000000 -100.000000 -25.000000 -135.000000 Your weekly salary cost is minimized to $7750 and all staffing needs have been met. You need to start 2 people on Monday, nobody on Tuesday, 2 on Wednesday, 7 on Thursday, 5 on Friday, 4 on Saturday, and 2 on Sunday to meet your requirements. However, there’s more in the solution report than just an optimal objective. If you look in the row titled THU), you see that there’s a slack of 1 returned on the THU constraint. This means, in order to satisfy all the requirements of the model, LINDO had to have one more person than required available on Thursday. Overstaffing always seems wasteful, but because of uneven staffing requirements, sometimes it is unavoidable. Slack or Surplus The SLACK OR SURPLUS column in a LINDO solution report tells you how close you are to the right-hand side (RHS) limit on each constraint. That is the limit that appears to the right of the 24 CHAPTER 1 inequality or equal sign in any given constraint. This quantity, on less-than-or-equal () constraints, is generally referred to as slack while, on greater-than-or-equal-to () constraints, it is called a surplus. If a constraint is exactly satisfied as an equality, the SLACK OR SURPLUS value will be zero. If a constraint is violated, as in an infeasible solution, the SLACK OR SURPLUS value will be negative. Knowing this can help you find the violated constraints in an infeasible model. Reduced Costs In a LINDO solution report, you’ll find a REDUCED COST figure for each variable. There are two valid, equivalent interpretations of a reduced cost. First, you may interpret a variable’s reduced cost as the amount by which the objective coefficient of the variable would have to improve before it would become profitable to bring that variable into the solution at a nonzero value. In the staffing example we’ve been looking at, only the variable TWORK is not in the solution: no workers start on Tuesday. The reduced cost of 100 for TWORK, the number of workers who start on Tuesday, means that TWORK’s objective coefficient of 325, the weekly pay of Tuesday start workers, would have to improve by at least 100 before TWORK would appear in the solution. In other words, the weekly pay of workers starting on Tuesday would have to reduce to 225 before it would be profitable for a worker to start on Tuesday. Note that an improvement in a minimization problem is a decrease in the objective. A reduced cost of zero, as in the case of MWORK, for instance, indicates that the variable is already in the solution. Second, the reduced cost may be interpreted as the amount of penalty you would have to pay to introduce a variable into the solution. In this case, to start one worker on Tuesday with the weekly pay remaining 325 would increase the objective function value (total labor cost) by 100 to 7850. Reduced costs are valid only over a range of values. LINDO provides a “Range Analysis” facility for determining the valid ranges of the reduced costs. Range analysis will be discussed in more depth in Chapter 2, LINDO for Windows. Dual Prices The LINDO solution report also gives a DUAL PRICE figure for each constraint. You can interpret the dual price as the amount by which the objective would improve given a unit of increase in the right-hand side of the constraint. Notice that “improve” is a relative term. In a minimization problem, such as our example, interpreting the dual price requires some thought. The dual price on the FRI constraint, for example, is -100. This means raising the right-hand side of the FRI constraint by one unit would cause the objective to “improve” by negative 100. That is, it would increase by 100. In other words, the marginal cost of providing one additional staff member on Fridays would be $100 in additional salary expense. Dual prices are sometimes called shadow prices, because they tell you how much you should be willing to pay for additional units of a resource. Going back to the Friday constraint, if we use the shadow price interpretation of the dual price, we can also say that we should be willing to pay up to $100 to have an additional staff member present on Friday. If temporary employees are available for less than $100 per day, then we might want to consider this option. As with reduced costs, dual prices are valid only over a limited range. Range analysis will be discussed in more depth in Chapter 2, LINDO for Windows. 25 2 LINDO for Windows This chapter explores all the commands available to the LINDO user running under Windows. In the Windows environment, LINDO partitions all commands into the following six categories: 1. 2. 3. 4. 5. 6. File Edit Solve Reports Window Help These categories are simply the menus available to you when running LINDO, as the following picture of the LINDO command menu illustrates: Each of these categories includes a number of commands, which we will discuss in depth in this chapter. Before proceeding, however, you may want to glance at the section below, which gives a brief, comprehensive list of all the commands available under LINDO for Windows. LINDO for Windows Commands in Brief In this section, we list each of the menu commands available to the LINDO user under Windows. The commands are broken down into the six main menu categories: File, Edit, Solve, Reports, Window, and Help. A brief description of each command is included. In depth discussions of each of these commands may be found in the sections immediately following. 26 CHAPTER 2 1. File Menu Command New Open View Save Save As Close Print Printer Setup Log Output Take Commands Basis Read Basis Save Title Date Elapsed Time License Exit Description Creates a new, blank Model Window Opens a model from a disk file Opens a “View Only” model from disk Saves the active Model Window to disk Saves a Model Window to disk and prompts for a new name Closes the active window Prints the contents of the active window Used to configure your printer Opens or closes a log file used for recording the results of your session Runs a LINDO script file (*.ltx) Loads a solution from disk into the active model Saves the active model’s current solution to disk Displays the title of the active model Displays the date Displays the time that has elapsed since the start of the session Allows input of a new password to upgrade your copy of LINDO Exits LINDO 2. Edit Menu Command Undo Cut Copy Paste Clear Find/Replace Options Go to Line Paste Symbol Select All Clear All Choose New Font Description Undoes last edit operation Removes selected text from window and places it in clipboard Copies selected text to clipboard Pastes clipboard’s contents into active window Removes selected text from window Finds a given string of text in active window and optionally allows for replacement Used to configure LINDO options Jumps to a given line number in active window An editing tool that allows you to paste variable names and reserved symbols into active window Selects all the text in the active window Clears all the text in the active window Resets font in active window WINDOWS COMMANDS 3. Solve Menu Command Solve Compile Model Debug Pivot Preemptive Goal Description Solves model in the active window Compiles model in the active window Debugs model in active window if it is infeasible or unbounded Performs a simplex iteration, or pivot, on the model in the active window Uses Lexico optimization (a form of goal programming) on active window 4. Reports Menu Command Solution Range Parametrics Statistics Peruse Picture Basis Picture Tableau Formulation Show Column Positive Definite Description Creates a solution report for the active Model Window Creates a range (sensitivity) analysis report for the active Model Window Performs parametric analysis on the right-hand side of a constraint Displays statistics for the model in the active window Used to generate text reports on and/or graphics of selected items of the active model Creates a text and/or graphics “picture” of the nonzero structure of the current model Creates a text based “picture” of the basis matrix for active model Displays the simplex tableau for the active model Displays the active model Displays a column/variable of the active model Determines if the constraint matrix of a quadratic programming model is positive definite 27 28 CHAPTER 2 5. Window Menu Command Open Command Window Open Status Window Send To Back Cascade Tile Close All Arrange Icons Description Opens a window that accepts traditional LINDO commands, which are discussed in the following chapter, Command Line Commands Opens the solver Status Window, which may be used to monitor the solver’s progress on a model Sends the active window to the back, bringing windows to the front, which were previously in the back Repositions all open windows in an overlapping “cascade” style Repositions all open windows in a “tiled” style Closes all open windows If any windows are minimized, the icons for the minimized windows will be arranged at the bottom of the screen 6. Help Menu Command Contents Search for Help On How to Use Help Register AutoUpdate About LINDO Description Display a table of contents of the LINDO Help system Performs a search of the Help system for a user specified topic Gives some assistance on using the Help system Registers your version of LINGO online. Prompts you to download updated software when available. Displays specific information about your version of LINDO including the version number and maximum problem capacity The Commands in Depth All LINDO menu commands available under Windows are listed and explained below by category. The commands are broken down into the six main menu categories: File, Edit, Solve, Reports, Window, and Help. Along with the description for each command, we also list any equivalent “button” from the toolbar and any equivalent accelerator keystroke combination. The toolbar runs along the top of the screen and is illustrated in the following picture: WINDOWS COMMANDS 29 Each button on the toolbar corresponds to a menu command. Not all menu commands have a toolbar button, but, in general, the most frequently used commands will have an equivalent button. For example, the File|New command for creating a new Model Window can be accessed by pressing the . following button: Along with accessing commands by mouse and buttons, most commands may also be accessed by a single, unique keystroke known as an accelerator. The equivalent accelerator key is listed alongside each command in the menus. For example, the File|New command for creating a new Model Window can be accessed by pressing the F2 function key. 1. File Menu At left is a picture of LINDO’s File menu. This menu contains commands, which generally pertain to the movement of files and data in and out of LINDO. Each of the commands contained in the File menu are discussed below in depth. New F2 The New command opens a new, blank Model Window. You may enter a model directly into this window or paste in text from the clipboard. Open F3 The Open command reads a saved model file from disk and places it in an Edit Window. All of the standard editing features (e.g., cut, copy and paste) are available in an Edit Window. The one restriction is that Edit Windows are limited to handling files with up to 64,000 characters. If you try to open a file that is too large for an Edit Window to handle, you will be prompted to place the file in a View Window instead (more on these when we get to the View command). 30 CHAPTER 2 When you issue the Open command, you will be presented with the Windows standard File Open dialog box as follows: This dialog box has all the standard features for navigating your system in search of a file. The only non-standard feature of the File Open dialog box is the list box in the lower left corner labeled “List files of type”. This allows the user to select one of the following four filters used for selecting files: LINDO Text (*.ltx), LINDO Packed (*.lpk), MPS (*.mps), and All Files (*.*). The first three filters correspond to the three different file formats supported by LINDO for storing models. In most cases, we recommend that you use the LINDO Text (*.ltx) format. This saves your model in text form exactly as it appears on your screen. For specifics on the other file formats, refer to the Save command below. After selecting a file to open, LINDO examines the file to determine the format it was saved under. If the model is in LINDO Text format, or some unknown format, it is read directly into LINDO without modification. MPS format and LINDO Packed format files are converted to their LINDO Text equation equivalents before being displayed in a window. For example, readers familiar with the MPS file format will find, if they were to read the following MPS file into LINDO: NAME ROWS N 1 L 2 L 3 L 4 COLUMNS X X X Y Y Y RHS RHS RHS RHS ENDATA 1 2 4 1 3 4 20.0000000 1.0000000 1.0000000 30.0000000 1.0000000 2.0000000 2 3 4 50.0000000 60.0000000 120.0000000 WINDOWS COMMANDS 31 LINDO converts the model into the more readable LINDO Text format before displaying it as follows: LINDO keeps track of a file’s original format. Thus, when you save the model, LINDO uses the original format unless you specify otherwise. Please refer to the Save command for more information. View F4 The View command reads a saved model file from disk and places it in a View Window. Unlike the Open command, which uses Edit Windows that are limited to files of 64,000 characters or less, the View command can read a file of any size and is limited only by available memory. A View Window is primarily useful in viewing models and submitting them to LINDO’s solver. Although you can read large models into a View Window, you will not have all the editing capabilities of an Edit Window. You can scroll through a View Window, use the Go To command to jump to a particular line, use the Find/Replace command to search for a selected string and, optionally, replace the string. If you need to do extensive editing on a large model, we suggest that you use a word processor (e.g., MS Word) to make your changes or any text editor (e.g., MS Notepad), and then load the file into LINDO with the View command. If you use an external editor, be sure to have the external editor save the model as “Text Only”. Otherwise, LINDO will not be able to read the file. With the exception of using a View Window, the View command functions exactly as the Open command does. Please refer to the documentation directly above on the Open command for additional insight into the functioning of the View command. 32 CHAPTER 2 Save Save As F5 F6 The Save and Save As commands save the contents of the active window to a disk file. Save uses the model’s existing file name and format, while Save As prompts you for a new name and format to save under. When issuing the Save As command, you will see the following standard File|Save As dialog box: This dialog box has all the standard features, which allow you to navigate through your system to save a file. The one non-standard feature is the list box in the lower left corner titled, “File Format”. When saving a model, you have a choice of three different formats. The File Format list box is used to select the desired format. The available formats are summarized in the table below: Format LINDO Text Ext *.ltx LINDO Packed *.lpk MPS *.mps Description Window is saved in text format exactly as it appears on the screen. Available for Model, Reports, and Command Windows. Comments and special formatting are saved with the model. Model is saved in a proprietary, compressed format. The file is a text file and may be easily ported to other platforms, but the contents are unreadable by other text editors or wordprocessors. All comments and special formatting are stripped from the model before saving. Model is saved in industry standard MPS format. This is an inefficient format in terms of required disk space, and is difficult to interpret. The advantage of this format is that it is a widely accepted standard for optimization models and is portable to many other solvers. All comments and special formatting are stripped from the model before saving. WINDOWS COMMANDS 33 Note that the Reports Window and Command Window may only be saved in the *.ltx text format. Model Windows may be saved in any of the three formats. Note: The LINDO Packed and MPS formats do not support comments or special formatting (e.g., indenting and spacing). Be forewarned that, should you save a model in either of these formats, all comments will be stripped and LINDO will reformat the model. In addition, when *.lpk and *.mps files are read back into LINDO, they are automatically translated into *.ltx format before being displayed on the screen. Using *.ltx files will avoid this additional translation step. For these reasons, we recommend you always try using the LINDO Text format to save your models. When saving with the Save command, LINDO automatically uses the file’s previous format. You must use the Save As command if you wish to override a file’s format Close F7 The Close command closes the active window. If you have made changes to the contents of this window without saving, you will be prompted to perform a save before the window closes. Note: You will lose all changes made since the last save if you close the window without saving. Print F8 The Print command sends the contents of the active window to the printer. You may print any type of window - Reports, Command, or Model. If, for some reason, the output from the printer is obscured or incorrect, you may need to configure your printer with the Printer Setup command (see below). Printer Setup F9 The Printer Setup Command presents you with the standard Windows printer setup dialog box. This allows you to control many options influencing how your document is printed. The print facility in LINDO is fairly simple, so many of these options are not applicable. In general, you should not need this command if you have already been successfully printing from your machine. Log Output F10 The Log Output command prompts you for a file name where all subsequent information output to the Reports Window will be sent. This is useful for creating disk copies of solution and range reports. These log files may then be read into other applications or sent to your printer. 34 CHAPTER 2 When selecting the Log Output command, you will be presented with the following dialog box: This is a standard Windows file selection dialog box allowing you to select a particular file for logging output to. There are two additional features to note, however, in the lower right corner of the dialog box. These features are the two check boxes labeled “Echo to screen” and “Append output”. The default is for both these boxes to be unchecked. If you leave “Echo to screen” unchecked, output will be directed only to the log file, and not to the Reports Window. Checking “Echo to screen” will cause output to be directed to both the log file and the Reports Window. If you are directing a lengthy solution to disk using the Log Output command, the process can be sped up substantially by suppressing simultaneous output to the Reports Window. If “Append output” is not checked, any preexisting log file under the selected name will be overwritten and lost. LINDO will warn you if you are about to overwrite an existing log file. If “Append output” is checked, LINDO will append output to the end of any preexisting log file. The Log Output command works as a “toggle”. When you first select the command, you open a file for logging output. As long as this file is open, a checkmark will appear next to the command in the File menu indicating that you are in Log Output mode. Select the command again and the log file is closed. The checkmark is removed from the menu as well. As an example, suppose you wish to create a disk file containing a copy of the solution report to the active model. First, solve the model using the Solve command in the Solve menu. Next, select the Log Output command from the File menu to open the file for the solution report. Once you have opened the file, pull down the File menu again and note the checkmark adjacent to the Log Output command indicating that you are now in “Log Output” mode. You have now opened the log file, but, as yet, it contains no data. To remedy this, select the Solution command from the Reports menu. The solution will then be sent to the log file. Note: The solution will not appear on your screen unless you also checked the “Echo to screen” box in the Log Output dialog box. WINDOWS COMMANDS 35 Finally, close the log file by once again selecting the Log Output command. You should now have a disk copy of the solution report suitable for such things as routing to the printer, pasting into a report, or loading into a text editor. Capturing Lengthy Sessions As you are running LINDO, output messages and reports are all directed to the Reports Window. Each new line of output is appended to the end of all other output in the Reports Window. The Reports Window can only maintain up to about 64,000 characters of data. Once it approaches this limit, LINDO deletes old output from the top of the Reports Window to make room for new output at the bottom. This makes it impossible to maintain entire copies of lengthy sessions in the Reports Window. If you would like to save a copy of an entire session that will exceed the 64,000 character limit, simply open a log file before beginning your work and check the “Echo to screen” box in the Log Output dialog box. All output to the Reports Window will also be directed, in duplicate, to the selected log file. When you are finished running LINDO, a copy of the output for the entire session will be contained in the log file. Take Commands F11 LINDO for Windows supports a command language for building script or macro files. The commands available are discussed in detail in Chapter 3, LINDO for Command-line Environments. If you build a script file, you may run it using the Take Commands command. As an example, suppose we have a situation where we run a model using several values for a particular right-hand side coefficient, saving a solution after each modification to the right-hand side. These operations would require us to input a number of commands. If we needed to do this on an ongoing basis, inputting all the required commands would be tiresome and prone to error. It would be better to build a script file, which we can run by issuing a single Take Commands command. Such a script file might look as follows: BAT ! A 3 warehouse, 4 customer transportation model: ! ! XWH<i>C<j> = amount shipped from 15 warehouse <i> ! to customer <j> MIN 6 XWH1C1 + 2 XWH1C2 + 6 XWH1C3 + 7 XWH1C4 + 4 XWH2C1 + 9 XWH2C2 + 5 XWH2C3 + 3 XWH2C4 + 8 XWH3C1 + 8 XWH3C2 + XWH3C3 + 5 XWH3C4 SUBJECT TO ! Demand constraints: C1) XWH1C1 + XWH2C1 + XWH3C1 >= 10 C2) XWH1C2 + XWH2C2 + XWH3C2 >= 17 C3) XWH1C3 + XWH2C3 + XWH3C3 >= 22 C4) XWH1C4 + XWH2C4 + XWH3C4 >= 12 ! Supply constraints: WH1) XWH1C1 + XWH1C2 + XWH1C3 + XWH1C4 <= 30 WH2) XWH2C1 + XWH2C2 + XWH2C3 + XWH2C4 <= 25 WH3) XWH3C1 + XWH3C2 + XWH3C3 + XWH3C4 <= 21 END ! Solve the model TERSE GO 36 CHAPTER 2 ! Divert a solution DIVERT SOLU.10 SOLU RVRT ! Set RHS of C1 to 15, re-solve and save report ALT C1 RHS 15 TERS GO DIVERT SOLU.15 SOLU RVRT ! Set RHS of C1 to 20, re-solve and save report ALT C1 RHS 20 TERS GO DIVERT SOLU.20 SOLU RVRT BAT LEAVE To have LINDO run the commands contained in this file, simply run the Take Commands command and input the name of the file to the prompt. For additional insight as to how the Take Commands Command is used, please refer to Chapter 7, Interfacing with the Outside World, section on “Running Command Scripts with the TAKE Command”. TAKE is the corresponding Command-line Command of the File|Take Commands Command in Windows. Basis Save Shift+F2 In the parlance of operations research, a solution to a linear programming model is referred to as a basis. Thus, the Basis Save command is simply a command to save the solution to your model. Why would you want to save a model’s solution? Suppose you need to run the model at a later date, perhaps with some minor modifications. Starting from the old optimal solution could save you considerable time - especially if the model is large. These saved solutions are different from the solution reports that LINDO generates with the Solution command. In general, solutions saved with the Basis Save command are difficult, if not impossible, to interpret. They are intended primarily for loading back into LINDO at some later date to use as a starting point for creating a similar model. WINDOWS COMMANDS 37 Assuming you have solved the active model, you can save the solution at any point by running the Basis Save command. When you issue the Basis Save command, you will be presented with a dialog box similar to the following: This is the standard Windows dialog box for selection to save a file. Once you have selected the file to save the basis in, you must also select a format. LINDO offers the following three different basis formats: Punch MPS “Punch” format FBS “File Basis Save” format SDBC “Save DataBase Column” format The details of these formats are of little interest. Be aware, however, that your best results will be obtained with either the Punch or FBS formats. SDBC does not save all the details required of a true basis, but is supported for backward compatibility with earlier releases of LINDO. Saving a basis generally has little effect on re-solving the model for integer and quadratic programs. For information on restoring a saved basis, please refer to the following Basis Read command. Basis Read F12 The Basis Read command is used to retrieve a solution to a model saved using the Basis Save command. For more information on how and why you save a solution, refer to the previous command, Basis Save. 38 CHAPTER 2 To restore a solution using the Basis Read command, you must first select the Model Window you wish to associate the solution with by clicking on it with the mouse. This model then becomes the active model. Once a Model Window is activated, the Basis Read command should be available in the File menu. When you choose the Basis Read command, LINDO will compile the model, if it hasn’t been compiled already, then the following dialog box appears: This is a standard Windows dialog box for selecting the basis file to read. You can use the list box in the lower left corner to select a file filter based on the three basis file formats used by LINDO: Punch MPS “Punch” format FBS “File Basis Save” format SDBC “Save DataBase Column” format Once you have selected the correct basis file, LINDO will attempt to install the solution into the model in the active window. Typically, your next step will be to solve the model. If the basis contained an optimal solution to the model, the required solution time should be quite short. In fact, usually no iterations are required at all. If you have modified the model slightly from the model used to save the solution, then LINDO may require several iterations to find the new optimum. Regardless, this beats having to wait through conceivably thousands of iterations on a large model. Reading the basis of models with integer restrictions or quadratic programming generally has little effect on the time required to re-solve the model. One final note: As long as a model is open in LINDO, LINDO automatically keeps a basis in memory. It is not until you physically close a model, or exit and reenter LINDO, that you need to read in a basis. If for some reason you want to eliminate the basis in memory to force LINDO to start from “scratch” on a model, you can do this by issuing the Compile Model command in the Solve menu. When you explicitly issue the compile command, LINDO discards all internal basis information. WINDOWS COMMANDS Title 39 Shift+F3 You can use the Title command to give a title to a model. In the following example, we have dubbed the model “Product Mix Example”: Running the Title command will cause the model’s title to be sent to the Reports Window, and you should see the following: The Title command is useful for attaching headers to solution reports. Otherwise, it is sometimes difficult to look at a solution and determine its corresponding model. Date Shift+F4 The Date command sends the current date and time to the Reports Window. This is useful for date stamping reports. Sample output from the Date command appears below: 40 CHAPTER 2 Elapsed Time Shift+F5 The Elapsed Time command sends the elapsed runtime of your current session to the Reports Window. This command is useful when you want to determine runtimes. Sample output from the Elapsed Time command follows: In this example, LINDO has been running for 17 minutes and 12.11 seconds. License Some versions of LINDO require the user to input a password. Think of the password as a "key" that unlocks the LINDO application. If you upgrade your copy of LINDO, then you will need to enter a new password. The File|License command prompts you for a new password. When you run the File|License command, you will be presented with the following dialog box: Carefully enter the password into the edit field, including hyphens, making sure that each character is correct. Click the OK button and, assuming the password was entered correctly, LINDO will display the Help|About LINDO... box listing the features of the upgraded license. Verify that these features correspond to the license you intended to install. Note: If you were e-mailed your password, then you have the option of cutting and pasting it into the password dialog box. Cut the password from the e-mail that contains it, then paste it into the LINDO File|License dialog box with the Ctrl-V shortcut. WINDOWS COMMANDS Exit 41 Shift+F6 The Exit command causes LINDO to quit and returns you to the operating system. You will be prompted to save any files, which have modified since they were last saved. Note: You will lose any changes you made to the open models if you don’t save them before quitting (see the SAVE command). 2. Edit Menu The LINDO Edit menu is pictured at left. This menu contains the commands that, in general, support the full screen editing options in LINDO. An in depth discussion of each of the commands in the Edit menu is below. Before jumping into detailed discussions of the Edit menu commands, it would be useful, at this point, to discuss some of the general properties of the LINDO editor. There are two commands contained in the File menu, which open a model in LINDO. These are the Open command and the View command. When you read a model into LINDO using the Open command, the model is placed into an Edit Window. When you read a model with the View command, the model is placed into a View Window. You can determine when a model is in a View Window by checking the window’s title bar. If it is a View Window, a “(v)” will appear after the file’s name in the title bar. 42 CHAPTER 2 The distinction between View Windows and Edit Windows is important when it comes to editing your files. Edit Windows can only handle files with up to approximately 64,000 characters, while View Windows can handle files as large as available memory allows. Edit Windows offer an advantage over View Windows in that there are many more editing features available. Thus, many of the commands discussed in this section are only available in Edit Windows. The table below lists the editing features supported by both classes of windows and should help in understanding the differences between them. Editing Feature Capacity Undo Cut Copy Paste Clear Find/Replace Go To Line Paste Symbol Select All Clear All Choose New Font View Window Limited only by available memory ■ ■ ■ Edit Window 64K ■ ■ ■ ■ ■ ■ ■ ■ ■ ■ ■ If you need extensive editing capabilities for a large model, we recommend that you use an external text editor to do your work. The model must be saved as “Text Only” in the external editor. Once this is done, the model may be read into LINDO using the View command. Undo Ctrl+Z The Undo command is used to reverse the last action taken in an Edit Window. The Undo command is not available in View Windows. For a discussion on the distinction between Edit and View Windows, please refer to the Open and View commands in the File menu section above. Cut Ctrl+X The Cut command is used to remove selected text from an Edit Window and place it into the Windows clipboard for future pasting at another point in the window, other Edit windows in LINDO, or other applications. To select text for cutting, simply press down on the left mouse button at the beginning of the text and then drag the mouse pointer to the end of the text and release the mouse button. The selected text should now be displayed in reverse video (white letters, black background). Selecting the Cut command at this point will cause the selected text to be removed from the window and placed into the Windows clipboard (For pasting this text, refer to the Paste Command below). Copy Ctrl+C The Copy command copies selected text from an Edit Window into the system clipboard. The text is not deleted from the Edit Window when it is copied. Once there, it may be pasted into other applications or other Edit Windows in LINDO. To select text for copying, simply press down on the WINDOWS COMMANDS 43 left mouse button at the beginning of the text and then drag the mouse pointer to the end of the text and release the mouse button. The selected text should now be displayed in reverse video (white letters, black background). Selecting the Copy command at this point will cause the selected text to be inserted into the Windows clipboard (For pasting this text, refer to the Paste Command below). Paste Ctrl+V The Paste command pastes text from the Windows clipboard into an Edit Window at the current cursor position. If text is currently selected when the Paste Command is given, the selected text will be erased and replaced with the clipboard text. In LINDO, you may only paste text. Graphics are not allowed. Clear Del The Clear command is used to remove selected text from an Edit Window. To select text for clearing, simply press down on the left mouse button at the beginning of the text and then drag the mouse pointer to the end of the text and release the mouse button. The selected text should now be displayed in reverse video (white letters, black background). Selecting the Clear command at this point will cause the selected text to be removed from the window. Note: The text that is removed using the Clear command or Delete key is not placed into the Windows clipboard and will be lost once cleared. The Undo command is not available here. Find/Replace Ctrl+F The Find/Replace command can be used in either an Edit or a View Window to find some specified string of text and, optionally, replace it with an alternate text string. After invoking the Find/Replace command, you will be presented with the following dialog box: If you just want to find a string of text, enter it in the box labeled “Find What” then press the “Find Next” button. LINDO will begin the search from the current cursor position. If you want to begin the search from the top of the file, you may want to use the Go To Line command to reposition the cursor to the top of the file before issuing the Find/Replace command. 44 CHAPTER 2 If you want to replace the search string with an alternate string, enter the replacement text in the box labeled “Replace With”, then press the Replace button. The first time you press replace, LINDO will simply jump to the next occurrence of the search string. Pressing replace again causes LINDO to replace the search string and then jump to the next occurrence. Using this technique, you can pass through a window clicking Replace when you want to replace an occurrence or Find Next when you want to skip to the next occurrence without replacing the current selection. To replace all occurrences of the search string from the current insertion point to the end of the document, press the Replace All button. LINDO will inform you as to the total number of replacements performed. The default action for LINDO, when doing a Find/Replace, is to ignore the case of the text. If you want LINDO to match the case of the text exactly, click the Match Case box in the lower left corner of the dialog box before proceeding with the command. Options Alt+O The Options command is used to modify default system parameters. When issuing the Options command, the following dialog box will appear: LINDO options remain in effect for the entire session. If you modify any options and wish to preserve their setting from one LINDO session to the next, press the “Save” button. This will save the current options, so they can be restored when LINDO is restarted. If at anytime you wish to return to the default set of options, press the “Default” button. The defaults are identified in detail below. WINDOWS COMMANDS 45 Options in LINDO are broken down into the following categories: 1. 2. Optimizer Options - options that pertain to the functioning of the solver engine a) Integer Programming (IP) - options that influence the solvers approach on IP models b) General - general solver options that pertain to all classes of models Output Options - options that affect the amount and style of output from LINDO The remainder of this section explores the options available in each of these categories. Optimizer Options The group box labeled “Optimizer” contains all the options that influence the functioning of the optimizer. This group box consists of the two subgroup boxes: “Integer Programming” and “General”. The options in the Integer Programming (IP) subgroup influence how LINDO’s branch-and-bound solver handles integer programming models. The options in the General subgroup pertain to the way the solver handles all classes of models - linear, integer and quadratic. Integer Programming (IP) OPTIMIZER Options Given that integer programming problems can, at times, be extremely difficult to solve, the following IP options will be of interest if you plan on solving anything other than the most trivial IP models. The integer programming options included in LINDO and discussed below are: Preprocessing Preferred branching direction IP optimality tolerance IP objective hurdle IP variable fixing tolerance Much of the discussion of these parameters assumes a certain amount of knowledge about the branch-and-bound solution algorithm for IP models. If you are unfamiliar with this algorithm and would like to learn more, you can refer to the companion LINDO textbook, Optimization Modeling with LINDO, by Linus Schrage. Preprocess An optional phase to the integer programming (IP) solver in LINDO is known as preprocessing. During the preprocessing phase, the solver does extensive evaluation of your model in order to add IP cuts. IP cuts are simply constraints added by the LINDO solver. These constraints “cut” away sections of the feasible region to the continuous model (i.e., the model with integer restrictions dropped), which are not contained in the feasible region to the integer model. On most IP models, this will accomplish two things. First, solutions to the continuous problem will tend to be more naturally integer. Thus, the branch-and-bound solver will have to branch on fewer variables. Secondly, the bounds that come out of solutions at intermediate nodes will tend to be “tighter”, allowing the branch-and-bound solver to “fathom” (i.e., drop from consideration) branches sooner. These improvements can really turbocharge the IP solver on many models. 46 CHAPTER 2 However, there is a downside to IP preprocessing, which you should be aware of. As you can imagine, determining a valid and meaningful set of cuts can be time consuming. If your model is naturally tight or if there are just a few integer variables, then the time to generate cuts can exceed the savings in solution times resulting from those cuts. In these cases, you are better off skipping the preprocessing phase. LINDO defaults to performing the preprocessing step. Preferred Branch When LINDO is solving an IP, one of the fundamental operations of the solver is branching. Initially, the solver lets the integer variables be continuous. The solver searches the integer variables to determine if any have fractional values. If they do, then the solver will branch on these variables. When the solver branches on a variable, it fixes its value to one of the nearest integer values and continues. Since there are always two close integer values to any fractional number (one just greater than and one just less than the fractional number), LINDO can initially branch either up or down. With some models, always branching up first or down first can make a large difference in performance. The Preferred Branch option gives you control over this parameter. The default is for LINDO to pick the branching direction. In this case, LINDO will make an educated decision whether to branch up or down by analyzing the direction that looks most favorable. IP Optimality Tolerance The IP Optimality Tolerance command specifies a fraction f that indicates the solver should only search for solutions with objective values 100*f% better than the best one considered so far. For command line users of LINDO, the IP Optimality Tolerance corresponds to the IPTOL value. The end results of using an IP Optimality Tolerance are twofold. First, on the positive side, solution times will tend to be considerably faster. On the negative side, use of this tolerance can mean LINDO may not find the optimal solution and you will not receive any warning to this effect in the solution report. You are guaranteed, however, that the solution found is within 100*f% of the true optimum. On large integer models, the alternatives of getting a solution within say 2% of optimal in a few minutes versus the true optimum in a few days makes an IP Optimality Tolerance value quite attractive. WINDOWS COMMANDS 47 As an illustration of the potential power of the IP Optimality Tolerance, consider the following IP: The default in LINDO is to use no IP Optimality Tolerance. When we stick with this default, we find the following in the Solver Status Window once optimization is complete: 48 CHAPTER 2 Note that it has taken us 10,064 iterations, 1,715 branches, and 19 seconds to reach optimality. Now, we set the IP Optimality Tolerance to .01 in the Options Dialog Box as follows: By setting this value to .01, we are telling the solver that we are happy with any integer solution that is no more than 1% worse than the true optimal solution. Re-solving the same model yields the following statistics in the Solver Status Window: This time, the model solves in only 74 iterations, 7 branches, and two seconds! The true objective value of 8,929,390 is a mere 0.002% better than the objective of 8,929,170 found using an IPTOL value. Differences of this magnitude applied to a large IP model can make for dramatic improvements in runtimes. The default IP Optimality Tolerance value is “None”. In other words, the feature is disabled. IP Objective Hurdle When IP Objective Hurdle is used, LINDO will only search for integer solutions in which the objective value is better than the specified hurdle. This bound is usually based on a known feasible solution. The bound is used in the branch-and-bound algorithm to narrow the search for the optimum. When LINDO is searching for a initial integer solution, it can ignore branches with objective values worse than your hurdle value, because LINDO knows that a better solution (the hurdle) will be found on a subsequent branch. In other words, branches must have objective values more attractive than the hurdle value before they will be considered. Depending on the problem, a good hurdle value can reduce solution times. WINDOWS COMMANDS As an example, consider the following, small IP: Running without an IP hurdle, we obtain the following results with the solver: Now, suppose we know a feasible integer solution exists with an objective value 14. If we set the IP hurdle to this value in the Options Dialog box as follows: 49 50 CHAPTER 2 and then re-solve, we get the following results: Notice the total number of iterations fell by more than 50 percent, from 68 to 32. Reductions of this magnitude can be a big help when tackling large IP models. However, if IP hurdles are set too aggressively, LINDO may return an infeasible message. In our previous example, a hurdle value of 16 would be infeasible because the objective is only 15. The default IP Objective Hurdle value is “None”. In other words, the feature is disabled. IP Variable Fixing Tolerance LINDO begins solving IP models by solving a linear relaxation of the original IP model. This linear relaxation merely lifts the integrality requirements and solves the remaining model as a pure linear programming problem. You may, optionally, have LINDO find integer variables that have an integer value and high reduced cost in the linear relaxation solution. LINDO will initially fix these variables to the integer values obtained in the relaxation and optimize over a restricted branch-and-bound tree. The underlying logic in doing this is that integer valued variables with a high reduced cost would incur a large expense if they were to move away from their bounds. Given this, they have a relatively high probability of remaining at their current values in the optimal integer solution. By initially fixing these variables and solving the restricted tree, the hope is to obtain good objective bounds early on allowing large portions of the full tree to be fathomed once we free up the fixed integer variables. To exploit this feature, input a numeric value in the IP Variable Fixing Tolerance box in the Options window. When solving IPs, LINDO will initially fix all integer variables with reduced costs exceeding this value. The default IP Variable Fixing Tolerance value is “None”. In other words, the feature is disabled. WINDOWS COMMANDS 51 GENERAL OPTIMIZER Options Options included here influence the optimizer’s operation on all classes of models and include the following: Nonzero Limit Iteration Limit Initial Constraint Tolerance Final Constraint Tolerance Entering Variable Tolerance Pivot Size Tolerance Nonzero Limit When we speak of nonzeros, we are referring to the coefficients on the variables in the constraint equations. It would be unusual for all variables in a model to appear in a single constraint. In fact, in most large, real world models, less than one percent of the variables will appear in the average row or constraint. Thus, in any given row, most variables have a coefficient of zero. Storing all these zeros would be wasteful with respect to both performance and storage. Therefore, LINDO only stores the nonzero coefficient values. When LINDO starts, it sets aside a fixed amount of memory as space for the nonzero coefficients. You can determine this limit by examining the Nonzero Limit field in the Options dialog box. If you have a model with a particularly large amount of nonzeros, you may want to increase the Nonzero Limit to allow LINDO to optimize the model. On the other hand, if you are trying to conserve memory, you might want to decrease the Nonzero Limit. Each nonzero you allocate requires eight bytes of storage. This memory will be taken up regardless of how large or small your models are. To change the nonzero limit, enter a new value in the Nonzero Limit field then press the “Save” button. At this point, you will be presented with the message: LINDO cannot physically change the Nonzero Limit in midstream. In order to accomplish this, you will need to exit LINDO and restart. Note: When you restart LINDO, you will lose any changes you have made since your last save. It is recommended you save your work before continuing here (See Save c ommand above). 52 CHAPTER 2 Upon restarting, the new nonzero limit will be established. If the Nonzero Limit is set to a size too large for available memory on your computer, LINDO will automatically scale back the limit to a size, which will allow the program to run. You can verify the true, physical Nonzero Limit at any time by selecting the About LINDO command from the Help menu. This command displays the LINDO release number, copyright information and, at the bottom, you should find a box similar to the following: This box lists the constraint and variable limits of your copy of LINDO along with the physical nonzero limit. We should also mention that LINDO uses the nonzero allocation as a work area during optimization. Specifically, LINDO stores the basis inverse matrix along with the structural nonzeros in this shared memory location. Given this, you should try to allocate a good number of additional nonzeros over and above what is required by just the structural nonzeros. If LINDO runs out of nonzero space, it halts the optimization and returns with an error. Iteration Limit The LINDO solver uses a form of the simplex method to perform optimization. The simplex method performs a series of iterations (also called pivots) until an optimal solution is found. At each iteration, a “favorable” variable is introduced into the solution, while another variable is simultaneously driven to zero and dropped from the current solution. In some cases, you may want to place an upper limit on the number of iterations LINDO performs. You can do this by typing a limit value into the box labeled “Iteration Limit” in the Options dialog box as follows: Should LINDO hit the Iteration Limit before optimization is complete, you will be presented with the following dialog box: WINDOWS COMMANDS 53 If you want to halt optimization, press the button labeled “Cancel”. LINDO will end optimization, and return with the best answer found so far. If you change your mind and you want to continue with optimization, input a number corresponding to the additional number of pivots you want LINDO to perform and then press “OK”. The optimizer will resume and, should it hit the new limit before completion, will prompt again for an additional increment to the Iteration Limit. The default Iteration Limit is “None”. In other words, the number of iterations is not limited. Initial Constraint Tolerance Final Constraint Tolerance Due to the finite precision available for floating point operations on digital computers, LINDO can’t always satisfy each constraint exactly. Given this, LINDO has two internal tolerances, which dictate the maximum amount of violation allowed on a constraint in order to consider it still to be “satisfied”. These tolerances are called the Initial Constraint Tolerance and the Final Constraint Tolerance. The Initial Constraint Tolerance is used when the solver first begins and can be relatively loose in order to speed solution times. Once LINDO has closed in on an optimal solution, it switches to the Final Constraint Tolerance, which should be relatively tight in order to guarantee an accurate final solution. The default value for the Initial Constraint Tolerance is 8-5, while the default for the Final Constraint Tolerance is 1-5. One instance where these tolerances can be of use is when LINDO reports a model is infeasible by a small amount. When a model is infeasible, LINDO reports a sum of infeasibilities, which is the amount of violation on all the constraints and bounds. If this number is relatively small, then you might want to consider loosening the constraint tolerances. This is particularly true in a model where scaling is poor and the units of measurement on some constraints are such that minor violations are insignificant. For instance, suppose you have a budget constraint measured in millions of dollars. In this case, a violation of a few pennies would be of no consequence. Short of the preferred method of re-scaling your model, loosening tolerances may be the most expedient way around a problem of this nature. Entering Variable Tolerance The fundamental operation in the algorithm used by the LINDO solver involves introducing a variable that formerly had a value of zero into the solution while, simultaneously, driving another variable to zero. Variables are only introduced into the solution if they are favorable to the progress of the objective. Due to round-off error in floating point calculations, a variable may compute as being favorable when, in fact, it may have no impact or, worse, a negative impact on the objective. The Entering Variable Tolerance is the dividing line between what we consider favorable and unfavorable. Variables with negative reduced costs whose absolute values exceed the Entering Variable Tolerance will be considered as potential candidates for entering into the solution. The default value for the Entering Variable Tolerance is .5-7. Pivot Size Tolerance When LINDO introduces a variable into the solution, it must assign the variable to a constraint or row. Each row has one variable assigned to it and this assigned row is used in computing the value of the 54 CHAPTER 2 variable. The row in which a variable is assigned is called its pivot row. In order for LINDO to assign a variable to a row, there must currently be a nonzero in the row, which is called the pivot element. The exact value of the pivot element will vary depending on all the matrix operations that were performed prior to assigning a variable to the row. If the pivot element is very small, then, given the finite precision of floating point arithmetic, there is a chance that the pivot element is merely a phantom consisting of noise due to round-off error. Assigning a variable to such a row can lead to erratic behavior of the solver. The Pivot Size Tolerance is the dividing line between what is and what is not considered a valid pivot element. The default value for the Pivot Size Tolerance is 1-10. Output Options These options allow you to control the amount and type of output you receive from LINDO. Status Window Whenever LINDO begins solving a model, it displays a Solver Status Window, which allows you to monitor the progress of the solution process. If you want to keep this window from popping up every time you solve a model, remove the checkmark from the Status Window box in the Options dialog box as illustrated here: Once you have done this, LINDO no longer automatically displays the Solver Status Window. However, you can still bring it up at any time during optimization by issuing the Open Status Window command from the Window menu (See Window menu section below). LINDO defaults to displaying the Solver Status Window whenever the Solver is invoked. Terse Output Unless specified otherwise in the Options dialog box, LINDO automatically routes a solution report to the Reports Window after solving a model. You can suppress this by checking the Terse Output box in the Options dialog box as shown here: Note that you can always request a solution report at any time using the Reports|Solution command (See Reports menu below). Switching to Terse Output will also suppress much of the trace output sent to the Reports Window when solving an integer programming model. The default in LINDO is to have the Terse Output option unchecked. That is, to run in Verbose mode. WINDOWS COMMANDS 55 Page Length Limit You can enter a Page Length Limit to request that LINDO interrupt output to the Reports Window every few lines and wait for a response from you. This is useful if you want to examine a long solution, before it has a chance to scroll out of the Reports Window. For instance, if you enter a page length limit of 25 as shown here: then every time LINDO sends 25 lines of output to the Reports Window, it will stop and display this dialog box: LINDO will not resume output until you press the “More” button in this box. The default Page Length Limit is “None”. In other words, this feature is disabled. Terminal Width When doing sequential I/O operations, LINDO respects a Terminal Width (i.e., maximum characters allowed per line). Thus, output lines to the Reports Window are wrapped to fit within the Terminal Width and input records are truncated to fit. You may change the Terminal Width in the Options dialog box in the following edit box: However, the minimum and maximum Terminal Width values allowed are 40 and 132. When LINDO reads an input file, any characters going beyond the Terminal Width limit set here will not be recognized by LINDO and may affect the way the model is solved. Constraints and objective functions may be split over multiple lines or combined on single lines. You may split a line anywhere except in the middle of a variable name or a coefficient. Be sure to use the return key to any rows that exceed this width on the next line. The default Terminal Width is 80 characters. Go To Line Ctrl+T The Go To Line command allows you to jump to a specified line in the current window. You can also select to jump to either the top or the bottom of the window. 56 CHAPTER 2 When issuing the Go To Line command, you will be presented with the following dialog box: If you want to go to a specific line, enter the line number in the edit box labeled “Line number to go to” and click the OK button. LINDO will move the cursor to the start of the specified line, scrolling it into view if required To go to the top or the bottom of the window, click either “Go to Top” or “Go to End”. Paste Symbol Ctrl+P The Paste Symbol command displays a dialog box, which assists you in building a model. This dialog box contains all the reserved symbols in the LINDO syntax, plus all the variable and row names defined so far in the model. The dialog box appears as follows: WINDOWS COMMANDS 57 When you double-click on a symbol, it is appended to the edit box titled “Paste Buffer”. Once you have finished constructing the constraint, you press the Paste button to send the contents of the paste buffer into the current Model Window at the cursor point. You may also type directly into the paste buffer if desired. Press the Clear button to erase the contents of the paste buffer. As an example, suppose we wanted to use the above dialog box to add the constraint XSAT + XSUN >= 4 to our model. We would double-click on the items: 1. 2. 3. 4. XSAT in the Variables list box The plus sign in the Reserved list box XSUN in the Variables list box The >= sign in the Reserved list box Finally, we would enter the right-hand side of 4 directly into the paste buffer. At this point, the dialog box should resemble the following: Note that the paste buffer contains the desired constraint. At this point, we may insert it into the Model Window at the current cursor location by pressing the Paste button. One final, important concept to keep in mind when using the Paste Symbol command is that LINDO must be able to compile (see the Compile Model command) the current model in order to build the variable and row name lists. If LINDO can’t compile the model, the Paste Symbol command will not execute. 58 CHAPTER Select All 2 Ctrl+A The Select All command sets the current selection to be all the text in the current window. That is, all the text in the current window is highlighted. This is useful when you want to copy the entire contents of a window and place it into a new window or into a different application. Clear All The Clear All command erases the entire contents of the current window. This is useful when you want to clear old output from the Reports Window and start with a “clean slate”. If you mistakenly run the Clear All command, it may be reversed by the Undo command. Choose New Font Use the Choose New Font command to select a new font in which to display or print the active window. You may find it easier to read models and solution reports if you select a mono-spaced font such as Courier. 3. Solve Menu The Solve menu appears to the left and contains all the commands, which invoke the core LINDO solver. These commands are discussed below in detail. Solve Ctrl+S The Solve command is the primary command you will use from the Solve menu. This command causes LINDO to begin solving your model. If it is a relatively small model, the Solve command will execute almost instantaneously. If it is a large, tough model, the Solve command could potentially run for hours. WINDOWS COMMANDS 59 When you invoke the Solve command, LINDO will check to see if the model has been modified and needs to be compiled. Assuming no compilation errors exist, LINDO posts a window called LINDO Solver Status. This window allows you to monitor the progress of the solver towards a solution. A sample of the window appears below: A description of the various fields and controls within the Status Window appears in the table below. Field/Control Status Iterations Infeasibility Objective Best IP IP Bound Branches Elapsed Time Update Interval Interrupt Solver Close Description Gives status of the current solution. Possible values include: Optimal, Feasible, Infeasible, and Unbounded. Number of solver iterations. Amount by which the constraints are violated. Current value of the objective function. Objective value of best integer solution found. Only for integer programming models. Theoretical bound on the objective for IPs. Only for integer programming models. The number of integer variables “branched” on by LINDO’s IP solver. Only for integer programming models. Elapsed time since the solver was invoked. The frequency (in seconds) that the Status Window is updated. Setting this to zero tends to increase solution times. Press this button to interrupt the solver and return the current best solution found. Press this button to close the Status Window. 60 CHAPTER 2 When the Solve command is finished, the solution will be sent to the Reports Window, where it can be reviewed, edited, and printed. If your model is formulated correctly, the Status Window will indicate that you have an optimal solution. If the Status Window indicates the model is infeasible or unbounded, then there is a problem in your formulation and you should not attempt to use the results from LINDO. If the model contains no integer variables and is not a quadratic programming model, the LINDO Debug command can assist you in finding the flaws in your model when it is either unbounded or infeasible. If you want to suppress the automatic generation of a solution report at the end of the solve command, click on “Terse output” in the Edit|Options command dialog box. The Reports Window can hold up to 64,000 characters of information. If required, LINDO will erase output from the top of the Reports Window in order to make room for new output at the bottom of the window. If you have a lengthy solution report, which you need to examine in its entirety, you can log all information sent to the Report Window in a disk file using the Log Output command from the LINDO File menu. This file can then be examined using an external text editor or using the View command from the LINDO File menu. If the model is linear, then, after writing the solution report, LINDO will prompt you to determine if you wish to do sensitivity and range analysis. If you request to see this report, it will also be sent to the Reports Window. You can also request this report at any time by using the Reports|Range command. For more information on this type of analysis, please refer to the Range command on page 130. Compile Model Ctrl+E Before LINDO can solve your model, it must compile (i.e., translate) the model into the arithmetic form required by the LINDO solver. LINDO will automatically do this if required, but you may request a compile at any time by running the Compile Model Command. While compiling your model, LINDO maintains the following window to keep you posted on the progress of the compilation: This window displays a progress bar showing the percentage of work completed along with a running count of constraints, variables, and nonzero coefficients encountered so far in the model. If LINDO finds a syntax error during compilation, it will inform you of the line number where the error occurred and move the cursor to that line. Requesting a compile may be useful in several instances. First off, you can use the compile command to check the syntax of a model as you are developing it. Secondly, compiling a model builds the variable and row name tables required by the Paste Symbol command. Finally, running the compile WINDOWS COMMANDS 61 command eliminates any stored basis for the model. If you have solved the model during the current session, LINDO maintains a basis (i.e., solution) in memory to use as a starting point should you modify and re-solve it again. Issuing the compile command causes LINDO to erase the basis for the model. Thus, all subsequent Solve commands will commence from “scratch”. Debug Ctrl+D In the ideal world, all models solved by LINDO would return an optimal solution. Unfortunately, this is not the case. Sooner or later, you are bound to run across either an infeasible or unbounded model. This is particularly true in the development phase of a project when the model will tend to suffer from typographical errors. Tracking down an error in a large model can prove to be a daunting task. The Debug command is useful in narrowing the search for problems in both infeasible and unbounded models. When Debug encounters a model with no feasible solution, it first tries to identify one or more “crucial” constraints. A constraint is crucial if dropping just that constraint from the entire model is sufficient to make the model feasible. These constraints are identified by Debug as the SUFFICIENT SET (ROWS). Not every infeasible model has a crucial constraint. Regardless of whether any crucial constraints were found, the Debug command also identifies a set of constraints as well as column bounds that constitute a NECESSARY SET (ROWS). Such a set has the feature that it is infeasible. However, if any member of this set is deleted, then the set becomes feasible. Thus, it is necessary to make at least one correction in the NECESSARY SET (ROWS) if the model is to be feasible. When Debug encounters an unbounded model, it first tries to identify one or more "crucial" variables. These variables are identified by Debug as SUFFICIENT SET (COLS). A variable is crucial if fixing it is sufficient to make the model bounded. Regardless of whether any crucial variables were found, Debug also identifies a set of variables that constitutes a NECESSARY SET (COLS). Such a set has the feature that it is unbounded. However, if any variable in this set is fixed, the set becomes bounded. In summary, if the complete model would be feasible except for a bug in a single row, that row will be listed in the SUFFICIENT SET of rows. The NECESSARY SET of rows is a set such that, if as long as all of them are present, the model remains infeasible. Typically, Debug helps substantially reduce the search effort. The first version of Debug was implemented in response to a user who had an infeasible model. The user had spent a day searching for a bug in a model with 400 rows. Debug quickly found a NECESSARY SET with 55 constraints as well as one SUFFICIENT SET constraint. The user quickly noticed that the RHS of the SUFFICIENT SET constraint was incorrect. The following example illustrates. The coefficient .55 in row 4 should have been 5.5. 62 CHAPTER 2 When we attempt to solve this formulation, we get the following error code: Now, if we run the Debug command, we are presented with the following report in the Reports Window: The Debug command has correctly identified that the erroneous constraint number 4, when eliminated, is sufficient to guarantee a feasible solution. Thus, Debug can be very useful in tracking down potential problems in a model. In general, the kind of correction required in a constraint is one or more of the following: change the RHS, change the direction, change the coefficient of a variable in the constraint, or change the upper or lower bound of a variable in the constraint. Debug operates in a similar manner for unbounded models. In the following example, we introduced an error by placing a minus sign instead of a plus sign in front of variable Z3 in constraint 3. A look at row 3 reveals that Z3 can be increased indefinitely, leading to an unbounded objective. WINDOWS COMMANDS 63 The resulting model is unbounded and, when issuing the Solve command, we receive the unbounded error message: Taking the cue from the error message and issuing the Debug command from the Solve menu, we receive the following breakdown: The Debug command has successfully determined that bounding Z3 is sufficient to bound the entire model. This illustrates that Debug can be very useful for narrowing down the search for problems in an unbounded model. In general, the kind of correction required in a column is one or more of the following: change the objective coefficient, change a coefficient in some constraint, change the direction of the inequality sign of some constraint where the variable in question appears, make either the upper or lower bound finite. Pivot Ctrl+N The fundamental operation in the simplex algorithm used by the LINDO solver involves introducing a variable, which formerly had a value of zero, into the solution while simultaneously driving another variable to zero. This operation is referred to as a pivot. The Pivot command allows you to perform individual pivots, optionally specifying the variable and constraint to perform the pivot on. The Pivot command is not of much practical use, but it is of great potential interest to students of the simplex algorithm, particularly when coupled with the Tableau command. The Tableau command can be used to view the current simplex tableau to assist in selecting an attractive pivot variable and its pivot row. Users unfamiliar with the simplex algorithm can refer to any introductory operations research text to learn more. 64 CHAPTER 2 As an example of the use of the Pivot command, consider the following model: We will use the Pivot command twice to introduce both X and Y into the solution and, in so doing, obtain the optimal solution. When we first issue the Pivot command, we are presented with the following dialog box: If you were to click the OK button at this point, LINDO would select the variable and the pivot row. In most cases, as a minimum, you will want to select the pivot variable. If you select the pivot variable, then you will also have the option of selecting the pivot row. Be careful when selecting your pivot row. LINDO will report that the objective function is unbounded if the row specified does not bound the pivot variable. If you do not select a row, LINDO will select the correct one for you. WINDOWS COMMANDS 65 Getting back to our example, let’s pivot on Y first, since it has the highest objective coefficient. Since we want to select the pivot variable, we must click on the button marked “Use Mine” in the box labeled “Variable Selection”. Next, we type the variable name, Y, into the edit box labeled “My Variable Selection”. Because we are also specifying the pivot row, we click on the button marked “Use Mine” in the box labeled “Row Selection”. Finally, we type the pivot row name into the box labeled “My Row Selection”. Examining our model, we find row 4 places the tightest restriction on Y, so we make that our pivot row. The Pivot command dialog box will now resemble the following: At this point, data input is finished for our first pivot, so we press the OK button. LINDO then performs the pivot operation and returns with a summary of the results in the Reports Window: LINDO confirms that it has pivoted on Y in row 4, Y now has a value of 60, and the objective row has a value of 1800. It is instructional to view the simplex tableau before performing the next pivot. To display the tableau, select the Reports|Tableau command. LINDO should display the following: 66 CHAPTER 2 The reader experienced with the theory of the simplex algorithm can see that the only attractive variable to pivot on is X due to its negative reduced cost in row 1. Furthermore, the row binding X will be row 2. Thus, this must be our pivot row. Entering all this into the Pivot command dialog box, we have the following: Clicking OK to perform the pivot, results in this summary from LINDO: After X enters the solution, the objective value climbs to 2050, the optimal solution. If you would like a full solution report, select the Reports|Solution command. You should receive the following: Preemptive Goal Ctrl+G The Preemptive Goal command performs Lexico-optimization on a model. This allows the user to specify an ordered list of objectives. LINDO begins by optimizing the first objective. Given the optimal value for the first objective, it then optimizes the second objective subject to the first objective being equal to its optimal value. Given the optimal values for the first and second objectives, it then optimizes the third objective, etc. WINDOWS COMMANDS 67 A typical situation has a first objective of minimizing cost or maximizing profit and a second objective of “smoothing” the solution in some sense. Examples are cutting stock or staff scheduling applications where a number of demand requirements must be satisfied. Traditional formulations of such problems frequently have “multiple optima” solutions, some of which greatly over-satisfy one or two requirements and just barely satisfy all others. The user typically has a slight preference for solutions, which “spread out” the over-satisfaction more evenly. A Goal Programming formulation would have a first objective of minimizing the cost of satisfying all requirements and perhaps a second objective of minimizing the maximum over-satisfaction of any requirement. The Lexico approach saves the user from having to worry about exact tradeoff rates between the cost of a solution and the value of oversatisfaction. In the following example, we look at the Preemptive Goal command applied to a small staff scheduling model. We have staffing requirements for each of the seven days of the week. Employees work for 5 days with two days off each week. M represents the number of employees starting on Monday, T is the number starting on Tuesday, and so on. The formulation for this model is: 68 CHAPTER 2 Typically, you must accept some overstaffing in problems of this sort, but you may want to spread the overstaffing across the week. After optimizing with the Solve command, you will notice the “clustered” overstaffing in the solution: As the solution currently stands, all of the overstaffing occurs on Monday and Tuesday, as indicated by the nonzero values in the SLACK OR SURPLUS column for these two days. Thus, on Monday and Tuesday, we have two extra staff members, while during the remainder of the week we have none. WINDOWS COMMANDS 69 We would like to have extra staff, if possible, but more than one extra employee per day is not beneficial. So, we’ll let Xi denote the extra workers up to a maximum of one on each day. Then, using the Preemptive Goal command (in place of the standard Solve command), we can first minimize cost, fix cost at its optimal value, and then maximize the sum of the Xi variables. The modified model is then: We want to minimize total cost first, so we place the variable COST first in the objective. The variable COST is defined in the row that is also named COST. After minimizing COST and fixing it to its optimal level, we want to maximize the excess staff for each day up to, at most, one person per day. Note that, since we are maximizing EXTRA, it has a negative coefficient in the objective. 70 CHAPTER 2 After applying the Preemptive Goal command, we obtain the new solution: Note, we now have one extra person on each of the four days Monday, Tuesday, Saturday, and Sunday as indicated by the values for the variables XM, XT, XS, and XN. Thus, we have spread our beneficial, excess staffing out to two additional days without increasing our staffing costs. The Preemptive Goal command may be applied to both linear and integer programs. It may not be applied to quadratic programming models. WINDOWS COMMANDS 71 4. Reports Menu The Reports menu is shown at left and contains all the commands, which may be used to generate reports related to your model. To generate a report for a window, you must first make it the active window by clicking on it with the mouse. Then, you can issue the desired command from the Reports menu. The commands in this menu are discussed below in detail. Solution Alt+0 The Solution command sends a standard solution report to the Reports Window for the currently active Model Window. Normally, LINDO automatically generates a solution report as part of the Solve command. This automatic solution report is suppressed if you have used the Options command to place LINDO in Terse mode. If LINDO is in Terse mode, you will need to run the Solution command to get a solution report. When you run the Solution command, you will be presented with the following dialog box: Basically, LINDO is prompting you to determine if you want all values included in the solution report, or just the nonzero values. If you request nonzeros only, then LINDO will only include the variables with values other than 0 and only the rows that are binding. Requesting just the nonzeros can cut down considerably on the size of the solution report. 72 CHAPTER 2 Once you determine the scope of the report, click the OK button and LINDO will begin generating the report. An example of a small solution report follows: The first information at the top of the solution report is the value of the objective function. After this, the solution report is broken down into two sections. The first section reports on the variables (i.e., the columns), and the second section reports on the rows (i.e., the constraints). In the variable section, there is one line for each variable giving the variable’s name, its value, and its reduced cost. Reduced costs are meaningful in linear and quadratic models, but, in general, should be ignored when solving integer programming (IP) models. There are two valid, equivalent interpretations of a reduced cost. First, you may interpret a variable’s reduced cost as the amount by which the objective coefficient of the variable would have to improve before it would become profitable to bring that variable into the solution. Second, the reduced cost may be interpreted as the amount of penalty you would have to pay to introduce a variable into the solution. Reduced costs are valid only over a finite range of a variable’s value. Next, in the rows section of the report, you will find one line for each constraint giving the constraint's name (if any), its slack or surplus value, and its dual price. The SLACK OR SURPLUS column tells you how close you are to the right-hand side limit on each constraint. This quantity, on less-than-or-equal-to constraints, is generally referred to as slack. Similarly, on greater-than-or-equal-to constraints it is called a surplus. If a constraint is exactly satisfied as an equality, the SLACK OR SURPLUS value will be zero. If a constraint is violated, as in an infeasible solution, the SLACK OR SURPLUS value will be negative. Knowing this can help you find the violated constraints in an infeasible model. The LINDO solution report also gives a DUAL PRICE figure for each constraint. You can interpret the dual price as the amount by which the objective would improve given a unit of increase in the right-hand side of the constraint. Dual prices are sometimes called shadow prices, because they tell you how much you should be willing to pay for additional units of a resource. Dual prices are meaningful in linear and quadratic models, but, in general, should be ignored when solving integer programming models. WINDOWS COMMANDS 73 As with reduced costs, dual prices are valid only over a limited range. The Range command may also be used to determine the extent of these valid ranges. The final line in the solution report gives the number of iterations, or simplex pivots, required to solve your model. In integer programming models, LINDO will also print a branch count, which is the number of variables the branch-and-bound solver had to branch on to arrive at a solution. Range Alt+1 The Range command generates a range report (i.e., sensitivity analysis) for the active Model Window. Note, you will need to solve the model before attempting to use the Range command. This range report includes: the variable names with their current objective function coefficients and allowable increases and decreases on these coefficients, and the row numbers (or names) with their current right-hand side values and allowable increases and decreases for these right-hand side values. The range report is relevant only for linear models. A range report for integer and quadratic programs is of little practical use. To illustrate the Range command, consider the small linear program: Solving this model, we get the solution: 74 CHAPTER 2 and the Range command yields the following range report: Interpretation of the range report is as follows: the OBJ COEFFICIENT RANGES for each variable are the amount by which that objective coefficient can be increased or decreased without causing a change in the basis (the values of the set of nonzero variables). The RIGHTHAND SIDE RANGES for each row are the amount by which that right-hand side can be increased or decreased without causing a change in the basis. We’ll now make some changes to demonstrate these concepts. Note that the allowable decrease on COMP1 is 5. Thus, changing COMP1’s objective coefficient to 15.1 ( 20 - 4.9) should not cause a change in the variable values. However, reducing the objective coefficient by one tenth more to 15 would begin to effect the solution. Making this modification to the objective, we have: WINDOWS COMMANDS 75 and re-solving, we get: As predicted by the range report, the optimal variable values are unchanged. Now, let’s push COMP1’s objective coefficient just past the allowable decrease to 14.9, so we have: Re-solving, we get the new solution: 76 CHAPTER 2 Note that the variable values have now changed, with COMP1 falling out of the solution. Before moving on, we should mention that the allowable ranges in range reports are minimal values. You can always alter a single right-hand side or objective coefficient up to the allowable range without affecting the variable values. However, you may need to go significantly past the allowable range before you actually experience a change in the variable values. Parametrics Alt+2 When reading about the Range command above, you may have been curious as to what happens to your model when you vary an objective coefficient or a right-hand side value over its entire range not just the allowable range listed in the range report. Of course, you could do this by hand as follows: alter a coefficient just beyond its allowable range, re-solve, and repeat. However, this could quickly become tedious. LINDO’s Parametrics command will automate this process for right-hand side values (at present, LINDO does not support objective coefficient parametrics). The Parametrics command will generate a report and/or graph detailing the changes in the objective value as a function of changes in a specified right-hand side value. You specify a new right-hand side and LINDO then changes the current right-hand side in steps to the new right-hand side value, displaying the objective function value at each step. To have LINDO parametrically vary a right-hand side value, solve your model then select the Parametrics command. To illustrate, suppose we have just solved the following staff scheduling model: WINDOWS COMMANDS 77 Next, we issue the Parametrics command and are presented with this dialog box: First, we must select a row and enter it into the box labeled “Parametric Row”. Suppose we want to see how increasing our staffing requirement on Saturdays influences our staffing costs. In this case, the row labeled “SAT” will be our parametric row. We can type SAT into the Parametrics Row box or simply double-click on SAT in the list box below. Our dialog box will then look like: 78 CHAPTER 2 Once we select our row, LINDO displays the row’s type (<=, = or >=) and current right-hand side value in the lower left corner of the dialog box. Let’s suppose we want to trace the effects of increasing Saturday’s staff to a total of forty employees. We would change the current right-hand side value of 120 to 400 in the box labeled “New RHS Value”. Next, we move to the Report Types section in the lower right corner of the dialog box where we have the option of selecting a text report and/or a graphics report. If you select a graphics report, you may also choose to display the graphics in either two or three dimensions. For our purposes, let’s select both a text report and a 3D graphics report. Input to the Parametrics dialog is complete and we have: Next, we click on the OK button to generate our parametrics report. The text report is sent to the Reports Window and appears as follows: WINDOWS COMMANDS 79 Starting with our original requirement for 120 people on Saturday, shown in the first RHS VAL row, we have a dual price of 20. That is, it costs $20 to increase the staffing requirement by one on Saturday. The increase to 170 people, shown in row two above, increases the objective value by $1000 (50 * $20). However, when the staffing requirement is increased to 185 people, the dual price goes up to 33.33. That is, it now costs $33.33 ($13.33 more) to increase the staffing requirement by one more on Saturday. The increase to 260 people, shown in row 4 above, increases the objective value by $2500 ($333.33 *7.5) over the value at 185 people. Yet again, however, the dual price rises to 100 when the staffing requirement on Saturday reaches 340 people in row 5 above. This increases the objective value by $8000 (80 * $100) over the value at 260 people. From here for this model, the staffing requirement for Saturday could increase indefinitely from here and each one more increased would add $100 to the objective value. Some models, however, if increased large enough, would become either infeasible or unbounded. The Parametrics text report shows the entering and leaving variables for every pivot, the right-hand side value as it changes from the current value to the new right-hand side value, the dual price, and the objective value of the new solution. Each line in the report represents a “breakpoint” in the piecewise linear (or piecewise quadratic if the model is quadratic) relationship between the objective value and the right-hand side value. The graphics report clearly illustrates this relationship. This report, if requested, will appear in an individual window. The graphics generated for this small example appears as follows: RHS Parametrics for Row: SAT 40000 35000 Objective (MIN) 30000 25000 20000 100 150 200 250 300 350 400 Righthand Side (>=) The right-hand side is represented on the horizontal axis and the objective value on the vertical axis. 80 CHAPTER 2 Ostensibly, the Parametrics command allows you to investigate changes in the right-hand side of at most one constraint at a time. Realize, however, that a simple device allows you to do this for several right-hand sides simultaneously in a linear fashion. Let the change column be called D. It may have coefficients in any or all rows. Add a constraint D = 0, and then do parametric analysis on the RHS of this constraint. The Parametrics command may be applied to linear and quadratic programs, but is not applicable to integer programs. Statistics Alt+3 The Statistics command sends a small report to the Reports Window. This report contains a number of summary statistics concerning the active Model Window. As an illustration, consider the following model: Issuing the Statistics command for this model yields the following report: The first line consists of: number of rows, number of variables, number of integer variables (with the number that are 0/1 or binary in parentheses), and the index of the first real constraint in a quadratic program (0 indicates this is not a quadratic program). WINDOWS COMMANDS 81 The second line consists of: number of nonzero coefficients in the whole model, number of nonzero coefficients in the constraints (with the number that are +1 or -1 in parentheses), and model density, defined as: (number of nonzeros) / [(number of rows) * (number of columns + 1)]. The third line consists of: absolute values of the smallest and largest nonzeros, respectively. The fourth line consists of: sense of the objective function (MIN or MAX), number of less-than-or-equal-to, equality, and greater-than-or-equal-to constraints, upper bound estimate of the number of generalized upper bound (GUBS) constraints (constraints which have no variable in common), and lower bound estimate of the number of variable upper bounds (VUBS). For example, the constraint X1 + X2 - X3 = 0 contains the implications: X3 = 0 implies X1 = 0 X3 = 0 implies X2 = 0 The last line consists of: the number of columns with only one nonzero coefficient, and the number of redundant columns (i.e., columns identical to some other column except possibly for the bounds). The Statistics command can be used for checking for certain types of errors in your model. For example, if there is a misspelled variable name, you may find columns with a single nonzero element when you don’t expect any. If you misplace a decimal point in the model, you may find a value that is unexpectedly large or small in absolute value. Peruse Alt+4 The Peruse command can be used to view or peruse selected portions of a model’s solution and/or structure. For old time LINDO users, the Peruse command is an enhanced version of the CPRI and RPRI commands. Peruse reports are generated in text and/or graphics format. The ability to focus on specific parts of a model and its solution through the use of Peruse is particularly useful on large models where attempting to sift through an entire formulation or solution can prove to be an overwhelming task. 82 CHAPTER 2 In order to use all the features of the Peruse command, you should first run the Solve command on your model (although this is not required). Next, issue the Peruse command and LINDO posts the following dialog box: The Peruse command will report on either columns or rows. So, depending on the type of report desired, you will need to highlight either the Columns or Rows button in the box labeled “Orientation”. Next, you need to check off the items that you want included in the report in the box labeled “View Items”. A list of candidate items and their definitions are listed below (Note, the definition of a report item depends on whether the report is oriented towards columns or rows): Report Item Name Primal Dual Rim Upper bound Column Definition Column name Column value Reduced cost Objective coefficient Upper bound Row Definition Row name Row slack/surplus Dual price Right-hand side N/A WINDOWS COMMANDS Lower bound Type Lower bound “C” for continuous, “F” for free, and “I” for integer Nonzeros Column nonzero count 83 N/A “<” for less-than-or-equal-to, “=” for equality, and “>” for greater-than-or-equal-to Row nonzero count Next, you may optionally input a condition in the “Condition (Optional)” box, which you can use to filter out unwanted columns or rows from the report. We will discuss this feature in more detail below. The remaining options deal with the format of your report. The first option in this regard is to select the type of report in the “Report Types” box. You may select a text-based report, a graphical report, or both. Text reports are routed to the Reports Window. Graphics reports are placed in individual windows. If you choose a text-based report, then you also have the options in the “Text Report Format” box of suppressing column headers and comma delimiting the data. If you select a graphics report, you can specify one of any of the following in the “Graph Type” box: area, bar, line, pie, and point. You can also opt in the “Graph Style” box to display graphs in either two or three dimensions. Finally, in graphics reports, you can optionally specify a graph title in the “Graph Title (Optional)” box. Once you’ve sorted through these various options, press the OK button to generate the report. As an example, consider the following staff scheduling model: 84 CHAPTER 2 In this model, Xi represents the number of employees that start on day i of the week. Each employee works for five consecutive days with two days off. When we solve this model, we get the following solution report: WINDOWS COMMANDS 85 Let’s create a text report and a graphics report to display the column values. For the graphics format, we’ll use a 3D bar chart. The Peruse command dialog box should be filled in, so it resembles the following: The text report is sent to the Reports Window, and appears as follows: 86 CHAPTER 2 The graphics report is sent to an individual window and is shown below: Column Values 3.0 2.5 2.0 Primal Value 1.5 1.0 0.5 0.0 XM XT XW XR XF XS XN Column As we mentioned above, you can input a condition as part of the Peruse command to filter out unwanted columns and rows. This feature is particularly useful when perusing large models, where unconditional reports would be unwieldy. The conditional expression is evaluated for each row and column. If the expression evaluates to true, then the row or column is added to the report. If the expression is false, it is skipped. When constructing conditional expressions, there is a set of eight symbols that you may use that correspond to the eight report items mentioned above. These symbols are listed below: Report Item Name Primal Dual Rim Upper bound Lower bound Type Nonzeros Symbol N P D R U L T Z WINDOWS COMMANDS In addition to these symbols, the following table lists a number of different operators, which may be applied to the symbols when constructing conditional expressions: Operator % + / * ^ LOG(x) EXP(x) ABS(x) .AND. .OR. .NOT. > < = # () Function Wild card character placeholder for use in forming variable name templates Addition Subtraction Division Multiplication Exponentiation Natural logarithm of x ex Absolute value of x Logical and Logical or Logical not Compare, greater than Compare, less than Compare, equal to Compare, not equal to Parentheses for specifying precedence 87 88 CHAPTER 2 As an illustration, in our example above there were several days of the week when we do not start any employees. Suppose we want to eliminate these days from our reports. We can do this by only including the columns with primal values greater than 0. A conditional expression to enforce this is: P > 0. We enter this expression into the edit box labeled “Condition” as shown here: Now, our graph includes only the days where the number of starting employees is greater than 0: Nonzero Column Values 3.0 2.5 2.0 Primal Value 1.5 1.0 0.5 0.0 XM XT XW Column XS WINDOWS COMMANDS Picture 89 Alt+5 The Picture command displays a model in matrix form. You may request either a text or graphical representation of the matrix of nonzero coefficients. This command is a useful way to obtain a visual impression of your model. Viewing the model in matrix form can be helpful in a couple of instances. First, and perhaps most importantly, is the use of nonzero pictures in debugging formulations. Most linear programming models have strong repetitive structure. Incorrectly entered sections of the model will stand out in a nonzero picture. Secondly, a nonzero picture can be helpful when you are attempting to identify special structure in your model. As an example, if your model displays strong, block angular structure, then algorithms that decompose the model into smaller fragments might prove fruitful. To view a nonzero picture of a model, select the model’s window by clicking on it with the mouse. Next, issue the Picture command. You should now see the Nonzero Picture dialog box: Your first option is to decide if you want LINDO to reorder (i.e., permute) the rows and columns in an attempt to maximize the number of nonzeros appearing beneath the matrix diagonal. A model that can be permuted with most of the nonzero elements appearing beneath the diagonal tends to be relatively easier to solve. If you want LINDO to permute the rows and columns, press the button labeled “Lower Triangular”. Otherwise, press the “None” button. Your next option is to select the Picture Type. You can select a graphics report, a text based report, or both. Text reports are routed to the Reports Window. Graphics reports will be sent to individual windows. 90 CHAPTER 2 As an illustration, we will create nonzero picture reports for the following model: We will choose to not have LINDO permute the rows and columns into lower triangular form and we will generate both text and graphics reports. So, we issue the Picture command and fill in the dialog box as follows: WINDOWS COMMANDS 91 After we press the OK button, our text and graphics reports are generated and will appear as follows: Text Nonzero Picture Report Graphics Nonzero Picture Report 92 CHAPTER 2 In the text report, variable names are printed vertically along the top, row names appear on the left, and right-hand side values appear on the right along with the direction of the row. Nonzero matrix coefficients appear in their appropriate positions in the matrix. Note that coefficients, which are integer valued in the range 1 to 9, are printed without modification. Alphabetic letters are substituted for all other coefficients using the following scheme: Letter Code Z Y X W V U T A B C D E F G Coefficient Range .000000 .000001 .000001 .000009 .000010 .000099 .000100 .000999 .001000 .009999 .010000 .099999 .100000 .999999 1.000001 10.000000 10.000001 100.000000 100.000001 1000.000000 1000.000001 10000.000000 10000.000001 100000.000000 100000.000001 1000000.000000 >1000000.000000 So, line 4 would read C(B1T1) + B(T1T1) < E where the variables are in parentheses and C, B, and E refer to the ranges specified above. The text version of the nonzeros picture report complies with the Terminal Width parameter, which may be reset using the Edit|Options command. Thus, if the width of the picture exceeds the Terminal Width parameter, the report will be continued on additional pages. You may want to increase the Terminal Width to maximize the amount of output per page in the text report. The graphics version of the nonzero picture report displays the model’s name across the top, the model dimensions across the bottom, and, space permitting, the row names along the left and variable names across the top. Negative coefficients are displayed using red rectangles, while positive coefficients are displayed in blue. If there is enough space in a rectangle, the actual coefficient value will also be displayed. The difference between the graphics and text version of a nonzero picture report are that the graphics version doesn’t have the right-hand side values or direction, but it does include the exact numbers of the larger coefficients. Along the right of the graphics report, you will notice three “tools” represented by the following icons: WINDOWS COMMANDS 93 The uppermost tool (the magnifying glass with a plus sign) is the zoom-in tool. To select this tool, click the button immediately to its left. The mouse cursor will then take on the appearance of the ). You may then position the mouse over an area of the matrix you wish to examine zoom-in tool ( more closely, click the mouse, and LINDO will zoom in around the area you selected. Using the model presented above, we used the zoom-in tool to enlarge rows 4 and 5 and columns B1T1 through T1T2: Note: By zooming in, there is enough space to begin displaying variable names along the top of the picture and larger numbers in their boxes. In addition, scroll bars have been added to the picture to allow you to scroll vertically and horizontally through the matrix. You may zoom out in a identical manner by selecting the zoom out tool ( ). The arrow tool ( ) can be used to select a specific area of the matrix to enlarge. Point to the upper left corner of the area that you want enlarged, click down on the mouse button and drag to the lower right corner of the area of interest. Finally, release the mouse button and LINDO will enlarge the selected area, so it fills the entire picture. At present, graphical nonzero picture reports cannot be printed directly from LINDO. However, you can issue the Copy command from the Edit menu. This places the nonzero picture into the Windows clipboard. From the clipboard, the picture can be pasted into any graphics program (e.g., Microsoft Paint, Microsoft Powerpoint, etc.) and printed from there. 94 CHAPTER Basis Picture 2 Alt+6 The Basis Picture command displays a text format report containing a “picture” of the current basis, ordering the rows and columns according to the last inversion or triangularization performed by the solver. The Basis Picture report is sent to the Reports Window. We will use the Basis Picture command to display a picture of the optimal basis for the following model: WINDOWS COMMANDS 95 First, we optimize the model by selecting the Solve command from the Solve menu. Then, we select the Basis Picture command from the Reports menu and LINDO sends the following report to the Reports Window: In the report, you will note that the basis matrix has been rotated by 90 degrees. The names of the variables appearing in the basis are displayed to the left. The names of the rows that the variables are basic in run from right to left along the top. Positive integer coefficients from 1 to 9 appear unaltered in the report. For the remaining nonzero coefficients, plus (+) symbols are displayed for positive values and minus (-) symbols are displayed for negative values. LINDO can triangularize the basis for some models (i.e., all nonzero elements contained on or below the diagonal). Models with a triangular basis tend to solve faster than non-triangular ones. In this particular example, the optimal basis matrix is mostly triangular, with only seven columns protruding beyond the diagonal (B2T1, B1T1, C2T1, T1T2, B1T2, T2T2, and P1T2) There may not always be a full complement of variables in a basis. In which case, you will see variables in the Basis Picture report titled ART. This stands for an artificial variable, which LINDO uses as a placeholder when it has not yet assigned a variable to a row. The Basis Picture report complies with the Terminal Width parameter, which may be reset using the Edit|Options command. Thus, if the width of the picture exceeds the Terminal Width parameter, the report will be continued on additional pages. You may want to increase the Terminal Width to maximize the amount of output per page in the report. 96 CHAPTER 2 Tableau Alt+7 The Tableau command shows the current simplex tableau. It is a useful way to observe the simplex algorithm at each step, especially when used in conjunction with the Pivot command. The Tableau command displays the variables across the top, the row numbers in the first column on the left, the basic variable in each row in the second column, the current coefficients for each variable, and the current right-hand side on the far right. The Tableau command may be combined with the Pivot command to monitor the internal workings of LINDO’s solver. In the following example, we alternate between the Tableau command and Pivot command to keep tabs on LINDO as it optimizes the following small model: The following discussion assumes a modest knowledge of the workings of the simplex algorithm. Interested readers can refer to any introductory operations research textbook to learn more or Optimization Modeling with LINDO, by Linus Schrage. Issuing the Tableau command, we receive a report containing the initial tableau: The term ART stands for artificial variable, which are devices used to “jump start” the simplex algorithm. An artificial variable is used whenever a variable has not yet been assigned to a row. The term “SLK n” stands for the slack variable for the n-th row. Slack variables are added internally by the solver to each inequality constraint to convert it to an equality. The current basic variables are listed in the second column on the left. Note, LINDO has already added all the slack variables into the basis. The variable names appear along the top. The updated column nonzero values are displayed beneath their column names. The updated right-hand side values are displayed to the right. Finally, note, LINDO has added an additional row at the bottom of the tableau. This additional row corresponds to the simplex algorithm’s Phase I objective of minimizing the sum of infeasibilities. Once LINDO performs the first pivot and verifies it has a feasible solution in this model, this row will be dropped from the tableau. WINDOWS COMMANDS 97 Glancing at the tableau, we see variable Y is the non-basic variable with the lowest reduced cost (-30 in row 1). Performing the simplex ratio test on Y shows variable Y is bounded tightest by row 4, which limits Y to 60 = 120/2. Thus, a good pivot candidate would be variable Y in row 4 for a value of 60. To see if LINDO agrees, issue the Pivot command in the Solve menu. When we do this, we find LINDO agrees with the above analysis: Now, we run the Tableau command once more to see the effects of bringing Y into the basis: Y has replaced SLK 4 in the list of basic variables on the left. The current objective value of 1800 appears in the upper right-hand corner. Y’s value of 60 appears in the last row in the far right-hand column, which contains the updated right-hand sides. Notice the last row from the previous Tableau report is gone because the first pivot was performed and LINDO knows there is a feasible solution. Variable X is the only non-basic variable, which now offers an attractive (negative) reduced cost. The bounding row is row 2 and limits X to 50. Once again, we run the Pivot command and find that LINDO concurs with our analysis: Running the Tableau command once again reveals: 98 CHAPTER 2 At this point, there are no further attractive variables to introduce into the solution. Therefore, we have arrived at the optimal solution. Issuing one more Pivot command verifies this: The Tableau report complies with the Terminal Width parameter. Thus, if the width of the report exceeds the Terminal Width parameter, it will be continued on additional pages. You may want to increase the Terminal Width using the Edit|Options command to maximize the amount of output per page in the report. Formulation Alt+8 The Formulation command is used to display all, or selected segments, of your model in the Reports Window. Longtime LINDO users will recognize the Formulation command is equivalent to the LOOK command in command-line versions. The Formulation command displays LINDO’s internal representation of the model created from compiling the text in your Model Window. Thus, all comments and special formatting will be absent. WINDOWS COMMANDS 99 To run the Formulation command, you must select the Model Window you want to generate the report for. Next, select the Formulation command from the Reports menu and you will be presented with the following dialog box: In the box labeled “Rows to view”, you have the option of viewing all the rows in the model or selected rows only. If you choose to view selected rows, then the box labeled “Selected rows” becomes enabled and you can specify starting and ending rows to view. The default LINDO opens up to is “All” the rows. Let’s illustrate the Formulation command using the following small model, which we have entered into a Model Window: Issuing the Formulation command for all rows of this model causes the following to appear in the Reports Window: 100 CHAPTER 2 As mentioned, this is LINDO’s internal representation and not an exact replica of the model you typed into your Model Window. As such, you will notice how all comments have been removed and the text has been reformatted. Of course, even though LINDO’s internal representation appears different from the model you input, the two formulations are mathematically equivalent. The Formulation report complies with the Terminal Width parameter. Thus, if the width of a constraint exceeds the Terminal Width parameter, the constraint will be continued onto additional lines. You may want to increase the Terminal Width using the Edit|Options command to increase the amount of output per line in the Formulation report. Show Column Alt+9 When you are dealing with a large model, it can be useful to be able to display a selected row or column without sifting through the entire formulation. The Formulation command allows you to view a single row while the Show Column command allows you to view the details of a single column. To run the Show Column command, you must first select the Model Window of interest by clicking it once with the mouse. Next, issue the Show Column command and select the variable you want to generate the report for. Press the OK button and the Show Column report is sent to the Reports Window. As an example, suppose you have solved the following small transportation model: WINDOWS COMMANDS 101 When we issue the Show Column command, LINDO presents the following dialog box to assist you in selecting a column name: The list box labeled “Column to Show” contains all the variable names in the current model. You may type in a name directly or select a column name from the list box. In this example, we have chosen the variable XWH1C2. Pressing the OK button, causes the following report to be sent to the Reports Window: In the first line, we have the variable name and its internal index. In this case, the internal index is 2, which means this was the second variable LINDO encountered when it compiled the model In the next section of the report, there is one line for each row in which the column has a nonzero coefficient. In each line, the row number, the nonzero coefficient, and the row’s dual price appear. Finally, at the bottom of the report the column's value and reduced cost are printed. Positive Definite The Positive Definite command is used with quadratic programs to check whether you have a guarantee of global optimality. It examines the submatrix of constraints corresponding to the quadratic form to determine whether this submatrix is positive definite. If the matrix is positive definite, then the objective function of the quadratic program is convex and the solution found is guaranteed to be a global optimal solution. For more detailed information on the POSD command, please see page 201. 102 CHAPTER 2 5. Window Menu The Window menu is shown at left and contains all the commands, which assist in managing the various windows created by LINDO. These commands are discussed below in detail. Open Command Window Alt+C LINDO has a macro or command language for accessing its features. For more details on the command language, refer to the next chapter, LINDO for Command-line Environments. A script file containing LINDO commands may be run using the Take Commands command in the File menu. Alternatively, you can interactively enter commands into LINDO’s Command Window. To bring up the Command Window, issue the Open Command Window command. The following window should appear on your screen: The colon in the upper left-hand corner is LINDO’s familiar command-line prompt. You may proceed by entering any of the valid LINDO commands. WINDOWS COMMANDS 103 In this next example, we enter a small model into the Command Window, display the formulation, and then solve it: In general, you will probably prefer to use the menu and toolbar interface when running LINDO interactively. The Command Window feature is primarily provided for users wishing to interactively test out ideas for LINDO scripts. 104 CHAPTER 2 Open Status Window When LINDO’s internal solver initiates, it displays a Status Window on your screen resembling the following: This window allows you to monitor the progress of the solver. You can close this Status Window at any time. If you do close it, it may be restored at any time with the Open Status Window command. For more information on the interpretation and use of the Status Window, please refer to the table on page 7. Send to Back Ctrl+B The Send To Back command sends the active window behind all other windows on the screen. This command is particularly useful when switching between a Model Window and the Reports Window. WINDOWS COMMANDS 105 As an example, suppose our screen is configured with a Model Window appearing before the Reports Window: Issuing the Send to Back command causes the windows to reverse position. The Reports Window moves to the front and becomes the active window: This example is shown with the Report Window and Model Window smaller than the full screen to allow the reader to see the switch of the windows. In actual use, this command would be most beneficial when the windows are maximized and you want to toggle between them quickly. The Send to Back button is provided to do this with the click of a mouse. Cascade Ctrl+A The Cascade command arranges all the open windows in a cascade from upper left to lower right with the currently active window on top. 106 CHAPTER 2 For instance, suppose our windows are positioned as follows: WINDOWS COMMANDS 107 After we issue the Cascade command, our windows will be repositioned in the following manner: Tile Alt+T The Tile command arranges all the open windows in a tiled pattern. Each window is re-sized, so all windows appear on the screen and are of roughly equivalent size. You may choose to tile either horizontally or vertically. LINDO will try and maximize the horizontal or vertical dimension of each window based on your selection. If there are more than three open windows, LINDO will tile the windows, but the choice of horizontal or vertical will no longer have an effect. 108 CHAPTER 2 For instance, suppose we have three open windows positioned as follows: Issuing the Tile command, we receive the following dialog box: WINDOWS COMMANDS 109 If we press the Horizontal button and then press the OK button, our windows are repositioned as below: Close All Alt+X The Close All command closes all open windows and dialog boxes. If you have made a change to a Model Window without saving it, you will be prompted to save the model before it is closed. Note: Any changes you have made since the last save will be lost if the model is not saved before closing. It is recommended to always choose yes at the save prompt to be sure. Arrange Icons Alt+I If you have minimized any open windows, so they appear as icons on the screen, you can issue the Arrange Icons command to line all the icons up in the lower left-hand corner of the frame window. 110 CHAPTER 2 6. Help Menu The Help menu is shown at left and contains several commands for accessing LINDO’s help facility. These commands are discussed below in detail. Contents: F1 The Contents Command opens LINDO’s help window to the contents section. You may examine the contents section for subjects of interest and jump to a desired topic by pressing on its text. The Contents command can be invoked by the button: . The button is used to invoke context sensitive help. Selecting this command turns the mouse cursor into a question mark. Once you have the question mark prompt, selecting any command or button will take you to the relevant section of the help file. Search for Help On Alt+F1 The Search for Help On Command allows you to search the LINDO help system for a key word or topic. How to Use Help Ctrl+F1 The How to Use Help command provides you with useful information on navigating the LINDO help system. WINDOWS COMMANDS 111 Register The Register command is used to register your version of LINDO online. You will need a connection to the internet open for this command to work. When issuing the Register command, the following dialog box will appear: By entering your personal information and select the Register button, your information will be sent directly to LINDO Systems via the Internet. 112 CHAPTER 2 Once your registration is complete, the following dialog box will appear on your screen: Selecting the OK button returns you to the main LINDO environment. LINDO Systems is constantly working to make our products faster and easier to use. Registering your software with LINDO ensures that you will be kept up-to-date on the latest enhancements and other product news. You can also register through the mail or by fax using the registration card included with your software package. AutoUpdate The AutoUpdate command is used to automatically check every time you start the LINDO software whether there is a more recent version of LINDO available for download on the LINDO Systems website. You will need a connection to the internet open for this command to work. When issuing the AutoUpdate command or starting a version of LINDO with AutoUpdate enabled, LINDO will search the internet to see if an updated version of the LINDO software is available for download. If you currently have the most recent version or AutoUpdate is in snooze mode (see below), then you will be returned to the main LINDO environment. If you have an old version of the software, you will be presented with the following dialog box: By entering a number of days in the textbox and selecting the Remind me in button, AutoUpdate is put in a type of snooze mode. A checkmark next to the command in the Help menu indicates that the command is still enabled. However, LINDO will suppress the AutoUpdate dialog box on startup until the time limit has elapsed. WINDOWS COMMANDS 113 Select the Yes button to download the new version of the software from the web. LINDO will start downloading the new installation file and present the following dialog box to show the status of downloading: Upon completion of downloading, the InstallShield Wizard will open to guide you through the setup process to update LINDO. For your convenience, your license key will be automatically transferred to the new version during installation. Select the Disable AutoUpdate button from the AutoUpdate dialog box to disable the AutoUpdate feature. The AutoUpdate feature is disabled by default. Keeping your software up to date helps ensure that you are using the most recent version of the software that you are entitled to and that compatibility and operational problems are kept to a minimum. 114 CHAPTER 2 About LINDO The About LINDO command opens a system window that provides you with information about the software you are using and LINDO Systems, Inc. The first box shows the version of LINDO being used, the release number and date, and the LINDO copyright, respectively. The following box shows the mailing address, telephone, e-mail address, and Internet address for LINDO Systems. This may be useful for future reference about updated versions of the software and other LINDO Systems products. The Maximum Model Size box lists the constraint, variable, and integer variable limits of your copy of LINDO along with the physical nonzero limit. The constraint, variable, and integer variable limits are determined by the version of LINDO you are using (contact LINDO for details). The Nonzeros limit can be set to whatever you would like by selecting Options from the Edit menu. Refer to Edit menu|General Optimizer Options|Nonzero Limit for details on how to change the limit and why you would want to. LINDO uses the nonzero allocation as a work area during optimization. Specifically, LINDO stores the basis inverse matrix along with the structural nonzeros in this shared memory location. Given this, you should try to allocate a good number of additional nonzeros over and above what is required by just the structural nonzeros. If LINDO runs out of nonzero space, it halts the optimization and returns with an error. The additional boxes in the screen list the serial number, type of user, and any expiration if applicable. These may be needed in updating or upgrading to larger versions. 115 3 LINDO for Commandline Environments This chapter discusses all of the command-line commands available to the LINDO user. On platforms other than Windows based PCs, the user interfaces with LINDO entirely through text commands issued to LINDO’s command-line colon prompt. LINDO commands may also be used to build command scripts, or macros, contained in an external file. These scripts may be run automatically at startup and/or whenever the user desires. Command scripts can be run by both Windows users and command-line users of LINDO, and, as such, are of interest to both classes of users. We will first list the commands according to their general function, then explain them one by one with some examples of their application. The Commands in Brief We have broken LINDO’s commands down into 11 categories. These categories are presented below along with a brief description of the commands in the category and their functions. Detailed examples of each of the commands follow. 1. Information Command CAT COM HELP LOCAL TIME Description List categories of commands List commands by category Give help on individual commands Give information specific to your installation Return cumulative time of current session 116 CHAPTER 3 2. Input Command FBR FINS LEAVE MAX/MIN RDBC RETR RMPS TAKE Description Retrieve a basis saved with FBS command Retrieve a basis saved with FPUN command Terminate a command script Start model input Retrieve a basis saved with SDBC command Retrieve a problem saved with SAVE Retrieve an MPS format file Take a command script from a file 3. Display Command BPICTURE CPRI DMPS LOOK NONZ PIC RANGE RPRI SHOCOLUMN SOLUTION TABLEAU Description Display a picture of the basis, ordering the rows according to the last inversion Obtain selected information about a user specified subset of a model’s columns Create an MPS format solution report Display all or part of a model formulation Display nonzero values of the solution Display logical picture of the problem Display range analysis report Obtain selected information about a user specified subset of a model’s rows Display a column (variable) of the model Display standard solution report Display current tableau 4. File output Command DIVERT FBS FPUN RVRT SAVE SDBC SMPS Description Divert screen output to a file Save current basis in LINDO format Save current basis in MPS format Restore screen output to the terminal Save current model in a compressed file Save a solution in column/database format Save current model in MPS format COMMAND-LINE COMMANDS 5. Solution Command GLEX GO PIVOT Description Perform Lexico optimization Go solve the model Do a simplex pivot/iteration 6. Problem editing Command ALTER APPC DEL EXT FREE SLB SUB Description Alter some element of the model Append a new column (i.e., variable to the formulation) Delete a specified constraint Extend problem by adding constraints Declare a variable unconstrained in sign Enter a Simple Lower Bound for a variable Enter a Simple Upper Bound for a variable 7. Integer, quadratic, and parametric programs Command BIP GIN INT IPTOL PARAMETRICS POSD QCP TITAN Description Set a bound on optimal solution to an IP model Indicate a general integer variable (0,1,2,…) Indicate a binary integer variable (0, 1) Set an optimality tolerance on an IP model Perform RHS parametric analysis Examine the submatrix of constraints to determine whether this submatrix is POSitive Definite Indicate first real constraint in a quadratic model Tighten up an IP 8. Conversational Parameters Command ! BATCH PAGE PAUSE TERSE VERB WIDTH Description Insert a comment Indicate this is a batch run Set page/screen length Pause for keyboard input Set conversational style to terse Set conversational style to verbose Set terminal display width 117 118 CHAPTER 3 9. User Supplied Subroutines Command USER Description Call a user supplied subroutine 10. Miscellaneous Command INVERT STATS BUG SET TITLE Description Invert current basis Print summary model statistics Display information on how to report a bug in LINDO Help in debugging infeasible and unbounded models Set assorted tolerances Enter, change, or return model title Command QUIT Description Quit LINDO DEBUG 11. Quit The Commands in Depth All LINDO commands are listed and explained below by category. 1. Information HELP The HELP command by itself will give you general information about your version of LINDO along with the maximum number of constraints, variables, and nonzeros, which your version of LINDO can handle. The HELP command combined with another LINDO command gives specific information on a command. This information is usually quite brief, but is often all you need. COMMAND-LINE COMMANDS 119 For example, typing HELP GO displays the following: GO COMMAND: SOLVES THE CURRENT MODEL. THE MODEL REMAINS INTACT THROUGH THE SOLUTION PROCESS. A POSITIVE INTEGER TYPED AFTER GO IS INTERPRETED AS AN UPPER LIMIT ON THE NUMBER OF PIVOTS. CAT The CAT command lists the eleven categories displayed in COM, but does not display the actual commands. Then it asks you which category is of interest, by number 1 through 11. If you enter a category number, the list of commands in the category is displayed followed by another prompt asking for a category number. To escape from the prompt, simply press the enter key instead of a category number. COM The COM command lists all commands arranged in eleven categories. When you know LINDO can do a particular function and you can’t remember which command to use, the COM command is helpful. COM displays the following: LINDO COMMANDS BY CATEGORY. FOR INFORMATION ON A SPECIFIC COMMAND, TYPE “HELP” FOLLOWED BY THE COMMAND NAME. 1) INFORMATION HELP COM LOCAL CAT 2) INPUT MAX MIN RETR RMPS TAKE LEAV RDBC FINS FBR 3) DISPLAY PIC TABL LOOK NONZ SHOC SOLU RANGE BPIC CPRI RPRI DMPS 4) FILE OUTPUT SAVE DIVE RVRT SMPS SDBC FBS FPUN 5) SOLUTION GO PIV GLEX 6) PROBLEM EDITING ALT EXT DEL SUB APPC SLB FREE 7) QUIT QUIT 8) INTEGER, QUADRATIC, AND PARAMETRIC PROGRAMS INT QCP PARA POSD TITAN BIP GIN IPTOL 9) CONVERSATIONAL PARAMETERS WIDTH TERS VERB BAT PAGE PAUS 10) USER SUPPLIED ROUTINES USER 11) MISCELLANEOUS INV STAT BUG DEB SET TITL 120 CHAPTER 3 LOCAL The LOCAL command displays information regarding your specific version of LINDO. On multi-user systems and mainframes, this command may give information supplied by the System Operator. TIME The TIME command displays the cumulative processor time used since opening LINDO. This command is useful for measuring your use of computer resources on a time-shared computer system or in determining the time required to solve a model. The TIME command takes no parameters and can be entered only at the colon prompt. The TIME command does not affect the current model or the current solution in memory. An example of the use of the Time command follows: : time CUMULATIVE HR:MIN:SEC = 0: 0:19.07 The user input is in bold here. This convention will be used throughout the command-line section of this user’s manual. 2. Input MAX/MIN Every model in LINDO must start with either MAX or MIN. Either of these two words, when entered at the command line, indicates to LINDO that a new model is being entered. Complete the objective function with the command ST, SUCH THAT, S.T. or SUBJECT TO). Note: The MAX and MIN commands erase any current model in memory and any current solution. The new model you enter becomes the current model. Leave a space or a carriage return after MAX or MIN. This ensures that the command is unambiguous. Following these, you may enter numbers (for objective function coefficients) or strings that begin with an alphabetic character (for variable names). LINDO looks at plus and minus symbols and letters to determine which characters are coefficients and which are variable names. For example, mAx 9x1-x2 -4x3-2 x4 + 8 X5 - 2x6- 8x7-12 x8 is interpreted as MAX 9 X1 - X2 - 4 X3 - 2 X4 + 8 X5 - 2 X6 - 8 X7 - 12 X8 A number following a plus, minus, MIN, or MAX is interpreted as a coefficient (e.g., the 9 above). A number immediately following a letter is interpreted as part of the variable name such as the 6 above. If the variable name string is too long, the input will be rejected by LINDO. For example, most versions of LINDO allow variable names of 8 characters in length, so the variable name X12345678 would be rejected. COMMAND-LINE COMMANDS 121 A letter followed by a space and a number (such as “min x 5”) is ambiguous. Here the 5 will be interpreted as a coefficient and rejected by LINDO. The coefficients must be to the left of the variable names. Do not use asterisks for multiplication and do not enter nonlinear formulas. Any number of spaces may be used, but leave at least one space after MAX or MIN. If you run out of space at the end of a line for your objective function, simply press enter to continue typing the model. You will get a question mark for a prompt. Again, you end the objective function with ST, SUBJECT TO, S.T., or SUCH THAT. You will get another question mark prompt, at which point, you can begin entering constraints or you may type the command END to indicate you have completed the model. An example using the MIN command to input a small model follows: : ? ? ? ? : min 20x + 30y st x < 50 y < 60 x + 2y < 120 end For additional information on the required syntax of a LINDO model, please refer to the section titled Model Syntax in Chapter 2, LINDO for Windows (page 12). RETRIEVE Syntax: RETRIEVE <FileName> The RETRIEVE command reads a file from disk that was created with the SAVE command. That is, only LINDO packed (*.lpk) format files. The file is loaded into memory and becomes the current model. Any previous model in memory will be lost. The form of the command is: RETRIEVE <FileName> where <FileName> is the file you wish to retrieve. If you attempt to retrieve a file, which is not the correct format or does not exist, LINDO will give an error message. If you enter nothing after the RETRIEVE command, LINDO will prompt you for the name of the file. You may also specify a drive and path as part of the full file name. FBR Syntax: FBR <FileName> The FBR command retrieves the current basis (i.e., solution) of a linear programming model in LINDO’s proprietary format. Once retrieved in this way, the file will then become the basis of the model currently in memory. This is particularly useful when you have solved a large model and want to make a small change in the formulation and don’t want to wait for a new solution. In order to do this, you would save the basis with FBS after solving (See FBS command below), alter the model, install the old basis with FBR, and solve again. The following example illustrates. 122 CHAPTER : : : : : : ? ? ? ? ? ? ? ? ? ? ? ? ? ? ? : : 3 take tran.dat ! A 3 warehouse, 4 customer transportation model: ! ! XWH<i>C<j> = amt shipped from warehouse i to customer j ! MIN 6 XWH1C1 + 2 XWH1C2 + 6 XWH1C3 + 7 XWH1C4 + 4 XWH2C1 + 9 XWH2C2 + 5 XWH2C3 + 3 XWH2C4 + 8 XWH3C1 + 8 XWH3C2 + XWH3C3 + 5 XWH3C4 SUBJECT TO ! ! Supply constraints: WH1) XWH1C1 + XWH1C2 + XWH1C3 + XWH1C4 <= 30 WH2) XWH2C1 + XWH2C2 + XWH2C3 + XWH2C4 <= 25 WH3) XWH3C1 + XWH3C2 + XWH3C3 + XWH3C4 <= 21 ! ! Demand constraints: C1) XWH1C1 + XWH2C1 + XWH3C1 >= 15 C2) XWH1C2 + XWH2C2 + XWH3C2 >= 17 C3) XWH1C3 + XWH2C3 + XWH3C3 >= 22 C4) XWH1C4 + XWH2C4 + XWH3C4 >= 12 END terse go LP OPTIMUM FOUND AT STEP 6 OBJECTIVE VALUE = 161.000000 : ! save the model : save tran1 : ! save the basis in FBS form : fbs tran1.fbs : ! save the basis in FPUN form : fpun tran1.fpu : ! retrieve the formulation : retr tran1 : ! add a new customer : ext BEGIN EXTEND WITH ROW 9 ? c5) xwh1c5 + xwh2c5 + xwh3c5 > 2 ? end : look c5 C5) XWH1C5 + XWH2C5 + XWH3C5 >= 2 END : alt 1 xwh1c5 VARIABLE NOT IN THIS ROW. WANT IT INCLUDED? ? y NEW COEFFICIENT: ? 2 : alt 1 xwh2c5 VARIABLE NOT IN THIS ROW. WANT IT INCLUDED? ? y NEW COEFFICIENT: ? 6 COMMAND-LINE COMMANDS 123 : alt 1 xwh3c5 VARIABLE NOT IN THIS ROW. WANT IT INCLUDED? ? y NEW COEFFICIENT: ? 5 : look 1 MIN 6 XWH1C1 + 2 XWH1C2 + 6 XWH1C3 + 7 XWH1C4 + 4 XWH2C1 + 9 XWH2C2 + 5 XWH2C3 + 3 XWH2C4 + 8 XWH3C1 + 8 XWH3C2 + XWH3C3 + 5 XWH3C4 + 2 XWH1C5 + 6 XWH2C5 + 5 XWH3C5 : ! : ! save the modified model : save tran2 : ! : ! see how many pivots it takes without warm start : ters : go LP OPTIMUM FOUND AT STEP 8 OBJECTIVE VALUE = 165.000000 : ! : ! see how many pivots it takes using FBR warm start : retr tran2 : fbr tran1.fbs : ters : go LP OPTIMUM FOUND AT STEP 2 OBJECTIVE VALUE = 165.000000 : ! : ! see how many pivots it takes using FINS warm start : retr tran2 : fins tran1.fpu : ters : go LP OPTIMUM FOUND AT STEP 1 OBJECTIVE VALUE = 165.000000 : quit FINS As illustrated in the previous example, FINS performs the same operation as FBR except it retrieves the current basis in an industry standard format known as MPS. These are bases saved using the FPUN Command in the current model. This allows you to export the basis information to other programs or systems, which may require it. See below for details on how this command is used with FPUN to create a new model from an old basis in MPS format. RMPS Syntax: RMPS <FileName> The RMPS command reads an MPS format file from disk. While MPS files tend not to be very compact, they are an industry standard and, as such, readily allow for porting models from one environment to another. MPS files are text files and may be read into any text editor. 124 CHAPTER 3 After issuing the RMPS command, the MPS file is loaded into memory and becomes the current model. See also the SMPS command. The form of the command is: RMPS <FileName> where <FileName> is the name of the MPS format file you wish to retrieve. If you attempt to retrieve a file, which is not the correct format or does not exist, LINDO will give an error message. If you enter nothing after the RMPS command, LINDO will prompt you for the name of the file. After finding the file, LINDO will prompt you for the row number of the objective function. If the model has more than one objective, then it suggests which row or rows are candidates to be the objective function. This is usually row 1. Following this, LINDO prompts you as to whether the model is a maximization or a minimization. If the MPS file was created with LINDO’s SMPS command, this information appears on the screen in the title block in parentheses. Finally, when the model is created in memory, the STATS command automatically displays various statistics about the model. The RMPS command erases any current model in memory and any current solution. The model that is read from the RMPS file becomes the current model in memory. You create MPS files with LINDO’s SMPS command. The MPS format files generally take longer to read and write than the SAVE/RETRIEVE format. TAKE Syntax: TAKE <FileName> The TAKE command is used to execute a file from disk, which contains a sequence or script file of LINDO commands stored in a text file. These files are automatically open and the commands in them executed. A file used with the TAKE command can include any valid LINDO command except the command TAKE (See the Take Commands command in Chapter 2, LINDO for Windows, for why these files would be useful). The syntax of the TAKE command is: TAKE <FileName> where <FileName> is the name of the file you wish to retrieve. If you enter nothing after the TAKE command, LINDO will prompt you for the name of the file. TAKE commands may not be nested (i.e., once a TAKE command is in effect, you may not issue another). If you attempt to TAKE a file that contains an invalid command or that does not exist, LINDO will give an error message. If an invalid command is encountered in the TAKE file, the message “INVALID COMMAND: <command>” is displayed. To echo the contents of the TAKE file on your screen as it is read, give the BATCH command before doing a TAKE. A comment may be added almost anywhere in a TAKE file. The remainder of any line following an exclamation point is treated as a comment by LINDO. COMMAND-LINE COMMANDS 125 Script files are created in any text format known by LINDO (LINDO text (*.ltx), LINDO packed (*.lpk), and MPS files (*.mps)). As an example, the following text put in a script file reads in a model, solves it, then writes a solution file. ! This file retrieves & solves MYFILE.LPK, then saves ! the solution. ! First turn on echoing of input. BATCH ! Turn off the output. TERS ! Retrieve the model from disk. RETR MYFILE.LPK ! Solve the model. GO SDBC MYFILE.SDB ! Then save the solution to MYFILE.SDB. ! Beep: ^G ! Last, close the TAKE file and end the script, ! staying in LINDO. LEAVE Suppose we named this command script file MYSCRIPT.LTX. Then, we could have LINDO run the script by issuing the command: TAKE MYSCRIPT.LTX For additional insight as to how the TAKE command is used, please refer to Chapter 7, Interfacing with the Outside World, section on “Running Command Scripts with the TAKE Command”. Automatic Take Command - AUTOLD.DAT When you open LINDO, it searches the current directory for a file called AUTOLD.DAT. If it doesn’t find one, it opens normally and awaits a command. However, if the AUTOLD.DAT file is found, LINDO reads and executes commands from the file automatically. What LINDO does is to automatically execute the command TAKE AUTOLD.DAT as soon as it opens. If you always want to issue a certain set of commands when LINDO starts, write the commands in the form of a TAKE file, and save the file as “text only”, with the name AUTOLD.DAT, to the directory where LINDO is located. LEAVE The LEAVE command indicates to LINDO that a TAKE command script file has ended. LINDO then closes the TAKE file. This command should be the last line of any TAKE file. On some computer systems, especially older ones, an error may occur if LEAVE is left out of the TAKE file. The LEAVE command may not be necessary on your system. However, it’s a good habit to include it. 126 CHAPTER 3 In the example below, we have a small command script, which is terminated with a LEAVE command: ! This file retrieves & solves MYFILE.LPK, then saves ! the solution. ! First turn on echoing of input. BATCH ! Turn off the output. TERS ! Retrieve the model from disk. RETR MYFILE.LPK ! Solve the model. GO SDBC MYFILE.SDB ! Then save the solution to MYFILE.SDB. ! Beep: ^G ! Last, close the TAKE file and end the script, ! staying in LINDO. LEAVE RDBC Syntax: RDBC <FileName> The RDBC command reads a file from disk, which was created with the SDBC command (or is in SDBC format). LINDO attempts to create a basis from the SDBC file. There must already be a model in memory. The form of the command is: RDBC <FileName> where <FileName> is the name of the file you wish to retrieve. If you try to retrieve a nonexistent file or one with an incorrect format, LINDO gives an error message. If you enter nothing after the RDBC command, LINDO prompts you for the name of the file. RDBC doesn’t affect the current model in memory, but it does change the current solution in memory. If LINDO succeeds in creating the basis from the RDBC file, the solution read from disk becomes the current solution. However, LINDO does not know whether the current solution is optimal. Solution display commands should show the right solution, but will also warn the solution may be infeasible or not optimal. If LINDO fails to create the basis, no message is given. Usually a few pivots will be necessary (either with GO or PIVOT) to fully install the solution, because the SDBC file does not contain full basis information. For installing solutions into current models, the FBS and FBR commands are more robust than SDBC and RDBC. Because SDBC does not store full basis information, RDBC is not always able to restore the exact solution as left by SDBC. FBS stores complete basis information. Note that retrieving solutions contained in basis files is of most benefit for linear programming models only. In general, retrieving a basis file cannot restore an optimal solution to an integer programming (IP) model. You can use the SOLUTION command immediately after RDBC to observe the current solution and determine whether it has been properly installed. COMMAND-LINE COMMANDS 127 3. Display LOOK Syntax: LOOK <Row | StartRow-EndRow | ALL> The LOOK command displays part or all of the current model. It may well be the most commonly used command in LINDO. If LOOK is typed alone, LINDO asks for a row specification. Some responses might be 3, or 1-2, or ALL, causing rows 3, 1 through 2, or all the rows to be printed to the screen, respectively. With a three line model, entering LOOK ALL or LOOK 1-3 displays the entire model: MIN X1 + 4 X2 + 3 X5 SUBJECT TO SECOND) X1 + 4 X2 + 3 X5 <= 3) X3 >= 2 END 11 Entering LOOK 1 displays: MIN X1 + 4 X2 + 3 X5 Entering LOOK SECOND or LOOK 2 displays: SECOND) X1 + 4 X2 + 3 X5 <= 11 SOLUTION The SOLUTION command displays the current solution of the model in memory. This includes: A warning if the current solution is not guaranteed to be optimal or feasible Objective function value Primal values and reduced costs of all the columns Slacks or surpluses and dual prices of all the rows Iterations (pivots) required to find the solution Number of branches in the branch-and-bound algorithm for integer programming (IP) Determinant of the basis matrix for an integer program (for integer programming (IP), determinants close to ±1 are preferred, because if the determinant is +1 or -1 and all right-hand side values are integer, then the solution will be naturally integer) The SOLUTION command is often used with the TERSE command, since TERSE prevents automatic output of the solution with GO. SOLUTION may be used with DIVERT to print the solution or save it to a file. See the DIVERT command for more information on this. 128 CHAPTER 3 In the following example, we use the TERSE command to suppress the automatic generation of a solution report, solve the model, and then use the SOLUTION command to request a report. : look all MAX 9 X1 - X2 - 4 X3 - 2 X4 + 8 X5 - 2 X6 - 8 X7 - 12 X8 SUBJECT TO 2) 2 X1 + X2 - 2 X3 - X4 + 2 X5 - X6 - 2 X7 - 3 X8 <= 12 3) X1 - 3 X2 + 2 X3 + 3 X4 - X5 + 2 X6 + X7 + X8 <= - 6 4) - X1 + X3 + X5 = - 9 5) X1 - X2 + X4 = 3 6) X2 - X3 + X6 - X7 = 12 7) - X4 - X6 + X8 = 9 8) - X5 + X7 - X8 = - 15 END : ters !Suppress automatic solution report : go !Solve the model LP OPTIMUM FOUND AT STEP 5 OBJECTIVE VALUE = 15.0000000 : solu !Print a solution report OBJECTIVE FUNCTION VALUE 1) 15.0000000 VARIABLE VALUE REDUCED COST X1 16.000000 .000000 X2 13.000000 .000000 X3 3.000000 .000000 X4 .000000 3.000000 X5 4.000000 .000000 X6 2.000000 .000000 X7 .000000 2.000000 X8 11.000000 .000000 ROW SLACK OR SURPLUS DUAL PRICES 2) .000000 4.000000 3) .000000 1.000000 4) .000000 1.000000 5) .000000 1.000000 6) .000000 -1.000000 7) .000000 -1.000000 8) .000000 .000000 NO. ITERATIONS= 5 COMMAND-LINE COMMANDS DMPS DMPS creates a detailed MPS format solution report. The following illustrates: : look all !Here is our model MAX 77 X1 +6 X2 +3 X3 +6 X4 +33 X5 +13 X6 +110 X7 + 21 X8 + 47 X9 SUBJECT TO SPACE) 774 X1 + 76 X2 + 22 X3 + 42 X4 + 21 X5 + 760 X6 + 818 X7 + 62 X8 + 785 X9 <= 1000 WEIGHT) 67 X1 + 27 X2 + 794 X3 + 53 X4 + 234 X5 + 32 X6 + 792 X7 + 97 X8 + 435 X9 <= 1200 END INTE 9 : solu !Here is the standard LINDO solution report OBJECTIVE FUNCTION VALUE 1) 170.0000 VARIABLE VALUE REDUCED COST X1 0.000000 -77.000000 X2 0.000000 -6.000000 X3 0.000000 -3.000000 X4 1.000000 -6.000000 X5 1.000000 -33.000000 X6 0.000000 -13.000000 X7 1.000000 -110.000000 X8 1.000000 -21.000000 X9 0.000000 -47.000000 ROW SLACK OR SURPLUS DUAL PRICES SPACE) 57.000000 0.000000 WEIGHT) 24.000000 0.000000 NO. ITERATIONS= 31 BRANCHES= 5 DETERM.= 1.000E 0 : dmps !Now, let’s view the solution in MPS format 129 130 CHAPTER 3 The report is a standard MPS report including all range and dual price information. The TIME is the total seconds elapsed since the last midnight. FUNCTIONAL refers to the objective. RANGE The RANGE command displays the sensitivity analysis of the currently installed solution of the model in memory. This includes: a warning if the current solution is not guaranteed to be optimal or feasible, variable names with their current objective function coefficients and allowable increases and decreases, and row numbers (or names) with their current right-hand side values and allowable increases and decreases. RANGE may be used with DIVERT to save the report to a file. Refer to the DIVERT command for more information on this. Interpretation of the range report is as follows: the OBJ COEFFICIENT RANGES for each variable are the amount by which the objective coefficient can be increased or decreased without causing a change in the basis (the set of nonzero variables). The RIGHTHAND SIDE RANGES for each row are the amount by which the right-hand side can be increased or decreased without causing a change in the basis. COMMAND-LINE COMMANDS In the following small model, we’ve made changes after solving to demonstrate. : look all MAX 20 COMP1 + 30 COMP2 SUBJECT TO 2) COMP1 <= 60 3) COMP2 <= 70 4) COMP1 + 2 COMP2 <= 120 END : go LP OPTIMUM FOUND AT STEP 2 OBJECTIVE FUNCTION VALUE 1) 2100.000 VARIABLE VALUE REDUCED COST COMP1 60.000000 .000000 COMP2 30.000000 .000000 ROW SLACK OR SURPLUS DUAL PRICES 2) .000000 5.000000 3) 40.000000 .000000 4) .000000 15.000000 NO. ITERATIONS= 2 DO RANGE(SENSITIVITY) ANALYSIS? ? y RANGES IN WHICH THE BASIS IS UNCHANGED: OBJ COEFFICIENT RANGES VARIABLE CURRENT ALLOWABLE ALLOWABLE COEF INCREASE DECREASE COMP1 20.000000 INFINITY 5.000000 COMP2 30.000000 10.000000 30.000000 RIGHTHAND SIDE RANGES ROW CURRENT ALLOWABLE ALLOWABLE RHS INCREASE DECREASE 2 60.000000 60.000000 60.000000 3 70.000000 INFINITY 40.000000 4 120.000000 80.000000 60.000000 131 132 CHAPTER 3 Now, we will change the objective coefficient of COMP1 to 14 (decreasing it by 1 more than the allowable decrease) and re-solve. : alt 1 VAR: comp1 NEW COEFFICIENT: ? 14 : go LP OPTIMUM FOUND AT STEP 1 OBJECTIVE FUNCTION VALUE 1) 1800.000 VARIABLE VALUE REDUCED COST COMP1 .000000 1.000000 COMP2 60.000000 .000000 ROW SLACK OR SURPLUS DUAL PRICES 2) 60.000000 .000000 3) 10.000000 .000000 4) .000000 15.000000 NO. ITERATIONS= 1 As expressed by the “.000000” VALUE for COMP1 in the solution report, the variable COMP1 has now been forced out of the solution and COMP2 has doubled in size. PICTURE The PICTURE command displays the model in matrix form, using letters for many of the numbers. For small to medium sized models, the PICTURE command is a useful way to obtain a visual impression of the model. COMMAND-LINE COMMANDS 133 The following letter codes are used to represent numbers in the PICTURE output: Letter Code Z Y X W V U T A B C D E F G Coefficient Range .000000 .000001 .000001 .000009 .000010 .000099 .000100 .000999 .001000 .009999 .010000 .099999 .100000 .999999 1.000001 10.000000 10.000001 100.000000 100.000001 1000.000000 1000.000001 10000.000000 10000.000001 100000.000000 100000.000001 1000000.000000 >1000000.000000 Single digit integers are shown explicitly rather than being displayed as a code. This is especially handy, because many models have a large number of coefficients of positive or negative 1, which can affect the solution procedure. Negative signs are also displayed. The following example shows a small model and its PICTURE report. : look all MIN X1 SUBJECT TO SECOND) 3) END : : picture X 1 1: 1 SECOND: 1 3: ' : + 4 X2 + 3 X5 X1 + 100 X2 + 3 X5 <= X3 >= 2 X X 2 5 4 3 B 3 ' 11 X 3 ' MIN ' < B 1 > 2 Note, the right-hand side of the SECOND row is 11 and is represented as B from the table above. The PIC command maintains row names. Variables are listed across the top. The sense of the objective function and the sense of each row are also shown. Spaces stand in for zeroes and single quote marks are inserted to give a grid-like background on large PICTUREs. SHOCOLUMN Syntax: SHOCOLUMN <Variable> The SHOCOLUMN command shows all information pertaining to a variable - its internal index, its nonzero coefficients (including a nonzero coefficient in the objective function), bounds on the variable, if they exist, and whether the variable is integer. 134 CHAPTER 3 If an optimal solution to the model is currently in memory, SHOCOLUMN displays the row numbers, variable coefficients, and dual prices for each row in which the variable has a nonzero. The primal value and reduced cost of the variable are also shown on the bottom. You may specify either a variable index or name as illustrated below: SHOCOLUMN <VarIndex> SHOCOLUMN <VariableName> Displays the coefficients of variable index number <VarIndex>. This is LINDO’s internal index for the variable. Displays the coefficients of the variable named <VariableName>. Consider the following model: MAX 9 X1 - X2 - 4 X3 - 2 X4 + 8 X5 - 2 X6 - 8 X7 - 12 X8 SUBJECT TO 2) 2 X1 + X2 - 2 X3 - X4 + 2 X5 - X6 - 2 X7 - 3 X8 <= 12 3) X1 - 3 X2 + 2 X3 + 3 X4 - X5 + 2 X6 + X7 + X8 <= - 6 4) - X1 + X3 + X5 = - 9 5) X1 - X2 + X4 = 3 6) X2 - X3 + X6 - X7 = 12 7) - X4 - X6 + X8 = 9 8) - X5 + X7 - X8 = - 15 END Before we solve the model, entering the command: : SHOCOLUMN 8 or : SHOCOLUMN X8 generates the following SHOCOLUMN report: X8 / ROW 1 2 3 7 8 8 COEF. -12.0000 -3.00000 1.00000 1.00000 -1.00000 DUAL-PRICE .000000 .000000 .000000 .000000 .000000 The “8” in the top line of the output is LINDO’s internal index for variable X8. After solving the model, with the current solution in memory, the same command displays: X8 / 8 ROW COEF. DUAL-PRICE 1 -12.0000 1.00000 2 -3.00000 4.00000 3 1.00000 1.00000 7 1.00000 -1.00000 8 -1.00000 .000000 VALUE= 11.0000 REDUCED COST= .000000 Note, the primal value and reduced cost from the solution are now shown. COMMAND-LINE COMMANDS 135 The above formulation was modified to give variable X3 a simple lower bound of 1 (with the SLB command), and simple upper bound of 20 (with the SUB command), and to be general integer (with the GIN command). The result is the model below: MAX - 4 X3 + 9 X1 - X2 - 2 X4 + 8 X5 - 2 X6 - 8 X7 - 12 X8 SUBJECT TO 2) - 2 X3 + 2 X1 + X2 - X4 + 2 X5 - X6 - 2 X7 - 3 X8 <= 12 3) 2 X3 + X1 - 3 X2 + 3 X4 - X5 + 2 X6 + X7 + X8 <= - 6 4) X3 - X1 + X5 = - 9 5) X1 - X2 + X4 = 3 6) - X3 + X2 + X6 - X7 = 12 7) - X4 - X6 + X8 = 9 8) - X5 + X7 - X8 = - 15 END SLB X3 1.00000 SUB X3 20.00000 GIN X3 This model was then solved with the GO command. Following the GO, SHOCOLUMN X3 was entered at the colon prompt, with the following output: X3 / 1 ROW COEF. DUAL-PRICE 1 -4.00000 1.00000 2 -2.00000 3.33333 3 2.00000 .000000 4 1.00000 1.33333 6 -1.00000 -.666667 SLB = 1.00000 SUB = 20.0000 (INTEGER VARIABLE) VALUE= 3.00000 REDUCED COST= -.666666 Note that SHOCOLUMN now displays the bounds and the integrality requirement as well. TABLEAU The TABLEAU command shows the current simplex tableau. It is a useful way to observe the simplex algorithm at each step, especially when used in conjunction with the PIVOT command. TABLEAU displays the variables across the top, the row numbers in the first column on the left, the basic variable in each row in the second column, the coefficients on each variable, and the current right-hand side on the far right. The term ART, shown in the example below, stands for artificial variable, which are devices used to “jump start” the solver. The term SLK n (where n is an integer) stands for the n-th slack variable (a slack variable is added internally to each inequality constraint to convert it to an equality). TABLEAU may be combined with PIVOT to monitor the internal workings of LINDO’s solvers. Also, the BPICTURE command may provide additional insight into each step of the algorithm. 136 CHAPTER 3 In the following example, we alternate between TABLEAU and PIVOT commands to keep tabs on LINDO as it optimizes the following small model. Note, LINDO always chooses the entering variable with the lowest reduced cost. : look all MAX 20 A + 30 C SUBJECT TO 2) A <= 60 3) C <= 50 4) A + 2 C = 120 END : tabl THE TABLEAU ROW (BASIS) A C SLK 2 SLK 3 1 ART -20.000 -30.000 .000 .000 .000 2 SLK 2 1.000 .000 1.000 .000 60.000 3 SLK 3 .000 1.000 .000 1.000 50.000 4 ART 1.000 2.000 .000 .000 120.000 ART 4 ART -1.000 -2.000 .000 .000 -120.000 : pivot C ENTERS AT VALUE 50.000 IN ROW 3 OBJ. VALUE= 1500.0 : tabl THE TABLEAU ROW (BASIS) A C SLK 2 SLK 3 1 ART -20.000 .000 .000 30.000 1500.000 2 SLK 2 1.000 .000 1.000 .000 60.000 3 C .000 1.000 .000 1.000 50.000 4 ART 1.000 .000 .000 -2.000 20.000 ART 4 ART -1.000 .000 .000 2.000 -20.000 : pivot A ENTERS AT VALUE 20.000 IN ROW 4 OBJ. VALUE= 1900.0 : tabl THE TABLEAU ROW (BASIS) A C SLK 2 SLK 3 1 ART .000 .000 .000 -10.000 1900.000 2 SLK 2 .000 .000 1.000 2.000 40.000 3 C .000 1.000 .000 1.000 50.000 4 A 1.000 .000 .000 -2.000 20.000 ART 4 ART .000 .000 .000 -10.000 .000 : pivot SLK 3 ENTERS AT VALUE 20.000 IN ROW 2 OBJ. VALUE=2100.0 : tabl THE TABLEAU ROW (BASIS) A C SLK 2 SLK 3 1 ART .000 .000 5.000 .000 2100.000 2 SLK 3 .000 .000 .500 1.000 20.000 3 C .000 1.000 -.500 .000 30.000 4 A 1.000 .000 1.000 .000 60.000 : pivot LP OPTIMUM FOUND AT STEP 3 COMMAND-LINE COMMANDS 137 OBJECTIVE FUNCTION VALUE 1) 2100.00000 VARIABLE VALUE REDUCED COST A 60.000000 .000000 C 30.000000 .000000 ROW SLACK OR SURPLUS DUAL PRICES 2) .000000 5.000000 3) 20.000000 .000000 4) .000000 15.000000 NO. ITERATIONS= 3 : tabl THE TABLEAU ROW (BASIS) A C SLK 2 SLK 3 1 ART .000 .000 5.000 .000 2100.000 2 A 1.000 .000 1.000 .000 60.000 3 SLK 3.000 .000 .500 1.000 20.000 4 C .000 1.000 -.500 .000 30.000 Refer to the Tableau Command in the Windows Commands in Depth section of Chapter 2, LINDO for Windows, for a more detailed description of how the Tableau Command works in LINDO. NONZEROS The NONZEROS command displays the nonzero values of the current solution. This includes: a warning if the current solution is not guaranteed to be optimal or feasible, objective function value, primal values of the columns for which these values are not zero, dual prices of the rows for which these values are not zero, number of iterations (pivots) required to find a solution, number of branches in the branch-and-bound algorithm for integer programming, and the determinant of the basis matrix for an integer program (integer programming, determinants close to ±1 are preferred, because, if the determinant is +1 or -1 and the right-hand sides are integer, the solution will be naturally integer). The NONZEROS command does not solve the model. It only displays the current solution. Use GO to solve the model. The NONZEROS command is often used when the TERSE command has been used, since TERSE prevents automatic output of the solution with GO. For large models, you may wish to see only the nonzero primal values. Using TERSE, GO, and NONZEROS eliminates a lot of uninteresting output in this case. NONZEROS may be used with DIVERT to print the solution or save the solution to a file. See the DIVERT command for more information on this. 138 CHAPTER 3 BPICTURE The BPICTURE command displays a picture of the current basis, ordering the rows according to the last inversion or triangularization. If a model has just been retrieved, the GO, PIVOT, or INVERT command must be used to obtain the first inversion. Plus (+) symbols are displayed for positive values and minus (-) symbols are displayed for negative values. LINDO can triangularize the basis for some models (i.e., all nonzero elements contained on or below the diagonal). Models with a triangular basis tend to solve rapidly. BPICTURE may be used with the TABLEAU and PIVOT commands to obtain additional insight into each step of the algorithm. The following shows the optimal basis to the following model: : look all MAX 9 X1 - X2 - 4 X3 - 2 X4 + 8 X5 - 2 X6 - 8 X7 - 12 X8 SUBJECT TO 2) 2 X1 + X2 - 2 X3 - X4 + 2 X5 - X6 - 2 X7 - 3 X8 <= 12 3) X1 - 3 X2 + 2 X3 + 3 X4 - X5 + 2 X6 + X7 + X8 <= - 6 4) - X1 + X3 + X5 = - 9 5) X1 - X2 + X4 = 3 6) X2 - X3 + X6 - X7 = 12 7) - X4 - X6 + X8 = 9 8) - X5 + X7 - X8 = - 15 END : terse : go LP OPTIMUM FOUND AT STEP 5 OBJECTIVE VALUE = 15.0000000 : bpic COLUMN ROW 18342567 X8:+-+ - + X2:+ - +-+ X3:+ ++- X1:- +-++ X5:---++ X6:+ + - +ART : The term ART stands for artificial variable, which are devices used to “jump start” the solver. You may also see a column titled SLK n (where n is an integer), which stands for the slack variable in the row n (a slack variable is added internally to each inequality constraint to convert it to an equality). CPRI Syntax: CPRI<ColAttList>: <CondExp> The CPRI command is a powerful command for obtaining selected information about a specific subset of a model’s columns (i.e., variables) that satisfy a user-specified condition. You specify the conditions you want the subset of columns to satisfy and the information you want listed for each column. This feature is extremely useful for perusing large models and their solutions. See the RPRI command for similar output regarding rows/constraints. COMMAND-LINE COMMANDS 139 The column-attributes (<ColAttList>) may be any of the characters in the left column in the following table. The interpretation of the attribute is listed as well. ColAtt D L N P R T U Z Interpretation Reduced cost Simple lower bound Column name Primal value (i.e., the solution value) Objective coefficient (Rim) Type of variable (“C” for continuous, “I” for integer, and “F” for free) Simple upper bound Number of nonzeros in the column The conditional-expression (<CondExp>) may include any of the operators listed in the table below in conjunction with the column attributes in the table above to form conditional expressions. Operator % + / * ^ LOG(x) EXP(x) ABS(x) .AND. .OR. .NOT. > < = # () Function Wild card character placeholder for use in forming variable name templates Addition Subtraction Division Multiplication Exponentiation Natural logarithm of x ex Absolute value of x Logical and Logical or Logical not Compare, greater than Compare, less than Compare, equal to Compare, not equal to Parentheses for specifying precedence LINDO evaluates the conditional expression for each column. If the conditional expression evaluates to True, LINDO will print the values for all the column attributes listed in the column attribute list to the left of the semicolon in the command. As an example, if you have an integer programming (IP) model with binary integer variables, the following: CPRI N P: P > 0 .AND. P < 1 .AND. T = ‘I’ will display the names and primal values of the fractional binary variables. 140 CHAPTER 3 If the column-attribute list is omitted, only the number of columns satisfying the conditional expression is printed. For instance, CPRI: P > 0 will return an integer value corresponding to the number of variables with values greater than 0. CPRI report output may be sent to an external file by using CPRI in conjunction with a DIVERT command. The resulting output may then be loaded into other programs such as spreadsheets and databases. If an attribute’s numeric value is excessively large, it will print as a series of asterisks in the CPRI report. Next, we will list a number of CPRI examples for the following model and solution: MAX 9 X1 - X2 - 4 X3 - 2 X4 + 8 X5 - 2 X6 - 8 X7 - 12 X8 SUBJECT TO 2) 2 X1 + X2 - 2 X3 - X4 + 2 X5 - X6 - 2 X7 - 3 X8 <= 12 3) X1 - 3 X2 + 2 X3 + 3 X4 - X5 + 2 X6 + X7 + X8 <= - 6 4) - X1 + X3 + X5 = - 9 5) X1 - X2 + X4 = 3 6) X2 - X3 + X6 - X7 = 12 7) - X4 - X6 + X8 = 9 8) - X5 + X7 - X8 = - 15 END OBJECTIVE FUNCTION VALUE 1) 15.0000000 VARIABLE VALUE REDUCED COST X1 16.000000 .000000 X2 13.000000 .000000 X3 3.000000 .000000 X4 .000000 3.000000 X5 4.000000 .000000 X6 2.000000 .000000 X7 .000000 2.000000 X8 11.000000 .000000 ROW SLACK OR SURPLUS DUAL PRICES 2) .000000 4.000000 3) .000000 1.000000 4) .000000 1.000000 5) .000000 1.000000 6) .000000 -1.000000 7) .000000 -1.000000 8) .000000 .000000 : cpri !This simply counts the number of columns NUMBER OF MATCHES: 8 COMMAND-LINE COMMANDS : cpri n !Here we list the names of all columns NAME X1 X2 X3 X4 X5 X6 X7 X8 : !List the names, duals (i.e., reduced costs), and : !value of all columns : cpri n d p NAME DUAL PRIMAL X1 0 16 X2 0 13 X3 0 3 X4 3 0 X5 0 4 X6 0 2 X7 2 0 X8 0 11 : !display name and value for all variables : !with a value greater than 5 : cpri n p: p > 5 NAME PRIMAL X1 16 X2 13 X8 11 : !display n and primal value for all : ! columns that have a value greater : ! than 5 and less than 15 : cpri n p: p > 5 .and. p < 15 NAME PRIMAL X2 13 X8 11 : Display name, primal, and dual : for all columns with a nonzero dual : cpri n d p: d # 0 NAME PRIMAL DUAL X4 0 3 X7 0 2 : display the name, primal and dual : for all colums with a “4” as the : second character in its name : cpri n d p: n = “%4” NAME DUAL PRIMAL X4 3 0 141 142 CHAPTER 3 RPRI Syntax: RPRI<RowAttList>:<CondExp> The RPRI command is a powerful command for obtaining selected information about a specific subset of model’s rows (i.e., objective and constraints) that satisfy a user specified condition. You specify the conditions you want the subset of rows to satisfy and the information you want listed for each row. This feature is extremely useful for perusing large models and their solutions. (Refer to the CPRI command above for similar output regarding columns.) The row attribute list (<RowAttList>) may be any of the characters in the left column in the following table. The interpretation of the attribute is in the right column. RowAtt D L N P R T U Z Interpretation Dual price Simple lower bound Row name Slack/surplus value Right-hand side value Type of row (“<” for less-than-or-equal-to, “=” for equality, and “>” for greater-than-or-equal-to) Simple upper bound Number of nonzeros in the row The conditional expression (<CondExp>) may include any of the operators listed in the table below in conjunction with the row attributes in the table above to form conditional expressions. Operator % + / * ^ LOG(x) EXP(x) ABS(x) .AND. .OR. .NOT. > < = # () Function Wild card character placeholder for use in forming row name templates Addition Subtraction Division Multiplication Exponentiation Natural logarithm of x ex Absolute value of x Logical and Logical or Logical not Compare, greater than Compare, less than Compare, equal to Compare, not equal to Parentheses for specifying precedence COMMAND-LINE COMMANDS 143 LINDO evaluates the conditional expression for each row. If the conditional expression evaluates to True, LINDO will print the values for all the row attributes listed in the row attribute list to the left of the semicolon in the command. As an example, the following command will print the names and slacks on all non-binding rows: RPRI N P : P > 0 If the row-attribute list is omitted, only the number of rows satisfying the conditional expression is printed. For instance, RPRI : P = 0 will return an integer value corresponding to the number of binding rows. RPRI report output may be sent to an external file by using RPRI in conjunction with the DIVERT command. The resulting output may then be loaded into other programs such as spreadsheets and databases. If an attribute’s numeric value is excessively large, it will print as a series of asterisks in the RPRI report. Next, we will list a number of RPRI examples for the following model and solution: MAX 9 X1 - X2 - 4 X3 - 2 X4 + 8 X5 - 2 X6 - 8 X7 - 12 X8 SUBJECT TO 2) 2 X1 + X2 - 2 X3 - X4 + 2 X5 - X6 - 2 X7 - 3 X8 <= 12 3) X1 - 3 X2 + 2 X3 + 3 X4 - X5 + 2 X6 + X7 + X8 <= - 6 4) - X1 + X3 + X5 = - 9 5) X1 - X2 + X4 = 3 6) X2 - X3 + X6 - X7 = 12 7) - X4 - X6 + X8 = 9 8) - X5 + X7 - X8 = - 15 END OBJECTIVE FUNCTION VALUE 1) 15.0000000 VARIABLE VALUE REDUCED COST X1 16.000000 .000000 X2 13.000000 .000000 X3 3.000000 .000000 X4 .000000 3.000000 X5 4.000000 .000000 X6 2.000000 .000000 X7 .000000 2.000000 X8 11.000000 .000000 ROW SLACK OR SURPLUS DUAL PRICES 2) .000000 4.000000 3) .000000 1.000000 4) .000000 1.000000 5) .000000 1.000000 6) .000000 -1.000000 7) .000000 -1.000000 8) .000000 .000000 : rpri !This command simply counts the rows NUMBER OF MATCHES: 8 : rpri n !List the row names 144 CHAPTER : : : : : : : : : : : 3 NAME 1 2 3 4 5 6 7 8 !List the name, nonzero count, and RHS !for all less-than-or-equal-to rows rpri n z r: t = “<“ NAME NONZEROES RIM 2 8 12 3 8 - 6 !List the name and RHS values for all rows !with RHS greater than 2 and less than 10 rpri n r : r > 2 .and. r < 10 NAME RIM 5 3 7 9 !List name and nonzero count on all rows with !a nonzero count less than 4 rpri n z : z < 4 NAME NONZEROES 4 3 5 3 7 3 8 3 !Print the value of the objective row rpri n p : n = "1" NAME PRIMAL 1 15 4. File output SAVE Syntax: SAVE <FileName> The SAVE command stores the model currently in memory using the LINDO packed format (*.lpk) at the path and filename you specify. For example: SAVE <FileName> where <FileName> is the name of the file you wish to save the model under, will save the file in the current working directory. If you enter nothing after the SAVE command, LINDO will prompt you for the name of the file. Note: Command line versions of LINDO do NOT warn you if you already have a file with that name. Any existing file under the same name will be overwritten. Use the RETRIEVE command to retrieve a file from disk which was created with SAVE. COMMAND-LINE COMMANDS 145 Large models may be saved and retrieved quickly with this format, in contrast with the TAKE command for LINDO text files (*.ltx), which can take longer to retrieve big models. Information regarding any solution, internal parameters (such as BIP, PAGE, IPTOL, SET, and WIDTH), and comments are not saved in the file. GIN, INTEGER, SLB, SUB, QCP, and TITLE specifications are saved. The file is on disk in a very compact text format. Because the file is text, it may be ported to other LINDO platforms. Unfortunately, since the file has been compressed, it is unusable for human interpretation. If you need to save a readable text copy of your model to disk, use the DIVERT command to open a file, a LOOK ALL command to send the model to the file, then close the file with the RVRT command. If desired, files created this way may be read back into LINDO with the TAKE command. DIVERT Syntax: DIVERT <FileName> The DIVERT command opens a file and diverts all subsequent reports (e.g., SOLUTION, RANGE, LOOK) from the screen to the specified file. This command is used to save models as a LINDO text format (*.ltx) file in the command-line versions of LINDO. These exported DIVERT files may then be loaded into other programs (e.g., word processors and spreadsheets), or they may be routed to your system’s printer. The form of the DIVERT command is: DIVERT <FileName> where <FileName> is the name of the file you wish to create. If you enter nothing after the DIVERT command, LINDO will prompt you for the name of the file. When DIVERTing output, keep in mind that you will see little or no output on your screen. This is because the output is being sent to the output file rather than the screen. The RVRT command reverses a DIVERT command and returns normal output to the screen after closing the DIVERT file. As an example, the following series of commands creates a file called MYFILE.TXT and then sends a copy of the model and its solution to the file: : : : : DIVERT MYFILE.TXT LOOK ALL SOLU RVRT A file created in this manner could be read into a word processor to become part of a larger report or routed to your site’s printer. RVRT This command undoes the preceding DIVERT, restoring subsequent output to screen. See above for details. FBS Syntax: FBS <FileName> The FBS command saves the current basis (i.e., solution) of a linear programming model in LINDO’s proprietary format. Once saved in this way after solution, the FBS file can be retrieved with FBR and 146 CHAPTER 3 will then become the basis of the model currently in memory. This is particularly useful when you have solved a large model and want to make a small change in the formulation without waiting for a new solution. See above for details on how this command is used with FBR to create a new model from an old basis. FPUN Syntax: FPUN <FileName> The FPUN command saves the solution currently in memory to a file using the file name that you specify. If you don’t supply a path, the file will be saved in the current working directory. If you enter nothing after the FPUN command, LINDO will prompt you for the name of the file. The FPUN command is an abbreviation for File PUNch, and was named in deference to the old PUNCH (as in “punching” a card deck) command in MPS. FPUN saves the current basis in MPS PUNCH format for later insertion as the “starting point” for a model. A basis file created with FPUN is reloaded into LINDO using the FINS (File INSert) command described above. In the following example, we read in a model, solve it from scratch, and save a basis in FPUN format. We then reread the model, load the FPUN basis file created in the previous step, and re-solve. The interesting point to note is, when starting with the benefit of a FPUN basis file, the number of iterations required to optimize the model falls from 741 to 0. : retr etamacro.lpk !Load a model from disk : stats !Examine the stats ROWS= 401 VARS= 688 INTEGER VARS= 0(0 = 0/1) QCP= 0 NONZEROS=2513 CONSTRAINT NONZ=2409(1026 = +-1) DENSITY=0.009 SMALLEST AND LARGEST ELEMENTS IN ABSOLUTE VALUE=0.833574E-02 10000.0 OBJ=MAX, NO. <,=,>: 48 272 80, GUBS <=182 VUBS >=267 SINGLE COLS= 32 REDUNDANT COLS= 0 : terse !Suppress solution report : go !Solve it LP OPTIMUM FOUND AT STEP 741 OBJECTIVE VALUE = 755.715271 : fpun etamacro.pun !Save the basis : retr etamacro.lpk !Load the problem again : fins etamacro.pun !Load the basis we just saved : terse !Suppress solution report : go !Solve again LP OPTIMUM FOUND AT STEP 0 OBJECTIVE VALUE = 755.715271 : !Note how starting with an optimal basis cuts steps to 0 Basis files created with the FPUN command are in text format and the curious user may examine them with a text editor if desired. SDBC Syntax: SDBC <FileName> The SDBC command saves the solution currently in memory to a file using the path and filename that you give. If you don’t supply a path, the file will be saved in the current working directory. If you enter nothing after the SDBC command, LINDO will prompt you for the name of the file. COMMAND-LINE COMMANDS 147 The file saved to disk is in a convenient form for perusing the solution, entering into other software, etc. SDBC files are text files and may be read into any text editor for examination. As an example, a small model is presented below along with its solution and corresponding SDBC file: Here’s the model formulation: :look all MIN 100 XMON 100 XFRI SUBJECT TO SUN) XWED MON) XMON TUE) XMON WED) XMON THU) XMON FRI) XMON SAT) XTUE END + 100 XTUE + 100 XWED + 100 XTHU + + 100 XSAT + 100 XSUN + + + + + + + XTHU XTHU XTUE XTUE XTUE XTUE XWED + + + + + + + XFRI XFRI XFRI XWED XWED XWED XTHU + + + + + + + XSAT XSAT XSAT XSAT XTHU XTHU XFRI + + + + + + + XSUN XSUN XSUN XSUN XSUN XFRI XSAT >= >= >= >= >= >= >= Here’s the standard solution report: :GO OBJECTIVE FUNCTION VALUE 1) 2200.000 VARIABLE VALUE REDUCED COST XMON 2.000000 0.000000 XTUE 2.000000 0.000000 XWED 4.000000 0.000000 XTHU 3.000000 0.000000 XFRI 3.000000 0.000000 XSAT 0.000000 0.000000 XSUN 8.000000 0.000000 ROW SLACK OR SURPLUS DUAL PRICES SUN) 0.000000 -20.000000 MON) 0.000000 -20.000000 TUE) 0.000000 -20.000000 WED) 0.000000 -20.000000 THU) 0.000000 -20.000000 FRI) 0.000000 -20.000000 SAT) 0.000000 -20.000000 NO. ITERATIONS= 0 :SDBC EXAMPLE.ltx 18 16 15 16 19 14 12 148 CHAPTER 3 And, finally, the SDBC file: :RDBC EXAMPLE.ltx SDBC 2200.0000 XMON 2.0000000 XTUE 2.0000000 XWED 4.0000000 XTHU 3.0000000 XFRI 3.0000000 XSAT 0.00000000E+00 XSUN 8.0000000 1.0000000 F 0.00000000E+00C 0.00000000E+00C 0.00000000E+00C 0.00000000E+00C 0.00000000E+00C 0.00000000E+00C 0.00000000E+00C 0.10000000E+31 0.10000000E+31 0.10000000E+31 0.10000000E+31 0.10000000E+31 0.10000000E+31 0.10000000E+31 0.10000000E+31 The columns in the SDBC file stores the following: 1. 2. 3. 4. 5. variable name, primal value of the variable, reduced cost of the variable, type of variable (free, continuous, integer), and simple upper bound. The SDBC command may also be used when you intend later retrieval of the solution. A solution saved using SDBC may be reloaded using the RDBC command. For saving solutions to be restored at a later date, the FBS and FPUN commands are generally more robust than SDBC. SDBC does not store complete basis information, so RDBC is not always able to precisely restore a solution. SMPS Syntax: SMPS <FileName> SMPS saves the model currently in memory to the path and filename that you give. If you don’t supply a path, the file will be saved in the current working directory. If you enter nothing after the SMPS command, LINDO will prompt you for the name of the file. The model is stored in MPS format, which is a common format in industry originally developed for IBM’s MPSX system. MPS files are text files and may be ported to other platforms. Being text files, the curious user may wish to examine a sample MPS file. We reproduce a small model below and its corresponding MPS file. First, here’s the model in standard equation format: MIN 100 XMON + 100 XTUE + 100 XWED + 100 XTHU + 100 XFRI + 100 XSAT + 100 XSUN SUBJECT TO SUN) XWED + XTHU + XFRI + XSAT + XSUN >= 18 MON) XMON + XTHU + XFRI + XSAT + XSUN >= 16 TUE) XMON + XTUE + XFRI + XSAT + XSUN >= 15 WED) XMON + XTUE + XWED + XSAT + XSUN >= 16 THU) XMON + XTUE + XWED + XTHU + XSUN >= 19 FRI) XMON + XTUE + XWED + XTHU + XFRI >= 14 SAT) XTUE + XWED + XTHU + XFRI + XSAT>= 12 END COMMAND-LINE COMMANDS Now, here’s the same model in MPS format: NAME ( MIN) ROWS N 1 G SUN G MON G TUE G WED G THU G FRI G SAT COLUMNS XMON XMON XMON XMON XMON XMON XTUE XTUE XTUE XTUE XTUE XTUE XWED XWED XWED XWED XWED XWED XTHU XTHU XTHU XTHU XTHU XTHU XFRI XFRI XFRI XFRI XFRI XFRI XSAT XSAT XSAT XSAT XSAT XSAT XSUN XSUN XSUN XSUN XSUN XSUN RHS 1 MON TUE WED THU FRI 1 TUE WED THU FRI SAT 1 SUN WED THU FRI SAT 1 SUN MON THU FRI SAT 1 SUN MON TUE FRI SAT 1 SUN MON TUE WED SAT 1 SUN MON TUE WED THU 100.0000000 1.0000000 1.0000000 1.0000000 1.0000000 1.0000000 100.0000000 1.0000000 1.0000000 1.0000000 1.0000000 1.0000000 100.0000000 1.0000000 1.0000000 1.0000000 1.0000000 1.0000000 100.0000000 1.0000000 1.0000000 1.0000000 1.0000000 1.0000000 100.0000000 1.0000000 1.0000000 1.0000000 1.0000000 1.0000000 100.0000000 1.0000000 1.0000000 1.0000000 1.0000000 1.0000000 100.0000000 1.0000000 1.0000000 1.0000000 1.0000000 1.0000000 149 150 CHAPTER RHS RHS RHS RHS RHS RHS RHS ENDATA 3 SUN MON TUE WED THU FRI SAT 18.0000000 16.0000000 15.0000000 16.0000000 19.0000000 14.0000000 12.0000000 One thing you will immediately notice is a relatively simple 11 line model balloons to more than 60 lines in MPS format. As a general rule, MPS files tend to be quite large. Another point to notice is an MPS file basically consists of a long list of (column, row) coordinate pairs followed by a nonzero value. As such, files in this format are not easily interpreted by merely looking at the text. On the other hand, if you are writing model generators to build formulations to pass to LINDO, you may find it easier to build MPS files as opposed to equation format files. Note: Information regarding any solution is not saved in an MPS file, and internal parameters (such as BIP, PAGE, IPTOL, SET, QCP, and WIDTH) are not saved as well. Use the RMPS command to read a file from disk created with SMPS. MPS format files generally take longer to read and write than the files created with LINDO’s SAVE format. Some Notes on MPS Format Files Most of the commonly used features of the MPS format are understood by LINDO, subject to the following restrictions: Leading blanks in variable and row names are ignored. All other characters, including embedded blanks, are allowed. Only one free row (type N row) is kept from the ROWS section after input. That is, the one selected as the objective. Only a single BOUNDS set is recognized in the BOUNDS section. The bound types recognized are: UP (upper bound) LO (lower bound) FR (free variable) FX (fixed variable) BV (bivalent variable, i.e., 0 or 1) UI (upper bounded integer variable) LI (lower bounded integer variable). Only one RANGES set is recognized in the RANGES section. GUB constraint types are not recognized. MODIFY sections are not recognized. SCALE lines are accepted, but have no effect. COMMAND-LINE COMMANDS 151 Although embedded blanks are permitted in names in an MPS file, they aren’t recommended. For example, even though “MY NAME” is an acceptable name for a row in an MPS file, the ALTER command couldn’t be used to change elements in this row. If you typed ALTER MY NAME, LINDO would try to alter the element in row MY called NAME. Lowercase names are permitted, but for consistency (also for ease in distinguishing between 1 (one) and l (L)), you should consider using only uppercase. 5. Solution GO Syntax: GO <PivotLimit> GO attempts to solve the model. GO can take at most one parameter, an optional integer limit on the maximum number of pivots you wish LINDO to make. For example, : GO 100000 will invoke the LINDO solver with a limit of 100,000 iterations. If you do not specify a pivot limit, then the default limit is 3*M+N+6*I*M, where M is the number of rows, N is the number of columns, and I is the number of integer variables. The GO command does not affect the current model. However, it destroys the current solution and creates a new one. GO generally starts with the current solution. If you have a solution or basis for the current model saved to a file, you may retrieve that solution or basis into the current model before issuing the GO command. GO will then try to use this as an initial starting point (refer to the SDBC, FBS, and FPUN commands for information on saving a solution). Six things can happen as a result of typing GO: 1. 2. 3. 4. 5. 6. an optimal solution is found, the model is infeasible (i.e., there is no solution, which simultaneously satisfies all the constraints), the model is unbounded (i.e., the model is such that the objective may be increased without bound), an upper limit on the number of pivots (i.e., solver iterations) is reached, you get tired of waiting for the model to be solved or you are pleased with the best solution found so far, so you interrupt the solver, LINDO runs out of memory. Each of these potential scenarios is discussed in more depth below. 1. EXAMPLE OF OPTIMAL SOLUTION OUTPUT Ideally, your model is formulated such that LINDO returns an optimal solution in a short amount of processing time. When LINDO returns with an optimal solution to a continuous model, you are asked if you wish to see the range report, which is the sensitivity analysis. (For more information on the range report, refer to the RANGE command.) If you do wish to see the range report, enter “y” or “yes” after the following prompt: DO RANGE(SENSITIVITY)ANALYSIS? 152 CHAPTER 3 If you do not wish to see the range report, you can enter “n”, “no”, or a carriage return and you will be returned to command level. Sample output for a small model follows: : look all MAX X + Y SUBJECT TO 2) X + Y <= 1 END : go LP OPTIMUM FOUND AT STEP 1 OBJECTIVE FUNCTION VALUE 1) 1.00000000 VARIABLE VALUE REDUCED COST X 1.000000 .000000 Y .000000 .000000 ROW SLACK OR SURPLUS DUAL PRICES 2) .000000 1.000000 NO. ITERATIONS= 1 DO RANGE(SENSITIVITY) ANALYSIS? Y RANGES IN WHICH THE BASIS IS UNCHANGED: OBJ COEFFICIENT RANGES VARIABLE CURRENT ALLOWABLE COEF INCREASE X 1.000000 INFINITY Y 1.000000 .000000 RIGHTHAND SIDE RANGES ROW CURRENT ALLOWABLE RHS INCREASE 2 1.000000 INFINITY ALLOWABLE DECREASE .000000 INFINITY ALLOWABLE DECREASE 1.000000 2. EXAMPLE OF INFEASIBLE SOLUTION OUTPUT If your model is overly constrained to the point that no solution can simultaneously satisfy all the constraints, then you will get an infeasible solution message from LINDO. A small infeasible example follows: : look all MAX X + Y SUBJECT TO 2) X + Y <= 3) X + Y >= END 1 2 COMMAND-LINE COMMANDS 153 : !This is obviously infeasible since X+Y cannot : !simultaneously be <= 1 AND >=2 : go NO FEASIBLE SOLUTION AT STEP 1 SUM OF INFEASIBILITIES= 1.00000 VIOLATED ROWS HAVE NEGATIVE SLACK, OR (EQUALITY ROWS) NONZERO SLACKS. ROWS CONTRIBUTING TO INFEASIBILITY HAVE NONZERO DUAL PRICE. OBJECTIVE FUNCTION VALUE 1) 1.00000000 VARIABLE VALUE REDUCED COST X 1.000000 .000000 Y .000000 .000000 ROW SLACK OR SURPLUS DUAL PRICES 2) .000000 1.000000 3) -1.000000 -1.000000 NO. ITERATIONS= 1 The returned variable values have little meaning when a model is infeasible. There is other information in the solution report, however, that may prove useful in helping to track down the source of the infeasibility. First off, the slack or surplus value for violated constraints will be negative. In the example above, constraint 3 is violated by 1 unit. Second, the dual prices have a useful meaning in this situation. They are the amount by which the total sum of infeasibility, the total amount that all constraints are violated, is reduced if the right-hand side is increased by one unit. Referring back to our example once again, we see that increasing the RHS of constraint 2 by one unit will reduce the infeasibility by one unit, while increasing the RHS of row 3 by one unit will result in a corresponding increase in the infeasibilities. In this small model, it is easy to verify this fact by “eyeball”. If you would like a more mechanical method for tracing down infeasibilities, please refer to the DEBUG command. The DEBUG command can narrow an infeasible model down to the smallest subset of constraints leading to an infeasibility. 3. EXAMPLE OF AN UNBOUNDED SOLUTION When LINDO can improve on the objective without bound, then the model is said to be unbounded. In most applications, this would imply a problem in the formulation, because, in the real world, we know it is impossible to maximize profit without limit. A sample of an unbounded model follows: : look all MAX X + Y SUBJECT TO 3) X + Y >= END 2 154 CHAPTER 3 : go UNBOUNDED SOLUTION AT STEP 0 UNBOUNDED VARIABLES ARE: SLK 2 X OBJECTIVE FUNCTION VALUE 1) 2.00000000 VARIABLE VALUE REDUCED COST X 99999900.000000 .000000 Y .000000 .000000 ROW SLACK OR SURPLUS DUAL PRICES 3) .000000 1.000000 NO. ITERATIONS= 0 There are a couple things you can do to help trace down the problem in your model when it is unbounded. First off, when a model is unbounded, LINDO helps by showing you the variables it can increase to drive the objective to infinity by assigning them a large value in the solution report. In the above example, we can see X is one of the culprits due to its large value of 99999900. Secondly, you can make use of the DEBUG command. The DEBUG command can find a minimal subset of variables, which may be used to force the objective to infinity. See the DEBUG command for more information. 4. EXAMPLE OF HITTING THE PIVOT LIMIT If an upper limit on the number of pivots is reached, LINDO prompts you as to how many more iterations you wish to do. You may specify an additional number of new pivots to perform, or enter a 0 to halt optimization and return to command level with the best solution found so far. In the next example, we read in a model and issue a GO command with a limit of 10 pivots. LINDO hits this limit before finding a solution and prompts us for an additional number of pivots. We reply with an additional 30 pivots, which allows LINDO to finish solving the model. : !Read in a small model : retr test2.lpk : terse !Go into terse output mode : ! Use GO to solve the model, set pivot limit to 10 : go 10 PIVOT LIMIT OF 10 EXCEEDED. HOW MANY MORE ALLOWED? 30 LP OPTIMUM FOUND AT STEP 18 OBJECTIVE VALUE = 8942181.00 : COMMAND-LINE COMMANDS 155 5. INTERRUPTING THE SOLVER If you have a large model and don’t want to wait for LINDO to find the optimal solution, the Windows version of LINDO allows you to interrupt the optimizer and return to command level with the best solution found up to that point. To interrupt the solver, press the interrupt button in the Status Window. If the Status Window is not on screen, from the Windows menu select the Open Status Window command. When you interrupt the optimizer, LINDO will inform you how many pivots it has done and ask you whether you want to do more. If you truly want to interrupt, reply with a 0. LINDO will return to command level with the best solution found so far in memory. On platforms that don’t support the interrupt feature, you can usually do a Ctrl-C or a Ctrl-Z to break out of LINDO. Note: When a solution is interrupted by pressing Ctrl-C or Ctrl-Z, keep in mind you will lose everything in volatile memory and will be returned to the operating system. 6. RUNNING OUT OF MEMORY If LINDO runs out of memory, it is usually because you attempted to load a model very close to its limits on inputs and it ran out of working space in memory. In general, you will need to either move to a larger version of LINDO or make your model smaller. If you do not know the limits of your version of LINDO, run the HELP command. If LINDO says you have hit a nonzero coefficient limit, you may be able to increase the limit on some platforms. In Windows versions, you can specify a larger nonzero limit by using Edit|Options command. GLEX The GLEX command for Lexico-optimization allows the user to specify an ordered list of objectives. GLEX begins by optimizing the first objective. Given the optimal value for the first objective, it then optimizes the second objective subject to the first objective being equal to its optimal value. Given the optimal values for the first and second objectives, it then optimizes the third objective, etc. A typical situation has a first objective of minimizing cost or maximizing profit and a second objective of “smoothing” the solution in some sense. Examples are cutting stock or staff scheduling applications where a number of demand requirements must be satisfied. Traditional formulations of such problems frequently have “multiple optima” solutions, some of which greatly over-satisfy one or two requirements and just barely satisfy all others. The user typically has a slight preference for solutions, which “spread out” the over-satisfaction more evenly. A Goal Programming formulation would have a first objective of minimizing the cost of satisfying all requirements and perhaps a second objective of minimizing the maximum over-satisfaction of any requirement. The Lexico approach saves the user from having to worry about exact tradeoff rates between the cost of a solution and the value of oversatisfaction. 156 CHAPTER 3 In the following example, we look at the GLEX command applied to a small staff scheduling model. We have staffing requirements for each of the seven days of the week. Employees work for 5 days with two days off each week. M represents the number of employees starting on Monday, T is the number starting on Tuesday, and so on. Typically, you must accept some overstaffing in problems of this sort, but you may want to spread the overstaffing across the week. Note the “clustered” overstaffing in the solution: : look all MIN M + T + W + R + F + S + N SUBJECT TO MON) M + R + F + S + N >= 3 TUE) M + T + F + S + N >= 3 WED) M + T + W + S + N >= 8 THU) M + T + W + R + N >= 8 FRI) M + T + W + R + F >= 8 SAT) T + W + R + F + S >= 3 SUN) W + R + F + S + N >= 3 END : go LP OPTIMUM FOUND AT STEP 4 OBJECTIVE VALUE = 8.00000000 OBJECTIVE FUNCTION VALUE 1) 8.000000 VARIABLE VALUE REDUCED COST M 5.000000 0.000000 T 0.000000 0.000000 W 3.000000 0.000000 R 0.000000 0.000000 F 0.000000 0.000000 S 0.000000 1.000000 N 0.000000 1.000000 ROW SLACK OR SURPLUS DUAL PRICES MON) 2.000000 0.000000 <- Note that we TUE) 2.000000 0.000000 <- have extra WED) 0.000000 0.000000 workers only THU) 0.000000 0.000000 on M & T FRI) 0.000000 -1.000000 SAT) 0.000000 0.000000 SUN) 0.000000 0.000000 NO. ITERATIONS= 4 COMMAND-LINE COMMANDS 157 We would like to have extra staff, if possible, but more than one extra employee per day is not beneficial. So, we’ll let Xi denote the extra workers up to a maximum of one on each day. Then, using GLEX, we can first minimize cost, fix cost at its optimal value, and then maximize the sum of the Xi variables. Note that since we are maximizing EXTRA, it has a negative coefficient in the objective. Here is the new formulation setup up for the GLEX command. : look all MIN COST - EXTRA SUBJECT TO MON) M + R + F + S + N - XM >= 3 TUE) M + F + S + N + T - XT >= 3 WED) M + S + N + T + W - XW >= 8 THU) M + R + N + T + W - XR >= 8 FRI) M + R + F + T + W - XF >= 8 SAT) R + F + S + T + W - XS >= 3 SUN) R + F + S + N + W - XN >= 3 XM) XM <= 1 XT) XT <= 1 XW) XW <= 1 XR) XR <= 1 XF) XF <= 1 XS) XS <= 1 XN) XN <= 1 COST) COST - 9M - 9R - 9F - 9S - 9N - 9T - 9W = 0 EXTRA) EXTRA - XM - XT - XW - XR - XF - XS - XN = 0 END : glex LP OPTIMUM FOUND AT STEP 4 OBJECTIVE VALUE = 72.0000000 LP OPTIMUM FOUND AT STEP 7 OBJECTIVE VALUE = 68.0000000 OBJECTIVE FUNCTION VALUE 1) 68.00000 VARIABLE VALUE REDUCED COST COST 72.000000 0.000000 EXTRA 4.000000 -1.000000 M 4.000000 0.000000 R 0.000000 0.000000 F 0.000000 0.000000 S 0.000000 9.000000 N 0.000000 9.000000 XM 1.000000 0.000000 < Note T 0.000000 0.000000 that XT 1.000000 0.000000 < we’ve spread W 4.000000 0.000000 our surplus XW 0.000000 0.000000 workers XR 0.000000 0.000000 across 4 XF 0.000000 9.000000 days: M, T, XS 1.000000 0.000000 < S & N XN 1.000000 0.000000 < 158 CHAPTER 3 ROW SLACK MON) TUE) WED) THU) FRI) SAT) SUN) XM) XT) XW) XR) XF) XS) XN) COST) EXTRA) NO. ITERATIONS= OR SURPLUS 0.000000 0.000000 0.000000 0.000000 0.000000 0.000000 0.000000 0.000000 0.000000 1.000000 1.000000 1.000000 0.000000 0.000000 0.000000 0.000000 0 DUAL PRICES 0.000000 0.000000 0.000000 0.000000 -9.000000 0.000000 0.000000 0.000000 0.000000 0.000000 0.000000 0.000000 0.000000 0.000000 -1.000000 0.000000 The GLEX command may be applied to both linear and integer programs. PIVOT Syntax: PIVOT <Variable> <Row> The PIVOT command is almost identical to entering “GO 1”. LINDO performs one pivot of the simplex algorithm. The name of the entering variable is given, it’s primal value, the number of the row that bounded the variable (i.e., the pivot row), and the objective function value. The syntax of the PIVOT command is as follows: PIVOT <Variable> <Row> You may, optionally, specify a variable name or index to enter into the basis. If you do not specify a variable, LINDO will make the selection automatically. If you do specify a variable, then you also have the option of selecting the pivot row name or row index. When a variable is specified, but not a row, PIVOT brings that variable into the basis in the ordinary fashion of the simplex algorithm. When a variable and row are specified, PIVOT brings that variable into the basis using the specified row as the pivot row. You can start with a feasible (or even optimal) solution and PIVOT in variables, which render the basis infeasible. LINDO may also report the objective function is unbounded when you specify both the variable and the row after PIVOT, if the row specified does not bound the variable specified. The TABLEAU and BPICTURE commands may provide additional insight into each step of the algorithm. COMMAND-LINE COMMANDS 159 In the following example, we use successive PIVOT commands to optimize a small model: : look all MAX 9 X1 - X2 - 4 X3 - 2 X4 + 8 X5 - 2 X6 - 8 X7 - 12 X8 SUBJECT TO 2) 2 X1 + X2 - 2 X3 - X4 + 2 X5 - X6 - 2 X7 - 3 X8 <= 12 3) X1 - 3 X2 + 2 X3 + 3 X4 - X5 + 2 X6 + X7 + X8 <= - 6 4) - X1 + X3 + X5 = - 9 5) X1 - X2 + X4 = 3 6) X2 - X3 + X6 - X7 = 12 7) - X4 - X6 + X8 = 9 8) - X5 + X7 - X8 = - 15 END : piv x1 !Here we pick the variable X1 ENTERS AT VALUE 3.0000 IN ROW 5 OBJ. VALUE= 27.0 : piv x2 2 !Now we pick both the variable and the row X2 ENTERS AT VALUE 2.0000 IN ROW 2 OBJ. VALUE= 43.0 : piv !Let LINDO make the selection X8 ENTERS AT VALUE 4.0000 IN ROW 4 OBJ. VALUE= 27.0 : piv X3 ENTERS AT VALUE 15.000 IN ROW 7 OBJ. VALUE= 27.0 : piv X5 ENTERS AT VALUE 3.0000 IN ROW 7 OBJ. VALUE= 15.0 : piv X6 ENTERS AT VALUE 1.6667 IN ROW 8 OBJ. VALUE= 13.0 : piv X3 ENTERS AT VALUE 3.0000 IN ROW 3 OBJ. VALUE= 15.0 : piv LP OPTIMUM FOUND AT STEP 7 OBJECTIVE FUNCTION VALUE 1) 15.00000 6. Problem editing ALTER Syntax: ALTER <Row> <VarName | DIR | NAME | RHS> The ALTER command can be used to: change the sense of the objective function (“MAX” or “MIN”), change the coefficient of a variable, including the sign, change the direction of a row (“<=“, “=“, or “=>“), change the right-hand side, add a variable to one row, change the name of a row, or delete a variable from one row. 160 CHAPTER 3 The syntax of the command is as follows: ALTER <Row> <VarName | DIR | NAME | RHS> where <Row> is the name or index of the row where you wish to make the alteration and <VarName> is the name of the variable to be altered. ALTER requires the row and the variable you wish to change to be identified. If you enter ALTER without identifying the row or variable, LINDO will prompt you for the row or variable. You cannot use a variable index number to identify a variable. Use the variable name with ALTER. You can use RHS in place of the variable name to change the right-hand side of any row except row number one (the objective function). If you wish to change the right-hand sides of all the rows, use the APPCOL command instead. Use DIR in place of the variable name to change the relational operator (, =, or ) of any row except row number one (the objective function). For row 1 only, use DIR in place of the variable name to change the sense of the objective function (“MAX” or “MIN”). You can use NAME in place of the variable name to change the name of any row, but a row name for row number one (the objective function) is never displayed. The current solution is no longer considered optimal after ALTER is used, unless you only change the name of a row. ALTER can be used in a TAKE file to automatically change parts of the model. This is an advanced use of LINDO and the TAKE command. See the TAKE command for more information. Suppose you want to change “- 2 WRNG” in the objective function to “+ RGHT” in the following model: MIN 130 X + 120 Y + 100 Z - 2 WRNG SUBJECT TO 2) X + Y - Z > 3 3) 2 X + 3 Y - 11 Z > 5 4) WRNG + X - Y > 6 END At the LINDO command prompt, type the commands listed in the session below: : alter !This is the Alter command. ROW: !LINDO asks what row we want to change. 1 !We want to change Row 1. VAR: !LINDO asks which variable we want to change. wrng !We want to change “- 2 WRNG” to “+ RGHT”. NEW COEFFICIENT: !LINDO asks for the new coefficient on !the variable. ? 0 !Enter a zero to get rid of it. COMMAND-LINE COMMANDS 161 : alt !Do another ALT to put “+ RGHT” in the obj. ROW: !LINDO asks what row number we want to change. 1 !We want to change Row 1 again. VAR: !LINDO asks the variable we want to change rght !We want to add RGHT to the row. VARIABLE NOT USED IN THIS PROBLEM BEFORE. WANT IT INCLUDED? ? y !Yes we want to include it. NEW COEFFICIENT: !LINDO prompts for the new coefficient. ? +1 !The new coefficient for the RGHT variable. : look all !Run LOOK 1 to examine the altered objective. MIN 130 X + 120 Y + 100 Z + RGHT~ : EXTEND The EXTEND command is used to add constraints to the model currently in memory. The form of the command is: EXTEND <Row1> <Row2> ... END where <Row1> and <Row2> are the constraints to be added. After you enter the EXTEND command, LINDO gives a question mark (“?”) prompt. Enter the new constraint rows as you normally would in a model. Refer to those commands for additional syntax specifications. However, you cannot use MAX, MIN, ST, SUCH THAT, or SUBJECT TO in this context. You may only enter new constraints. Complete the command by entering the word “END”. The EXTEND command changes the current model by adding to the end of the model the constraints, which you enter. The row numbers of the new rows follow the last row number already in the model. The current solution is no longer considered optimal after EXTEND is used. In this following sample session, two new constraints are appended to the model. : look all !here is our model MAX 9 X1 - X2 - 4 X3 - 2 X4 + 8 X5 - 2 X6 - 8 X7 - 12 X8 SUBJECT TO 2) 2 X1 + X2 - 2 X3 - X4 + 2 X5 - X6 - 2 X7 - 3 X8 <= 12 3) X1 - 3 X2 + 2 X3 + 3 X4 - X5 + 2 X6 + X7 + X8 <= - 6 4) - X1 + X3 + X5 = - 9 5) X1 - X2 + X4 = 3 6) X2 - X3 + X6 - X7 = 12 7) - X4 - X6 + X8 = 9 8) - X5 + X7 - X8 = - 15 END : extend !use EXTEND to add two more constraints ? x1 + x2 + x3 + x4 < 116 ? 24x8 -x9 >0 ? end 162 CHAPTER 3 : look all !look at model with MAX 9 X1 - X2 - 4 X3 - 2 X4 + SUBJECT TO 2) 2 X1 + X2 - 2 X3 - X4 + 2 X5 3) X1 - 3 X2 + 2 X3 + 3 X4 - X5 4) - X1 + X3 + X5 = - 9 5) X1 - X2 + X4 = 3 6) X2 - X3 + X6 - X7 = 12 7) - X4 - X6 + X8 = 9 8) - X5 + X7 - X8 = - 15 9) X1 + X2 + X3 + X4 <= 116 10) 24 X8 - X9 >= 0 END APPCOL new constraints appended to end 8 X5 - 2 X6 - 8 X7 - 12 X8 - X6 - 2 X7 - 3 X8 <= 12 + 2 X6 + X7 + X8 <= - 6 Syntax: APPCOL <NewVarName | RHS> The APPCOL command is used to add variables or to change the right-hand sides of the model currently in memory. If you do not type anything after APPCOL, LINDO will prompt you for the name of the variable. The form of the command is: APPCOL <NewVarName | RHS> If you use “RHS” as an argument, LINDO assumes you want to change the model’s right-hand side values. All other argument values are assumed to be a name of a new variable you want to add to the model. After entering the first line of the command, LINDO gives a question mark (“?”) prompt. Enter the row numbers and coefficients in pairs, one pair per line, with a space in between. For all row numbers not entered, the coefficient will be assumed as zero in the model. Complete the command by entering “0” for the row number. You may use the word “END” instead of the “0”, if you wish. If “RHS” is entered as the command argument, the command changes all right-hand sides. After entering “APPCOL RHS”, enter the row numbers and new right-hand sides in pairs, one pair per line, with a space in between as mentioned above. The APPCOL command modifies the current model. The current solution is no longer considered optimal after APPCOL is used. In the following sample session, a variable name “Y” is appended to the model. : look all MAX 9 X1 - X2 - 4 X3 - 2 X4 + 8 X5 - 2 X6 - 8 X7 - 12 X8 SUBJECT TO 2) 2 X1 + X2 - 2 X3 - X4 + 2 X5 - X6 - 2 X7 - 3 X8 <= 12 3) X1 - 3 X2 + 2 X3 + 3 X4 - X5 + 2 X6 + X7 + X8 <= - 6 4) - X1 + X3 + X5 = - 9 5) X1 - X2 + X4 = 3 6) X2 - X3 + X6 - X7 = 12 7) - X4 - X6 + X8 = 9 8) - X5 + X7 - X8 = - 15 END COMMAND-LINE COMMANDS 163 : appcol y ? 1 -11 ? 3 16.5 ? 5 -22 ? 0 : look all MAX 9 X1 -X2 -4 X3 -2 X4 + 8 X5 - 2 X6 - 8 X7 - 12 X8 - 11 Y SUBJECT TO 2) 2 X1 + X2 - 2 X3 - X4 + 2 X5 - X6 - 2 X7 - 3 X8 <= 12 3) X1 -3 X2 +2 X3 +3 X4 -X5 +2 X6 +X7 +X8 + 16.5 Y <= - 6 4) - X1 + X3 + X5 = - 9 5) X1 - X2 + X4 - 22 Y = 3 6) X2 - X3 + X6 - X7 = 12 7) - X4 - X6 + X8 = 9 8) - X5 + X7 - X8 = - 15 : DELETE Syntax: DELETE <Row | BegRowEndRow> The DELETE command deletes a row or range of rows from your model. After DELETE, enter the row name, row number, or range of row numbers you want to delete. If you type nothing after the DELETE command, LINDO will prompt you for the row(s) to delete. Some examples of the DELETE command are: : DELETE 3 : DELETE CAPACITY : DELETE 3 5 !Deletes row 3 !Deletes the row called CAPACITY !Deletes rows 3 through 5 The DELETE command changes the current model by deleting the constraints you choose. The current solution is no longer considered optimal after DELETE is used. If you to want to clear an entire model from memory and begin entering a new one, simply use the MAX or MIN command. LINDO will clear the old model from memory before parsing the new one. SUB Syntax: SUB <Variable> <UpperBound> The SUB command specifies a simple upper bound for one variable. In other words, the SUB command can be used to represent constraints of the form X b, where b is some constant, nonnegative bound. LINDO uses these upper bounds directly in the simplex algorithm. Alternatively, you can specify simple upper bounds as an explicit constraint in the model. However, LINDO can solve the model more efficiently when the SUB command is used in place of an explicit constraint. The form of the command is: SUB <Variable> <UpperBound> where <Variable> is the name of the variable you want to bound and <UpperBound> is a nonnegative bound value. The value for <UpperBound> must be non-negative even if you use the FREE command with the variable. However, a negative upper bound can be specified in an explicit constraint in the model for variables designated as FREE. If you type nothing after the SUB, LINDO will prompt you for <Variable> and <UpperBound>. 164 CHAPTER 3 The FREE command and SUB are contradictory. If you use the FREE command with a variable after using the SUB command with that variable, the upper bound is erased. You can use this to remove the SUB. Entering “FREE <Variable>” eliminates the SUB. Then entering “SLB <Variable> 0” (see the SLB command) restores the default simple lower bound of 0. Every variable (except a variable specified as FREE) can have a SUB. The SUB specification does not count against LINDO’s constraint limit. Whereas, an explicit constraint does. The SUB specification is saved when the model is saved with SAVE, SMPS, and the DIVERT/LOOK ALL sequence. The current solution is no longer considered optimal after SUB is used. The following session illustrates the use of the SUB command on a small model. : look all MAX 20 X + 30 Y SUBJECT TO 2) X <= 50 3) Y <= 60 4) X + 2 Y <= 120 END : terse : go !Solve the model LP OPTIMUM FOUND AT STEP 2 OBJECTIVE VALUE = 2050.00000 : delete 3 !Delete the simple bound constraints : delete 2 : look all MAX 20 X + 30 Y SUBJECT TO 2) X + 2 Y <= 120 END : sub x 50 !Bound the variables with SUB commands : sub y 60 : look all MAX 20 X + 30 Y SUBJECT TO 2) X + 2 Y <= 120 END SUB X 50.00000 SUB Y 60.00000 : go !Re-solve, we should get the same objective LP OPTIMUM FOUND AT STEP 1 OBJECTIVE VALUE = 2050.00000 COMMAND-LINE COMMANDS SLB 165 Syntax: SLB <Variable> <LowerBound> The SLB command specifies a simple lower bound for one variable. In other words, the SLB command can be used to represent constraints of the form X b, where b is some constant bound and may be negative. LINDO uses these lower bounds directly in the simplex algorithm. Alternatively, you can specify simple lower bounds as an explicit constraint in the model. However, LINDO can solve the model more efficiently when the SLB command is used in place of an explicit constraint. The form of the command is: SLB <Variable> <LowerBound> where <Variable> is the name of the variable you wish to bound and <LowerBound> is any real number. If you type nothing after the SLB, LINDO will prompt you for <Variable> and <LowerBound>. The FREE command and SLB are contradictory. If you use the FREE command with a variable after using the SLB command with that variable, the lower bound is erased. If you wish to remove a SLB on a variable and return to the default lower bound of 0, enter the command “SLB <Variable> 0”. Every variable (except a variable specified as FREE) can have a SLB. The SLB specification does not count against LINDO’s constraint limit. Whereas, an explicit constraint does. The SLB specification is saved when the model is saved with SAVE, SMPS, and the DIVERT/LOOK ALL sequence. The current solution is no longer considered optimal after SLB is used. The following illustrates the use of the SLB command on a small model. : look all MAX 2 X + Y SUBJECT TO 2) X >= 2 3) Y >= 3 4) 3 X + Y <= 12 END : terse : go !Solve the model LP OPTIMUM FOUND AT STEP 2 OBJECTIVE VALUE = 10.0000000 : delete 3 !Remove the lower bound constraints : delete 2 : look all MAX 2 X + Y SUBJECT TO 2) 3 X + Y <= 12 END 166 CHAPTER 3 : slb x 2 !Reenter bounds with the SLB command : slb y 3 : look all MAX 2 X + Y SUBJECT TO 2) 3 X + Y <= 12 END SLB X 2.00000 SLB Y 3.00000 : go !Re-solve … we should get the same objective LP OPTIMUM FOUND AT STEP 0 OBJECTIVE VALUE = 10.0000000 FREE Syntax: FREE <Variable> The FREE command specifies that a variable has no upper or lower bound. It allows variables to take on any real value. After typing FREE, enter the name or number of the variable you choose. If you do not specify a variable, LINDO will prompt you for one. The FREE command and simple bounding commands (i.e., SUB and SLB) are contradictory. If you use the FREE command with a variable after using the SUB and/or SLB commands with that variable, the bounds are erased. The FREE specification is saved when the model is saved with SAVE, SMPS, and the DIVERT/LOOK ALL sequence. The current solution is no longer considered optimal after FREE is used. The following session illustrates the use of the FREE command: : look all !Display the model MIN 5 X + Y SUBJECT TO 2) - X + Y <= 3 3) X + Y >= 1 END : go !Now, solve it LP OPTIMUM FOUND AT STEP 1 OBJECTIVE FUNCTION VALUE 1) 1.000000 VARIABLE VALUE REDUCED COST X 0.000000 4.000000 Y 1.000000 0.000000 ROW SLACK OR SURPLUS DUAL PRICES 2) 2.000000 0.000000 3) 0.000000 -1.000000 NO. ITERATIONS= 1 DO RANGE(SENSITIVITY) ANALYSIS? N COMMAND-LINE COMMANDS 167 : free x !Let x go negative : look all !Notice that x is now free MIN 5 X + Y SUBJECT TO 2) - X + Y <= 3 3) X + Y >= 1 END FREE X : go !Re-solve and note how x becomes negative LP OPTIMUM FOUND AT STEP 2 OBJECTIVE FUNCTION VALUE 1) -3.000000 VARIABLE VALUE REDUCED COST X -1.000000 0.000000 Y 2.000000 0.000000 7. Integer, quadratic, & parametric programs INTEGER Syntax: INTEGER <Variable | NumberOfVars> The INTEGER command is used to specify variables as binary integer. A binary integer variable can take on only one of the two values: 0 or 1. Binary variables are very useful for modeling go/no-go situations, an example of which would be whether or not to incur a fixed cost. For more information on the application of binary variables, you may refer to the LINDO textbook, Optimization Modeling with LINDO, by Linus Schrage. The form of the command is: INTEGER <Variable | NumberOfVars> where <Variable> is the name of an individual variable you want to designate as binary or <NumberOfVars> is an integer value corresponding to the number of variables you wish to make binary. Both forms of the INTEGER command are illustrated below: : look all : : : : : : MAX 30 X + 20 Y + 10 Z SUBJECT TO 2) 17 X + 13 Y + 11 Z <= 29 END !Make all the variables 0/1 using the ! INTEGER <Variable> form int x int y int z look all MAX 30 X + 20 Y + 10 Z 168 CHAPTER 3 SUBJECT TO 2) 17 X + 13 Y + 11 Z <= 29 END INTE 3 : !Note the “INTE 3” indicating that the first : ! three variables are binary : int 0 !Now we remove the integrality condition : look all MAX 30 X + 20 Y + 10 Z SUBJECT TO 2) 17 X + 13 Y + 11 Z <= 29 END SUB X 1.00000 SUB Y 1.00000 SUB Z 1.00000 : !Note that the SUBS remain, but the binary integer : ! restrictions are gone : terse : go !Now we solve the continuous version LP OPTIMUM FOUND AT STEP 2 OBJECTIVE VALUE = 48.4615402 : nonz OBJECTIVE FUNCTION VALUE 1) 48.46154 VARIABLE VALUE REDUCED COST X 1.000000 -3.846154 Y 0.923077 0.000000 ROW SLACK OR SURPLUS DUAL PRICES 2) 0.000000 1.538462 NO. ITERATIONS= 2 : int 3 !Restore integers using INTEGER n command : look all MAX 30 X + 20 Y + 10 Z SUBJECT TO 2) 17 X + 13 Y + 11 Z <= 29 END INTE 3 : terse : go !Solve for an integer solution LP OPTIMUM FOUND AT STEP 1 OBJECTIVE VALUE = 48.4615402 NEW INTEGER SOLUTION OF 40.0000000 AT BRANCH 0 PIVOT 4 BOUND ON OPTIMUM: 40.00000 ENUMERATION COMPLETE. BRANCHES= 0 PIVOTS= 4 LAST INTEGER SOLUTION IS THE BEST FOUND REINSTALLING BEST SOLUTION ... COMMAND-LINE COMMANDS 169 : nonz !Note that Y is no longer used OBJECTIVE FUNCTION VALUE 1) 40.00000 VARIABLE VALUE REDUCED COST X 1.000000 -30.000000 Z 1.000000 -10.000000 NO. ITERATIONS= 4 BRANCHES= 0 DETERM.= 1.000E 0 The INTEGER <NumberOfVars> form of the command is most useful when you want to turn all the variables in the model to binary integers. If you don’t remember the total number of variables in the model, then give the STATS command. If you want to make a subset of variables binary using INTEGER <NumberOfVars>, then those variables must appear first in LINDO’s internal ordering of variables. A variable’s internal order is determined by the order in which it initially appears in the formulation. If you aren’t sure what the internal order of the variables is, enter the command “CPRI N” to see the variables listed in their internal order. The INTEGER <Variable> form of the command is most useful when you want to designate a small subset of the variables to be binary. This is particularly true when the variables are scattered throughout the formulation and, therefore, not all first in the formulation. For efficiency reasons, LINDO permutes all integer variables to the front of the internal ordering of variables. Thus, in solution reports, the values of the integer variables will appear before the values of the continuous variables. The INTEGER specification is saved when the model is saved with SAVE, SMPS, and the DIVERT/LOOK ALL sequence. The INTEGER command is equivalent to using the GIN command (below) with a simple upper bound of 1 (SUB <Variable> 1). This is how LINDO interprets the INTEGER command internally. If you wish to convert an integer program to a linear program with all continuous variables, just enter INTEGER 0. This says there are no integer variables. However, this will not remove the simple upper bound of 1 on the binary variables. You can use the FREE command to do this (above). When you specify integer variables with either INTEGER or the following GIN command, LINDO solves the problem using the branch-and-bound technique, a special algorithm to narrow the search for the best answer that satisfies the requirement for integrality. The branch-and-bound technique, however, does slow the solution process considerably. If time is of the essence in solving a large problem, try to formulate it without using integer variables and round the fractional variables whenever possible. However, keep in mind that rounded continuous solutions may be non-optimal and, at worst, infeasible. 170 CHAPTER 3 GIN Syntax:GIN <Variable | NumberOfVars> The GIN command is used to specify general integer variables. A general integer variable can take on any non-negative integer value (0,1,2,…). General integer variables are useful for modeling decision values, which are difficult to round to the nearest integer value. For instance, if you have a planning model for building 2.5 factories, whether you round to 2 or 3 will have a big impact on the company’s future. In this case, you would probably want the number of factories represented in a LINDO model using a general integer variable. On the other hand, if the objective function of a model says to manufacture 3,741,543.35 two inch nails, whether you round up or down is of little consequence. The cost in time to solve the model largely outweighs the benefits of getting an exact nail count. In this case, for solution efficiency reasons, you should use a continuous variable to represent the number of nails manufactured. For more information on the application of integer programming (IP), you may refer to the LINDO textbook, Optimization Modeling with LINDO, by Linus Schrage. The form of the command is: GIN <Variable | NumberOfVars> where <Variable> is the name of an individual variable you want to designate as general integer or <NumberOfVars> is an integer value corresponding to the number of variables you wish to make binary. Both forms of the GIN command are illustrated below. : look all MAX 20 X + 14 Y + 13 Z SUBJECT TO 2) 17 X + 13 Y + 11 Z <= 93 END : go !Solve as a continuous model LP OPTIMUM FOUND AT STEP 1 OBJECTIVE FUNCTION VALUE 1) 109.9091 VARIABLE VALUE REDUCED COST X 0.000000 0.090909 Y 0.000000 1.363636 Z 8.454545 0.000000 ROW SLACK OR SURPLUS DUAL PRICES 2) 0.000000 1.181818 NO. ITERATIONS= 1 DO RANGE(SENSITIVITY) ANALYSIS? N : !Now use the GIN <Variable> command to make : ! each variable general integer : gin x : gin y : gin z COMMAND-LINE COMMANDS : look all MAX 20 X + 14 Y + 13 Z SUBJECT TO 2) 17 X + 13 Y + 11 Z <= 93 END GIN 3 : !The integer solver may print copious output : ! if not in TERSE mode : terse : !Solve the integer form of the model (allow for : ! 1000 iterations : go 1000 LP OPTIMUM FOUND AT STEP 1 OBJECTIVE VALUE = 109.909088 NEW INTEGER SOLUTION OF 104 AT BRANCH 1 PIVOT 8 BOUND ON OPTIMUM: 109.8333 NEW INTEGER SOLUTION OF 105 AT BRANCH 4 PIVOT 17 BOUND ON OPTIMUM: 109.8333 NEW INTEGER SOLUTION OF 106 AT BRANCH 8 PIVOT 27 BOUND ON OPTIMUM: 109.8333 NEW INTEGER SOLUTION OF 107 AT BRANCH 17 PIVOT 59 BOUND ON OPTIMUM: 108.5455 ENUMERATION COMPLETE. BRANCHES = 22 PIVOTS = 72 LAST INTEGER SOLUTION IS THE BEST FOUND REINSTALLING BEST SOLUTION ... : solution OBJECTIVE FUNCTION VALUE 1) 107.0000 VARIABLE VALUE REDUCED COST X 2.000000 -20.000000 Y 2.000000 -14.000000 Z 3.000000 -13.000000 ROW SLACK OR SURPLUS DUAL PRICES 2) 0.000000 0.000000 NO. ITERATIONS= 72 BRANCHES= 22 DETERM.= 1.000E 0 : !Note that the integer solution is considerably : ! different from the continuous solution. Rounding : ! in this case would not have been appropriate : gin 0 !Turn off all integers : look all MAX 20 X + 14 Y + 13 Z SUBJECT TO 2) 17 X + 13 Y + 11 Z <= 93 END : !This time use the GIN <NumberOfVariables> form to make : !the variables integer : gin 3 171 172 CHAPTER 3 : look all MAX 20 X + 14 Y + 13 Z SUBJECT TO 2) 17 X + 13 Y + 11 Z <= END GIN 3 93 The GIN <NumberOfVars> form of the command is most useful when you want to turn all the variables in the model to general integers. If you don’t remember the total number of variables in the model, then give the STATS command. If you want to make a subset of variables general integer using GIN <NumberOfVars>, then those variables must appear first in LINDO’s internal ordering of variables. A variable’s internal order is determined by the order in which it initially appears in the formulation. If you aren’t sure what the internal order of the variables is, enter “CPRI N” to see the variables listed in internal order. The GIN <Variable> form of the command is most useful when you want to designate a small subset of the variables to be general integer. This is particularly true when the variables are scattered throughout the formulation and, therefore, not all first in the formulation. For efficiency reasons, LINDO permutes all integer variables to the front of the internal ordering of variables. Thus, in solution reports, the values of the integer variables will appear before the values of the continuous variables. The GIN specification is saved when the model is saved with SAVE, SMPS, and the DIVERT/LOOK ALL sequence. If you wish to convert an integer program to a linear program with all continuous variables, just enter GIN 0. This specifies that there are no integer variables. When you specify integer variables with either INTEGER or the GIN command, LINDO solves the problem using the branch-and-bound technique, which is an algorithm to narrow the search for the best answer that satisfies the requirement for integrality. The branch-and-bound technique, however, does slow the solution process considerably. In the example above, the continuous model solved in only one iteration, while the integer version took 72 iterations. This should illustrate that, if time is of the essence in solving a large problem, try to formulate it without using integer variables and round the fractional variables whenever possible. Of course, rounding may not always be viable. In the continuous example above, we would have had to round Z down to 8 (Z rounded up to 9 would be infeasible), which yields an objective of 104. Solving as a true integer problem, we get a considerably different solution (X=Y=2, Z=3) with an objective of 107. QCP Syntax: QCP <FirstRealConstraint> The QCP command is used in conjunction with quadratic programs. The QCP command identifies the end of the first order condition constraints and the beginning of the real constraints. The QCP command is entered to the command level colon prompt after the model’s END statement. In conjunction with the QCP command, you must enter an integer specifying the index of the first real constraint that immediately follows the first order condition constraints. Acceptable argument values for the QCP command run from 2 to one more than the number of constraints. COMMAND-LINE COMMANDS 173 The QCP specification is saved with the model when you use the SAVE command or a DIVERT/LOOK ALL sequence. The QCP specification is NOT supported under the MPS file format, and will not be saved in model files created with the SMPS command. For additional information on the use of the QCP command, please turn to the Chapter 5, Quadratic Programming, on page 196. PARAMETRICS Syntax: PARAMETRICS <Row><NewRHS> The PARAMETRICS command does a parametric (sensitivity) analysis on the right-hand side of one constraint for linear and quadratic programs. It allows you to automatically trace out the effect of varying a right-hand side over a wide range. You specify a new right-hand side and LINDO then changes the current right-hand side, in steps, to the new right-hand side value, displaying the objective function value at each step. The form of the command is: PARAMETRICS <Row> <NewRHS> where <Row> is the number (or name) of the row you wish to analyze and <NewRHS> is the righthand side value you wish to extrapolate to. If you type nothing after PARAMETRICS, LINDO will prompt you for the row and the new right-hand side value. You must have a solution LINDO considers optimal in memory to use this command properly. If no optimal solution is in memory, LINDO attempts to carry out the command, but also warns you that the solution is not optimal. PARAMETRICS shows the entering and leaving variables for every pivot, the right-hand side value as it changes from the current value to <NewRHS>, the dual price, and the objective value of the new solution. The PARAMETRICS command does not apply to integer programs. It is only intended for linear and quadratic programs. Please refer to the RANGE command for related sensitivity analysis. You may wish to use the RANGE command to choose an interesting value for <NewRHS>. The PARAMETRICS command does not change the row you specify or the current model, in any way. However, the current solution is no longer considered optimal after PARAMETRICS is used because the LINDO solver must change the internal representation of the solution to do the analysis. If you wish to use PARAMETRICS twice, you must use GO to re-optimize the model between PARAMETRICS commands. In the following example, observe that the allowable decrease for the right-hand side of row 4 is 50 (as reported by the RANGE command). We use the PARAMETRICS command to see how the objective value would change if the right-hand side of row 4 were to change to -1, well beyond the allowable decrease. : max 20 astro + 30 cosmo ? subject to ? astro <= 60 ? cosmo <= 70 ? astro + 2 cosmo <= 210 ? end 174 CHAPTER 3 : terse : go LP OPTIMUM FOUND AT STEP 2 OBJ VALUE = 2700.00000 : solution OBJECTIVE FUNCTION VALUE 1) 2700.00000 VARIABLE VALUE REDUCED COST ASTRO 60.000000 0.000000 COSMO 50.000000 0.000000 ROW SLACK OR SURPLUS DUAL PRICES 2) 0.000000 20.000000 3) 0.000000 30.000000 4) 50.000000 0.000000 NO. ITERATIONS= 2 : ! Now use the RANGE command to get the allowable : ! decrease on row 4 : range RANGES IN WHICH THE BASIS IS UNCHANGED OBJ COEFFICIENT RANGES VARIABLE CURRENT ALLOWABLE ALLOWABLE COEF INCREASE DECREASE ASTRO 20.000000 INFINITY 20.000000 COSMO 30.000000 INFINITY 30.000000 RIGHTHAND SIDE RANGES CURRENT ALLOWABLE ALLOWABLE RHS INCREASE DECREASE 2 60.000000 50.000000 60.000000 3 50.000000 25.000000 50.000000 4 210.000000 INFINITY 50.000000 : ! Now illustrate the PARAMETRICS command on row 4: : para ROW: 4 NEW RHS VAL= -1 VAR VAR PIVOT RHS DUAL PRICE OBJ OUT IN ROW VAL BEFORE PIVOT VAL 210.000 0.000000 2700.00 SLK 4 SLK 3 4 160.000 0.000000 2700.00 COSMO SLK 2 3 60.0000 15.0000 1200.00 ASTRO ART 2 0.000000 20.0000 0.000000 -1.00000 +INFINITY INFEASIBLE ROW Ostensibly, the PARAMETRICS capability allows you to investigate the impact of changes to the RHS of at most one constraint at a time. Realize, however, that a simple device allows you to change several right-hand sides simultaneously in a linear fashion. Let the change column be called D. It may have coefficients in any or all rows. Add a constraint D = 0, and then do parametric analysis on the RHS of this constraint. COMMAND-LINE COMMANDS 175 POSD The POSD command is used with quadratic programs to check whether you have a guarantee of global optimality. POSD examines the submatrix of constraints corresponding to the quadratic form to determine whether this submatrix is POSitive Definite. If the matrix is positive definite, then the objective function of the quadratic program is convex and the solution found is guaranteed to be a global optimal solution. By specifying which rows are the first order conditions of the quadratic program with the QCP command, you also specify the submatrix corresponding to the quadratic form. If you specify QCP k where k is an integer, then the POSD command tests the matrix defined by rows 2 through k-1, excluding the dual variables required by the first order conditions to the quadratic program. The POSD command also checks to see that the submatrix is symmetric and computes the rank of the submatrix. For more details on the use of the POSD command, please turn to page 201. TITAN The TITAN command adds valid constraints to a binary or general integer program to allow for faster solving. These additional constraints, commonly called “cuts,” do not violate the integer feasible region of the model. They do, however, intentionally violate the linear feasible region of the model with smaller or new upper bounds and smaller constraint coefficients. The idea is that we should be able to get tighter objective bounds and/or less fractional solutions during the branch-and-bound procedure used by the LINDO solver on integer programs. The result being faster solution times. The TITAN command directly modifies the model currently in memory. The new constraints, in the form of added bounds on the variables, are displayed after TITAN is entered. 176 CHAPTER 3 The following graph pertains to the example below and illustrates how these “cuts” can reduce time spent searching for a solution. 4 3 2 1 0 0 1 IP Feasible Region 2 3 4 Linear Feasible Region The bounds created by the TITAN command remove from the search the areas outside the IP Feasible region. A reference for the theory behind TITAN is A.L. Brearley, G. Mitra, and H.P. William’s “Analysis of Mathematical Programming Problems Prior to Applying the Simplex Algorithm,” Mathematical Programming, 1975, Vol. 8, pp. 54-83. In the following sample session, a general integer program is displayed and solved before using TITAN. Two branches and five pivots were required. The same model is displayed and solved after using TITAN. Note, after using the TITAN command, no branches and only two pivots were required. : look all MAX SUBJECT 2) X 3) Y 4) X END GIN X + Y TO <= 2.5 <= 2.1 + Y <= 4.3 2 COMMAND-LINE COMMANDS : go LP OPTIMUM FOUND AT STEP 2 OBJECTIVE VALUE = 4.30000000 NEW INTEGER SOLUTION OF 4.00000000 AT BRANCH BOUND ON OPTIMUM: 4.000000 ENUMERATION COMPLETE. BRANCHES= 2 PIVOTS= LAST INTEGER SOLUTION IS THE BEST FOUND RE-INSTALLING BEST SOLUTION... : titan REDUCTIONS: BNDS: 8 IN 3 PASSES. COEFFICIENTS: 0 : look all MAX X + Y SUBJECT TO 2) X <= 2.5 3) Y <= 2.1 4) X + Y <= 4.3 END SUB X 2.00000 GIN X SUB Y 2.00000 GIN Y : go LP OPTIMUM FOUND AT STEP 2 OBJECTIVE VALUE = 4.00000000 ENUMERATION COMPLETE. BRANCHES= 0 PIVOTS= LAST INTEGER SOLUTION IS THE BEST FOUND RE-INSTALLING BEST SOLUTION... BIP 2 PIVOT 177 5 5 2 Syntax: BIP <ObjectiveValue> The BIP command is used to specify a bound on the worst objective value of an integer program. This bound is usually based on a known feasible solution. The bound is used in the branch-and-bound algorithm to narrow the search for the optimum. When LINDO is searching for an initial integer solution, it can ignore branches with objective values worse than your BIP value. Depending on the problem, a good BIP value can greatly speed solution times. If you enter BIP without <ObjectiveValue>, LINDO will prompt you for the number. For a maximization problem, the default value for BIP is negative infinity. For a minimization problem, it is positive infinity. If BIP is set too large for a maximization problem or too small for a minimization problem, LINDO will report that no integer solution could be found. The BIP specification is not saved with any files created by LINDO. The BIP command should usually reduce the amount of time required to solve the model. However, this is not guaranteed, as seen in the example below. 178 CHAPTER 3 In the following example, an integer program with optimal value 15 is first solved with the default setting of BIP. LINDO finds four integer solutions requiring 30 branches and 88 pivots. When BIP is set to 10, the optimal solution is found in 43 branches and 110 pivots. When BIP is set to 14.5, the optimal solution is found in only 13 branches and 41 pivots. Thus, a bad bound may not be helpful while a good bound can be very helpful. : retr trybip.lnd : look all MAX 9 X1 - X2 - 4 X3 - 2 X4 + 8 X5 - 2 X6 SUBJECT TO 2) 2 X1 + X2 - 2 X3 - X4 + 2 X5 - X6 - 2 X7 3) X1 - 3 X2 + 2 X3 + 3 X4 - X5 + 2 X6 + X7 + 4) - X1 + X3 + X5 = - 9 5) X1 - X2 + X4 = 3 6) X2 - X3 + X6 - X7 = 12 7) - X4 - X6 + X8 = 9 8) - X5 + X7 - X8 = - 15 END GIN 8 : ters : go LP OPTIMUM FOUND AT STEP 5 OBJECTIVE VALUE = 19.3000000 NEW INTEGER SOLUTION OF -1.00000000 AT BRANCH BOUND ON OPTIMUM: 16.82500 NEW INTEGER SOLUTION OF 3.00000000 AT BRANCH BOUND ON OPTIMUM: 16.82500 NEW INTEGER SOLUTION OF 9.00000000 AT BRANCH BOUND ON OPTIMUM: 16.30000 NEW INTEGER SOLUTION OF 15.0000000 AT BRANCH BOUND ON OPTIMUM: 16.30000 ENUMERATION COMPLETE. BRANCHES= 30 PIVOTS= LAST INTEGER SOLUTION IS THE BEST FOUND RE-INSTALLING BEST SOLUTION... : retr trybip.lnd : bip 10 : go LP OPTIMUM FOUND AT STEP 5 OBJECTIVE VALUE = 19.3000000 NEW INTEGER SOLUTION OF 14.0000000 AT BRANCH BOUND ON OPTIMUM: 18.00000 NEW INTEGER SOLUTION OF 15.0000000 AT BRANCH BOUND ON OPTIMUM: 17.07500 ENUMERATION COMPLETE. BRANCHES= 43 PIVOTS= LAST INTEGER SOLUTION IS THE BEST FOUND RE-INSTALLING BEST SOLUTION... 8 X7 - 12 X8 3 X8 <= 13.1 X8 <= -6.1 14 PIVOT 43 20 PIVOT 59 25 PIVOT 69 29 PIVOT 81 88 35 PIVOT 85 41 PIVOT 103 110 COMMAND-LINE COMMANDS 179 : retr trybip.lnd : bip 14.5 : go LP OPTIMUM FOUND AT STEP 5 OBJECTIVE VALUE = 19.3000000 NEW INTEGER SOLUTION OF 15.0000000 AT BRANCH 10 PIVOT 31 BOUND ON OPTIMUM: 17.07500 ENUMERATION COMPLETE. BRANCHES= 13 PIVOTS= 41 LAST INTEGER SOLUTION IS THE BEST FOUND RE-INSTALLING BEST SOLUTION... IPTOL Syntax: IPTOL <Fraction> The IPTOL command specifies a fraction f, which indicates to the branch-and-bound solver that it should only search for solutions with objective values 100*f% better than the best one considered so far. The end results of using an IPTOL are twofold. First, on the positive side, solution times will tend to be considerably faster. On the negative side, however, the use of IPTOL can mean LINDO may not find the optimal solution, and you will not receive any warning to this effect in the solution output. You will know, however, that the solution found is within 100*f% of the true optimal. On large integer models, the potential of getting a solution within say 2% of optimal in a few minutes versus getting the true optimal in a few days makes the use of an IPTOL value quite attractive. In the following example, we solve a small IP without the benefit of an IPTOL value and we see that it solves to optimality in a little over 10,000 iterations. Then, re-solving the model using an IPTOL value of 1% finds the solution in only 74 iterations. The true objective value of 8,929,390 is a mere 0.002% better than the objective of 8,929,170 found using an IPTOL value. : retrieve testipt !read in our test model : stats !print the model’s statistics ROWS= 21 VARS= 34 INTEGER VARS= 34(0 = 0/1) QCP= 0 NONZEROS= 102 CONSTRAINT NONZ= 64(52 = +-1) DENSITY=0.139 SMALLEST AND LARGEST ELEMENTS IN ABSOLUTE VALUE= 1. 80000. OBJ=MAX, NO. <,=,>: 6 14 0, GUBS <= 9 VUBS >= 8 SINGLE COLS= 0 REDUNDANT COLS= 2 : terse !suppress some output : go 100000 !solve the model (give it lots of iterations) LP OPTIMUM FOUND AT STEP 18 OBJECTIVE VALUE = 8942181.00 NEW INTEGER SOLUTION OF 8929170 AT BRANCH 7 PIVOT 74 BOUND ON OPTIMUM: 8936519. NEW INTEGER SOLUTION OF 8929230 AT BRANCH 98 PIVOT 630 BOUND ON OPTIMUM: 8936519. NEW INTEGER SOLUTION OF 8929390 AT BRANCH 766 PIVOT 4484 BOUND ON OPTIMUM: 8936519. ENUMERATION COMPLETE. BRANCHES= 1715 PIVOTS= 10064 LAST INTEGER SOLUTION IS THE BEST FOUND REINSTALLING BEST SOLUTION ... 180 CHAPTER 3 : !We will now re-solve but use an IPTOL this time : retr testipt : iptol .01 : terse : go LP OPTIMUM FOUND AT STEP 18 OBJECTIVE VALUE = 8942181.00 NEW INTEGER SOLUTION OF 8929170 AT BRANCH 7 PIVOT 74 BOUND ON OPTIMUM: 8936519. ENUMERATION COMPLETE. BRANCHES= 7 PIVOTS= 74 LAST INTEGER SOLUTION IS THE BEST FOUND REINSTALLING BEST SOLUTION ... 8. Conversational Parameters TERSE/VERBOSE TERSE turns off automatic display of the solution after solving the model with the GO command. VERBOSE reverses a TERSE and turns on automatic display of the solution after a GO. The default setting for LINDO is VERBOSE. For a linear program, the output from GO when TERSE has been given is just two lines showing the number of steps and the objective function value. For an integer program, the output from GO when a TERSE command has been given is first the number of steps and the objective value for the linear relaxation of the integer program. Then, the value of each integer solution is given, as it is found, with the branch and pivot numbers and the bound on the optimum. Finally, LINDO reports when it has found the best solution and is preparing it for output. In the following example, we use the TERSE command before the GO command. Notice how the standard solution report is suppressed. In its place, we receive a brief message indicating the optimal solution was found, the step at which it was found, and the optimal objective value. : retr model.lpk : terse : go LP OPTIMUM FOUND AT STEP 18 OBJECTIVE VALUE = 8942181.00 : WIDTH Syntax: WIDTH <NumberOfChars> WIDTH tells LINDO the number of characters per line your screen or printer supports. LINDO will wrap output lines in order not to overflow the WIDTH limit. For a wide screen or printer, you may wish to set WIDTH to a large value. For a narrow screen or printer, you may wish to set it to a small value. You may use any integer between 40 and 132. If you enter nothing after WIDTH, LINDO will prompt you for the value. The default value for WIDTH is dependent on the platform you are running on, but, in general, will lie somewhere between 68 and 80. COMMAND-LINE COMMANDS 181 WIDTH also affects input. When reading input, LINDO will ignore any input that lies outside the terminal width. For example, if you have WIDTH 40, but you enter more than 40 characters on one line, LINDO will ignore anything following the 40th column. The WIDTH parameter is not saved when the model is saved with SAVE, SMPS, or the DIVERT/LOOK ALL sequence. You can use different values of WIDTH during one LINDO session. Thus, if your screen is 68 columns wide, you probably will wish to use the default setting. If your printer or workstation screen is 132 columns wide, you may wish to enter the command WIDTH 132. If you want a terminal width different from the default each time you run LINDO, you may want to place a WIDTH command in your AUTOLD.DAT, so it is executed each time LINDO starts up. For more information, see the TAKE Command in the File Input section. ! Comment An exclamation point may be added almost anywhere in a LINDO input line. The remainder of any line, following the exclamation point, is ignored by LINDO. The carriage return ends the comment. These are stripped out by LINDO as soon as the model is entered into memory. For example, if you type the following at the colon prompt for a new model: :MAX X+Y !The Objective Function ?_ As soon as you hit the carriage return, the comment is lost. As you can see, entering comments in interactive mode is of little or no help. However, when an external editor is used to develop a LINDO TAKE file, these comments can help make your model easier to read during development while having no effect on the final solution. BATCH The BATCH command in LINDO causes the following two things to happen: 1. 2. all input is echoed to the screen and if LINDO’s input contains more than 5 consecutive errors, LINDO will automatically exit to the operating system. The BATCH command is a “toggle”. Typing a second BATCH command undoes the first. The BATCH command is useful when submitting command scripts to LINDO to run in batch (i.e., non-interactive) mode. In this case, without the BATCH command, all input to the program would not be visible and, should there be errors in the file, LINDO would not stop until it reached the end of the command script. The BATCH command is also useful in an interactive environment. When you execute a TAKE command on a LINDO script file, you may find it useful to have the input of the script file echoed to your screen as LINDO reads it. This is particularly useful when you are attempting to debug a LINDO script file. To do this, simply make both the first and last commands in the script BATCH. The first BATCH command enables echoing, while the last command disables it. 182 CHAPTER 3 PAUSE Syntax: PAUSE <Message> The PAUSE command suspends LINDO until you press the enter key. When you press the enter key, LINDO continues processing command input. This is useful when you need to view intermediate output from a BATCH file without having it scroll off the screen. A message following the PAUSE command is optional. If a message is present, it must be on the same line as PAUSE. LINDO will echo the message on the screen before pausing and waiting for you to press enter. As an example of PAUSE, suppose you have the following LINDO command script contained in the file MYSCRIPT.TXT: MAX 20 X + 30 Y ST X < 50 Y < 60 X + 2Y < 120 END TERSE GO PAUSE The objective should be 2050. Press <Enter> to resume. LEAVE When you run this command script, you should see the following on your screen: : take myscript.txt LP OPTIMUM FOUND AT STEP 2 OBJECTIVE VALUE = 2050.00000 THE OBJECTIVE SHOULD BE 2050. PRESS <ENTER> TO RESUME. : PAGE The PAGE command sets the length of the page or screen size in lines. For instance, PAGE 25 will cause the display to pause after 25 lines and await a carriage return before displaying the next 25 lines. When 0 is entered as the argument to PAGE, paging is turned off entirely. LINDO will no longer stop output to wait for a carriage return. PAGE 0 is very useful at the start of any LINDO batch command file. 9. User Supplied Subroutines USER The USER Command calls the subroutine with the name USER. A dummy version is supplied with LINDO that does nothing except print a brief message. However, the user may replace the dummy USER subroutine with one of his own making. This subroutine may call any number of internal LINDO routines for building models, solving them, and requesting solution output. For more information on this programming interface to the LINDO libraries, please refer to the Chapter 8, LINDO Callable Libraries. COMMAND-LINE COMMANDS 183 10. Miscellaneous INVERT INVERT re-solves the set of simultaneous linear equations implied by the current set of basic variables. The inverse is represented by a product of elementary matrices (i.e., identity matrix except for one column). Inversion tries to permute the rows and columns of the basis, so the matrix is as close to triangular as possible. The rows that cannot be triangularized constitute the “bump”. The columns in the bump, which protrude above the diagonal, are called “spikes”. INVERT prints a short summary describing the basis, the new inverse, and the bump and spike structure. You can use the BPICTURE command after INVERT to observe the structure of the basis. The model below was partially solved, then the INVERT command was given. : look all MAX 9 X1 - X2 - 4 X3 - 2 X4 + 8 X5 - 2 X6 - 8 X7 - 12 X8 SUBJECT TO 2) 2 X1 + X2 - 2 X3 - X4 + 2 X5 - X6 - 2 X7 - 3 X8 <= 12 3) X1 - 3 X2 + 2 X3 + 3 X4 - X5 + 2 X6 + X7 + X8 <= - 6 4) - X1 + X3 + X5 = - 9 5) X1 - X2 + X4 = 3 6) X2 - X3 + X6 - X7 = 12 7) - X4 - X6 + X8 = 9 8) - X5 + X7 - X8 = - 15 END : invert INVERT AT STEP 3 CAUSE= 1 STATUS= 0 Z= 6.0000 CYCLING= 0 OLD INV NONZEROES: IN L = 7 IN U = 23 BASIS: COLS= 6 ELEMENTS= 30 + SLACKS= O ARTS = 1 NEW INV: IN L= 10 IN U= 22 BUMPSIZE= 5 SPIKES= 4 SINGLE COLS= 2 TRIANGULAR: COLS= 2 DETERM= -4.00E 0 BUG The BUG command displays the address and telephone number of the technical support department at LINDO Systems, with the request that suggestions or errors in LINDO be reported. DEBUG The DEBUG command is useful in debugging both infeasible and unbounded models. When DEBUG encounters a model with no feasible solution, it first tries to identify one or more “crucial” constraints. A constraint is crucial if dropping just that constraint from the entire model is sufficient to make the model feasible. These constraints are identified by DEBUG as the SUFFICIENT SET (ROWS). Not every infeasible model has a crucial constraint. Regardless of whether any crucial constraints were found, the DEBUG command also identifies a set of constraints, as well as column bounds, that constitute a NECESSARY SET (ROWS). Such a set has the feature that it is infeasible. However, if any member of this set is deleted, then the set becomes feasible. Thus, it is necessary to make at least one correction in the NECESSARY SET (ROWS) if the model is to be feasible. 184 CHAPTER 3 When DEBUG encounters an unbounded model, it first tries to identify one or more "crucial" variables. These variables are identified by DEBUG as SUFFICIENT SET (COLS). A variable is crucial if fixing it is sufficient to make the model bounded. Regardless of whether any crucial variables were found, DEBUG also identifies a set of variables that constitutes a NECESSARY SET (COLS). Such a set has the feature that it is unbounded, but if any variable in this set is fixed, the set becomes bounded. Hence, constraints (ROWS) are infeasible and variables (COLS) are unbounded. Typically, DEBUG helps substantially reduce the search effort. The first version of DEBUG was implemented in response to a user who had an infeasible model. The user had spent a day searching for a bug in a model with 400 rows. DEBUG quickly found a NECESSARY SET with 55 constraints as well as one SUFFICIENT SET constraint. The user quickly noticed that the RHS of the SUFFICIENT SET constraint was incorrect. Debugging Infeasible Models Suppose an LP model contains a single typographical mistake that makes the model infeasible. The constraint containing the mistake will have a nonzero dual price in the solution report. Unfortunately, there may be a large number of other constraints that also have a dual price not equal to zero. The nonzero dual price on a constraint means that relaxing the constraint may reduce the sum of the infeasibilities. The following model illustrates. The coefficient .55 in row 4 should have been 5.5. MAX 3 X + 7 Y SUBJECT TO 2) X + 2 Y <= 3 3) 2 X + Y <= 2 4) 0.55 X + Y >= 4 END When we attempt to solve this formulation, we get the following: NO FEASIBLE SOLUTION AT STEP 1 SUM OF INFEASIBILITIES= 2.483333 VIOLATED ROWS HAVE NEGATIVE SLACK, OR (EQUALITY ROWS) NONZERO SLACKS. ROWS CONTRIBUTING TO INFEASIBILITY HAVE NONZERO DUAL PRICE. OBJECTIVE FUNCTION VALUE 1) 10.33333 VARIABLE VALUE REDUCED COST X 0.333333 0.000000 Y 1.333333 0.000000 ROW SLACK OR SURPLUS DUAL PRICES 2) 0.000000 0.483333 3) 0.000000 0.033333 4) -2.483333 -1.000000 All the constraints have nonzero dual prices, so we do not have much of a clue in tracking down the culprit. COMMAND-LINE COMMANDS 185 The DEBUG command will identify a minimal set of constraints, so, if any one constraint in the set is dropped, the formulation becomes feasible. Let us illustrate use of the DEBUG command on the above model: : debug SUFFICIENT SET (ROWS) TO CORRECT: 4) 0.55 X + Y >= 4 NECESSARY SET (ROWS) TO CORRECT: 3) 2 X + Y <= 2 Notice that row 2, which happens to be correct, does not appear in the list of possibly faulty rows, while the faulty one, row 4, does appear. So, DEBUG helps reduce the number of rows over which you need search for a bug. If the complete model would be feasible except for a bug in a single row, that row will be listed in the SUFFICIENT SET of rows. The NECESSARY SET of rows is a set such that, as long as all of them are present, the model remains infeasible. In the above example, as long as rows (3) and (4) are present, the model remains infeasible. In general, the kind of correction required in a constraint is one or more of the following: change the RHS, change the direction, change the coefficient of a variable in the constraint, or change the upper or lower bound of a variable in the constraint. Debugging Unbounded Models DEBUG operates in a similar manner for unbounded models. Consider the following example: MAX 12 X1 + 13 X2 + 22 Y1 + 25 Y2 + 23 Z1 + 28 Z2 + X3 + Y3 + Z3 SUBJECT TO 2) X1 + X2 + X3 <= 400 3) Y1 + Y2 + Y3 - Z3 <= 500 4) Z1 + Z2 <= 500 END : go UNBOUNDED SOLUTION AT STEP 1 REDUCED COST= -26.0000 UNBOUNDED VARIABLES ARE: Z3 Y2 OBJECTIVE FUNCTION VALUE 1) 0.9999990E+08 VARIABLE VALUE REDUCED COST X1 .000000 312.000000 X2 400.000000 .000000 Y1 .000000 571.000000 Y2 99999903.000000 .000000 Z1 .000000 598.000000 Z2 500.000000 .000000 X3 .000000 26.000000 Y3 .000000 25.000000 Z3 99999903.000000 27.000000 186 CHAPTER 3 ROW SLACK OR SURPLUS DUAL PRICES 2) .000000 13.000000 3) .000000 25.000000 4) .000000 28.000000 NO. ITERATIONS= 1 : debug SUFFICIENT SET (COLS) TO CORRECT: Z3 NECESSARY SET (COLS) TO CORRECT: Y2 Here, the NECESSARY SET contains the variables Y2 and Z3, and the crucial (SUFFICIENT SET) variable is Z3. Although at first glance all variables seem to be constrained, a look at row 3 reveals that Z3 can be increased indefinitely. As long as the sum of the Y variables minus Z3 is less than 500, the constraint will be satisfied. Removing Z3 from the model, or constraining it separately, will cause the problem to become bounded. In general, the kind of correction required in a column is one or more of the following: change the objective coefficient, change a coefficient in some constraint, change the direction of some constraint in which the variable appears, or make either the upper or lower bound finite. STATS The STATS command gives various statistics about the model. The first line of the report consists of: number of rows, number of variables, number of integer variables (with the number that are 0/1, or binary, in parentheses), and the index of the first real constraint in a quadratic program (0 indicates this is not a quadratic program). The second line consists of: number of nonzero coefficients in the whole model, number of nonzero coefficients in the constraints (with the number that are +1 or -1 in parentheses), and model density, defined as: (number of nonzeros) / [(number of rows) * (number of columns + 1)]. The third line consists of: absolute values of the smallest and largest nonzeros, respectively. COMMAND-LINE COMMANDS 187 The fourth line consists of: sense of the objective function (MIN or MAX), number of less-than-or-equal-to, equality, and greater-than-or-equal-to constraints, upper bound estimate of the number of generalized upper bound (GUBS) constraints (constraints that have no variable in common), and lower bound estimate of the number of variable upper bounds (VUBS). For example, the constraint X1 + X2 - X3 = 0 contains the implications: X3 = 0 implies X1 = 0 X3 = 0 implies X2 = 0 The last line consists of: the number of columns with only one nonzero coefficient, and the number of redundant columns (i.e., columns identical to some other column except possibly for the bounds). The STATS command can be used for checking for certain types of errors in your model. For example, if there is a misspelled variable name, you may find “SINGLE COLS” when you don’t expect any. If you misplace a decimal point in the model, you may find a variable with an unexpectedly large or small absolute value. The STATS command for the following model is illustrated below: : look all MAX 9 X1 - X2 - 4 X3 - 2 X4 + 8 X5 - 2 X6 - 8 X7 - 12 X8 SUBJECT TO 2) 2 X1 + X2 - 2 X3 - X4 + 2 X5 - X6 - 2 X7 - 3 X8 <= 12 3) X1 - 3 X2 + 2 X3 + 3 X4 - X5 + 2 X6 + X7 + X8 <= - 6 4) - X1 + X3 + X5 = - 9 5) X1 - X2 + X4 = 3 6) X2 - X3 + X6 - X7 = 12 7) - X4 - X6 + X8 = 9 8) - X5 + X7 - X8 = - 15 END GIN 8 : stats ROWS = 8 VARS = 8 INTEGER VARS = 8(0 = 0/1) QCP = 0 NONZEROES = 47 CONSTRAINT NONZ = 32(23 = +-1) DENSITY = .653 SMALLEST AND LARGEST ELEMENTS IN ABSOLUTE VALUE= 1.00000 15.0000 OBJ=MAX, NO. <,=,>: 2 5 0, GUBS <= 2 VUBS >= 0 SINGLE COLS = 0 REDUNDANT COLS = 0 188 CHAPTER 3 SET Syntax: SET<ParameterID><NewValue> The SET command can be used to set internal parameters used by LINDO. These parameters are: Param ID 1 2 3 4 5 6 7 8 Description final constraint tolerance initial constraint tolerance entering variable reduced cost tolerance fixing threshold for integer variables pivot size threshold whether LINDO should do integer program preprocessing: 0 means no, 1 means yes not in use whether to display the pop-up solution window automatically: 0 means no, 1 means yes The form of the command is: SET <ParameterID> <NewValue> where <ParameterID> is one of the Parameter IDs listed in the table above and <NewValue> is the new value you wish to change the parameter to. For a more detailed discussion about each of these parameters, please see page 45. The SET command does not affect the current model or the current solution. Values for SET are not saved with any model or solution file. TITLE Syntax: TITLE <TitleString> The TITLE command associates a text string with the model. The string is displayed at the beginning of the model, preceded by the word TITLE. The title-string can be no more than 73 characters long. If you enter a longer string, it will be truncated. If you enter nothing after TITLE, LINDO will display the current TITLE. The default value is blank. There does not need to be a blank between the command TITLE and the title-string. However, you may wish to insert a blank between TITLE and title-string to make the TITLE more readable. There must be exactly one newline (enter) character in the command, which ends the title. The TITLE will be saved when the model is saved with SAVE, SMPS, or the DIVERT/LOOK ALL sequence. COMMAND-LINE COMMANDS 189 The following example illustrates how to input a title, and how the title is displayed when you run the LOOK command. : title this is the title of this model : look all TITLE THIS IS THE TITLE OF THIS MODEL. MAX 9 X1 - X2 - 4 X3 - 2 X4 + 8 X5 - 2 X6 - 8 X7 - 12 X8 SUBJECT TO 2) 2 X1 + X2 - 2 X3 - X4 + 2 X5 - X6 - 2 X7 - 3 X8 <= 12 3) X1 - 3 X2 + 2 X3 + 3 X4 - X5 + 2 X6 + X7 + X8 <= - 6 4) - X1 + X3 + X5 = - 9 5) X1 - X2 + X4 = 3 6) X2 - X3 + X6 - X7 = 12 7) - X4 - X6 + X8 = 9 8) - X5 + X7 - X8 = - 15 END 11. Quit QUIT The QUIT command exits the LINDO environment and returns you to the operating system. QUIT has no parameters. Note: You will lose any changes you made to the current model if you don’t save it before quitting (see the SAVE command). 190 CHAPTER 3 191 4 Integer Programming Two kinds of integer variables are recognized by LINDO: zero/one variables (binary) and general integer variables. Zero/one variables are restricted to the values 0 or 1. They are useful for representing go/no-go type decisions. General integer variables are restricted to the non-negative integer values (0, 1, 2, ...). GIN and INTEGER statements are used, respectively, to identify general and binary integer variables. The statements should appear after the END statement in your model. Variables that are restricted to the values 0 or 1 are identified using the INTEGER statement. It is used in one of two forms: INTEGER <VariableName> or INTEGER <N> The first (and recommended) form identifies variable <VariableName> as being 0/1. The second form identifies the first N variables in the current formulation as being 0/1. The order of the variables is determined by their order encountered in the model. This order can be verified by observing the order of variables in the solution report. The second form of this command is more powerful because it allows the user to identify several integer variables with one line, but it requires the user to be aware of the exact order of the variables. This may be confusing if not all variables appear in the objective. If there are several variables, but they are scattered throughout the internal representation of the model, the variables would have to be identified as integers on separate lines. General integer variables are identified with the GIN statement. The GIN command is used exactly as the INT command. For example, GIN 4 makes the first 4 variables general integer. GIN TONIC makes the variable TONIC a general integer variable. The solution method used on an integer program (IP) is the branch-and-bound search process. It will typically find a sequence of better and better solutions. If LINDO is in the default (verbose) output mode, then a log of the search process will be displayed. If you have placed LINDO into terse output mode from either the Options command in Windows versions or the TERSE command in command-line versions, then only a short message is printed as each better solution is found in the branch-and-bound search. Once the branch-and-bound enumeration process is completed, the best solution found is reinstalled. Thus, report generating commands can be used to examine the best solution. Note, however, that the reduced costs and dual prices resulting from an integer model are essentially meaningless to the casual user and, therefore, should be disregarded. General integer variables are represented directly. LINDO does not use the so-called binary expansion representation of a general integer variable as a sum of 0/1 variables. For most practical problems, the binary expansion method increases solution times prohibitively. 192 CHAPTER 4 The following is a small example of a valid IP model. MIN X + 3 Y + 2 Z ST2 2.5 X + 3.1 Z > 2 .2 X + .7 Y + .4 Z > .5 END INTEGER X INTEGER Y INTEGER Z Notice the INTEGER statements appear after the END statement. These three INTEGER statements declare our three variables as being zero/one. If we solve this model, LINDO displays the following report: LP OPTIMUM FOUND AT STEP 3 OBJECTIVE VALUE = 2.25714278 SET Y TO >= 1 AT 1, BND= -4.000 TWIN= -3.000 12 NEW INTEGER SOLUTION OF 4.00000000 AT BRANCH 1 PIVOT 12 BOUND ON OPTIMUM: 3.000000 FLIP Y TO <= 0 AT 1 WITH BND= -3.0000000 NEW INTEGER SOLUTION OF 3.00000000 AT BRANCH 1 PIVOT 12 BOUND ON OPTIMUM: 3.000000 DELETE Y AT LEVEL 1 ENUMERATION COMPLETE. BRANCHES= 1 PIVOTS= 12 LAST INTEGER SOLUTION IS THE BEST FOUND REINSTALLING BEST SOLUTION ... OBJECTIVE FUNCTION VALUE 1) 3.000000 VARIABLE VALUE REDUCED COST X 1.000000 1.000000 Y 0.000000 3.000000 Z 1.000000 2.000000 ROW SLACK OR SURPLUS DUAL PRICES 2) 3.600000 0.000000 3) 0.100000 0.000000 NO. ITERATIONS= 12 BRANCHES= 1 DETERM.= 1.000E 0 Branch-and-Bound Solution Method The solution method used by LINDO is based around the enumerative method known as branch-and-bound. Some understanding of this mechanism may help you produce formulations that are easier to solve. The basic idea is to solve the problem as a linear program and pray the solution is integer. If the prayer algorithm does not work (i.e., some variable that should be integer is fractional), then some fractional variable, say X, is selected as a branch variable. Suppose, X was declared as a general integer. However, in the solution of the problem as an LP, variable X was equal to 3.7. Two new subproblems are created by alternately appending one of the two constraints: X 3 or X 4. This branching is continued as long as there are fractional variables and various feasibility tests are satisfied. INTEGER PROGRAMMING 193 If LINDO first pursues the branch X 3 and it is in verbose output mode, then it will print a message resembling the following: SET X <= 3 AT 1 WITH BND= 3.20000 TWIN = 2.8000. The 3.2 means there are no solutions better than 3.2 down the branch with X 3. There are no solutions better than 2.8 down the branch with X 4. When LINDO later returns to examine the branch X 4, it prints the message: FLIP X TO >= 4 AT LEVEL 1 After having fully examined all offspring of both branches, it prints the message: DELETE X AT LEVEL 1. The selection of the variable upon which to branch is biased towards variables which: 1. 2. 3. have a fractional part close to .5, appear early in the problem, cause a large change in the objective value if their values are changed. Superimposed upon this variable based branching, LINDO may use a set based branching. In a hypothetical IP, suppose variables X3, X7, and X8 have value zero when solved as an LP. If the reduced costs of these variables are large (suggesting variables should remain at zero), LINDO may create two new subproblems by alternately adding the Martin (due to Kipp Martin) cuts: X3 + X7 + X8 = 0 or X3 + X7 + X8 1. When the first cut is added, a message of the flavor: FIXING ALL VARIABLES WITH RC > 9.2 is printed. While, when the second replaces the first, a message like RELEASING FIXED VARIABLES is printed. The subproblem with the first constraint is investigated first because we suspect we will quickly find a good "rounded" solution. This set based branching strategy is particularly appropriate for large knapsack problems where a simple variable based branching strategy would perform an embarrassingly large number of branches just to find the first integer solution. When set based branching is used, you will notice in solution reports that there are additional rows in the problem corresponding to the added cuts. These constraints will be deleted from the problem when the solution process is finished. Solving Difficult Integer Programs A usual feature of a good IP formulation is that, when it is solved as an LP, most of the integer variables will naturally be integer valued. You can sometimes predict this before-hand. If the coefficient matrix consists entirely of 0's, +1's and -1's, then the following are good indicators: each column has at most two nonzeros and they are of opposite sign; each row has at most two nonzeros and they are of opposite sign; or each column has more than two nonzeros, but they are in consecutive rows and of the same sign. For problems not satisfying the above, you may nevertheless be able to predict the integrality of the LP solution by considering special cases of the problem. For example, in a production scheduling IP, a useful case might be to suppose demands are the same for all products and demands & costs are constant from period to period. In this case, you may be able to deduce the optimal LP solution and assess it’s integrality without numerically solving it. 194 CHAPTER 4 Setting an Optimality Tolerance On difficult IP problems, it may be useful to curtail the search with the Integer Programming Optimality Tolerance (IPTOL). Use of IPTOL can frequently reduce the solution time dramatically. You can set the IPTOL value using either the Edit|Options command in Windows versions of LINDO or the IPTOL command in command-line versions. The IPTOL value can be set to any fractional value, say f, from 0 to 1. Once a feasible IP solution is found, a branch in the tree will be pursued only if it can improve on the current best solution by at least the fraction f. The end result is that the objective value of the final solution returned by LINDO will be within 100*f percent of the true optimal objective value. Suppose, for example, we have an IPTOL of .02, we are maximizing, and the branch-and-bound procedure has just found a solution with value 100. A branch of the search tree will not be pursued if it cannot lead to a solution better than 102. The end result is the solution returned by LINDO will be no farther than 2 percent away from the true optimal solution. Exploiting a Known Good Solution to an IP If you have a known good solution (but not necessarily optimal) to an IP, then you may be able to exploit this knowledge. In the early stages of the branch-and-bound search, branches that are clearly not optimal in light of this prior information need not be examined. The IP Objective Hurdle value allows you to exploit this prior knowledge. You can set this value using either the Edit|Options command in Windows versions or the BIP command in command-line versions of LINDO. As an example, suppose you know the optimal solution to a certain IP is greater than 1492. Further, the objective is MAX. You should set the IP Objective Hurdle to 1492. LINDO will not waste time examining solutions with objective values less-than-or-equal-to 1492. Benders Decomposition For certain integer programs with special structure, a two level iterative solution approach known as Benders Decomposition can be useful. LINDO has a special subroutine interface to facilitate the use of Benders Decomposition. This solution approach involves the repeated solution of a "master" integer program by LINDO and the solution of a very simple, problem specific, linear program "subproblem" by a user supplied subroutine. Each time LINDO obtains a new integer solution, it calls a subroutine NEWIP ( ACTUAL, BOUND). To use Benders Decomposition, the user should rewrite this subroutine, so it solves the subproblem. Generally this will result in a new feasible solution to the entire problem. In the subroutine NEWIP, the user should set the argument ACTUAL to the value of this solution to the entire problem. For further details on the NEWIP interface, see page 264. Tightening Loose IP Formulations Because IP problems tend to be difficult to solve, it is important they are "tight". Loosely speaking, this means, when the formulation is solved as an LP, the solution should look a lot like the IP solution (e.g., many of the IP variables are naturally integer and the LP objective value is approximately equal to the IP objective value). INTEGER PROGRAMMING 195 LINDO has a command, TITAN, which will do some of this tightening. It will do two things: a) deduce tighter upper and lower bounds for continuous variables and then, using this information, b) reduce the coefficients of integer variables where justified. The net effect of (b) is that, when the problem is solved as an LP, the nonzero IP variables will be closer to 1 than they would otherwise have been. For example, if you have the constraint: 7 X + 4 Y + 2 Z 5, where all variables have a lower bound of zero and X is declared to be an integer variable, then TITAN will transform this constraint to: 5 X + 4 Y + 2 Z 5. 196 CHAPTER 4 197 5 Quadratic Programming LINDO has a quadratic capability, which allows the user to consider models with a quadratic objective function. That is, objectives that contain the product of two variables. In matrix notation, a quadratic program may be written as: Minimize: x’Qx + cx Subject To Ax<=b. In words, a quadratic optimization problem is considered to be a quadratic when: 1. 2. all constraints are linear, and the objective contains at least one quadratic (second degree) term. As an example, Model 1 is a quadratic program, but Model 2 is not due to the cubic term in the objective and the quadratic terms in the first constraint. Model 1: MAX X 2 - X*Y + 3*X +10 * Y ST X + Y < 10 X < 7 Y < 6 END Model 2: MAX X 3 - X Y + 3 X +10 Y ST X 2 + Y 2< 10 X < 7 Y < 6 END To use LINDO to solve quadratic programs, you must convert models to an equivalent, linear form. This is accomplished by writing a LINDO model with the first order conditions (also called the Karush/Kuhn/Tucker/LaGrange conditions) as the first set of rows and the Ax<=b constraints, which we refer to as the “real” constraints, as the second set of rows. The first order conditions are the optimality conditions, which must be satisfied by a solution to a quadratic model. It turns out that the first order conditions to a quadratic model are all linear. LINDO exploits this fact to use it’s linear solver to solve what is effectively a nonlinear model. If you are uncertain as to exactly what first order conditions are and how they are used, you can refer to any introductory calculus text. 198 CHAPTER 5 The QCP statement identifies the end of the first order condition constraints and the beginning of the real constraints. In Windows versions of LINDO, the QCP statement appears as part of the model text after the END statement. In command-line versions of LINDO, the QCP statement is entered as a command to the command level colon prompt after the model’s END statement. In conjunction with the QCP command, you will need to enter an integer specifying the index of the first real constraint that immediately follows the first order condition constraints. Acceptable argument values for the QCP command run from 2 to one more than the number of constraints. By specifying that the first real row number is one more than the largest row number in the model, you indicate there are no real constraints in the problem. At this point, a small example may help in understanding the function of the QCP command. Suppose we have the following budget constrained investment portfolio optimization problem. There are three candidate assets (X, Y, and Z) for our portfolio. We want to determine what fraction should be devoted to each asset, so an expected return of at least 12% (equivalently, a growth factor of 1.12) is obtained while minimizing the variance in return and not exceeding a budget constraint. The expected returns for X, Y, and Z are 30%, 20%, and 8%, respectively. We also have the restriction that any given asset can constitute, at most, 75% of the portfolio. Finally, the covariance matrix for the assets is: X Y Z X 3 Y 1 2 Z -.5 -.4 1 Let the symbols X, Y, and Z represent the fraction of the portfolio devoted to each of the three assets. The variance of the entire portfolio will then be: 3 X2 + 2 Y2 + Z2 + 2 X Y - X Z - 0.8 Y Z Since variance is a measure of risk, we want to minimize it. The complete model is then: !Minimize portfolio risk (i.e., variance) Minimize: 3 X2 + 2 Y2 + Z2 + 2 X Y - X Z - 0.8 Y Z Subject To ! We start with $1 X + Y + Z = 1 ! We want to end with at least $1.12 1.3 X + 1.2 Y + 1.08 Z > 1.12 ! No asset may constitute more than 75% of the portfolio X < 0.75 Y < 0.75 Z < 0.75 The input procedure for LINDO requires this model be converted to true linear form by writing the first order conditions. To do this, we must introduce a dual variable, or LaGrange multiplier, for each constraint. For the above 5 constraints, we will use 5 dual variables denoted, respectively, as: UNITY, RETURN, XFRAC, YFRAC, and ZFRAC. QUADRATIC PROGRAMMING 199 The LaGrangean expression corresponding to this model is then: Min f(X,Y,Z) = 3 X2 + 2 Y2 + Z2 + 2 X Y - X Z - .8 Y Z + ( X + Y + Z - 1) UNITY + + (1.12 - (1.3 X + 1.2 Y + 1.08 Z)) RETURN + (X - .75) XFRAC + (Y - .75) YFRAC + (Z - .75) ZFRAC Basically, we have moved all the constraints into the objective, weighting them by their corresponding dual variables. The next step is to compute the first order conditions. The first order conditions are computed by taking the partial derivatives of f(X,Y,Z) with respect to each of the decision variables and setting them to be non-negative. For example, for the variable X, the first order condition is: 6 X + 2 Y - Z + UNITY - 1.3 RETURN + XFRAC 0 Qualitatively speaking, this constraint says that at the optimum the cost of increasing X must be non-negative. If it were negative, then decreasing X could reduce the objective. The input procedure is LP-based and requires a pseudo objective row, even though there is no explicit objective listed in the first order conditions. The pseudo objective row serves an important purpose, however, in that it is used to identify the order of variables, which in turn determines the correspondence between variables and rows. This is important because LINDO tries to find a feasible solution to the first order conditions, which satisfies the complementary slackness conditions. For the above example, the complementary slackness conditions require that, if X is strictly greater than zero, then the above constraint (6 X + 2 Y - Z + UNITY - 1.3 RETURN + XFRAC 0) must hold as an equality. Similarly, if Y is nonzero, then it’s first order condition (2 X + 4 Y - 0.8 Z + UNITY - 1.2 RETURN + YFRAC 0) must hold as an equality and so forth. Thus, LINDO must know this correspondence between variables and constraints to enforce these conditions. There is one final restriction on the input of quadratic models. Namely, the real constraints, which are: X + Y + Z = 1 1.3X + 1.2Y + 1.08Z 1.12 X .75 Y .75 Z .75 in our example, must appear last. 200 CHAPTER 5 Finally, the command QCP must be used to specify which constraint is the first of the real constraints. Since we have an objective and one first order condition for each of the three variables, the real constraints begin with row 5. Thus, we will need a “QCP 5” statement to complete our model which should resemble the following: MIN X + Y + Z + UNITY + RETURN + XFRAC + YFRAC + ZFRAC ST ! First order condition for X: 6 X + 2 Y - Z + UNITY - 1.3 RETURN + XFRAC > 0 ! First order condition for Y: 2 X + 4 Y - 0.8 Z + UNITY - 1.2 RETURN + YFRAC > 0 ! First order condition for Z: - X - 0.8 Y + 2 Z + UNITY - 1.08 RETURN + ZFRAC > 0 ! ------- Start of "real" constraints -------------! Budget constraint, multiplier is UNITY: X + Y + Z = 1 ! Growth constraint, multiplier is RETURN: 1.3 X + 1.2 Y + 1.08 Z > 1.12 ! Max fraction of X, multiplier is XFRAC: X < .75 ! Max fraction of Y, multiplier is YFRAC: Y < .75 ! Max fraction of Z, multiplier is ZFRAC: Z < .75 END QCP 5 After solving our model, we obtain the following solution: OBJECTIVE FUNCTION VALUE 1) 0.4173749 VARIABLE VALUE REDUCED COST X 0.154863 0.000000 Y 0.250236 0.000000 Z 0.594901 0.000000 UNITY -0.834750 0.000000 RETURN 0.000000 0.024098 XFRAC 0.000000 0.595137 YFRAC 0.000000 0.499764 ZFRAC 0.000000 0.155099 ROW SLACK OR SURPLUS DUAL PRICES 2) 0.000000 -0.154863 3) 0.000000 -0.250236 4) 0.000000 -0.594901 5) 0.000000 -0.834750 6) 0.024098 0.000000 7) 0.595137 0.000000 8) 0.499764 0.000000 9) 0.155099 0.000000 NO. ITERATIONS= 7 Thus, our portfolio variance is minimized at .417 by investing 15.5% in X, 25% in Y, and 59.5% in Z. QUADRATIC PROGRAMMING 201 Debugging a QP and the POSD Command You will in general be interested in whether the optimum found by the quadratic solver is a global optimum or simply a local optimum. If the submatrix corresponding to the quadratic part satisfies certain conditions, then the solution found will be a global optimum. One condition sufficient to guarantee global optimality is positive definiteness. In matrix notation, a quadratic program may be represented as: Min x’Qx + cx Subject To Ax <= b The term x’Qx is the quadratic form. The matrix Q is defined to be positive definite if and only if x’Qx > 0 for all nonzero x. If Q is positive definite, then the objective function is convex and the solution found is guaranteed to be the unique optimal. The list of all possible conditions for Q is: 1. 2. 3. 4. 5. positive definite if x’Qx > 0 for all nonzero x, positive semidefinite if x’Qx 0 for all nonzero x, negative semidefinite if x’Qx 0 for all nonzero x, negative definite if x’Qx < 0 for all nonzero x, indefinite if x’Qx > 0 for some x and x’Qx < 0 for some x. If your problem does not satisfy either condition 1 or condition 2, then the results from LINDO’s solver will be unpredictable and should not be relied upon. A physical interpretation of positive definiteness is that a matrix is positive definite if the quadratic expression corresponding to the matrix is strictly convex. A matrix is said to be positive semidefinite if the corresponding quadratic expression is convex, but not strictly convex (i.e., it has some linear sections). For many applications of quadratic programming, the quadratic part of the model can be expected to be positive definite. For example, in portfolio models, the quadratic part is really a covariance matrix and this matrix is naturally positive definite or, at worst, positive semidefinite. LINDO has a command for ascertaining the definiteness of the submatrix corresponding to the quadratic part of the objective. In Windows versions of LINDO, the command is Reports|Positive Definite. In command-line versions of LINDO, the command is POSD. This command first checks if the matrix is symmetric. If not symmetric, LINDO will identify the elements in violation. Thus, the Positive Definite command is useful for debugging a quadratic programming model. After checking the symmetry of the submatrix, the Positive Definite command will ascertain the positive definiteness of the submatrix and report on the results. To reemphasize, if you find the model is neither positive definite nor positive semidefinite, then the results from LINDO’s solver will be unpredictable and should not be relied upon. Finally, LINDO will tell you the rank of the submatrix. If you think of the submatrix as the coefficients of a set of linear equations, then the rank is the number of independent equations in the set. 202 CHAPTER 5 It is a good idea to apply the POSD command to any quadratic program when you first develop the model. In most cases, in particular with financial portfolio models, one would expect the Positive Definite command to declare the matrix positive definite or at least positive semi-definite. If you do not get either of these two messages, then it probably means there is an error in the data or the logic. If the model is indefinite, it may have multiple local optima (which optimum you will get as a solution is arbitrary). Below, is the results for running the Positive Definite command on our 3 asset portfolio model presented above: (SUB)MATRIX IS POSITIVE DEFINITE; RANK = 3 OUT OF 3 Parametric Analysis of Quadratic Programs LINDO allows you to perform parametric analysis on right-hand side (RHS) coefficients of quadratic models as well as linear models. There are some subtle differences, however, that the user should be aware of. We illustrate with the following portfolio example from the previous sections: MIN X + Y + Z + UNITY + RETURN + XFRAC + YFRAC + ZFRAC ST ! First order condition for X: 6 X + 2 Y - Z + UNITY - 1.3 RETURN + XFRAC > 0 ! First order condition for Y: 2 X + 4 Y - 0.8 Z + UNITY - 1.2 RETURN + YFRAC > 0 ! First order condition for Z: - X - 0.8 Y + 2 Z + UNITY - 1.08 RETURN + ZFRAC > 0 ! ------- Start of "real" constraints -------------! Budget constraint, multiplier is UNITY: X + Y + Z = 1 ! Growth constraint, multiplier is RETURN: 1.3 X + 1.2 Y + 1.08 Z > 1.12 ! Max fraction of X, multiplier is XFRAC: X < .75 ! Max fraction of Y, multiplier is YFRAC: Y < .75 ! Max fraction of Z, multiplier is ZFRAC: Z < .75 END QCP 5 Now, suppose we wish to trace out the objective value as we increase the RHS of the growth constraint (constraint number 6): 1.3 X + 1.2 Y + 1.08 Z > 1.12. QUADRATIC PROGRAMMING 203 The highest possible value we could hope to achieve is 1.3, which corresponds to putting all weight on variable X. To perform the parametric analysis on this constraint, run the Reports|Parametrics command in Windows versions of LINDO or the PARAMETRICS command in command-line versions. You should receive the following report: RIGHTHANDSIDE PARAMETRICS REPORT FOR ROW: 6 VAR OUT SLK 6 SLK 7 Z VAR IN PIVOT ROW RETURN XFRAC ART 6 7 0 RHS VAL 1.12000 1.14410 1.26947 1.27500 1.30000 DUAL PRICE OBJ BEFORE PIVOT VAL 0.000000E+00 0.417375 0.000000E+00 0.417375 -25.8299 2.03651 -28.7500 2.18750 -INFINITY INFEASIBLE One line is produced in the report for each value of the RHS at which some variable hits a bound. The parametric analysis indicates that constraint 6 is not binding for any RHS value below 1.441. Above this value, the return constraint becomes binding. At a RHS value of 1.26947 the constraint X .75 becomes binding. The objective value at this RHS value has increased to 2.03651. The dual price on row 6 at this value is -25.8299. This means that, if we make a very small decrease in the RHS of row 6, then the objective value will decrease at the rate of 25.8299. Note, however, that in quadratic programs, the dual price does not remain constant between the points where variables enter and leave the solution. Interpolation of the Objective Value in Parametric Analysis In linear programs, the objective value changes linearly with the RHS between breakpoints in the parametric analysis. In quadratic programs, however, the objective function changes quadratically with the RHS value. Thus, to get the objective value at some intermediate point requires a bit more analysis. One could, of course, re-solve the model at the intermediate point, but there is a modest interpolation formula that will also give the objective value. Suppose we wish to interpolate between two adjacent breakpoints, which we label 1 and 2. We will use the following notation: Vi Ri D2 r w = objective value at point i, for i = 1 or 2, = RHS value at point i, for i = 1 or 2, = dual price just before point 2, = some value between R1 and R2, = ( R2 - r) / ( R2 - R1). The objective value with a RHS of r is: V2 + D2 R2 - r + ( V1 - V2 - D2 ( R2 - R1)) w2. For example, consider an r = 1.2. This falls between R1 = 1.1441 and R2 = 1.26947. Thus, D2 = -25.8299, V1 = .417375, and V2 = 2.03651. Substituting these values into the interpolation formula implies an objective value of .7393. To check, if we re-solve the model with the constraint: 6) 1.3 X + 1.2 Y + 1.08 Z >= 1.2 204 CHAPTER 5 we get the solution: QP OPTIMUM FOUND AT STEP 6 OBJECTIVE FUNCTION VALUE 1) .739300400 VARIABLE VALUE REDUCED COST X .420234 .000000 Y .229572 .000000 Z .350194 .000000 UNITY 12.342430 .000000 RETURN 11.517520 .000000 XFRAC .000000 .329766 YFRAC .000000 .520428 ZFRAC .000000 .399806 ROW SLACK OR SURPLUS DUAL PRICES 2) .000000 -.420234 3) .000000 -.229572 4) .000000 -.350194 5) .000000 12.342430 6) .000000 -11.517520 7) .329766 .000000 8) .520428 .000000 9) .399806 .000000 Notice that the dual price on row 6 is at a value intermediate between the prices at the two points that bracket 1.2 (i.e., the dual price is not constant between breakpoints). 205 6 Analyzing & Debugging a Model Analyzing a model becomes difficult when the model is large. For our purposes, a model is large if neither it’s formulation nor it’s solution report fit on one printed page. You may be interested in only parts of the model or parts of the solution report. The difficulty should be apparent if these parts are scattered over several pages. One of the major reasons for analyzing a model is the concern that it may be invalid. A large model is like a large computer program: it must be debugged. Bugs in a model come in a variety of species. A variable name may be spelled incorrectly; the sign of a coefficient may be wrong; the coefficient may be in the wrong constraint; or the decimal point may be misplaced. The main commands for analyzing a model in Windows versions of LINDO are Reports|Statistics, Reports|Peruse, and Solve|Debug. In command-line versions of LINDO, the corresponding commands are STATS, CPRI, RPRI, and DEBUG, respectively. Model Statistics The Reports|Statistics command in Windows versions of LINDO and the STATS command in command-line versions gives some simple summary statistics on the current model. We illustrate this command by entering the following example into LINDO: MAX 2x + 3y + 2z ST 4x + 3z < 8 2x + 3y - z = 1 4x + 3y - 2z > 2 END INT 2 The statistics report for this model is as follows: ROWS= 4 VARS= 3 INTEGER VARS= 2( 2 = 0/1) NONZEROS= 14 CONSTRAINT NONZ= 8( 1 = +-1) SMALLEST AND LARGEST ELEMENTS IN ABSOLUTE OBJ=MAX, NO. <,=,>: 1 1 1, GUBS <= 1 VUBS SINGLE COLS= 0 REDUNDANT COLS= 0 QCP= 0 DENSITY=0.875 VALUE= 1.0 8.0 >= 0 206 CHAPTER 6 Most statistics in the report are straightforward, such as the row and column counts in the first row. If a variable name is misspelled, it should manifest itself via a column count that is greater than expected. This is because the typical variable appears several places in the model, but is misspelled only one place. The number of general and binary integers is also shown here, so you can be sure the proper number is specified. Also in the first row, the QCP statistic indicates the row in which the first real constraint (as opposed to first order conditions) starts in a quadratic program. The number of nonzeros gives another measure of model size. In the second row, the constraint nonzeros is the count when the objective function is not included. If the constraint nonzeros are +1 or -1, the model tends to be easier to solve, so this count is also given here. The density is the fraction (not the percent) of the elements in the model that are nonzero. If a decimal point in a coefficient is grievously misplaced, it will manifest itself as either an extremely small number or an extremely large number. Thus, the largest and smallest coefficients in absolute value are given on the third line. If either of these are "out of line", you are on the trail of a bug. The fourth line of the statistics report gives the count of the number of rows of each type. The GUBS, Generalized Upper Bounds statistic, is a measure of model simplicity. It is an upper bound on the number of non-intersecting constraints in the model. If all the constraints were non-intersecting, the model could be solved by inspection by considering each constraint as a separate model. A model for which the GUBS statistic is high relative to the row count tends to be easier to solve. Finally, the SINGLE COLS statistic is a count of the number of variables that appear in only one row. Such a variable is effectively a slack. If you did not explicitly add slack variables to your model and the SINGLE COLS count is greater than zero, then it suggests a misspelled variable name. The REDUNDANT COLS statistic is a count of the number of columns with the same nonzero structure. You may want to examine the model and try to consolidate. Perusing A Model for Errors For more detailed analysis, the Reports|Peruse command (page 81) in Windows versions or the CPRI and RPRI commands (page 138) in command-line versions are useful. They allow you to select a subset of either rows or columns that satisfy a specified condition and print various attributes of each column or row in the subset. For example, suppose we suspect a variable name is misspelled. The misspelling will show up as a variable with only one nonzero. To request a listing of variables with a single nonzero element in command-line versions of LINDO, give the following CPRI command: : CPRI N : Z = 1 ANALYZING & DEBUGGING A MODEL 207 In Windows versions of LINDO, select the Reports|Peruse command and fill in the dialog box as follows: Note, we have specified Columns for our orientation, we’ve placed the condition “Z=1” in the Condition box and requested a text report. The key in both cases is the use of the Z=1 condition. This restricts the report to columns with one nonzero element. As another example, suppose we have a model that doesn’t seem to be behaving correctly and we suspect a problem in the formulation. So, we generate a statistics report and find the following: ROWS= 85 VARS= 84 NO. INTEGER VARS= 0 QCP= 0 NONZEROS=1848 CONSTRAINT NONZ=1680(1680 ARE +-1)DENSITY=.256 SMALLEST AND LARGEST ELEMENTS IN ABSOLUTE VALUE=1.0 5.0 NO. < : 84 NO. =: 0 NO. > : 0, OBJ=MAX, GUBS <= 4 SINGLE COLS= 1 208 CHAPTER 6 The fact that we have a column with one nonzero (SINGLE COLS= 1) looks suspicious. Fortunately, we happen to know that every variable whose name is such that its first character is 'R' and its third character is 'C' should have 21 nonzero elements. It is easy to check this feature with Reports|Peruse Windows command or the CPRI command-line command. In Windows, we fill out the Reports|Peruse dialog box as follows: In command-line versions, we issue the following CPRI command: : cpri n z : n = 'r%c%' .and. z # 21 The key in both cases is that we use the condition: n = 'r%c%' .and. z # 21. This requests LINDO to display all the variables that have a name where the first character is ‘r’ and the second is ‘c’ (n = ‘r%c%’) and the nonzero count does not equal 21 (z # 21). After issuing this command, we received the following report: NAME R1C1 R1C6 R5C1 R5C6 RDC4 RDC6 NONZEROS 41 29 1 13 22 20 Thus, we easily see that there are a half dozen variables in error. The Reports|Show Column command in Windows and the SHOCOLUMN command-line command may be used to look at each of the above columns. ANALYZING & DEBUGGING A MODEL 209 Debug Command Suppose an LP model contains a single typographical mistake that makes the model infeasible. The constraint containing the mistake will have a nonzero dual price in the solution report. Unfortunately, there may be a large number of other constraints, which also have a dual price not equal to zero. The nonzero dual price on a constraint means that relaxing that constraint may reduce the sum of the infeasibilities. The following example illustrates. The coefficient .55 in row 4 should have been 5.5. MAX 3 X SUBJECT TO 2) 3) 4) END + 7 Y X + 2 Y <= 3 2 X + Y <= 2 0.55 X + Y >= 4 When we attempt to solve this formulation, we get the following solution report: NO FEASIBLE SOLUTION AT STEP 1 SUM OF INFEASIBILITIES= 2.483333 VIOLATED ROWS HAVE NEGATIVE SLACK, OR (EQUALITY ROWS) NONZERO SLACKS. ROWS CONTRIBUTING TO INFEASIBILITY HAVE NONZERO DUAL PRICE. OBJECTIVE FUNCTION VALUE 1) 10.33333 VARIABLE VALUE REDUCED COST X 0.333333 0.000000 Y 1.333333 0.000000 ROW SLACK OR SURPLUS DUAL PRICES 2) 0.000000 0.483333 3) 0.000000 0.033333 4) -2.483333 -1.000000 All the constraints have nonzero dual prices, so we do not have much of a clue in tracking down the culprit. 210 CHAPTER 6 The Solve|Debug (page 61) command in Windows and the DEBUG command-line command (page 138) will try to identify one or more “crucial” constraints. A constraint is crucial if dropping just that constraint from the entire model is sufficient to make the model feasible. These constraints are identified by Debug as the SUFFICIENT SET. Not every infeasible model has a crucial constraint. Regardless of whether any crucial constraints were found, the Debug command also identifies a set of constraints as well as column bounds that constitute a NECESSARY SET. Such a set has the feature that it is infeasible. However, if any member of this set is deleted, then the set becomes feasible. Thus, it is necessary to make at least one correction in the NECESSARY SET (ROWS) if the model is to be feasible. Running the Debug command on the above model generates the following report: SUFFICIENT SET (ROWS), CORRECT ONE OF: 4) 0.55 X + Y >= 4 NECESSARY SET (ROWS), CORRECT ONE OF: 2) X + 2 Y <= 3 Notice row 2, which happens to be correct, does not appear in the SUFFICIENT SET list of possibly faulty rows, while the faulty one, row 4, does appear. So, the Debug command can be useful in reducing the number of rows over which you need search for a bug. The Debug command may be used in a similar fashion on unbounded models to determine sets of potentially faulty variables that need bounding. 211 7 Interfacing with the Outside World Although LINDO has an extensive set of commands for interactive model development and solution, there are instances where it may be more convenient or necessary to build models outside of LINDO. This chapter explores three instances where we hook LINDO to external sources. The first instance deals with editing model and solution files outside of LINDO. LINDO’s editing capabilities are somewhat limited and many users may find themselves longing for the powerful features of modern text editors for model development. Secondly, we will examine the use of command script files. These are text files that contain a series of LINDO commands. Finally, developers of “turnkey” systems requiring optimization may need to access LINDO in an automated or batch mode. We will examine these three areas in detail throughout the remainder of this chapter. Using External Editors with LINDO If you are familiar with the general purpose text editors (e.g., MS Notepad) or word processors (e.g. MS Word) available on most computers, you may find it efficient to use a text editor for preparing input or examining output. The major commands in LINDO for facilitating this use of external editors are the File|Open and File|Log Output commands in Windows versions of LINDO and the TAKE and DIVERT commands in command-line versions of LINDO. Reading Models Created with External Editors As an example, suppose we want to prepare the following transportation model in a text editor outside of LINDO: MIN 2 4 5 ST A1 + A2 + A3 + A4 + A1 + B1 + C1 + END A1 + 4 A2 + 3 A3 + 5 A4 + B1 + 3 B2 + 2 B3 + 6 B4 + C1 + 6 C2 + 4 C3 + 3 C4 B1 B2 B3 B4 A2 B2 C2 + + + + + + + C1 C2 C3 C4 A3 B3 C3 = = = = + + + 9 ! 7 ! 6 ! 8 ! A4 < 12 ! B4 < 11 ! C4 < 13 ! Demand Demand Demand Demand Supply Supply Supply for cust 1 for cust 2 for cust 3 for cust 4 limit for A limit for B limit for C 212 CHAPTER 7 The following session illustrates how to do this. With the text editor, we open a file and enter the following subset of the model. MIN 2 4 5 ST A1 + A1 + END A1 + 4 A2 + 3 A3 + 5 A4 + B1 + 3 B2 + 2 B3 + 6 B4 + C1 + 6 C2 + 4 C3 + 3 C4 B1 + C1 = 9 ! Demand for cust 1 A2 + A3 + A4 < 12 ! Supply limit for A Most popular editors have some variation of a copy command. Using it, we make three additional copies of the demand constraint and two additional copies of the supply constraint, so the model looks as follows: MIN 2 4 5 ST A1 + A1 + A1 + A1 + A1 + A1 + A1 + END A1 + 4 A2 + 3 A3 + 5 A4 + B1 + 3 B2 + 2 B3 + 6 B4 + C1 + 6 C2 + 4 C3 + 3 C4 B1 B1 B1 B1 A2 A2 A2 + + + + + + + C1 C1 C1 C1 A3 A3 A3 = = = = + + + 9 ! 9 ! 9 ! 9 ! A4 < 12 ! A4 < 12 ! A4 < 12 ! Demand Demand Demand Demand Supply Supply Supply for cust 1 for cust 1 for cust 1 for cust 1 limit for A limit for A limit for A Most editors also have some form of a Find/Replace command. Using it, we replace every occurrence of "1" in the second demand constraint by "2", etc.; every occurrence of "A" in the second supply constraint by "B", etc. When done, the file should appear as follows: MIN 2 A1 + 4 A2 + 3 A3 + 5 A4 + 4 B1 + 3 B2 + 2 B3 + 6 B4 + 5 C1 + 6 C2 + 4 C3 + 3 C4 ST A1 + B1 + C1 = 9 ! Demand A2 + B2 + C2 = 9 ! Demand A3 + B3 + C3 = 9 ! Demand A4 + B4 + C4 = 9 ! Demand A1 + A2 + A3 + A4 < 12 ! Supply B1 + B2 + B3 + B4 < 12 ! Supply C1 + C2 + C3 + C4 < 12 ! Supply END for cust 1 for cust 2 for cust 3 for cust 4 limit for A limit for B limit for C INTERFACING 213 Now, we make individual substitutions to make the right-hand sides correct. This gives the following: MIN 2 4 5 ST A1 + A2 + A3 + A4 + A1 + B1 + C1 + END A1 + 4 A2 + 3 A3 + 5 A4 + B1 + 3 B2 + 2 B3 + 6 B4 + C1 + 6 C2 + 4 C3 + 3 C4 B1 B2 B3 B4 A2 B2 C2 + + + + + + + C1 C2 C3 C4 A3 B3 C3 = = = = + + + 9 ! 7 ! 6 ! 8 ! A4 < 12 ! B4 < 11 ! C4 < 13 ! Demand Demand Demand Demand Supply Supply Supply for cust 1 for cust 2 for cust 3 for cust 4 limit for A limit for B limit for C Now, we want to store this model in standard text format. On some editors, this requires some care. The default file format for many editors is a special format unique to that editor. We do not want to store the model in this special format because it will be unreadable by LINDO. Most such editors have an optional file save command for saving in "generic" text form. For example, in Microsoft Word you choose the File|Save As command and from the list box labeled “Save as type” choose the “Text Only (*.txt)” format and press the Save button as illustrated here: 214 CHAPTER 7 Suppose we save this model in the text file called SAMPLE.LTX and we have restarted LINDO. If you are using a Windows version of LINDO, select the File|Open command and direct LINDO to SAMPLE.LTX. After pressing the OK button, the transportation model should appear on your screen in a Model Window as follows: If you are running a command-line version of LINDO, you can use the TAKE command to read SAMPLE.LTX from disk as illustrated in this next sample session: : take FILE NAME: sample.ltx : look all MIN 2 A1 + 2 B3 + SUBJECT TO 2) A1 3) A2 4) A3 5) A4 6) A1 7) B1 8) C1 END + 4 A2 + 3 A3 + 5 A4 + 4 B1 + 3 B2 6 B4 + 5 C1 + 6 C2 + 4 C3 + 3 C4 + + + + + + + B1 B2 B3 B4 A2 B2 C2 + + + + + + + C1 C2 C3 C4 A3 B3 C3 = = = = + + + 9 7 6 8 A4 <= B4 <= C4 <= 12 11 13 Sending LINDO Output to External Editors Now, suppose we wish to direct the output from a LINDO session to a file that might be processed by an editor or sent to a printer. If you are using a Windows version of LINDO, you can log all Reports Window output to an external text file that will be readable by any text editor or may be printed from the operating system. To open and close a log file, use the File|Log Output command. This command is discussed in more detail on page 33. If you are using a command-line version of LINDO, you can redirect report output to a file with the DIVERT command. See page 145 for the details of the DIVERT command. INTERFACING 215 As an example of this feature, suppose we are running a command-line version of LINDO and we have the transportation model listed above in memory. We will then solve the model and send a copy of the model to one file and a solution report to another as follows: : look all MIN 2 A1 + 4 A2 + 3 A3 + 5 A4 + 4 B1 + 3 B2 + 2 B3 + 6 B4 + 5 C1 + 6 C2 + 4 C3 + 3 C4 SUBJECT TO 2) A1 + B1 + C1 = 9 3) A2 + B2 + C2 = 7 4) A3 + B3 + C3 = 6 5) A4 + B4 + C4 = 8 6) A1 + A2 + A3 + A4 <= 12 7) B1 + B2 + B3 + B4 <= 11 8) C1 + C2 + C3 + C4 <= 13 END : terse !Suppress the solution : go !Solve the model LP OPTIMUM FOUND AT STEP 5 OBJECTIVE VALUE = 77.0000000 : divert model.txt !Put the model in a file : look all : rvrt : divert solu.txt !Put the solution in a file : solution OBJECTIVE FUNCTION VALUE 1) 77.00000 : rvrt We could read the solution or model files into a text editor, display them on our terminal using the the cat command in Unix, or send them to the printer using the the lpr command in Unix. Doing so would reveal the following two files: MIN 2 A1 + 3 B2 + 4 C3 SUBJECT TO 2) 3) 4) 5) 6) 7) 8) END + 4 A2 + 3 A3 + 5 A4 + 4 B1 + 2 B3 + 6 B4 + 5 C1 + 6 C2 + 3 C4 A1 A2 A3 A4 A1 B1 C1 + + + + + + + B1 B2 B3 B4 A2 B2 C2 + + + + + + + C1 C2 C3 C4 A3 B3 C3 = 9 = 7 = 6 = 8 + A4 <= + B4 <= + C4 <= 12 11 13 216 CHAPTER 7 MODEL.TXT OBJECTIVE FUNCTION VALUE 1) 77.00000 VARIABLE VALUE REDUCED COST A1 9.000000 0.000000 A2 2.000000 0.000000 A3 0.000000 0.000000 A4 0.000000 2.000000 B1 0.000000 3.000000 B2 5.000000 0.000000 B3 6.000000 0.000000 B4 0.000000 4.000000 C1 0.000000 3.000000 C2 0.000000 2.000000 C3 0.000000 1.000000 C4 8.000000 0.000000 ROW SLACK OR SURPLUS DUAL PRICES 2) 0.000000 -2.000000 3) 0.000000 -4.000000 4) 0.000000 -3.000000 5) 0.000000 -3.000000 6) 1.000000 0.000000 7) 0.000000 1.000000 8) 5.000000 0.000000 NO. ITERATIONS= 5 SOLU.TXT Note that since command-line versions of LINDO do not contain a print command, you will need to rely on this ability to build external output files for printing. Using the Take Command on Divert Files One useful feature of the output from the Reports|Formulation command in Windows versions of LINDO and the LOOK ALL command in command-line versions is that it is readable as an external model file. As an example, we will use the file MODEL.TXT created above, but we will use an external text editor to modify the demand constraint right-hand sides yielding: MIN 2 A1 + 3 B2 + 4 C3 SUBJECT TO 2) 3) 4) 5) 6) 7) 8) END + 4 A2 + 3 A3 + 5 A4 + 4 B1 + 2 B3 + 6 B4 + 5 C1 + 6 C2 + 3 C4 A1 A2 A3 A4 A1 B1 C1 + + + + + + + B1 B2 B3 B4 A2 B2 C2 + + + + + + + C1 C2 C3 C4 A3 B3 C3 = 10 = 9 = 4 = 9 + A4 <= + B4 <= + C4 <= 12 11 13 INTERFACING 217 Now, we use the File|Open command in Windows or the TAKE command in command-line versions to read the model back into LINDO. We will illustrate this with a sample session from a commandline version of LINDO: : take model.txt : look all MIN 2 A1 + 4 A2 + 3 A3 + 5 A4 + 4 B1 + 3 B2 + 2 B3 + 6 B4 + 5 C1 + 6 C2 + 4 C3 + 3 C4 SUBJECT TO 2) A1 + B1 + C1 = 10 3) A2 + B2 + C2 = 9 4) A3 + B3 + C3 = 4 5) A4 + B4 + C4 = 9 6) A1 + A2 + A3 + A4 <= 7) B1 + B2 + B3 + B4 <= 8) C1 + C2 + C3 + C4 <= END : terse : go LP OPTIMUM FOUND AT STEP 5 OBJECTIVE VALUE = 84.0000000 12 11 13 So, even if you don’t currently have a text copy of your model, you can always create one by sending the output from the Reports|Formulation command in Windows or the LOOK ALL command in command-line versions to a file. Running Command Scripts with the Take Command LINDO allows the user to construct an external text file containing a series of commands. The commands in these files are run by using the File|Take Commands command in Windows or the TAKE command in command-line versions of LINDO. 218 CHAPTER 7 In the section above, one of the things we did was to build a model in an external editor and import it using the TAKE command. This was actually your first view of a command script. Normally, however, we will want to place additional commands in our script along with the model text. As an example, we will take the transportation model from the previous section and expand on it by adding commands to solve the model and send the nonzero variable values to a separate file. The following is a script file that should do what we want: PAGE 0 !Turns off terminal paging MIN 2 A1 + 4 A2 + 3 A3 + 5 A4 + 4 B1 + 3 B2 + 2 B3 + 6 B4 + 5 C1 + 6 C2 + 4 C3 + 3 C4 ST A1 + B1 + C1 = 9 ! Demand for cust 1 A2 + B2 + C2 = 7 ! Demand for cust 2 A3 + B3 + C3 = 6 ! Demand for cust 3 A4 + B4 + C4 = 8 ! Demand for cust 4 A1 + A2 + A3 + A4 < 12 ! Supply limit for A B1 + B2 + B3 + B4 < 11 ! Supply limit for B C1 + C2 + C3 + C4 < 13 ! Supply limit for C END TERSE !Suppresses solution report GO 100 !Solves model DIVERT SOLUTION.TXT !Opens output file CPRI N P : P > 0 !Print names and values of nonz vars RVRT !Close output file In general, the PAGE 0 command should be the first command in any LINDO script. This disables LINDO’s terminal paging feature where it pauses after each screen of output. This allows your script file to run without interruption. The TERSE command is added to suppress the standard solution report. There is no reason to generate the entire solution report when we need only the nonzero variable values. The GO 100 command solves the model, using the value of 100 as a pivot limit. When running scripts, it is always a good idea to provide a pivot limit sufficient to solve the model. If not, LINDO computes a limit based on a model’s dimensions, which may not be adequate. In which case, you can end up with a non-optimal solution. The DIVERT command opens a file for the solution values. The CPRI command prints the name (N) and primal values (P) for all variables such that (:) their value is greater than 0 (P>0). Since we have an open DIVERT file, the CPRI output is redirected to the file. Finally, we close the DIVERT file using the RVRT command. INTERFACING 219 To execute this script, use the File|Take Commands command in Windows or the TAKE command in command-line versions of LINDO. Opening the solution file, SOLUTION.TXT, after running the script reveals the following file containing all the nonzero variable values: NAME A1 A2 B2 B3 C4 PRIMAL 9 2 5 6 8 This discussion of script files is intended only as a brief introduction. Many more options are available to the creative user. One possibility that leaps to mind is the use of the ALTER command in a script in an iterative fashion to repeatedly modify a model and re-solve, saving solutions along the way. All of LINDO’s command-line commands described in Chapter 3, Command-line Commands, are available for use in script files, with the one exception being the TAKE command itself. LINDO does not allow for “nested” or multiple TAKE files. Thus, a TAKE command may not be embedded in a script file that is to be read by the TAKE command. Auto-Loading Script File - AUTOLD.DAT When LINDO starts, it looks for a file called AUTOLD.DAT in the default directory. If it does not find a file with that name, it continues in the standard fashion. If the file is found, then LINDO starts reading commands from the file. Effectively, LINDO automatically executes the command File|Take Commands (or TAKE in command-line versions) on AUTOLD.DAT as soon as it starts. This feature is particularly useful if you always want to issue a standard set of commands at the start of a LINDO session. Error Detection in Script Files If LINDO encounters an error while reading a script file and you have difficulty identifying the location of the error, then you may find the BATCH command useful in tracking down the error. The effect of the command is to cause all input, whether from a file or from the terminal, to be echoed to the terminal. Thus, you can see exactly what was read from the file up to the point where the error was encountered. Place a BATCH command at the very start of the script file to turn on the feature each time the file is read. Place a BATCH command at the very end of the file to toggle off the feature before exiting the script file. Integrating LINDO Into Other Applications Developers of application specific turnkey systems, which require optimization capability, need to access LINDO in an automated or batch mode. Perhaps the most seamless way to accomplish this is by using the LINDO callable libraries or the LINDO Windows DLL (see Chapter 8, LINDO Callable Libraries), but this may take intensive programming and development efforts. The more casual system developer may find it expedient to have a front-end application build an input file for LINDO, run LINDO to process the input file and create output files, and then, upon returning to the front-end application, parse the output files from LINDO and present the results to the user in a custom report 220 CHAPTER 7 format. In this section, we will illustrate how to accomplish this using three different styles. First off, we will explore the use of input and output redirection as a tool for linking up your application with command-line versions of LINDO. Next, we will use Microsoft Visual Basic to develop a simple front-end to the Windows version of LINDO. Finally, we will use Microsoft Visual C/C++ to develop a simple front-end to a command-line version of LINDO. Input and Output Redirection One of the simplest ways to tie LINDO into your application is by using input and output redirection. This is a technique, which allows you to “trick” LINDO into reading input from a file rather than from the keyboard and sending output to a file instead of to the screen. This feature is more a function of the operating system than of LINDO and, therefore, is not available on all versions of LINDO. Operating systems that support I/O redirection currently include all the various versions of Unix. You set up for I/O redirection when you initially start LINDO as follows: lindo < input.txt > output.txt The less than sign (<) is the input redirection operator, while the greater than sign (>) is the output redirection operator. In this example, we are telling LINDO to get input from the file input.txt rather than the keyboard. Similarly, we are telling LINDO to send all output to the file output.txt instead of the screen. You need not specify both an input and output file. Specifying either one by itself is also allowed. By specifying an input file, you no longer need to interactively enter commands. Instead, you may place all required commands in a file and entirely automate the input process. By specifying an output file, you can capture output for use later by your application and/or suppress unwanted output, so it does not appear on the screen. Skillful use of input and output redirection coupled with applications of your own and operating system batch files can result in applications that appear to be tightly integrated with LINDO. As a simple example of the use of I/O redirection with LINDO, we will have a batch file that invokes LINDO sending it the following model for solution: Maximize 20 X + 30 Y S.T. X < 50 Y < 60 X + 2 Y < 120 End When LINDO has solved the model, our batch program will display the results on the screen from a file created by LINDO. Here is the listing of the batch file we will use: lindo < input.txt > output.txt echo X and Y = cat solution.txt INTERFACING 221 In the first line, we run LINDO passing it input from the script file named input.txt and directing all of LINDO’s screen output to the file output.txt. In this simple example, we will have input.txt made up beforehand, but a more realistic application would probably build the input.txt file based on user input or some new data set. The second line merely sends the string “X and Y =” to the users screen. The final line sends the solution to the screen from a file created during the LINDO run. The interesting part of this application is in the LINDO command script file input.txt, which is reproduced below with comments to document the purpose of each command: !PAGE 0 should always be the first command !in a LINDO script. It disables the terminal !paging feature. PAGE 0 ! !Here is the model MAX 20X+30Y ST X<50 Y<60 X+2Y<120 END ! !Suppress the standard solution report TERSE ! !Solve the model and be sure to allow !plenty of pivots GO 1000 ! !Open a solution file DIVERT SOLUTION.TXT ! !Send the primal values to !the solution file CPRI /N P ! !Close the solution file RVRT ! !Quit LINDO QUIT Assuming we named the batch file lindo-bat, your screen should appear as follows when you run this application: $> chmod a+x lindo-bat $> lindo-bat X and Y = 50 35 $> Note that any operating system that allows for I/O redirection and batch programming will support this form of integration with LINDO. 222 CHAPTER 7 A Visual Basic Front-End for Windows LINDO The following example uses Microsoft Visual Basic 3.0 and the Windows version of LINDO to build and solve this simple model: Maximize 20 X + 30 Y S.T. X < 50 Y < 60 X + 2 Y < 120 End If you would prefer to simply examine this sample application without going to the trouble of entering it, it may be found in the file \LINDO\SHELL\SHELL.MAK. The approach used in this example is straightforward. We write a LINDO script file containing the model and various commands using Visual Basic (VB), use the Shell command in VB to load the Windows version of LINDO for processing the script file, and finally return to the VB front-end to read a solution file created by LINDO. The results are then displayed in the VB application window. Although a real life application would do much more than this, the basic framework used here should help to provide some insights into the process. To begin entering this example, start VB and select the File|New Project command. Visual Basic will present you with a blank form. Use the tool palette to add two new buttons to the form. Label the first button “Solve” and the second button “Quit”. At this point, your form should resemble the following: Next, double-click on the Solve button, then input the following code: Sub Command1_Click () Rem Sample VB matrix generator for LINDO. Uses Rem the LINDO executable for Windows to perform Rem the optimization. Dim I, X, Y INTERFACING Rem Let the user know we are about to start optimization Print "Begin optimization..." Rem Eliminate any old work files On Error Resume Next Kill "C:\LINDO\SHELL\LNDIN.TXT" Kill "C:\LINDO\SHELL\LNDOUT.TXT" On Error GoTo 0 Rem Open a LINDO Command file Open "C:\LINDO\SHELL\LNDIN.TXT" For Output As #1 Rem Always a good idea to do a PAGE 0 Rem first off in LINDO command files Print #1, "PAGE 0" Rem Send the formulation to the command file Print #1, "MAX 20X+30Y" Print #1, "ST" Print #1, "X<50" Print #1, "Y<60" Print #1, "X+2Y<120" Print #1, "END" Rem Suppress the standard solution report Print #1, "TERSE" Rem Solve the model Print #1, "GO" Rem Open a file for storing the solution Print #1, "DIVERT C:\LINDO\SHELL\LNDOUT.TXT" Rem Send the solution to the output file Print #1, "CPRI /N P" Rem Close output file Print #1, "RVRT" Rem Quit LINDO Print #1, "QUIT" Rem Close LINDO command file Close #1 Rem Shell to LINDO, passing the name of the Rem command file in the command line. The 2 Rem means run LINDO minimized. I = Shell("C:\LINDO\LINDO -t""C:\LINDO\SHELL\LNDIN.TXT""", 2) Rem We now need to wait until LINDO creates Rem our input file On Error Resume Next Do Err = 0 Rem Try to open the solution file printed by Rem LINDO Open "C:\LINDO\SHELL\LNDOUT.TXT" For Input As #1 223 224 CHAPTER 7 Rem Break out of loop if successful If Err = 0 Then Exit Do Rem Let other tasks run DoEvents Loop On Error GoTo 0 Rem Read in the variable values Input #1, X, Y Rem Close solution file Close #1 Rem Print solution on screen Print "X and Y =", X, Y Page224cEnd Sub This is the code that writes a script file, uses a shell command to invoke LINDO for solving it, reads the results from a LINDO output file, and reports the results in the Visual Basic application window. To save on typing, you may also paste this code into your Visual Basic project from the one provided on your disk under the name \LINDO\SHELL\SHELL.MAK.1 Next, click on the “Quit” button and input the following code: Sub Command2_Click () End End Sub This code will terminate the application when the user presses the “Quit” button. To run the application, select the VB Run|Start command and then press the Solve button in the sample application’s dialog box. If you’ve entered everything correctly, then you should see the following solution displayed in the VB application window: 1 This sample code assumes that you have installed LINDO in the default C:\LINDO subdirectory. If this is not the case, then you will need to modify the code to account for LINDO’s actual directory. INTERFACING 225 Finally, press the “Quit” button to exit this sample application and return to the Visual Basic development environment. The VB code in this example is all straightforward with some minor exceptions. In particular, consider the following line: I = Shell ("C:\LINDO\LINDO -t""C:\LINDO\SHELL\LNDIN.TXT""", 2) Note that the character should not actually be entered in the code. We have simply placed that character there to indicate that we had to break the line in two to have it fit within the margins of this document. This line of code loads the executable version of LINDO, and tells LINDO to run our script file by adding the following string to the command line: -t""C:\LINDO\SHELL\VB\LNDIN.TXT"" When LINDO for Windows starts, it checks the command line for the presence of the following three commands: Command -t“filename” -o“filename” -l“filename” Action at Runtime LINDO executes a File|Take Commands command on the file filename. If an AUTOLD.DAT file is present, it will be queued before filename. LINDO executes a File|Open on filename. LINDO executes a File|Log Output command, causing all Reports Window output to be routed to filename. If LINDO finds any of these commands in the command-line, it will attempt to perform the associated action immediately after starting up. So, by adding the -t command above to LINDO’s command line, we are simply telling LINDO to run our script file on startup. The second argument value of 2 tells LINDO to run minimized. When LINDO runs minimized, it appears as a small icon at the bottom of your screen. Also when LINDO runs minimized, the initial banner is not displayed. The end result is that your application remains displayed on the screen while LINDO runs giving the appearance of tight integration with LINDO. 226 CHAPTER 7 One other aspect of this example to consider is the following section of code: Rem We now need to wait until LINDO creates Rem our input file On Error Resume Next Do Err = 0 Rem Try to open the solution file printed by Rem LINDO Open "C:\LINDO\SHELL\LNDOUT.TXT" For Input As #1 Rem Break out of loop if successful If Err = 0 Then Exit Do Rem Let other tasks run DoEvents Loop On Error GoTo 0 Keep in mind that the Shell command in VB runs applications asynchronously. Therefore, we must wait for LINDO to build the output file before we attempt to read it in the VB application. The above loop iterates until we successfully open the LINDO output file. At that point, we drop out of the loop and retrieve the results from LINDO. As a final note, if you don’t want LINDO to display the Status Window during the solution process, you can disable it by running LINDO interactively and using the Edit|Options command to disable the Status Window. Be sure to save the options after making any changes. LINDO will now be configured to suppress the Status Window during all subsequent runs. For more details, please see page 54. A “C” Front-End for LINDO The following example uses Microsoft Visual C 4.0 and the command-line version of LINDO to build and solve the following simple model: Maximize 20 X + 30 Y S.T. X < 50 Y < 60 X + 2 Y < 120 End INTERFACING 227 The approach used in this example is straightforward. We have a small C program that builds a LINDO script file containing the model and various LINDO commands. We then use the shell function in C to load the command-line version of LINDO as a subtask to process the script file. Finally, we return to the C front-end to read the solution file created by LINDO and print the results on the screen. Although a real-life application would do much more than this, the basic framework used here should help provide insights. The C source code for this sample application is as follows:2 #include <stdio.h> // for file i/o #include <io.h> // for dup functions #include <process.h> // for spawn function void main() { char *cFileIn = "LNDIN.TXT"; char *cFileOut = "LNDOUT.TXT"; char *cFileSolu = "SOLUTION.TXT"; float fXVal, fYVal; FILE *fp, *fpIn, *fpOut, *fpSolution; int nStdIn, nStdOut; // Open a LINDO script file fp = fopen( cFileIn, "w"); // Always a good idea to do a PAGE 0 // first off in LINDO script files fprintf( fp, "PAGE 0\n"); // Send the formulation to the script file fprintf( fp, "MAX 20X+30Y\n"); fprintf( fp, "ST\n"); fprintf( fp, "X<50\n"); fprintf( fp, "Y<60\n"); fprintf( fp, "X+2Y<120\n"); fprintf( fp, "END\n"); // Suppress the standard solution report fprintf( fp, "TERSE\n"); // Solve the model fprintf( fp, "GO\n"); // Open a file for storing the solution fprintf( fp, "DIVERT %s\n", cFileSolu); // Send the solution to the output file fprintf( fp, "CPRI /N P\n"); // Close output file fprintf( fp, "RVRT\n"); // Quit LINDO fprintf( fp, "QUIT\n"); // Close LINDO command file fclose( fp); 2 This sample code assumes that the C executable file is in the same directory as the LINDO software. If this is not the case, then you will need to modify the code to account for LINDO’s actual directory. 228 CHAPTER 7 // Redirect standard input to the script file nStdIn = dup( 0); fpIn = fopen( cFileIn, "r"); dup2( fileno( fpIn), 0); // Redirect standard output to a file nStdOut = dup( 1); fpOut = fopen( cFileOut, "w"); dup2( fileno( fpOut), 1); // Run LINDO and process script file. spawnlp( P_WAIT, "LINDO", " ", NULL); // Flush i/o streams fflush( stdin); fflush( stdout); // Restore standard i/o dup2( nStdIn, 0); dup2( nStdOut, 1); // Close files fclose( fpIn); fclose( fpOut); // Open solution file fpSolution = fopen( cFileSolu, "r"); // Display the solution fscanf( fpSolution, "%f\n%f", &fXVal, &fYVal); printf("X and Y = %f %f\n", fXVal, fYVal); // Close solution file fclose( fpSolution); } Assuming you name the compiled executable shell, then when you run this application, your screen should appear as follows: $> shell X and Y = 50.000000 35.000000 $> The crucial point to observe in this application is that we are exploiting the fact that LINDO reads from the standard input device and writes to the standard output device. Before invoking LINDO with the C spawnlp function, we redirect standard input to the script file built earlier in the application and redirect all standard output to an additional file. Thus, the running of LINDO is entirely automated with no output appearing on the screen. By doing this, we make it appear as if LINDO is seamlessly integrated into the front-end C application. This example should be portable to other C compilers and hardware platforms with only minor modifications. Nothing in the code is dependent on Microsoft Visual C. Thus, you should be able to make use of the above code with any standard C compiler using a command-line version of LINDO on any hardware platform that allows for redirection of input and output. INTERFACING 229 Conclusion We hope we have successfully demonstrated a number of ways to easily hookup your applications to LINDO without having to go to the effort of linking to the LINDO callable libraries. Many users have been very successful in building impressive applications around LINDO utilizing the techniques demonstrated in this section. However, for the user that requires the maximum in performance and control, the callable libraries are still the best bet. We examine the use of these libraries in Chapter 8, LINDO Callable Libraries. 230 CHAPTER 7 231 8 LINDO Callable Libraries Most versions of LINDO are available in a form that lets you link your own programs directly with LINDO. The internal structure of LINDO is designed, so you can combine LINDO with your code to create an integrated, customized system. Furthermore, you can design your system such that the user is unaware that a linear programming solver is being accessed. The LINDO callable libraries come in two forms. Windows versions of LINDO provide the callable libraries in Windows Dynamic Link Library (DLL) format. The advantage of this format is that it is compiler independent. Thus, you may build your application in any language that can call a DLL (effectively all current PC compilers). On all other platforms, the callable libraries are supplied in linkable object code library format. In order to link successfully with an object code library, you must use the same development environment that is used in creating the object code library. For information on the required development environment for the version of LINDO that you are using, please refer to the Installation Instructions provided with your copy of LINDO. We proceed next by introducing the routines available through the LINDO library. After this, we will illustrate the use of the libraries through a number of examples. LINDO Callable Library Routines Introduction The LINDO library routines, reproduced below in alphabetical order, can be called from your program to access LINDO’s functionality. There are many routines listed below, but most are concerned with one of three areas: 1) passing a model to LINDO, 2) solving a model, and 3) retrieving the solution to a model. If a routine has an equivalent command-line command, we make note of it, so you can refer to the command for additional insights. The arguments to each of the routines listed below are enclosed in parentheses following the name of the routine. Arguments to the routines are classified as Character, Integer, Float or Double. The equivalents of these various argument types in Basic, C/C++ and FORTRAN are listed below: Argument Type Character Integer Float Double Basic String Long Single Double C/C++ char long float double FORTRAN CHARACTER INTEGER*4 REAL*4 REAL*8 232 CHAPTER 8 A pair of square brackets will follow arguments that are arrays. If the length of the array is known, it will be contained in the brackets. Arrays of unknown length will contain no length value in their brackets. One important fact to keep in mind when calling LINDO routines, particularly from C/C++, is that all arguments are passed by reference. Library Routine Definitions APPCOL ( KNAME[8], NONZ, VAL[NONZ], IRO, TROUBLE) Character KNAME Float VAL Integer NONZ, IRO, TROUBLE Appends a new column (i.e., a variable) whose name is stored in character format in the 8-byte character vector KNAME. The column has NONZ nonzero coefficients stored in the float vector VAL with the associated row numbers stored in the vector IRO. On return, TROUBLE will be set to 1 if LINDO ran out of space, else it will be 0. The contents of KNAME should be in uppercase. KNAME must be declared as an array with at least 8 elements of character type. If the name of the column has less than 8 characters, then the remaining elements in KNAME must be filled with blanks. APPCOL is the quickest way to load a model into LINDO. Internally, LINDO stores a model in column major form, so APPCOL does not need to do any shuffling of data to store the new column. Given this, APPCOL is much faster than routines such as INSROW and INSERT discussed below. Note, in order to append a column with APPCOL, all the rows in the model should have been previously defined by calls to the DEFROW routine. The APPCOL routine corresponds to the APPC command-line command. BINVT ( DDA[]) Double DDA On entry, DDA contains a double precision vector. BINVT pre-multiplies this vector by the inverse of the current basis matrix. For example, to get column J of the current basis inverse, DDA should contain all zeros except for a 1.0 in the J-th position in DDA. CAPOUT ( LUNIT) Integer LUNIT Captures all of LINDO’s standard terminal output in a file assigned to unit number LUNIT. This may be required in GUI environments, such as Windows, in order to keep your application from crashing. To assign a unit number to a file, see routines LUNGET and LUNOPN. To restore LINDO’s output to the standard output device, call CAPOUT with LUNIT < 0. CLRBAS () Clears the current basis without altering the current model formulation. LINDO CALLABLE LIBRARIES 233 D2DMY ( NS1800, NDAY, MON, NYR) Integer NS1800, NDAY, MON, NYR On entry, NS1800 contains the number of days since 28 Feb 1800. On return, NDAY will contain the corresponding day of the month, MON will contain the corresponding month of the year ranging from 1 to 12, and NYR will contain the corresponding year as a 4 digit integer for the current date. DMY2D ( NDAY, MON, NYR, NS1800, NDOFWK) Integer NDAY, MON, NYR, NS1800, NDOFWK On entry, NDAY contains the day of the month, MON the month of the year (1 to 12), and NYR the year as a 4-digit integer. On return, NS1800 will contain the number of days since 28 Feb 1800 and NDOFWK will contain the day of the week for the current date, where Mon=1, Tue=2, … DEFROW( IDIR, RHS, IDROW, TROUBLE) Float RHS Integer IDIR, IDROW, TROUBLE Appends a new row to the end of the current formulation. All rows are defined via this routine. A row must be defined before you can use APPCOL or INSROW to add nonzero elements to it. On entry, set IDIR to the direction of the row (-1 if a row or MAX objective, 0 if an = row, and 1 if a row or MIN objective) and set RHS to the right-hand side value of the row. On return, IDROW will contain the row number assigned to this row, and TROUBLE returns 1 if trouble occurred (e.g., an out-ofspace condition) in DEFROW. DELCON ( J) Integer J Deletes constraint number J. All higher numbered constraints are renumbered down by 1. The objective function, row 1, cannot be deleted. This routine corresponds to the DELETE command-line command. DRPVAR ( J, PRIMAL, DUAL) Double PRIMAL, DUAL Integer J Call this routine after optimization to get the value and reduced cost for variable J. On entry, J contains the index of a variable. On output, the double arguments PRIMAL and DUAL will contain the value and reduced cost for variable J. If you don’t know the index of a variable, you can have LINDO look it up with the NDXOFV routine. Note that DRPVAR is a double precision equivalent of the REPVAR routine. FPRIME ( N1, N2) Integer N1, N2 Returns in N2 the smallest prime number greater-than-or-equal-to N1. 234 CHAPTER 8 FREEIT ( J) Integer J Makes variable J a free variable. In other words, variable J may take on any real value, positive or negative. If you don’t know the index of a variable, you can have LINDO look it up with the NDXOFV routine. This routine corresponds to the FREE command-line command. GETCOL ( J, KNAME[8], NONZ, VAL[NONZ], IRO[NONZ], SUBJ, TROUBLE) Character KNAME Float VAL, SUBJ Integer J, NONZ, IRO, TROUBLE Retrieves the description of variable J. If you don’t know the index of a particular variable, you can have LINDO look it up with the NDXOFV routine. KNAME should be declared as a character array of at least 8 bytes and will return the variable’s name. NONZ returns the number of nonzero coefficients in the variable’s column. VAL is a single precision array, which returns the values of the nonzero coefficients. IRO is an array returning the row indices of the nonzeros. Be sure VAL and IRO have been declared to be of adequate length to hold the entire column. SUBJ returns the simple upper bound on the variable. TROUBLE returns 1 if J is not a valid variable index. GO ( LIMGO, ISTAT) Integer LIMGO, ISTAT Solves the current model. On entry, LIMGO contains a limit on the number of pivots (i.e., solver iterations). LIMGO = 0 means let LINDO set its own sensible limit. If LINDO reaches this limit it will interrupt the solution process and return to the calling application. If you don’t want LINDO to interrupt the solution process, set LIMGO to a sufficiently large value. ISTAT on return describes the solution status. ISTAT = 4 means optimal, 5 means unbounded, and 2 means infeasible. APPCOL, DEFROW, etc. may be called after GO to do "on-the-fly" column or row generation. This routine corresponds to the GO command-line command. HEAPIT ( N, M, INDX[N], NVALU[M]) Integer N, M, INDX, NVALU Creates a heap of the items in the NVALU vector using the INDX vector as a pointer. Used in conjunction with the HEAPFR routine, HEAPIT is useful for performing efficient sorts. On entry, N contains the number of items to be heaped, and M contains the dimension of the NVALU vector. On return, INDX() has been adjusted to “heap” form (i.e., NVALU( INDX( J)) NVALU( INDX( J/2)), for J = 2, 3,... N). LINDO CALLABLE LIBRARIES 235 HEAPFR ( N, M, INDX[N], NVALU[M]) Integer N, M, INDX, NVALU Using the pointer vector INDX, swaps the first (largest) item with the item in position N and then reheaps the first N - 1 items. User must reset N to N - 1. M is the dimension of NVALU. Thus, HEAPFR removes items from a heap in decreasing order. ILINDO () Performs one time initialization for LINDO. ILINDO must be called once before calling any other LINDO routines. INIT () Initializes storage in preparation for a new model. INIT should be called whenever creating a new formulation. INSERT ( I, J, AMT, NOADD) Float AMT Integer I, J, NOADD Adjusts the element in row I, column J of the matrix. If NOADD = 1, then AMT replaces the old value at position (I,J), else AMT is added to the old value. The right-hand side is indicated by setting J = 0. Row I and column J must have been previously defined by DEFROW and APPCOL calls. INSROW ( J, NONZ, LSTCOL[NONZ], VALIST[NONZ]) Float AMT Integer I, J, NOADD Inserts one or more elements into row J of the formulation. Row J must have been defined previously (e.g., with a call to DEFROW). The scalar NONZ contains the number of nonzeros to be inserted. LSTCOL, a vector, contains the list of column indices to be inserted. The corresponding nonzero values are given in the vector VALIST. This routine is more efficient than repeated calls to the routine INSERT if more than one element is to be inserted. However, APPCOL is the most efficient routine for adding nonzeros to the model’s matrix. Columns named in LSTCOL must have been previously defined (e.g., with calls to APPCOL) and must not already appear in row J. INVPRM ( N, IPERM[N]) Integer N, IPERM Performs an in place invert of a permutation matrix. On entry, N contains the number of items in the permutation, and IPERM contains an array, where the K-th element of IPERM is the index of the item in the K-th position of the permutation. On return, IPERM is permuted, so the K-th element gives the position containing the K-th item. 236 CHAPTER 8 KLOSE ( LUNIT) Integer LUNIT Closes a file assigned to logical unit LUNIT that was opened by a call to the LUNOPN or LUNGET routines. LOOK ( J1, J2) Integer J1, J2 Prints rows J1 through J2 of the current formulation in natural format. Output is routed to the standard output device. You can capture LINDO’s standard output in a file via a call to the CAPOUT routine. This routine corresponds to the LOOK command-line command. LSALTN ( IRTCOD, KTEXT, J1, J2, INROW) Character KTEXT Integer IRTCOD, J1, J2, INROW Modifies a constraint’s name. On entry, KTEXT, a character array, contains the new variable name, J1 points to the start of the name in KTEXT, J2 points to the end, and INROW contains the index of the row to receive the new name. IRTCOD will be set to 0 if there was no problem, 1 if the name already exists, 2 if INROW is out of range, or 3 if no name was found in KTEXT. LSAVPR ( DZ[MEMDZ], MEMDZ, KZ[8*MEMKZ], MEMKZ, IRTCOD) Character KZ Double DZ Integer MEMDZ, MEMKZ, IRTCOD Saves the current model to memory. Once saved, the model may be restored by calling the LSGTPR routine. On entry, MEMDZ contains the length of the numeric DZ array in double words (8 bytes) and MEMKZ contains the length of the character KZ array in double words. On output, DZ contains the numeric part of the model, KZ the character part, and IRTCOD = 0 if there was enough space in the DZ and KZ arrays to store the model. The number of double words required in the KZ array for storing the model’s character data is: M + N + T/8, where, M = number of rows in model N = number of variables T = length of model’s title (if any). LINDO CALLABLE LIBRARIES 237 The number of double words required in the NZ array depends on many things including the number of rows, variables, inequality rows, and nonzero elements. In general, it would be difficult for a calling application to compute the exact number of double words required in NZ. However, if there is insufficient space to store the model, IRTCOD returns the number of double words required in the NZ array. Thus, a useful tactic is to call LSAVPR once with little or no space allotted. LSAVPR will then return with the required number of elements for the NZ array in IRTCOD. Using this value in IRTCOD, your application can then allocate an array of appropriate length for storing the numeric part of the model, and then recall LSAVPR to perform the actual save. LSCTTN () Adds valid constraints to a binary or general integer program to allow for faster solving. These additional constraints, commonly called “cuts,” do not violate the integer feasible region of the model. They do, however, intentionally violate the linear feasible region of the model with smaller or new upper bounds and smaller constraint coefficients. The idea is that we should be able to get tighter objective bounds and/or less fractional solutions during the branch-and-bound procedure used by the LINDO solver on integer programs. The result being faster solution times. LSCTTN corresponds to the TITAN command-line command. LSDLVR ( J) Integer J Deletes variable J from the current formulation. Variables with indices greater than J are all shifted down by one. If you don’t know the index of a variable, you can have LINDO look it up with the NDXOFV routine. LSDMPS ( LUNIT) Integer LUNIT Sends an MPS format solution report to the file associated with output unit LUNIT. To associate a file with a unit number, see routine LUNOPN or LUNGET. LSDMPS corresponds to the DMPS command-line command. LSEXIT () Call LSEXIT when your application no longer needs access to the LINDO routines. LSEXIT performs LINDO’s final clean-up. LSFETP ( DERR, NPARAM, DPVAL) Double DERR, DPVAL Integer NPARAM Fetches the values of internal parameters used by LINDO. For a list of these parameters, refer to the documentation on the SET command-line command. On entry NPARAM contains the index of the parameter to fetch. On return, DPVAL will contain the parameter’s current value. DERR will be set to 0 if there was no problem or 1 if the parameter index was invalid. To set the values of parameters, see the LSPUTP routine. 238 CHAPTER 8 LSGTPR ( DZ[], KZ[], IRTCOD) Character KZ, IRTCOD Double DZ Integer IRTCOD Retrieves a formulation saved in memory using the LSAVPR routine. On entry, the double precision array DZ contains the numeric part of the model and the character array KZ contains the text parts of the model. These two arrays are written by the LSAVPR routine and their formats are not of practical interest to the average user. On return, IRTCOD will be 0 if all went well. Otherwise, it returns a 1 to indicate failure. LSGTRO ( IROW, NNZMX, NNZ, COF[NNZMX], ISCOL[NNZMX]) Float COF Integer IROW, NNZMX, NNZ, ISCOL Retrieves information on a row. On entry, IROW contains the index of the row you want to retrieve and NNZMX gives the maximum number of nonzero values you want returned in the COF and ISCOL arrays. On return, the arrays COF and ISCOL will contain the row’s nonzero coefficients and the corresponding column indices, respectively. NNZ returns the number of nonzeros in these two arrays. LSINSR ( LUNIT) Integer LUNIT Reads in a solution basis from an MPS PUNCH format file attached to logical unit number LUNIT. This solution basis will be used as a starting point when you solve the current model. The model must be in memory before calling LSINSR. To attach a file to a unit, see routines LUNOPN and LUNGET. To create an MPS PUNCH format file, see routine LSPUNC. This routine corresponds to the FINS command-line command. LSPUNC ( LUNIT, XDATA[8]) Character XDATA Integer LUNIT Sends a solution basis in MPS PUNCH format to the file associated with unit number LUNIT (see LUNOPN and LUNGET). XDATA contains an 8-byte name to be written to the first line of the report. This routine corresponds to the FPUN command-line command. LSPUTP ( DERR, NPARAM, DPVAL) Double DERR, DPVAL Integer NPARAM Sets various internal parameters used by LINDO. For a list of these parameters, refer to the documentation on the SET command-line command. On entry, NPARAM contains the index of the parameter to set and DPVAL contains the new value for the parameter. DERR will be set to 0 if there was no problem, 1 if the parameter index was invalid, or 2 if the new parameter value was invalid. To retrieve the current setting of a parameter, see the LSFETP command. LSPUTP corresponds to the SET command-line command. LINDO CALLABLE LIBRARIES 239 LUNGET ( LUNIT, INROUT, NOTFMT) Integer LUNIT, INROUT, NOTFMT Prompts the user for a filename and opens it on logical unit LUNIT. On entry, set INROUT to 1 if you are opening the file for input. Otherwise, set it to 0. Set NOTFMT to 1 if the file is not formatted (i.e., binary). Otherwise, set NOTFMT to 0. On return, LUNIT will be -1 if the open was unsuccessful. Otherwise, it will contain the logical unit number of the file. When you are finished using the file, it should be closed with a call to the KLOSE routine. LUNOPN ( LUNIT, LFNAME, KFNAME[LFNAME], INROUT, NOTFMT, LUTRMI, LUTRMO) Character Integer KFNAME LUNIT, LFNAME, INROUT, NOTFMT, LUTRMI, LUTRMO Opens a file on unit number LUNIT. On entry, the character array KFNAME contains the filename. Set LFNAME to the number of characters in the filename, INROUT to 1 for file input or 0 for file output, NOTFMT to 1 for a binary or 0 otherwise, LUTRMI to the standard input unit number (normally 5), and LUTRMO to the standard output unit number (normally 6). On return, LUNIT will be -1 if the open was unsuccessful. Otherwise, it will contain the logical unit number assigned to the opened file. LXBRED ( LUNIT, INERR) Integer LUNIT, INERR Reads in a solution basis saved with the LXBWRT routine from the file associated with the logical unit LUNIT. Use routine LUNOPN to assign a unit number to a file. The solution basis will be used as a starting point when solving the current model. The model must be in memory before calling LXBRED. On return, INERR will be nonzero if an error occurred. This routine corresponds to the FBR command-line command. LXBWRT ( LUNIT, INERR) Integer LUNIT, INERR Saves the current solution in a basis file. The format of this file is proprietary and is of little use outside the LINDO software. The basis is sent to the file associated with the logical unit number LUNIT (see LUNGET and LUNOPN). INERR will return 0 if everything was successful, otherwise, it will be nonzero. This routine corresponds to the FBS command-line command. 240 CHAPTER 8 MAKINT ( J) Integer J Makes variable J a general integer variable. The SLB and SUB of variable J remain unchanged. LINDO permutes integer variables to appear first in the internal ordering. Thus, this routine may change the internal ordering of variables. To make variable J binary, make two calls: first call SETSUB to set the upper bound to 1, then call MAKINT to make the variable integer. If you don’t know the index of a variable, you can have LINDO look it up with the NDXOFV routine. NDXOFV ( KLINE[I2], I1, I2, J) Character KLINE Integer I1, I2, J Returns the internal index J of the variable whose name is stored one character per element in the character array KLINE, starting at position I1 and extending no further than position I2. On return, I2 will point to the last byte in the name. J will be 0 if the name is invalid, or one more than the number of existing variables if the name was valid, but did not match any existing variable. NINTEQ ( NOINT) Integer NOINT Sets the number of integer variables to NOINT. You must place the desired integer variables first in the formulation (i.e., you must define them using APPCOL before defining any other variables) and must set the simple upper and lower bounds appropriately (see SETSUB and SETSLB). OUTSPC ( J) Integer J Sends a standard LINDO solution report to the standard output device. On entry, set J to 0 to display nonzero values only or 1 to display the full report. To capture this output in a file, see the CAPOUT routine. This routine corresponds to the SOLU and NONZ command-line commands. PARBGN ( IROW, PAML) Float PAML Integer IROW Sets up for doing right-hand side parametrics. On entry, set IROW to the index of the row you want to do parametrics on and PAML to the target right-hand side value. The model should be optimized beforehand using the GO routine. Once you have called PARBGN to setup for parametrics, you will then need to call PARSTP iteratively to perform the actual parametric steps. PARBGN in conjunction with PARSTP correspond to the PARA command-line command. LINDO CALLABLE LIBRARIES 241 PARSTP ( PV, JI, JO) Float PV Integer JI, JO Performs a single step in parametric analysis of a right-hand side value. You must setup for parametrics by calling PARBGN once before making any calls to PARSTP. PARSTP returns the change in the value of the right-hand side in the single precision variable PV, the index of the entering variable in JI, and the index of the departing variable in JO. If no departing variable could be found (e.g., the solution becomes unbounded), then JO will return 0. If no entering variable could be found (e.g., the solution becomes infeasible), then JI returns 0. In general, you will want to iteratively call PARSTP until one of three things occur: 1) PV reaches your target value, 2) JO returns 0 (unbounded), or 3) JI returns 0 (infeasible). PARSTP, in conjunction with PARBGN, correspond to the PARA command-line command. QUIET ( NOISE) Integer NOISE Sets LINDO’s output level. On entry, set NOISE to the following desired output level from LINDO: NOISE -1 0 1 2 LINDO Message Level Essentially no output Corresponds to TERSE mode Default or VERBOSE mode Message at each pivot step Be sure you have thoroughly debugged your application before calling QUIET(-1). Otherwise, you may miss important error system messages from LINDO. As an alternative to QUIET, all messages may be routed to a file by use of the CAPOUT routine. RDBC ( LUNIT) Integer LUNIT Reads in a solution basis from the file associated with logical unit number LUNIT. To associate a file with a unit number, see routines LUNOPN and LUNGET. The file must have been created with a call to the SDBC routine. This solution basis will be used as a starting point when solving the current model. The model must be in memory before calling RDBC. Note that at this point, routines LXBWRT and LXBRED are more powerful than SDBC and RDBC at saving and restoring a basis. This routine corresponds to the RDBC command-line command. 242 CHAPTER 8 RDMPS ( LUNIT, NDIR) Integer LUNIT, NDIR Reads an MPS format model from the file associated with unit number LUNIT. To associate a file with a unit number, see routines LUNOPN and LUNGET. On entry, set NDIR as follows: 1 for minimization, -1 for maximization, and 0 if the user is to be prompted for the direction of the objective. LUNIT will return -1 if the attempt to read failed. This routine corresponds to the RMPS command-line command. REPROW ( IROW, PRIMAL, DUAL) Float PRIMAL, DUAL Integer IROW Determines, after optimization (i.e., calling routine GO), the slack value and dual price on row IROW. On return, the variables PRIMAL and DUAL will contain the slack value and dual price for row IROW. REPVAR ( JCOL, PRIMAL, DUAL) Float PRIMAL, DUAL Integer JCOL Determines, after optimization (i.e., calling routine GO), the value and reduced cost for variable JCOL. On return the single precision variables PRIMAL and DUAL will contain the value and reduced cost for the variable. To retrieve this same information in double precision, see routine DRPVAR. RETR ( LUNIT) Integer LUNIT Retrieves a model from a file attached to logical unit LUNIT. The file should have been created using the SAVE routine. To attach a file to a logical unit, see routines LUNOPN and LUNGET. This routine corresponds to the RETRIEVE command-line command. RNGBGN () Does the initial setup for range analysis. It must be called once just before the first call to either RNGCOL or RNGROW. See these two routines for details on performing range analysis. RNGBGN, in conjunction with RNGCOL and RNGROW, correspond to the RANGE command-line command. RNGCOL ( JCOL, COBJ, TU, TD) Float COBJ, TU, TD Integer JCOL Does range analysis on the objective row coefficient of column JCOL. RNGBGN must have been called just before the first call to RNGCOL. On return from RNGCOL, COBJ is the objective coefficient of column JCOL, TU is the allowable change up, and TD is the allowable change down in COBJ before a basis change is necessary to retain optimality. LINDO CALLABLE LIBRARIES 243 RNGCOL in conjunction with RNGBGN and RNGROW correspond to the RANGE command-line command. RNGROW ( IROW, RHS, TU, TD) Float RHS, TU, TD Integer IROW RNGROW does range analysis on the right-hand side of row IROW. RNGBGN must have been called just before the first call to RNGROW. On return from RNGROW, RHS is the right-hand side coefficient of row I, TU is the allowable change up, and TD is the allowable change down in the righthand side before a basis change is necessary to retain feasibility. If I < 0, then -I is interpreted as a column number and the analysis is done on the implicit constraint X( J) > 0. RNGROW, in conjunction with RNGBGN and RNGCOL, corresponds to the RANGE command-line command. SAVE ( LUNIT) Integer LUNIT Saves a model in a proprietary, compressed format to the file associated with logical unit LUNIT. The model may be restored using the RETR routine. To associate a file with a unit number, see routines LUNGET and LUNOPN. This routine corresponds to the SAVE command-line command. SDBC ( LUNIT) Integer LUNIT Writes a column report to the file associated with logical unit LUNIT. To associate a file with a unit number, see routines LUNGET and LUNOPN. This routine corresponds to the SDBC command-line command. SETIPT ( TOL) Float TOL Sets the acceptance tolerance for solving integer programs to the value of TOL. For example, if TOL = .1, then the branch-and-bound search is terminated as soon as the (unknown) optimum is guaranteed to be no more than 10% better than the known incumbent. SETIPT must be called after each call to INIT. SETIPT corresponds to the IPTOL command-line command. SETQCP ( IROW) Integer IROW Indicates that row IROW is the first real constraint in a quadratic programming model. SETQCP corresponds to the QCP command-line command. 244 CHAPTER 8 SETSLB ( JCOL, SLB) Float SLB Integer JCOL Sets the simple lower bound of variable JCOL to the value SLB. For efficiency, use this feature in place of explicit constraints of the type: X SLB. The SETSLB routine corresponds to the SLB command-line command. SETSUB ( JCOL, SUB) Float SUB Integer JCOL Sets the simple upper bound of variable JCOL to the value SUB. For efficiency, use this feature in place of explicit constraints of type: X SUB. The SETSUB routine corresponds to the SUB command-line command. STATS ( IDTAIL) Integer IDTAIL Sends a model statistics report to the standard output device. If IDTAIL > 0, then it prints the model statistics report as would be generated by the STATS command. If IDTAIL = 0, then it just checks the model for poor scaling. To capture the output from STATS in a file, see the CAPOUT command. General Application Requirements There is a wealth of different applications one could devise using the LINDO libraries. Fundamentally, all these different applications will, as a minimum, always perform the following functions: building a model, solving the model, and retrieving the solution to the model. The primary routines used to perform each of these functions are listed below: Operation Building a Model Solving a Model Retrieving the Solution Routines Called INIT, DEFROW, APPCOL GO REPROW, REPVAR Almost every application linking to LINDO will make extensive use of the routines listed above. Some small examples are illustrated below. LINDO CALLABLE LIBRARIES 245 Sample Matrix Generators As a simple example, suppose we want to use the callable libraries to pass LINDO the following two-variable model: Maximize 20X + 30Y Subject to X < 50 Y < 60 X + 2Y < 120 End In addition, we want to solve the model, get the solution from LINDO, and report the solution to our user. The following sections illustrate how to accomplish this using three development environments Visual Basic, Visual C/C++, and Powerstation FORTRAN. The examples assume you, the user, have a base knowledge of the programming language. All examples make use of the LINDO DLL for Windows. For linking instructions on platforms other than Windows, refer to the Installation Instructions provided with your specific version of LINDO. In order to simplify the following examples, all forms of error checking have been omitted in our sample code. A well-written application, however, would check all returned error codes to guard against potential problems. A Sample Visual Basic Application This section illustrates a Microsoft Visual Basic application to interface with the LINDO DLL, which builds and solves the simple, two variable model presented above. If you would prefer to skip the details of constructing this project and jump ahead to experimenting with the completed project, you can find it under the name \LINDO\DLL32\MSVB\LNDMSVB.VBP. You should be able to load this project directly into VB 5.0. 246 CHAPTER 8 Building the Application The first step in building the project is as follows: 1. 2. 3. Start Visual Basic and then issue the File|New Project command. Select “Standard Exe” and then click the OK button. Use the button tool to add two buttons to the project’s form, so it resembles: Now, you will need to add handler code for the two buttons on the form. The Quit button is relatively straightforward. All the Quit button does when the user clicks on it is exit the application. So, double click on the Quit button and enter the following code: Private Sub Quit_Click() End End Sub A little more work is required to handle the Solve button. This button is programmed below. When the user presses the Solve button, the model passes to LINDO, LINDO solves the model, and the solution is then printed in the upper left corner of the form. LINDO CALLABLE LIBRARIES 247 As a first step, all the external LINDO functions must be declared. The declarations for Visual Basic may be found in the file \LINDO\DLL32\MSVB\LNDDECL.TXT, which is a standard text file readable into any text editor. Read the declarations into the text editor of your choice, copy them, and then paste them into the General code section of the VB project. When looking at the General code section of your project, you should now see the LINDO routine declarations: The next step is to add handler code for the Solve button, which references the LINDO routines. To do this, double click on the Solve button and enter the following code: Private Sub Solve_Click() ' A simple Visual Basic 5.0 program to define ' and solve the following model using the 32 ' bit LINDO DLL: ' ' Max 20 X + 30 Y ' S.T. ' X < 50 ' Y < 60 ' X + 2Y < 120 ' End Dim Nonz As Long, Istat As Long Dim I As Long, Idir As Long Dim Trouble As Long, Idrow As Long Static Iro(3) As Long Dim Primal As Single, Dual As Single Static Rhs(3) As Single Static Value(3) As Single Dim Kname As String ' Initialize LINDO Call ILINDO Call INIT ' Redirect LINDO's standard output to a file Call LUNOPN(60, 9, "LINDO.OUT", _ 0, 0, 0, 0) Call CAPOUT(60) 248 CHAPTER 8 ' Put LINDO in TERSE model (note: not ' generally good practice until your ' app is fully debugged) Call QUIET(0) ' Define objective row Call DEFROW(-1, 0#, Idrow, Trouble) ' Define constraint rows Rhs(1) = 50: Rhs(2) = 60: Rhs(3) = 120 For I = 1 To 3 Call DEFROW(1, Rhs(I), Idrow, Trouble) Next I ' Define column "X" Iro(1) = 1: Iro(2) = 2: Iro(3) = 4 Value(1) = 20: Value(2) = 1: Value(3) = 1 Kname = "X " Nonz = 3 Call APPCOL(Kname, Nonz, Value(1), _ Iro(1), Trouble) ' Define column "Y" Iro(1) = 1: Iro(2) = 3: Iro(3) = 4 Value(1) = 30: Value(2) = 1: Value(3) = 2 Kname = "Y " Nonz = 3 Call APPCOL(Kname, Nonz, Value(1), _ Iro(1), Trouble) ' Solve the model Call GO(0, Istat) ' Print objective value I = 1 Call REPROW(I, Primal, Dual) Print " Objective Value:", Primal ' Print variable values Call REPVAR(1, Primal, Dual) Print "" Print " X = ", Primal Call REPVAR(2, Primal, Dual) Print " Y = ", Primal ' Shut down LINDO Call LSEXIT End Sub First off, in the above code, LINDO is initialized with the calls: Call ILINDO Call INIT ILINDO performs one-time initialization for LINDO. It should be called once at the start of your code. Then, INIT performs initialization for a new model. INIT should be called each time your code begins input of a new model. LINDO CALLABLE LIBRARIES 249 Next, the file called LINDO.OUT is opened with the LUNOPN routine. Then, LINDO's standard output is redirected to this file via a call to CAPOUT: Call LUNOPN(60, 9, "LINDO.OUT", _ 0, 0, 0, 0) Call CAPOUT(60) Had LINDO’s standard output not been redirected, the application would crash under Windows the first time LINDO wrote anything to the standard output device. As a note, if you are having difficulty debugging your LINDO application, it can be useful to view the contents of this LINDO output file for any helpful system messages. In order to enhance performance, the QUIET routine is called next: Call QUIET(0) This puts LINDO into terse output mode, minimizing the amount of output to the log file. In general, it is best to leave out this call to QUIET until you have completely debugged your application. By suppressing LINDO’s output, you may miss important system messages. As mentioned above, you must make one call to DEFROW for each row in your model. The following code does this once to define the objective row, and three more times in a loop to define the three constraints. ' Define objective row Call DEFROW(-1, 0#, Idrow, Trouble) ' Define constraint rows Rhs(1) = 50: Rhs(2) = 60: Rhs(3) = 120 For I = 1 To 3 Call DEFROW(1, Rhs(I), Idrow, Trouble) Next I Once the rows are defined, APPCOL can be used to define the columns. Here APPCOL is called twice, once for each column in our model: ' Define column "X" Iro(1) = 1: Iro(2) = 2: Iro(3) = 4 Value(1) = 20: Value(2) = 1: Value(3) = 1 Kname = "X " Nonz = 3 Call APPCOL(Kname, Nonz, Value(1), _ Iro(1), Trouble) ' Define column "Y" Iro(1) = 1: Iro(2) = 3: Iro(3) = 4 Value(1) = 30: Value(2) = 1: Value(3) = 2 Kname = "Y " Nonz = 3 Call APPCOL(Kname, Nonz, Value(1), _ Iro(1), Trouble) INSROW or INSERT could also have been used to add the nonzero elements to the model. However, because LINDO stores models internally in column order, using APPCOL is much more efficient. At this point, the entire model is built. The next step is to solve it using LINDO’s GO routine: Call GO(0, Istat) 250 CHAPTER 8 Once the model is solved, the solution is retrieved from LINDO and displayed: ' Print objective value I = 1 Call REPROW(I, Primal, Dual) Print " Objective Value:", Primal ' Print variable values Call REPVAR(1, Primal, Dual) Print "" Print " X = ", Primal Call REPVAR(2, Primal, Dual) Print " Y = ", Primal The LINDO routine REPROW is used to get the value of the objective row. Likewise, REPVAR is used twice to get the values for the two variables. Finally, LINDO is closed down with a call to LSEXIT: Call LSEXIT Running the Application In order to run the application, you need to make the LINDO DLL available to the system. To do this, simply copy \LINDO\DLL32\LNDDLL32.DLL to either the Windows directory or to the directory containing your application. Once you have done this, you can issue the Run|Start command in VB to begin execution. You should see the dialog box displayed on the screen: LINDO CALLABLE LIBRARIES 251 Press the Solve button to build and solve the model, at which point you should see the solution displayed in the dialog box: Finally, press the Quit button to exit. A Sample Visual C/C++ Application The next section uses Visual C/C++ 5.0 (VC5) to build and solve the simple, two variable model discussed above. This section assumes the reader is well versed in the mechanics of using VC5. If you would rather skip the details involved in constructing this project, and would prefer to experiment with a completed version of the project, you can load the project file, \LINDO\DLL32\MSVC\LNDMSVC.DSW, directly into the VC5 IDE. Building the Application The following discussion walks you through the steps involved in building a VC5 project to interface with LINDO. VC5’s AppWizard is used to provide the base code for a dialog based application. In a dialog based application, the user interface consists of a single dialog box. Additional code is added to the AppWizard code to perform the model generation, solution and reporting. 252 CHAPTER 8 The steps required to create the base code with AppWizard follow: 1. 2. 3. 4. 5. 6. 7. Start up the VC5 IDE. Issue the File|New command. In the New dialog box, select the Projects tab, click on the “MFC AppWizard (exe)” option, and click OK. Assign the project a name. For this example, the name LNDMSVC was chosen. Click the OK button. You should now see the “MFC AppWizard – Step 1” dialog box. Click on the “Dialog based” radio button and then press the Finish button. You should now see the following summary of your choices: Finally, press the OK button and AppWizard will generate the base code set. LINDO CALLABLE LIBRARIES 253 Use the IDE’s resource editor to modify the application’s main dialog box, so it resembles the following: Next, you will need to use the Class Wizard in VC5 to assign member variables to the three output fields in the dialog box. Specifically, the following member variables should be assigned to the three output fields (all members are of type float): Output Field Objective Value X Y Member Variable (float) m_fObjective m_fX m_fY You need to add definitions for the LINDO library routines to the dialog class. The LINDO definitions for VC5 can be found in the file \LINDO\DLL32\MSVC\LINDMSVC.H. Open up the header file for the dialog class and add the “#include” statement (shown below in bold): // lndmsvcDlg.h : header file // #if !defined( AFX_LNDMSVCDLG_H__ … __INCLUDED_ ) #define AFX_LNDMSVCDLG_H__ … __INCLUDED_ #if _MSC_VER >= 1000 #pragma once #endif // _MSC_VER >= 1000 #include "lindmsvc.h" //////////////////////////////////////////////////////////// // CLndmsvcDlg dialog class CLndmsvcDlg : public CDialog { // Construction public: CLndmsvcDlg(CWnd* pParent = NULL);// standard constructor . . . 254 CHAPTER 8 The next task is to attach a handler routine to the Solve button to pass the model to LINDO and solve it. Use the ClassWizard to map the BN_CLICKED message from the Solve button to a handler routine called OnSolve. Once you have the stub handler in place, edit it and add the code listed below: void CLndmsvcDlg::OnSolve() { //-------------------------------------------------------// // When the user presses the Solve button we use the 32 bit // LINDO DLL (LNDDLL32.DLL) to generate and solve the // following small LP: // // Max 20 X + 30 Y // S.T. // X < 50 // Y < 60 // X + 2Y < 120 // End // // Results are posted to the dialog box. // //-------------------------------------------------------// // Initialize LINDO by calling ILINDO and INIT. ILINDO(); INIT(); // Capture any standard output in a file: // First, open a file char *cKfname = "LINDO.OUT"; long lUnit = 60, lFname = 9, lInOrOut = 0, lNotFmt = 0, lLutrmi = 0, lLutrmo = 0; LUNOPN( &lUnit, &lFname, &cKfname, &lInOrOut, &lNotFmt, &lLutrmi, &lLutrmo); // Now, tell LINDO to divert all standard // output to this unit CAPOUT( &lUnit); // Put LINDO in TERSE mode long lTerse = 0; QUIET( &lTerse); // Define the rows long i; long lIdir = -1, lIdrow, lTruble; float fRhs = 0.f; float fConstraintRhs[3]={50.f,60.f,120.f}; // Define objective row DEFROW( &lIdir, &fRhs, &lIdrow, &lTruble); // Define constraint rows lIdir = 1; for ( i = 2; i <= 4; i++) { DEFROW( &lIdir, &fConstraintRhs[ i - 2], &lIdrow, &lTruble); } LINDO CALLABLE LIBRARIES 255 // Define our two columns char *cNameX = "X "; char *cNameY = "Y "; long lNonz = 3; float fValX[] = { 20.f, 1.f, 1.f}; float fValY[] = { 30.f, 1.f, 2.f}; long lIroX[] = { 1, 2, 4}; long lIroY[] = { 1, 3, 4}; // Call APPCOL to send LINDO column X APPCOL( &cNameX, &lNonz, fValX, lIroX, &lTruble); // Call APPCOL to send LINDO column Y APPCOL( &cNameY, &lNonz, fValY, lIroY, &lTruble); // Call GO to optimize the model long lLIMGO = 0, lISTAT; GO( &lLIMGO, &lISTAT); // Get the solution from LINDO // Get the objective value float fDual; i = 1; REPROW( &i, &m_fObjective, &fDual); // Get the value of X REPVAR( &i, &m_fX, &fDual); // Get the value of Y i = 2; REPVAR( &i, &m_fY, &fDual); // Post solution values in dialog box UpdateData( FALSE); // Shut LINDO down LSEXIT(); // All done return; } First off, in the above code, LINDO is initialized with the calls: ILINDO(); INIT(); ILINDO performs one-time initialization for LINDO. It should be called once at the start of your code. Next, the INIT command performs initialization for a new model. INIT should be called each time your code begins input of a new model. Next, a file called LINDO.OUT is open with the LUNOPN routine, and LINDO’s standard output is redirected to this file via a call to CAPOUT: char *cKfname = "LINDO.OUT"; long lUnit = 60, lFname = 9, lInOrOut = 0, lNotFmt = 0, lLutrmi = 0, lLutrmo = 0; LUNOPN( &lUnit, &lFname, &cKfname, &lInOrOut, &lNotFmt, &lLutrmi, &lLutrmo); // Now, tell LINDO to divert all standard // output to this unit CAPOUT( &lUnit); 256 CHAPTER 8 Had LINDO’s standard output not been redirected, the application would crash under Windows the first time LINDO wrote anything to the standard output device. In addition, if you are having difficulty debugging your LINDO application, it can be useful to view the contents of this LINDO output file for any helpful system messages. Note, in the calls to LUNOPN and CAPOUT, all arguments are passed by reference. This is true for all LINDO routines—all arguments must be passed by reference rather than by value. Next, in order to enhance performance, the QUIET routine is called: long lTerse = 0; QUIET( &lTerse); This puts LINDO into terse output mode, minimizing the amount of output to the log file. In general, it’s best to leave out this call to QUIET until you have completely debugged your application. By suppressing LINDO’s output, you may miss important system messages. As mentioned at the beginning of this chapter, you must make one call to DEFROW for each row in your model. The following code does this once to define the objective row, and three more times in a loop to define our three constraints. // Define objective row DEFROW( &lIdir, &fRhs, &lIdrow, &lTruble); // Define constraint rows lIdir = 1; for ( i = 2; i <= 4; i++) { DEFROW( &lIdir, &fConstraintRhs[ i - 2], &lIdrow, &lTruble); } Once the rows are defined, APPCOL can be used to define the columns. Here APPCOL is called twice, once for each column in our model: // Define our two columns char *cNameX = "X "; char *cNameY = "Y "; long lNonz = 3; float fValX[] = { 20.f, 1.f, 1.f}; float fValY[] = { 30.f, 1.f, 2.f}; long lIroX[] = { 1, 2, 4}; long lIroY[] = { 1, 3, 4}; // Call APPCOL to send LINDO column X APPCOL( &cNameX, &lNonz, fValX, lIroX, &lTruble); // Call APPCOL to send LINDO column Y APPCOL( &cNameY, &lNonz, fValY, lIroY, &lTruble); INSROW or INSERT could also have been used to add the nonzero elements to the model. However, because LINDO stores models internally in column order, using APPCOL is more efficient. At this point, the entire model is built. The next step is to solve it using LINDO’s GO routine: // Call GO to optimize the model long lLIMGO = 0, lISTAT; GO( &lLIMGO, &lISTAT); LINDO CALLABLE LIBRARIES 257 Once the model is solved, the solution is retrieved from LINDO and displayed: // Get the solution from LINDO // Get the objective value float fDual; i = 1; REPROW( &i, &m_fObjective, &fDual); // Get the value of X REPVAR( &i, &m_fX, &fDual); // Get the value of Y i = 2; REPVAR( &i, &m_fY, &fDual); // Post solution values in dialog box UpdateData( FALSE); The LINDO routine REPROW is used to get the value of the objective row. Likewise, REPVAR is used twice to get the values for the two variables. Finally, LINDO is closed down with a call to LSEXIT: // Shut LINDO down LSEXIT(); Now, an import library needs to be created to add to our project, which resolves the external references to the LINDO library routines. The import library is built from the definitions, or DEF, file for the LINDO library. The DEF file can be found in location \LINDO\DLL32\LNDDLL32.DEF. The LIB utility supplied with MSVC is used to create the import library with the following DOS command: LIB /DEF:LNDDLL32.DEF /OUT:LNDDLL32.LIB This creates the import library under the name LNDDLL32.LIB. You must add this import library to your project with the Project|Add to Project|Files command. At this point, you should be able to build and run the application. 258 CHAPTER 8 Running the Application In order to run the application, you need to make the LINDO DLL available to the system. To do this, simply copy \LINDO\DLL32\LNDDLL32.DLL to either the Windows directory or to the directory containing your application. Once you have done this, you can issue the Build|Execute command in VC5 to begin execution. You should see the dialog box displayed on the screen: Press the Solve button to build and solve the model. At which point, you should see the solution displayed in the dialog box: Finally, press the OK button to exit the application. LINDO CALLABLE LIBRARIES 259 A Sample FORTRAN Application This section illustrates Powerstation FORTRAN 4.0 code, which generates and solves the simple, two variable model discussed in the sections above. Building the Application The following discussion walks you through the steps to build the sample executable: 1. 2. 3. Start the Powerstation IDE. Create a new project workspace using File|New command. Select “Console Application” as the project type. Use the LINDO library definitions file, \LINDO\DLL32\LNDDLL32.DEF, to build an import library with the following DOS command: LIB /DEF:LNDDLL32.DEF /OUT:LNDDLL32.LIB 4. 5. Note, that the LIB application is included with Powerstation FORTRAN. Use the Insert|File Into Project command to add the sample FORTRAN application file (\LINDO\DLL32\MSFORT\LINDOPS.FOR) and the import library from the previous step in the project. Use the Build|Build command to create the executable. The contents of the FORTRAN source file are reproduced below: program lindops c--------------------------------------------------------c c A Microsoft Powerstation FORTRAN program to define and c solve the following model using the 32 bit LINDO Dynamic c Link Library: c c Max 20 X + 30 Y c S.T. c X < 50 c Y < 60 c X + 2Y < 120 c End c c--------------------------------------------------------implicit none c lnspsint.h contains the definitions for all the LINDO c callable routines include 'lndpsint.h' c define variables character*8 kname integer*4 i, idrow, istat, irowx( 3), irowy( 3) logical trouble real obj, x, y, dual real rhs( 3), valx( 3), valy( 3) 260 CHAPTER 8 c data initialization data rhs /50., 60., 120./ data valx / 20., 1., 1./ data valy / 30., 1., 2./ data irowx /1,2,4/ data irowy /1,3,4/ c Initialize LINDO by calling ILINDO and INIT. call ilindo call init c Put LINDO in TERSE mode call quiet( -1) c Call DEFROW to define objective row call defrow( -1, 0., idrow, trouble) c Now, call DEFROW to define constraint rows do i = 1, 3 call defrow( 1, rhs( i), idrow, trouble) enddo c Call APPCOL to define columns. Note that all character c data is passed using double indirection! c Define X kname = 'X' call appcol( loc( kname), 3, valx, irowx, trouble) c Define Y kname = 'Y' call appcol( loc( kname), 3, valy, irowy, trouble) c Display the formulation call look( 1, 4) c Call GO to solve the model call go( 1000, istat) c Get the objective value call reprow( 1, obj, dual) c Get the value of x call repvar( 1, x, dual) c Get the value of y call repvar( 2, y, dual) c Report values write(6,10) obj, x, y 10 format(//, +' Objective =',f8.1,/,' X =',f8.1,/, * +' Y =',f8.1,/) pause ' Press <Enter> to exit:' c Shut down LINDO by calling LSEXIT call lsexit c All Done end LINDO CALLABLE LIBRARIES 261 When calling LINDO from Powerstation, you must include the definitions of the LINDO routines, so the compiler formats the calls to the LINDO library correctly. The following code accomplishes this: c lnspsint.h contains the definitions for all the LINDO c callable routines include 'lndpsint.h' Note, you can find the definitions file, LNDPSINT.H, in the directory \LINDO\DLL32\MSFORT. LINDO is initialized with calls to ILINDO and INIT: call ilindo call init ILINDO performs one-time initialization for LINDO. It should be called once at the start of your code. Next, you should call the INIT command, which performs initialization for a new model. INIT should be called each time your code begins input of a new model. When demonstrating Basic and C++, the next thing the sample code above does is redirect LINDO’s output to a file. This is required when building Windows GUI applications. In this case, it is a console application, in which, the standard output device is available. Thus, LINDO can default to writing to the standard output device. Therefore, redirection of output is unnecessary. On the other hand, if you were using Powerstation to build a Windows GUI application, you would need to redirect LINDO’s output. In order to minimize the amount of LINDO’s output to the console, the QUIET routine is called: call quiet( -1) In general, it’s best to leave out this call to QUIET until you have completely debugged your application. By suppressing LINDO’s output, you may miss important system messages. As mentioned at the beginning of this chapter, you must make one call to DEFROW for each row in your model. The following code does this once to define the objective row, and three more times in a loop to define the three constraints. c Call DEFROW to define objective row call defrow( -1, 0., idrow, trouble) c Now, call DEFROW to define constraint rows do i = 1, 3 call defrow( 1, rhs( i), idrow, trouble) enddo Once the rows are defined, APPCOL can be used to define the columns. Here APPCOL is called twice, once for each column in the model: c Define X kname = 'X' call appcol( loc( kname), 3, valx, irowx, trouble) c Define Y kname = 'Y' call appcol( loc( kname), 3, valy, irowy, trouble) INSROW or INSERT could also have been used to add the nonzero elements to the model. However, because LINDO stores models internally in column order, using APPCOL is more efficient. 262 CHAPTER 8 At this point, the entire model is built. A useful debugging device is to display the model’s formulation. This is done with LINDO’s LOOK routine: c Display the formulation call look( 1, 4) The next step is to solve the model using LINDO’s GO routine: call go( 1000, istat) Once the model is solved, the solution is retrieved from LINDO and displayed: c Get the objective value call reprow( 1, obj, dual) c Get the value of x call repvar( 1, x, dual) c Get the value of y call repvar( 2, y, dual) c Report values write(6,10) obj, x, y 10 format(//, +' Objective =',f8.1,/,' X =',f8.1,/, * +' Y =',f8.1,/) pause ' Press <Enter> to exit:' The LINDO routine REPROW is used to get the value of the objective row. Likewise, REPVAR is used twice to get the values for the two variables. Finally, LINDO is closed down with a call to LSEXIT: call lsexit LINDO CALLABLE LIBRARIES 263 Running the Application In order to run the application, you need to make the LINDO DLL available to the system. To do this, simply copy \LINDO\DLL32\LNDDLL32.DLL to either the Windows directory or to the directory containing your application. Once you have done this, execute the application and you should see the following displayed on your screen: 264 CHAPTER 8 Calling LINDO from Other Languages Even if you aren’t using Basic, C, or FORTRAN, you should still be able to successfully link to the LINDO DLL. Any current development environment for Windows should be able to call a DLL. We suggest you thoroughly review your compiler’s documentation on calling DLLs. Some additional guidelines are: LINDO conforms to the 32-bit (or NT) DLL standard. Be sure you are making 32-bit calls and not the old style 16-bit calls. All LINDO routine names are in uppercase. Be aware of your compiler’s name decoration strategies. Some compilers may append underscores and other strange characters to symbol names. This will lead to unresolved external symbols when linking with LINDO. In general, however, there should be an option in the compiler to suppress name decoration. All arguments are passed to LINDO by reference rather than by value. All character arguments are passed to LINDO using double indirection (i.e., by passing a pointer to a pointer). If your development environment isn’t capable of generating a double pointer, there is a single pointer cover function for each routine that passes character data. To call the single pointer cover function, simply place the letter X on the end of the routine name. For example, APPCOL expects a character name passed by placing a pointer to a pointer on the stack. Calling APPCOLX accesses the single pointer cover function. All LINDO routines conform to the cdecl standard, where the calling routine is responsible for cleaning up the stack. However, many development environments use the standard calling convention where the called routine is responsible for cleaning the stack. If you’re compiler can’t generate cdecl calls, then LINDO provides standard call cover functions for each of its routines. To access the standard cover function for each routine, append the string “_STD” to the end of the routine’s name. As an example, the standard cover for APPCOL has the name APPCOL_STD. Integer Programming User Interface LINDO uses the branch-and-bound search technique to solve IP models. This search technique finds a series of better and better integer solutions until optimality is reached. You have the option of providing a callback routine to monitor and influence the branch-and-bound procedure. The LINDO DLL searches for a 32-bit DLL called NEWIP.DLL when it starts. If this file is present, LINDO will call NEWIP.DLL whenever a new integer solution is found and pass two 32-bit float values by reference. We call these two arguments ACTUAL and BOUND. Just before calling NEWIP, LINDO sets ACTUAL to the cost of the current solution as perceived by LINDO and BOUND to the bound on the best possible IP solution. NEWIP lets you reset the argument ACTUAL, but not BOUND. LINDO CALLABLE LIBRARIES 265 You can use the NEWIP interface in a number of ways. For example, the C version of NEWIP (shown below) makes LINDO search for all integer solutions greater than 1000 and displays each such solution (Note that this NEWIP will cause longer solution times than the usual). void NEWIP( float *fActual, float *fBound) { /* Print this solution */ int nOne = 1; OUTSPC( &nOne); /* Now claim that this solution was not very good */ *fActual = (float) 1000.; return; } The following version of NEWIP, written in FORTRAN, causes LINDO to consider future branches in the search tree only if they might lead to solutions at least 15% better than the incumbent solution. This search process will tend to be a little shorter than the standard search procedure. Maximization is presumed. SUBROUTINE NEWIP( ACTUAL, BOUND) C PRINT OUT THIS SOLUTION CALL OUTSPC( 1) C NOW CLAIM THIS SOLUTION WAS 15% BETTER THAN IT REALLY IS ACTUAL = ACTUAL + .15* ABS( ACTUAL) RETURN END Monitoring the Solver At each iteration of the simplex algorithm, LINDO can call a user supplied callback routine with information on the status of the current solution. The LINDO DLL searches for a 32-bit DLL called WATSUP.DLL when it starts. If this file is present, LINDO will call the first routine in WATSUP.DLL once per iteration of the simplex algorithm passing two arrays. The first array, which we will call ISTTUS, contains two 32-bit integers. The second array, ENVIRN, contains four 32-bit float values. C and FORTRAN definitions of WATSUP are given below: C: void WATSUP( long ISTTUS[4], float ENVIRN[4]) FORTRAN: SUBROUTINE WATSUP( ISTTUS, ENVIRN) INTEGER *4 ISTTUS(4) REAL*4 ENVIRN(4) 266 CHAPTER 8 The contents of the elements in these arrays are listed in the tables below: ISTTUS Index 1 2 ENVIRN Index 1 2 3 4 Contents 1 if current solution is infeasible, 2 if feasible but not LP optimal, and 3 if solver is doing branch-and-bound Current iteration/pivot number Contents Current sum of infeasibilities Current objective value Best IP objective value found thus far Bound on the best IP objective value 267 9 Numerical Considerations The size of model that can be conveniently solved depends mainly on the speed of the machine used, memory limitations of the machine, and how well the model is formulated. On a standard personal computer with 8Mb of addressable memory, the capability is for 8000 rows and 16000 columns. On machines with less stringent memory limitations, there are versions of LINDO that will accept problems with 64,000 rows and several 100,000 columns. The user should scale rows and columns to avoid numerical difficulties. A rule of thumb is that there should be no nonzero coefficient whose absolute value is greater than 100,000 or less than .0001. If LINDO feels the matrix is poorly scaled, it will print a warning. On poorly scaled problems, LINDO will do significance checking of crucial calculations (e.g., to determine in which situations a number like .00000325 is really zero and in which situations it is really a perfectly valid nonzero number). In very large problems with lots of non-binding constraints, there is a slight computational advantage to converting greater-than-or-equal-to constraints to less-than-or-equal-to constraints. The expense in terms of both space and time of carrying along a non-binding constraint is slightly less for the latter. LINDO assumes your input data is accurate to about 6 decimal digits. Generally, the answers from LINDO will have almost the same accuracy as the input data. However, if you do not keep in mind the accuracy LINDO expects in the input data, it is very easy to produce a formulation for which the accuracy of the answers is considerably less than the accuracy of the input data. As an example of a careless formulation, consider the following: MAX Z SUBJECT TO 2) - 0.6666 Z + X = 3) - 0.3333 Z + Y = 4) - Z + X + Y = 5) Z <= 1 END 0 0 0 A possible interpretation of the user's intentions is that he wanted: 2) 3) 4) 5) X = Y = X+Y Z < (2/3)Z (1/3)Z = Z 1 268 CHAPTER 9 In this case, the solution should be Z = 1, X = 2/3, Y = 1/3. LINDO, however, literally interprets the coefficients that were entered and proposes the following solution (correctly) as the optimum. LP OPTIMUM FOUND AT STEP 1 OBJECTIVE FUNCTION VALUE 1) 0.0000000E+00 VARIABLE VALUE REDUCED COST Z 0.000000 0.000000 X 0.000000 0.000000 Y 0.000000 0.000000 ROW SLACK OR SURPLUS DUAL PRICES 2) 0.000000 9998.340820 3) 0.000000 9998.340820 4) 0.000000 -9998.340820 5) 1.000000 0.000000 The reason is that for the given input data, constraint (4) is consistent with constraints (2) and (3) only if X = Y = Z = 0. If you sum constraints (2) and (3), you get -.9999 Z + X + Y = 0. This is consistent with (4) to five decimal digits only if X = Y = Z = 0. On the other hand, if you specify the fractions to 6 decimal places as below: MAX Z SUBJECT TO 2) - 0.666666 Z + X = 3) - 0.333333 Z + Y = 4) - Z + X + Y = 0 5) Z <= 1 END 0 0 then LINDO gives the solution: LP OPTIMUM FOUND AT STEP 1 OBJECTIVE FUNCTION VALUE 1) 1.000000 VARIABLE VALUE REDUCED COST Z 1.000000 0.000000 X 0.666666 0.000000 Y 0.333333 0.000000 ROW SLACK OR SURPLUS DUAL PRICES 2) 0.000000 0.000000 3) 0.000000 0.000000 4) 0.000001 0.000000 5) 0.000000 1.000000 This is because it considers .999999 and 1 indistinguishable. The general moral to this little example is that a good formulation has the quality that the feasible region does not suffer a dramatic change if only a small change is made in a coefficient. In mathematical terms, a model should not contain a constraint that is (almost) linearly dependent upon other constraints. For the above example, constraint 4 (or 3, or 2) should not have been in the formulation. When Z = 1, constraint (4) is either redundant or inconsistent with respect to (2) and (3), depending upon a very small change in a coefficient. If you delete constraint (4), you will discover NUMERICAL CONSIDERATIONS 269 that the formulation is now robust and the solution is only slightly affected by small changes in the coefficients of Z in (2) and (3). The large dual prices (9998.34) in the first solution are a clue that the formulation contains linearly dependent, but not quite consistent, constraints. Large dual prices indicate that a small change in a parameter may have a big effect on the results. Numerical Aesthetics If numbers like .99999 (instead of 1) in a solution report displease you, then you may be interested in some of the causes of these un-aesthetic round-off errors. One fundamental cause is that computers that use binary rather than decimal arithmetic are unable to represent most fractions with complete accuracy. For example, most computers cannot represent a perfectly innocent fraction like .1 with complete accuracy. Thus, if your input formulation had fractions, then the formulation stored inside the computer may be very slightly different from the formulation you entered. As a result, the solution may be very slightly different from what you think it should be. To reduce un-aesthetic round-off, you may wish to avoid fractions in your input data. Fractions that are obviously truncated, such as .66666, should be avoided. A constraint like: -.66666 Z + X = 0 might be better rewritten as: -2 Z + 3 X = 0. Also, a constraint like: X - .1 Y < 0 might be better rewritten as: 10 - Y < 0. 270 CHAPTER 9 271 A. Error Messages Listed below by code number are the error messages you may encounter when using LINDO. Brief suggestions for overcoming these errors are also included. 1. UNRECOGNIZED COMMAND. The last command you entered was not recognized by the LINDO command processor. Check the spelling of the command and try again. 2. EXPECTING ''SUBJECT TO'' ... ENTER THAT OR ''END''. The LINDO model parser was expecting to find “SUBJECT TO” or “ST” to indicate the start of the constraints. This indicates that a syntax error has occurred. You should enter several carriage returns to retreat to command level, examine the model with the LOOK command, make sure there is a SUBJECT TO, SUCH THAT, S.T. or ST after the MAX/MIN objective and at the start of the constraints, and enter the remainder of the model with the EXTEND command. 3. FIRST ROW SHOULD NOT HAVE A RELATIONAL OPERATOR. The first row in a LINDO model must always be the objective row. Given this, the first row should never contain a relational operator (e.g., <, =, or >). You should enter several carriage returns to retreat to command level, examine the model with the LOOK command, make sure the objective is in the first row starting with a MAX/MIN, and enter the remainder of the model with the EXTEND command. 4. EXPECTING SIGN OR RELATIONAL OPERATOR. The LINDO model parser was expecting to find a coefficient sign or a relational operator, but found something else. This indicates that a syntax error has occurred. You should enter several carriage returns to retreat to command level, examine the model with the LOOK command, check and edit, if necessary, the operators of all constraints, and enter the remainder of the model with the EXTEND command. 5. EXPECTING A VARIABLE COEFFICIENT. The LINDO model parser was unable to find a variable coefficient. This indicates that a syntax error has occurred. You should enter several carriage returns to retreat to command level, examine the model with the LOOK command, check and edit, if necessary, all variable coefficients, and enter the remainder of the model with the EXTEND command. 6. FIRST CHARACTER OF A VARIABLE NAME MUST BE A LETTER. The LINDO model parser did not find a variable name beginning with an alphabetic character. This indicates that a syntax error has occurred. You should enter several carriage returns to retreat to command level, examine the model with the LOOK command, make sure all variable 272 APPENDIX A names begin with an alphabetic character, and enter the remainder of the model with the EXTEND command. 7. VARIABLE NAMES MUST BE <= 8 CHARACTERS. The maximum number of characters allowed in LINDO variable and row names is 8. You should enter several carriage returns to retreat to command level, examine the model with the LOOK command, make sure all variable names are less than 9 characters, and enter the remainder of the model with the EXTEND command. 8. INVALID VARIABLE NAME. You have specified a variable name that LINDO does not recognize. You should enter several carriage returns to retreat to command level, examine the model with the LOOK command, check the spelling of all variable names, and enter the remainder of the model with the EXTEND command. 9. INVALID ROW NUMBER. REENTER ROW NO. (1 TO M). You have entered an invalid row number or a row number that is out-of-bounds. Please try again and enter a row number in the range of 1 to M, where M is the number of rows in the current model. 10. ROW 1 HAS NO RHS ... REENTER ROW NUMBER. You have attempted to ALTER the right-hand side coefficient on the objective function. The objective function in LINDO is not allowed to have a right-hand side value. It is always row 1 and must begin with a MAX or MIN. 11. CANNOT DELETE ROW 1 ... REENTER ROW NUMBER. LINDO requires that an objective function always be present in a model. Thus, you may not use the DELETE command on the objective row. To edit the objective row, use the ALTER command on row 1. 12. END INVALID EXCEPT AFTER A COMPLETE ROW. LINDO found an END statement before the completion of model input. This indicates that a syntax error has occurred. You should enter several carriage returns to retreat to command level, examine the model with the LOOK command, make sure END is on the last line by itself, and enter the remainder of the model with the EXTEND command. 14. EXPECTING A RHS VALUE The LINDO model parser was expecting a right-hand side value, but encountered something else. Chances are you tried to place a variable on the right-hand side, which is not allowed by LINDO. All variables must be carried over to the left-hand side of your constraints. You should enter several carriage returns to retreat to command level, examine the model with the LOOK command, make sure all variables are on the left-hand side of the constraints, and enter the remainder of the model with the EXTEND command. ERROR MESSAGES 15. 273 INVALID DATA SET NAME ... PLEASE REENTER. You have input an invalid file name. Please check the spelling and path specification and try again. 16. <Not In Use> 17. <Not In Use> 18. THERE IS NO CURRENT FORMULATION IN MEMORY. You have issued a command that requires a formulation be in memory. Please enter a new model with the MAX or MIN commands or read in a model from disk using the RETRIEVE or TAKE commands. 19. <Not In Use> 20. UGH! RETREATING TO COMMAND LEVEL. USE LOOK, ALTER, DELETE, AND EXTEND TO VIEW DAMAGE, MAKE MINOR REPAIRS, DELETE A CONSTRAINT AND GET BACK IN INPUT MODE. LINDO has encountered several contiguous errors in the text of your model. Rather than attempt to go on, LINDO halts model input and returns to command level. At this point, you can begin entering a new model again with the MAX or MIN commands or read in a model from disk using the RETRIEVE or TAKE commands. 21. COMMAND DISREGARDED. You have input an invalid argument to a command or you have chosen to back out of a command by entering a blank line to a prompt. In either case, processing of the command is interrupted and you will be returned to command level. 22. 23. <Not In Use> TOO MANY INTEGER VARS. MUST BE <= <n>. LINDO places a limit on the maximum number of integer variables in a model, which you have exceeded. In general, this limit is the same as the limit on the total number of variables. However, some special versions of LINDO may have a lower limit on integer variables than there is on total variables. In Windows versions of LINDO, the Help|About LINDO... Command shows the limit on the total number of variables. Command-line versions of LINDO can use the HELP Command alone to get the same information. Please refer to your manual for information on special versions of LINDO. 24. BAD VARIABLE NAME. You have input an invalid variable name. Processing of the command is terminated. Check the spelling of the name and try again. 274 25. 26. APPENDIX A <Not In Use> FILE TYPE NOT RECOGNIZED. You tried to read a model file, which is not in a format recognized by LINDO. This error typically occurs when trying to read a LINDO text file into the command-line version of LINDO using the RETR Command, which only recognizes LINDO packed (*.lpk) files. In order to open a LINDO text file in the command-line versions, the TAKE command must be used. 27. MODEL SIZES OF: <m> ROWS <I> INTEGERS <n> VARIABLES, <z> NONZEROS ARE TOO BIG FOR VERSION LIMITS OF: <M> <I> <N> <Z> The model you are attempting to read is too big for the limits on your version of LINDO. Either cut back on the model’s size or use a larger version of LINDO that has the capacity for this model. In Windows versions of LINDO, the Help|About LINDO... Command shows the limits on the version of LINDO you are using. This also shows how to contact LINDO Systems, Inc. to order an upgrade to a larger version. Command-line versions of LINDO can use the HELP Command alone to get the same information. Please refer to your manual for information on special versions of LINDO. 28. NO. OF VARIABLES MUST EQUAL NO. OF CONSTRAINTS. In a quadratic programming model, there is one dual variable for each real constraint and one first order condition constraint for each real variable. Thus, in an expanded quadratic model with the first order conditions present, the total number of variables must equal the total number of constraints. LINDO has detected that this is not the case. Please check your model for mistakes and typographical errors. 29. OUT OF SPACE WHILE ADDING SLACK VARIABLES. When LINDO solves a model, it adds one slack or surplus variable to each inequality row to convert it internally to an equality row. These additional variables count against the variable limit in your version of LINDO, which you have exceeded. Try running a larger version of LINDO. If this is not possible, you may be able to convert some inequality constraints to equalities without loss of generality. In Windows versions of LINDO, the Help|About LINDO... Command shows the limits on the version of LINDO you are using. This also shows how to contact LINDO Systems, Inc. to order an upgrade to a larger version. Command-line versions of LINDO can use the HELP Command alone to get the same information. Please refer to your manual for information on special versions of LINDO. 30. FILE COULD NOT BE OPENED. LINDO was unable to open a file that you specified as part of a command. Make sure you have spelled the filename correctly, the path specified is correct, and you have access to the file. ERROR MESSAGES 31. 275 NOT ENOUGH WORKING MEMORY LINDO did not set aside enough memory to complete the operation you specified. Adding additional memory to your machine will not alleviate the problem. Call technical support for assistance ((312) 988-9421). 32. INVALID COMMAND: <Command> TYPE “COM” TO SEE VALID COMMANDS You have input an unknown command to LINDO command-line prompt. Please check the spelling of the command or give the COMMANDS command to get a list of available commands. 33. AMBIGUOUS COMMAND: <Command> LINDO allows you to abbreviate commands as long as there is no possibility for confusion. When you abbreviate a command too much, it may be confused with other commands and LINDO issues this error message. 34. 35. <Not In Use> INADMISSABLE VALUE: <Value>. COMMAND IGNORED. You have entered an invalid argument for a command. Please check the documentation or help file for this command and try again. 36. <Not In Use> 37. <Not In Use> 38. INVALID ROW. DISREGARDED. You have specified an invalid row name or number. Please check the spelling of names or be sure that row numbers are within the range of total rows in the model. 39. COMMAND DISREGARDED: SOLVE MODEL FIRST You have attempted a command that requires a valid solution in memory. Use the GO command to solve the model and then try again. 40. WARNING: OVERLENGTH LINE, CHARACTERS MAY HAVE BEEN LOST OFF END. USE CARRIAGE RETURN TO BREAK UP OVER SEVERAL INPUT LINES. You have attempted to input a line that has exceeded (or is close to exceeding) the terminal width limit. Either shorten your input lines or use the WIDTH command-line command or the Windows Edit|Options command to increase the terminal width. 276 41. 42. APPENDIX A <Not In Use> NAME ALREADY IN USE. You have attempted to use the ALTER command to change a row name to a name that is already in use. Try using a different name. 43. INPUT WAS INVALID. You have specified invalid input for a command. Please refer to the documentation or help file for the command and try again. 44 <Not In Use> 45. WARNING: VARIABLE <Variable> HAS THE LOWER AND UPPER BOUNDS: <Lower> <Upper> You have specified inconsistent bounds. This usually means that you have specified a lower bound that is greater than the upper bound. Please reenter the bounds on the variable. 46. VARIABLE NOT RECOGNIZED. You have specified an invalid variable name as part of a command. Please check the spelling of the name and try again. 47. <VariableIndex> IS NOT A VALID INTEGER VARIABLE You have specified an improper variable index while trying to make a variable integer. The index must lie in the range of 1 to N, where N is the total number of variables. 48. INVALID BOUND VALUE. You have specified an invalid value for a variable bound. Be sure that the bound value is numeric and retry. 49. SUB FOR INVALID VARIABLE: <VariableIndex> You have specified an improper variable index while trying to set a simple upper bound on a variable. The index must lie in the range of 1 to N, where N is the total number of variables. 50. INVALID SUB: <Value> FOR VAR <VariableIndex> You have specified an invalid value for a simple upper bound on a variable. Be sure that the bound is numeric and that it is non-negative. ERROR MESSAGES 51. <Not In Use> 52. UNBOUNDED SOLUTION AT STEP <N>, REDUCED COST= <Value> USE THE "DEBUG" COMMAND FOR MORE INFORMATION. 277 The objective function can be increased without bound. You have most likely misspelled a variable name or have omitted some constraints. Run the DEBUG command to narrow down the problem. 53. ITERATION LIMIT EXCEEDED. LINDO has hit the limit on iterations. You can specify your own limit as part of the GO command by typing GO N, where N is an integer value that will be used as an iteration limit. Typically, this error will prompt the user as to how many additional iterations should be allowed. 54. NO FEASIBLE SOLUTION AT STEP <N>. There is no solution that simultaneously satisfies all the constraints. Run the DEBUG command in command-line versions and the Solve|Debug command on Windows versions to try to narrow down the problem. 55. NO INTEGER SOLUTION WAS FOUND. Your model is LP feasible, but IP infeasible. However, no solution was found once the integer restrictions were restored. Be sure your model is correctly specified and that there are no misspelled words. 56. WARNING, SOLUTION MAY BE NONOPTIMAL /NONFEASIBLE. The current solution in memory is either non-optimal or infeasible. Use the GO command to solve the model and then try again. 57. NESTED ''TAKE'' FILES ARE NOT ALLOWED. LINDO does not allow nested TAKE files. In other words, you cannot place a TAKE command in a file you intend to do a TAKE on. 58. MORE THAN <N> COLUMNS HAD NONZERO OBJECTIVE COEFFICIENTS. THIS EXCEEDS THE LIMITS OF THIS VERSION. You have too many goals in a goal programming model. Try to eliminate some goals. 59. FORMULATION ANOMALIES PRESENT: FIRST ANOMALY WAS IN COLUMN <N> OBJECTIVE COEFFICIENT NOT +1 The objective coefficients in a goal programming model should always be +1. 278 60. APPENDIX A FORMULATION ANOMALIES PRESENT: FIRST ANOMALY WAS IN COLUMN <N> MORE THAN 2 NONZEROS IN COLUMN WITH +1 IN OBJECTIVE ROW. The goal variable in a goal programming model should only have 2 nonzeros - one in the objective and the other in the row defining the goal. 61. <Not In Use> 62. <Not In Use> 63. INFEASIBLE MODEL ENCOUNTERED DURING GOAL PROGRAMMING. You have attempted to solve a goal programming model that does not have any solution that simultaneously satisfies all the constraints. Run the DEBUG command to try to narrow down the problem. 64. UNBOUNDED MODEL ENCOUNTERED DURING GOAL PROGRAMMING. You have attempted to solve a goal programming model that has a goal that may be increased without bound. Run the DEBUG command to try to narrow down the problem. 65. MAXIMUM ROW LIMIT OF <M> EXCEEDED.' LINDO has a limit on the total number of constraints in a model, which you have exceeded. You can move to a larger version of LINDO or eliminate some constraints. Keep in mind that the default lower limit for variables in LINDO is 0. Thus, constraints of the form X 0 are not required. Also, using the SUB and SLB statements to set simple bounds does not count against the constraint limit. In Windows versions of LINDO, the Help|About LINDO... Command shows the limits on the version of LINDO you are using. This also shows how to contact LINDO Systems, Inc. to order an upgrade to a larger version. Command-line version of LINDO can use the HELP Command alone to get the same information. Please refer to your manual for information on special versions of LINDO. 66. WARNING: PROBLEM IS POORLY SCALED. THE UNITS OF THE ROWS AND VARIABLES SHOULD BE CHANGED SO THE COEFFICIENTS COVER A MUCH SMALLER RANGE. LINDO prints this message when some nonzero coefficients are abnormally large or small in value. It also computes the ratio of the smallest coefficient to the largest coefficient and will print this message if it finds this ratio excessive. This is really just a warning and you may be able to go ahead and solve the model without problems. However, if LINDO seems to have a hard time solving the model, you may want to attempt to scale your data. 67. INVALID VALUE DISREGARDED You have entered an invalid argument value as part of a command. Please refer to the documentation or help file for this command and try again. ERROR MESSAGES 68. 279 END ASSUMED. TOO MANY ELEMENTS. You have too many nonzero elements in an APPCOL command. Please check your data and try again. 69. VARIABLE ALREADY EXISTS, COMMAND DISREGARDED. You have attempted to append a column with a name that already exists. Please use a different name and try again. 70. BAD COLUMN INDEX <N> TO INSERT ROW. You have attempted to insert a row with a bad column index. Check your data and try again. 71. OUT OF SPACE IN INSERT ROW ADDING ROW: <I> SPACE NEEDED: <J> SPACE AVAILABLE: <K> You have run out of nonzero space adding a constraint to LINDO. Increasing the nonzero limit may help (see message 72). However, if you have already maximized the nonzero space, you may need to reduce the size of the model or use a larger version of LINDO. In Windows versions of LINDO, the Help|About LINDO... Command shows the limits on the version of LINDO you are using. This also shows how to contact LINDO Systems, Inc. to order an upgrade to a larger version. Command-line versions of LINDO can use the HELP Command alone to get the same information. Please refer to your manual for information on special versions of LINDO. 72. FATAL OUT-OF-SPACE IN INVERT AT STEP: <N> LINDO has run out of working nonzero space during a basis inversion. In Windows versions, you can use the Edit|Options command to increase the nonzero limit. In other versions, you may be able to increase the maximum nonzero level by creating a file in LINDO’s directory called LINDO.CNF. Set the first line in the file to be “MAXNZ=z”, where z is the maximum number of nonzero elements you desire. Restart LINDO and run the HELP command to see if you have obtained the desired number of nonzero elements. 73. NO BASIS ORDER EXISTS. USE INVERT FIRST. The Basis Picture command (BPIC) requires that an active basis be present in memory. Run the INVERT command and try again. 74. MODEL TOO BIG TO PERMUTE. LINDO has run out of space while attempting to permute a model into lower triangular form for a nonzero “picture”. Increasing the nonzero limit may help (see message 72). 75. DUPLICATE ROW IN MPS MODEL: <Row> A row has been declared twice in a MPS file. Please correct the MPS file and try again. 76. BAD CARD IN MPS MODEL: <CardText> An invalid record was encountered in an MPS file. Please correct the MPS file and try again. 280 77. APPENDIX A NO OBJECTIVE ROW WAS FOUND IN THE MPS MODEL. LINDO did not find an objective row in an MPS model. Please add an objective to the file and retry. 78. ERROR IN MPS MODEL ON LINE: <N> <CardText> An invalid record was encountered in an MPS file on line number <N>. Please correct the MPS file and try again. 79. OUT OF PLACE INTEGER MARKER CARD IN LINE: <CardText> LINDO requires that integer variables appear first in the variable set in an MPS file. Please move integers to the front and try again. 80. WARNING: UNTERMINATED MARKER SET. The integer variable set was not terminated. All variables will be made integer. This is just a warning and it is not mandatory that you correct this in order to proceed. 81. BAD VARIABLE IN BOUNDS SECTION OF MPS MODEL IN LINE <N> An invalid variable name was specified in the BOUNDS section of an MPS file on line number <N>. Please check the spelling of the variable name and retry. 82. BAD BOUND <BoundValue> IN BOUNDS SECTION OF MPS MODEL IN LINE: <N> An invalid bound value was specified in the BOUNDS section of an MPS file. Be sure that you have specified a numeric value and be sure that the bound value is lined up in the correct columns and retry. 83. UNRECOGNIZED BOUND TYPE IN MPS MODEL ON LINE: <N> You have used an invalid bound type in an MPS model file on line <N>. The bound types recognized by LINDO are FX, UP, LO, FR, BV, UI, and LI. Please correct the bound type and try again. 84. BAD RANGE IN MPS MODEL ON LINE: <CardText> You have specified a range on a row that does not exist. Check the spelling of the row name and try again. 85. *** WARNING *** <N> ERRORS INPUTTING MPS FILE. CORRECT EXECUTION UNLIKELY. LINDO encountered <N> errors while processing your MPS file. This is a warning and will not terminate processing of the file. However, if any of the errors were unexpected, you should correct them before proceeding. ERROR MESSAGES 86. 281 PROBLEM TOO BIG: DATA INPUT IS FINISHED. <M> ROWS <N> COLUMNS <Z> NONZERO ELEMENTS Your MPS model has hit an internal limit of your version of LINDO. LINDO prints the total number of rows, columns and nonzeros read before interrupting processing of the file. To determine the limits of your version, give the Help|About LINDO... command in Windows or the HELP command in command-line versions. Note, in some versions of LINDO, you can increase the nonzero limit (see error message 72). 87. RETRIEVAL ABORTED LINDO has interrupted processing of your MPS file due to errors in the file. Please correct any errors and retry. 88. END OF FILE ENCOUNTERED IN MPS FILE, LINES READ: <N> LINDO has encountered a premature end of file in your MPS format file. Perhaps part of the file is missing or you omitted the ENDATA card at the end of the file. Please correct and retry. 89. NONEXISTENT COLUMN NAME ON THE FOLLOWING BASIS RECORD: <CardText> LINES READ= <N> LINDO encountered an invalid variable name while reading an MPS format basis file. Perhaps this basis file does not correspond to the current model or the variable name is spelled incorrectly. Please correct and retry. 90. THE FOLLOWING RECORD HAD AN INVALID STATUS: <CardText> THE RECORD IS IGNORED. LINES READ= <N> LINDO did not recognize a record type in an MPS format basis file. The types recognized by LINDO are XL, XU, LL, UL, or IV. Please correct and retry. 91. NONEXISTENT ROW NAME ON THE FOLLOWING BASIS RECORD: <CardText> LINES READ= <N> LINDO encountered an invalid row name while reading an MPS format basis file. Perhaps this basis file does not correspond to the current model or the row name is spelled incorrectly. Please correct and retry. 282 92. APPENDIX A THE MODEL MUST BE SOLVED FIRST. You have attempted to print an MPS format solution report without first solving your model. Please solve the model using the Solve command in Windows versions and the GO command in command-line versions then try again. 93. THE ROW ON THE FOLLOWING LINE IS NOT BASIC: <CardText> Tried to make a column basic in a row that already has a column assigned to it. This is merely a warning. If it is unexpected, you should correct the problem and retry. 94. ROW <RowName> HAS WRONG BOUND - OPPOSITE BOUND SET. Tried to set a slack variable to an infinite bound. 95. THE COLUMN ON THE FOLLOWING LINE IS BASIC: Tried to make a column basic, which is already basic. 96. THE COLUMN ON THE FOLLOWING CARD IS NOT AN INTEGER VARIABLE: <CardText> LINES READ= <N> Tried to fix a variable that is not an integer variable using the "IV" status. 97. SEARCH TERMINATED DUE TO USER INTERRUPT OR NUMERICALPROBLEMS. The LINDO solver was interrupted prematurely. This is generally the result of the user interrupting the solver. In this case, LINDO will return with the best solution found so far. If you did not interrupt the solver, then LINDO encountered numerical problems and you should not rely on the reported results. 98. <Not In Use> 99. <Not In Use> 100. <Value> IS NOT A VALID INTEGER VALUE. You have input a non-integral value to a command that was expecting an integer. Please retry specifying an integer value. 101. BAD INPUT TO NDXOFV: <I1> <I2> <VariableName> You have passed invalid values to the user interface routine NDXOFV. Please see the documentation on this routine and correct your input values. 102. SOLUTION STATUS NOT OPTIMAL AT START OF PARAMETRICS. LINDO must have an optimal solution in memory in order to perform right-hand side parametrics. Please use the Solve command in Windows or the GO command in command-line versions to optimize the model and then retry. ERROR MESSAGES 283 103. INVALID OPTION FIELD IN COMMAND. You have specified an invalid option in the print-list of a CPRI or RPRI command. Valid options are N, P, D, R, U, T, and Z. Refer to the documentation or help files on these commands for help and try again. 104. INVALID SYMBOL IN COMMAND. You have used an invalid symbol in the conditional expression in a Reports|Peruse command in a Windows version of LINDO or in a CPRI/RPRI command in a command-driven version of LINDO. Refer to the documentation or help file for these commands for help. 105. UNMATCHED PARENTHESES IN CONDITIONAL EXPRESSION. You have unmatched parentheses in the conditional expression in a Reports|Peruse command in a Windows version of LINDO or in a CPRI/RPRI command in a command-driven version of LINDO. Add or remove parentheses as required and retry. 106. INSTRUCTION LIST OVERFLOW IN CONDITIONAL EXPRESSION. You have too many instructions in the conditional expression in a Reports|Peruse command in a Windows version of LINDO or in a CPRI/RPRI command in a command-driven version of LINDO. Try reducing the size of the conditional expression and try again. 107. TEMPORARY OPERATOR STACK OVERFLOW IN CONDITIONAL EXPRESSION. The conditional expression in a Reports|Peruse command in a Windows version of LINDO or in a CPRI/RPRI command in a command-driven version of LINDO is too complex. Try simplifying or reducing the size of the conditional expression and try again. 108. IMMEDIATE TEXT LIST OVERFLOW IN CONDITIONAL EXPRESSION. You have too many text operands in the conditional expression in a Reports|Peruse command in a Windows version of LINDO or in a CPRI/RPRI command in a command-driven version of LINDO. Try reducing the number of text operands in the conditional expression and try again. 109. NUMERIC STACK OVERFLOW IN CONDITIONAL EXPRESSION. The conditional expression in a Reports|Peruse command in a Windows version of LINDO or in a CPRI/RPRI command in a command-driven version of LINDO is too complex. Try simplifying or reducing the size of the conditional expression and try again. 110. TEXT STACK OVERFLOW IN CONDITIONAL EXPRESSION. The conditional expression in a Reports|Peruse command in a Windows version of LINDO or in a CPRI/RPRI command in a command-driven version of LINDO is too complex. Try simplifying or reducing the size of the conditional expression and try again. 111. UNDEFINED OPERATION IN CONDITIONAL EXPRESSION. The conditional expression in a Reports|Peruse command in a Windows version of LINDO or in a CPRI/RPRI command in a command-driven version of LINDO contains an undefined operation (e.g., division by 0). Correct this problem and try again. 284 APPENDIX A 112. CONDITIONAL EXPRESSION DOES NOT EVALUATE TO A BOOLEAN VALUE. The conditional expression in a Reports|Peruse command in a Windows version of LINDO or in a CPRI/RPRI command in a command-driven version of LINDO must evaluate to either TRUE or FALSE to be considered valid. Correct this problem and try again. 113. REQUESTED OUTPUT LINE LENGTH EXCEEDS TERMINAL WIDTH. The text report line length implied by a Reports|Peruse command in a Windows version of LINDO or in a CPRI/RPRI command in a command-driven version of LINDO exceeds the terminal width. The terminal width may be increased using the Edit|Options command in Windows versions or the WIDTH command in command-line versions. Alternatively, you can cut down on the amount of requested output. If you are running under windows and all you want is a graphical view of the data, you can cancel the request for a text based report. 114. INVALID QCP ROW, COMMAND DISREGARDED. You have specified an invalid row number as part of the QCP command. Check your model to determine the valid range for rows. Be sure to use the row’s number and not its name. Error codes 1000 and above pertain only to Windows versions of LINDO. 1000. Toolbar installation failed. LINDO was unable to install the command toolbar into memory on startup. You are probably low on memory. If other applications are running, try exiting them before starting LINDO. 1001. Please enter a valid line number to go to. You have input an invalid line number in the Edit|Go To Line dialog box. Please reenter a nonnegative integer value corresponding to the line you wish to jump to. 1002. No help available on this command. The LINDO Help System does not currently have any help available on this command. 1003. The row values are not valid. Please reenter them. You have input invalid row numbers or names to the Reports|Formulation dialog box. Please enter row numbers or names that are valid for the current model. 1004. The dimensions of your model have exceeded the limits of this version. The model is too large for the limits of this version of LINDO. You can determine the limits of your version with the Help|About LINDO... command. You will need to cut back on the size of your model or use a version of LINDO that has a larger capacity. Keep in mind that simple bounds (e.g., X > 6 or X < 10) entered with the SUB and SLB statements do not count against the row limit. Thus, converting simple bound constraints to use SUB and SLB statements can reduce the row count in a model. Also, the default lower bound for variables is zero. Thus, constraints of the form X > 0 are not required. ERROR MESSAGES 285 1005. LINDO must finish the current task before an exit is allowed. You have attempted to exit LINDO while it is performing background calculations. Typically, this is because the solver is currently optimizing a model. Press the “Interrupt Solver” button on the Solver Status dialog box, then try exiting again. If the Solver Status dialog box is not visible, use the Window|Open Status Window command to display it. 1006. Report Window may not be closed at this time. You have attempted to close the Reports Window while LINDO is in the middle of generating a report. You will have to wait until the report is complete before closing the window. If the report is excessively long, you may want to use the File|Log Output command to divert it to disk. Diverting a file to disk is quicker than sending it to the Reports Window. 1007. Windows is running low on space. Try closing some windows. LINDO has received a low memory warning from Windows. This generally occurs when you are trying to place too much text in an Edit Window created with either the File|New or File|Open commands. Edit Windows can only hold up to about 64,000 characters. If you need more capacity than this, use a View Window instead. View Windows may be opened with the File|View command. 1008. Please select some text first. You have issued a command that requires you to select a box of text. Please select some text by clicking with the mouse and dragging and then try the command again. 1009. <Not In Use> 1010. Nothing in clipboard to paste! You have issued the Edit|Paste command when there was no text in the Windows clipboard. Use the Copy command in LINDO or some other application to select some text and try Paste again. 1011. Unable to Solve ... no model currently in memory! You have issued a Solve command without a model in memory. Select a Model Window by clicking on it and reissue the Solve command. 1012. LINDO is busy right now. Try again later. LINDO is busy performing critical background computations and is unable to handle your request at the moment. Please try the request later. 1013. Error writing to LOG file. Perhaps the disk is full? LINDO has encountered an error writing to a log file open with the File|Log Output command. The most likely cause is a full disk. If the disk your writing to is not full, then you may want to run diagnostics on it to determine if there is a problem. 286 APPENDIX A 1014. Unable to open the LOG file. The log file specified as part of the File|Log Output command could not be opened. Perhaps you have specified an invalid drive or a drive to which you do not have write access. Try reissuing the command using a different drive. 1015. Error writing to basis file. An error has occurred writing to a basis file opened with the File|Basis Save command. Perhaps the disk is full or you do not have write access to the drive? 1016. Not enough memory for Find command. LINDO did not have enough memory to execute an Edit|Find command. Try closing other applications and any windows not currently required. Also, if you have allocated an excessive amount of nonzero elements using Edit|Options, there may be inadequate memory available for other functions. 1017. <Not In Use> 1018. Cannot save file: <FileName> LINDO was unable to perform a successful save of the file <FileName>. Perhaps the disk is full or you do not have write access to the specified drive. 1019. Error writing to file: <FileName> An error occurred writing to the file <FileName>. Perhaps the disk is full. If not, you may need to run diagnostics on your drive to determine if there is a problem. 1020. Could not open file: <FileName> LINDO could not open the file <FileName>. Perhaps you do not have the required privileges to access this file or you may need to run diagnostics on your drive to determine if there is a problem. 1021. <Not In Use> 1022. Could not read file: <FileName> LINDO experienced a read error on file <FileName>. Perhaps you do not have the required privileges to access this file or you may need to run diagnostics on your drive to determine if there is a problem. 1023. Not enough memory to complete command. LINDO was unable to access enough memory to complete the command you just issued. Try closing other applications and any windows not currently required. Also, if you have allocated an excessive amount of nonzero elements using Edit|Options, there may be inadequate memory available for other functions. ERROR MESSAGES 287 1024. Error attempting to load the file into a window. This error is most likely the result of either low memory (see previous message 1023), a file too large for a Model Window (see message 1027), or a disk error (see message 1022). 1025. <Not In Use> 1026. An error occurred during compilation on line: <N> LINDO was unable to successfully compile your model due to a syntax error on line <N>. Use the Edit|Go To Line command to jump to this line and correct the syntax error. Keep in mind that LINDO does its best to point to the line where the syntax error actually occurred, but it may not always nail the line down precisely. So, be sure to examine surrounding lines in addition to the one specified by LINDO. 1027. Model is too large for an Edit Window. Please use the File View command instead. You have attempted to open a model with the File|Open command that contains more characters than can be handled in a standard Edit Window. Standard Edit Windows can only handle up to about 64,000 characters. To open a large file, use the File|View command, which is limited only by available memory. 1028. There is no compiled model in memory. You have issued a command that requires a compiled model in memory. Select a Model Window and issue the Solve|Compile Model command and then try again. 1029. <Not In Use> 1030. <Not In Use> 1031. The model must be compiled first. Please choose the Solve|Compile Model command first. Or, alternatively, save the model using LINDO Text (*.ltx) format. You have attempted to save a file that is to be stored in either LINDO packed format (*.lpk) or MPS format (*.mps) that has not been successfully compiled. Please select the Solve|Compile Model command and then retry. If you are unable to compile for some reason, you may always save the file in LINDO text format (*.ltx). 1032. A graph may not have more than 8000 points The graph you are trying to create has too many data points selected. Try reducing the number of data points contained in the graph by restricting the selection more. 1033. The selected row was not found in the current model. You have specified a row name or row number that is not valid for the current model. Please check the row number and retry the command. 288 APPENDIX A 1034. The right-hand side value is invalid. You have specified a right-hand side value for a constraint that is not valid. Please be sure that you have entered a numeric value and retry the command. 1035. Right-hand side parametrics are not permitted on the objective row. You have attempted to perform right-hand side parametric analysis on the objective row, which is not allowed. Either cancel the command or specify a constraint. 1036. The current solution is non-optimal. Please use the Solve command first. You have attempted to issue a command that requires a model that has been solved to optimality. Please issue the Solve command first and then retry. 1037. Not enough memory to generate graph. There was insufficient free memory to complete a request for graphics. Try closing other applications and any windows not currently required. Also, if you have allocated an excessive amount of nonzero elements using Edit|Options, there may be inadequate memory available for other functions. 1038. The current model is not compiled. Please choose the Solve|Compile Model command first. You have attempted a command that requires that the current model be compiled. Please issue the Solve|Compile Model command and then retry. 1039. The current window is not a Model Window. Please select a Model Window first. You have issued a command that requires you to first select a Model Window. Click on a window that contains the desired model and then reissue the command. 1040. The selected option field contains an invalid argument. You have input an invalid value for one of the fields in the Edit|Options dialog box. LINDO will highlight the first invalid value that it finds. Please correct the highlighted value, or press the “Cancel” button. 1041. Please select an Edit Window to paste into. You have attempted to paste text into a window that doesn’t accept pasted data (e.g., a view or graphics window). The only windows in LINDO that accept pasted data are Edit Windows. Edit Windows are created using either the File|Open or File|New commands. 1042. If you wish to choose the pivot variable, you must specify a variable name in the 'My Variable Selection' box. You have elected to choose the pivot variable as part of the Solve|Pivot command, but have neglected to specify the variable. Either choose a variable or let LINDO select the pivot variable. ERROR MESSAGES 289 1043. If you wish to choose the pivot row, you must specify a row name in the 'My Row Selection' box. You have elected to choose the pivot row as part of the Solve|Pivot command, but have neglected to specify the row. Either choose a row or let LINDO select the pivot row. 1044. The selected variable was not found in the current model. You have specified a variable that does not exist in the current model. Please be sure you have spelled the variable’s name correctly and retry. 1045. Objective row missing from beginning of model. The objective row, which is signified by either ‘MAX’ or ‘MIN’ must appear first in a model. Either you have omitted the objective or have placed some constraints before it. Please edit the model to correct the problem and retry. 1046. You may not have both an AUTOLD.DAT file and a command line input file. Please use one or the other. LINDO looks for a command script file called AUTOLD.DAT when it starts up. If this file is found, LINDO will automatically execute the commands contained therein. You may also specify a command script file as a command-line argument to LINDO. LINDO restricts you to doing one or the other, however. If you attempt to use both files, you will receive this error message. Try combining the commands in the files to either the AUTOLD.DAT file or the command script file. 1047. LINDO was unable to allocate sufficient space for nonzero elements. LINDO will quit and return to Windows. On startup, LINDO needs to allocate a minimal amount of storage for nonzero elements. You will get this error message when this allocation fails. Try closing other applications and any windows not currently required. 1048. LINDO was unable to save the configuration values to a file. Check for write access to your working directory. LINDO stores non-default options values in a file called LINDO.CNF. When you change the options in the Edit|Options dialog box and press the ‘Save’ button, LINDO writes a new copy of the LINDO.CNF file in the working directory. If this process fails, you will receive this error message. Either you do not have write access to the working directory, the disk is full, or you are experiencing a hardware error. 1049. You requested a graph with <N> points. Graphs can have up to 500 points; pie charts can have 100. Use a condition to narrow the selection. You have used the Reports|Peruse command to request a graph, which has more points than LINDO can plot. Use the condition field to specify a filter on data points to reduce their number. For more information, refer to the Reports|Peruse command on page 81. 290 APPENDIX A 291 INDEX Symbol ! exclamation mark, 13, 117, 181 32-bit DLL standard, 264 A About LINDO command, 28, 52, 114 Absolute values, 81, 87, 139, 142, 186, 206 Accelerator keystrokes, 28 Accuracy decimals, 267, 269 Addition, 87, 120, 139, 142 Algorithm in LINDO. See Revised Simplex Method All-or-nothing situations, 17 Allowable increases/decreases, 73, 130 ALTER, 11, 117, 159 Analysis parametric analysis, 27, 76–80, 117, 173–74, 202–4, 241 range analysis, 7, 27 sensitivity analysis, 11 APPCOL, 117, 162–63, 249, 256 Append output option, 34 Applications integrating with, 219–28 AppWizard, 251 Arguments, 2, 231 character, 231 double, 231 float, 231 integers, 231 passing by reference, 232, 264 Arrange Icons command, 28, 109 ART (artificial variable), 95, 96, 135, 138 AUTOLD.DAT, 125, 181, 219, 225 Automatic Take Command, 125 Automating files, 211, 219 AutoUpdate, 112 B Backordering, 18 Basic, 231, 264 Basis, 94, 183 creating, 126 determinant, 127 erasing, 61 in memory, 38 inverting, 52, 118 matrix, 95, 127 optimal, 94 range report, 130 retrieving, 38, 116, 121, 123, 124, 126, 241 saving, 36, 116, 145 triangularizing, 95, 138, 183 Basis Picture command, 27, 94–95 Basis Read command, 26, 37–38 Basis Save command, 26, 36–37 BATCH, 117, 124, 181, 219 Batch mode, 211 Benders decomposition, 194 Binary arithmetic, 269 Binary expansion, 191 Binary integers, 15, 17, 117, 167, 191, 206 Binding constraints, 203, 267 BIP, 117, 177 Boldface lettering, 2 BPICTURE, 116, 135, 138 Branch-and-bound, 45, 73, 127, 169, 172, 191, 192–93, 264 Breakpoints, 79, 203 Brearley, A.L., 176 BUG, 118, 183 Building an application, 246, 251, 259 C C/C++, 231, 264 Callable libraries, 219, 231–66 application requirements, 244 routines, 232–44 samples, 245 Capitalization, 14, 264 CAPOUT, 249, 255 Cascade command, 28, 105–7 CAT, 115, 119 cdecl standard, 264 Choose New Font command, 26, 58 292 INDEX Class Wizard, 253 Clear command, 26, 43, 58 Close command, 26, 28, 33, 109 Coefficients, 9 changing, 159, 202 determining, 120 matrix, 193 nonzeros, 81, 186 objective, 24 Column to Show list box, 101 Columns (<ColAttList>), 139 limits, 267 matrix, 2 redundant, 81, 187 statistics, 206 COM, 115, 119 Command language, 102 Command line Entering a model, 8–12 prompts. See also Prompts Command menus, 25 Command window, 2, 33, 103 Command-line commands, 115–89 in brief, 115–18 in depth, 118–89 Commands, Windows, 25–114 in brief, 25–28 in Depth, 29–115 Comments, 13, 117, 181 saving, 32 Compile Model command, 27, 57, 60 Compilers, 228 Compiling the model, 6 Conditional selection, 139, 142 Constraints, 4, 9, 12, 57, 81, 121 adding, 117, 161 additional cuts, 175 binding, 203 crucial, 183, 210 defining, 5 first order conditions, 20, 172, 197, 199 generalized upper bound, 81 infeasibilities, 53 limits, 19, 164 naming, 12 nonbinding, 267 real, 20, 172, 197 removing, 117 submatrix, 101 syntax, 13, 14 variable upper bounds, 81 Contacting LINDO, v, 2 Contents command, 28, 110 Continuous variables, 16 Conventions, 2 Conversational Parameters command-line commands, 117, 180–82 Convexity, 101, 201 Copy command, 26, 42 Copyright, ii, 8 Covariance matrix, 201 CPRI, 116, 138–41, 206–8, 218 Crucial constraints, 61, 183, 210 Cut command, 26, 42 Cutting stock, 67 D Databases, 143 Date command, 26, 39 DEBUG, 118, 153, 154, 183, 205 Debug command, 27, 60, 61–63, 205, 209–10 Debugging, 118, 183, 205–10 infeasible models, 152, 184 quadratic programs, 201–2 script files, 181, 219 Decimal arithmetic, 269 Decimal points, 267 Decision arguments, 2 DEFROW, 249, 256, 261 DELETE, 117, 163 Density of a model, 81, 206 Disable AutoUpdate button, 113 Display command-line commands, 116, 127–44 Displaying the model, 127, 147 cat command, 215 NONZ command, 137 DIVERT, 11, 116, 145, 218 Diverting a model, 145, 216 Division, 87, 139, 142 DLLs. See Dynamic Link Libraries DMPS, 116, 129 Double indirection, 264 Downloading, 112 Dual prices, 24, 72, 127, 137, 142, 153 range analysis, 24 Dual variables, 198 Dynamic Link Libraries (DLLs), 231–66 samples, 245–63 INDEX E e, 87, 139, 142 Echo to screen, 34 Edit menu, 26, 41–58 Edit windows, 29, 41 Editing, 41–58, 42, 211–17 Elapsed Time command, 26, 40 END, 5, 10, 12, 15, 23 Entering a command line model, 8–12 Entering a Model in Windows, 4–8 Entering Variable Tolerance, 51, 53 Equal to, 12, 87, 139, 142 Error messages, 271–89 Exit command, 26, 41 Exponentiation, 87, 139, 142 EXTEND, 117, 161–62 External editors, 2, 211–17, 218 output, 214 F FBR, 116, 121–23, 126 FBS, 116, 126, 145 FBS files, 37, 38 Feasible region, 268 Feasible solution, 97 File menu, 26, 29 File output command-line commands, 116, 144–51 File types, 32 Compressed files, 116 External files, 115 FBS(File Basis Save), 37, 38 LINDO text (*.ltx), 30, 32 Macro files, 35, 115 MPS "Punch" files, 30, 32, 33, 37, 38, 116, 146, 150–51 Packed files (*.lpk), 30, 32, 33, 121, 144 Save DataBase Column (*.SDB), 37, 38, 116 Script files, 35, 115, 116, 124 Text files (*.ltx), 145, 146, 148, 213, 217 Final constraint tolerance, 51, 53, 188 Find Next button, 43 Find/Replace command, 26, 43–44, 212 FINS, 116, 123 First order conditions, 197, 199 Formatting, 58, 100 saving, 33 Formulating a model, 267, 268 Formulation command, 27, 98–100, 216 FORTRAN, 231, 264 293 sample application, 259–63 FPUN, 116, 146 Fractions, 269 FREE, 15–16, 117, 164, 165, 15–16 G General integers, 15, 16, 117, 170, 191, 206 General Optimizer Options, 51–54 Generalized upper bounds, 187, 206 Getting Started with LINDO, 1–24 GIN, 15, 16–17, 117, 135, 170–72, 191 GLEX, 117 Global optimums, 101, 175, 201 GO, 11, 23, 117, 151, 158, 218 Go To Line command, 26, 55 Goal programming, 67, 155 Graphic reports, 78, 81, 83, 89, 91 printing, 93 Greater than, 12, 87, 139, 142 H Handler code, 246 HELP, 115, 118 Help menu, 28, 110–14 How to Use Help command, 28, 110 I ILINDO, 255, 261 Infeasible models, 61, 118, 151, 152–53, 158, 183, 184–85 Information command-line commands, 115, 118–20 INIT, 255, 261 Initial constraint tolerance, 51, 53, 188 Input command-line commands, 116, 120–26 Input/Output redirection, 220–21, 228 INSERT, 249, 256 INSROW, 249, 256 Installing the software, 3–4 Integer binary, 15, 167 general, 15 INTEGER, 15, 17–18, 117, 167–69, 191 Integer programming, 139, 172, 191–95, 264 basis matrix, 137 Benders decomposition, 194 bounding, 117, 177 branch-and-bound, 137 294 INDEX cuts, 175 dual prices, 191 exploiting solutions, 194 optimality tolerance, 117 options, 45–50 reduced costs, 191 solving difficult, 193–96 tightening the formulation, 194 user interface, 264 Integer, quadratic, and parametric programs command-line commands, 117, 167–80 Integers, 80, 186 binary, 17, 191, 206 general, 16, 117, 170, 191, 206 Integers, 46 Integrating, 219–28 C Front End, 226–28 Visual Basic Front-End, 222–26 Interfacing LINDO, 211–29 Internal parameters, 188 Internal representation, 98, 100, 169, 172, 191 Internal solver, 104 matrix, 2 monitoring, 265 Interrupting the solver, 53, 151, 155 INVERT, 118, 183 IP cuts, 45 IP objective hurdle, 194 IPTOL, 117, 179–80, 194 Iterations, 117 limiting, 51, 52, 151, 154 reducing, 179 K Karush/Kuhn/Tucker/LaGrange conditions, 197 L LaGrange multiplier, 198 LEAVE, 116, 125 Left-hand sides, 14 Less than, 12, 87, 139, 142 Lexico-optimization, 66, 67, 117, 155 Libraries, Callable, 219, 231–66 application requirements, 244 linkable object code, 231 routines, 232–44 samples, 245–63 Linear programming, 231 LOCAL, 115, 120 Local optimum, 201 Log Output command, 26, 33–35, 214 Logical operators, 87, 139, 142 LOOK, 10, 11, 116, 127, 216 lpr command, 215 LSEXIT, 257 LUNOPN, 249, 255 M Macros, 35, 102, 115 Mainframes, 120 Martin cuts, 193 Match Case box, 44 Mathematical programming, 2 Matrix, 127 coefficients, 92, 193 form, 89 generators, 245–63 notation, 201 permuting, 235 picture of, 132 positive definite, 101, 175 quadratic programs, 197 rotating, 95 MAX/MIN, 5, 9, 12, 116, 120–21, 160 Memory limit, 155 Minus, 12 Miscellaneous command-line commands, 118, 183– 89 Mitra, G., 176 Model windows, 4, 33 Models changing a line, 11 compiling, 6 entering in Windows, 4–8 printing, 11 solving, 6 splitting lines of, 13 syntax, 12–21 Monitoring the Solver, 7 MPS "Punch" files, 30, 32, 37, 38, 146, 150–51 Multiple optima, 67, 155, 202 Multiplication, 87, 139, 142 Multi-user systems, 120 INDEX N Natural logarithm, 87, 139, 142 NECESSARY SET, 61, 183, 210 Negative definite, 201 Negative variables, 18 Nesting files, 124, 219 New command, 26, 29, 259 New Features, v New Project command, 222, 246 NEWIP, 264 Nonzeros in reports, 71 limit, 51 statistics, 81, 206 NONZEROS, 116, 137 Not equal to, 87, 139, 142 Notepad, 2, 31, 211 Numerical Aesthetics, 269 Numerical considerations, 267–70 O OBJ COEFFICIENT RANGES, 74, 130 Objective coefficient, 24 Objective function, 4, 9, 12, 72, 81, 127, 158, 187, 203 changing, 159 quadratic programming, 101 syntax, 12, 13, 120 Objective hurdle, 45, 48 Online registration, 111 Open command, 26, 29–31, 217 Open Command Window command, 28, 102–3 Open Status Window command, 28, 104 Operators, 12 Optimal solution, 151–52, 155 Optimality tolerance, 45, 46, 117, 194 Optimization Modeling with LINDO, 2, 17, 45, 96, 167, 170 Optimizer options, 45–54 Optional modeling statements, 15–21 Options optimizer options, 45–54 output options, 54–57 page length limit, 55 resetting defaults, 44 saving for later sessions, 44 solver status window, 54 terminal width, 55 terse output, 54 295 Options command, 26, 44–55 Output, 2 DIVERT/RVRT, 11 external editors, 214 options, 54–57 terse mode, 117, 180 verbose mode, 117, 180 Overstaffing, 23, 68 P Packed files, 30, 32, 121, 144 PAGE, 117, 182, 218 Page length limit, 55 Parameter defaults, 44 Parametric analysis, 202–4, 241 PARAMETRICS, 117, 173–74 Parametrics command, 27, 76–80 Parentheses, 13, 87, 139, 142 Paste command, 26, 43, 57, 60 Paste Symbol command, 26, 56 PAUSE, 117, 182 Permuting a model, 89 Peruse command, 27, 81–88, 206–8 filtering, 86 PICTURE, 116, 132–33 Picture command, 27, 89–93 PIVOT, 117, 135 Pivot command, 27, 63–66, 96, 97 Pivot Size Tolerance, 51, 53 Pivots, 52, 73, 79, 117, 127, 151 element, 54 limits, 154, 218 row, 54 Plus, 12 POSD, 117, 175, 201–2, 201 Positive Definite command, 27, 101, 117, 175, 201 Prayer algorithm, 192 Preemptive goal command, 66–70 Preferred branch, 45, 46 Preprocessing, 45, 188 Primal values, 127, 139, 158 Print command, 26, 33 Printer Setup command, 26, 33 Printing a model, 11, 33, 215 Command-line, 145 Problem editing command-line commands, 117, 159–67 Product form Inverse, 2 Prompts, 8 backing out, 9 296 INDEX colon, 8, 11, 102 question mark, 9, 121 Pseudo objective row, 199 Punch files, 37, 38, 146 Q QCP, 15, 20, 117, 172–73, 198, 200 statistics, 206 Quadratic programming, 20, 101, 117, 172, 175, 186, 197–204 parametric analysis, 202–4 real constraints, 15 statistics, 80 QUIET, 249, 256, 261 QUIT, 118, 189 Quit command, 41, 118, 189 R Raffensperger, Fritz, ii RANGE, 116, 130–32, 173 Range analysis, 27, 116, 130 rows, 73 variables, 73 Range command, 27, 73–76 RDBC, 116, 126 Real constraints, 197 Reduced costs, 24, 127, 188 negative, 53 range analysis, 24 REDUNDANT COLS, 206 Register, 111 Remind me in button, 112 Replacing text. See Find/Replace command Reports menu, 27, 71–101 Reports window, 7, 33, 34, 39, 60 capturing lengthy sessions, 35 REPROW, 250, 262 REPVAR, 257, 262 Reserved symbols, 56 Resuming optimization, 53 RETRIEVE, 116, 121, 144 Revised Simplex Method, 2, 52, 63, 66, 73, 96, 117, 135, 158 Phase I, 96 WATSUP subroutine, 265 RIGHTHAND SIDE RANGES, 74, 130 Right-hand sides, 142 changing, 76, 79, 159, 162, 173, 202 saving with scripts, 35 syntax, 14 RMPS, 116, 123–24 Rounding solutions, 17, 18, 269 Rows changing, 11 direction of, 159 limits, 267 names, 92 statistics, 80, 186, 206 RPRI, 116, 142–44, 206–8 Running an application, 250, 258, 263 Running minimized, 225 Runtimes, 40, 46, 48 RVRT, 11, 116, 145, 218 S SAVE, 116, 121, 144–45, 189 Save As command, 26, 32–33, 213 Save command, 26, 32–33 Saving, 32, 33, 144 internal parameters, 150 solutions, 146 Scaling, 267 Scripting, 35, 124, 217–19 SDBC, 116, 126, 146–48 SDBC files, 37, 38 Search for Help On command, 28, 110 Select All command, 26, 58 Send to Back command, 28, 104–5 Sensitivity analysis, 11, 73, 130, 151, 173 SET, 118, 188 Shadow prices, 24, 72 Shell command, 222, 226 Shell function, 227 SHOCOLUMN, 116, 133–35, 208 Show Column command, 27, 100–101, 208 Simple lower bounds, 15, 18–19, 117, 142, 165 Simple upper bounds, 15, 18–19, 117, 142, 163 Simplex Method. See Revised Simplex Method Simplex tableau, 135 SINGLE COLS, 206 Size of a model, 267 Slack or surplus, 23, 72, 127, 142 SLB, 15, 18–19, 117, 165–66 Smoothing, 67 SMPS, 116, 148 SOLUTION, 11, 116, 127 Solution command, 27, 71–73 Solution command-line commands, 117, 151–59 INDEX Solution reports, 8, 11, 21, 60, 71, 116, 153, 191, 269 constraints, 72 DUAL PRICE, 24, 72 feasible, 137 headers, 39 iterations (pivots), 137 optimal, 137 printing, 11, 137 range analysis, 24 REDUCED COST, 24, 72 retrieving, 37 saving, 33, 34, 36, 137 SLACK OR SURPLUS, 23, 72 suppressing, 54 variables, 72 Solve command, 6, 27, 58–60 Solve menu, 27, 58–70 Solver Status Window, 6, 7, 59, 104, 226 fields, 59 removing, 54 Solvers, 231 monitoring, 7 Solving, 6, 11, 23, 54, 58, 151, 218 iterations, 8, 11 maximum, 8 spawnlp function, 228 Splitting lines, 13 Spreadsheets, 143, 145 Staff scheduling, 67 example, 21–24 Start command, 224, 250 Starting LINDO, 4 Statistics command, 27, 80–81, 205–6 Statistics reports, 186, 205, 207 STATS, 118, 169, 186, 205–6 Strict inequality, 12 SUB, 15, 18–19, 117, 163–64 SUBJECT TO, 5, 10, 12, 22, 120 Submatrix, 117, 175, 201 Subroutines Callable Libraries, 182 user created, 182 Subtraction, 87, 120, 139, 142 SUFFICIENT SET, 61, 183 Syntax, 12, 56 errors, 6, 10, 13, 60, 81, 271 names, 12 optional modeling statements, 15–21 System Operator, 120 System parameters, 44 297 System requirements, 3 T TABLEAU, 116, 135–37 Tableau command, 27, 63, 96–98, 116 TAKE, 116, 124–25, 216, 217–19 Take command, 217–19 Take Commands command, 26, 35–36, 102, 124 Technical support, v, 2, 183 Terminal width, 55, 117, 181 TERSE, 117, 180 Terse mode, 54 Text files, 30, 32, 213, 217 Text reports, 78, 89, 91, 207 Tile command, 28, 107–9 TIME, 115, 120, 130 TITAN, 117, 175, 195 TITLE, 15, 20–21, 118, 188 Title command, 26, 39 Tolerances, 45, 51, 188 entering variable tolerance, 53 final constraint tolerance, 53 initial constraint tolerance, 53 IP optimality tolerance, 46, 194 pivot size tolerance, 53 variable fixing tolerance, 50 tool palette, 222 Toolbars, 28 Solve button, 23 Trademarks, ii Transportation model, 100, 211 Triangularization, 95, 138, 183 Turnkey systems, 219 Tutorial. See Getting Started with LINDO U Unbounded models, 61, 118, 151, 153–54, 158, 183, 185–86 Undo command, 26, 42, 58 Updating, 112 USER, 118, 182 User Supplied Subroutines, 118 V Variable fixing tolerance, 45, 50 Variables, 2, 4, 9, 12, 133 adding, 159, 162 298 INDEX artificial, 95, 96, 135, 138 binary, 17, 117, 191 bounds, 187 branching, 193 continuous, 16, 18, 195 defining, 11 deleting, 159 favorable, 53 integers, 16, 46, 80, 117, 170, 191 names, 12, 92, 95, 120 negative, 18, 117 pivoting, 158 primal values, 137 rounding, 53, 54 slack, 96 statistics, 80, 186 VERBOSE, 117, 180 Verbose mode, 54, 193 View command, 7, 26, 31 View windows, 29, 31, 41 Visual Basic, 220, 222–26 sample application, 245–51 Visual C/C++, 220, 226–28 sample application, 251–58 W Warranties, ii WATSUP, 265 WIDTH, 117, 180 Wildcards, 87, 139, 142 William, H.P., 176 Window menu, 28, 102–9 Windows Command window. See Command window Edit windows. See Edit windows Entering a model, 4–8 mainframe window, 4 Model windows. See Model windows Reports window. See Reports window Solver Status. See Solver Status Window View windows. See View windows Windows commands, 25–114 in brief, 25–28 in depth, 29–115 Word, 2, 31, 211 X XYZ Corporation, 4, 9 Z Zoom tool, 93