1
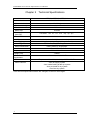
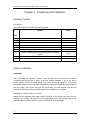
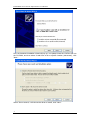
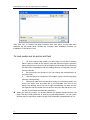
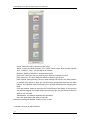
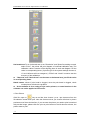
EXTREME series Solvent Inkjet Printer User Manual Extreme series Solvent Inkjet Printer User Manual -1 EXTREME series Solvent Inkjet Printer User Manual Contents Chapter 1 Safety Information ....................................................... 3 Chapter 2 Technical Specifications .............................................. 4 Chapter 3 Unpacking and installation .......................................... 5 Packing Content ........................................................................ 5 Printer installation...................................................................... 5 To load media and do printer self test ....................................... 8 Chapter 4 Operation instruction ................................................. 10 Control keys introduction:........................................................ 10 Usage of liyuPrint .................................................................... 10 Chapter 5 Maintenance.............................................................. 16 Purging during printing ............................................................ 16 Print head maintenance after printing ..................................... 17 Cautions of KONICA print head .............................................. 17 Chapter 6 Guarantee ................................................................. 19 Appendix: ..................................................................................... 20 Thank you very much for your choice Extreme printers. -2 EXTREME series Solvent Inkjet Printer User Manual Chapter 1 Safety Information Please read the following safety directions thoroughly before you start to use this machine: 1. To place the printer in a clean and airy room with flat ground; 2. Anti-electromagnetic, quakeproof and without heavy dust and away from corrosive gas and liquid; 3. To place the printer in a place without drastic temperature and humidity changes, and keep the condition around at temperature: 20℃~25℃ and humidity: 40% RH ~70%RH. 4. After the printer installed, severe vibration is prohibited, do not place heavy objects on the printer or beat the printer with heavy objects. 5. Be connect the printer and PC to a reliable outlet well grounded. The printer and the computer connected to it require a reliable grounding-line! There are two specific methods of grounding as the following: 1. With an 500mm×500mm and 1 ~ 3mm thick copper plate, buried underground 1 ~ 1.5m deep as the ground terminal, the pit can sprinkle a little salt water; 2. With a nail of 40mm×1000mm copper-coated iron or zinc-coated iron (the thickness of copper or zinc skin are not less than 2mm) driven into the ground 1 ~ 2m deep as the ground terminal; To use a wire with cross-sectional area thicker than 1mm2 to connect ground terminal with the printer, then link the printer and the computer with a reliable wire. 6. Do not pull or plug the power cable between the printer and PC, and be waiting 30 seconds before you need to turn on the power again. 7. Adoption of good quality solvent ink is necessary for the printer. If you want to use the ink of other brand please contact the local dealer. 8. When using the machine, be care for that, Do not press the machine cover by hand or other heavy things; Do remember to turn on / off by power switch which is at the right of printer; 9. Printing directly on the printer plate without the media is forbidden; 10. If you encounter the following questions, please cut off the power and contact the local dealer, Power switch is insensitivity or out of control; Cannot operate it normally or some obvious changes of machine function. -3 EXTREME series Solvent Inkjet Printer User Manual Chapter 2 Technical Specifications PTP256-4/PTP256-6/PTP256-8 Print heads 4/6/8 * KONICA KM-256 Print resolution 360×720dpi Print heads height 2.5mm~3mm off media Print Width 3232mm Media size 3270mm Printing Speed (two-way) PTP3200:(40,27,21)㎡/h (2p,3p,4p) Print direction Uni/bi-direction Ink Type Ink-supply type Media Type Media transmission Interface Size(mm) Weight (net) Power Requirement Environment Other Features C,M,Y,K,LC,LM(four or six colors) solvent Using force pump to supply ink continuously PVC Banner, Vinyl, Coating Film, etc. Rolling media or single paper USB 4700 x 850 x1300 520KG 220V±10%,>10A,50/60HZ Temperature: 20 ~25 , Humidity: 40%RH~70%RH Auto ink-supply system Auto media feeding & take-up system Auto pre-heater & dry system Auto fans dry system If the technical specifications above are changed, we will not notice again. -4 EXTREME series Solvent Inkjet Printer User Manual Chapter 3 Unpacking and installation Packing Content One printer A set of accessories, details in the following table: Items QTY. 1 Power cable 1 2 USB cable 1 3 Cleaner cloth and nylon tube 1+2 4 Inner hexagon spanner 1 set 5 Print software 1 set 6 Control software 1 set 7 Roller for feeding and pulling paper(options for pulling paper) Per 2 8 Left and right column of fan 1 set 9 Ventilator bearings 2 NO. Printer installation Installation After unpacking the machine, please check whether the accessories is complete compared with packing list, is there an obvious exterior damage, if any of the above occurs, please contact the local dealer. The printer should be placed on flat ground, assembled printer bracket and place the printer on the bracket, install the feeding system and dry system, and connect air plugs with connectors in the left chassis. After link the machine to reliable grounding described above, the installation is complete. Installation of control software and driver Please use the supplied USB cable connect computer to the printer, and then boot the computer, the system will require to install appropriate driver, then please refer to the following steps to install USB driver (takes WINDOS XP as an example): -5 EXTREME series Solvent Inkjet Printer User Manual First, the hardware installation wizard will pop up, now please insert the LiYuPrint CD into the CD-ROM, and then select "Install from a list or specific location (Advanced)", click "Next." Select "Do not search, I will choose the driver to install", click "Next." -6 EXTREME series Solvent Inkjet Printer User Manual Click "Have Disk", to show "Install From Disk" interface. Click "Browse" to choose CYusb.inf document in CD. -7 EXTREME series Solvent Inkjet Printer User Manual Then click "OK" in "Install From Disk" interface, then click "Next". At the same time Windows XP will install driver. Restart the computer after installation finished. So installation of USB driver is over To load media and do printer self test 1. Lift up the pinch roller handle, put roller paper on the reel( or directly place a piece of media on the device), pass the paper through the pressure piping and press it on the reel, pull the media from back side to front and keep the side of the media aligned with the feeding direction of the printer, then put down the handle; 2. By the switch of the power box you can change the rotate direction of the paper roller; 3. Use two clamps to hold brims of the media in order to avoid rough edge affecting normal printing; 4. Check and make sure that electrical wiring is connected properly and there is no object such as screws left on the worktable, then turn on the printer, the carriage move from left to right automatically one time and the principal axis with the media move to-and-fro one time, after self test is over, we can do print heads test and color calibration. -8 When you print long image, you should calibrate the parallel degree between roll paper side and feeding direction to avoid the media displacement. You can press direction keys to feed some media to check if the media side is displacement or not. EXTREME series Solvent Inkjet Printer User Manual -9 EXTREME series Solvent Inkjet Printer User Manual Chapter 4 Operation instruction 1. Control keys introduction: Heat: heat to make media level and help the ink dry. Purge: clean the print heads. Press ink: perform press ink when the print heads are clogged. Dry: can fast dry the work. High voltage switch: This is supply voltage for carriage board, switch on to supply ink. ◆ Before you turn off the machine, please shut down high-voltage switch, otherwise it will cause circuit board damage. 2. Usage of liyuPrint Double click the icon of LiYuPrint on the desktop and then start its program, main interface is as follows: Figure 4.1 interface 1. System settings - 10 EXTREME series Solvent Inkjet Printer User Manual Please choose "System settings" under File menu, or click interface: to open the following Please select the type of printer you are using, be sure to choose the right one, otherwise the image will print an error. At the same time you can choose bi-direction or single direction of print mode, print speed and print mode. Meaning of all items under system settings are as follows: - 11 EXTREME series Solvent Inkjet Printer User Manual Printer: Select the type of printer you are using. Speed: Select the printing speed. PTP Series Printer offers three printing speeds "low", "medium", "high", you can adjust as needed. Direction: Select bi-direction or single direction print. Print mode: Select the way you need to print, that is the number of PASS. Flash frequency: The print head jets number of times every second. Flash interval: During printing, the print head carriage will move to the flash position on the left of the printer to flash jet. The times that printing back and forth are flash interval. The right flash interval can help you to prevent effectively from clogging print head. Color bar position: Select to add color bar on both ends of the image, so the process can prevent clogging print heads which are no need to jet, you can choose to add two sides or only one side. Task distance: the distance between two operations. Color bar width: Select the width of color bar. After above settings is finished, click the "Save" to exit. 2. Glossary of keys on main interface: - 12 EXTREME series Solvent Inkjet Printer User Manual Direction Key: The left and right keys control the printer carriage to move horizontally. The up and down keys control the step motor to roll media. Flash: The print heads jet a few times every certain time at the left of the printer to prevent from clogging the print head. It is invalid during printing Return: make the printer carriage return to printing state. Origin print: Each print will start from fixed point, the origin position can be changed in advance option of System Settings. Color bar: select whether add color bar on the both end of image. Automatic flash: enable it, the print heads jets at the left of the printer after finish printing. The left of the interface is shortcut, which has two columns: "Print" and "Test". The functions of Print are as follows: Print: print the image. Cancel: stop operation of printing. Reset: reset the machine. Pause: press Pause during printing, the print carriage will stop at the left of the printer and jet, press Continue to return to print. Continue: press Flash during printing then press Continue to return to print. The functions of Test are as follows: - 13 EXTREME series Solvent Inkjet Printer User Manual Horizontal test: To run horizontal test, to set "Resolution" and "Speed" according to need, select "Print"", the printer will print diagram of horizontal calibration test. The calibration value is number of the aligning place in each test diagram. Fill the value in corresponding items. (If printer type of the system settings chooses 4, LC and LM items will not emergence.) "Effect" and "check" is used to test the accuracy of the calibration. "Step test" and "Vertical test" are the same as horizontal test, just fill the value in corresponding items. Nozzle status: shows if print head is clogged, once the print head is clogged, check nozzle picture will show the problem. As the software is for a variety of Liyu series printers, so some functions in the software can not be applied to PTP series. 4. Print Picture Click file→open or key on tool bar, then choose *.prt or *.prn document from the file selection screen and open. Now the document that you choose will show in picture preview area of the main interface. If you are sure the picture you need to print is matched with preview image, please click file→print or print button on the left shortcut column, the printer starts to print. - 14 EXTREME series Solvent Inkjet Printer User Manual The beneath of Preview bar is operation status bar, the property of operation will be displayed here after the user call in an operation, the user can change "Print mode", "Speed", "Direction" and "Copies." - 15 EXTREME series Solvent Inkjet Printer User Manual Chapter 5 Maintenance 1. Purging during printing 1. During printing, if you find out that the print head is clogged, you should press "Pause" key. The print carriage will move automatically to the purging area at the left end of the machine; 2. Press "press ink" button on the panel to press ink the print head, you can also open the valve to pressure ink to single print head. ◆ Keep the valve under the row close. 3. When press ink is completed, please use professional non-woven fabric to wipe the surface of print head, press Continue button, then press ink is finished and return to print; 4. If you encounter invalid press ink (print head clogged seriously), you need to clean the print head with cleaning solution, open the valve down (straight down), press Purge button to purge the print head, you can also purge the print head separately. 5. After cleaning, open the valve up (straight up) and recover the supply of ink. 6. If the above press ink and purge operations are invalid (print head clogged or oblique jet seriously), you must stop printing and power off. Take down the print heads, clean them with cleaning solution, then put the nozzle down into a clean stainless steel or enamel container with cleaning solution, and soak them into the cleaning solution for 8~24 hours then re-install it. Don't hurt the print head surface when you take down it! Be careful the top of the print head can't be touched by the cleaning solution. When you install the print head, please adjust the distance among the print heads again! When the state of the print head declines, you need to immediately clean and soak method maintaining the print head, until the nozzle test has no break line, oblique jet and other defects. If you do not take care timely, it may cause clogging or permanent blockage. 9. If above measures are useless, please contact the local dealer at once, and ask for professional maintenance or replacement. Be careful the airproof of tube at connection of print head. 10. Please keep the filter filled with ink, or the ink will flow back to gas cylinders of auxiliary ink tank, resulting in no press ink; if you find there is air in the filter, please open the filter valve to press ink until the filter filled up with ink. 11. We recommend to replace filter at least 3 months. Please use ink recommended by the manufacturers. - 16 EXTREME series Solvent Inkjet Printer User Manual Print head maintenance after printing After work, please wash the print head, after washing soak it in a tray loaded with clean solution, and wrap the print head with preservative film to prevent dust, and complete cleaning. After finishing purging print head, keep full cleaning solution in the tube between valve and print head. Please clean the nozzles of print head to avoid the ink used previously to debase print capability. Be care that the cleaning solution can’t splash on the motor and meet lines. 2. Printer maintenance 1. Keep the printer room order and cleanness. 2. Keep the convey belt propriety tight. Open left cover, you can adjust the convey belt tight degree. After adjustment, you must tighten meet bolt. 3. Around the nozzles of print head, it must be cleanness, not remained ink, no dust and fibre. You can't hurt the surface of nozzle. 4. Ink and cleaning solution are all stronger solvent. So they can't touch with electrical appliance and lead. If there is some ink or cleaning solution on the bottom plate and guide cover, you should clean them quickly. 5. Keep the work plate cleanness. Before power on, you must check printer plate and ensure there are no any sundries on it, such as bolt, to protect print head. 3. Cautions of KONICA print head 1. Working environment a) Temperature: The environmental temperature of the print head: 20 ~ 25 ℃, Relative humidity of the print head: 40 ~ 70% RH b) Usage of ink: ink authorized by seller Viscosity: 10mPa.s (25 degrees Celsius) Surface tension 31mN / m (25 degrees Celsius) c) Ensure the indoor environment is clean, neat, no dust and little air flow. 2. Pressure of print head: (indicated with water column) When measure from the height of nozzle ‘s surface, the pressure of ink supply can not deviate from the following values. a) Without drive +0 / - 300mmAq (mm water column) (Note 1) b) When driven +0 / -100 mmAq (mm water column) (Note 2) Note 1) This value includes the pressure change of print carriage in acceleration, vibration and shock Note 2) This value includes the pressure loss of the ink system 3. Operation guidance a) The body of machine is reliable grounded. Because the print head installed with - 17 EXTREME series Solvent Inkjet Printer User Manual CMOS_IC, so it is necessary to do anti-static electricity measures to prevent from damaging the print head by the charge and discharge, do not touch the circuit inside the print head when adjust it. b) Please avoid errors of mechanical vibration, such as impact, knock, or fall, because the incentive parts inside the print head are easily damaged. Please do not use print head damaged by these vibration. c) Avoid using and storing under condensation condition. Do not use print head polluted by ink on electrical connections. d) Use the filter to filter ink outside the print head to maintain a clean environment for ink supply in the print head, and ensure the print quality during printing. e) The print head should be assembled in set, please do not disassemble or modify it. f) Please keep ink recommended by sealer within the print head and ink distribution channels. g) Please keep the surface of print head wet by covering a tray or other method. As dry inside the print head or on the nozzle plate is the reason for not jetting, you can remove the solid part of ink around the print head. h) Any other ink except recommended ink may be factors damaging print head, please do not use any ink except recommended ink. Expired or damaged ink in storage conditions (including transportation) may also affect the jet ability of print head. I) The print head has mixture of lead. When dealing with print head, please deal with it follow the standards of each country or region or industrial waste treatment rules. 4. Maintenance of print head a) During the printing process, if you find broken line, please press ink timely, long time without treatment can cause permanent print head clogged. b) The pipeline between the valve and the print head can not have bubbles, if so, please press ink until the bubbles are discharged or replace ink tube, if there still have bubbles, check whether the main and auxiliary ink tanks run out of ink, or whether is leakage somewhere. c) After the completion of print jobs everyday, please clean the print head and put it into a tray with cleaning solution, put non-woven fabrics in it in order to maintain the print head moist. d) If you do not use the print head for a long time, you need to completely clean the print head with cleaning solution, hold it with a tray filled with cleaning solution and non-woven fabric (remember to change it every day), it is best to remove the whole print head and soak it in cleaning solution compatible with the ink, and keep the cleaning solution in the tray not completely volatile. e) After cleaning the print head with cleaning solution, it will remain some solution in the ink tube,keep it when you are not printing, when you need to print, please use Press ink button to discharge the cleaning solution and continue press ink for several seconds. f) Please use ink suitable for the season, otherwise the print head will be damaged and affect the printing. g) Use KONICA series ink recommended by manufacturer, other ink may cause print head clogged. - 18 EXTREME series Solvent Inkjet Printer User Manual Chapter 6 Guarantee 1. Any PTP series printer purchased from our authorized dealer, we guarantee one year from the purchasing date verified by Guarantee Card. 2. If you have any question under normal usage state, the local dealer will provide free charge for service in a year guarantee period. 3. The following is exceed guarantee range, Without valid Guarantee Card or Guarantee Card does not return to our company; Damaged by unwarrantable operation or abnormal use; Damaged by taking apart or refitting the printer not allowed; Because of FORCE MAJEURE or natural damage; Consumptive parts are out of warranty (such as print head, pinch roller, ink filter, ink pump, rectangular guide and a block). 4. The local dealer will undertake the charged service out of guarantee time. 5. The manufacturer just bears the obligation based on machine itself, excluding any other loss induced from troubled machine. - 19 EXTREME series Solvent Inkjet Printer User Manual Appendix: 1. To avoid problems caused by computer, we recommend brand computer or computer with better hardwares, refer to the followings: CPU: Dual Core 2.5G or above Memory: At least 1G HDD: 120G or more, at least 15-25G space on system disk Motherboard: Asus or Gigabyte UPS: choose according to printer Recommendation: use a 2000W regulator Operating System: Windows XP 2. Location conditions and necessary tools: Keep the room cleanness and brightness, temperature (20 ℃ ~25 ℃ ) 、 humidity (40%~70%); In the workroom, you'd better install one big-power exhaust fan, one thermometer and one hygrometer. In dry area, one humidifier is also necessary. Some cleaner cloth with good quality. - 20 EXTREME series Solvent Inkjet Printer User Manual - 21 EXTREME series Solvent Inkjet Printer User Manual - 22