1
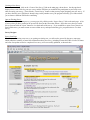
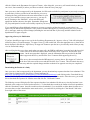
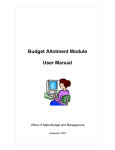
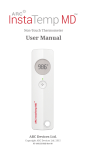
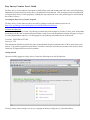
Easy Survey Creator: User’s Guide
The Easy Survey Creator software is designed to enable faculty, staff, and students at the University of Iowa Psychology
Department to quickly and easily create surveys for publication on the Internet. This document provides an introduction
to using the Easy Survey Creator program by outlining the steps required to create, edit, publish, approve, and download
the results of a survey.
Accessing the Easy Survey Creator Program
The Easy Survey Creator software can be accessed by pointing a JavaScript-enabled web browser to
http://www.psychology.uiowa.edu/EasySurveyCreator/WebForms/Default.aspx.
Username and Password
In order to use Easy Survey Creator, a Psychology username and password must be provided. Faculty, staff, and students
should login with the same username and password that is used to access the Department’s internal webpage or to log on
to various departmental computers. For testing purposes, the following information may be used instead:
Username: PSYCHOLOGY\XXX
Password: YYY
This information should be typed into the password prompt that is displayed when the above URL is entered into a web
browser. If an incorrect password is entered three consecutive times, the associated user account will be locked. Please
contact the IT Support Staff to resolve this problem.
Getting Started
Upon successfully logging in to Easy Survey Creator, the following screen will be displayed:
You may start by either creating a new survey or opening an already existing survey, as described below.
Creating a New Survey
To create a new survey, click on the “Create a New Survey” link on the main page, shown above. On the page that is
displayed next, enter a title for your new survey and the URL that you would like the participants in your study to use
when accessing your survey. Then click the “Create Survey” button so that you may begin designing your new survey. If
you have chosen to use a URL that is already being used by another survey, the program will notify you of this and ask
you to choose a different URL before continuing.
Open an Existing Survey
To view or modify an existing survey, you may open it by clicking on the “Open a Survey” link on the main page. A list
of surveys that you have permission to open will be listed on the screen that follows. Select the survey that you would
like to open and click the “Open” button to view the details of the survey. If you would like to open a survey that is not
listed on this menu, you must contact an owner of that survey and request that they give you permission to view their
survey.
Survey Designer
Survey Start Page
Whether you are creating a new survey or opening an existing one, you will next be greeted by the survey start page,
which contains a summary of some basic information about your survey, including its name and URL as well as its status
and a list of steps that need to be completed for a survey to be successfully published, as shown below.
Changing the Name or URL of a Survey
To change the name or URL of the survey you are editing, click the “Change Survey Information” button at the top of the
survey start page and then provide the updated information and click “Save” to return to the survey start page.
Deleting a Survey
To delete a survey, click the “Delete This Survey” button at the top of the survey start page. This will delete the survey
definition (including any questions or other settings you have defined) as well as any responses that have been recorded
for the survey. This action cannot be undone.
Survey Status
A summary of the status of your survey is shown on the right of the survey start page. If an
open padlock is displayed (as shown above), your survey is currently in design mode and
you are free to make changes to the content of the survey that you wish. If, however, a
locked padlock is displayed (as shown to the right), this means that your survey has been
submitted to the department for approval and no changes can be made to it without first
unlocking the survey.
To unlock your survey, click the “Unlock Your Survey” button that is located below the
locked padlock. Doing this will result in the deletion of any responses that have previously
been recorded for your survey and will require your survey to be re-approved by the
department before it can be published again. This will also mean that (during the time that
it is unlocked) your survey will not be available for gathering responses from participants.
Steps to Finish Your Survey
The middle portion of the start page contains a list of seven steps that need to be completed before a survey can be
successfully published. These steps include:
1.
2.
3.
4.
5.
6.
7.
Informed Consent
Survey Questions
Debriefing Text
Group Login
Permissions
Appearance
Publish It!
You may use these links on the survey start page, the menu on the left of the screen, or the forward and back arrows in the
bottom right and left corners of the pages to navigate between the different pages of the survey designer in order to
complete these steps, as described below.
Survey Preview
In order to preview what your survey will look like at any point during the design process, you may click on the “Preview
Your Survey” button under the menu to the left of the screen. This will open a separate window that will contain a
preview of what your survey looks like as you have currently defined it. Opening your survey in preview mode like this
will not result in any responses being recorded in the database, so feel free to test it as many times as you like without
worrying about corrupting the results of your study.
Step 1: Informed Consent
The first step to completing your survey for publication is to provide the Informed Consent text that the user must agree to
before they may complete your survey. Clicking on the “Informed Consent” link on the menu to the left of the screen will
display a screen with a text box where you may copy and paste the informed consent document that was approved by the
IRB and then click the “Save” button.
Step 2: Survey Questions
To edit the questions that make up your survey, click on the “Questions” link in the menu to the left of the screen. This
will display any questions that are currently included in your survey (if there are any) and will allow you to edit them or
insert new ones.
Inserting a New Survey Item
To insert a new survey item, pick the location in your survey where you would
like to insert the new item and click on the appropriate orange “Insert Item Here”
button (as shown on the right). On the screen that is displayed next, select the
type of item that you would like to add to your survey from the drop down menu and click the “Create” button. If no
additional information is required to create this item, you will be taken back to the page showing the list of questions in
your survey, updated to include the newly
inserted item.
If, on the other hand, more information is
required to successfully create your survey
item, the screen to the left will be displayed so
that you can provide the missing information.
Depending on the survey item you have
chosen to insert into your survey, you may
have the ability to specify instructions,
questions, and/or options on this screen. To
view what your question will look like at any
point during the design process, you may click
on the “Preview Item” tab.
When you are providing information about the
questions associated with this survey item, the
“Question Alias” field corresponds to the column name in the results spreadsheet that will contain the responses to this
survey item. If a question alias is not provided, the question text will be used in its place. Similarly, when defining the
options for a survey item, the “Option Alias” field corresponds to the text that will be returned in the result spreadsheet as
the response for the appropriate survey question when this option is selected. If no option alias is provided, the option text
will be used instead.
If the item type you have selected supports questions that are specified by the participant, the “User Defined” option will
be available on the questions tab and selecting this option will insert a text box into the question text for the user to
specify their own question. Similarly, if the item type you have selected allows the user to specify their own options when
responding to a question, the “User Defined” option will be available on the options tab. Selecting this when you create
an option will provide the user with a text box where they may specify their own response to your question (like an
“other” option on a multiple choice question, for example).
When you have finished inputting the information for your question, you may click the “Save” button to be returned to the
listing of questions in your survey, or the “Save and Insert Another” button to save the current question you are working
on and insert another directly after it in the survey.
Editing a Survey Item
To edit an existing item, you may use the buttons provided to the right of the survey question (as shown here).
Using the blue up and down arrows, you can change the order of the questions in your survey by moving the
question corresponding to these buttons up or down. The red “X” can be used to delete a question from your
survey. Finally, clicking on the pencil and paper icon will open the survey item for editing so that you may
change the instructions, questions, or options associated with the survey item.
Step 3: Debriefing Text
To specify the debriefing text that will be displayed to your survey participants after they have responded to your survey,
click on the “Debriefing Text” link in the menu to the left of the screen. You may type the debriefing text in the textbox
provided and click the “Save” button when you are finished.
Step 4: Group Login (Optional)
If your survey requires that your participants provide a username, a password, or both before responding to your study,
this information can be specified from the “Group Login” page. This page can be accessed by clicking on the “Group
Login” link on the menu to the left of the survey designer screen. By default, every survey is created to ignore any
username or password requirements, so feel free to skip this step if your survey does not require this functionality.
To specify what login information should be gathered from your survey respondents before they are allowed to respond to
your survey, click the “Change How Groups Log In to Your Survey” button toward the top of the page. On the next
screen that is displayed, you may select whether you would like your survey participants to provide a login name, a
password, or both when they respond to your survey, whether you would like the login name to be selected from a dropdown menu or typed in a text box, and whether you would like either the login name or password to be validated or just
stored with the participant’s response regardless of what information they enter. After deciding what login policy you
would like your survey to use, click the “Save” button to return to the “Group Login” page. If the login policy you have
selected requires that any additional information be entered, you may use the form on this page to provide it.
Step 5: Permissions
To specify which other members of the Psychology Department should be allowed access to your survey, click on the
“Permissions” link on the menu to the left of the screen. This page displays the permissions that various users currently
have to view or modify the survey you are viewing. You may also edit or delete these permissions, or grant new users
permission to view your survey.
Granting a New User Permission for Your Survey
To add permissions for someone new, you will use the bottom half of the screen. Select the person’s name from the list
on the left and then check the permissions that you would like that user to have. Then click the “Add” button to grant the
selected permissions to that user. Granting a user “View Survey,” “Manage,” or “Design” permissions on your survey
will add it to that user’s “Open a Survey” menu (which is accessed from the Easy Survey Creator’s homepage). Granting
a user “View Results” permission on your survey will add it to the user’s “Download Survey Results” menu once the
survey has been approved.
Editing or Deleting Existing Permissions
To edit or delete existing permissions, locate the user you would like to modify in the list at the top of the screen (as
shown below). To edit this user’s permissions, click the “Edit” link to the right of their name and then check the boxes
corresponding to the
permissions you would like
for this user to have and
click the “Update” button
to apply the changes. To delete this user’s permissions, click the “Delete” link to the right of their name.
Step 6: Appearance
To change the colors and fonts that are used when your survey is displayed to participants, click on the “Appearance” link
in the menu. This will allow you to choose between several pre-defined styles as well as any custom styles that have been
defined by those users with design privileges on your survey. Selecting one of these styles from the drop down menu will
update the preview of your survey on the bottom half of the screen. If you find a style that you would like to use for your
survey, click the “Save” button at the bottom of the page to apply this style to your survey. If, on the other hand, you find
that none of these styles meet your needs, you may choose to create your own by clicking on the “Design Your Own”
button on the right of the screen, providing a name for your style and content for the various style tags used by the survey
document, and clicking the “Save” button. You may then select your newly created style from the drop down menu on
the main “Survey Appearance” page and click the “Save” button to apply it to your survey.
Step 7: Publish It!
To complete the final step in designing your survey, click on the “Publish It!” link in the menu on the left of the screen.
Select the start and end dates for your survey on the provided calendars and then submit it to the Psychology Department
for approval. The start date is the first date that (once approved) your survey will be available at the specified URL for
participants to respond to. The end date is the last date on which your survey will be available to gather responses. This
date should match the “Expiration Date” approved by the IRB. Once all of this information has been provided, you may
click the “Submit to the Department for Approval” button. After doing this, your survey will remain locked (so that you
can view it, but not modify it) unless you choose to unlock it from the survey start page.
Once your survey has been approved by the department, it will be made available for participants in your study to respond
to on the date you have provided as the start date for your survey.
If (during the time period between the start and end dates for your
survey) you would like to stop or start your survey, you may do
this by returning to the “Publish It!” screen and clicking the
appropriate buttons (shown to the right). Remember, though, that
for your participants to be able to successfully respond to your survey, it must not be stopped.
If, you would like to collect additional responses to your survey once its end date has passed, you must have it reapproved by the IRB and the department. Once you have obtained IRB approval, you may unlock your survey from the
survey start page, make any desired changes (including the start and end date of your study) and then submit it to the
department to be approved again.
Approving a Survey for Publication
If you have the ability to approve surveys for the Psychology Department, the “Approve a Survey” link will be displayed
on the Easy Survey Creator homepage. To approve a survey, click on this link, select the appropriate survey from the list
that is displayed, and click the “Open Survey for Approval” button to open the survey in read-only mode so that you may
view its content and settings.
After verifying that the survey does match what was approved by the IRB for publication, locate the box in the lower left
corner of the screen below the menu (shown to the left), select “Approved” and click the “Save”
button. On the next page that is displayed, enter the information that was provided by the IRB
when it approved this survey and click the “Save” button to finish approving the survey.
If the survey does not match what the IRB approved, you may choose “Not Approved” in the box
in the lower left corner of the screen and then click the “Save” button. This will unlock the survey
so that the survey’s owners may make the required changes and then resubmit it for approval once they are completed.
Downloading the Results of a Study
Once your survey has been approved by the department, you may download any responses that have been submitted. This
can be done by returning to the Easy Survey Creator homepage (at
http://www.psychology.uiowa.edu/EasySurveyCreator/WebForms/Default.aspx) and clicking on the “Download Survey
Results” link to display a list of surveys for which you have permission to view the results. Select the survey you would
like to download the responses for from the menu and click the “Get Results” button.
The following screen will display all of the responses that have been submitted for this survey since the last time it was
unlocked or the results were cleared (as shown below). To download these results in the format of an Excel spreadsheet,
click the “Download” button. Once the results have been downloaded, if you would like to delete them from the server
(to ensure that you don’t download the same results twice), you can do this by clicking the “Clear Results” link in the
lower right corner of the screen.
Frequently Asked Questions
Why can’t I change anything in the survey designer view?
There are two possible reasons why you would be unable to modify a survey through the survey designer screens. The
first possibility is that your survey has already been submitted to the department for approval and is locked for this reason.
If this is the case, the survey start page should display a locked padlock under the “Survey Status” section. In order to
make any changes to the survey, you will need to unlock your survey as previously described. The second possibility is
that you cannot change anything because the survey owner(s) have not given you permission to make any changes. For
example, you may have “View Survey” permission, but not “Manage” or “Design” permissions. To correct this, you will
need to contact an owner of the survey and request that you be granted additional permissions for the survey.
Why do I have to submit my survey for “Departmental Approval”? What does this involve?
Submitting your survey to the department for approval is really just a double check that the survey you are submitting
matches what was initially approved by the IRB for your study. As long as you haven’t made any significant changes to
your survey since you initially submitted it to the IRB, there should be no problems obtaining departmental approval in a
timely fashion.
Why does my survey show up as “Not Active” when I go try to open it in a web browser?
There are a number of reasons why your survey may appear as “Not Active” when you try to open it in a web browser. It
may be that your survey has not yet been approved by the department or that (even though it has been approved) you are
trying to access it before the start date or after the end date that you specified. Alternatively, even if your survey has been
approved, choosing to manually stop it by clicking the “Stop” button on the “Publish It!” page of the survey designer will
also cause it to appear as “Not Active.”
How can I get more help?
If you have additional questions or would like assistance using Easy Survey Creator, please contact the Psychology
Department’s IT Support Staff at (319) 335-2410 or by submitting a Job Request (at
http://www.psychology.uiowa.edu/internal/jobrequest).