1
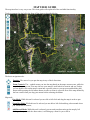
MAP USER GUIDE
The map interface is very easy to use. This short guide will explain all of the available functionality.
Tools are arranged on the left in the form of blue icons as described below.
The basic navigation tools:
Panning: The arrows let you pan the map in any of the 4 directions.
Zoom Controls: The + symbol zooms you into the map based on the maps current center, while the
– symbol zooms you out. You may also use your mouse's scroll wheel to zoom in and out. Further
you can double click on the map to zoom into a specific point, or you can press and hold the shift
button while pressing the left mouse button in order to zoom to a specific area of the map defined by
the box created when you drag your mouse before releasing the button.
Map tools:
Pan Mode: While this tool is selected you are able to left click and drag the map in order to pan.
Zoom Box Mode: While this tool is selected you are able to left click and drag a box around where
you would like to zoom to,
Add Record Mode: While this tool is selected you can mark an observation on the map by left
clicking where you made the observation, it will bring up a form for you to fill in.
To the left of the map are the layer controls:
Click SET MAP BACKGROUND in order to see the list of available base layers. Selecting on of the available
base layers will change which is displayed on the map
Click CHOOSE DISPLAY LAYERS in order to see a list of available data sets that are displayed over the map.
Selecting on one of the available layers will turn them on and off, keep in mind some of the layer are dependent
on scale and may not show up when fully zoomed out.
Click VIEW RESULTS in order to see your observations on the map.
Click JUMP TO SECTION in order to see a list of communities that you may jump to. By selecting a
community it will zoom to that community.