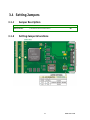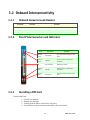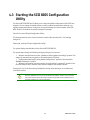
1
PMC261 User’s Guide
Ultra SCSI 160/320 mezzanine
Document Revision 1.0.1
Ref. : 1016-2693/ April 2007
Customer Service
Contact Information:
Kontron Canada, Inc.
616 Curé-Boivin
Boisbriand, Québec, Canada
J7G 2A7
Tel:
(450) 437-5682
(800) 354-4223
Fax:
(450) 437-8053
E-mail: [email protected]
Visit our site at:
www.kontron.com
© 2007 Kontron, an International Corporation. All rights reserved.
The information in this user’s guide is provided for reference only. Kontron does not assume any
liability arising out of the application or use of the information or products described herein. This
user’s guide may contain or reference information and products protected by copyrights or patents
and does not convey any license under the patent rights of Kontron, nor the rights of others.
Kontron is a registered trademark of Kontron. All trademarks, registered trademarks, and trade
names used in this user’s guide are the property of their respective owners. All rights reserved.
Printed in Canada. This user’s guide contains information proprietary to Kontron. Customers may
reprint and use this user’s guide in other publications. Customers may alter this user’s guide and
publish it only after they remove the Kontron name, cover, and logo.
Kontron reserves the right to make changes without notice in product or component design as
warranted by evolution in user needs or progress in engineering or manufacturing technology.
Changes that affect the operation of the unit will be documented in the next revision of this user’s
guide.
i
PMC261 User’s Guide
Contents
Customer Service ................................................................................i
Contents ..........................................................................................ii
Safety Instructions ............................................................................ v
Before You Begin ............................................................................................vi
When Working Inside a Computer ......................................................................vii
Preventing Electrostatic Discharge ...................................................................viii
Working with Batteries.................................................................................... ix
Preface ........................................................................................... xi
How to Use This Guide.....................................................................................xii
Customer Comments......................................................................................xiii
Advisory Conventions ....................................................................................xiii
Unpacking................................................................................................... xiv
Powering Up the System................................................................................. xiv
Adapter Cables .............................................................................................. xv
Storing Boards .............................................................................................. xv
Regulatory Compliance Statements ................................................................... xv
Limited Warranty .......................................................................................... xvi
1.
2.
3.
1.1
1.2
1.3
Product Description................................................................ 1-0
Product Overview ............................................................................... 1-1
What’s Included ................................................................................. 1-2
Board Specifications ........................................................................... 1-2
Onboard Features................................................................... 2-0
2.1
Block Diagram ................................................................................... 2-1
2.2
System Core ...................................................................................... 2-2
2.2.1 SCSI Controller ............................................................................... 2-2
Installing the board................................................................ 3-0
3.1
Setting Jumpers................................................................................. 3-1
3.1.1 Jumper Description ......................................................................... 3-1
3.1.2 Setting Jumper & locations............................................................... 3-1
3.2
Onboard Interconnectivity ................................................................... 3-2
3.2.1 Onboard Connectors and Headers....................................................... 3-2
3.2.2 Front Plate Connectors and Indicators................................................. 3-2
3.2.3 Installing a PMC Card ....................................................................... 3-2
ii
PCM261 User’s Guide
4.
Software Setup ...................................................................... 4-0
4.1
SCSI BIOS ......................................................................................... 4-1
4.2
Initialization ..................................................................................... 4-1
4.2.1 Boot Initialization with BBS .............................................................. 4-1
4.2.2 CD-ROM Boot Initialization ............................................................... 4-1
4.3
Starting the SCSI BIOS Configuration Utility ............................................ 4-2
4.4
Using the SCSI CU............................................................................... 4-3
4.4.1 User Input ..................................................................................... 4-3
4.4.2 Main Menu..................................................................................... 4-3
4.4.3 Boot Adapter List Menu .................................................................... 4-4
4.4.4 Global Properties ............................................................................ 4-5
4.4.5 Adapter Properties Menu .................................................................. 4-6
4.4.6 Device Properties ............................................................................ 4-8
4.4.7 Exiting the SCSI BIOS Configuration Utility .........................................4-11
4.5
Installing Drivers ..............................................................................4-11
4.5.1 Drivers.........................................................................................4-11
iii
PCM261 User’s Guide
A. Connector Pinouts ........................................... A-1
A.1
A.2
A.3
A.4
A.5
A.6
Connectors and Headers Summary ............................................................................... A-1
JN1 & PN1............................................................................................................... A-2
JN1 & PN1............................................................................................................... A-3
JN2 & PN2............................................................................................................... A-4
JN3 & PN3............................................................................................................... A-5
JN4 ....................................................................................................................... A-6
B. Getting Help .................................................. B-1
iv
PMC261 User’s Guide
Safety Instructions
Contents
Before You Begin ................................................... vi
When Working Inside a Computer ............................. vii
Preventing Electrostatic Discharge .......................... viii
Working with Batteries............................................ ix
v
PCM261 User’s Guide
Before You Begin
Before handling the board, read the instructions and safety guidelines on the following pages to
prevent damage to the product and to ensure your own personal safety. Refer to the “Advisories”
section in the Preface for advisory conventions used in this user’s guide, including the distinction
between Warnings, Cautions, Important Notes, and Notes.
♦ Always use caution when handling/operating the computer. Only qualified,
experienced, authorized electronics service personnel should access the interior of
the computer. The power supplies produce high voltages and energy hazards, which
can cause bodily harm.
♦ Use extreme caution when installing or removing components. Refer to the
installation instructions in this user’s guide for precautions and procedures. If you
have any questions, please contact Kontron Technical Support.
WARNING
High voltages are present inside the chassis when the unit’s power cord is plugged
into an electrical outlet. Turn off system power, turn off the power supply, and
then disconnect the power cord from its source before removing the chassis cover.
Turning off the system power switch does not remove power to components.
vi
PCM261 User’s Guide
When Working Inside a Computer
Before taking covers off a computer, perform the following steps:
Turn off the computer and any peripherals.
Disconnect the computer and peripherals from power sources or subsystems to prevent
electric shock or systemboard damage. This does not apply to when hot-swapping parts.
Follow the guidelines provided in “Preventing Electrostatic Discharge“ on the following
page.
Disconnect telephone or telecommunications lines from the computer.
In addition, take note of these safety guidelines when appropriate:
♦ To help avoid possible damage to system boards, wait five seconds after turning off
the computer before removing a component, removing a system board, or
disconnecting a peripheral device from the computer.
♦ When you disconnect a cable, pull on its connector or on its strain-relief loop, not on
the cable itself. Some cables have a connector with locking tabs. If you are
disconnecting this type of cable, press in on the locking tabs before disconnecting the
cable. As you pull connectors apart, keep them evenly aligned to avoid bending any
connector pins. Also, before connecting a cable, make sue both connectors are
correctly oriented and aligned.
CAUTION
Do not attempt to service the system yourself, except as explained in this user’s
guide. Follow installation and troubleshooting instructions closely.
vii
PCM261 User’s Guide
Preventing Electrostatic Discharge
Static electricity can harm system boards. Perform service at an ESD workstation and follow proper
ESD procedure to reduce the risk of damage to components. Kontron strongly encourages you to
follow proper ESD procedure, which can include wrist straps and smocks, when servicing
equipment.
Take the following steps to prevent damage from electrostatic discharge (ESD):
♦ When unpacking a static-sensitive component from its shipping carton, do not remove
the component’s antistatic packing material until you are ready to install the
component in a computer. Just before unwrapping the antistatic packaging, be sure
you are at an ESD workstation or grounded. This will discharge any static electricity
that may have built up in your body.
♦ When transporting a sensitive component, first place it in an antistatic container or
packaging.
♦ Handle all sensitive components at an ESD workstation. If possible, use antistatic
floor pads and workbench pads.
♦ Handle components and boards with care. Don’t touch the components or contacts on
a board. Hold a board by its edges or by its metal mounting bracket.
♦ Do not handle or store system boards near strong electrostatic, electromagnetic,
magnetic, or radioactive fields.
viii
PCM261 User’s Guide
Working with Batteries
Care and Handling Precautions for Lithium Batteries
Your computer board has a standard, nonrechargeable lithium battery.
Do not short circuit
♦ Do not heat or incinerate
♦ Do not charge
♦ Do not deform or disassemble
♦ Do not apply solder directly
♦ Do not mix different types or partially used batteries together
♦ Always observe proper polarities
ix
PCM261 User’s Guide
Replacing Lithium Batteries
Exercise caution while replacing lithium batteries!
WARNING
Danger of explosion if battery is incorrectly replaced. Replace only with the same
or equivalent type recommended by the manufacturer. Dispose of used batteries,
following manufacturer’s instructions.
ATTENTION
Il y a danger d’explosion s’il y a remplacement incorrect de la batterie. Remplacer
uniquement avec une batterie du même type ou d’un type équivalent recommandé
par le constructeur. Mettre au rebut les batteries usagées conformément aux
instructions du fabriquant.
ACHTUNG
Explosionsgefahr bei falschem Batteriewechsel. Verwenden Sie nur die
empfohlenen Batterietypen des Herstellers. Entsorgen Sie die verbrauchten
Batterien laut Gebrauchsanweisung des Herstellers.
ATENCION
Puede explotar si la pila no este bien reemplazada. Solo reemplazca la pila con
tipas equivalentes segun las instrucciones del manifacturo. Vote las pilas usads
segun las instrucciones del manifacturo.
x
PCM261 User’s Guide
Preface
Contents
How to Use This Guide............................................ xii
Customer Comments............................................. xiii
Advisory Conventions ........................................... xiii
Unpacking.......................................................... xiv
Powering Up the System........................................ xiv
Adapter Cables ..................................................... xv
Storing Boards ..................................................... xv
Regulatory Compliance Statements .......................... xv
Limited Warranty ................................................. xvi
xi
PCM261 User’s Guide
How to Use This Guide
This user’s guide is designed to be used as step-by-step instructions for installation, and as a
reference for operation, troubleshooting, and upgrades.
You can find the latest release of this User’s Guide at:
http://www.kontron.com or at: ftp://ftp.kontron.ca/support/
For the circuits, descriptions and tables indicated, Kontron assumes no responsibility as far as
patents or other rights of third parties are concerned.
The following is a summary of chapter contents:
♦ Chapter 1, Product Description
♦ Chapter 2, Onboard Features
♦ Chapter 3, Installing the board
♦ Chapter 4, Software Setup
♦ Appendix A, Connector Pinout
♦ Appendix B, Getting Help
xii
PCM261 User’s Guide
Customer Comments
If you have any difficulties using this user’s guide, discover an error, or just want to provide some
feedback, please send a message to: [email protected]. Detail any errors you find. We
will correct the errors or problems as soon as possible and post the revised user’s guide in our Web
site. Thank you.
Advisory Conventions
Seven types of advisories are used throughout the user guides to provide helpful information or to
alert you to the potential for hardware damage or personal injury. They are Note, Signal Paths,
Related Jumpers, BIOS Settings, Software Usage, Cautions, and Warnings. The following is an
example of each type of advisory. Use caution when servicing electrical components.
Note :
Indicate information that is important for you to know
Signal Paths:
Indicate the places where you can fin the signal on the board
Related Jumpers:
Indicate the jumpers that are related to this sections
BIOS Settings :
Indicate where you can set this option in the BIOS
Software Usage :
Indicates how you can access this feature through software.
CAUTION
Indicate potential damage to hardware and tells you how to avoid the problem.
WARNING
Indicates potential for bodily harm and tells you how to avoid the problem.
Disclaimer: We have tried to identify all situations that may pose a warning or a caution condition
in this user’s guide. However, Kontron does not claim to have covered all situations that might
require the use of a Caution or a Warning.
xiii
PCM261 User’s Guide
Unpacking
Follow these recommendations while unpacking:
♦ Remove all items from the box. If any items listed on the purchase order are missing,
notify Kontron customer service immediately.
♦ Inspect the product for damage. If there is damage, notify Kontron customer service
immediately.
♦ Save the box and packing material for possible future shipment.
Powering Up the System
Before any installation or setup, ensure that the board is unplugged from power sources or
subsystems.
If you encounter a problem, verify the following items:
♦ Make sure that all connectors are properly connected.
♦ Verify your boot devices.
♦ Make sure the BIOS has at least 32K of continuous space to execute.
♦ If the system does not start properly, try booting without any other I/O peripherals
attached, including Compact PCI or PMC adapters.
Make sure your system provides the minimum DC voltages required at the board’s slot, especially if
DC power is carried by cables.
If you are still not able to get your board running, contact our Technical Support for assistance.
xiv
PCM261 User’s Guide
Adapter Cables
Because adapter cables come from various manufacturers, pinouts can differ. The direct crimp
design offered by Kontron allows the simplest cable assembly. All cables are available from Kontron
Sales Department.
Storing Boards
Electronic boards are sensitive devices. Do not handle or store device near strong electrostatic,
electromagnetic, magnetic or radioactive fields.
Regulatory Compliance Statements
This section provides the FCC compliance statement for Class B devices and describes how to keep
the system CE compliant.
FCC Compliance Statement for Class B Devices
This equipment has been tested and found to comply with the limits for a Class B digital
device, pursuant to Part 15 of the FCC Rules. These limits are designed to provide reasonable
protection against harmful interference in a residential installation. This equipment
generated, uses and can radiate radio frequency energy and, if not installed and used in
accordance with the instructions may cause harmful interference to radio communications.
However, there is no guarantee that interference will not occur in a particular installation. If
this equipment does cause harmful interference to radio or television reception, which can
be determined by turning the equipment off and on, the user is encouraged to try to correct
the interference by one or more of the following measures:
• Reorient or relocate the receiving antenna.
• Increase the separation between the equipment and receiver.
• Connect the equipment into an outlet on a circuit different from that to which the
receiver is connected.
• Consult the dealer or an experience radio/TV technician for help.
WARNING
This is a Class B product. If not installed in a properly shielded enclosure and used
in accordance with this User’s Guide, this product may cause radio interference in
which case users may need to take additional measures at their own expense.
xv
PCM261 User’s Guide
Safety Certification
All Kontron equipment meets or exceeds safety requirements based on the IEC/EN/UL/CSA 60950-1
family of standards entitled, “Safety of information technology equipment.” All components are
chosen to reduce fire hazards and provide insulation and protection where necessary. Testing and
reports when required are performed under the international IECEE CB Scheme. Please consult the
"Kontron Safety Conformity Policy Guide" for more information.
CE Certification
The product(s) described in this user’s guide complies with all applicable European
Union (CE) directives if it has a CE marking. The CE declaration of conformity is
provided on the last page of this user’s guide. For computer systems to remain CE compliant, only
CE-compliant parts may be used. Maintaining CE compliance also requires proper cable and cabling
techniques. Although Kontron offers accessories, the customer must ensure that these products are
installed with proper shielding to maintain CE compliance. Kontron does not offer engineering
services for designing cabling systems. In addition, Kontron will not retest or recertify systems or
components that have been reconfigured by customers.
Limited Warranty
Kontron Canada, Inc, (“The seller”) warrants its boards to be free from defects in material and
workmanship for a period of two (2) years commencing on the date of shipment. The liability of the
seller shall be limited to replacing or repairing, at the seller’s option, any defective units.
Equipment or parts, which have been subject to abuse, misuse, accident, alteration, neglect, or
unauthorized repair are not covered by this warranty. This warranty is in lieu of all other warranties
expressed or implied.
xvi
PCM261 User’s Guide
1. Product Description
Contents
1.1
1.2
1.3
Product Overview .......................................1-1
What’s Included .........................................1-2
Board Specifications ...................................1-2
1-0
PCM261 User’s Guide
1.1 Product Overview
Flexibility
With three possible options for accessing SCSI signals (externally on the PMC or the RTM faceplates,
or internally with a connector on the RTM), the choice of a storage subsystem architecture is
limitless. Whether the drives are internal or external to the chassis, the PMC261 can accommodate
the required configuration. Additionally, when used with Kontron’s cPCI-DT64 CPU board (dual slot
version), it can be stacked with another mezzanine to allow the use of another PMC.
Performance
Ultra160 SCSI used on a 64-bit/66MHz PCI or Ultra 320 SCSI used on a 64-bit/133MHz PCI-X bus
allows for building high throughput, well balanced, storage solutions. The Low Voltage Differential
signaling allows less system design constraints. An onboard BIOS comes with a built-in SCSI
configuration utility as well.
Reliability
With an MTBF of 1,000,000hrs combined with Kontron’s reputation of high quality, the PMC261 can
be relied upon for critical applications in the communications, medical, military, aerospace and
industrial automation fields.
1-1
PCM261 User’s Guide
1.2 What’s Included
This board is shipped with the following items:
1.
2.
3.
4.
One Quick Reference Sheet.
One CD-ROM containing drivers.
One PMC261 board
Cables that have been ordered
If any item is missing or damaged, contact the supplier.
1.3 Board Specifications
FEATURES
PCI Interface
SCSI Interface
DESCRIPTION
- Ultra 160, up to PCI 64 bit/66MHz; Ultra 320, up to PCI-X64-bit/133MHz
- 3.3V or 5V I/O compatible
- Option to stack a mezzanine over the PMC to bring the PCI signals up to a second PMC
(only on a dual slot cPCI-DT64 board)
- Ultra 160 LSI 53C1010R SCSI chip / Ultra 320 LSI 53C1030 SCSI chip
- Dual channel:
1) 68 pins VHDCI SCSI connector on faceplate
2) Rear access (cPCI J4), Rear I/O module
- Low Voltage Differential (LVD) or Single Ended (SE) signaling
- LVD and Activity LED’s for Rear and Front channels
- 4MB Flash memory (BIOS)
OS Compatibility
Windows®2000, Windows®XP, Windows®2003, Linux
Compliancy
- PMC P1386.1 V2.4 with 64-bit/Up to 133MHz PCI-X bus.
Mechanical
Power Requirements
- 5.86” x 2.91” (149 x 74 mm), Standard PMC board
- Weight: 90g
- Supply Voltage Vcc = +3.3V ±5%, +5V ±5%
- ICC max: +3.3V
2.8A
- ICC max: + 5V
0.2A *
* Based on power consumption from onboard termination only
BIOS size
30 720 bytes
1-2
PCM261 User’s Guide
Operating
Environmental
Storage and Transit
Temperature
0-60°C/32-131°F
-40 to +70°C/-40 to 158°F
Humidity*
5% to 90% @40°C/104°F
5% to 95% @ 40°C/104°F
non-condensing
non-condensing
Altitude*
4,000 m / 13,123 ft
15,000 m / 49,212 ft
Shock*
5G each axis
Bellcore GR-63-CORE
Section 4.3
Vibration*
1.0G, 5-500Hz each axis
2.0G, 5-50Hz;
3.0G,50-500Hz each axis
Reliability
MTBF: > 1 000 000 hours @ 30°C / 86°F (Telcordia SR-332, Issue 1)
Designed to meet or exceed:
Safety/EMC
- Safety: UL 60950 3rd Ed.; CSA C22.2 No 60950-00; EN 60950:2000; IEC60950-1
- EMI/EMC: FCC 47 CFR Part 15, Class B; CE Mark to EN55022/EN55024
Warranty
Two year limited warranty
* Designed to meet or exceed
1-3
PCM261 User’s Guide
2. Onboard Features
Contents
2.1
2.2
Block Diagram ...........................................2-1
System Core ..............................................2-2
2-0
PCM261 User’s Guide
2.1 Block Diagram
2-1
PCM261 User’s Guide
2.2 System Core
2.2.1
SCSI Controller
The LSI53C10XX is an extremely high performance, intelligent dual-channel controller. Its FusionMPT™ (Message Passing Technology) based architecture provides the highest-possible performance
from the Ultra160/320 SCSI channels. The LSI53C10XX offers unparalleled flexibility and reliability,
and binary compatibility of host software for emerging I/O interfaces.
2.2.1.1
Ultra 160 SCSI Features
Double transition clocking enables throughput of up to 160 MBps on each channel for a total of 320
MBps, without increasing the interface clock rate. Cyclic Redundancy Check (CRC) improves the
reliability of SCSI data transmission through enhanced detection of communication errors. CRC
provides extra data protection for marginal cable plants and external devices. CRC is the best way to
ensure data protection during hot plugging. It uses the same proven CRC algorithm used by FDDI,
Ethernet, and Fibre Channel, and detects all single bit errors, all double bit errors, all odd number
of errors, and all burst errors up to 32 bits long. To provide complete end-to-end protection of the
SCSI I/O, AIP protects all non-data phases, augmenting the CRC feature of Ultra160.
SureLINK domain validation technology detects the configuration of the SCSI bus and automatically
tests and adjusts the SCSI transfer rate to optimize interoperability. The LSI53C1010 exceeds
Ultra160 by providing not only Basic (Level 1) and Enhanced (Level 2) domain validation, but adds
Margined (Level 3) domain validation. This enhancement margins LVD drive strength and clock
signal timing characteristics to identify marginal Ultra160 systems.
2.2.1.2
New Ultra 320 SCSI Features
Paced transfers and double transition clocking enable throughput of up to 320 MBps on each
channel for a total of 640 MBps. Both the data and clock frequencies are doubled from Ultra160
SCSI. Because of the faster data and clock speeds, Ultra320 SCSI introduces skew compensation and
InterSymbol Interference (ISI) compensation. These new features simplify system design by
resolving timing issues at the chip level. Skew compensation adjusts for timing differences between
data and clock signals caused by cabling, board traces, etc. ISI compensation enhances the first
pulse after a change in state to ensure data integrity.
2-2
PCM261 User’s Guide
3. Installing the board
Contents
3.1
3.2
Setting Jumpers.........................................3-1
Onboard Interconnectivity ...........................3-2
3-0
PCM261 User’s Guide
3.1 Setting Jumpers
3.1.1
Jumper Description
Description
SCSI Termination
3.1.2
To enable the onboard SCSI termination
W1
Setting Jumper & locations
3-1
PCM261 User’s Guide
3.2 Onboard Interconnectivity
3.2.1
3.2.2
Onboard Connectors and Headers
Description
Connector
Comments
SCSI
J1
PCI Mezzanine
PN1-PN4
64-Bit PCIX Mezzanine & PIM
PCI Mezzanine
JN1-JN3
64-Bit PCIX Mezzanine
VHDCI-68 SCSI connector (This connector is located on faceplate).
Front Plate Connectors and Indicators
Name
3.2.3
Description
Comments
ACT LED
Front
Activity LED
Flash when there is activity on the
drive.
LVD LED
Front
LVD LED
Always on when an LVD drive is
connected.
J1
SCSI Connector
VHDCI-68 connector
LVD LED
Rear
LVD LED
Always on when an LVD drive is
connected.
ACT LED
Rear
Activity LED
Flash when there is activity on the
drive
Installing a PMC Card
To install a PMC card:
1.
2.
3.
4.
Turn OFF the computer.
Remove the front bezel.
Carefully push the PMC to mate the four connectors.
Screw the four screws at the bottom of the PMC to fix it to the board.
3-2
PCM261 User’s Guide
4. Software Setup
Contents
4.1
4.2
4.3
4.4
4.5
SCSI BIOS .................................................4-1
Initialization .............................................4-1
Starting the SCSI BIOS Configuration Utility ....4-2
Using the SCSI CU.......................................4-3
Installing Drivers ..................................... 4-11
4-0
PCM261 User’s Guide
4.1 SCSI BIOS
A SCSI BIOS is the bootable ROM code that manages SCSI hardware resources. The Fusion-MPT SCSI
BIOS integrates with a standard system BIOS to extend the standard disk service routine that is
provided through INT13h. During the boot time initialization, the SCSI BIOS determines if the
system BIOS has already installed other hard disks, such as an IDE drive. If so, the SCSI BIOS maps
any SCSI drives it finds behind the already-installed drive(s). Otherwise, the SCSI BIOS installs
drives starting with the system boot drive and the system boots from a drive controlled by the SCSI
BIOS. The Fusion-MPT BIOS supports the BIOS Boot Specification (BBS). Please ensure that the
BIOS has at least 32K of continuous space to execute.
4.2 Initialization
This section describes the BBS initialization and CD-ROM initialization procedures.
4.2.1
Boot Initialization with BBS
The Fusion-MPT SCSI BIOS provides support for the BBS, which enables selection of the boot device.
If the system supports the BBS, use the system BIOS setup menu to select the boot and drive order.
4.2.2
.
.
.
.
.
CD-ROM Boot Initialization
The Fusion-MPT SCSI BIOS supports boot initialization from a CD-ROM drive. The five types of
emulation are:
•No emulation disk
•Floppy 1.2 Mbyte emulation disk
•Floppy 1.44 Mbyte emulation disk
•Floppy 2.88 Mbyte emulation disk
•Hard disk emulation
The type of emulation assigns the drive letter for the CD-ROM. For example, if a 1.44 Mbyte floppy
emulation CD is loaded, the CD-ROM drive becomes the A: drive and the existing floppy becomes
drive B:.
4-1
PCM261 User’s Guide
4.3 Starting the SCSI BIOS Configuration
Utility
The Fusion-MPT SCSI BIOS and CU allow you to change the default configuration of the SCSI host
adapters. You can change the default values to resolve conflicts between device settings or to
optimize system performance. During boot, the system displays the version number of the SCSI
BIOS. If the CU is installed, the system displays the message:
Press Ctrl-C to start LSI Logic Configuration Utility...
This message remains on the screen for about 5 seconds. After pressing Ctrl-C, the message
changes to:
Please wait, invoking LSI Logic Configuration Utility...
The system displays the Main Menu of the Fusion-MPT SCSI BIOS CU.
The system might display the following messages during the boot process:
.
.
.
• “Adapter removed from boot order, parameters will be updated accordingly” appears if an
adapter is removed from the system or relocated behind a PCI bridge.
• “Configuration data invalid, saving default configuration!” appears if the nonvolatile
(NVRAM) information is invalid.
• “Adapter Configuration may have changed, reconfiguration is suggested!” appears if less
than four adapters are in the boot order and more adapters exist than are shown.
Pressing Ctrl-E or Ctrl-A after memory initialization during reboot allows you to re-enable and
reconfigure devices.
Note :
The Fusion-MPT BIOS cannot control all the devices the CU detects. Devices such as tape drives
and scanners require a device driver that is specific to the peripheral. The SCSI BIOS CU allows
parameter modification to support these devices.
4-2
PCM261 User’s Guide
4.4 Using the SCSI CU
This section describes the SCSI BIOS CU. The options in the SCSI CU depend upon which BIOS and
firmware you have installed. You could have installed either the standard SCSI BIOS and its
associated firmware, or the IM-enabled SCSI BIOS and its associated firmware.
All of the SCSI BIOS CU screens follow fixed field areas. The header area provides static information
text, which is typically the product title and version. The menu area provides the current menu and
uses a cursor for menu item selection. The footer area provides general help information.
4.4.1
User Input
User Input Key
F1
F2
Arrow Keys
Definition
Help
Menu
Select Item
+/-
Change Item
Esc
Abort/Exit
Enter
Execute Item
4.4.2
Description
Context sensitive help for the cursor-resident field.
Sets cursor context to the menu selection area. Select a menu item and press Enter.
Use these keys to position the cursor.
The items with values in ‘[ ]’ brackets are modifiable. Use the numeric keypad ‘+’ and
‘-’ to change a modifiable field to its next relative value.
Escape stops the current context operation and exits the current screen.
Items with values in ‘< >’ brackets are executable. Press Enter to execute the
function of the selected field.
Main Menu
When invoked, the CU first displays the Main Menu, which contains a scrolling list of up to 256 LSI
Logic PCI to SCSI host adapters and information about each of them. Use the arrow keys to select an
adapter. Press Enter to view and modify the properties of the selected adapter, and to gain access
to the attached devices. The CU can only access adapters with LSI Logic Control enabled. After
selecting an adapter and pressing Enter, the CU scans the adapter’s SCSI bus and then displays the
Adapter Properties screen.
Main Menu
4-3
PCM261 User’s Guide
Field
Adapter
PCI Bus
Dev/Func
Port Number
IRQ
NVM
Boot Order
LSI Logic Control
4.4.3
Description
Indicates the specific family of LSI Logic Host Adapters.
Indicates the PCI Bus number assigned by the system BIOS to an adapter. The PCI Bus number can be
between 0x00 and 0xFF.
Indicates the PCI Device and PCI Function assigned by the system BIOS to an adapter. Bits [2:0] of this
8-bit value designate the PCI Function. Bits [7:3] designate the PCI Device.
Indicates the I/O Port Number that communicates with an adapter. The system BIOS assigns this
number.
Indicates the Interrupt Request Line for the adapter. The system BIOS assigns this value.
Indicates whether an adapter has nonvolatile memory. The possible values are Yes or No.
Indicates the relative boot order of an adapter. The BIOS traverses up to four adapters in the specified
order in search of bootable media. The possible values are 0, 1, 2, or 3. The Boot Adapter List Menu
modifies this item.
Indicates whether an adapter is eligible for LSI Logic software control or is reserved for control by nonLSI Logic software.
Boot Adapter List Menu
The Boot Adapter List Menu specifies the adapter boot order when more than one OS adapter is
present. The CU can designate up to four adapters as bootable. To access the Boot Adapter Menu,
select <Boot Adapter List> on the Main Menu and press enter. The CU then displays the Boot
Adapter List Menu.
To add an adapter to the boot list, press Insert while on the Boot Adapter List. This locates the
cursor on the adapter select list. Use the arrow keys to select an adapter and press Enter to add it to
the end of Boot Adapter List. To remove an adapter from the boot list, select the adapter and press
Delete. Select the adapter and press the ‘-’ key to decrease the adapter’s relative order in the boot
list, or press the ‘+’ key to increase the adapter’s relative order in the boot list.
Boot Adapter List Menu
4-4
PCM261 User’s Guide
Field
Adapter
PCI Bus
Dev/Func
Boot Order
Current Status
Next Boot
4.4.4
Description
Indicates the specific family of LSI Logic Host Adapters.
Indicates the PCI Bus number assigned by the system BIOS to an adapter. The
PCI Bus number can be between 0x00 and 0xFF.
Indicates the PCI Device and PCI Function assigned by the system BIOS to an
adapter. Bits [2:0] of this 8-bit value designate the PCI Function. Bits [7:3]
designate the PCI Device.
Specifies the relative boot order of an adapter. The value of this field can be 0,
1, 2, or 3. Press ‘-’ to decrease an adapter’s relative boot order. Press ‘+’ to
increase an adapter’s relative boot order.
Indicates if an adapter in the boot list was enabled during the most recent boot.
The Fusion-MPT SCSI BIOS ignores disabled adapters and their attached
devices, but these adapters and devices are visible to the CU.
Specifies whether to enable an adapter upon the next boot.
Global Properties
The Global Properties Menu allows configuration of the Display and Video modes, as well as a pause
if the CU displays an alert message. To access the Global Properties Menu, select “<Global
Properties>” on the Main Menu and press Enter. The system then displays the Global Properties
Menu.
Global Properties Menu
Field
Pause When Boot Alert
Displayed
Boot Information Display
Mode
Negotiate with Devices
Video Mode
Support Interrupt
<Restore Defaults>
Description
This option specifies whether or not the CU pauses for user acknowledgement after displaying an
alert message during boot. To continue after displaying a message, specify ‘No.’ To wait for the
user to press any key after displaying a message, specify ‘Yes.’
This option specifies the information display mode of the BIOS. It controls how much adapter
and device information the system displays during boot. You can set the Display Mode to either
‘Terse’ or ‘Verbose.’ Specify the Terse mode to display the minimum amount of information.
Specify the Verbose mode to display detailed information.
This option sets the default value for synchronous and wide negotiations with specified devices.
Options are: All, None, or Supported.
This option specifies the default video mode for the CU. You can set the Video Mode to either
‘Color’ or ‘Monochrome.’ The monochrome setting enhances readability on a monochrome
monitor.
This option allows the ability to stop the system from hanging on INT40.
Pressing Enter obtains default settings.
4-5
PCM261 User’s Guide
4.4.5
Adapter Properties Menu
The Adapter Properties Menu allows you to view and modify adapter settings. It also provides access
to an adapter’s device settings. To access the Adapter Properties Menu, select the adapter on the
Main Menu and press enter. The CU then displays the Adapter Properties Menu for the selected
adapter.
Host Adapter Properties Menu Example
4-6
PCM261 User’s Guide
Field
<Device Properties>
Host SCSI ID
SCSI Bus Scan Order
Removable Media
Support
CHS Mapping
Spinup Delay
Secondary
Cluster Server
Termination Control
Restore Defaults
Description
Press Enter to view and modify device properties.
This field indicates the SCSI identifier of an adapter. LSI Logic recommends setting this field to the
highest priority SCSI identifier, which is SCSI ID 7.
This field indicates the order in which to scan SCSI identifiers on an adapter. Changing this item
affects drive letter assignments if more than one device is attached to an adapter and might create a
conflict with an operating system that automatically assigns drive order.
This field specifies the removable media support option for an adapter. There are three possible
settings: None, Boot Drive Only, and With Media Installed. ‘None’ indicates there is no removable
media support, whether the drive is selected as first (BBS), or is the first in the scan order (nonBBS). ‘Boot Drive Only’ provides removable media support for a removable hard drive if it is first in
the scan order. ‘With Media Installed’ provides removable media regardless of the drive ordering.
This field defines the Cylinder Head Sector (CHS) values mapping method. CHS Mapping allows two
settings: ‘SCSI Plug and Play Mapping’ (default value) and ‘Alternate CHS Mapping.’ SCSI Plug and
Play Mapping automatically determines the most efficient and compatible mapping. Alternate CHS
Mapping utilizes an alternate method that might be required if a device is moved between adapters
from different vendors. These options have no effect after the FDISK command partitions the disk. To
change the CHS Mapping on a partitioned disk, use the FDISK command to delete all partitions and
reboot the system to clear the memory. Be certain that the correct disk is the target of an FDISK
command.
This field indicates the number of seconds to wait between spin-ups of devices attached to an
adapter. Staggered spin-ups balance the electrical current load on the system during boot. The
default value is 2 seconds, with choices between 1 and 10 seconds.
The options for this field are ‘Yes’ or ‘No’ (default). Setting this field to Yes
indicates that the Fusion-MPT adapter shares devices with another adapter, and
prevents the Fusion-MPT SCSI BIOS from issuing SCSI Bus resets. This is a
requirement for the Microsoft Cluster Server.
This field indicates if an adapter has automatic termination control. The options for this field are
‘Auto’ or ‘Off.’ ‘Auto’ indicates that the adapter automatically determines to enable or disable its
termination. ‘Off’ indicates that termination at the adapter is off and that other devices at the ends
of the SCSI bus must terminate the bus. If Auto is grayed out, it means that termination is not
programmable.
To obtain default settings, press Enter.
4-7
PCM261 User’s Guide
4.4.6
Device Properties
The Device Properties screen provides viewing and updating of device settings for an adapter. To
access the Device Properties Menu, select ‘<Device Properties>’ on the Host Adapter Properties List
Menu and press Enter. Changing a setting for the host device changes the setting for all devices.
Device Properties Menu
4-8
PCM261 User’s Guide
4-9
PCM261 User’s Guide
Field
SCSI ID
Device Identifier
MB/sec
MT/sec
Data Width
Scan ID
Scan LUNs > 0
Disconnect
SCSI Timeout
Description
This field indicates the device’s SCSI Identifier.
This field indicates the ASCII device identifier string extracted from the device’s Inquiry Data.
This field specifies the maximum synchronous data transfer rate in Mbytes/s. Users cannot directly edit
this field because the Data Width or MT/s fields determine its setting. The default for this field is 320.
This field indicates the maximum synchronous data transfer rate, in Mega Transfers/s. The default value
is 160 MT/Sec.
This field indicates the maximum data width in bits.
This field indicates whether to scan for this SCSI identifier at boot time. Set this option to ‘No’ if there is
a device that you do not want to be available to the system. To decrease the boot time, choose No for
unused SCSI IDs.
This field indicates whether to scan for non-zero LUNs. LUN 0 is always queried. Use this option if a
multi-LUN device responds to unoccupied LUNs, or to reduce the visibility of a multi-LUN device to LUN
0. Set this option to ‘No’ if there is a problem with a device that responds to all LUNs.
This field allows a device to disconnect during SCSI operations. Some newer devices run faster with
disconnect enabled, while some older devices run faster with disconnect disabled.
This field indicates the maximum amount of time [0 to 9999] in seconds to wait for a SCSI operation to
complete. Because time-outs provide a safeguard that allows the system to recover if an operation fails,
LSI Logic recommends using a value greater than zero. A value of zero allows unlimited time for an
operation to complete and could result in the system hanging. To specify a new timeout value, press
Enter, type in a value, and press Enter again.
4-10
PCM261 User’s Guide
Queue Tags
Boot Choice
Format
Verify
Restore Defaults
This field allows the use of queue tags for a device. The Fusion-MPT SCSI BIOS does not use queue tags.
This item specifies queue tag control to higher level device drivers.
This field indicates if this device can be selected as the boot device. This option is only applicable to
devices attached to adapter 0 in the boot list on non-BBS systems. It provides primitive BBS flexibility
to non-BBS systems.
Press Enter to low-level format the device. If enabled, this option allows low-level formatting on a disk
drive. Low-level formatting completely erases all data on the drive. Formatting the drive creates a 512byte sector size, even if the drive was formatted to another sector size.
Press Enter to verify all sectors on the device and to reassign defective Logical Block Addresses.
Press Enter to obtain default settings.
Information on data transfer rates.
Mega Transfers/s
0 = Asynchronous
5
10
20
40
80
160
4.4.7
Data Width = 8 (Mbytes/s)
0 = Asynchronous
5
10
20
40
–
–
Data Width = 16 (Mbytes/s)
0 = Asynchronous
10
20
40
80
160
320
Synchronous Period (nsec)
0 = Asynchronous
200
100
50
25
12.5
6.25
Exiting the SCSI BIOS Configuration Utility
Because some changes only take effect after the system reboots, it is important to exit this
configuration utility properly. To exit, press Esc and respond to the verification prompts. Some
changes might be lost if you reboot before properly exiting the CU.
4.5 Installing Drivers
4.5.1
Drivers
For drivers and installation instructions or for more information, visit our Web site at
www.kontron.com or our FTP site at ftp.kontron.ca/support/ or you may also contact Kontron’s
Technical Support department.
4-11
PCM261 User’s Guide
Appendix
Contents
A - Connector Pinouts ........................................................... A-1
B - Getting Help................................................................... B-1
PMC261 User’s Guide
A. Connector Pinouts
A.1
CONNECTORS AND HEADERS SUMMARY
Connector
Description
J1
SCSI Connector
JN1-JN3
64-bit PCIX Mezzanine connectors
PN1-PN4
64-bit PCIX Mezzanine connectors
A-1
PMC261 User’s Guide
A.2
JN1 & PN1
Signal
Pin
Pin
Signal
D12+
1
35
D12-
D13+
2
36
D13-
D14+
3
37
D14-
D15+
4
38
D15-
DPH+
5
39
DPH-
D0+
6
40
D0-
D1+
7
41
D1-
D2+
8
42
D2-
D3+
9
43
D3-
D4+
10
44
D4-
D5+
11
45
D5-
D6+
12
46
D6-
D7+
13
47
D7-
DPL+
14
48
DPL-
GND
15
49
GND
DIFFSENS
16
50
GND
TERMPWR
17
51
TERMPWR
TERMPWR
18
52
TERMPWR
N.C.
19
53
N.C.
GND
20
54
GND
ATN+
21
55
ATN-
GND
22
56
GND
BSY+
23
57
BSY-
ACK+
24
58
ACK-
RESET+
25
59
RESET-
MSG+
26
60
MSG-
SEL+
27
61
SEL-
CD+
28
62
CD-
REQ+
29
63
REQ-
IO+
30
64
IO-
D8+
31
65
D8-
D9+
32
66
D9-
D10+
33
67
D10-
D11+
34
68
D11-
# Active Low
A-2
PMC261 User’s Guide
A.3
JN1 & PN1
Signal
Pin
Pin
Signal
N.C.
1
2
-12V
GND
3
4
INTA_P64PMC#
INTB_P64PMC#
5
6
INTC_P64PMC#
BUSMODE1#
7
8
VCC
INTD_P64PMC#
9
10
N.C.
GND
11
12
VCC3E
CLK66_PMC
13
14
GND
GND
15
16
P64GNT#_PMC
P64REQ#_PMC
17
18
VCC
VIO
19
20
P64AD31
P64AD28
21
22
P64AD27
P64AD25
23
24
GND
GND
25
26
P64C/BE#3
P64AD22
27
28
P64AD21
P64AD19
29
30
VCC
VIO
31
32
P64AD17
P64FRAME#
33
34
GND
GND
35
36
P64IRDY#
P64DEVSEL#
37
38
VCC
PCIXCAP/GND
39
40
P64LOCK#
RSV
41
42
SB0#
P64PAR
43
44
GND
VIO
45
46
P64AD15
P64AD12
47
48
P64AD11
AD9
49
50
VCC
GND
51
52
P64C/CBE0#
P64AD6
53
54
P64AD5
P64AD4
55
56
GND
VIO
57
58
P64AD3
P64AD2
59
60
P64AD1
P64AD0
61
62
VCC
GND
63
64
P64REQ64#
# Active Low
A-3
PMC261 User’s Guide
A.4
JN2 & PN2
Signal
Pin
Pin
Signal
+12V
1
2
RSV
RSV
3
4
N.C.
RSV
5
6
GND
GND
7
8
N.C.
N.C.
9
10
N.C.
BMODE2#
11
12
VCC3
PCIRST#
13
14
BMODE3#
VCC3
15
16
BMODE4#
N.C.
17
18
GND
P64AD30
19
20
P64AD29
GND
21
22
P64AD26
P64AD24
23
24
VCC3
IDSEL_PMC
25
26
P64AD23
VCC3
27
28
P64AD20
P64AD18
29
30
GND
P64AD16
31
32
P64C/BE2#
GND
33
34
N.C.
P64TRDY#
35
36
VCC3
GND
37
38
P64STOP#
P64PERR#
39
40
GND
VCC3
41
42
P64SERR#
P64C/BE1#
43
44
GND
P64AD14
45
46
P64AD13
P64M66EN
47
48
P64AD10
P64AD8
49
50
VCC3
P64AD7
51
52
N.C.
VCC3
53
54
N.C.
N.C.
55
56
GND
N.C.
57
58
N.C.
GND
59
60
N.C.
P64ACK64#
61
62
VCC3
GND
63
64
N.C.
# Active Low
A-4
PMC261 User’s Guide
A.5
JN3 & PN3
Signal
Pin
Pin
Signal
N.C.
1
2
GND
GND
3
4
P64C/BE7#
P64C/BE6#
5
6
P64C/BE5#
P64C/BE4#
7
8
GND
VIO
9
10
P64PAR64
P64AD63
11
12
P64AD62
P64AD61
13
14
GND
GND
15
16
P64AD60
P64AD59
17
18
P64AD58
P64AD57
19
20
GND
VIO
21
22
P64AD56
P64AD55
23
24
P64AD54
P64AD53
25
26
GND
GND
27
28
P64AD52
P64AD51
29
30
P64AD50
P64AD49
31
32
GND
GND
33
34
P64AD48
P64AD47
35
36
P64AD46
P64AD45
37
38
GND
VCC3
39
40
P64AD44
P64AD43
41
42
P64AD42
P64AD41
43
44
GND
GND
45
46
P64AD40
P64AD39
47
48
P64AD38
P64AD37
49
50
GND
GND
51
52
P64AD36
P64AD35
53
54
P64AD34
P64AD33
55
56
GND
VIO
57
58
P64AD32
N.C.
59
60
N.C.
N.C.
61
62
GND
GND
63
64
N.C.
# Active Low
A-5
PMC261 User’s Guide
A.6
JN4
Signal
Pin
Pin
Signal
P1+
1
2
P2+
P1-
3
4
P2-
P3+
5
6
P4+
P3-
7
8
P4-
P5+
9
10
P6+
P5-
11
12
P6-
P7+
13
14
P8+
P7-
15
16
P8-
P9+
17
18
P10+
P9-
19
20
P10-
P11+
21
22
P12+
P11-
23
24
P12-
P13+
25
26
P14+
P13-
27
28
P14-
P15+
29
30
P16+
P15-
31
32
P16-
P17+
33
34
P18+
P17-
35
36
P18-
P19+
37
38
P20+
P19-
39
40
P20-
P21+
41
42
P22+
P21-
43
44
P22-
P23+
45
46
P24+
P23-
47
48
P24-
P25+
49
50
P26+
P25-
51
52
P26-
P27+
53
54
P28+
P27-
55
56
P28-
P29+
57
58
P30+
P29-
59
60
P30-
P31+
61
62
P32+
P31-
63
64
P32-
# Active Low
A-6
PMC261 User’s Guide
B. Getting Help
At Kontron, we take great pride in our customers’ successes. We believe in providing full support at
all stages of your product development.
If at any time you encounter difficulties with your application or with any of our products, or if you
simply need guidance on system setups and capabilities, contact our Technical Support at:
CANADIAN HEADQUARTERS
Tel. (450) 437-5682
Fax: (450) 437-8053
If you have any questions about Kontron, our products, or services, visit our Web site at:
www.kontron.com
You also can contact us by E-mail at: [email protected]
Or at the following address:
Kontron Canada, Inc.
616 Curé Boivin
Boisbriand, Québec
J7G 2A7 Canada
B-1
PMC261 User’s Guide
RETURNING DEFECTIVE MERCHANDISE
Before returning any merchandise please do one of the following if your product malfunctions:
•
Call
1. Call our Technical Support department in Canada at (450) 437-5682. Make sure you have
the following on hand: our Invoice #, your Purchase Order #, and the Serial Number of
the defective unit.
2. Provide the serial number found on the back of the unit and explain the nature of your
problem to a service technician.
3. The technician will instruct you on the return procedure if the problem cannot be solved
over the telephone.
4. Make sure you receive an RMA # from our Technical Support before returning any
merchandise.
•
Fax
1. Make a copy of the request form on the following page.
2. Fill it out.
3. Fax it to us at: (450) 437-8053
•
E-mail
1. Send us an e-mail at: [email protected]. In the e-mail, you must include your name,
your company name, your address, your city, your postal/zip code, your phone number,
and your e-mail. You must also include the serial number of the defective product and a
description of the problem.
When returning a unit.
i)
In the box, you have to include the name and telephone number of a person whom we can
contact for further explanations if necessary when returning goods. Where applicable, always
include all duty papers and invoice(s) associated with the item(s) in question.
ii)
Ensure that the unit is properly packed. Pack it in a rigid cardboard box.
iii)
Clearly write or mark the RMA number on the outside of the package you are returning.
iv)
Ship prepaid. We take care of insuring incoming units.
Kontron Canada Inc.
616 Curé Boivin
Boisbriand, Québec
J7G 2A7 Canada
B-2
PMC261 User’s Guide
Return to
Manufacturer
Authorization Request
Contact Name:
______________________________________________________________
Company Name:
______________________________________________________________
Street Address:
______________________________________________________________
City:
__________________________
Province/State:
_________________________
Country:
__________________________
Postal/Zip Code:
_________________________
Phone Number:
__________________________
Extension:
_________________________
Fax Number:
__________________________
E-Mail:
_________________________
Serial Number
P.O. #
Failure or Problem Description
(if not under warranty)
Kontron Canada, Inc., 616 Curé Boivin, Boisbriand, Québec, Canada, J7G 2A7
Fax this form to Kontron’s Technical Support department in Canada at (450) 437-8053
B-3
PMC261 User’s Guide