1
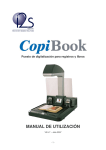
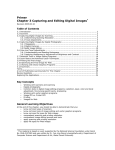
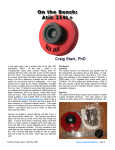
Culture Days 2013
Marketing User Guide
FOR ACTIVITY &
COMMUNITY ORGANIZERS
Marketing User Guide
An overview
One of the benefits of registering a Culture Days activity is the access to free promotional Tips & Tools that
will help make the best of your Culture Days 2013 experience!
In an effort to help promote Culture Days activities in every community throughout the country, a variety of free
branded and customizable promotional tools are made available on the Culture Days website. Check out the
“Tips & Tools” page to download these tools:
-Call for Participation
-
Email Signature
-
Logos and Logo Guidelines
-
Video Bumpers
-
Web Badges
-
Web Banners
-
Posters
-
Postcards
-
E-Flyers
-
PR Toolkit
The tools listed above can be used to spread the word about your Culture Days activity to your community,
professional and social networks, friends, neighbours or anyone you communicate with! And there are many
free tip sheets available to help guide you on promoting your activity too.
Whether you are an activity organizer promoting yourself, or a community organizer mobilizing an entire network,
community, or city, this Marketing User Guide will help you learn how to maximize the use of customizable tools
such as posters, postcards and e-flyers.
What are Community Organizers? Many activity organizers form working groups to plan and promote their Culture
Days activities together, and they decide whether the activities will take place in one building, a public space, on a
block, throughout a neighbourhood, or across an entire community. These activities are a great way to reach new
people and catalyze arts and culture in their community! Other people, such as those involved in municipal cultural
departments, local arts councils, Business Improvement Associations and Tourism bureaus, contribute to making
Culture Days in their communities a grand occasion for the arts and cultural community and public.
Culture Days Marketing and PR Campaign
The annual Culture Days campaign is a multi-level, multi-media collective effort across the country to promote
the weekend of free activities taking place in hundreds of cities and towns. By uniting everyone involved in
Culture Days’ marketing and PR efforts under one high-visibility campaign, the results are impressive - millions of
Canadians are reached as the weekend approaches. With the support of national partners, combined with regional
and local promotional initiatives by activity organizers, the collective campaign aims to ensure that events are
prominent in the public eye and activities are well-attended.
The public campaign picks up steam in August and builds through September, culminating in a crescendo during
the final weeks leading up to the Culture Days weekend.
Table of Contents
Culture Days Bright Spots.............................................................................................................................................1
Steps for Activity Organizers:
Customizable Posters & Postcards......................................................................................................................3
Culture Days E-Flyer.............................................................................................................................................7
Steps for Community Organizers:
Customizable Posters & Postcards......................................................................................................................9
Culture Days E-Flyer...........................................................................................................................................14
Tips & Tricks for Everyone:
Culture Days Web Banners.................................................................................................................................16
Before You Start: Installing and using fonts........................................................................................................17
Getting Fancy: Working with live files in InDesign and Photoshop.....................................................................18
Editing in InDesign..............................................................................................................................................19
Culture Days Bright Spots
With the generous support of National Partner Sun Life Financial, the Culture Days Bright Spots program aims to
help better identify and promote registered Culture Days activities by increasing visibility, awareness and public
participation in activities over the Culture Days weekend. The program includes the online Culture Days Bright
Spots Schedule, and Venue Identifiers.
Bright Spots Schedule
The Culture Days Bright Spots Schedule is a free, online scheduling tool that allows members of the public
to create a personalized schedule of activities taking place in their community over the Culture Days weekend.
The Bright Spots Schedule is also a great tool for activity and community organizers to publicize their activities
by creating a printed or online program guide that helps the public plan their weekend in advance.
With the ability to create, save, edit, and share multiple schedules using an unique URL, activity and community
organizers can customize schedules by activity day, category, theme or geographic area (to name a few) and
can appeal to a diversity of audiences.
To learn more about the Bright Spots schedule, click here.
Bright Spots Venue Identifiers
The Culture Days Bright Spots Venue Identifiers are designed to help activity organizers prominently identify
their venues as Culture Days activity locations leading up to and during the weekend. Venue IDs will be available
for pick-up at Sun Life Financial locations across Canada in September. Stay tuned for when by subscribing to
the newsletter.
| 1
steps for
activity
organizers
activity organizers posters & postcards
Customizable Posters & Postcards
A step-by-step guide
Promote your Culture Days activity by creating these eye-catching posters and easy-to-distribute postcards.
Poster Template
Finished Poster
Postcard Template
Finished Postcard
steps for activity organizers | 3
activity organizers posters & postcards
The Editable Areas
This guide contains step-by-step instructions
on how to fill in the editable areas of your
2013 Culture Days promotional posters and
postcards.
STEP 1: The name of your Culture Days activity.
STEP 2: Brief details of your Culture Days activity.
STEP 3: Place your logo and your sponsors’
logos here.
1
2
3
Poster Template
1
2
3
Postcards Template
steps for activity organizers | 4
activity organizers posters & postcards
Step 1: Event Title
This section is where you can promote your Culture Days activity.
Step 2: Event Details
Once you’ve entered the event title, it’s time to add some details.
It is suggested you include a brief description of your Culture Days activity, including the date, time, location and
contact information.
TIP: Feel free to bold important information.
NOTE: If your event details are too long to fit in the allotted space, please adjust the point size of the font.
However, the details should never be larger than the title.
steps for activity organizers | 5
activity organizers posters & postcards
Step 3: Sponsor and Event Logos
The final step in the creation of your poster is to add your event’s logo and those of any sponsors
you’d like to include.
First, place your cursor in the text box that resides in the lower left-hand corner of the page (fig.1 and fig. 2).
To locate the image file you’d like to insert, go to the INSERT menu > choose PICTURE > select FROM FILE (fig. 3).
When the file is placed, you may need to resize it. This can be done with the anchor points on the bounding box
(fig. 4) but it is easier and more precise to use the FORMAT PICTURE option in the formatting palette (fig. 5 & 6).
You can add as many logos as will fit in the allotted space and use your keyboard to space them within the text box.
Poster
fig. 1
Postcard
fig. 2
fig. 3
fig. 4
fig. 6
fig. 5
steps for activity organizers | 6
activity organizers e-flyer
Culture Days E-Flyer
Declare your participation and support in the Culture Days movement by sharing the Culture Days E-Flyer
with your network.
Simply insert the image file in the content box of your e-mail window, and send away!
steps for activity organizers | 7
steps for
community
organizers
community organizers posters & postcards
Customizable Posters & Postcards
A step-by-step guide
Promote your Culture Days activity by creating these eye-catching posters and easy-to-distribute postcards.
Poster Template
Finished Poster
Postcard Template
Finished Postcard
steps for community organizers | 9
community organizers posters & postcards
The Editable Areas
This guide contains step-by-step
instructions on how to fill in the editable
areas of your 2013 Culture Days
promotional posters and postcards.
1
STEP 1: The location where activities are
happening.
STEP 2: The approximate number of
activities happening (e.g. dozens,
hundreds, etc.)
2
STEP 3: The location where activities are
happening.
3
4
STEP 4: A catching headline and brief
description of the Culture Days celebration
in your city.
STEP 5: Place your logo and your
sponsors’ logos here.
5
Poster Template
1
2
3
4
5
Postcard Template
steps for community organizers | 10
community organizers posters & postcards
Step 1: Your City
Place your cursor in the text box that runs vertically alongside the heart. By default it currently holds “YOUR CITY”.
Type in the name of the city/town where activities are happening (e.g. Kamloops).
RICHMOND
NOTE: If your city/town is too long to fit in the allotted space, please adjust the point size of the font.
Step 2: Your City Call-out
DOZENS Of frEE EvENtS HappENiNg iN riCHMOND!
Celebrate
the
creativity
Place your cursor in the text box that runs horizontally
under the large
“CULTURE”
copy.
of your city!
Artists, organizations and community groups in Richmond are hosting free,
participatory
arts
and culture activities
during
the Culture
Days
weekend,
By default it currently holds the phrase “(XXXX) OF FREE
EVENTS
HAPPENING
IN (YOUR
CITY)!”.
Replace
“XXXX”
and
you’re
invited!
with the number of activities happening in your area (i.e. dozens, hundreds, etc.) and replace “YOUR CITY” with the
Visit culturedays.ca to find out about what’s happening in Richmond.
city/town in which your activities are to be held.
NOTE: If your location is too long to fit in the allotted space, please adjust the point size of the font.
4TH GREAT YEAR
7000+ EXPERIENCES
National Partners
National Broadcast
Partner
National Marketing
Partner
Provincial Partners
steps for community organizers | 11
Federal Governme
RICHMOND
community organizers posters & postcards
Step 3: Event Title
The next section is where you can promote Culture Days in your city.
Step 4: Event Details
Once you’ve entered the event title, it’s time to add some details.
It is suggested you include a brief explanation of the Culture Days events or celebrations in your city.
Tip: Feel free to bold important information.
NOTE: If your Event Details are too long to fit in the allotted space, please adjust the point size of the font.
However, the details should never be larger than the title.
DOZENS Of frEE EvENtS HappENiNg iN r
Celebrate the creativity of your city!
Artists, organizations and community groups in Richmond a
participatory arts and culture activities during the Culture Da
and you’re invited!
Visit culturedays.ca to find out about what’s happening in
4TH G
7000+
steps for community organizers | 12
community organizers posters & postcards
Step 5: Sponsor and Event Logos
The final step in the creation of your poster is to add your event’s logo and those of any sponsors
you’d like to include.
First, place your cursor in the text box that resides in the lower left-hand corner of the page (fig.1 and fig. 2).
To locate the image file you’d like to insert, go to the INSERT menu > choose PICTURE > select FROM FILE (fig. 3).
Poster
fig. 1
Postcard
fig. 2
RICHMOND
When the file is placed, you may need to resize it. This can be done with the anchor points on the bounding box (fig.
4) but it is easier and more precise to use the FORMAT PICTURE option in the formatting palette (fig. 5 & 6). You can
add as many logos as will fit in the allotted space and use your keyboard to space them within the text box.
DOZENS Of frEE EvENtS HappEN
Celebrate
fig.the
3 creativity of yo
Artists, organizations and community groups in
participatory arts and culture activities during th
and you’re invited!
Visit culturedays.ca to find out about what’s h
fig. 4
National Partners
Provincial Partners
fig. 6
fig. 5
steps for community organizers | 13
Na
Pa
community organizers e-flyer
Culture Days E-Flyer
Declare your participation in and support of the Culture Days movement by sharing the Culture Days E-Flyer
with your network.
Simply insert the image file in the content box of your e-mail window, and send away!
steps for community organizers | 14
tips & tricks for
everyone
everyone tips & tricks
Culture Days Web Banners
Show your stripes! If you know how to update the HTML on your website, consider promoting Culture Days by
embedding a banner on your site. It’s easy.
Generic Web Bannner
• Copy the embedded code provided in the Web Banners section of the Tips and Tools.
• Paste the embedded code into the source code (HTML) of your webpage, wherever you would like the banner
to appear.
• Save/publish. The banner should now appear on your webpage.
Customizable Web Banner
Promote your Culture Days activity on your web site or blog with the Culture Days Customizable Web Banner!
It’s easy to use! The Customized Banner automatically generates your activity name and the link to your activity
page on the Culture Days website; all you have to do is copy and paste the provided embed code into the HTML
on your website or blog and your web banner will appear!
To access the customized banner, simply click the “promote” button to the right of each of your published
activities. The embed code will then appear under each activity you have registered in “My Activities” in the
“My Culture Days” section of the website. Please note that you must have an account and be logged in to
access these banners.
Customizable Web Bannner
tips & tricks for everyone | 16
everyone tips & tricks
Before You Start:
Installing and using fonts
Included in your download are the fonts Helvetica and DINEngschrift Alternate. Helvetica is a system font that
should already be installed on your machine, but you may need to install DINEngschrift Alternate. Should you not
have these fonts, Culture Days provides them for free download here.
Below are instructions for both PC and Macintosh operating systems.
Windows PC — Windows 7
Open “Fonts” to install new fonts. It is located in the APPEARANCE AND PERSONALIZATION folder. You can
find this folder by going to the START menu > clicking CONTROL PANEL > selecting APPEARANCE AND
PERSONALIZATION.
Once there, click FILE and then select INSTALL NEW FONT.
If you don’t see the FILE menu, press ALT.
In the ADD FONTS dialog box, under DRIVES, click the drive where the font that you want to install is located.
Under FOLDERS, double-click the folder containing the fonts that you want to add.
Under the list of fonts, click the font that you want to add, and then click INSTALL.
Source: http://windows.microsoft.com/en-US/windows-vista/Install-or-uninstall-fonts
Macintosh — OSX 10.7
Use Font Book (included with Mac OS X v10.3 and later) to install new fonts. It is located in the APPLICATIONS
folder. You can find this folder by going to the FINDER menu > clicking APPLICATIONS > selecting FONT BOOK.
To preview a new font that you downloaded, double-click the font file and Font Book will display a sample of
the font.
If you want to install the font so that it can be used in documents you create or view, click the INSTALL FONT
button that appears below the preview of the font.
Source: http://support.apple.com/kb/HT2509
tips & tricks for everyone | 17
everyone tips & tricks
Getting Fancy:
Working with live files in InDesign and Photoshop
If you have experience working with the Adobe Creative Suite and would like to add to or alter the images within
the heart (YOUR CITY heart CULTURE), then this section is for you.
NOTE: These files were created on a Mac using Creative Suite 5.5.
BEFORE YOU START: PRINTING BASICS
Colour mode: CMYK (not RGB!)
Photoshop: IMAGE > MODE > CMYK
Resolution: 300 pixels per inch
Photoshop: IMAGE > IMAGE SIZE
NOTE: If you need to change the image size, deselect the Resample Image check box and
leave the Scale Styles and Constrain Proportions check boxes selected. If your image
is too small after this, then you most likely shouldn’t use it as it is too low resolution for proper
printing. Enlarging the image will produce a low quality, blurry image.
tips & tricks for everyone | 18
everyone tips & tricks
Editing in InDesign:
Working with live files in InDesign and Photoshop
NOTE: This section is written to be as comprehensive as possible for people whose knowledge of InDesign and
Photoshop is at the most basic levels. If you are a more advanced user, you’re probably not even reading this.
1) To start off, duplicate the file you’ve downloaded (CMND + D on a Mac, CTRL+D on a PC) and add an extension
to the file name to identify it as yours (e.g.: file_name copy.indd > file_name_ME.indd). This way, if something
goes pear-shaped along the way, you can always backtrack.
2) Open up the newly named version and take a second to review the file. The major
editable elements are separated on their own layers named Copy and Heart Image.
Please do not alter the elements on the third layer, Static Elements, as these have
been placed in specific areas at specific sizes for specific reasons. Brand continuity,
specifically speaking.
3) Replace the word YOUR CITY (areas labelled (A) and (B)) with the
name of the city/town/village etc. where your activity will take place.
4) Now let’s add the main title and a short blurb (140 characters or
less. Tweet, tweet). There is a preset text box for you to use (C).
Just take your Type tool and click in the box to type away. Use the
style sheets Activity Title and Activity Blurb to format your
copy in a Culture Days kind of way. Try to keep it short and concise.
Remember to include the address, time and any particulars that
are relevant (i.e. “Fully accesible”, “Rain or shine!” etc.).
5) Got a sponsor? An organizing committee? A generous venue owner?
Represent them here (D)! Click on one of the pink boxes and choose
the Place... option from the Edit menu (or press CMD+D on a Mac
or CTRL+D on a PC). A pop up window will appear prompting you to
find your logo. Once placed, you can resize it to fit within the allotted
space by going to the Object menu > Fitting > Fit Content
Proportionally. Place as many logos as you need and size
them to fit accordingly within the space provided.
6) The Heart Image (E) is actually split onto 2 layers: Heart Image (static) and Heart Image (editable).
The static layer is locked in place and is there to give a warm red tint to the image collage on the editable layer.
To modify the editable layer, click anywhere on the heart and choose
Edit menu > Edit Original. Photoshop will launch and the PSD will
pop up. The default image is made up of 4 images repeated across 4 rows
that are slightly staggered. You can follow this layout using the images or
create your own. The PSD is already set to 4 colour (CMYK) for printing
purposes and the image resolution is set to 300ppi. As you import your
own photos, they may appear very small (meaning
tips & tricks for everyone | 19
everyone tips & tricks
your original image was too small or too low
resolution), or HUGE (meaning your original image
was either much larger or much higher resolution
than the destination space). You can resize your
images easily by choosing Edit menu > Free
Transform. A bounding box with eight anchor
points will appear around your image (fig. A).
Select a corner anchor and hold shift while you
drag the corner to resize it proportionally. When
you are finished placing images, save the file
(as a PSD or TIF) and close out of Photoshop.
Back in InDesign, if the image doesn’t
automatically update, then select it with your
black pointer tool and open the Links panel
(Window menu > Links). There are four
buttons along the bottom of the panel with
the third being Update Link (fig. B). Click
it and check out how your image fits within the
heart shape. If you like it, you’re done. If you
plan on printing it yourself, print away!
If you plan on taking it to a print shop you’ll
need to export it as a high resolution PDF. To
create a print-ready PDF, choose EXPORT from
the FILE menu. From the options window that
pops up, choose ADOBE PDF (PRINT) from the
FORMAT menu at the bottom of the window.
This will prompt a new pop up with PDF
specific options:
fig. A
fig. B
ADOBE PDF PRESET: [PDF/X-1a:2001]
STANDARD: Acrobat PDF/X-1a:2001
COMPATIBILITY: Acrobat 4 (PDF 1.3)
From the sub menu on the left-hand side,
choose COMPRESSION. Your settings
should look exactly like those in fig. C.
Next, select MARKS AND BLEEDS from
the sub menu. Nothing should be checked
as these files are set up so as not to bleed
off the edges.
The third and final step is to choose the
ADVANCED option to ensure that the
TRANSPARENCY FLATTENER (fig. D)
is set to HIGH RESOLUTION. Once it is,
click the EXPORT button and you’re finished.
fig. C
fig. D
tips & tricks for everyone | 20