1
NuPoint Messenger - User Guide
for the Superset™ 4025/4125
DUE TO THE DYNAMIC NATURE OF THE PRODUCT DESIGN, THE INFORMATION CONTAINED IN
THIS DOCUMENT IS SUBJECT TO CHANGE WITHOUT NOTICE. MITEL CORPORATION, ITS
AFFILIATES, AND/OR ITS SUBSIDIARIES ASSUME NO RESPONSIBILITY FOR ERRORS AND
OMISSIONS CONTAINED IN THIS INFORMATION.
Trademark of Mitel Networks Corporation.
Copyright 2001, Mitel Networks Corporation.
All rights reserved
Contents
Introduction
2
Accessing Your Mailbox
3
Inside Your Company
Outside Your Company
3
3
Setting Up Your Mailbox
4
Greetings
Name
Passcode
4
4
4
Playing Messages
5
While Listening to a Message...
After Listening to a Voice or Fax Message...
Making Messages
6
6
7
To Make a Voice Message
To Make a Fax Message (without voice)
To Make a Combined Voice and Fax Message
User Options
7
8
9
10
Greeting, Name and Passcode
User Tutorial
Distribution Lists
Call Schedule Options
Fax Delivery Options
10
10
10
11
12
1
Introduction
Mitel NuPoint Messenger will enhance the way you communicate because you
can now retrieve your voice and fax messages from any touch-tone telephone in
the world.
•
VoiceMemo makes it easy to play, send, answer and forward voice
messages.
•
FaxMemo allows you to send, receive, forward, answer, voice
annotate and broadcast fax messages.
NOTE: Depending on how your mailbox is configured, you may not have all of
the options described in this guide.
2
Accessing Your Mailbox
All of your voice and fax messages will reside in your personal "mailbox," which
you can protect by a passcode. Your system administrator will assign you a
temporary passcode to use the first time you access your mailbox. How you call
into your mailbox will depend on whether you’re calling from inside or outside
your company.
Inside Your Company
FROM YOUR OWN EXTENSION
1. Dial the internal VoiceMemo access number.
2. Enter your passcode when prompted.
FROM ANOTHER EXTENSION
1. Dial the internal VoiceMemo access number.
2. Press the ∗ key when prompted to enter a passcode.
3. Enter your mailbox number followed by the ∗ key.
4
Enter your passcode when prompted.
Outside Your Company
FROM AN OUTSIDE LINE
1. Dial the external VoiceMemo access number.
2. Enter your mailbox number followed by the ∗ key.
3. Enter your passcode when prompted.
FROM AN OUTSIDE LINE TO THE AUTOMATED RECEPTIONIST
1. Dial the automated receptionist number.
2. Press the ∗ key to access the VoiceMemo system.
3. Enter your mailbox number followed by the ∗ key.
4. Enter your passcode when prompted.
3
Setting Up Your Mailbox
When you access your mailbox for the first time, a user tutorial is automatically
activated. This tutorial will guide you through your first mailbox session, explain
how to record a greeting and your name, and prompt you to change your
temporary passcode.
Greetings
You will be asked to record one or more greetings that callers will hear when they
call your mailbox. For example, you may record one greeting callers hear when
your line is busy (e.g., "I’m currently on the phone and unable to take your call")
and a different one when you’re not there (e.g., "I’m currently away from my
desk").
Name
You will be prompted to record your name so that the system can:
•
Address you when you call in to the system (e.g.,"Hello, Jane Smith").
•
Inform other users when a message comes from you (e.g., "4:54 p.m.,
from Jane Smith").
•
State your name to other users when they address messages to your
mailbox (e.g., "Jane Smith").
Passcode
The first time you access your mailbox you will use the temporary passcode
assigned by the system administrator. During the tutorial, you will be prompted to
change your passcode to a number with 4 to 10 digits. Please define a passcode
that you can remember, but do not select something trivial such as "1234."
Once your mailbox is set up, you’re ready to start using the advanced messaging
features of VoiceMemo and FaxMemo!
NOTE: Passcodes are provided to protect your privacy; however, you can
choose not to have one by pressing 0000 when prompted during the tutorial.
4
Playing Messages
When you access your mailbox to retrieve your messages, the system will first
tell you how many messages you have ("You have 2 urgent messages and 4
unplayed messages with fax"). To play your voice and fax messages:
1. Press 7 or the Play softkey to play. Your urgent messages will
automatically be played first.
2. If you have any fax messages, after pressing 7 or the Play softkey to play
the message, the system will ask you to press 8 for fax transmittal
options. From this menu you can:
•
Press 4 to input a number where you want the fax printed.
•
The system will then confirm the number; press 2 to accept it
or press 4 to input a new number.
•
After pressing 2 to accept the number, press 9 to deliver the
fax immediately to that number, or press 8 to schedule a time
for future delivery.
NOTES:
If you have additional fax messages, you can send them to the same fax number
you input for the first number simply by pressing 4, and then #.
You can also use the fax delivery options under the User Options menu (see
page 10) to set up a preprogrammed fax delivery number. Once this default
number is set up, you can simply press 8 for fax transmittal options, and then 3 to
print out your fax messages.
If you are accessing your messages from a fax phone, you can press 7 to receive
a fax message print out. When prompted, press the Start key on the fax machine.
Once you receive the fax, you can stay on the line to resume your mailbox
session.
5
While Listening to a Message…
At any time during message playback you can press
1 to pause for 30 seconds,
∗ to move back 5 seconds,
# to move forward 5 seconds,
8 or the Skip softkey to skip to your next message, and
8∗ to go back to the beginning of your previous message.
After Listening to a Voice or Fax Message…
When are finished listening to a voice or fax message, you can press:
•
7 or the Play softkey to play the message again.
•
2 to answer the person who sent the message. When you are finished
recording your answer, press 9 or the Send softkey to send it and
continue your session, and then press ∗ to send your answer to
additional mailboxes if you wish.
•
4 to give the message to another mailbox, distribution list, or offsystem telephone number. The system will also give you the
opportunity to record additional comments before sending the
message to someone else. Once you have added your comments,
press 9 or the Send softkey to send your message and continue your
session, and then press ∗ to give the message to additional mailboxes
if you wish.
•
5 or the Keep softkey to keep the message. Kept messages cannot
be accessed until you have skipped through your unplayed messages
and message receipt queues.
•
3 or the Del softkey to discard the message.
•
84 for the time and date when the message was sent.
NOTE: Be careful not to discard a message until AFTER you have answered or
given it to someone else. If you accidentally discard a message, you can retrieve
it by immediately pressing ∗ or the Undelete softkey. You can retrieve a deleted
message only after listening to ALL unplayed messages in your mailbox.
6
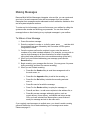
Making Messages
Because Mitel NuPoint Messenger integrates voice and fax, you can create and
send voice, fax and compound voice and fax messages from your mailbox.
Remember that messages can be addressed to other mailboxes, distribution lists
and off-system telephone numbers.
To make any kind of message, you must first access your mailbox by calling the
system access number and entering your passcode. You can then make a
message before or after listening to any unplayed messages in your mailbox.
To Make a Voice Message
1. Press 6 to make a message.
2. Enter the recipient’s number or, to dial by name, press____, and then dial
the recipient’s last name followed by their first name until the system
recognizes the name.
3. Once the system confirms the recipient’s name, enter the names or
numbers of any other intended recipients. (For example, you may wish to
send a single message to all three members of a certain committee,
telling them when and where the next committee meeting will be held.)
4. When you have finished addressing your message, press # or the
Record softkey.
5. Begin recording your message after the tone. (You may press 1 to pause
during recording, and then 2 to resume recording.)
6. When you are finished recording:
•
Press 9 or the Send softkey to send the message and exit to
the main menu, or
•
Press 2 or the Append softkey to add to the recording, or
•
Press 3 or the Del softkey to delete the recording and start
over, or
•
Press 5 to send a fax with the message.
•
Press 7 or the Review softkey to replay the message, or
•
Press 9, and then ∗ to add more recipients to the address list, or
•
Press 6 to access message addressing options, such as
urgent delivery, future delivery, confidential and return receipt.
Once you have selected from these options, press 9 twice to
send your message and exit to the main menu.
If you regularly send messages to multiple users, you should consider creating
personal distribution lists to make addressing your messages even easier.
Please see page 12.
7
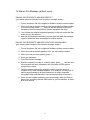
To Make a Fax Message (without voice)
DIALING THE RECIPIENT’S MAILBOX DIRECTLY
(your name will not be included in the recipient’s message header):
1. From a fax phone, dial your company’s FaxMemo system access number.
2. When you hear the system greeting, enter the recipient’s mailbox number
or, to dial by name, press ____, and then dial the recipient’s last name
followed by their first name until the system recognizes the name.
3. You will hear the recipient’s personal greeting. At the tone, press the Start
button on your fax machine.
4. After the fax has been transmitted, you can press 8 to mark the message
urgent or press 9 to leave a message for another mailbox.
DIALING THE RECIPIENT’S MAILBOX FROM YOUR OWN MAILBOX
(your name will be included in the recipients message header):
1. From a fax phone, dial your company’s FaxMemo system access number.
2. When you hear the system greeting, enter you own mailbox number.
3. When you hear your own greeting, press ∗.
4. Enter your passcode.
5. Press 6 to make a message.
6. Enter the recipient’s number or, to dial by name, press____, and then dial
the recipient’s last name followed by their first name until the system
recognizes the name.
7. Once the system confirms the recipient’s name, enter the names or
numbers of any other intended recipients. (For example, you may wish to
send a single message to all three members of a certain committee,
telling them when and where the next committee meeting will be held.)
8. When you are finished addressing your fax message, press the 5 key to
leave a fax, and then press the Start button on your fax machine, or press
# for more options.
8
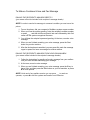
To Make a Combined Voice and Fax Message
DIALING THE RECIPIENT’S MAILBOX DIRECTLY
(your name will not be included in the recipient’s message header)
NOTE: In order to send a fax message to someone’s mailbox you must use a fax
phone.
1. From a fax phone, dial your company’s FaxMemo system access number.
2. When you hear the system greeting, enter the recipient’s mailbox number,
or press____, and then dial the recipient’s last name followed by their first
name until the system recognizes the name.
3. You will hear the recipient’s personal greeting. At the tone, record a voice
message.
4. When you are finished recording your voice message, press the Start
button on your fax machine.
5. After the fax has been transmitted, you can press 8 to mark the message
urgent or press 9 to leave a message for another mailbox.
DIALING THE RECIPIENT’S MAILBOX FROM YOUR OWN MAILBOX
(your name will be included in the recipient’s message header)
1. Follow the instructions for sending a fax-only message from your mailbox
until you have finished addressing your message.
2. At the tone, record a voice message.
3. When you are finished recording your voice message, press the 5 key to
leave a fax, and then press the Start button on your fax machine, or press
# for more options.
NOTE: At the end of any mailbox session you can press ___ to reach an
operator, or press # to exit the system and transfer to an extension.
9
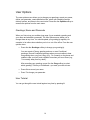
User Options
The user options menu allows you to change your greetings, record your name,
define your passcode, create distribution lists, select call scheduling and fax
delivery options, and listen to the user tutorial. Press 8 or the Options softkey to
access user options from the main menu.
Greetings, Name and Passcode
When you first set up your mailbox (see page 4) you recorded a greeting and
your name and selected a passcode. The user options menu allows you to
change these at any time. You should update your greeting(s) regularly--for
example, to let callers know whether you’re in or out of the office. From the user
options menu:
•
Press 4 or the Greetings softkey to change your greeting(s).
You can record a Primary greeting and one or more Conditional
greetings. Record Conditional greetings when you want callers to hear
one greeting when your line is busy (e.g., "I’m currently on the phone and
unable to take your call") and a different one when you’re not there (e.g.,
"I’m currently away from my desk").
After recording your greetings, press 3 or the Chng softkey to select
which greeting—Primary or Conditional—you want your calls to hear.
•
Press 6 to re-record your name.
•
Press 7 to change your passcode.
User Tutorial
You can go through the user tutorial again at any time by pressing 8.
10
Distribution Lists
A distribution list allows you to record a single message and then send it to a
large number of people without addressing them all individually. You can use
distribution lists whenever you make a message or give a message to someone
else.
TO CREATE OR MODIFY A DISTRIBUTION LIST:
1. Press 5 from the user options menu.
2. Enter the number of the distribution list.
Note: All personal distribution lists have to begin with the number 0.
3. Press 6 to record a name for the distribution list (e.g., "product planning
committee"). The system will play this name each time you address
messages to this distribution list.
4. Press 2 to add members to the list; press 3 to drop members.
5. Enter the numbers or names of users you wish to add or drop.
6. Press 7 if you would like the system to play back the list of members you
have selected.
7. Press 9 to exit to the main menu.
Call Schedule Options
•
Automatic Wakeup allows you to program VoiceMemo to call you at a
specific telephone number at a specific time. You can schedule
automatic wakeup calls for Monday through Friday, weekends,
everyday, or as needed.
•
Message Delivery allows you to define a schedule so that if a
message arrives in your mailbox, VoiceMemo will call you at a specific
telephone number at a specific time so that you can retrieve the
message.
•
Paging allows you to define a schedule so that when a message
arrives in your mailbox, VoiceMemo notifies your pager.
•
Future Delivery Audit allows you to audit any message scheduled for
future delivery. You can schedule delivery of any message up to 365
days in the future using the message addressing options menu (see
page 7).
11
Fax Delivery Options
These options allow you to specify where and how your fax messages are
delivered. For example:
•
Press 7 to have all unplayed fax messages currently in your mailbox
linked together and delivered to your default fax number.
•
Press 6 to define a default fax delivery number. All your faxes will be
automatically sent to this number when you press 3 while in the fax
transmittal options menu (see page 5).
•
Press 2 from a fax phone to fax into your mailbox a cover page that
will be automatically included with all faxes printed from your mailbox.
This cover page will not be included with faxes you send to other
mailboxes.
•
Press 3 to enable or disable automatic fax delivery. Automatic fax
delivery means that all fax messages that arrive in your mailbox are
automatically delivered to your default fax number.
Note: You do not receive any type of message waiting indication when this
feature is enabled; you must check your fax machine regularly to see whether
faxes have arrived. However, fax messages received when this feature is
enabled are stored in your saved message queue.
12


![[U4.32.03] Opérateur RECU_FONCTION](http://vs1.manualzilla.com/store/data/006358353_1-36e621887bf8578179e34db6cf81796e-150x150.png)
![[U4.32.03] Opérateur RECU_FONCTION](http://vs1.manualzilla.com/store/data/006383215_1-b64aee0ac4b83eb4afc970a6d32121db-150x150.png)