1
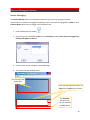
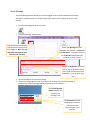
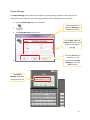
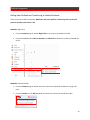
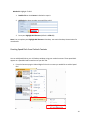
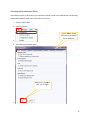
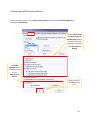
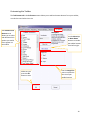
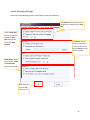
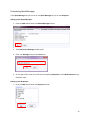
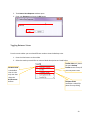
NEC Desktop Suite User Guide
Table of Contents
Desktop Screen Overview .................................................................................................................. 3
Presence States and BLF Colour Descriptions ..................................................................................... 3
Managing Calls using Desktop Suite .................................................................................................. 4
Make a Call ..................................................................................................................................... 4
Put a Call on Hold ........................................................................................................................... 4
Call Transfer ................................................................................................................................... 5
Call Park ........................................................................................................................................... 6
Conference Calling .......................................................................................................................... 6
Directed Call Pickup ....................................................................................................................... 7
Last Number Redial ........................................................................................................................ 7
Presence, Call Forwarding and DND .................................................................................................. 8
Presence........................................................................................................................................... 8
Setting Presence .............................................................................................................................. 8
Call Forwarding ................................................................................................................................ 9
DND .................................................................................................................................................. 9
Chat and Messaging Functions ......................................................................................................... 10
Instant Messaging ........................................................................................................................ 10
Quick Message ............................................................................................................................... 11
Display Message............................................................................................................................. 12
Outlook Integration ......................................................................................................................... 13
Dialing from Outlook and Transferring to Outlook Contacts ......................................................... 13
Creating Speed Dials from Outlook Contacts ................................................................................ 14
Highlight Dial ................................................................................................................................. 15
1
Desktop Customization .................................................................................................................... 16
Saving Profiles ............................................................................................................................... 16
Accessing the Preferences Menu .................................................................................................. 17
Customizing the BLF/Presence Buttons ........................................................................................ 18
Customizing the Toolbar ............................................................................................................... 19
Highlight Dial Hotkey Setup .......................................................................................................... 20
Instant Messaging Settings ........................................................................................................... 21
Customizing Quick Messages ........................................................................................................ 22
Toggling Between Views ................................................................................................................ 23
2
Desktop Screen Overview
Personal
Presence
Menu
ACD
Menu
Main
Menu
Presence
Button
Active Call
Window
Park
Toolbar
Presence States and BLF Colour Descriptions
3
Managing Calls Using Desktop Suite
Make a Call
You can make a phone call right from the Desktop Suite using the Dial button on the main tool bar.
1. Press the Dial button on the tool bar
2. Enter the number you would like to dial in the Destination Field
3. Press the Start button to initiate the call
Put a Call on Hold
Once you have a call in your Active Call Window you can use the Hold button on the main toolbar to
place your caller on hold.
1. Ensure you have a live call in your Active Call Window, as seen below. Active calls have a Green
border
2. Press the Hold button on the tool bar
3. The call will drop below the Active Call Window and have a Yellow border. This indicates the
caller is on Hold
4. To retrieve the held call simply Double Click on it
4
Call Transfer
Initiate transfers in the desktop suite using the Transfer button the tool bar
1. While on an active call press the Transfer button on the toolbar
2. Enter the extension or phone number you would like to transfer in the Destination Field
3. Next you have 2 options. Press Start to begin a Supervised Transfer- this allows you to talk to
the person you are transferring too prior to putting the call through. Alternately press Blind to
complete a Blind Transfer- this is where the call is taken directly from you and rings to the
person you are transferring too. If you select Blind your transfer is complete and you do not
need step 4.
4. Once you have the person you are transferring to on the line press the Complete button to
complete your transfer. If the person does not pick up you have the option to press Voicemail to
put the caller directly into their voicemail instead.
5
Call Park
There are 2 ways to Park an active call using the Desktop Suite.
1. With an active call press the Park button on the toolbar and enter a Park Location
OR
2. Press the Valet button at the bottom of the desktop window and the Race Car Icon will move to
the Park Location for you.
Conference Calling
Using the Conf button on the toolbar you can achieve three way calls.
1.
First you need to connect with the first caller. Dial their number or press their Presence Button
to get them on the line.
2. Next, press the Conf button on your toolbar
3. In the Destination Field enter the extension or outside number you would like to join the
conference then press Start
4. Your first caller will be put on hold while you speak with the second caller. Press Complete to
join the 2 calls together or press Disconnect if the second person declines the conference.
6
Directed Call Pickup
Use the Desktop Suite to answer another phone in the office that is ringing without leaving your desk.
1. From the Toolbar press the Dir.Pickup button
2. Enter the Extension you would like to pick up
3. Press Start
Last Number Redial
Dialing the last number you dialed is easy using the toolbar
1. Press the Redial button on the toolbar
2. You will be connected to your previously dialed number
7
Presence, Call Forwarding and DND
Presence
Your Presence Status appears to all other users with the Desktop Suite on your Presence Button. This
allows your colleagues to see where you are, when you’re due back and notes on how to reach you of
necessary.
Setting Your Presence
While you’re setting up your Presence Status, the desktop suite allows you to update your Call
Forwarding or DND Status as well, saving you a step.
1. Click the Presence Dropdown at the top of the desktop screen
Use the
Subject,
Location and
Presence State
fields to let
your colleagues
know where
you are
2. Select your desired Presence Status. Some examples are: In a Meeting, On Vacation or Out of
the Office.
Phone Settings allows
3. Complete the Set Presence window
you to choose your Call
Forward type and
destination, or turn on
DND mode.
Set your
Expected
Return
date/time so
everyone knows
when you’re
4.
back
The Remarks field lets
you leave specific notes
or call handling
instructions for your
team
8
Call Forwarding
There may be times you wish to set up a Call Forward without changing your Presence Status.
1. Press the Forward button the toolbar
2. Select Set Call Forward
Enter an extension
number or the
outside number
you would like to
forward to in the
Destination field
Use the Forward On dropdown to
select when you would like your
Call Forward to be active.
These options include Immediate
call forwarding and Both Ring, as
well as others.
3. Complete the remaining fields as noted above, then click Start
Note: To cancel your Call Forward simply press the Forward button on the toolbar and select Cancel
Call Forward
DND
Do Not Disturb takes your calls and points them directly to voicemail without ringing your phone.
1. Press the DND button on the toolbar
2. Select Set Do Not Disturb and using the dropdown what types of calls you would like the DND to
apply to (internal, external, all, etc)
3. Press Start
Note: To cancel DND press the DND button on the toolbar and select Cancel Do Not Disturb
9
Chat and Messaging Functions
Instant Messaging
The Instant Message feature of the desktop suite allows you to have an ongoing text based
conversation with another user logged into Desktop. A user’s name will be highlighted in Yellow on their
Presence Button when they are logged in and available to IM.
1. Press the IM button the toolbar
2. Select the user you would like to IM from the Participant window. Note: Only users logged in to
Desktop will appear on this list.
3. Press the Start button to begin the Instant Message
4. The instant Message Window opens
Your messages will
appear here
Enter your message here and hit the
Enter key
Send button
TheorStatus
Bar to send it
indicates if the
user has accepted
your IM request
The Status Bar
indicates if the
user has accepted
your IM request
10
Quick Message
The Quick Message feature allows you to send a logged in user a quick predetermined message
with built in response options for common place items such as their meeting arriving, or a call
waiting.
1. Click the Quick Msg button on the toolbar
2. The Quick Message window opens
Click the To: button and select
your recipients from the list of
users logged in. Note: You can
send quick messages to more
than one user at a time
Select your Message from the
dropdown. For example: “<Someone>
is on the phone”. The cursor will go to
the <Someone> placeholder and
allow you to enter a name
Select what Responses you would
like the user to be able to choose
from. Some of these will be auto
populated, or you can enter your
own.
3. Hit the Send button to send your message
4. The quick message appears under your Active Call window. If you send the message to
multiple users a Quick Message Bubble will appear for each extension.
Each Quick Message
Bubble indicates the
extension the
message is for.
5.
The Response: field will
populate when the user
selects one of the
response options you
provided
11
Display Message
The Display Message option allows you to program a preset greeting to appear on the screen of your
phone when you’re away from your desk, giving details to anyone looking for you at your desk.
1. Press the Display Msg button on the toolbar
2.
Use the dropdown to
select the Message you
would like to display
3. The Display Message window opens
Use the Date, Time and
Number fields to fill in any
blanks in your chosen
message.
4.
Press the Set button to
complete, or if you
already have a Display
Message set up press
Clear to clear it.
Your Display
Message displays on
the phone until you
Clear it.
12
Outlook Integration
Dialing from Outlook and Transferring to Outlook Contacts
There are 3 ways to dial from outlook. Methods 1 and 2 also work for transferring calls to contacts if
you have already connected to a call.
Method 1: Right Click
1. From the Contacts page in outlook Right Click on the contact you would like to dial
2. From the dropdown select NEC UC Desktop then NEC Call and chose the number you would like
to dial
Method 2: Outlook Toolbar
1. From the Contacts page in outlook select the contact you would like to dial with a single Left
Click
2. From the Toolbar use the Dial dropdown and select the number you would like to dial
13
Method 3: Highlight-To-Dial
1. Double click on the Contact in Outlook to open it
2. Highlight the phone number you would like to dial
3. Press your Highlight Dial Shortcut (default is CTRL+F1)
Note: You can update your Highlight Dial Shortcut in Desktop- see section Desktop Customization for
more details.
Creating Speed Dials from Outlook Contacts
You can add Speed Dials to your UC Desktop window using your outlook contacts. These speed dials
appear on a Speed Dial tab located next to your BLF Tab.
1. From the Contacts page in Outlook Right Click on the contact you would like to add to Speed
Dial
14
2. Select NEC UC Desktop from the drop down
3. Click NEC Add to Speed Dial
4. The contact is now added to your speed dial tab
Highlight Dial
Highlight Dial works with many types of documents such as web pages, spreadsheets and CRM
applications.
1. Highlight the number you would like to dial
2. Press your Highlight Dial Shortcut (default is CTRL+F1)
Note: You can update your Highlight Dial Shortcut in Desktop- see section Desktop Customization for
more details.
15
Desktop Customization
Saving Profiles
Before you begin changing settings save a base profile you can revert to in case of trouble.
1. Select Tools from the Toolbar
2. Select Profiles
3. The Profiles window opens
4. Click the Save button and name your profile.
Note: All users can see these profiles so use something unique to you to name your profile
5. To apply the profile in the future simply select it from the list and click the Apply button
16
Accessing the Preferences Menu
The Preference menu is where all your customization options reside in the Desktop suite. All following
customization options require you to first access this menu.
1. Click the Tools button
2. Select Preference
Use the Tabs to locate
the features you would
like to customize
3.
4. The Preferences window opens
Make sure to hit OK to
save your changes
5.
17
Customizing the BLF/Presence Buttons
You can customize details on your BLF/Presence buttons by accessing the Preference Menu and
selecting the BLF/DSS tab
Use the Label Format
and Name Display for
BLF/Directory fields to
personalize how you
view contact names on
your BLF/Presence
buttons
Use the BLF
Appearance field
to change the size
of your
BLF/Presence
buttons
Make sure to hit
the OK button to
save
18
Customizing the Toolbar
The Tool Button tab in the Preferences menu allows you to add and remove buttons from your toolbar,
re order them and select icon size.
The Available Tool
Buttons menu
allows you to select
and deselect which
options you would
like to appear on
the toolbar
Use the Move Up
or Move Down
buttons to reorder
the toolbar buttons
from left to right.
Make sure you
press the OK
button to save
Use the Image Size
menu to customize
the size of your
toolbar buttons
19
Highlight Dial Hotkey Setup
From the Shortcuts menu you can
Use the Highlighted Dial Shortcut
section to enable or disable the
Highlighted Dial feature as well as
select the Hotkey
Note: Hotkeys for this feature can
be Ctrl+F1 through Ctrl+F12
Make sure you
press the OK
button to save
20
Instant Messaging Settings
Access the Instant Messaging tab to make change to your IM preferences
The General section allows you to
change basic settings such as Font
Size.
Use the Auto Save
section to enable or
disable the Auto
Save feature and
chose your Save
Location
The History section
allows you to set the
number of sessions to
keep in History as well
as other options
Notifications allows
you to choose Alarm
and Screen Pop
options for your IM’s
Make sure you
press the OK
button to save
21
Customizing Quick Messages
In the Quick Message tab you can set up new Quick Messages as well as new Responses.
Setting up new Quick Messages:
1. Press the New button below the Defined Messages section
2. The Create a New Message window opens
3. Enter your Message and press the OK button
4. On the right of the screen check off the corresponding Responses or add a New Response using
the below steps
Setting up new Responses:
1. Press the New button below the Responses section
22
2. The Create a New Response window opens
3. Enter your Response and press the OK button
Toggling Between Views
From the main toolbar you can select different modes to view the Desktop suite.
1. Press the View button on the toolbar
2. Select the mode you would like to activate. Mode descriptions are listed below
Standard View
is the default
view. It is the
only view that
shows the
BLF/Presence
buttons
Toolbar View only shows
the main Desktop
Toolbar across the top of
your computer screen
Compact Phone
resembles a mobile flip
phone for easy dialing
23