1
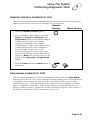
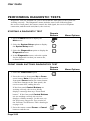
User Guide
PERFORMING DIAGNOSTIC TESTS
Diagnostic Tests are available for you to check that the main parts of the system are
working correctly. The Diagnostics menu includes tests for the following parts:
the receiver front panel, the remote control, the dish signal, the receiver telephone
connection, and the main unit (that is, the receiver).
STARTING A DIAGNOSTIC TEST
Remote
Buttons
Menu Options
FRONT PANEL BUTTONS DIAGNOSTICS TEST
Remote
Buttons
Menu Options
1. Press the Menu button to display the
Main menu.
2. Select the System Setup option to display
the System Setup menu.
3. Select the Diagnostics option to display the
Diagnostics menu.
4. In the Diagnostics menu, select the option
for the diagnostic test that you want to do,
as listed below.
1. Select the Front Panel option.
2. Press the receiver front panel Up or Down
arrow button. Note: If you press the receiver
front panel Power button (the center button
of the three buttons on the front panel), the
receiver turns OFF, ending the test.
If the front panel Control Buttons are
working correctly, the receiver briefly
displays a message that says “Front Panel
button.” If the front panel Control Buttons
are not working correctly, the receiver
displays a failure message. In this case, see
the Performing Diagnostic Tests section of
the Problems and Solutions Tables that begin
on page 4-10.
3. Press the remote control Power or Cancel
button to end the test.
Page 3-50
Using The System
Performing Diagnostic Tests
REMOTE CONTROL DIAGNOSTIC TEST
This test checks that the remote control buttons are working correctly. Do not press any
buttons on the remote or the receiver while this Test is in progress.
Remote
Buttons
Menu Options
1. Select the Remote Control option.
2. Press any remote control button, except the
Power, the Cancel, the Page Up or the
Page Down button. If the remote control is
working correctly, the receiver briefly
displays a message that says “Remote
Control Button.” If the remote control is not
working correctly, the receiver displays a
failure message. In this case, see the
Performing Diagnostic Tests section of the
Problems and Solutions Tables that begin on
page 4-10. Note: This test does not cover the
remote control Page Up and Page Down
buttons.
3. Press the Power button or Cancel button to
end the test.
DISH SIGNAL DIAGNOSTIC TEST
This test checks that the receiver has normal signal reception. Select the Dish Signal
option to begin the test. The receiver displays a message asking you to wait until the test
is completed. Do not press any buttons on the remote control or the receiver while
conducting this test. If the signal reception is normal, the receiver displays a message
that says “Signal Reception OK.” If the signal reception is not normal, the receiver
displays a failure message. In this case, see the Performing Diagnostic Tests section of
the Problems and Solutions Tables that begin on page 4-10.
Page 3-51
User Guide
TELEPHONE CONNECTION DIAGNOSTIC TEST
This test checks that the receiver telephone connection is correct. Select the Phone
Connection option to begin the test. The receiver displays a message asking you to
wait until the test is completed. If the telephone connection is correct, the receiver
displays a message that says “Phone Connection OK.” If the telephone is not connected
properly, the receiver displays a failure message. In this case, see the Performing
Diagnostic Tests section of the Problems and Solutions Tables that begin on page 4-10.
MAIN UNIT (RECEIVER) DIAGNOSTIC TEST
This test checks that the receiver is working correctly. Select the Main Unit Test option
to begin the test. The receiver displays a message asking you to wait until the test is
completed. If the receiver is working correctly, it displays a message that says “Main
Unit OK.” If the receiver is not working correctly, it displays a failure message. In this
case, call Bell ExpressVu Customer Service Call Centre for assistance.
Note: This test may temporarily distort the TV picture.
Page 3-52