1
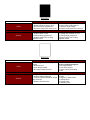
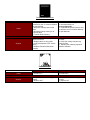
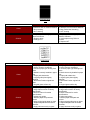
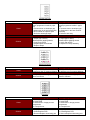
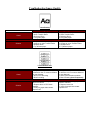
Troubleshooting Image Quality
Letter Blasting
Cause
Solution
Analog Copier
1. Inspect Fuser components
2. Worn Transfer Roller
3. Defective Drum
4. Low grade paper
Digital Copier/Laser Printer
1. Inspect Fuser components
2. Worn Transfer Roller
3. Defective Drum
4. Low grade paper
1. Replace Worn Fuser part(s)
2. Change or clean Transfer Roller
3. Replace Drum
4. Try different paper
1. Replace Worn Fuser part(s)
2. Change or clean Transfer Roller
3. Replace Drum
4. Try different paper
Horizontal Black lines
Cause
Solution
Analog Copier
1. If repeated at specific interval, refer
to defective ruler or measure distance
for part diameter
2. Drum or PCR arching
3. Bias fluctuating
Digital Copier/Laser Printer
1. If repeated at specific interval, refer
to defective ruler or measure distance
for part diameter
2. Laser synchronization problem.
3. Bias fluctuating (dual component)
1. Replace part matching repetitive
distance diameter.
2. Replace drum or PCR clean
contacts.
3. Verify for proper bias contact.
Replace HVT
1. Replace part matching repetitive
distance diameter.
2. Replace Laser Unit
3. Verify for proper bias contact.
Replace HVT
Black page
Cause
Solution
Analog Copier
1. No drum ground
2. Blown Exposure Lamp or Fuse
3. Defective lamp regulator brd.
4. Exposure Lamp does not come on
Digital Copier/Laser Printer
1. No charge voltage on drum
2. Laser beam continuously on
3. Defective High Voltage
4. Exposure Lamp does not come on
1. Replace drum/verify drum shaft
2. Replace lamp or fuse
3. Change lamp regulator brd.
4. Replace Lamp/Fuse or Lamp
regulator board
1. Replace PCR/verify contacts
2. Change DC controller or LSU
3. Change High Voltage brd.
Replace Lamp/Fuse or Lamp
regulator board
Blank page
Cause
Solution
Analog Copier
1. Lost charge from PCR/charge
corona
2. Defective HVT
3. Poor charge contact
4. No image transfer process
Digital Copier/Laser Printer
1. Absent Mag. Roller bias voltage
(mono-component engines)
2. No image transfer
3. Poor drum ground
4. Laser unit not illuminating
5. 24V
1. Replace PCR/charge corona wire
2. Replace High Voltage Brd
3. Verify all contacts related to charge
assy. and HVT
4. Replace Transfer roller
1. Replace Mag. Roller or bias
contact
2. Replace Transfer Roller.
3. Change drum
4. Change LSU
5. Replace LVPS
Perpendicular Blank areas
Cause
Solution
Analog Copier
1. If repeated at specific interval, refer
to defective ruler or measure distance
for part diameter
2. Defective charging area on the
Drum
3. Discharge Lamps turning on at
incorrect times
4. Transfer Roller shorting
Digital Copier/Laser Printer
1. Transfer Roller shorting
2. Intermittent Bias lost
(monocomponent)
3. If repeated at specific interval, refer
to defective ruler or measure distance
for part diameter
1.Replace part matching repetitive
distance diameter
2. Replace drum or drum shaft
3. Verify 24V/replace LVPS. Check
wiring
4. Replace Transfer Roller/clean
contacts
1. Replace Transfer Roller/clean
contacts
2. Verify bias voltage. Adjust mag.
Roller contact.
3. .Replace part matching repetitive
distance diameter
Grape pattern print
Cause
Solution
Analog Copier
1. Poor Drum ground
2. Erratic HVT
Digital Copier/Laser Printer
1. Poor Drum ground
2. Erratic HVT
1. Replace drum and/or verify ground
contact
2. Replace HVT
1. Replace drum and/or verify ground
contact
2. Replace HVT
Compressed
print
Cause
Solution
Analog Copier
1. Perform midway test and verify
image on drum
2. Check feed/aligning roller rotation
3. Drum flange slipping
4. Verify fuser roller drive
Digital Copier/Laser Printer
1. Perform midway test and verify
image on drum
2. Check feed/aligning roller rotation
3. Drum flange slipping
4. Verify fuser roller drive
1. If image on drum is compressed,
verify optics and scanner for proper
function.
2. Correct as required
3. Glue flange or replace drum
4. Correct or replace fuser
1. If image on drum is compressed,
verify optics and scanner for proper
function.
2. Correct as required
3. Glue flange or replace drum
4. Correct or replace fuser
Contamination
on back
Cause
Solution
Analog Copier
1. Residual toner remains on drum at
end of print cycle
2. Dirty transfer roller or transfer plate
3. Dirty pressure roller
Digital Copier/Laser Printer
1. Residual toner remains on drum at
end of print cycle
2. Dirty transfer roller or transfer plate
3. Dirty pressure roller
1. Replace drum/wiper blade
discharge lamps
2. replace transfer roller/clean plate
3. Clean/replace pressure roller or
oily cleaning roller
1. Replace drum/wiper blade
discharge lamps
2. replace transfer roller/clean plate
3. Clean/replace pressure roller or
oily cleaning roller
Wrinkled Copy
Cause
Solution
Analog Copier
1. Humid Paper
2. Worn or uneven fuser rollers
3. Paper feeds crooked
4. Dirty fuser plate
5. Obstruction in paper path
Digital Copier/Laser Printer
1. Humid Paper
2. Worn or uneven fuser rollers
3. Paper feeds crooked
4. Dirty fuser plate
5. Obstruction in paper path
1. Replace paper with fresh batch
2. Replace or adjust fuser roller
pressure
3. Replace roller/adjust paper feed
guide
4. Clean fuser plate surface
5. Observe and adjust
1. Replace paper with fresh batch
2. Replace or adjust fuser roller
pressure
3. Replace roller/adjust paper feed
guide
4. Clean fuser plate surface
5. Observe and adjust
Curl
Cause
Solution
Analog Copier
1. Media type does not meet system
specifications
2. Incorrect fusing temperature for
media
3. Humid paper
4. fusing rollers pressure incorrect
Digital Copier/Laser Printer
1.Media type does not meet system
specifications
2. Incorrect fusing temperature for
media
3. Humid paper
4. fusing rollers pressure incorrect
1. Refer to manual for media
requirements
2. Refer to manual for temperature
adjustment
3. Replace paper with fresh batch
4. Reduce fuser roller pressure
1. Refer to manual for media
requirements
2. Refer to manual for temperature
adjustment
3. Replace paper with fresh batch
4. Reduce fuser roller pressure
Blurred Print
Cause
Solution
Analog Copier
1. Drum/Developer Fatigue
2. Misaligned optic mirror(s)
3. Developer/Drum or scanner drive
hindered
4. Moisture on optics or drum
5. Paper path obstructed
Digital Copier/Laser Printer
1. Drum/Developer Fatigue
2. Erratic laser scanner
3. Developer/Drum or scanner drive
hindered
4. Defective controller board
5. Paper path obstructed
1. Replace drum/developer
2. Refer to service manual for proper
adjustment
3. Verify drum/developer including
drive gears is rotating freely.
4. Wipe moisture. Make certain
humidifier heaters are enabled in
copier if included
5. Examine all components are clean
and installed correctly
1. Replace drum/developer
2. Replace laser scanner unit
3. Replace/repair broken gears,
seized bearing and used belts
4. Replace controller board
5. Examine all components are clean
and installed correctly
Drop outs
Cause
Solution
Analog Copier
1. Humid paper
2. Charger/Transfer unit are dirty or
worn
3. Paper type not porous enough
4. Developer material depleted
5. Fuser roller imperfection
6. Low density level
7. Bias voltage too high
Digital Copier/Laser Printer
1. Humid paper
2. Charger/Transfer unit are dirty or
worn
3. Paper type not porous enough
4. Developer material depleted
5. Fuser roller imperfection
6. Low density level
7. Bias voltage to low
(monocomponent) too high for dual
8. Faulty laser scanner unit
1. Replace paper. Turn on damp
heaters if available
2. Clean or replace unit
3. Refer to manual and paper
packaging for proper application
4. Replace developer
5. Replace fuser roller
6. Adjust density level to spec.
7. Adjust to system specification
1. Replace paper. Turn on damp
heaters if available
2. Clean or replace unit
3. Refer to manual and paper
packaging for proper application
4. Replace developer
5. Replace fuser roller
6. Adjust density level to spec.
7. Adjust to system specification
8. Replace laser scanner unit
Margin Band
Cause
Solution
Analog Copier
1. Worn Doctor Blade/Bar
2. Mag roller bushing
3. Scored drum
4. Defective Mag/Developer roller
Digital Copier/Laser Printer
1. Worn Doctor Blade/Bar
2. Mag roller bushing
3. Scored drum
4. Defective Mag/Developer roller
1. Replace Doctor Blade/Bar
2. Change Mag roller busing
3. Replace Drum
4. Change Mag/Developer roller
1. Replace Doctor Blade/Bar
2. Change Mag roller busing
3. Replace Drum
4. Change Mag/Developer roller
Perpendicular Faded Print
Cause
Solution
Analog Copier
1. Fluctuating Exposure lamp
2. HVT defective or dirty contacts
3. Defective Transfer roller
4. Discharge lamp illuminating at
wrong interval
Digital Copier/Laser Printer
1. Fluctuating Laser scanner unit
2. HVT defective or dirty contacts
3. Defective Transfer roller
4. Erratic bias voltage
1. Verify for any cuts in scanner
cable. Replace lamp regulator brd.
2. Clean all HVT related
contacts/replace HVT
3. Replace Transfer roller
4. Check broken wires. Replace
LVPS or Discharge lamp
1. Replace Laser scanner unit
2. Clean all HVT related
contacts/replace HVT
3. Replace Transfer roller
4. Verify Mag. Roller contact/Replace
HVT
Faulty
Registration
Cause
Solution
Analog Copier
1. Aligning rollers dirty/worn
2. Registration clutch slipping
3. Paper set incorrectly in cassette
4. Worn feed rollers
5. feed one-way bearing slipping
6. Incompatible paper type creating
feed delay
7. Photoconductor slipping
Digital Copier/Laser Printer
1. Aligning rollers worn/dirty
2. Registration clutch slipping
3. Paper set incorrectly in cassette
4. Worn feed rollers
5. feed one-way bearing slipping
6. Incompatible paper type creating
feed delay
7. Photoconductor slipping
1. Clean/replace aligning roller
2. Replace/adjust registration clutch
3. Verify paper tray guides and max
allowable paper is within the line
indication correct as required
4. Replace all paper tray rollers
5. Clean one way bearing and
shaft/replace if required
6. Refer to manual for paper
specification
7. Verify drum flanges
Gray/Dark background copy
Cause
Solution
Analog Copier
1. Dirty Optics
2. Overtoning
3. Low Bias voltage
4. Incorrect drum potential
5. Charge voltage set to high
6. Depleted Developer
7. Poor drum ground
Digital Copier/Laser Printer
1. High Bias voltage
(monocomponent)
2. Low bias voltage (dualcomponent)
3. Overtoning
4. Charge voltage set too low
5. Depleted Developer
6. Poor drum ground
7. Incorrect drum potential
1. Clean mirrors
2. Calibrate toner ratio
3. Adjust/replace HVT
4. Perform drum potential adjustment
or replace drum
5. Adjust/replace HVT
6. Replace developer
7. Replace/clean drum shaft/ground
contact. Apply conductive grease
1. Adjust Bias voltage to spec.
Replace HVT
2. Adjust Bias voltage to spec.
Replace HVT
3. Calibrate toner ratio
4. Adjust/replace HVT
5. Replace Developer
6. Replace/clean drum shaft/ground
contact. Apply conductive grease
7. Perform drum potential adjustment
or replace drum
Horizontal white
lines
Cause
Solution
Analog Copier
1. If repeated at specific interval, refer
to defective ruler or measure distance
2. Drum arching
3. HVT shorting
Digital Copier/Laser Printer
1. If repeated at specific interval, refer
to defective ruler or measure distance
2. Mag. Roller bias fluctuating
3. HVT shorting
1. Replace part matching repetitive
distance diameter
2. Replace drum
3. Change HVT
1. Replace part matching repetitive
distance diameter
2. Verify/replace mag. Roller or
contact
3. Replace HVT
Image Skew
Cause
Solution
Analog Copier
1. Aligning roller out of spec or used
2. Optics Scanner misaligned
3. Incorrect paper type causing feed
skew
4. Media incorrectly installed in paper
tray
5. Paper path obstruction
6. original guide plate slightly
diagonal
7. Document Feeder original belt
used
8. Original glass surface dry
Digital Copier/Laser Printer
1. Aligning roller out of spec or used
2. Laser Scanner misaligned
3. Incorrect paper type causing feed
skew
4. Media incorrectly installed in paper
tray
5. Paper path obstruction
6. original guide plate slightly
diagonal
7. Document Feeder original belt
used
8. Original glass surface dry
1. Adjust/replace aligning roller
2. Align Optics scanner to factory
specification
3. Refer to manual for media
specifications
4. Adjust tray guides
5. Monitor paper feed path and
correct
6. Align original guide plate on glass
7. Replace/adjust/clean document
feed belt
8. Apply lubricant evenly on glass
1. Adjust/replace aligning roller
2. Align Laser scanner to factory
specification
3. Refer to manual for media
specifications
4. Adjust tray guides
5. Monitor paper feed path and
correct
6. Align original guide plate on glass
7. Replace/adjust/clean document
feed belt
8. Apply lubricant evenly on glass
Toner not fused/smeared
Cause
Solution
Analog Copier
1. Incompatible paper type
2. Incorrect fusing temperature for
media type
3. Defective/worn fuser rollers
4. Insufficient pressure between
Upper and Lower fuser rollers
Digital Copier/Laser Printer
1. Incompatible paper type
2. Incorrect fusing temperature for
media type
3. Defective/worn fuser rollers
4. Insufficient pressure between
Upper and Lower fuser rollers
1. Refer to manual for media
specification
2. Refer to manual for media fuser
setting
3. Replace fuser rollers and cleaning
web/oily roller
4. Adjust fusing roller
pressure/replace fuser
bushings/verify pressure springs
1. Refer to manual for media
specification
2. Refer to manual for media fuser
setting
3. Replace fuser rollers and cleaning
web/oily roller
4. Adjust fusing roller
pressure/replace fuser
bushings/verify pressure springs
Wavy Print
Cause
Solution
Analog Copier
1. Scanner mirrors out of true
2. Lens/CCD assembly misaligned
3. Drum asymmetrical/worn
4. Drum condensation
5. Original not placed flat on glass
6. Damaged drive gear/belt
Digital Copier/Laser Printer
1. Laser unit defect
2. Drum asymmetrical/worn
3. Drum condensation
4. Original not placed flat on glass
5. Damaged drive gear/belt
1. Adjust to factory specification
2. Adjust to factory specification
3. Replace drum
4. Turn on damp heaters if available,
or relocate system in a room
temperature environment
5. Adjust lid/document feeder for
appropriate pressure when in lowered
position
6. Locate and replace defective gear
or belt
1. Replace Laser scanner unit
2. Replace drum
3. Turn on damp heaters if available,
or relocate system in a room
temperature environment
4. Adjust lid/document feeder for
appropriate pressure when in lowered
position
5. Locate and replace defective gear
or belt
Parallel Half Print
Cause
Solution
Analog Copier
1. Paper feed direction does not
match programmed media in paper
tray
2. Incorrect drum to developer gap
3. Obstruction in the optics assembly
4. Drum shutter in exposure path
5. Defective discharge lamps
Digital Copier/Laser Printer
1. Paper feed direction does not
match programmed media in paper
tray
2. Incorrect drum to developer gap
3. Obstruction in the laser scanner
assembly
4. Defective led array
1. Correct and adjust matching sizes
2. Adjust gap to factory
default/replace gapping wheels
3. Verify and remove
4. Adjust/replace drum shutter
5. Replace lamps
1. Correct and adjust matching sizes
2. Adjust gap to factory
default/replace gapping wheels
3. Verify and remove
4. Replace led array assembly
Repetitive Defects
Cause
Solution
Analog Copier
1. If repeated at specific interval, refer
to defective ruler or measure distance
Digital Copier/Laser Printer
1. If repeated at specific interval, refer
to defective ruler or measure distance
1. Replace part matching repetitive
distance diameter
1. Replace part matching repetitive
distance diameter
Tire tracks
Cause
Solution
Analog Copier
1. Faulty Magnetic Roller
2. Soiled PCR
3. Obstruction in Image process
components
4. Clumped toner
1. Replace MR
2. Clean/Replace PCR
3. Remove/Replace obstructing part
Digital Copier/Laser Printer
1. Faulty Magnetic Roller
2. Soiled PCR
3. Obstruction in Image process
components
4. Clumped toner
1. Replace MR
2. Clean/Replace PCR
3. Remove/Replace obstructing part
4. System Operating Temperature
10 degrees to 32 degrees C
20 percent to 80 percent RH
Consumable Storage Temperature
0 degrees to 35 degrees C
35 percent to 85 percent RH
4. System Operating Temperature
10 degrees to 32 degrees C
20 percent to 80 percent RH
Consumable Storage Temperature
0 degrees to 35 degrees C
35 percent to 85 percent RH
Toner specks
Cause
Solution
Analog
1. Out of spec. toner recovery blade
2. Damaged magnetic roller sealing
blade
3. Defective Photoconductor
4. Pin holes on PCR
Digital/Laser Printer
1. Out of spec. toner recovery blade
2. Damaged magnetic roller sealing
blade
3. Defective Photoconductor
4. Pin holes on PCR
1. Adjust/Replace toner recovery
blade
2. Adjust/Replace sealing blade
3. Replace/Wipe (with cotton pad)
photoconductor
4. Replace PCR
1. Adjust/Replace toner recovery
blade
2. Adjust/Replace sealing blade
3. Replace/Wipe (with cotton pad)
photoconductor
4. Replace PCR
Vertical black
lines
Cause
Solution
Analog
1. Scratched drum
2. Residue on document feeder slit
glass
3. Faulty wiper blade
4. Burnt area on exposure lamp
5. Dirty charge corona/PCR
Digital/Laser Printer
1. Scratched drum
2. Residue on document feeder slit
glass
3. Faulty wiper blade
4. Burnt area on exposure lamp
5. Dirty charge corona/PCR
1. Replace drum
2. Wipe clean slit glass
3. Replace wiper blade
4. Replace exposure lamp
5. Clean/replace charge
1. Replace drum
2. Wipe clean slit glass
3. Replace wiper blade
4. Replace exposure lamp
5. Clean/replace charge