1
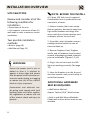
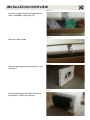
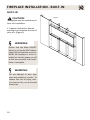
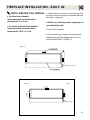
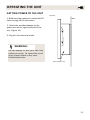
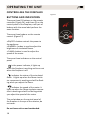
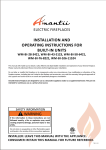
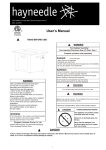
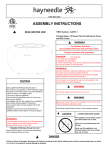
electric fireplaces
INSTALLATION AND
OPERATING INSTRUCTIONS FOR
Built-in units
Blt-in-38, Blt-in-58, Blt-in-36 & Blt-in-62
INSTALLER: LEAVE THIS MANUAL WITH THE APPLIANCE.
CONSUMER: RETAIN THIS MANUAL FOR FUTURE REFERENCE.
7 18 11 - 02
Blt-in-36 spECiFiCAtiOns
Model Number
Blt-iN-36
Description
Built-in appliance
Voltage
12
Watts
10.5
amps
.2
appliance Width
24-7/16” or 62 cm
appliance Height
19-1/8” or 48.5 cm
appliance Depth
7-5/16” or 18.5 cm
Gross Weight
58 lbs or 26.5 kg
Plug Location
right side
cord length
76” or 193 cm
7 5/8
8 3/16
this appliance has been tested in accordance with the ETL Intertek Standards for
fixed and location-dedicated electric room
appliances in the United States and Canada. If you need assistance during installation, please contact your local dealer.
nOtE: this appliance must be electrically
wired and grounded in accordance with
local codes. in the absence of local codes,
us the current CsA C22.1 Canadian Electrical Code in Canada or the ANSI/NFPA
70 national Electrical Code in the united
States.
36
20 11/16
7 5/8
7 11/16
10 1/2
26 1/2
19 1/8
8 5/16
7 5/16
24 7/16
6
26 1/2
INSTALLATION OVERVIEW
SITE SELECTION
Review and consider all of the
following conditions for
installation:
• Dimensions of the unit
• Unit requires a minimum of two (2)
wall studs in order to ensure a secure
installation.
Two possible installation
methods:
• Built-In (page 10)
• Wall Mount (Page 12)
NOTE: bEFORE yOU INSTALL
A 15 Amp, 120 Volt circuit is required.
a dedicated circuit is preferred but not
essential in all cases.
1. Select a location that is not susceptible to moisture, dust and is away from
high traffic locations and things that
many catch fire or block openings such
as drapes, pillows, furniture etc.
2. If possible, select a location near an
existing electrical outlet for ease of
electrical hook up.
3. Remove fireplace, front, fireglass
media, and all hardware from box and
remove all packaging related materials
prior to installation. (Figures 1,2,3,4)
WARNING:
Ensure the power cord is not installed so that it is pinched or
against a sharp edge and ensure
that the power cord is stored or secured to avoid tripping or snagging
to reduce the risk of fire, electric
shock or injury to persons.
Construction and electrical outlet wiring must comply with local
building codes and other applicable regulations to reduce the risk
of fire, electric shock and injury to
persons.
8
4. Plug in the unit to ensure the LED
lights are working correctly. (See page
15)
5. Store the fireplace in a safe, dry and
dust free location until you are ready to
install the fireplace.
ADDITIONAL HARDWARE
MAy bE REqUIRED:
• Wall Mount Method:
Approx. Twelve (12) 6” Wood screws.
• Built-In and Wall Mount Methods:
Plastic wall anchors where studs are not
available.
INSTALLATION OVERVIEW
figure 1
Locate fire glass media and set aside for
later installation. (See Page 13)
Remove sides of box
Remove packaging surrounding the unit
and front.
figure 2
figure 3
figure 4
Discard packaging materials and store
fireplace in a safe, dry location.
9
FirEplACE instAllAtiOn - Built-in
Built-in
CAUTION:
Two people may be needed to perform this installation.
1. Prepare a wall with a framed
opening to accomodate the size of
your unit. (Figure 5)
WARNING:
Ensure that the Main ON/OFF
Switch is set to the OFF Position
(page 16) and that the circuit on
which the fireplace is to be installed on has the power cut off
at the service panel until installation is complete.
WARNING:
Do not attempt to wire your
own new outlets or circuits. To
reduce the risk of injury, electric shock or fire, use a licensed
electrician.
10
figure 5
FirEplACE instAllAtiOn - Built-in
NOTE: bEFORE yOU INSTALL
• For Glass front Models:
units must stick out of the wall a
minimum of 2” or 5 cm.
• For stone and steel front Models:
units must stick out of the wall a
minimum of 2-3/4” or 7 cm.
1. Lift fireplace and insert into opening. Adjust the unit to achieve the desired amount
of depth. (Figure 6)
2. Make sure that the power supply port is
not behind the wall.
3. Level the fireplace.
4. Drive mounting screws into the mounting brackets (nailing flanges) on the unit
and the wall studs. (Figure 7)
figure 6
Power adaptor port
figure 7
Wall
Power adaptor port
11
FirEplACE instAllAtiOn - WAll MOunt
NOTE: bEFORE yOU INSTALL
It is strongly recommended that the screws
be screwed into the wall studs where possible. If the wall studs cannot be used,
ensure that plastic anchors are used.
figure 8
Mounting holes for
wall bracket
stakes for hanging
1. Affix the provided mounting bracket to
the wall. (Figure 8)
• Make sure it is level.
2. Lift fireplace unit and insert the stakes
for hanging into the keyholes on the back
of the unit. (Figure 9, Figure 10)
Height from floor
floor
3. Check the appliance for stability ensuring that the appliance will not pull free
from the wall.
Figure 9
figure 10
stakes for hanging
Wall
Back of unit
12
Side view
FIRE GLASS MEDIA INSTALLATION
NOTE: bEFORE yOU INSTALL
CLEANING THE MEDIA: The media may contain a fine white dust
that needs to be cleaned prior to installation. Clean the media
with soap, drain, rinse thoroughly and dry before placing into the
tray.
figure 11
1. Choose the colour of Fire Glass Media you would like to use.
(figure 11)
2. Place the Fire Glass Media into the Tray (Figure 12)
(Built-In installation shown, Fire Glass Media installation is the
same for both Built-in and Wall Mount installation methods.)
• It is not necessary to use all the media supplied.
figure 12
fire Glass Media tray
13
FRONT INSTALLATION
NOTE: bEFORE yOU INSTALL
It is recommended that two people install
the front onto the appliance, wear safety
glasses and gloves when handling glass.
figure 13
1. Lift fireplace front (Figure 13) and line
up the brackets with the four (4) shoulder
screws on the side of the appliance body
(figure 14, or figure 15)
2. Attach the front to the unit.
figure 15
figure 14
Unit
Unit
Moun
Shoulder Screw
Shoulder Screw
Wall
Built-In Installation
14
Wall
Wall Mount Installation
acket
OPERATING THE UNIT
GETTING POWER TO THE UNIT
figure 16
1. Make sure the appliance is switched OFF
(refer to page 16 for instruction)
Wall
2. Attach the provided adaptor to the
power port on the right hand side of the
unit. (Figure 16)
3. Plug unit into electrical outlet.
WARNING:
Do not attempt to wire your own new
outlets or circuits. To reduce the risk of
injury, electric shock or fire, use a
licensed electrician.
Power adaptor port
15
OPERATING THE UNIT
CONTROLLING THE FIREPLACE
bUTTONS AND INDICATORS
There are three (3) buttons on the remote
controller (figure 14), and three (3) on the
control panel of the fireplace, each pair of
buttons with the same label perform the
same function.
There are three buttons on the remote
control: (Figure 17)
<ON/OFF> button controls the power to
the appliance.
<DIMMER> button is used to adjust the
brightness of simulated flames.
<FLAME> button is used to adjust the
speed of the motor.
there are three indicators on the control
panel:
is the power indicator, it lights up
when the fireplace is working and turns out
when the fireplace is off.
indicates the status of the simulated
flame. It lights up when the flame simulator component is working and will be flashing when you adjust the flame.
indicates the speed of the motor. It
lights up when the flame simulator component is working and will be flashing when
you adjust the speed of the motor.
The red window on the control panel of
the fireplace is the eye of the receiver, do
not cover.
Do not leave unit on and unattended.
16
figure 17
FIREPLACE MAINTENANCE
WARNING:
Disconnect power before performing any maintenance or cleaning to reduce the risk of
fire, electric shock or damage.
LED LIGHT bULb REPLACEMENT
LED light bulbs are to be replaced by the manufacturer, it’s service agent or similar qualified person in order to avoid hazard.
WARNING:
Allow at least 5 minutes for LED bulbs to cool off before handling bulbs to avoid burns.
LED LIGHT bULb REqUIREMENTS
Rating Voltage: 12 Volts
Rating Power: 5 Watts
BLT-IN-38: 3 Bulbs
BLT-IN-58: 5 Bulbs
BLT-IN-36: 3 Bulbs
BLT-IN-62: 5 Bulbs
CAUTION:
Do not exceed 5 watts per bulb.
UNIT DISPOSAL
Do not dispose with other household wastes. To prevent possible harm to the environment
or human health from uncontrolled waste disposal, recycle it responsibly to promote the
sustainable reuse of material resources. Contact your local landfill for appropriate disposal
instruction.
17
WARRANTy
Amantii Imports Corp. (“Amantii”) warrants that your newly purchased Amantii electric fireplace is free from manufacturing and
material defects for a period of one (1) year from the date of the first purchase, subject to the conditions and limitations contained
below.
Warranty Application & Exclusions
This limited warranty applies to your newly purchased Amantii electric fireplace; the limited warranty’s application is limited to
purchases made in any province of Canada or in any of the 52 States of the United States of America, including the District of Columbia. Only the original purchaser of the product is eligible for coverage under this limited warranty; the warranty is not transferable.
Light bulbs are not covered by this limited warranty and are the sole responsibility of the owner/purchaser.
Warranty Coverage and Term
Products covered by this limited warranty have been tested and inspected prior to shipment and, subject to the provisions of this
warranty, Amantii warrants such products to be free from defects in material and workmanship for a period of one (1) year from
the date of the first purchase of such products.
The limited one (1) year warranty period for products also applies to any implied warranties that may exist under applicable law.
Some jurisdictions do not allow limitations on how long an implied warranty lasts, so the above limitation may not apply to the
purchaser.
All other warranties—expressed or implied—with respect to the product, its components and accessories or any obligation/liabilities on the part of Amantii are hereby expressly excluded.
Limitations to Coverage Under Limited Warranty
This limited warranty does not apply to products that have been repaired, except by Amantii or its authorized service representatives, or otherwise altered. This limited warranty further does not apply to defects resulting from misuse, abuse, accident, neglect,
incorrect installation, improper maintenance or handling, or operation with an incorrect power source.
Products made by other manufacturers, sold with the product or thereafter, are not covered by this limited warranty. The use of
unauthorized components will render this warranty null and void.
Service Under Limited Warranty
Defects must be brought to the attention of Amantii Technical Service by contacting Amantii at (1-888-406-8764), or at 1503 – 7088
18th Avenue, Burnaby, British Columbia, Canada, V3N 0A2. Please have your proof of purchase, catalogue/model and serial numbers available when calling; any and all service under the limited warranty requires a proof of purchase of the product.
Defects
Should a product or part covered by this limited warranty be proven to be defective, in material or workmanship, and during the
one (1) year limited warranty period, Amantii will replace such defective product or part without charge. If Amantii is unable to
replace such product, or if replacement is not commercially practicable or cannot be timely done, in its sole discretion Amantii may,
in lieu of replacement, choose to refund the purchase price for such product or part.
Limitations
In no event will Amantii, including without limitation any of its directors, officers, shareholders, employees, consultants, agents,
heirs, executors, administrators and assigns, be liable to the purchaser or any third party, whether in contract, in tort, or on any
other basis for any indirect, special, punitive, exemplary, consequential, or incidental loss, cost or damage arising out of or in connection with the sale, maintenance, use or inability to use the product, even if Amantii, including without limitation any of its directors, officers, shareholders, employees, consultants, agents, heirs, executors, administrators and assigns, have been advised of the
possibility of such losses, costs or damages, or if such losses, costs or damages are foreseeable. In no event will Amantii, including
without limitation any of its directors, officers, shareholders, employees, consultants, agents, heirs, executors, administrators and
assigns, be liable for any direct losses, costs or damages that exceed the purchase price of the product.
Some jurisdictions do not allow the exclusion or limitation of incidental or consequential damages, so the above limitation or exclusion may not apply to the purchaser.
Application of Provincial and State Law
This limited warranty gives you specific legal rights, and you may also have other rights which vary from jurisdiction to jurisdiction.
The provisions of the United Nations Convention on Contracts for the Sale of Goods shall not apply to this limited warranty or the
sale of products covered by this limited warranty.
General
Amantii reserves the right to make changes at any time without notice, in design, material, specifications, prices and the right to
discontinue styles and products.
electric fireplaces
www.amantii.com
Date of Purchase:
Dealer Information: