1
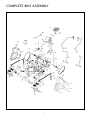
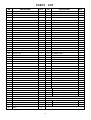
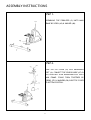
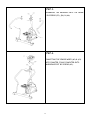
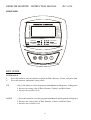
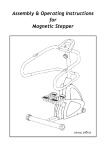
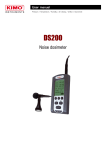
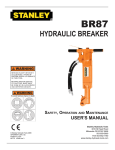
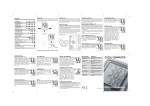
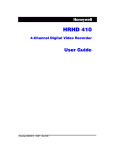
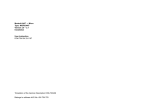
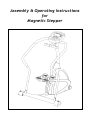
Assembly & Operating Instructions
for
Magnetic Stepper
1
COMPLETE BIKE ASSEMBLY
1
PARTS
NO
DESCRIPTION
LIST
Q’TY
NO
DESCRIPTION
1
2
3
4
Main Frame
Foot Tube
Stabilizer
Handlebar Post
1
2
1
1
48
49
50
51
Washer 19 x 8
Screw M8 x 10L
Cap
5
6
7
8
9
10
11
12
13
14
15
16
17
18
19
20
21
22
23
24
25
26
Pulley I
Pulley II
Magnetic System
Bearing Housing
Belt I
Belt II
Bearing Hub
Spacerφ25 x 28 x 8.5L
Screw M8 x 45L
Washer 19 x 8 x 1.5T
M8 Nylock Nut
Axle
Key 6 x 6 x 15L
Screw M8 x 12L
Washer 12 x 16 x 1T
Nut 3/8 x 26t x 3T
Nut 3/8 x 26t
Springφ20 x 16 x 2 x 40L
Idle Wheel II
Nut 3/8 x 26t
Spring φ20 x 16 x 2 x 70L
Idle Wheel I
1
1
1
2
1
1
2
8
8
8
1
1
1
1
1
4
2
1
1
2
1
1
52
53
54
55
56
57
58
59
60
61
62
63
64
65
66
67
68
69
70
71
72
73
O-Ring
Sensor plate
Magnet
Screw φ8 x 33.5L
Screw M6 x 12L
Screw M8 x 10L
Washer 19 x 8
M5 Nylock nut
Handpulse sensor wire
Screw M5 x 50L
Sensor wire I
Sensor wire II
Screw 4 x 12
Screw 4 x 25
Handpulse sensor
Motor sensor wire
Screw M5 x 40L
Screw M5 x 12L
Foam Grip
Meter
Top Cover
4
4
2
2
27
28
29
30
31
32
33
34
35
36
37
38
39
40
41
42
43
44
45
46
47
C Clip #19
Rubber stopper
C clip #13
M8 Nylock Nut
Moving wheel
Screw M8 x 35L
Cap
Spacer φ19 x 12 x 60.5L
Chain
Chain-Spring connector
Spring
Spring connector
Screw M10 x 55L
M10 Nylock Nut
Spacer φ16 x 10 x 40L
Pedal fixing plate
Screw M12 x 85L
M12 Nylock nut
Screw M6 x 20L
Rubber stopper
Pedal
4
2
4
2
2
2
2
4
2
2
2
2
2
2
2
2
4
4
8
2
2
74
75
76
77
78
79
80
81
82
83
84
85
86
87
88
Left Cover
Right Cover
Screw M5 x 12L
Screw 4 x 12
Screw 4 x 16
Screw 4 x 12
Rubber stopper
35mm Plug
Tension cable
Tension Gear box
Screw M5 x 10L
Foam grip
Handrail – top (Right + Left)
Handrail – bttom (Right + Left)
AC Adaptor
Φ25 C Clip
Bushing
Q’TY
φ76
4
1
1
8
8
4
4
3
1
1
1
1
2
2
2
1
1
4
2
1
1
1
1
1
2
2
3
4
2
2
1
1
2
2
1
1
1
TOOL
Allen Key 6mm
Allen Key 5mm
Screw driver
2
1
2
1
ASSEMBLY INSTRUCTIONS
STEP 1.
ASSEMBLING THE STABILIZER (3) UNTO MAIN
FRAME BY SCREN (49) & WASHER (48).
STEP 2.
SLIDE THE TOP COVER (72) INTO HANDLEBAR
POST (4). CONNECT THE SENSOR WIRE (67) &
(63) TOGETHER. SLIDE HANDLEBAR POST ONTO
MAIN FRAME. FIXING THEM TOGETHER BY
SCRENS (57) & WASHERS (58) SLIDE TOP COVER
TO BOTTOM POSITION.
3
STEP 3.
ASSEMBLING THE HANDRAIL ONTO THE FRAME
BY SCREWS (55) ,(56) & (64).
STEP 4.
CONNECTING THE SENSOR WIRES (60) & (63)
ONTO COMUTER. FIXING COMPUTER ONTO
HANDLEBAR POST BY SCREWS (69).
4
EXERCISE MONITER
INSTRUCTION MANUAL
BC-51126
FRONT VIEW
SACN
TIME
RPM
COUNT
CAL
PULSE
MANUAL
FAT BURN
VALLEY
INTERVALS
KEY GUIDE
ENTER/MODE:
1.
2.
Press this button to enter the function setting from Time, Distance, Calorie, and pulse limit.
Press this button to confirm the setting values.
UP
: 1. Press this button to select the program form Manual and Program 1 to Program 6.
2. Increase the setting value of Time, Distance, Calories, and Pulse Limit.
3. Increase the resistance level.
DOWN
: 1. Press this button to select the program form Manual and Program 6 to Program 1.
2. Decrease the setting value of Time, Distance, Calories, and Pulse Limit.
3. Decrease the resistance level.
5
START/STOP: 1. Press this button to start or stop exercising.
2. Hold this button for 2 seconds can enter initial mode and reset value to zero.
POWER UP
1. Before all, you should connect the connection cables with monitor together.
2. If the power source is coming form ADAPTOR (6V 1A), plug in the ADAPTOR.
When stop exercising, please remember to unplug the ADAPTOR. (6V 1A)
3. After power up, all LCD segments will light up for 2 seconds & CPU will be reset the
into level 0. And then the system goes into the initial mode.
resistance
FUNCTIONS AND OPERATIONS
· AUTO ON/OFF
The monitor will wake up automatically if the exercise machine is in motion. If stop exercising for over 4
minutes, monitor will turn off and reset all function values to zero.
SCAN
While at “start” operation,
Press the MODE button until mark appear on the position of Scan. Monitor will display the following
function and each function will keep 5 seconds on the main screen. Time–Speed-Distance–Calorie–Pulse.
TIME
Press the MODE button until the mark appearance on the position of TIME. Monitor will display the
Time function on the main screen.
Count up:
Without setting the time value, the monitor will count up the time from 00:00~99:59.
Count down:
Setting the exercise time from 1:00~99:00 minutes, the monitor will count down from your setting values.
Once reach setting value, monitor will alarm.
RPM
Press the MODE button until the mark appearance on the position of RPM. Monitor will display the
current RPM on the main screen. The monitor will display the current RPM from 0 ~ 999 rpm/min
COUNT
Press the MODE button until the mark appearance on the position of COUNT. Monitor will accumulate
the distance trip.
6
CALORIE
Press the MODE button until the mark appear on the position of Calorie.
Count up:
Without setting the calorie value, the monitor will count up the calorie from 0.1~999.0.
Count down:
Setting the exercise calorie from 1.0~999.0, the monitor will count down from your setting values. Once
reach setting value, monitor will alarm.
PULSE (Target Heart Rate)
Pulse Limit:
Setting the value of pulse limit between 90 to 220, the monitor will measure your heartbeats. Once reach
setting value, monitor will produce beep sounds to remind you.
NOTE:
1. If no pulse signal input within 16 seconds, the display will indicate “P”.
2. In the stop mode, the monitor can not measure heart rate.
OPERATION:
This system contains one manual and 6 programs.
You can preset the workout time and system will divide the
time by 10 intervals. If you don’t preset workout time, system will count up the workout time in one-second
increment.
DETAIL OPERATION OF MANUAL AND PROGRAM 1st – PROGRAM 6th:
1. Setting the value of Time and/or Distance and/or Calories and/or Pulse
a. Press the UP or DOWN button to choose desired program from Manual. Program 1 to program 6.
b. Press the ENTER button to confirm your desired program.
c. The time window will flash.
d. Press the UP or DOWN button to set up your workout time.
e. Press the ENTER to confirm your setting value.
f. The distance window will flash.
g. Press the UP or DOWN button to set up the distance value.
h. Press the ENTER to confirm your setting value
i. The Calorie window will flash
j. Press the UP or DOWN button to set up the calorie value.
k. Press the ENTER to confirm your setting value
l. The Pulse window will flash
m.
Press the UP or DOWN button to set up the pulse value
n. Press the ENTER to confirm your setting value
o. Press start to begin the exercise.
7
2. Without setting the value of time, distance, calories and pulse
a. Press the UP or DOWN button to choose desired program from Manual. Program 1 to program 6.
b. Press the ENTER button to confirm your desired program.
c. Press start to begin the exercise.
Note: Program 6 is a very unique program, it allows the monitor to adjust the workout resistance according to
your heart rate automatically. If your present heart rate is greater than your target heart rate, CPU will decrease the
workout resistance automatically. If your present heart rate is smaller than your target heart rate, CPU will increase
workout resistance.
8