1
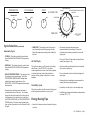
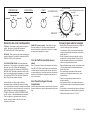
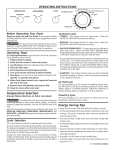
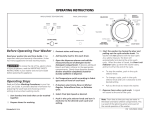
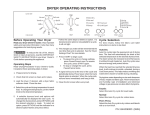
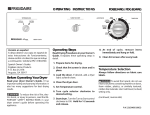
OPERATING INSTRUCTIONS
TEMPERATURE
START
REGULAR/WHITES
DELICATES/PERM PRESS/COLORS
TOWELS
OFF
DAMP DRY
AUTOMATIC DRY
OFF
MEDIUM HEAT
HIGH HEAT
CYCLE SIGNAL
LOW HEAT
ON
OFF
COOL DOWN
10
COOL DOWN
ON
OFF
20
30
30
20
40
TIMED DRY
Before Operating Your Dryer
5. Set Temperature and Cycle Signal controls.
Read your dryer Use and Care Guide. It has
important safety and warranty information. It also
has many suggestions for best drying results.
6. Turn cycle selector clockwise to desired
setting.
To reduce the risk of fire, electric
shock, or injury to persons, read the IMPORTANT
SAFETY INSTRUCTIONS in your dryer Use and
Care Guide before operating this appliance.
Operating Steps
Read Drying Procedures in your Use and Care
Guide. It explains these operating steps in detail.
7. Start dryer. Turn the Turn to Start control
clockwise to ON. Hold for 1-2 seconds and
release.
8. When Cycle Signal control is on, a signal
will sound at the end of the cycle.
9. Remove items immediately and hang or fold.
10. Clean lint screen after every load.
1. Prepare items for drying.
Temperature Selection
2. Check that lint screen is clean and in place.
Always follow directions on fabric care
labels.
3. Load the dryer. If desired, add a dryer fabric
softener sheet.
4. Close the dryer door.
Printed in U.S.A.
To avoid fire hazard, do not use
heat to dry items containing feathers or down, foam
rubber, plastics, or similarly textured, rubber-like
materials. Use the Air Fluff-No Heat cycle only.
10
50
OFF
60
70
80
90
AIR FLUFF
NO HEAT
Select the temperature setting most suitable for
each load. The REGULAR--HIGH HEAT, PERM
PRESS--MEDIUM HEAT and DELICATES--LOW
HEAT temperature settings may be used with any
cycle setting.
Cycle Selection
Turn cycle selector clockwise to desired cycle and
setting.
The Automatic and Timed Dry cycles end with a
cool down period. The heat automatically turns off
and the load continues to tumble during the cool
down period. This reduces wrinkling and makes
items easier to handle during unloading.
Drying time varies depending on size and
dampness of load, weight and fabric type. Room
temperature and humidity, type of installation and
electrical voltage or gas pressure can also affect
drying time.
(continued, reverse side)
P/N 134383600
(0401)
TEMPERATURE
START
REGULAR/WHITES
DELICATES/PERM PRESS/COLORS
TOWELS
OFF
DAMP DRY
AUTOMATIC DRY
OFF
MEDIUM HEAT
HIGH HEAT
CYCLE SIGNAL
LOW HEAT
ON
OFF
ON
COOL DOWN
10
COOL DOWN
OFF
20
30
30
20
40
TIMED DRY
Cycle Selection (continued)
Automatic Cycle
• TOWELS - This setting is best for towel loads.
Select the REGULAR--HIGH HEAT temperature
setting.
• REGULAR - This setting is best for cotton items.
Select the REGULAR--HIGH HEAT temperature
setting.
• DELICATES/PERM PRESS - This setting is best
for delicate or perm press items. Select the
PERM PRESS--MEDIUM HEAT temperature
setting for permanent press items, or the
DELICATES--LOW HEAT temperature setting for
delicate items.
• Occasionally a load may seem too damp or
overdried at the end of the cycle. To increase
drying time for similar loads in the future, set the
cycle selector on the indicator line to the left of
the TOWELS, REGULAR, or DELICATES/PERM
PRESS setting. For loads requiring less drying
time, set the cycle selector on the indicator line to
the right.
10
50
OFF
60
70
80
90
AIR FLUFF
NO HEAT
• DAMP DRY - This setting is best for items you
wish to partially dry before hanging or ironing.
Select the temperature setting most suitable for
the load.
• Sort laundry properly and select proper
temperature and cycle settings. Choose the
Automatic cycle whenever possible for accurate
drying time.
Air Fluff Cycle
• Dry only full loads. Single items and small loads
usually take longer to dry.
This cycle provides up to 30 minutes of tumbling
without heat. Use AIR FLUFF to dry items
containing feathers or down, foam rubber, plastics,
or similarly textured, rubber-like materials, to
freshen clothing, pillows or blankets, or to dust
draperies.
• Avoid overloading, adding wet items to a partially
dry load, and overdrying.
• Dry one load after another to take advantage of a
warm dryer.
• Opening the door needlessly causes warm air to
escape, which prolongs drying time.
Timed Dry Cycle
• If possible, use the dryer on low humidity days.
This cycle provides up to 80 minutes of drying time
at the temperature selection of your choice.
• Install the dryer in an area where the room temperature
is at least 45°F (7°C).
Energy Saving Tips
• Keep the lint screen clean and exhaust the dryer
correctly.
P/N 134383600
(0401)
INSTRUCCIONES PARA EL FUNCIONAMIENTO
TEMPERATURE
START
REGULAR/WHITES
DELICATES/PERM PRESS/COLORS
TOWELS
OFF
DAMP DRY
AUTOMATIC DRY
OFF
MEDIUM HEAT
HIGH HEAT
CYCLE SIGNAL
LOW HEAT
ON
OFF
COOL DOWN
COOL DOWN
10
ON
OFF
20
30
30
20
40
TIMED DRY
Antes de poner la secadora
en funcionamiento
Lea el Manual de Uso y Mantenimiento de su secadora.
Contiene información importante sobre la seguridad y la
garantía. También contiene muchas sugerencias para
obtener los mejores resultados de su secadora.
Para reducir el riesgo de incendio,
descargas eléctricas o lesiones a las personas, lea las
INSTRUCCIONES IMPORTANTES PARA LA
SEGURIDAD del Manual de Uso y Mantenimiento de su
secadora antes de ponerla en funcionamiento.
Pasos para el funcionamiento
Lea los Procedimientos para el secado en el Manual de
Uso y Mantenimiento. Le explican estos pasos con más
detalle.
1. Prepare la ropa para el secado.
2. Compruebe que la rejilla para pelusas esté limpia y
colocada en su lugar.
3. Llene la secadora. Si lo desea, añada una hoja de
suavizante.
4. Cierre la puerta de la secadora.
5. Arregle los controles de temperatura y de
selección de ciclos.
Impreso en los EE.UU.
6. Gire el control de selección de ciclos en el sentido
de las agujas del reloj, hasta la posición deseada.
7. Ponga la secadora en marcha. Gire la perilla de
Turn to Start (Gire para poner en marcha) en el
sentido de las agujas del reloj hasta la posición de
encendido (ON). Mantenga durante 1 ó 2 segundos
y suelte.
8. Cuando el control de Cycle Signal (Indicador de
ciclo) esté activado, se escuchará una señal al
final del ciclo.
9. Saque las prendas inmediatamente y cuélguelas o
dóblelas.
10. Limpie la rejilla para pelusas después de cada
carga.
Selección de temperatura
Siempre siga las instrucciones en las etiquetas de
las prendas.
Para prevenir el incendio, no use
calor para secar prendas que contengan plumas o
plumón, goma espuma, plásticos o texturas similares. Use
el ciclo Air Fluff-No heat (Solo aire-sin calor).
10
50
OFF
60
70
80
90
AIR FLUFF
NO HEAT
Seleccione el reglaje de temperatura más apropiado
para cada carga. Los reglajes de temperatura
REGULAR-HIGH HEAT (calor regular-alto), PERM
PRESS-MEDIUM HEAT (planchado permanentemedio calor), y DELICATES-LOW HEAT (delicadosbajo calor) pueden usarse con cualquier selección de
ciclo.
Selección de ciclo
Gire el selección de ciclos en el sentido de las agujas
del reloj.hasta el ciclo y el reglaje deseados.
Los ciclos automatico y secado temporizado se
teminan con un período de enfriado. El calor se apaga
automáticamente y la carga continúa movién-dose en
el tambor durante el período de enfriado. Esto reduce
las arrugas y hace que las prendas sean más fáciles
de manejar al sacarlas de la secadora.
El tiempo de secado varía dependiendo del tamaño de
la carga, la cantidad de agua que tenga y el tipo de
tejido. La temperatura ambiente, la humedad, el tipo de
instalación y el voltaje eléctrico o la presión del gas
también pueden afectar el tiempo de secado.
(continúa al reverso)
P/N 134383600
(0401)
TEMPERATURE
START
REGULAR/WHITES
DELICATES/PERM PRESS/COLORS
TOWELS
OFF
DAMP DRY
AUTOMATIC DRY
OFF
MEDIUM HEAT
HIGH HEAT
CYCLE SIGNAL
LOW HEAT
ON
OFF
COOL DOWN
10
COOL DOWN
ON
OFF
20
30
30
20
40
TIMED DRY
Selección de ciclo (continuación)
TOALLAS - Este reglaje es mejor para las cargas de
toallas. Seleccione el reglaje de temperatura
REGULAR-HIGH HEAT (Calor regular-alto).
REGULAR - Este reglaje es mejor para las prendas de
algodón. Seleccione el reglaje de temperatura REGULAR-HIGH HEAT (Calor regular-alto).
DELICATES-PERM PRESS (Delicados-planchado
permanente) - Este reglaje es mejor para las prendas
delicadas, de puntos o planchado permanente.
Seleccione el reglaje de temperatura PERM PRESSMEDIUM HEAT (planchado permanente-calor medio)
para las prendas planchado permanente o el reglaje
de temperatura DELICATES-LOW HEAT (delicadosbajo calor) para las prendas delicadas.
Ocasionalmente una carga puede resultarse
demasiada mojada o demasiada secada al final del
ciclo. Para aumentar el tiempo de secado para similares
cargas en el futuro, coloque el selector de ciclo sobre la
línea indicadora a la izquierda del reglaje para
TOWELS, REGULAR, or DELICATES/PERM PRESS
(toallas, regular o delicados/planchado permanente).
Para las cargas que requieran menos tiempo de
secado, coloque el selector de ciclo en la línea
indicadora a la derecha.
10
50
OFF
60
70
80
90
AIR FLUFF
NO HEAT
Consejos para ahorrar energía
DAMP DRY (secado mojado) - Este reglaje es mejor
para las prendas que Ud desea secar partialmente
antes de tenderlas o plancharlas. Seleccione el reglaje
de temperatura apropiado a la carga.
Ciclo Air Fluff-No heat (Sólo aire-sin
calor)
Este ciclo provee 30 minutos de tamboreacción sin calor.
Use AIR FLUFF (Aire sin calor) para secar prendas que
contienen plumas o plumón, goma espuma, plásticos o
texturas similares que contienen goma para refrescar las
prendas, las almohadas o las mantas o para sacudir el
polvo a las cortinas.
Ciclo Timed Dry Regular (Secado
temporizado)
Este ciclo proporciona hasta un máximo de 80 minutos de
tiempo de secado a la selección de temperatura que usted
elija.
• Mantenga la rejilla para pelusas limpia y coloque el
orificio de salida de aire de la secadora
correctamente. Elija el ciclo de secado automático
siempre que sea posible para obtener un tiempo de
secado preciso.
• Divida los grupos de ropa correctamente y elija la
temperatura y el ciclo apropiados. Elija un ciclo de
secado automático siempre que sea posible para
obtener un tiempo de secado preciso.
• Seque solamente cargas enteras. Las prendas solas
y las cargas pequeñas normalmente tardan más
tiempo en secarse.
• Evite sobrecargar la secadora, añadir prendas
mojadas en una carga parcialmente seca y secar
excesivamente.
• Seque una carga tras otra para aprovechar la
secadora caliente.
• Abrir la puerta cuando no es necesario hace que el
aire caliente se escape, lo cual prolonga el tiempo de
secado.
• Si es posible, use la secadora en días poco húmedos.
• Instale la secadora en un área donde la temperatura
ambiente sea de por lo menos 7°C (45°F).
P/N 134383600
(0401)