1
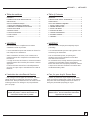
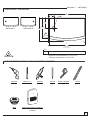
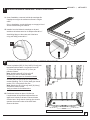
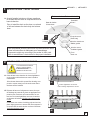
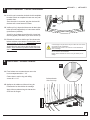
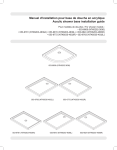
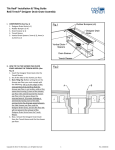
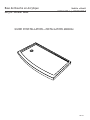
Base de Douche en Acrylique
Acrylic Shower Base
GUIDE D’INSTALLATION
Modèle ● Model
ABF3260BF-L | ABF3260BF-R
●
INSTALLATION MANUAL
09.11K
ABF3260BF-L | ABF3260BF-R
● Table of Contents
● Table des matières
IMPORTANT.....................................................
L’entretien de votre Base de Douche.................
spÉcification.................................................
OUTILS eT MATÉRIaux REQUIS...............................
1. Installez LA BRIDE DE CARRELAGE.....................
2. PRÉPAREz la PLOMBERIE D’ÉVACUATION...............
3. Installez le drain.......................................
4. nivelez la base...........................................
5. testez le drainage......................................
6. fixez la base...............................................
7. finition.....................................................
2
2
3
3
4
4
5
5
6
6
7
IMPORTANT.....................................................
Care for your Acrylic Shower Base...................
specification.................................................
TOOLS AND MATERIALS REQUIREd..........................
1. INSTALL TILING FLANGE...................................
2. prepare draining pipe...................................
3. Install the drain........................................
4. leveling the base........................................
5. testing the drainage...................................
6. SECURING the base.......................................
7. finishing....................................................
2
2
3
3
4
4
5
5
6
6
7
● IMPORTANT
● IMPORTANT
- Lire attentivement et complètement le manuel
d’installation avant de procéder.
- Read this manual carefully and completely before proceeding.
- Il est recommandé de porter des lunettes de sécurité en
tout temps lors de l’installation.
- It is recommended that you wear safety glasses at all times during the installation.
- Avant l’installation de la base, toute l’ossature et la plomberie doivent être complétées conformément aux instructions.
S’il s’agit de travaux de rénovation, les surfaces murales existantes doivent être enlevées pour installer l’ossature appropriée.
Les murs extérieurs doivent être isolés adéquatement et inclure un coupe-vapeur conformément aux codes du bâtiment.
- Prior to installation of base, all framing and plumbing work must be completed in accordance with this instruction sheet.
For renovation work, existing shower surfaces must be removed to accommodate framing requirements.
Ensure that outer wall are properly insulated, and that a vapor barrier has been installed in accordance with established building codes.
● L’entretien de votre Base de Douche
● Care for your Acrylic Shower Base
- Pour protéger le fini acrylique de votre base, n’utilisez
jamais de poudre ou tampons de récurage ou d’autres
solvants forts. Nettoyez seulement avec une solution d’eau
et détergent doux ou un détergent conçu expressément
pour l’acrylique.
- In order to protect the acrylic surface of your base,
never use scouring powder pads or other strong solvent.
Only clean with a mild detergent diluted in water or a
detergent formulated specifically for acrylic.
Des changements peuvent être apportés au
produit sans préavis. Veuillez donc utiliser les
instructions fournies avec le produit.
Product specifications are subject to change
without notice. Use the installation instructions
supplied with the product.
2
09.11K
ABF3260BF-L | ABF3260BF-R
spÉcification. / specification.
9"
[23cm]
1"
Ø34
[Ø8cm]
60"
[152cm]
16"
[41cm]
ABF3260BF-L
ABF3260BF-R
30 3/16"
36" [77cm]
[92cm]
5"
38
[9cm]
1"
[3cm]
1"
[3cm]
58"
[147cm]
FINISHED WALL
OUVERTURE MUR FINI
3"
[8cm]
* Tolérence sur les dimensions: ± 1/4” [.6 cm]
* Tolerance on dimensions: ±1/4” [.6 cm]
OUTILS eT MATÉRIaux REQUIS. / TOOLS AND MATERIALS REQUIREd.
PERÇEUSE
DRILL
DRAIN
DRAIN
MÈCHE 3/16˝
DRILL BITS 3/16˝
SCELLANT
SILICONE
CRAYON
PENCIL
RUBAN À MESURER
TAPE MEASURE
NIVEAU
LEVEL
CIMENT ÉGALISATEUR ou MORTIER
FLOOR LEVELING COMPOUND
or MORTAR
3
09.11K
1
ABF3260BF-L | ABF3260BF-R
Installez LA BRIDE DE CARRELAGE. / INSTALL TILING FLANGE.
1A.Avant l’installation, retourner la bride de carrelage afin
d’appliquer une ligne de scellant en silicone le long du
canal.
Prior to installation, turn the tile flange so to apply a line of
silicone sealant along the channel.
1B.Installez la ou les brides de carrelage sur la paroi
extérieure de la base avec les vis autopercante #6 x 1”
Install tiling flange on the outter wall of the base
using self drilling screws #6 x 1”
1A
2
1B
PRÉPAREz la PLOMBERIE D’ÉVACUATION. / prepare draining pipe.
2A.Percez le plancher [Ø5”(12.7cm) à Ø6”(15.2cm)] pour
la plomberie d’évacuation. Le tuyau de renvoi de
2”( 5.0cm) doit dépasser de 1/2”(1.27cm) du
plancher existant.
Note: les dimensions D [16”(41cm)] et E [9”(23cm)] du mur au centre du drain.
Vérifier votre base pour les dimensions finales.
Cut floor [Ø5”(12.7cm) to Ø6”(15.2cm)] to accommodate plumbing. The 2” (5.0cm) drain pipe should
project 1/2”(1.27cm) above floor line.
Note: Dimensions D [16”(41cm)] and E [9”(23cm)]
from wall to center of drain.
Verify your base for final dimensions.
Dim D
Dim E
2B.Positionnez la base en place. Vérifiez que
l’emplacement de la plomberie d’évacuation est
aligné avec le drain de la base. Enlevez la base.
Position base. Verify that the draining pipe location
matches the actual location of the base drain.
Remove the base.
Modèle ABF3260BF-L illustré - Model ABF3260BF-L shown
4
09.11K
3
ABF3260BF-L | ABF3260BF-R
Installez le drain. / Install the drain.
Drain non inclus - Drain not included
3A.Avant d’installer le drain sur la base, appliquez
du scellant silicone entre le corps de renvoi et la
base de douche.
Prior to install the drain on the base, run a bead
of silicone between the drain body and shower
base.
Base de douche
Shower base
3A
Corps du renvoi
Drain body
Silicone
Silicone
Joint de caoutchouc
Rubber gasket
* Les composants peuvent varier selon le modèle du drain utilisé.
Suivez les instructions du fabriquant pour l’assemblage.
Components might vary according to the model of drain used.
Refer to manufacturer’s instructions for the proper installation.
4
Pommelle*
Cover*
Joint de carton
Cardboard gasket
Ecrou
Drain nut
nivelez la base. / leveling the base.
SI LE PLANCHER EST DE NIVEAU.
PASSEZ À L’ÉTAPE SUIVANTE.
IF THE FLOOR IS LEVEL.
PROCEED TO THE NEXT STEP.
4A.Calez la base et/ou étendez du ciment égalisateur
ou du mortier uniformément sur toute la surface
d’installation.
Shim shower base and/or spread floor leveling compound or mortar evenly over the entire area where
the base will be installed.
4A
Ciment égalisateur ou mortier
Floor leveling compound or mortar
4B.Déposez la base en l’enlignant au centre du tuyau
de drainage et posez-la en place en appliquant une
pression pour s’assurer qu’ils entrent bien en contact avec le ciment égalisateur sur toute la surface
en dessous de la base. Vérifiez que la base est de
niveau.
Lower base over center of draining pipe and set into
place. Apply pressure to ensure that the compound is
in contact with the entire bottom surface of the base.
Verify that the base is level.
4B
5
09.11K
5
ABF3260BF-L | ABF3260BF-R
testez le drainage. / testing the drainage.
5A.Une fois que la connexion du drain ait été complétée,
bouchez le drain et remplisez la base avec une petit
quantité d’eau.
5A
Once the drain is connected, plug the drain and fill
the base with a small amount of water.
5B.Vérifiez qu’il n’y ait pas de fuite autour du drain (des bulles pourraient apparaître) ou à tout autre endroit (en dessous si possible).
Check for any leakage around the drain (some bubbles may appear) and below (if you have access to).
5C.Débouchez le drain et vérifiez que l’écoulement de
la base se fasse correctement. il ne doit pas y avoir
d’accumulation de flaque d’eau dans la base.
Unplug the drain and assure that the drainage is efficient. There must be no puddle of water accumulation in the base.
6
Si le drainage n’est pas efficace et que la base est bien nivelée,
ne poursuivez pas l’installation.
Veuillez enlever la base et la retourner à votre distributeur
pour un échange.
If water doesn’t drain properly even though the base is leveled,
do not continue this installation.
Please remove the base and return it to your dealer for exchange.
fixez la base. / SECURING the base.
6B
6A.Fixez la base aux montants de mur avec des
les vis autopercante #6 x 1 1/2”
Fasten base to studs using self drilling
screws #6 x 1 1/2”
Calez au besoin
Shim if necessary
6B.Appliquer du scellant en silicone le long de
l’intersection les deux brides de carrelage.
Apply silicone sealant along the intersection
of the two tile flanges.
6A
6
09.11K
7
finition. / finishing.
Conseils pour une finition étanche
d’aspect professionnel.
Tips to achieve a professional looking and
watertight finish.
ABF3260BF-L | ABF3260BF-R
Montant.
Stud.
Panneau de gypse.
Drywall.
Ciment pour carreaux de
céramique.
Tile adhesive.
Carreaux de céramique.
Tile.
Bride de carrelage en “ T”.
“Tee section” Tiling flange.
Espace de 3 ou 4mm.
3 to 4mm gap.
Base de douche.
Shower base.
Scellant.
Silicone.
Calez au besoin.
Shim if necessary.
7
09.11K