1
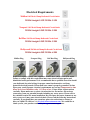
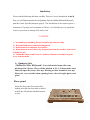
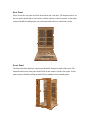
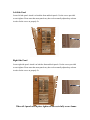
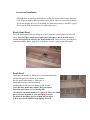
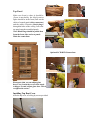
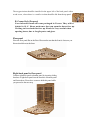
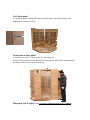
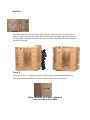
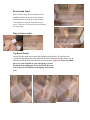
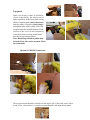
Installation Manual
A Brighter Future…
www.westcoastsaunas.com
[email protected]
Technical Support
1-800-975-6180 ext 2
Electrical Requirements
Malibu 110/120volt 15amp Dedicated Circuit/Outlet
NEMA Straight 5-15P/ NEMA 5-15R
Newport 110/120volt 20amp Dedicated Circuit/Outlet
NEMA Straight 5-20P/ NEMA 5-20R
Del Mar 110/120volt 20amp Dedicated Circuit/Outlet
NEMA Straight 5-20P/ NEMA 5-20R
Hollywood 220/240volt 20amp Dedicated Circuit/Outlet
NEMA Straight 6-20P/ NEMA 6-20R
Malibu Plug
Newport Plug
Del Mar Plug
Hollywood Plug
Dedicated requires that no other appliance should share outlet/circuit with sauna.
Failure to comply with this requirement may cause electrical interruption and
diminished sauna performance. It is recommended that a qualified electrician install
your dedicated electrical wiring for proper sauna function and to avoid any
potential electrical hazards. Please make sure sauna is properly grounded. Serious
injury may result if proper electrical requirements are not met. Sauna must be shut
down for at least 30 minutes after 1 1/2 hour of use. Please follow all instructions
carefully. Please make sure to select a location that is a flat surface. Please keep
sauna away from any potential hazards including any water source. Please select a
dry suitable location for sauna installation. Do not expose the heater elements to any
water source as it may cause electrical shock. Please read the following instructions
carefully. If you should have any questions, please do not hesitate to contact us
direct at 1-800-975-6180 ext 2 or [email protected]. We would like to
thank you for your purchase and wish you a great sauna experience.
Installation
Please read the following directions carefully. There are 2 sets of instructions A and B.
First you will find instructions for the Quadrate Style A (Malibu/Delmar/Hollywood)
then the Corner Style B (Newport) page 8. The installation of the sauna requires a
minimum of 2 people and a minimum of 2 hours. You should not try to install the
sauna on your own as damage will easily occur.
CAUTION:
1) No plumbing or plumbing fixtures should be placed in the sauna.
2) Keep all liquids away from the heating panels
3) Install sauna on a completely level surface.
4) Install sauna in an area that is dry and protected from the weather. Sauna is for
in home use only
5) Flammable objects and Corrosive chemical substances should be kept far
away from the sauna.
A. Quadrate Style
(Malibu/Del Mar/ Hollywood): Your infrared Sauna will come
packaged in 3 boxes. They will be labeled A, B, C. Please make sure
that you open the boxes face up. Writing on box should be face up.
Please be very careful when opening boxes, due to fragile parts and
glass.
Floor panel
Place the floor panel flat on the floor,
making sure that the front label is indeed
at the front. (Floor heater should be nearest
to you)
Rear Panel
Please locate the rear panel and slide the brackets into each other. The bottom brackets on
the rear panel should slide in and connect with the brackets of the floor panel. At this point
someone should be holding up the rear panel until another the next connection is made.
Front Panel
The front of the door and larger control panel should be facing the outside of the sauna. The
bottom brackets on the front panel should slide in and connect with the floor panel. At this
point someone should be holding up both sides by standing in between both panels.
Left Side Panel
Locate left side panel. Attach it to both the front and back panels. Use the screws provided
to semi-tighten. Please note that sauna panels may have to be manually adjusted up or down
in order for the screws to properly fit.
Right Side Panel
Locate right side panel. Attach it to both the front and back panels. Use the screws provided
to semi-tighten. Please note that sauna panels may have to be manually adjusted up or down
in order for the screws to properly fit.
When all 4 panels are in place tighten all screws to fully secure Sauna
Accessories Installation
Although there are small pre-drilled holes for the placement of these items, the towel
rack, magazine holder, and cup holder can be placed wherever you prefer as long as
you do not damage the wood. If installing in a different location, it would be a good
idea to pre-drill the holes before you tighten the screws.
Bench Stand Panel
Place the bench stand panel by lining up its sides with the vertical guides on each side
panel. Note: Del Mar model may require that you remove one of the side heater
covers (wood grills) in order for the bench stand to fit. After you have positioned the
bench stand panel, please plug in all of the heater electric cords into the back panel.
Bench Panel
Install the bench panel by sliding it over the horizontal guides
on each side panel. Be careful not to scratch
the side panels when doing so. Make sure to
position the bench so that smooth and
finished sides of the bench are facing up and forward.
Note: Del Mar model may require that you remove
one of the side heater covers (wood grills)
in order for the bench stand to fit. Optional: There are small
pieces of wood included in your packaging to secure
the bench from sliding up Screw them into the back
wall to prevent the benches from tipping forward.
Top Panel
Make sure front is where it should be.
(Front is marked by the label/exterior
lights should be in the front) Pull out the
cables of control panel (white connectors),
and the cables of heaters (black plugs)
through the holes of the ceiling. Lower the
top panel onto the assembled panels.
Note: Black Plugs should be pulled thru
from the front, side, and rear panels.
Make the connections.
Optional LCD/DVD Connections
Please note that you can adjust glass
door. First, loosen the screws that attach
to hinges. Second, adjust glass door. Third,
re-tighten the screws.
Installing Top Dust Cover
Affix the top cover of ceiling by screws provided.
The oxygen ionizer should be installed in the upper left of the back panel with a
wood screw, where there is a small wire that should be fed from the top panel.
B. Corner Style (Newport)
Your infrared Sauna will come packaged in 3 boxes. They will be
labeled A, B, C. Please make sure that you open the boxes face up.
Writing on box should be face up. Please be very careful when
opening boxes, due to fragile parts and glass.
Floor panel
Place the floor panel flat on the floor. Please make sure that the front is closest to you.
Heater should be near the front.
Right-back panel to floor panel
Connect right-back panel to bottom panel by inserting sliding
brackets of right-back panel into the brackets of bottom panel
and fasten them. Please have someone hold this panel while
you proceed to the next step.
Left-back panel
As right-back panel is being held connect left back panel. Then affix them by semi
tightening the screws provided.
Front panel to floor panel
Connect front panel to floor panel by inserting the
brackets of front panel into the brackets of bottom panel. Please have someone hold
this panel while you proceed to the next step.
Side panel (left & right) 2 steps *DO NOT COMPLETE STEPS OUT OF ORDER
Brackets
Step 1
Attach the right-side panel to the front and back panel at the same time. To do this, please
raise the right-side panel a bit higher than the front and back panels, then slide down the
left-side panel so that the brackets connect with each other. Next follow the same procedure
for the left-side panel.
Step 2
Please insert screws to tighten the panels together. Please note that sauna panels may
have to be manually adjusted up or down in order for the screws to properly fit.
When all panels are in place tighten all
screws to fully secure Sauna
Bench Stand Panel
Please find the longest bench stand panel and
install first then the shorter one. Place down the
bench heater panel by lining up its sides with the
vertical guides on each side panel. Be careful
not to scratch the side panels when positioning
the heater panel.
Plug in heater cables
Top Bench Panels
Install left, then right, then center bench panels on the bench. Be careful not to
scratch the adjacent panels when sliding in the bench. Push the benches all the way in
until they touch the back panel and are securely in place. Optional: There are small
pieces of wood included in your packaging to secure
the bench from sliding up Screw them into the back
wall to prevent the benches from tipping up from the
rear
Top panel
Make sure front is where it should be.
(Front is marked by the label/exterior
lights should be in the front) Pull out the
cables of control panel (white connectors),
and the cables of heaters (black plugs)
through the holes of the ceiling. Lower the
top panel onto the assembled panels. If the
corners of the cover do not completely
come down please use long wood screws
provided to screw down corners.
Note: Black Plugs should be pulled thru
from the front, side, and rear panels. Make
the connections.
Optional LCD/DVD Connections
The oxygen ionizer should be installed in the upper left of the back panel with a
wood screw, where there is a small wire that should be fed from the top panel.
Please note that you can adjust glass
door. First, loosen the screws that attach
to hinges. Second, adjust glass door. Third,
re-tighten the screws.
Accessories Installation
Although there are small pre-drilled holes for the placement of these items, the towel
rack, magazine holder, and cup holder can be placed wherever you prefer as long as
you do not damage the wood. If installing in a different location, it would be a good
idea to pre-drill the holes before you tighten the screws
Installing Top Dust Cover
Affix the top cover of ceiling by screws provided.
Installation Complete
Plug in your sauna and make sure to read the
“How to Use” instructions.
Enjoy your West Coast Sauna!
Copyright 2008 West Coast Saunas Inc. All rights reserved