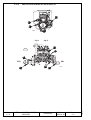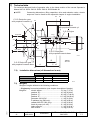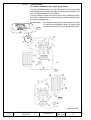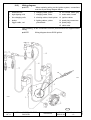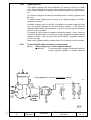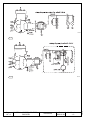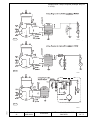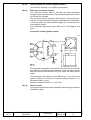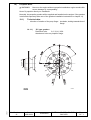
1
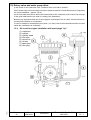
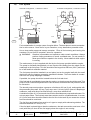
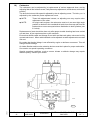
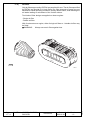
SZ
AIRCRAFT ENGINES
SS
Installation Manual
for engine types
ROTAX 447 UL SCDI
ROTAX 503 UL DCDI
ROTAX 582 UL DCDI
ROTAX 582 UL DCDI mod. 99
▲ WARNING
Before starting with the engine installation, please,
read the Installation Manual completely as it contains important safetyrelevant information.
The Manual must remain with the engine / aircraft in case of sale.
Edition: 0 of 1999 02 01
These technical data and the information contained therein are property of ROTAX® GmbH
and must not be reproduced, neither in entirety nor partially, and passed on to third parties
without previous consent in writing by ROTAX ® GmbH. This text must be written on every
complete or partial reproduction.
Copyright - ROTAX® GmbH
Approval of translation to best knowledge and judgement - in any case the original text in German language is authoritative.
part no. 899 482
0) Preface
Congratulation on your decision to use a ROTAX® aircraft engine.
Before starting with the engine installation, read this Installation Manual carefully. The Manual will
provide you with basic information on correct engine installation, a requirement for safe engine
operation.
If any passages of the Manual are not completely understood or in case of questions, please,
contact an authorized Distribution- or Service Partner for ROTAX® engines.
0.1)
Remarks
This Installation Manual is to acquaint the owner/user of this aircraft engine with basic
installation instructions and safety information.
For more detailed information on operation, maintenance, safety or flight, consult the
documentation provided by the aircraft builder and dealer.
For further information on maintenance and spare part service contact the nearest ROTAX®
distributor (see chapter of Service Partners).
0.2)
Engine serial number
On all enquiries or spare parts orders, always indicate the engine serial number, as the
manufacturer makes modifications to the engine for further development.
Page
0-2
INSTALL 447 SCDI, 503 DCDI,
582 DCDI
Preference
Date
1999 02 01
Modification no.
-0-
d00287
The engine serial number is on the top of the crankcase, magneto side, or ignition cover.
1) Safety
Although the mere reading of such an instruction does not eliminate a hazard, the understanding
and application of the information will promote correct use.
The information and components-/system descriptions contained in this Maintenance Manual are
correct at the time of publication. ROTAX®, however, maintains a policy of continuous improvement of its products without imposing upon itself any obligation to install them on its products
previously manufactured.
ROTAX® reserves the right at any time to discontinue or change specifications, designs, features,
models or equipment without incurring obligation.
The fig.s in this Maintenance Manual show the typical construction. They may not represent in full
detail or the exact shape of the parts which have the same or similar function.
Specifications are given in the SI metric system with the USA equivalent in parenthesis. Where
precise accuracy is not required, some conversions are rounded off for easier use.
1.1)
Repeating symbols
This Manual uses the following symbols to emphasize particular information. These
indications are important and must be respected.
▲ WARNING:
Identifies an instruction which, if not followed, may cause serious
injury including the possibility of death.
■ ATTENTION: Denotes an instruction which, if not followed, may severely damage
the engine or other component.
◆ NOTE:
1.2)
Indicates supplementary information which may be needed to fully
complete or understand an instruction.
Safety information
▲ WARNING:
This engine, by its design, is subject to sudden stoppage. Engine
stoppage can result in forced landings, no power landings or crash
landings. Such crash landings can lead to serious bodily injury or death.
▲ WARNING:
Never fly the aircraft equipped with this engine at locations, airspeeds,
altitudes, of other circumstances from which a successful no-power
landing cannot be made, after sudden engine stoppage.
Aircraft equipped with this engine must only fly in DAYLIGHT VFR
conditions.
▲ WARNING:
This is not a certificated aircraft engine. It has not received any safety or
durability testing, and conforms to no aircraft standards. It is for use in
experimental, uncertificated aircraft and vehicles only in which an engine
failure will not compromise safety.
d00311
User assumes all risk of use, and acknowledges by his use that he knows
this engine is subject to sudden stoppage.
Modification no.
-0-
Date
1999 02 01
Preference
INSTALL 447 SCDI, 503 DCDI,
582 DCDI
Page
1-1
☞ It should be clearly understood that the choice, selection and use of this particular
engine on any aircraft is at the sole discretion and responsibility of the aircraft
manufacturer, assembler and owner/user.
☞ Due to the varying designs, equipment and types of aircraft, ROTAX® makes no
warranty or representation on the suitability of its engine’s use on any particular
aircraft. Further, ROTAX ® makes no warranty or representation of this engine’s
suitability with any other part, component or system which may be selected by the
aircraft manufacturer, assembler or user for aircraft application.
☞ You should be aware that any engine may seize or stall at any time. This could lead
to a crash landing and possible severe injury or death. For this reason we recommend
strict compliance to the maintenance, operation and any additional information which
may be given to you by your dealer.
☞ Select and use proper aircraft instrumentation. This instrumentation is not included
with the ROTAX® engine package. Only approved instrumentation can be installed.
☞ Unless in a run up area, never run the engine with the propeller turning while on the
ground. Do not operate engine if bystanders are close.
☞ To prevent unauthorized use, never leave the aircraft unattended with the engine
running.
☞ Keep an engine log and respect engine and aircraft maintenance schedules. Keep the
engine in top operating condition at all times. Do not operate any aircraft which is not
properly maintained or has engine operating irregularities which have not been
corrected.
☞ Keep an engine log and enter any unusual engine behaviour. Do not fly unless you
have corrected a given problem and recorded the correction in the log.
☞ Since special tools and equipment may be required, engine servicing should only be
performed by an authorized ROTAX® engine dealer or a qualified trained mechanic
approved by the local airworthiness authority.
☞ To eliminate possible injury or damage, ensure any loose equipment or tools are
properly secured before starting the engine.
☞ Never leave your aircraft or other vehicle unattended while the engine is running. If
operated by someone else you could be sued even if the use was unauthorized by you.
☞ When in storage protect the engine and fuel system from contamination and exposure.
☞ Never operate the engine and gearbox without sufficient quantities of lubricating oil.
☞ Periodically verify level of coolant at 582 UL DCDI and 582 UL DCDI mod. 99.
Page
1-2
INSTALL 447 SCDI, 503 DCDI,
582 DCDI
Preference
Date
1999 02 01
Modification no.
-0-
d00311
☞ Never exceed maximum rated rpm. and allow the engine to cool at idle for several
minutes before turning off the engine.
☞ Operating the engine at high rpm. at low throttle position, for example during descent,
may increase engine and exhaust temperatures and cause critical overheating.
Always compensate and match rpm. with throttle position.
☞ Maintain your engine in top condition and assume it's going to quit running at any time.
Leave yourself a way out in the event of unexpected failure.
☞ Never mix fuel in an enclosed area, or where fumes could reach an ignition point.
☞ Make sure all engine controls are operative, that you know ON and OFF positions of
throttle and ignition, that they are easily accessible, and that you can operate them
instinctively without hesitation.
☞ Never refuel if fuel could be spilled on hot engine components. Use only safety
approved fuel containers and never transport fuel in an unsafe manner.
☞ Check engine suspension frequently as well as the drive components, fuel lines,
wiring, and fuel and air filters.
d00311
☞ Check for fuel contamination, air vents, etc. Protect engine while not in use from any
contamination entering fuel or carburetion system, but be sure to remove storage
protection before starting engine.
Modification no.
-0-
Date
1999 02 01
Preference
INSTALL 447 SCDI, 503 DCDI,
582 DCDI
Page
1-3
1.3)
Technical documentation
The information given in the
☞Installation Manual
☞Operator's Manual
☞Maintenance Manual
☞Service Informations
☞Spare parts list
are based on data and experience that are considered applicable for professionals under
normal conditions.
The fast technical progress and variations of installation might render present laws and
regulations inapplicable or inadequate.
The illustrations in this Manual are mere sketches and show a typical arrangement. They
might not represent the actual part in all its details but depict parts of the same or similar
function. Therefore deduction of dimensions or other details from illustrations is not
permitted.
All necessary documentation is available from the ROTAX Distribution- and Service
Centers (see Chapter 14).
◆ NOTE:
The Illustrations in this Operator´s Manual are stored in a graphic data file
and are provided with a consecutive irrelevant number.
Page
1-4
INSTALL 447 SCDI, 503 DCDI,
582 DCDI
Preference
Date
1999 02 01
Modification no.
-0-
d00311
This number (e.g. 00277) is of no significance for the content.
2)
0)
Preface.................................................................................................................. 0 - 2
0.1)
0.2)
1)
Remarks ................................................................................................................ 0 - 2
Engine serial number............................................................................................ 0 - 2
Safety .................................................................................................................... 1 - 1
1.1)
1.2)
1.3)
2)
3)
4)
5)
6)
Table of contents
Repeating symbols ............................................................................................... 1 - 1
Safety information ................................................................................................. 1 - 1
Technical documentation ...................................................................................... 1 - 4
Table of contents .................................................................................................. 2 - 1
Index ..................................................................................................................... 3 - 1
Index of pages ...................................................................................................... 4 - 1
List of amendments .............................................................................................. 5 - 1
Describtion of design.......................................................................................... 6 - 1
6.1)
6.2)
6.3)
Designation of type ............................................................................................... 6 - 1
Standard engine design ....................................................................................... 6 - 1
Engine components, engine views, numbering of cylinders ................................ 6 - 2
6.3.1)
6.3.2)
6.3.3)
7)
Technical data ...................................................................................................... 7 - 1
7.3)
7.2)
7.4)
8)
Weights ................................................................................................................. 7 - 1
Installation dimensions (all dimensions in mm) .................................................... 7 - 1
Centre of gravity and moments of inertia ............................................................. 7 - 2
Preparations for engine installation .................................................................. 8 - 1
8.1)
8.2)
9)
447 UL SCDI ..................................................................................................... 6 - 2
503 UL DCDI ..................................................................................................... 6 - 3
582 UL DCDI and 582 UL DCDI mod. 99 .......................................................... 6 - 4
Engine preservation ............................................................................................. 8 - 1
Protective covering ............................................................................................... 8 - 2
Engine suspension and position ....................................................................... 9 - 1
9.1)
Definition of attachment points ............................................................................. 9 - 1
9.1.1)
9.1.2)
9.2)
9.3)
10)
Permissible fitting positions .................................................................................. 9 - 2
General directives for engine suspension ............................................................ 9 - 2
Exhaust system ................................................................................................. 10 - 1
10.1)
10.2)
10.3)
11)
503 UL DCDI, 582 UL DCDI and 582 UL DCDI mod. 99 ................................. 9 - 1
447 UL SCDI ..................................................................................................... 9 - 1
Installation of the exhaust system: ..................................................................... 10 - 1
After-muffler system: ........................................................................................... 10 - 2
Exhaust gas temperature (EGT): ....................................................................... 10 - 2
Cooling system .................................................................................................. 11 - 1
11.1)
11.2)
11.3)
Fan cooling (ROTAX 447 UL SCDI, ROTAX 503 UL DCDI) ............................... 11 - 1
Free air cooling (ROTAX 447 UL SCDI, ROTAX 503 UL DCDI) ........................ 11 - 1
Liquid cooling (ROTAX 582 UL DCDI and 582 UL DCDI mod. 99) .................... 11 - 1
11.3.1)
11.3.2)
11.3.3)
11.3.4)
11.3.5)
11.3.6)
11.3.7)
12)
Lubrication system ........................................................................................... 12 - 1
12.1)
12.2)
Mixture lubrication .............................................................................................. 12 - 1
Oil injection for engine lubrication ...................................................................... 12 - 1
12.2.1)
12.2.2)
12.2.3)
d00312
Coolant flow ..................................................................................................... 11 - 1
Cooling liquid temperature ............................................................................... 11 - 1
Anti-freeze additives ........................................................................................ 11 - 1
Cooling system ................................................................................................ 11 - 2
Cooling circuit .................................................................................................. 11 - 3
Cooling circuit .................................................................................................. 11 - 4
Water pump performance diagram and cooling system flow resistance: ........ 11 - 6
Modification no.
-0-
General advice: ............................................................................................... 12 - 1
Technical data and configuration: .................................................................... 12 - 1
Installation ....................................................................................................... 12 - 1
Installation at ROTAX 582 UL DCDI and 582 UL DCDI mod. 99 .................... 12 - 2
Installation at ROTAX 503 UL DCDI ................................................................ 12 - 3
Date
1999 02 01
Preference
INSTALL 447 SCDI, 503 DCDI,
582 DCDI
Page
2-1
13) Rotary valve and water pump drive: ................................................................... 13 - 1
13.1)
13.2)
Oil circuit for engine installation with spark plugs "up": ..................................... 13 - 1
Oil circuit for engine installation with spark plugs "down": ................................. 13 - 2
14)
15)
16)
Gearbox installation and gearbox lubrication ................................................ 14 - 1
Fuel System ....................................................................................................... 15 - 1
Carburetor .......................................................................................................... 16 - 1
17)
Air intake system ............................................................................................... 17 - 1
16.1)
17.1)
17.2)
18)
Carburetor air intake ........................................................................................... 16 - 2
Intake silencer: ................................................................................................... 17 - 1
Air filter ................................................................................................................ 17 - 4
Electric system .................................................................................................. 18 - 1
18.1)
18.2)
18.3)
18.4)
18.5)
General: .............................................................................................................. 18 - 1
Function of the ignition unit: ............................................................................... 18 - 1
Wiring diagram: ................................................................................................... 18 - 2
Lighting circuit: .................................................................................................... 18 - 3
Technical Data and connection of components ................................................. 18 - 3
18.5.1)
18.5.2)
18.5.3)
18.5.4)
19)
Wiring diagram for rectifier regulator 866 080 ................................................. 18 - 3
Wiring diagram for rectifier regulator 264 870 ................................................. 18 - 5
Electronic revolution counter: .......................................................................... 18 - 6
Connection to dual ignition system: ................................................................. 18 - 6
Electric starter ................................................................................................. 18 - 6
Starter relay (992 819) .................................................................................... 18 - 7
Fuse ................................................................................................................. 18 - 7
Battery: ............................................................................................................ 18 - 7
Power source: .................................................................................................. 18 - 7
Propeller drive ................................................................................................... 19 - 1
19.1)
Technical data: .................................................................................................... 19 - 1
19.1.1)
19.1.2.)
“B” type gearbox ........................................................................................... 19 - 1
“C” (CL) - and “E” (EL) type gearbox .......................................................... 19 - 2
20.) Connections for instrumentation ..................................................................... 20 - 1
20.1)
20.2)
20.3)
20.4)
20.5)
Break-in procedure ............................................................................................ 21 - 1
ROTAX® authorized Distributors ...................................................................... 22 - 1
Page
2-2
INSTALL 447 SCDI, 503 DCDI,
582 DCDI
Preference
Date
1999 02 01
Modification no.
-0-
d00312
21)
22)
Sensor for cylinder head temperature (spark plug seat temperature)............... 20 - 1
Air and coolant sensor ........................................................................................ 20 - 1
Exhaust gas temperature sensor ....................................................................... 20 - 2
Installation plan for the sensors at 582 UL DCDI and
582 UL DCDI mod. 99 ........................................................................................ 20 - 3
Installation plan for the sensors at 447 UL SCDI, 503 UL DCDI ....................... 20 - 4
3)
Index
A
F
After-muffler 10 - 2
Air and coolant sensor 20 - 1
Air filter 17 - 3
Air intake 16 - 2, 17 - 1
Anti-freeze 11 - 1
Attachment points 9 - 1
Auxiliary equipment 6 - 1
Fan cooling 11 - 1
Fitting positions 9 - 2
Free air cooling 11 - 1
Fuel System 15 - 1
Fuse 18 - 7
G
Gearbox 14 - 1
B
I
“B” type gearbox 19 - 1
Battery 18 - 7
Break-in procedure 21 - 1
Ignition circuit 18 - 1
Index of pages 4 - 1
Installation dimensions 7 - 1
Instrumentation 20 - 1
Intake silencer 17 - 1
C
“C” (CL) type gearbox 19 - 1
Centre of gravity 7 - 2
Charging coil 18 - 1
Components 6 - 2
Coolant flow 11 - 1
Cooling 11 - 1
Cooling circuit 11 - 3
Cooling liquid temperature 11 - 1
Cylinder head temperature 20 - 1
L
Lighting circuit 18 - 3
Liquid cooling 11 - 1
List of amendments 5 - 1
Lubrication 12 - 1
M
Mixture lubrication 12 - 1
Moments of inertia 7 - 2
D
Denomination of cylinders 6 - 2
Design 6 - 1
Documentation (technical) 1 - 3
Dual carburetor 17 - 1
N
E
Permissible fitting positions 9 - 2
Preface 0 - 2
Preparations for engine installation 8 - 1
Preservation 8 - 1
Preservation (engine) 8 - 1
Propeller drive 19 - 1
Protective covering 8 - 1
protective covering 8 - 1
Numbering of cylinders 6 - 2
P
d00313
“E” (EL) type gearbox 19 - 1
Electric system 18 - 1
Engine components 6 - 2
Engine installation 8 - 1
Engine position 9 - 1
Engine preservation 8 - 1
Engine serial number 0 - 2
Engine suspension 9 - 1, 9 - 2
Engine views 6 - 2
Exhaust gas temperature 20 - 2
Exhaust gas temperature (EGT) 10 - 2
Exhaust system 10 - 1
Modification no.
-0-
Date
1999 02 01
R
Rectifier regulator 18 - 3
Remarks 0 - 2
Revolution counter 18 - 6
Rotary valve 13 - 1
ROTAX® authorized Distributors 22 - 1
Preference
INSTALL 447 SCDI, 503 DCDI,
582 DCDI
Page
3-1
S
Safety 1 - 1
Safety information 1 - 1
Single carburetor 17 - 1
Starter relay 18 - 7
Symbols 1 - 1
T
Table of contents 2 - 1
Technical data 7 - 1
Technical documentation 1 - 3
Triggers 18 - 1
V
Views 6 - 2
W
Page
3-2
INSTALL 447 SCDI, 503 DCDI,
582 DCDI
Preference
Date
1999 02 01
Modification no.
-0-
d00313
Water pump 13 - 1
Weights 7 - 1
Wiring diagram 18 - 2
4)
Index of pages
Chap-
00522
Page
Date
d00314
ter
Chap-
Page
Date
ter
0
0-1
0-2
99 02 01
99 02 01
15
15 - 1
15 - 2
99 02 01
99 02 01
1
1-1
1-2
1-3
1-4
99
99
99
99
16
16 - 1
16 - 2
99 02 01
99 02 01
17
2
2-1
2-2
99 02 01
99 02 01
17
17
17
17
-
1
2
3
4
99
99
99
99
02
02
02
02
01
01
01
01
3
3-1
3-2
99 02 01
99 02 01
18
4
4-1
4-2
99 02 01
99 02 01
5
5-1
5-2
99 02 01
99 02 01
6
6-1
6-2
6-3
6-4
99
99
99
99
18
18
18
18
18
18
18
18
-
1
2
3
4
5
6
7
8
99
99
99
99
99
99
99
99
02
02
02
02
02
02
02
02
01
01
01
01
01
01
01
01
19
19 - 1
19 - 2
99 02 01
99 02 01
20
7
7-1
7-2
99 02 01
99 02 01
8
8-1
8-2
99 02 01
99 02 01
20
20
20
20
99
99
99
99
21
9
9-1
9-2
99 02 01
99 02 01
21 - 1
21 - 2
99 02 01
99 02 01
22
10
10 - 1
10 - 2
99 02 01
99 02 01
11
11
11
11
11
11
11
-
1
2
3
4
5
6
99
99
99
99
99
99
02
02
02
02
02
02
01
01
01
01
01
01
22
22
22
22
99
99
99
99
12
12
12
12
12
-
1
2
3
4
99
99
99
99
02
02
02
02
01
01
01
01
13
13 - 1
13 - 2
99 02 01
99 02 01
14
14 - 1
14 - 2
99 02 01
99 02 01
Modification no.
-0-
Date
1999 02 01
02
02
02
02
02
02
02
02
01
01
01
01
01
01
01
01
Preference
-
-
1
2
3
4
1
2
3
4
INSTALL 447 SCDI, 503 DCDI,
582 DCDI
02
02
02
02
02
02
02
02
01
01
01
01
01
01
01
01
Page
4-1
Page
Date
ter
Page
4-2
Chap-
Page
Date
ter
INSTALL 447 SCDI, 503 DCDI,
582 DCDI
Preference
Date
1999 02 01
Modification no.
-0-
d00314
Chap-
5)
Currt.
no.
d00315
0
List of amendments
Chapter
0÷22
Modification no.
-0-
Pages
all
Date
1999 02 01
Date
of
modifikation
Note
of
approval
99 02 01
not required
Preference
Date of
approval by
authority
Date of
insertion
Marks /
Signature
99 02 01 AA/HeC
INSTALL 447 SCDI, 503 DCDI,
582 DCDI
Page
5-1
Chapter
Page
5-2
Pages
Date
of
modifikation
INSTALL 447 SCDI, 503 DCDI,
582 DCDI
Note
of
approval
Preference
Date of
approval by
authority
Date of
insertion
Date
1999 02 01
Marks /
Signature
Modification no.
-0-
d00315
Currt.
no.
6) Describtion of design
6.1)
Designation of type
Refer to latest version of current Operator’s Manual 447 UL SCDI- 503 UL DCDI -582 UL582 UL DCDI mod. 99.
6.2)
Standard engine design
Refer to latest version of current Operator’s Manual 447 UL SCDI- 503 UL DCDI -582 UL582 UL DCDI mod. 99.
Auxiliary equipment
■ ATTENTION: Any equipment not included as part of the standard engine version and
thus not a fix component of the engine is not in the scope of supply.
Components especially developed and tested for this engine are readily
available at ROTAX®.
▲ WARNING:
This equipment has not been tested for safety and durability to the
standards of aviation. The user assumes all risks possibly arising by
utilizing auxiliary equipment.
☞ Exhaust system
☞ Intake filter
☞ Coolant radiator
☞ Flydat
☞ Electric rev counter
d00316
☞ Hour-meter
Modification no.
-0-
Date
1999 02 01
Preference
INSTALL 447 SCDI, 503 DCDI,
582 DCDI
Page
6-1
6.3)
Engine components, engine views, numbering of cylinders
See fig. 1, 2 and 3.
PTO
power take off side
MS
magneto side
A
points of attachment for engine transport
Cyl. 1
cylinder 1
Cyl. 2
cylinder 2
(1) propeller flange
(6) exhaust socket
(2) propeller gear box
(7) electric starter
(3) intake manifold
(8)
fresh oil lubrication pump
(4) carburetor
(9)
electronic modules of ignition
unit
(5) coolant pump
(10) ignition housing
6.3.1)
447 UL SCDI
4
6
02781
Cyl. 1
Cyl. 2
02782
3
PTO
MS
fig. 1
Page
6-2
INSTALL 447 SCDI, 503 DCDI,
582 DCDI
10
A
Preference
Date
1999 02 01
Modification no.
-0-
d00316
A
6.3.2)
503 UL DCDI
4
6
02780
A
A
Cyl. 1
Cyl. 2
3
2
PTO
MS
9
1
d00316
fig. 2
Modification no.
-0-
Date
1999 02 01
10
02779
7
Preference
INSTALL 447 SCDI, 503 DCDI,
582 DCDI
Page
6-3
6.3.3)
582 UL DCDI and 582 UL DCDI mod. 99
4
3
6
5
02042
8
Cyl. 1
Cyl. 2
9
fig. 3
2
MS
PTO
1
Page
6-4
INSTALL 447 SCDI, 503 DCDI,
582 DCDI
A
10
7
Preference
02043
Date
1999 02 01
Modification no.
-0-
d00316
A
7) Technical data
For technical data and limits of operation refer to the latest revision of the current Operator’s
Manual 447 UL SCDI- 503 UL DCDI- 582 UL DCDI Model 99.
◆ NOTE:
Connecting dimensions, filling capacities, drive and reduction ratios, electric
output etc. can be found in the respective chapter of engine installation.
Z3
C.O.G Reduction gear
with propshaft towards cyl.
Z1
Z2
C.O.G Powerplant
with propshaft towards cyl.
C.O.G Engine
Prop shaft
torwards cyl.
Y3cy
Y2
X3cy
X1
X3ba
X2
X2
Y2
Y1
Y3ba
X3ba
C Engine
X2
X2
Y2
Joint face
gearbox-engine
Prop shaft
C torwards base
C.O.G Reduction gear
with propshaft towards base
A
C.O.G Powerplant
with propshaft towards base
02794
B
fig. 4
C
Z3
Z2
7.2)
X3cy
X1
Y3cy
D
Y2
Y1
Y3ba
G
E
F
C
Z1
Installation dimensions (all dimensions in mm)
Total dimension
447 UL SCDI 503 UL DCDI 582 UL DCDI / mod. 99
max. dimension x axis
543
556
582
max dimension y axis
523
513
437
max dimension z axis
416
374
387
7.3)
02851
Weights
Weight of engine defined to the following conditions:
☞Engine dry from serial production (see chapter description of design)
d00317
Weight of
Modification no.
-0-
electric starter.: ...................................... 3,5
gearbox “B”.: .......................................... 4,5
gearbox “C”.:.......................................... 8,0
gearbox “E”: ......................................... 11,2
generator 220 W DC: ............................ 1,1
2 radiators big (582 only): ..................... 2,2
radiator 995 697 (582 only): .................. 1,0
fresh oil pump (not 447): ....................... 0,1
intake silencer: ...................................... 1,1
after muffler: .......................................... 1,6
Date
1999 02 01
Preference
kg (7,71 lb.)
kg (9,99 lb.)
kg (17,64 lb.)
kg (24,69 lb.)
kg (2,42 lb.)
kg (4,85 lb.)
kg (2,20 lb.)
kg (0,22 lb.)
kg (2,42 lb.)
kg (3,52 lb.)
INSTALL 447 SCDI, 503 DCDI,
582 DCDI
Page
7-1
7.4)
Centre of gravity and moments of inertia
Power Plant
Engine assy with carb and exhaust manifold
Engine type
Carb
447 UL SCDI
503 UL DCDI
582 UL DCDI / mod. 99
1 x BING
ZSV 54/36
1 x BING
ZSV 54/36
2 x BING
ZSV 54/36
Exhaust manifold weight (kg)
Location of C.O.G. (mm) Moment of inertia around axis (kgcm2)
C
E
x1-x1
y1 -y1
z1 - z1
879458
29
148,7
70,5
3411
4430
3854
878936
31,7
146,7
76,5
3777
5530
4197
973122
30,2
154,5
58
3150
4684
4118
02852
Reduction gear assy.
Type of
gearbox
Weight
(kg)
B
C
E
EL
5,3
8,1
11,3
12,4
Location of C.O.G.
(mm)
A
D
92
46
102
37
125
5
144
13,5
Moment of inertia around axis
(kgcm2)
X2-X2
Y2-Y2
Z2-Z2
166
256
184
317
456
315
684
1005
554
682
1186
717
Page
7-2
INSTALL 447 SCDI, 503 DCDI,
582 DCDI
Preference
Date
1999 02 01
Modification no.
-0-
d00317
02975
8) Preparations for engine installation
■ ATTENTION: The stated directives are measures needing your attention at engine installation
to prevent accidents and engine damage.
8.1)
Engine preservation
d00318
See latest revision of the current Operator’s Manual 447 UL SCDI- 503 UL DCDI ,582 UL
DCDI and 582 UL DCDI mod. 99.
Modification no.
-0-
Date
1999 02 01
Preference
INSTALL 447 SCDI, 503 DCDI,
582 DCDI
Page
8-1
8.2)
Protective covering
All openings are protected against ingress of contamination and dampness. It is recommended not to remove these plugs until installation of the specific feed line.
◆ NOTE:
If the engine will be sent to the manufacturer or distributor reuse transport
equipment and replug openings.
List of protective covering:
☞ carburetor inlet: ............................................................. 1 each cover
☞ fresh oil pump: ............................................................... 1 plug
☞ vent screw, gearbox: ..................................................... 1 cap
☞ exhaust: ......................................................................... adhesive tape
Page
8-2
Protective covering to be utilized for transport and at engine installation
only. All shipping and preservation devices must be removed prior to
engine operation.
INSTALL 447 SCDI, 503 DCDI,
582 DCDI
Preference
Date
1999 02 01
Modification no.
-0-
d00318
▲ WARNING:
9) Engine suspension and position
■ ATTENTION: At installation of engine be aware of engine weight and assure careful handling.
The engine suspension is determined essentially by the aircraft design. Four attachment points
are provided on the engine.
▲ WARNING:
9.1)
All four attachments points must be utilized.
Definition of attachment points
9.1.1)
503 UL DCDI, 582 UL DCDI and 582 UL DCDI mod. 99
02862
fig. 5
02863
153 mm
94 mm
9.1.2)
447 UL SCDI
02864
fig. 6
02865
d00319
145 mm
94 mm
▲ WARNING:
The engine suspension must be designed by the aircraft or fuselage
builder such that it will carry safely the maximum occurring operational
loads without exceeding the max. allowable-forces and moments on the
engine attachment points.
▲ WARNING:
Tighten all engine suspension screws as specified by the aircraft builder.
Do not overtighten engine hardware. Follow recommended manufacturers torques.
Modification no.
-0-
Date
1999 02 01
Preference
INSTALL 447 SCDI, 503 DCDI,
582 DCDI
Page
9-1
9.2)
Permissible fitting positions
Take care that all limits of operation are in compliance with the Operator’s Manual and
Installation Manual.
■ ATTENTION: Ensure that the carburetors are positioned vertical in normal flying
position to warrant proper operation of the floats in the carburetor.
9.3)
General directives for engine mounting
Isolation mounts must be used between engine and aircraft frame to neutralize vibrations.
Page
9-2
◆ NOTE:
The engine suspension must be designed to prevent any excessive
engine movement and to minimize noise emission and vibration on air
frame side.
▲ WARNING:
Respect manufacturers recommended torques during engine installation.
INSTALL 447 SCDI, 503 DCDI,
582 DCDI
Preference
Date
1999 02 01
Modification no.
-0-
d00319
Damping elements as generally used in the aircraft industry are suitable.
10) Exhaust system
▲ WARNING:
Considerable effort has gone into the design of the ROTAX exhaust system. Any
changes to the original system may severely deteriorate performance, reliability,
engine life, fuel economy and ability of noise reduction. Improper handling or
modification of the exhaust system as supplied could ruin the engine.
■ ATTENTION: Beware of any accessory systems that advertise an improvement over stock
components.
The exhaust system is tuned for the respective engine and performance and must not be changed.
If modifications are inevitable, then the mid length of inlet tube between exhaust flange and muffler
must be maintained without fail (see ill. 7). For necessary modifications, ask for manufacturer’s
approval in writing. Check engine performance with serial exhaust system, prior to any modification.
Engine
Motor
muffler
Auspufftopf
fig. 7
Auspufftopf
medium length of tube
mittlere Rohrlänge
02049
For engine type 582 UL DCDI 40 with reduced performance and noise emission an exhaust is
offered that consists of items to be fitted by the aircraft manufacturer to suit the aircraft. Consult the
respective parts list for parts needed.
◆ NOTE:
Pay special attention to maintain medium length of tubes. When using bent tubes,
refer to length of centre line.
Engine type
medium length of tube
ROTAX 582, 40 kW
660 mm
(26")
Check exhaust system prior to every flight for tightness, physical damage or changes in sound
pattern. Especially inspect springs and hooks.
10.1) Installation of the exhaust system:
fig. 8
The muffler must be supported on vibration damping blocks. All ball joints must be greased
regularly with heat resistant lubricant (e.g. LOCTITE Anti-Seize, 297 431) to avoid gripping
or seizing of joints and consequent breaking of exhaust components.
Springs used on exhaust system must be secured
against loss and vibration (see Service Information 11
UL 87-E, page 5).
d00320
02795
Modification no.
-0-
Date
1999 02 01
Preference
INSTALL 447 SCDI, 503 DCDI,
582 DCDI
Page
10 - 1
■ ATTENTION: Vibration due to improper suspension is by far the most common reason
for damage to the exhaust system.
▲ WARNING:
Don’t use any sharp tool for removal of the tension spring for reason of
possible damage of spring wire. A hook bent out of a 5 mm Ø bar is the
most suitable tool.
◆ NOTE:
Ensure that exhaust system is properly supported and maintained.
10.2) After-muffler system:
For noise reduction at the tail pipe, an after-muffler can be fitted. This after-muffler will only
slightly affect engine performance and can be clamped to tail pipe of muffler.
At the installation of the after-muffler (1) in final position, drill the two
5,7 mm Ø holes in the bend and muffler end-pipe, for securing
pin (5). The outer situated holes (2) have been already
machined on the serial production line. Remove accumulated chips from the exhaust system.
To ensure lasting fixed position of the aftermuffler during engine operation, the
connections of muffler (3) to bend
(4) and after-muffler (1) are to be
fig. 9
02796
secured against twisting by the securing pin (5).
Fit clamp (6) in the specific position that the Allen screw (7)
prevents the securing pin (5) from dropping out.
02797
fig. 10
10.3) Exhaust gas temperature (EGT):
Exhaust gas temperature will give the most rapid response in the event of improper mixture,
pre-ignition or detonation. Ideally the exhaust temperature should be measured about 100
mm (4 in.) from the piston, with separate sensors for each cylinder.
EGT (max.) = 650 ° (1200 °F)
■ ATTENTION: The exhaust manifold is provided with
tapped holes. If the EGT is not measured the holes must be closed with
screws which must be safety-wired.
fig. 11
Page
10 - 2
INSTALL 447 SCDI, 503 DCDI,
582 DCDI
Preference
Date
1999 02 01
Modification no.
-0-
d00320
02798
11.) Cooling system
11.1) Fan cooling (ROTAX 447 UL SCDI, ROTAX 503 UL DCDI)
The engine driven cooling fan provides sufficient cooIing air, provided that the cooling air
has free access and the hot air is not recirculated to the fan.
On aircraft equipped with engine cowlings the exit must be of sufffcient size and in a low
pressure area allowing the air to cool engine cabin and crankcase.
11.2) Free air cooling (ROTAX 447 UL SCDI, ROTAX 503 UL DCDI)
Means ram air cooling, for engines without fan
In case of a tractor propeller configuration, with the propeller blowing air onto the cylinder(s),
this air stream serves for engine cooling.
On 2-cylinder-engines the air stream must be directed from the exhaust side towards the
carburetor side with suitable ducting (available from ROTAX).
Pusher propeller configurations should not be used with free air cooled engines without
consulting the engine manufacturer (in writing).
11.3) Liquid cooling (ROTAX 582 UL DCDI and 582 UL DCDI mod. 99)
These engines have an integrated water pump. The cooling circuit must be arranged as
shown on the illustrations 12 to 17. Pay attention to the following:
◆ NOTE:
11.3.1)
The 582 UL DCDI mod. 99 has a two way cooling system. (see latest revision
of the current operators manual 447 UL SCDI-503 UL DCDI- 582 UL DCDI
Coolant flow
It should be in the range of 60 - 70 litres/min. at engine r.p.m. 6500 l/min. See
ill. 18.
11.3.2)
Cooling liquid temperature
The radiator must be of sufficient size, and the airstream of sufficient intensity
to maintain the coolant temperature below the maximum permitted value of 80°C
(175 °F~ under the most severe conditions, i.e. at full load operation (= at takeoff).
The average coolant temperature must be 60 - 80°C (140 -175 °F).
In case of a pusher propeller installation, take particular care that coolant
radiator has sufficient air flow.
The max. temperature difference of the coolant between radiator entry and exit
must not exceed 6 °C (11 °F), the average difference must be around 3 and 5
°C (5 and 9 °F).
If temperature limits are exceeded or coolant flow rate is below specified values
(excessive flow resistance), vapour is produced in the cylinder head, causing
cooling break-down and engine damage.
11.3.3)
Anti-freeze additives
d00321
◆ NOTE:
Modification no.
-0-
Date
1999 02 01
Anti-freeze additives reduce the cooling effect. This should be
taken into consideration at choice and installation of the
radiator.
Preference
INSTALL 447 SCDI, 503 DCDI,
582 DCDI
Page
11 - 1
11.3.4)
Cooling system
To avoid coolant pump cavitation, the cooling system must be under pressure.
This is achieved by using a pressure cap with a release pressure of approx. 0,9 bar
(13 psi).
The coolant hoses must be installed in such a way that air and steam bubbles
can escape from any point of the system towards the expansion chamber.
The overflow hose (10) coming from the radiator neck is to be led into a vented
overflow bottle (11) . It should be half filled with coolant. The overflow hose must
reach into the coolant or enter at the bottom of the overflow container.
The overflow bottle should be fitted not lower than 250 mm (10 inch) below the
radiator cap. When the system cools down, the originally displaced liquid is
sucked back through the breather valve in the radiator cap.
Page
11 - 2
INSTALL 447 SCDI, 503 DCDI,
582 DCDI
If the coolant is not sucked back, the cooling system is
faulty and must be checked.
Preference
Date
1999 02 01
Modification no.
-0-
d00321
◆ NOTE:
11.3.5)
Cooling circuit
for engine installation with spark plugs up
02799
02801
fig. 13
fig. 12
02800
fig. 14
d00321
◆ NOTE: illustration shows 582 UL DCDI
1
crankcase
10 overflow hose
2
cylinder
11 overflow bottle
3
cylinder head
12 bottle venting
4
water pump
13 expansion tank
5
radiator
14 cylinder head venting tube
6
hose from radiator to the water pump
15 excess pressure valve
7
hose from cylinderhead to the radiator
16 return valve
8
radiator cap, with excess pressure
valve and return valve
9
temperature gauge for cooling water
Modification no.
-0-
Date
1999 02 01
Preference
INSTALL 447 SCDI, 503 DCDI,
582 DCDI
Page
11 - 3
11.3.6)
Cooling circuit
(for engine installation with spark plugs down)
For this installation position, a vent tube must be connected on top
of the waterpump housing (4) leading to the expansion chamber (10)
or to the water chamber of the radiator.
Vent the cooling system well, check after a short operating period,
and refill coolant as required. Only a perfectly vented cooling system
will operate satisfactorily.
▲ WARNING:
Do not open cooling system until engine has cooled
to outside air temperature, failure to respect this
information will result in severe scalds and injuries.
fig. 15
02802
02804
fig. 17
fig. 16
02803
Page
11 - 4
INSTALL 447 SCDI, 503 DCDI,
582 DCDI
Preference
Date
1999 02 01
Modification no.
-0-
d00321
◆ NOTE: illustration shows 582 UL DCDI
1 crankcase
10 overflow hose
2 cylinder
11 overflow bottle
3 cylinder head
12 bottle venting
4 water pump
13 expansion tank
5 radiator
14 cylinder head venting tube
6 hose from radiator to the water pump
15 excess pressure valve
7 hose from cylinder head to the radiator
16 return valve
8 radiator screw cap, with excess
pressure valve and return valve
9 temperature gauge for cooling water
d00321
fig. 18
Modification no.
-0-
Date
1999 02 01
Preference
INSTALL 447 SCDI, 503 DCDI,
582 DCDI
Page
11 - 5
11.3.7) Water pump performance diagram and cooling system flow
resistance graph:
measured with: Standard 582 UL DCDI with double radiator set
flow
nce
ista
res
Page
11 - 6
INSTALL 447 SCDI, 503 DCDI,
582 DCDI
Preference
Date
1999 02 01
Modification no.
-0-
d00321
02808
12) Lubrication system
If the engine is to be used inverted (with spark plugs pointing down) select a lubricant which
features low carbon deposits. Oil residues tend to drain to low points, i.e. spark plug
cavities. If these residues fail to burn during normal operation, plug fouling will occur,
possibly causing pre-ignition. Producers of suitable lubricants will issue warranty of their
products.
12.1) Mixture lubrication
Refer to latest version of current Operator’s Manual.
12.2) Oil injection for engine lubrication
12.2.1)
General advice:
The oil pump driven by the crankshaft via the pump gear supplies fresh oil for
engine lubrication. The oil pump is a piston type pump with a metering system.
Via diffuser jets in the intake cover or intake socket each cylinder is supplied with
exactly proportioned quantity of two-stroke oil. The oil quantity consumed is
defined by the engine r.p.m and the oil pump lever position. This lever is actuated
via a Bowden cable connected to the throttle cable. The oil flows to the pump
from an oil tank by gravity.
▲ WARNING: In case of fresh oil lubrication the carburetors are supplied with
pure gasoline (no oil/gasoline mixture).
12.2.2)
Technical data and configuration:
Oil:
Super two-stroke oil.
The oil pump assy. features an oil return nipple and two oil exit nipples with
integrated check valve.
12.2.3)
Installation
1 ) Oil tank capacity: The oil tank size should be more than 5 % of the fuel tank
capacity.
2) The oil tank bottom outlet must not be below the oil pump inlet nipple, even
at the greatest possible inclination of the aircraft (i.e. dimension HS must be
greater than zero, see fig. no. 20).
3) Use a firm, oil-resistant suction hose which cannot be squeezed. Secure it
with clamps at the connections.
4) Install an adequate oil filter between oil tank and oil pump.
5) Install a Bowden cable to actuate the pump lever simultaneously with the
carburetors.
■ ATTENTION: At a pump cable breakage or failure. On the ROTAX 582
engine, oil pump is set to minimum discharge. On the
ROTAX 503 engine the oil pump is set to maximum
discharge.
6) Adjustment of oil injection pump alignment marks: At throttle lever idle
position the 2 marks must align (see fig. no. 19).
7) Vent the suction hose before engine start by opening the vent plug (see fig.
no. 19, pos. 9) until all air is vented from that line. Close vent plug carefully.
8) It is recommended to fill the first tank of fuel with a gasoline oil mixture at a
mixing ratio of 100: 1. This is for safety until the complete system is properly
filled with oil.
d00322
◆ NOTE:
Modification no.
-0-
Date
1999 02 01
This oil injection will not affect or replace the rotary valve
gear lubrication nor the reduction gearbox lubrication.
Preference
INSTALL 447 SCDI, 503 DCDI,
582 DCDI
Page
12 - 1
Installation at ROTAX 582 UL DCDI and 582 UL DCDI mod. 99
(1) Engine
(2) Oiltank
(3) Suction hose
(4) Oil pump
(5) Discharge line
(6) Checkvalve
(7) Oil intake port
(8) Adjuster nuts
(9) Venting
(10) Oil filter
02805
Page
12 - 2
INSTALL 447 SCDI, 503 DCDI,
582 DCDI
Preference
fig. 19
fig. 20
02806
Date
1999 02 01
Modification no.
-0-
d00322
◆ NOTE: Oil pump aligning marks for the 503 and 582 are identical.
Installation at ROTAX 503 UL DCDI
02783
fig. 21
(4)
oil tank
(5)
oil filter
(6)
suction hose
(7)
oil pump
(8)
pressure hose
(9)
check valve
d00322
◆ NOTE: The dimension „Hs“ must be
positive (also at descent or
climb).
Modification no.
-0-
Date
1999 02 01
Preference
INSTALL 447 SCDI, 503 DCDI,
582 DCDI
Page
12 - 3
4
5
6
8
Hs
9
7
02807
Page
12 - 4
INSTALL 447 SCDI, 503 DCDI,
582 DCDI
Preference
Date
1999 02 01
Modification no.
-0-
d00322
fig. 22
13) Rotary valve and water pump drive:
In the center of the crankcase a 90 o transfers drive in oil bath is located.
Use 2-stroke motor-oil for the rotary valve drive (same as used for 2-stroke fuel mixture). Oil quantity
on a new installation: approx. 310 cc.
An oil hose leads from the oil tank to the bottom side of the crankcase, and a return line from top
of the gear leads back to the tank for venting (see illustration).
Before every operation check the oil level (approx. mid height of the oil tank). Check oil tubes for
security and condition of connections.
In case of notable oil consumption (more than 1 c.c./hour) look for the leak and check the oil seals
inside the crankshaft, as necessary.
13.1) Oil circuit for engine installation with spark plugs "up":
(1)
(2)
(3)
(4)
(5)
(6)
(7)
(8)
crankcase
cylinder
cylinder head
inlet tube
return line
oil tank
spark plug
vent plug
02809
d00323
fig. 23
Modification no.
-0-
Date
1999 02 01
Preference
INSTALL 447 SCDI, 503 DCDI,
582 DCDI
Page
13 - 1
13.2) Oil circuit for engine installation with spark plugs "down":
In this arrangement the oil system for rotary valve drive and water pump drive must be
modified by the aircraft manufacturer as per the following illustration. The oil tank
installation should not be below the oil inlet tube (4).
■ ATTENTION:
(1)
(2)
(3)
(4)
(5)
(6)
(7)
(8)
For inverted installation, the oil tank must be removed from the
bracket and installed in a suitable location above the engine. Vent
system by removing plug (8) when filling the oil tank (6).
crankcase
cylinder
cylinder head
inlet tube
return line
oil tank
spark plug
vent plug
02810
Page
13 - 2
INSTALL 447 SCDI, 503 DCDI,
582 DCDI
Preference
Date
1999 02 01
Modification no.
-0-
d00323
fig. 24
14)
Gearbox installation and gearbox lubrication
■ ATTENTION: Use only suitable oil.
2
Oil capacity on the new gearbox:
position of installation* B
SZ
330 cm3
300 cm3
SS
gearbox type
C/CL
E/EL
3
200 cm
400 cm3
120 cm3
180 cm3
*see fig. 27
■ ATTENTION: For gearbox installation refer to
SI 9 UL 94 and SI 10 UL 94.
- The gear box can be installed in two basic positions:
SZ = upright with prop shaft towards cylinder
fig. 25
SS = inverted with prop shaft towards engine base
According to position of gear box, fit magnetic plug and sealing
ring (1) (tightening torque 24 Nm = 212 in.lb.) and vent screw
with sealing ring (2) (tightening torque 6 Nm = 53 in.lb.)
1
02811
- Generally replenish oil, until oil emerges at the respective lower oil level plug (3).
■ ATTENTION: The two large ventilation bores (6) on both sides of gear housing
have to remain always open to warrant dissipation of heat.
- Wire-secure vent screw, oil level plugs and drain plug (D).
- With the installation of an EL gear box the tapped holes for radiator support are
transferred from gear box housing to adapter housing.
5
3
4
6
02814
d00324
fig. 26
Modification no.
-0-
Date
1999 02 01
Preference
INSTALL 447 SCDI, 503 DCDI,
582 DCDI
Page
14 - 1
■ ATTENTION: At trial run, check tightness without fail!
- The propeller flange (5) is furnished with 6 tappings M6 and 6 holes each of 6,5 mm and
8,2 mm dia., but screws are not in the supply scope.
■ ATTENTION: With use of ROTAX gear box type “C” (CL) or “E” (EL) the
moment of inertia of the propeller must not be in excess of 6000 kgcm²
(“B” type gearbox: 3000 kgcm²). Enquire for moment of inertia and
have it confirmed by the manufacturer of propeller in writing.
SZ
SS
fig. 27
Page
14 - 2
INSTALL 447 SCDI, 503 DCDI,
582 DCDI
Preference
Date
1999 02 01
Modification no.
-0-
d00324
02812
15)
Fuel System
Schematic arrangement, 1 carburetor version
Schematic arrangement, 2 carburetor version
02941
02940
fig. 28
fig. 29
Fuel contamination is a major cause of engine failure. The best place to avoid contamination is at the source. Once fuel is in your container, a very harzardous potential exists.
Use a clean safety approved storage container. Filter all fuel entering and leaving this
container. Do not over-fill container, allow for expansion.
▲ WARNING:
Gasoline is flammable and explosive under certain conditions. Always
perform fueling procedures in a well ventilated area. Do not smoke or
allow open flames or sparks in the vicinity. Never add fuel while engine
is running.
The carburetor(s) is (are) supplied with fuel by the fuel pump provided with the engine.
The pump is actuated pneumatically via an ,impulse line leading from the nipple on the
crankcase to the fuel pump. This line should not be longer than 500 mm (20 in.) and must
be of stiff and fuel-resistant material.
The fuel pump should be installed in a cool place (not on the engine itself,with the small
drain hole near the impulse connection towards the bottom. This hole drains oil condensate from the pump diaphragm chamber.
If possible, the pump should be located below the fuel tank level.
If the fuel tank is considerably lower than the engine, an electric pump should be used. This
pump is to be connected in parallel as in case of series-connection the fuel pressure would
be excessive.
The electric pump must produce a pressure of minimum 0,2 bar (3 psi), and together with
the pneumatic pump max. 0,5 bar (7 psi) resp. max. 0, 4 bar (6 psi) in case of a diaphragm
carburetor, and must allow free flow-through, even when switched off.
A suitable fuel filter of 0,15 mm mesh size must be fitted between pump and carburetor. Do
not use paper filters. The fuel tank must have a drain cock for condensed water. A screen
of 0,3 mm mesh size should be fitted to the fuel line in the tank. By no means the normal
fuel flow should be restricted.
The fuel lines and impulse line must be of a type to comply with national regulations. The
minimum diameter is 5 mm (0,2 in.).
d00325
If the fuel tank is placed higher than the carburetor, the tank connection must have a fuel
cock (with filter) to shut off the fuel supply when the engine is not running.
Modification no.
-0-
Date
1999 02 01
Preference
INSTALL 447 SCDI, 503 DCDI,
582 DCDI
Page
15 - 1
▲ WARNING: The carburetor needle valve is not sufficient tight to seal for a prolonged
period of time and during transport.
National regulations may require a fuel cock to be fitted even if the fuel tank is below the
carburetor.
Page
15 - 2
INSTALL 447 SCDI, 503 DCDI,
582 DCDI
Preference
Date
1999 02 01
Modification no.
-0-
d00325
The carburetor needle valve is not to be used as a fuel cock.
16)
Carburetor
The carburetor can be adjusted by jet replacement of various approved sizes, and by
adjusting idle air/fuel mixture screw, carb piston stop adjustment, needle sizes, and needle
position.
The air/fuel mixture at idle speed is adjusted by the air adjusting screw. The idle r.p.m. is
adjusted by the carburetor piston adjustment screw.
◆ NOTE:
These idle adjustments interact, so adjusting one may require minor
adjustment of the other.
◆ NOTE:
On single carb engines, the carburetor must be in an exact right angle
position in relation to the crankshaft in both views from top and from the
intake side to ensure an equal mixture distribution to both cylinders (see
ill. below).
Replacement of parts should be done only after proper trouble shooting has been carried
out and then, by an experienced two cycle mechanic.
Ensure that throttle cable and linkage do not stick and that carb piston valve can be fully
opened and closed . Minor cable backlash can be adjusted at cable adjustment screw and
lock nut.
Be certain that throttle linkage is not affected by engine or airframe movement. This will
change throttle settings.
Air intake filtration and/or noise reduction devices must be in place for proper carburation.
See section on special operating conditions.
Special operating conditions, such as severe climate or altitude change may require
different jetting. Contact your dealer.
02813
02815
d00326
fig. 30
Modification no.
-0-
Date
1999 02 01
Preference
INSTALL 447 SCDI, 503 DCDI,
582 DCDI
Page
16 - 1
In no case should jet changes be made by unqualified persons or those who do not have
ROTAX technical information to do so.
16.1)
Carburetor air intake
The carburetor air intake must be protected against the ingestion of water, dirt
and foreign material. Use a Rotax approved air filter. Avoid paper, foam and
synthetic material types that absorb water.
Equal air pressure conditions must prevail in the vicinity of the carburetor air
intake and the carburetor float chamber vent pipes (i.e. the pressure must not
be influenced by the propeller air stream).
02816
Ausgleichbohrungen für Vergaser-Entlüftung
compensation bores for carburetor venting
fig. 31
If necessary, the carburetor intake should be shielded against effects of the
slipstream by a sheetmetal shield or air intake box, and the carburetor vent
pipes should be routed to a calm air zone or connected to a vent chamber (see
sketch below).
Engines supplied with an intake silencer must not be operated without it unless
the carburetor calibration is altered. Consult the engine supplier or manufacturer (in writing)for details.The correct carburetor calibration is also described
in the parts list.
If the aircraft is to be operated in climatic conditions where carburetor icing is
likely to occur, a heating system must be fitted.
Page
16 - 2
INSTALL 447 SCDI, 503 DCDI,
582 DCDI
Preference
Date
1999 02 01
Modification no.
-0-
d00326
No modifications should be made to the carburetor and air intake system without
consulting the engine manufacturer (in writing).
17)
Air intake system
17.1)
Intake silencer:
ROTAXâ offers intake silencers as an option. Intake silencer for single and dual
carbs are available from ROTAX.
■ATTENTION: At employment of an intake silencer a different carburetor
jetting will be necessary.
Ø 117
DUAL CARBURETOR VERSION
ROTAX
02817
fig. 32
SINGLE CARBURETOR VERSION
175
12
Ø 117
180
232
7
12
02818
140
255
390
fig. 33
d00327
■ ATTENTION: Weight of silencer must not influence position of carburetor. If
need be, support silencer accordingly.
Modification no.
-0-
Date
1999 02 01
Preference
INSTALL 447 SCDI, 503 DCDI,
582 DCDI
Page
17 - 1
Fit silencer parallel to crankshaft axis with screw-on filter (2) not pointing towards propeller.
The double intake silencer is available with either left or right hand side inlet opening, to suit
respective position.
3
2
3
F ET Y
E
B
IRE
ER
D
MU
ST
W
SA
AIR
F
ILT
02955
1
fig. 34
3
TAX
RO
6
B038A
fig. 35
02954
Page
17 - 2
INSTALL 447 SCDI, 503 DCDI,
582 DCDI
Preference
Date
1999 02 01
Modification no.
-0-
d00327
With the silencer on a single carburetor engine, pay special attention when fitting, as with
an inclined silencer the intake situation is unsymmetrical, thus badly influencing mixture
distribution possibly leaning down one cylinder, leading to a rise of combustion temperature and finally to piston seizure.
02953
fig. 36
Fitting position 1
Fitting position 2
Fitting position 3
Fitting position 4
Position 1 would be best. Positions 3 and 4 are also acceptable, but avoid unfavourable
position 2.
d00327
▲ WARNING:
Modification no.
-0-
Date
1999 02 01
Screw-on filter and silencer must be wire-secured against slackening and
loss on the assigned lug (3).
Preference
INSTALL 447 SCDI, 503 DCDI,
582 DCDI
Page
17 - 3
17.2)
Air filter
Only air filters approved by ROTAX are permitted for use. The air filters specified
by ROTAX are special K & N air filters. Dry filter elements of paper are not
allowed for humid operating conditions, as they absorb water, thus reducing the
air intake leading to enrichment of the fuel/air mixture.
Two kinds of filter design are applied on these engines:
- Single air filter
- Double air filter
With 2 carburetors on engine, either 2 single air filters or 1 double air filter may
be fitted.
■ WARNING:
Always secure air filters against loss.
AIR
Y WIRE
S
D
ET
AF
E
AIR F
ILTER
M
U
S
T
B
X
TA
RO
B4
B020
02820
FILT
ER M
UST
BE S
AFE
TY W
IR
R O
T A
X
DO8
ED
4A6
fig. 37
Page
17 - 4
INSTALL 447 SCDI, 503 DCDI,
582 DCDI
Preference
Date
1999 02 01
Modification no.
-0-
d00327
02819
18)
Electric system
18.1)
General:
The engine is equipped with a breakerless 12V 170W DUCATI capacitordischarge dual ignition system. It consists of a flywheel magneto generator, 2
double ignition coils complete with integrated control-circuit and 2 external
trigger coils (pick-up).
The 12-pole flywheel generator is an outer rotor type with 12 integrated
permanent magnets. The stator is equipped with 12 coils. 8 of them are used for
feeding auxiliary equipment and 4 are used for the dual ignition. The grey cable
is foreseen for connection of a revolution counter.
18.2)
Function of the ignition unit:
Two charging coils fitted on the generator stator and independant from each
other each feed one ignition circuit. The energy supplied is stored in the ignition
capacitor. At the moment of ignition the external trigger coils supply an impulse
to the control circuits and the ignition condensors are discharged via the primary
winding of the ignition coil. The secondary winding supplies the high voltage for
the ignition spark.
d00328
■ ATTENTION: When flying both ignition systems must be switched ON.
Modification no.
-0-
Date
1999 02 01
Preference
INSTALL 447 SCDI, 503 DCDI,
582 DCDI
Page
18 - 1
18.3)
Wiring diagram:
◆ NOTE:
When replacing wiring on the ignition system, connections
must be as per wiring diagram below.
1
Electronic box
6 charging cable, green
10 rev.counter cable, gray
2
eight lighting coils
7 charging cable, white
11 mass cable, brown
3
four charging coils
8 shorting cables, black/yellow 12 ignition cables
4
pickup
9 lighting cables, yellow-
5
trigger cable, red
yellow/black
13 spark plug connectors
14 spark plugs
15 shrink tube
After installing, all the connections must be protected with the supplied shrink
tubing.
◆ NOTE:
Wiring diagram shows DCDI ignition.
15
02821
02822
Page
18 - 2
INSTALL 447 SCDI, 503 DCDI,
582 DCDI
Preference
Date
1999 02 01
Modification no.
-0-
d00328
fig. 38
18.4)
Lighting circuit:
In the stator 8 lighting coils are incorporated. The output is 170W A.C. at 6000
l/min. This alternating current can be used directly to feed A.C. consumers, or
via a rectifier-regulator for loading a battery and feeding direct current consumers.
To avoid the voltage to rise above permissible levels, a voltage regulator must
be used.
To operate loads requiring direct current (e.g. charging battery), a rectifierregulator is required.
A rectifier-regulator, part no. 866 080, is available. As a power supply for lights
only. This rectifier-regulator can be used without a battery. In this case the
regulated RMS voltage will be between 11 and 12 Volts as long as a minimum
load of 1 amp is provided.
If a battery is used it must be capable of absorbing approx. 1 amp. minimum
continuous charging load, even with full charge (suggested minimum battery
capacity: 9 amp.h, resp. 16 amp.h with electric starter). Regulated voltage is
13.5 to 14.5 volts.
When using 3-phase rectifier-regulator 264 870 no minimum load is required.
18.5)
Technical Data and connection of components
18.5.1)
Wiring diagram for rectifier regulator 866 080
■ Attention:
To avoid excessive voltage in conjunction with the
rectifier regulator 866080, a constant minimum
wiring diagram in a circuit w i t h o u t battery
02825
d00328
fig. 39
Modification no.
-0-
Date
1999 02 01
Preference
INSTALL 447 SCDI, 503 DCDI,
582 DCDI
Page
18 - 3
02824
fig. 40
fig. 41
INSTALL 447 SCDI, 503 DCDI,
582 DCDI
Preference
Date
1999 02 01
Modification no.
-0-
d00328
Page
18 - 4
02823
ballast load of 1 amp is required (example: lamp 12
V 15 W).
fig. 42
02828
fig. 43
02827
fig. 44
d00328
02826
Modification no.
-0-
Date
1999 02 01
Preference
INSTALL 447 SCDI, 503 DCDI,
582 DCDI
Page
18 - 5
18.5.2)
Wiring diagram for rectifier regulator 264 870
(not limited to minimum of 1 Ampere consumption)
18.5.3)
Electronic revolution counter:
The revolution counter, part no. 966 404, has been specifically
designed to be connected to the 12 pole flywheel generator used on
the Ducati CDI Systems.
The revolution counter measures the frequency of the pulses provided by one of the transducers supply winding where it is connected.
It does not require any external power supply. It is connected by two
wires without polarity.
The indicating range comes up to 8000 r.p.m. The weight is 235
gram.
Connection to dual ignition system:
02960
fig. 45
The generator integrated in the DUCATI dual ignition has a special
gray cable for revolution counter connection. The revolution counter
966 404 must be fitted between the gray cable and mass (brown
cable).
The tachometer will indicate correct RPM even if one of the two
ignition systems is turned off for ignition testing procedure or a
transducer failure occurs.
Maximum allowed deviation: +/- 100 1/min
Page
18 - 6
Electric starter
Two types of electric starters can be fitted to ease starting procedures
especially in flight.
INSTALL 447 SCDI, 503 DCDI,
582 DCDI
Preference
Date
1999 02 01
Modification no.
-0-
d00328
18.5.4)
Electric starter fitted on “E” type gearbox. There is also the possibility
to use a rewind start.
Electric starter fitted on magneto side. For use with engines utilizing
ROTAX gear reduction unit,however, this electric starter system
prevents recoil start capability.
Battery:
BLANK PAGE
consumers
fuse
battery
12V 16 Ah (min.)
fuse 16A
B
DC
M
starter
button
S
E
starter relay
electric starter
fig. 46
d00328
02829
Modification no.
-0-
Date
1999 02 01
Preference
INSTALL 447 SCDI, 503 DCDI,
582 DCDI
Page
18 - 7
To ensure reliable starting, a battery of least 16 Ah (high-discharge
battery) must be utilized. A higher battery amp- hour-rate would be
preferable. Cables supplying power to the starter from the battery
and to ground should be a minimum 10 mm2 flexible multi-strand
cable.
Power source:
from rectifier regulator
Starter relay (992 819)
Starter control should be via starter relay (supplied with starter kit)
wired as shown above.
Page
18 - 8
INSTALL 447 SCDI, 503 DCDI,
582 DCDI
Preference
Date
1999 02 01
Modification no.
-0-
d00328
Fuse
A 16 Amp fuse must be installed between battery charging circuit and
main power terminal.
19)
Propeller drive
▲ WARNING:
Never run the engine without a propeller installed as engine would suffer
severe damage by overspeeding.
Never fit propeller directly on crankshaft.
Normally, the propeller gearbox will be supplied and installed on the engine. If the gearbox
is delivered seperately take note of the gearbox installation instructions in chapter 14).
19.1)
Technical data:
-
direction of rotation of the prop flange: clockwise, looking towards face of
flange
ø25,4 -0,1
19.1.1)
“B” type gearbox
Reduction ratio:
2,0 / 2,24 / 2,58
Attachment holes on propeller flange
6
15
11,7
8
89
M
75
d00329
fig. 47
Modification no.
-0-
Date
1999 02 01
02840
Preference
INSTALL 447 SCDI, 503 DCDI,
582 DCDI
Page
19 - 1
19.1.2.)
“C” (CL) - and “E” (EL) type gearbox
Reduction ratio:
2,62 / 3,0 / 3,47 / 4,0
Attachment holes of propeller flange
8
Ø 6,5 +0,1
M
5
12
LK=Ø
100
Ø114
ø25,4 -0,1
LK=Ø
75
,2
Ø8
15
+0,
fig. 48
Page
19 - 2
INSTALL 447 SCDI, 503 DCDI,
582 DCDI
Preference
Date
1999 02 01
Modification no.
-0-
d00329
02841
20.)
Connections for instrumentation
20.1)
Sensor for cylinder head temperature (spark plug seat temperature)
- location and connection ....................... one each per cylinder fastened by
one spark plug (see also section 10.3)
Tightening Torque of spark plug:
15 Nm (133 in.lB.)
fig. 49
01005
20.2)
Air and coolant sensor
location and connection coolant:
only at 582 UL DCDI and 582 UL DCDI
mod. 99 on cylinderhead
Air: .................................................... location free to choose
Tightening Torque:
6 Nm (53 in.lB.) +
LOCTITE Anti Seize
fig. 50
d00330
01004
Modification no.
-0-
Date
1999 02 01
Preference
INSTALL 447 SCDI, 503 DCDI,
582 DCDI
Page
20 - 1
20.3)
Exhaust gas temperature sensor
location and connection .................... Exhaust manifold assy
01002
Tightening Torque:
20 Nm (177 in.lB.) +
LOCTITE Anti Seize
Page
20 - 2
INSTALL 447 SCDI, 503 DCDI,
582 DCDI
Preference
Date
1999 02 01
Modification no.
-0-
d00330
fig. 51
20.4)
Installation plan for the sensors at 582 UL DCDI and
582 UL DCDI mod. 99
fig. 52
01008
1) Sensor at spark plug seat (CHT)
2) Air- and liquid temperature sensor
3) EGT- sensor
d00330
4) Sealing ring
Modification no.
-0-
Date
1999 02 01
Preference
INSTALL 447 SCDI, 503 DCDI,
582 DCDI
Page
20 - 3
20.5)
Installation plan for the sensors at 447 UL SCDI, 503 UL DCDI
1) Sensor at spark plug seat (CHT)
2) Air- and liquid temperature sensor
3) EGT- sensor
Page
20 - 4
INSTALL 447 SCDI, 503 DCDI,
582 DCDI
Preference
Date
1999 02 01
Modification no.
-0-
d00330
4) Sealing ring
21)
Break-in procedure
for aircraft installation (in other applications proceed accordingly)
The break-in must be performed with the engine installed, and properly loaded with
matched propeller for max. R.P.M. In case of an aircraft, anchor the fuselage to the
ground. Run the engine according to the following graph:
engine
rpm x
1000
10
sec
max. rpm
refer to OM
15
sec
20
sec
30
sec
1 2
min min
3
min
1
5,5
5
1
5,0
5
4,5
5
5
5
5
02854
4,0
5
3,5
5
5
3,0
2,0
1
1
1
1
1
1
1
1
2
1,0
0
10
fig. 54
20
30
40
50
60
time (min.)
On a liquid cooled engine it is possible that the cooling air flow (speed) on ground is not
enough to provide adequate cooling for extended periods of time. Therefore, it is
necessary to observe carefully the temperature of the cooling liquid during break-in
procedure to avoid overheating. Before exceeding the maximum allowed cooling temperature on cylinder head (outlet) of 80 O C/180 O F interrupt the run-in and cool down the engine
at idle for approximately one minute and continue the run from where it was interrupted.
d00331
On a free air engine it is possible that the cooling air flow on ground is not enough to
provide the necessary cooling for extended periods of time. Therefore, it is necessary to
observe carefully the cylinder head temperature (CHT) during the break-in procedure and
avoid overheating. Before exceeding the maximum allowed CHT of 250 O C / 480 O F
interrupt the run and cool down the engine at idle for approximately one minute and
continue the run from where it was interrupted.
Modification no.
-0-
Date
1999 02 01
Preference
INSTALL 447 SCDI, 503 DCDI,
582 DCDI
Page
21 - 1
Be sure to use a safe run-up area, to anchor aircraft at those points approved by the
airframe manufacturer, and to have someone present who is able to shut off the engine
instantly and to prevent unauthorized people entering the danger area.
Proper clothing, ear protection etc. should be used on any engine run-up test.
Page
21 - 2
INSTALL 447 SCDI, 503 DCDI,
582 DCDI
Preference
Date
1999 02 01
Modification no.
-0-
d00331
After this procedure the idle must be adjusted (see also latest revision of the current
Maintenance Manual 447-503-582). Then proceed with taxi test to verify proper cooling
system. Then short take offs can be conducted. After a few short full-load take-offs, but not
later than 2 hours total running time, the cylinder head nuts must be re-torqued to 22 Nm
(195 in.lb.). For this procedure the cylinder cowl (if any) must be taken off.
22)
ROTAX® authorized Distributors
for ROTAX® Aircraft Engines
Edition 1999 01 02
1) E U R O P E
AUSTRIA:
GREAT BRITAIN / IRELAND / ICELAND:
➤ HB - FLUGTECHNIK GES.M.B.H.
Dr. Adolf Schärf Str. 44
A-4053 HAID
Tel.: 07229 / 79104/79117, Fax: 07229 / 79104 15
Contact person: Ing. Heino Brditschka
BULGARIA:
➤ GERGANOV - AIRCRAFT EINGINES LTD.
25B-Post 20, 23 peh. Shlp. polk Blvd.
BG-6100 KAZANLAK
Tel.: 431 / 27 247, Fax: 431 / 23 777
Contact person: Radosslav D. Gerganov
CROATIA / former YUGOSLAVIA
(except SLOVENIA):
ITALY / MALTA:
➤ ICARO MOTORI S.R.L.
Via Emilia, 61/B
I-27050 REDAVALLE (PV)
Tel.: 0385 / 74 591, Fax: 0385 / 74 592
E-mail: [email protected]
Contact person: Corrado Gavazzoni
➤ TEVESO S.R.O.
Skroupova 9441
CS-50002 HRADEC KRALOVE
Tel.: 049 / 56 30 127, Fax: 049 / 56 30 226
E-mail: [email protected]
Contact persons: Ing. Samal / Ing. Halek
POLAND:
DENMARK / THE NETHERLANDS:
➤ FASTON LTD.
ul. Szeroka 2
PL-05-860 PLOCHOCIN
Tel.: 22 / 722-5858; Fax: 22 / 840-0196
Contact person: Wojtek Madry, Manager
➤ FLIGHT-CENTER
Flugplatz
D-27777 GANDERKESEE, GERMANY
Tel.: 04222 / 3789, Fax: 04222 / 6042
E-mail: [email protected]
Contact person: Robert Heilig
ROMANIA:
➤ S.C. BERIMPEX S.R.L.
Str. Dr. Taranu Grigore No. 8, Ap. 2, Sector 5
R-76241 BUCHAREST
Tel.: 1-410 90 03; Fax: 1-410 9020
E-mail: [email protected]
Contact person: Dr. Christian Berar
FINLAND / NORWAY/ SWEDEN/
ESTONIA/ LATVIA / LITHUANIA
➤ BOMBARDIER NORTRAC LTD.
Box 8039, FIN-96101 ROVANIEMI
Tel.: 16 320 8111; FAX: 16 320 8200
E-mail: [email protected]
Contact person: Tommi Ristimella
SLOVAKIA:
➤ TEVESO S.R.O.
Skroupova 441
CS-50002 HRADEC KRALOVE
Tel.: 049 / 56 30 127, Fax: 049 / 56 30 226
E-mail: [email protected]
Contact persons: Ing. Samal / Ing. Halek
FRANCE / BELGIUM / MONACO /
LUXEMBURG:
➤ MOTEUR AERO DISTRIBUTION
11 Blvd Albert 1
98000 MONACO
Tel.:7 93 30 17 40, Fax: 7 93 30 17 60
E-mail: [email protected]
Contact person: Patrick Coyette
SLOVENIA:
GERMANY:
for postcodes 0-5-6-7-8-9:
➤ FRANZ AIRCRAFT ENGINES VERTRIEB GMBH
Am Eckfeld 6e, D-83543 ROTT AM INN
Tel.: 08039 / 90350, Fax: 08039 / 9035-35
E-mail: [email protected]
Contact person: Eduard Franz
for postcodes 1-2-3-4:
➤ FLIGHT-CENTER
Flugplatz
D-27777 GANDERKESEE
Tel.: 04222 / 3789, Fax: 04222 / 6042
E-mail: [email protected]
Contact person: Robert Heilig
d00332
➤ KINISI
Ellis 1 str. , GR-14563 KIFISSIA
Tel.: 01 / 620 8611; Fax: 01/ 625 0026
Contact person: Michael Poulikakos
Nick Siganos
➤ HALLEY
Baktai út 45, P.O. Box 425
H-3300 EGER
Tel.: 36 / 313-830, Fax: 36 / 320-208
CZECHIA:
Date
1999 02 01
GREECE / CYPRUS:
HUNGARY:
➤ SHAFT D.O.O.
B.L. Mandica 161 a
HR-54000 OSIJEK
Tel. + Fax:031 / 280-046
Contact person: Ing. Ivan Vdovjak
Modification no.
-0-
➤ SKYDRIVE LTD.
Burnside, Deppers Bridge
LEAMINGTON Spa. CV 33 OSU
Tel.: 1926 / 612 188, Fax: 1926 / 613 781
E-mail: [email protected]
Contact person: Nigel Beale
Preference
➤ PIPISTREL d.o.o.
Strancarjeva Ul. 11
5270 AJDOVSCINA
Tel. 065 63 873, Fax: 065 61 263
E-mail: [email protected]
Contact person: Ivo Boscarol
SPAIN / PORTUGAL:
➤ AVIASPORT S.A.
Almazara 11
E-28760 TRES CANTOS (MADRID)
Tel.: (91) 803 77 11, Fax: (91) 803 55 22
E-mail: [email protected]
Contact person: Mariano de Castro
INSTALL 447 SCDI, 503 DCDI,
582 DCDI
Page
22 - 1
SWITZERLAND / LIECHTENSTEIN:
➤ FRANZ AIRCRAFT ENGINES VERTRIEB GMBH
Am Eckfeld 6e, D-83543 Rott am Inn, GERMANY
Tel.: 08039 / 90350, Fax: 08039 / 9035-35
E-mail: [email protected]
Contact person: Eduard Franz
TURKEY:
➤ KLASIK HALI A.S.
Klasik Hali is Merkezi, Bozkurt Caddesi No. 25/A
35230 Kapilar / IZMIR TURKEY
Tel.: (232) 441 4911; Fax: (232) 445 1285
Contact person: Tahir Önder, President
2) A M E R I C A
CANADA:
➤ ROTECH RESEARCH CANADA, LTD.
6235 Okanagan Landing Rd.
VERNON, B.C., V1H 1M5, Canada
Tel.: 250 / 260-6299, Fax: 250 / 260-6269
E-mail: [email protected]
website: www.rotec.com
NORTH / MIDDLE / SOUTH AMERICA:
➤ KODIAK RESEARCH LTD.
P.O. Box N 7113
Marlborough House Cumberland Street
NASSAU, BAHAMAS
Tel.: 242 / 356 5377, Fax: 242 322 6784
E-mail: [email protected]
website: www.kodiakbs.com
3) A U S T R A L I A
➤ AIRCRAFT ENGINE DISTRIBUTORS PTY. LTD.
P.O. Box 84, Boonah, QLD. 4310
Tel.: 07 5463 2755, Fax: 07 5463 2987
E-mail: [email protected]
Contact person: Jim Fenton
➤ BERT FLOOD IMPORTS PTY. LTD.
P.O. Box 61, LILYDALE, VICTORIA 3140
Tel.: 03 / 9735 5655, Fax: 03 / 9735 5699
E-mail: [email protected]
Contact person: Bert Flood
NEW ZEALAND:
➤ TIPPINS INTERNATIONAL
P.O. Box 192, Tuakau
SOUTH AUCKLAND
Tel.: 09 / 233 - 4898, Fax: 09 / 233 - 4798
E-mail: [email protected]
Contact person: Murray Tippins
4) A F R I C A
CHINA / HONG KONG / MACAO:
➤ DUEN MU CO.
Flat A, 3/F, Kam Meng Fung
Industrial Building,
6 Hong Man Street, Chai Wan,
HONG KONG
Tel.: 2756 5725, Fax: 2754 4774
E-mail: [email protected]
Contact person: W. C. Choi
CIS:
➤ AVIAGAMMA JSCo.
P.O. Box 51, 125 057 MOSCOW
Tel.: 095 / 158 31 23, Fax: 095 / 158 6222
E-mail: [email protected]
Contact person: Vladimir Andriytschuk
General Director
INDIA:
➤ GREAVES LIMITED
22-A, Janpath
NEW DELHI - 110 001
Tel.: 11/338 50 61/338 26 53 (Dir.), Fax:11/37 82 553
Tlx.: 031-62663
E-mail: [email protected]
Contact person: Wg Cdr S.N. Chhabra
Divisional Manager
INDONESIA / MALAYSIA / PHILIPPINES /
SINGAPORE / THAILAND:
➤ TPA PTE LTD.
12 Little Road, #02-01/02
Lian Cheong Industrial Building
Singapore 536986
Tel.: (65) 289 8022
Fax: (65) 289 1011
E-mail:[email protected]
Contact person: Chan Nyuk Lin
IRAN:
➤ TASHAR CO. LTD.
54 Khaled Eslamboli Ave., TEHERAN 15117
Tel.: 21 / 871 4787 / 872 3222, Fax: 21 / 872 2260
Contact persons: Morthesar Sadjat
Jusufi Nejadan
ISRAEL:
➤ CONDOR-AVIATION INDUSTRIES LTD.
P.O. Box 1903, 14 Topaz st.
Cesaria 38900
Tel.:06 / 6265080, 90 / 50-290189
Fax: 06 / 62650 95
E-mail: [email protected]
Contact person: David Viernik
JAPAN:
➤ SALEM BALLOONS
40 Talaat Harb St., CAIRO
Tel.: (2) 2991 946 / (2) 3038 214, Fax: (2) 3038 214
E-mail: [email protected]
Contact person: Weaam Salem, General Manager
ANGOLA / BOTSWANA / LESOTHO /
MADAGASCAR / MALAWI /
MOZAMBIQUE / NAMIBIA / SOUTH
AFRICA / SWAZILAND / ZAMBIA /
ZIMBABWE:
➤ AVIATION ENGINES ANDACCESSORIES (PTY)
LTD
Private Bag X10021, Edenvale 1610, South Africa
Tel.: 011 / 455 4203/4/5/6/9, Fax: 011 / 455 4499
E-mail: [email protected]
Contact person: Mike Blyth
INSTALL 447 SCDI, 503 DCDI,
582 DCDI
➤ JUA, LTD.
1793 Fukazawa, Gotemba City
SHIZUOKA PREF 412
Tel.: 550 / 83 8860, Fax: 550 / 83 8224
Contact person: Yoshihiko Tajika, President
KOREA:
➤ HWA YOUNG MEDICAL & SCIENCE CO.
Office address:
401 KeumKang Building
1439-1, Seocho 1 dong, seocho-ku, SEOUL 137-071
Tel.: 02 / 3472-0271-5,
Fax: 02 / 3472-0276 (02/3471-4753)
Contact person: John Lee, President
Mailing address:
SL Kang Nam
P.O. Box 918, SEOUL
Preference
Date
1999 02 01
Modification no.
-0-
d00332
EGYPT:
Page
22 - 2
5) A S I A
PAPUA NEW GUINEA:
➤ BERT FLOOD IMPORTS PTY. LTD.
P.O. Box 61, LILYDALE, VICTORIA 3140
AUSTRALIA
Tel.: 03 / 9735 5655, Fax: 03 / 9735 5699
E-mail: [email protected]
Contact person: Bert Flood
TAIWAN:
➤ TAIWAN MAXIEM INDUSTRIES
7/1 Tung Feng Street, TAIPEI, 10 651
Tel.: 2 / 2704 6163, Fax: 2 / 2702 84 85
Contact person: Lester Lin
UNITED ARAB. EMIRATES:
d00332
➤ AL MOALLA
P.O. Box 7787
ABU DHABI
Tel.: 2 / 723 248, Fax: 2 / 788 073
E-mail: [email protected]
Contact person: Hussain Al Moalla
Modification no.
-0-
Date
1999 02 01
Preference
INSTALL 447 SCDI, 503 DCDI,
582 DCDI
Page
22 - 3
INSTALL 447 SCDI, 503 DCDI,
582 DCDI
Preference
Date
1999 02 01
Modification no.
-0-
d00332
Page
22 - 4