1
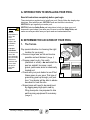
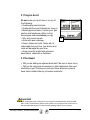
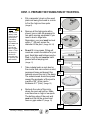
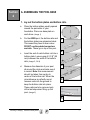
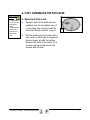
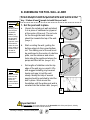
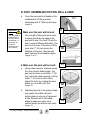
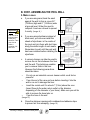
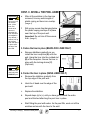
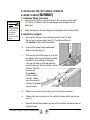
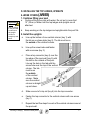
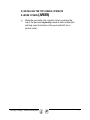
97-0753
Aboveground Pool Installation Manual
This manual must be left with the pool owner
www.wilbargroup.com
Section
1
GENERAL INSTRUCTIONS – ROUND POOL
GROUND PREPARATION
Safety Rules for Pool Owners
Your pool contains a large quantity of water, and is deep enough to present inherent dangers to
life and health unless the following safety rules are strictly observed. First-time users run the
highest risk of injury. Make sure everyone understands all safety rules before entering the pool.
Post no diving and no jumping signs beside the pool.
For additional safety information please consult Section 3.
1. No Jumping or Diving
The top rail of your pool is not a walkway and must not be used for jumping or diving. Do not
permit jumping or diving into the pool from a deck or the top rail of the pool. Diving or jumping
into the pool can result in serious injury.
2. Never use the Pool Alone
Never permit the pool to be used unless it is attended by at least one person other than the
bather. Someone should always be available to lend assistance in an emergency.
3. Never Leave Children Unattended
Never leave a child alone and unsupervised in or near the pool—not even for a second. There is
no substitute for constant adult supervision.
4. No “Rough-housing”
Do not permit “rough-housing” in and around your pool. Surfaces can become slippery and
hazardous when wet.
5. Light the Pool at Night
If the pool is used after dusk, adequate lighting must be provided. Illumination in the pool area
must be sufficient to clearly judge pool depth and all features in and around the pool. For
lighting recommendations, consult your local licensed electrical contractor.
6. Restrict Access to the Pool
Do not leave chairs or other furniture beside the pool that could be used by a child to climb up
into the pool. Ladders must be removed whenever the pool is unattended. A fence with a
lockable gate around the pool or yard is strongly recommended and may be required by law in
some jurisdictions.
7. No Alcohol or Drugs
The use of alcohol or drugs does not mix with pool activities. Persons who have been drinking
alcohol or using any drugs should not be allowed in the pool, and should be carefully supervised
in the surrounding area.
8. Keep Your Pool Clean and Sanitary
Your filter system will remove suspended particles from the water and the surface skimmer will
remove insects, leaves and other debris from the water surface. Use the correct pool chemicals
as directed to destroy harmful bacteria and prevent formation of algae. Remember, unsanitary
water is a serious health hazard.
No Diving or Jumping. Observe all Safety Rules.
2
A. INTRODUCTION TO INSTALLING YOUR POOL
Read all instructions completely before you begin.
Important
Note:
Ground
preparation is
one of the
most
important
steps in the
installation
process.
A proper
foundation
will ensure the
rest of the
pool assembly
goes smoothly
and that no
problems will
occur when
the pool is
filled with
water.
These instructions explain how to install your pool. Simply follow the step-by-step
directions. Start with this part, SECTION 1 and use the other instructions,
SECTION 2 to put together your entire pool.
SECTION 3 also has Safety Rules and instructions to help you keep your pool
clean and in good shape, year after year. Be sure to read the Safety Rules, and
make sure everyone who uses your pool reads and understands them.
B. DETERMINE THE LOCATION OF YOUR POOL
1. The Terrain
Pay special attention to choosing the right
location for your pool:
• Choose a large area, as flat and level as
possible and well drained. (Image 1)
• Choose a spot on dry, firm earth
(stabilizer or other)—do not install the
pool on asphalt, tar paper, sand,
gravel, peat moss, wood or chemically
treated soil.
• Check with your pool dealer to see if Nut
Grass grows in your area. This type of
grass may grow up through your pool
liner. Your dealer will be able to advise
how best to treat the site.
• Sloped areas will need to be made level
by digging away high spots, not by
filling low spots—be prepared to hire
earth-moving equipment if necessary.
1
2
(Image 2)
No Diving or Jumping. Observe all Safety Rules.
3
2. Things to Avoid
Do not locate your pool near or on any of
the following:
• Overhanging tree branches.
• Overhead wires and clotheslines. (Image 3)
• Buried pipes and wires. Contact your gas,
electric and telephone utilities to find
buried pipes and wires before you dig.
• Hilly and uneven terrain.
• Areas with poor drainage.
• Grass, stones and roots. Grass will rot
underneath the pool liner, and stones and
roots will damage the pool liner.
• Areas recently treated with oil-based
weed killers, chemicals or fertilizers.
3
3. Plan Ahead
• Will you be adding an adjacent deck later? Be sure to leave room.
• Will you be using pool accessories or other appliances that need
electricity or gas? Locate your pool near these services or plan to
have them installed later by a licensed contractor.
Important
When locating the centre of the pool, be sure to take into consideration any structures (deck,
patio, house) or relevant items (change rooms, gazebo, etc.) that the pool may need to line up
with and ensure that the pool is in the most visual pleasing location for your property.
No Diving or Jumping. Observe all Safety Rules.
4
Tools Needed
Compactor
Hammer
Water hose
Level
File
Vacuum cleaner
Pliers
Rake
Lawn roller
Metal snips
Screwdriver
Wheelbarrow
Shovel
Spray paint
Mallet
Measuring tape
Duct tape
Trowel
Wrench
List of required materials:
•Straight wood plank
•Material that provides a permanent base (ex. Rockdust)
•Fine sand (void of debris)
•Cement blocks (20cm x 40cm x 45cm / 8”x16”x18”) (optional)
•Cardboard
•Wood board (30cm x 30 cm / 1ft x 1ft)
•Vinyl covered hooks
•String and stakes
•Prefabricated cove sections (optional)
•Pool carpeting (optional)
No Diving or Jumping. Observe all Safety Rules.
5
C. PREPARE THE FOUNDATION OF YOUR POOL
1. Mark out the Area
a. Drive a peg into the ground at the
centre of the area where you want
your pool. (Image 4)
Important
Note:
Your pool must
be perfectly
levelled. Take
the time you
need to be sure
your foundation
is perfectly
levelled.
b.
Use a length of string tied between
the peg and a can of spray paint, and
mark a circle on the ground (a tape
measure can also be used). The circle
will be 8” (20 cm) bigger all round
than the pool. (Image 5)
2. Remove the sod
a. Remove all sod and plants from the
4
5
circle. (Image 6)
b.
Remove any sticks, stones and roots
from the circle using a rake.
c.
To make sure your pool is stable,
compact the ground well before
adding the sand.
6
3. Make the Area Flat and Level
a. Replace the centre peg with a flattopped stake, at least 1” (25 mm)
square and 6” (15 cm) long. Drive it
down flush with the ground surface.
b.
7
Nail one end of a straight 2-by-4 (5cm x 10cm) wood plank to
the top of the stake. Use a nail long enough to hold the end of
the 2-by-4 (5cm x 10cm) wood plank to the stake while you
rotate it in a circle. (Image 7)
No Diving or Jumping. Observe all Safety Rules.
6
CONT. C. PREPARE THE FOUNDATION OF YOUR POOL
c.
Put a carpenter’s level on the wood
plank and swing the board in a circle
to find the high and low spots.
(Image 8)
Important
Note:
The outer 24”
(60cm) of the
circle must be
perfectly flat.
The bottom
edge of the
pool must rest
flat on the
ground and
have no gaps
under it. Take
the time you
need to be
sure this area
is perfectly flat
and levelled.
d.
e.
Remove all the high spots with a
shovel, hoe or rake. Be prepared to
hire earth moving equipment if you
need to level a large area.
Remember, your pool must be level
within 1” (25 mm) across the
diameter of the pool. (Image 9 & 10)
Do not fill in low areas. Filling will
create an unsafe foundation for your
pool. Small dips and hollows may be
filled in, but the soil must be hardpacked with a tamping tool.
(Image 11)
8
9
10
f.
Take material such as rock dust or
fine mortar that can conform a solid,
permanent base and deposit this
11
material around the rim of the basin.
The material used should be spread
around the perimeter of the pool to
a width of 24” (60cm) and a
thickness of 2” (5cm). (Image 12)
g.
Recheck the outer of the circle,
where the pool wall will be. Make
sure there are no high or low spots.
The bottom edge of the pool wall
must rest flat on the ground and
have no gaps under it. (Image 13)
12
13
No Diving or Jumping. Observe all Safety Rules.
7
CONT. C. PREPARE THE FOUNDATION OF YOUR POOL
4. Patio Stones
a.
Place concrete patio stones at the
base of each upright of your pool.
Patio stones 12” (30 cm) or larger
will do. Round patio stones will also
work.
b.
Temporarily lay out the bottom rails
and bottom plates around the circle.
Each bottom plate will show the
location for a patio stone. Make a
14
mark in the ground at each base
plate. (Image 14)
c.
Remove the bottom rails and base
plates and lay out the patio stones
around the circle where the base
plates were. (Image 15)
d.
15
The patio stones must be sunk into
the ground so the tops are flush with
the soil around them. Use the
carpenter’s level to make sure the
16
patio stones are perfectly level and
flush with the ground. Use the
carpenter’s level and a 2-by-4 (5cm x
10cm) wood plank between patio
stones to make sure the stones are
level with each other. (Image 16)
5. Proceed to Section 2
No Diving or Jumping. Observe all Safety Rules.
8
Section
2
A. ASSEMBLING THE POOL BASE
1. Lay out the bottom plates and bottom rails.
a.
Place the bottom plates equally spaced
around the perimeter of your
foundation. Place one base plate on
each stone. (Image 1)
b.
For the ARIES pool, the bottom rails and
the bottom plates are galvanized steel.
This means they have a silver colour.
DO NOT use the painted connectors
and rails. These go on top of the pool.
c.
Insert the end of each bottom rail into a
bottom plate. Leave a gap of 2-1/8" (55
mm) between the ends of the bottom
rails. (Image 2, 3 & 4)
d.
Measure the diameter of your pool
all around the circle and make sure it
is correct. Note: this measurement
should be taken from centre to
centre of the bottom rail. When the
circumference is perfectly round,
hammer nails into the ground to
keep the bottom rails into place.
These nails are to be removed only
at the last step-when filling up the
pool. (Image 5)
1
2
3
4
5
No Diving or Jumping. Observe all Safety Rules.
9
A. CONT. ASSEMBLING THE POOL BASE
Important
Note:
It is preferable
to use very fine
sand that is
easily
compacted. Be
careful not to
spill sand on
the bottom
rails.
2. Spread out brick sand.
a.
b.
Spread a layer of fine brick sand (no
pebbles) over the foundation area, 2"
(5 cm) deep. Use a rake to make the
brick sand flat and smooth. (Image 6)
6
Wet the sand and pack it down with a
lawn roller or other type of compactor.
Using a trowel, smooth the surface.
Remove the stake at the center, fill in
the hole with sand and smooth the
surface with a trowel.
No Diving or Jumping. Observe all Safety Rules.
10
B. ASSEMBLING THE POOL WALL & LINER
Do not attempt to install the pool wall in the wind, wait for a calm
day. It takes at least 3 people to install the pool wall.
Important
Note:
Bring the
following items
onto the pool
foundation
before you
start uncoiling
the pool wall:
cardboard or
plywood, some
extra sand to
make the cove
and a ladder to
climb out after
the wall is
assembled.
1. Set the pool wall in place.
a.
b.
c.
Important
Note:
Make sure the
skimmer and
water return
holes are
located where
you need them
to be.
Unpack the coiled pool wall and stand
it on a piece of cardboard or plywood
at the centre of the pool. The cut-outs
for the through-the-wall skimmer
should be towards the top of the wall.
(Image 1)
Start uncoiling the wall, guiding the
bottom edge into the curved bottom
rail. The starting end of the wall must
be positioned in the centre of a bottom
plate, and the skimmer and return
holes should be positioned where the
pump and filter will be. (Image 2 & 3)
Set lengths of stabilizer onto the top
edge of the wall as you uncoil it. We
also suggest installing vinyl-covered
hooks and rope to hold the wall
steady. Ideally the help of several
people should be solicited to hold the
wall in place. Work around the
foundation until the entire pool wall is
uncoiled into the bottom rails. (Image 4)
1
2
3
4
Important Hint
For best results, mount the skimmer on the downwind side of the pool (that is, directly
across from the most common wind direction).
No Diving or Jumping. Observe all Safety Rules.
11
B. CONT. ASSEMBLING THE POOL WALL & LINER
2. Join the ends of the pool wall.
a.
Line up the holes in the two ends of
the pool wall.(Image 5)
b.
Now that you have installed the wall
you can be faced with three scenarios.
Important
Note:
Stick a
screwdriver
through two of
the holes to
help line up the
ends of the
wall.
5
1) The wall joints align perfectly, if so,
move on to the next step.
2) Your wall appears to be too short. It
is not. However the space between the
bottom rails must be decreased by
lightly tapping the bottom plates
towards the inside of the pool. You can
also tap the wall lightly with both
hands in the desired direction. (Image 6)
Important
Hint:
Ensure that all
bolts and all the
holes are used.
3) Your wall appears too long. It is not.
However the space between the
bottom rails must be increased by
tapping the bottom plates lightly
towards the outside of the pool or by
tapping the wall with both hands in the
desired direction. (Image 7)
WARNING: Bottom rails must always be
held in place in the bottom plate.
c.
6
7
8
A wall bar must be used both inside
and outside of the pool wall joint
where the two ends of the wall are
jointed together. (Image 8)
No Diving or Jumping. Observe all Safety Rules.
12
B. CONT. ASSEMBLING THE POOL WALL & LINER
d.
Cover the seam and bolt heads on the
inside/interior of the pool wall
completely with 2” (50mm) duct tape.
(Image 9)
Important
Note:
The pool must be
levelled within 1"
(25 mm) across
the diameter. A
pool that is not
levelled is
dangerous and
may collapse.
3. Make sure the pool wall is level.
a.
Use a length of string and a line-level
to check across the top edge of the
pool wall to see if it is level. Check the
wall in several different directions. The
wall must be level. If the level is off by
more than 1" (25 mm) across the
diameter of the pool, take the wall
apart and level the foundation again.
9
10
(Image 10 & 11)
4. Make sure the pool wall is round
a.
Using a tape measure, measure across
the circle at each bottom plate. The
pool wall must be round within 1" (25
mm) (all of the measurements must be
within 1" (25 mm) of each other).
Adjust the circle by nudging the base
plates in or out with your foot.
(Image 12)
b.
Adjusting the pool to the proper shape
may cause the bottom rails and
bottom plates to slip out of alignment
a little. Recheck all of the bottom
plates to make sure each one is
centred where the bottom rails meet.
11
12
13
(Image 13)
No Diving or Jumping. Observe all Safety Rules.
13
B. CONT. ASSEMBLING THE POOL WALL
5. Make a cove
a.
Important
Note:
The cove is an
important part
of the pool
structure. Take
your time to
make a
complete, fullsize cove.
b.
c.
•
•
•
•
If you are using sand, bank the sand
against the wall to form a cove of 6”
(15.24cm) high and 6” (15.24cm) wide
at ground level. Water the sand to
compact it and use a trowel to spread
it evenly. (Image 14 )
If you are using styrofoam instead of
brick sand, you can now install the
sheets of styrofoam in the centre of
the pool and join them with duct tape
along the whole length of each seam.
Remember to wait until the pool wall
has been installed before installing the
styrofoam.
A vacuum cleaner can later be used to
remove the air from between the liner
and the wall. This technique enables
you to remove folds in the liner.
However the following precautions
should be taken:
14
15
16
Do not use an industrial vacuum cleaner which could be too
powerful.
Tape the end of the vacuum hose before inserting it into the
wall so as not to damage the liner.
Insert the nozzle until it is about 4” (10cm) above the cove
(insert through the water return outlet or the skimmer
depending on the diameter of your hose). Make sure you will be
able to remove the hose later on.
Tape the hose to the wall.
(Image 15)
d.
Close the skimmer opening with cardboard and adhesive tape
to prevent air from escaping. (Image 16)
No Diving or Jumping. Observe all Safety Rules.
14
C. INSTALL THE POOL LINER
Important
Note:
If possible,
unfold the liner
on the grass
one to two
hours before
installation. Be
careful not to
leave the liner
too long or you
may damage
the grass.
1. Set the liner in place
a.
Open the carton. Do not use anything
sharp to open the carton.
b.
Unpack and unfold the liner and
spread it out in the sun to warm it up.
Inspect all the seams and surfaces for
holes.
1
c.
Remove your shoes to avoid damaging
the base or tearing the liner.
Important
Hint:
d.
The liner is
generally
smaller than
the support
structure of the
pool. It will
stretch more
easily when
warm. It is
important that
the liner is
installed on a
warm sunny
day.
Spread out the liner, smooth side
down. The curved seam should be
centred on the cove at the base of the
wall. The other seams will form
straight lines across the bottom of the
pool. (Image 1 & 2)
e.
Smooth out all the wrinkles in the bottom.
2
2. Fasten the liner in place (OVERLAP ONLY)
a.
Remove stabilizers gradually as you
fold the liner over the top of the wall.
Note: We suggest an overlap of 6” to
8” (15 to 20cm). (Image 3)
b.
Fasten the liner to the top of the wall
with plastic coping. Let the liner hang
slack for now. Do not pull the liner tight.
3
c.
Turn the vacuum cleaner on and push the liner outward with
your feet to iron out any wrinkles. Once finished, turn off
vacuum cleaner.
d.
Start filling the pool with water. As the pool fills, work out all
the wrinkles and smooth the liner to the wall. Remove the
plastic coping around the top edge of the wall one piece at a
time and adjust the liner. Keep smoothing out the wrinkles.
No Diving or Jumping. Observe all Safety Rules.
15
CONT. C. INSTALL THE POOL LINER
Important
Note:
Do not trim off
the excess
liner. (If the
liner ever
needs to be
removed,
trimming the
liner will make
re-installation
very difficult.)
Instead, roll up
any excess
liner and tape it
in place near
the top of the
pool wall.
e.
(Image 4)
f.
Roll up any excess liner hanging below
the plastic coping and tape it in place
near the top of the pool wall.
Important: Do not trim off the excess
liner. (Image 5)
3. Fasten the liner in place (BEADLOCK LINER ONLY)
a.
Important
Note
Stabilizers are
used only with
SUNRAY pool.
After all the wrinkles in the liner are
removed, trim any extra length of
plastic coping so there is no overlap.
Remove stabilizers gradually as you
install the liner receptors (A) onto the
wall. Hang the liner into the molded slot
(B) of the receptors. Secure the liner in
place with the locking device (C).
(Optional)
6
4. Fasten the liner in place (HUNG LINER ONLY)
a.
Remove the stabilizer gradually from
the top edge of the pool wall.
b.
Hook the V-bead over the edge of the
pool wall.
c.
Replace the stabilizer.
d.
Repeat steps (a) to (c) until you have gone around the entire
pool and finished attaching the pool liner in place.
e.
Start filling the pool with water. As the pool fills, work out all the
wrinkles and smooth the liner to the wall.
No Diving or Jumping. Observe all Safety Rules.
7
16
CONT. C. INSTALL THE POOL LINER
Important
Note:
Be careful and
wear gloves
when installing
the stabilizers.
The edges of
the parts are
sharp.
5. Stabilizer installation (SUNRAYonly)
a.
Once the liner is in place and the plastic coping or bead
track is all set, install the stabilizers around the top edge
of the pool. The stabilizers are reduced on one end so
that they slide into each other about 1-3/4”.
Inner Stabilizer
Inner Stabilizer
Plastic Coping
Wall
Liner
No Diving or Jumping. Observe all Safety Rules.
D. INSTALLING THE TOP LEDGES, UPRIGHTS
& LEDGE COVERS (SUNRAY)
1. Continue filling your pool
a.
Continue filling your pool with water. Do not put in more that
12” (30cm) of water until the top ledges and uprights are all
attached.
b.
Keep working on the top ledges and uprights while the pool fills.
Important
Note:
Use the ridges
in the pool wall
to make sure
the upright
column is
straight up and
down.
2. Install the uprights
a.
Line up the bottom of one vertical column (key 1) with
the tab on one base plate (key 2). The tab must be on
the outside of the vertical column.
b.
Line up the screw holes and fasten
with one screw (key 3).
c.
Place a top connector (key 4) over the
top edge of the pool wall (key 5) with
the tab on the outside of the pool.
Line up the hole in the tab with the
screw hole near the top of the vertical
column. The tab
must be on
the outside
of the vertical
column. Make
sure the vertical
column is straight
up and down.
2
d.
Slide one end of a top rail (key 6) into the top connector.
e.
Fasten the top connector to the vertical column with one screw
(key 7).
f.
Repeat the last five steps for each of the vertical columns around
the pool wall.
No Diving or Jumping. Observe all Safety Rules.
18
D. INSTALLING THE TOP LEDGES, UPRIGHTS
& LEDGE COVERS (SUNRAY)
g.
Make the pool settle into a perfect circle by pushing the
top of the pool wall vigorously inward at each vertical (this
will help make the bottom of the pool wall shift into a
perfect circle).
No Diving or Jumping. Observe all Safety Rules.
19
D. INSTALLING THE TOP LEDGES, UPRIGHTS
& LEDGE COVERS (ARIES)
1. Continue filling your pool
a.
Continue filling your pool with water. Do not put in more that
12” (30cm) of water until the top ledges and uprights are all
attached.
b.
Keep working on the top ledges and uprights while the pool fills.
Important
Note:
Use the ridges
in the pool wall
to make sure
the upright
column is
straight up and
down.
2. Install the uprights
a.
Line up the bottom of one vertical column (key 1) with
the tab on one base plate (key 2). The tab must be on
the outside of the vertical column.
b.
Line up the screw holes and fasten
with one screw (key 3).
c.
Place a top connector (key 4) over the
top edge of the pool wall (key 5) with
the tab on the outside of the pool.
Line up the hole in the tab with the
screw hole near the top of the vertical
column. The tab
must be on
the outside
of the vertical
column. Make
sure the vertical
column is straight
up and down.
2
d.
Slide one end of a top rail (key 6) into the top connector.
e.
Fasten the top connector to the vertical column with one screw
(key 7).
f.
Repeat the last five steps for each of the vertical columns around
the pool wall.
No Diving or Jumping. Observe all Safety Rules.
20
D. INSTALLING THE TOP LEDGES, UPRIGHTS
& LEDGE COVERS (ARIES)
g.
Make the pool settle into a perfect circle by pushing the
top of the pool wall vigorously inward at each vertical (this
will help make the bottom of the pool wall shift into a
perfect circle).
No Diving or Jumping. Observe all Safety Rules.
21
Parts List - SUNRAY
Part Number
Wilbar Description
12'
15'
18'
21'
24'
Top Rails
36756
TR 2.5" STL ALI PEARL 12'D SUN 56-1/4"
36757
TR 2.5" STL ALI PEARL 15'D SUN 55-1/4"
36758
TR 2.5" STL ALI PEARL 18'D SUN 56"
36759
TR 2.5" STL ALI PEARL 21'D SUN 56-1/4"
36843
TR 2.5" STL ALI PEARL 24'D SUN 56-1/8"
8
10
12
14
16
Upright
36789
UR 2" STL ALI PEARL SUNRAY 46-3/4"
8
10
12
14
16
36871
UR 2" STL ALI PEARL SUNRAY 50-3/4"
8
10
12
14
16
NLR-1460061
BTM RAIL 6'0"R 53-15/16" (5/8" STL)
8
NLR-1460062
BTM RAIL 7'5"R 53-15/16" (5/8" STL)
NLR-1460063
BTM RAIL 9'0"R 53-13/16" (5/8" STL)
NLR-1460066
BTM RAIL 10'5"R 54-3/8" (5/8" STL)
NLR-1460064
BTM RAIL 12'0"R 54-1/16" (5/8" STL)
Bottom Rails
10
12
14
16
Stabilizers
36853
INR STAB SQ STL 6'0"R 57-9/16" SUN
36854
INR STAB SQ STL 7'6"R 57-9/16" SUN
36855
INR STAB SQ STL 9'0"R 57-9/16" SUN
36856
INR STAB SQ STL 10'6"R 58" SUN
36857
INR STAB SQ STL 12'0"R 57-11/16" SUN
8
10
12
14
16
Bottom Plate
NLR-1320103
BOTTOM PLATE 2" STL SUNRAY
8
10
12
14
16
TC 2-1/2" CONNECTOR ALI PEARL SUNRAY
8
10
12
14
16
SCREW #12X5/8" PHIL PAN ZY PTD PEARL HEA
16
20
24
28
32
Top Cap Connector
NLR-LC10009
Hardware
99-0114
No Diving or Jumping. Observe all Safety Rules.
Exploded view - SUNRAY
7
Inner Stabilizer (10)
10
4
3
Inner Stabilizer (10)
9
Plastic Coping (9)
7
Wall (5)
10
Liner (6)
9
6
1
5
8
2
3
8
No Diving or Jumping. Observe all Safety Rules.
1 Upright
2 Bottom Connector
3 Screw
4 Top Connector
5 Pool Wall
6 Liner
7 Top Rail
8 Bottom Rail
9 Plastic Liner Coping
10 Inner Stabilizer
Parts List - ARIES
Part Number
Wilbar Description
12'
15'
18'
21'
24'
Top Tracks (PAINTED)
36863
BTM RAIL PTD 6'0"R 53-15/16" (5/8" STL)
36864
BTM RAIL PTD 7'5"R 53-15/16" (5/8" STL)
36865
BTM RAIL PTD 9'0"R 53-13/16" (5/8" STL)
36866
BTM RAIL PTD 10'5"R 54-3/8" (5/8" STL)
36867
BTM RAIL PTD 12'0"R 54-1/16" (5/8" STL)
8
10
12
14
16
Uprights
36789
UR 2" STL ALI PEARL SUNRAY 46-3/4"
8
10
12
14
16
36871
UR 2" STL ALI PEARL SUNRAY 50-3/4"
8
10
12
14
16
NLR-1460061
BTM RAIL 6'0"R 53-15/16" (5/8" STL)
8
NLR-1460062
BTM RAIL 7'5"R 53-15/16" (5/8" STL)
NLR-1460063
BTM RAIL 9'0"R 53-13/16" (5/8" STL)
NLR-1460066
BTM RAIL 10'5"R 54-3/8" (5/8" STL)
NLR-1460064
BTM RAIL 12'0"R 54-1/16" (5/8" STL)
Bottom Rails
10
12
14
16
Bottom Plate
NLR-1320103
BOTTOM PLATE 2" STL SUNRAY
8
10
12
14
16
TC 5/8" CONNECTOR ALI PEARL ARIES
8
10
12
14
16
SCREW #12X5/8" PHIL PAN ZY PTD PEARL HEA
16
20
24
28
32
Top Cap Connector (PAINTED)
36868
Hardware
99-0114
No Diving or Jumping. Observe all Safety Rules.
Exploded view - ARIES
9
4
3
8
9
8
6
1
5
7
2
3
7
No Diving or Jumping. Observe all Safety Rules.
1
2
3
4
5
6
7
8
9
Upright
Bottom Connector - Silver
Screw
Top Connector - Painted
Pool Wall
Liner
Bottom Rail - Silver
Plastic Liner Coping
Top Rail - Painted