1
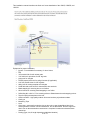
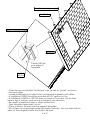
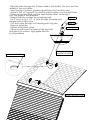
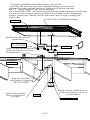
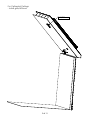
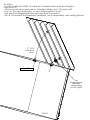
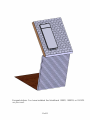
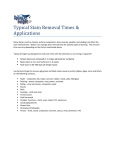
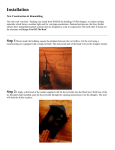
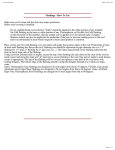
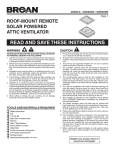
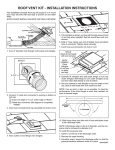
The SolarSheat
1500G/1500GS/1501GS –
Flush Roof Mount
Installation Manual
By
Your Solar Home, Inc.
Version 1.0
December 28, 2006
All building, plumbing, electrical, and safety codes supersede the instructions in this manual.
The manufacturer assumes no liability for improper installation. Use this manual at your own risk.
This installation manual describes the flush roof mount installation of the 1500G, 1500GS, and
1501GS.
Equipment for proper installation:
• jig saw – bi-metal blade if necessary, for ducts’ holes
• Drill
• 3/8” metal drill bit for tall unistrut pads
• 3/16” drill bit for pilot holes for 3/8” lag bolts
• prying tool for shingles
• Socket (square) driver bit for wall grill screws (if applicable)
• 9/16” hex socket driver for 3/8” lag bolts
• Utility knife for cutting template and shingles
• Small flat head screw driver for thermostat’s wire terminals
• Metal strapping for securing duct to roof rafters
• Wood screws for screwing metal strapping to roof rafter
• Self drilling #8, or #10 x ¾” for screwing collars to Solarsheat and metal strapping to duct
• Tape for taping the template on the roof
• Outdoor sealant – high quality outdoor silicon and outdoor polyurethane sealant
• Caulk gun
• Measuring Tape
• Level
• Clean rags – temporarily needed to plug up duct only to stop drywall/wood dust from
entering collector if house is under construction, turn off thermostat. Remove rags from
duct & turn on thermostat when construction is complete & construction dust has been
cleaned up.
• Ducting (type, size, & length depends on individual situation)
2 of 11
Drill 3/8" holes,
1/2" - 1" from ends
tall Unistrut pads
.5
13
- Drill all tall Unistrut pads
3 of 11
Duct hole (hot air supply)
Roof Rafter
piece of scrap shingle
template
Center Tall Pad
over edge of
Template
Unistrut
Tall Pad
- Collector can be installed "landscape" style as well as "portait", as shown
- Find roof rafters
- Locate SolarSheat duct holes shown on template between roof rafters
- A SolarSheat 1500G should be mounted with PV section on top
- A SolarSheat 1500GS or 1501GS does not have a PV section, nor do they
have a top or bottom, and can be mounted in any direction
- Be careful of electrical wires or other obstructions
- Tape template temporarily to roof
- Place a Unistrut tall pad over the edge of template
- Slip a piece of scrap shingle under the Unistrut tall pad - this can help reduce
wear on the shingle(s) below the Unistrut tall pad.
4 of 11
- Drill pilot holes through the 2 holes made in the Unistrut, the roof, and the
middle of the roof rafters
- Inject plenty of outdoor grade polyurethane into the pilot holes
- Screw in 3/8" x 3" lag bolts to hold the pads location over the pilot holes
- Place next unistrut pad over the appropriate rafter, centering it
over the edge of the template.
- Repeat the above steps for remaining pads
lag bolt
- For 5" duct, cut a 5-1/2" - 6" hole through template and
shingles with a utility knive.
tall pad scrap
- Cut duct holes through roof decking with a jig saw
- Remove template
- Tighten all lag bolts down.
shingle
- Surround and cover the head of the lag bolts
with plenty of outdoor, high grade silicone
or polyurethane
Pilot hole (3/16")
in center of rafter
Return air duct hole
Supply air duct hole
5 of 11
- lift shingles above each duct hole enough to slip flashing under.
- double check flashings' location by placing template's holes over flashing,
before nailing.
- nail flashing down
- cover nails with outdoor grade polyurethane/roofing sealant
- lay shingles back over flashing
Keep longer portion of
flashing pointing up the slope
Trim flashing with scissors
above the ridge marked
for the duct size (5")
Shingles should extend at least
to middle of rubber cone
6 of 11
- Cut holes in SolarSheat backing insulation using a knife
- Install Duct Kit as shown below (for cathedral ceilings, if the distance
between the interior drywall surface-to- exterior roof surface is greater
than ~7", longer lengths of duct will be needed)
-For a SolarSheat 1500G, run thermostat wire through nearest passive roof attic vent,
cut hole in screen (if applicable), and fasten to roof rafter inside. Alternatively
install a "goose neck" flashing and run thermostat wire through it, sealing with
spray foam.
Cut duct hole in SolarSheat backing
SolarSheat
Seal all joints with outdoor
grade silicon
#8 x 3/4" screw
(NOT INCLUDED)
Foam tape
Apply outdoor grade silicone to
entire duct seem on all ducts
(if applicable)
5" Adapter Collar
Roof Rafter
Strap duct to rafters
using screws & strapping
(NOT INCLUDED)
Apply outdoor grade
silicon to entire inner
lip/edge
Apply outdoor grade silicon to
entire duct seam on all ducts
(if applicable)
5" duct
Backdraft damper
7 of 11
3/8" x 1 1/4' hex bolt
Collector Clamp
3/8" Spring Nut
- Clamp collector down to Unistrut tall Pads
using collector clamps, bolts, and spring nuts
- Connect thermostat wire to thermostat
(Red wire to RH, White wire to WH)
- For SolarSheat 1501 GS, see the fan's
electrical diagram for thermostat's connection.
- For SolarSheat 1500GS, no fan, nor control is
included with the collector itself. See the fan's
electrical diagram for thermostat's connection.
8 of 11
For Cathedral Ceilings:
- Install grills/diffusors
Grill/Diffusor
9 of 11
For Attics:
- For the SolarSheat 1500G, an Inline fan is needed when total duct length is
more than ~6'.
- All fans should be located next to Solarsheat intake duct. This way it will
"push" air through Solarheat(s) - so as to help lengthen fan life
- see electrical diagram(s)for the fan's electrical connection
- Run R-12 Insulated duct between SolarSheat, fan (if applicable), and ceiling diffusors
5" - R12
insulated
duct
ceiling diffusor
fan
(may appear
different,
depending
on fan type)
10 of 11
Congratulations. You have installed the SolarSheat 1500G, 1500GS, or 1501GS
on your roof.
11 of 11