1
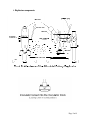
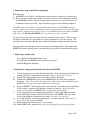
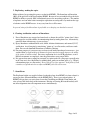
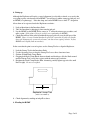
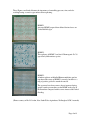
MICROBIAL COLONY REPLICATOR
for
ISO-GRID HGMF™ hydrophobic grid membrane filters
User manual
This Replicator permits preparation of HGMFs that accurately copy the
colony pattern of an HGMF master. The ability to incubate replicates under
a range of growth conditions is a useful diagnostic and research tool.
Replicating HGMFs is a simple three-step process, viz:
1. Lock an Inoculator in the Replicator.
2. Register the HGMF "master" under the microscope crosshairs and pull the
Operating Lever to charge the Inoculator.
3. Register a fresh HGMF under the crosshairs and pull the Lever to transfer a
replica inoculum to it.
However, there is a skill to learn and points to keep in mind. Also, this
instrument differs in several ways from earlier Replicators. Please take a
few moments to read this Manual.
Contents
1. Replicator components
2. Replicating - keep in mind what's happening
3. Replicating - getting ready
4. Replicating - charging an Inoculator from the master HGMF
5. Replicating - making the copies
6. Cleaning, sterilization and care of Inoculators
7. About Focus
8. Lining up the Replicator
(ISO-GRID HGMF is a registered trademark of QA Lifesciences Inc, San Diego, CA, USA)
FILTAFLEX Ltd.
Tel 613 256 3066
PO Box 1224
Fax 613 256 8681
Almonte
Ontario K0A 1A0
www.filtaflex.ca
Canada
E-mail [email protected]
Page 1 of 6
1. Replicator components
Page 2 of 6
2. Replicating - keep in mind what's happening
Remember that:
i) An HGMF is very flexible - each Inoculator points deforms it and presses it into the agar;
ii) The agar is like a sponge - the instant it is pressed it expresses water which floods back up
into the HGMF grid-cell. If pressed for more than a second or so, water will swamp and
contaminate adjacent grid-cells. Agars for different purposes have different sponginess.
The skill to learn in replicating is to bring the Inoculator down onto the HGMF just firmly
enough - and for long enough - that floodwater washes some microbial cells from the Inoculator
point. But be careful not to press for too long or you will flush microbes into adjacent HGMF
grid-cells (see 9. Flooding the HGMF). One second or less contact is enough...
As agar plates dry the agar becomes harder and its surface becomes concave. This can cause
incomplete inoculation. It is preferable to use plates containing 12-15 ml of fresh agar. The
ample agar layer will ensure that the agar is resilient and planar enough to inoculate properly.
The agar surface should be planar but does not have to be uniformly thick. The compressible
HGMF Slider allows the Replicator to accommodate plates gelled on a non-horizontal surface.
3. Replicating - getting ready
- have sufficient sterilized Inoculators ready;
- lay sufficient sterile HGMF on their respective agar plates;
- check the Replicator alignment.
4. Replicating - charging an Inoculator from the master HGMF
i)
Use the Operating Lever to raise the Inoculator Dock. Move the Inoculator Locking Lever
to the left and slide a sterile Inoculator into the Locators. Touch only its "wings".
ii) Turn the Inoculator Locking Lever to the right to lock the Inoculator.
iii) Withdraw the HGMF Slider, place a master HGMF plate on it, then slide it under the
Inoculator. (Note: If you try to slip a plate under an Inoculator without withdrawing the
HGMF Slider you may touch and contaminate the Inoculator).
iv) Align the HGMF "T" bar under the microscope crosshairs. Absolutely perfect registration
is not essential - experience will show how accurate you must be. Keep fingertips in
contact with both Base and HGMF Slider to steady them whilst aligning.
v) Use the Operating Lever to bring down the Inoculator. The weight of the Inoculator,
Dock, and Shaft will usually provide sufficient force on the HGMF. The force can be
increased by pulling the Operating Lever gently - do not use excessive force.
vi) A smooth "down-up" movement, without pause, is usually sufficient. More than 1 sec
pause will usually swamp the HGMF.
vii) Push the Operating Lever back to its "rest" position.
viii) Make HGMF copies without delay - microbes die off quickly on a drying Inoculator.
Page 3 of 6
5. Replicating - making the copies
Make replicates by repeating this process on the fresh HGMFs. The Inoculator will inoculate
100% of the grid-cells of the first daughter HGMF. Because it loses microbial cells to the fresh
HGMF its ability to provide 100% inoculation decreases for succeeding replicates. The number
of replicates one can make before incomplete replications occur depends very much on the type
of colonies on the HGMF master - it may vary from five to 20 or more.
In general, using a fresh Inoculator is preferable to recharging one that has been used.
6. Cleaning, sterilization, and care of Inoculators
i) If used Inoculators are wrapped and autoclaved as shown, they will be "points down" when
unwrapped to avoid the chance of contaminating them by turning them over. Alternatively,
autoclave them without wraps, in covered trays.
ii) Epoxy Inoculators withstand mild acids, alkalis, chlorine disinfectants, and normal (121ºC)
sterilization. Avoid warping by autoclaving "points up" on a flat surface, and do not stack
them. Do not soak aluminum Inoculators in alkaline solutions.
iii) For many purposes it is not necessary to clean (wash, brush) Inoculators between uses - just
sterilize them (a slight build-up of denatured organic material actually improves the ability
of the points to hold inoculum). Do not use replication for in-situ PCR procedures, even if
DNAase treatments are employed, since the point surfaces may protect DNA.
iv) If it appears that some warping has occurred (test prints made on a flat paper repeatedly miss
in the same area) dress Inoculators by rubbing them gently on medium-grade (e.g., 320 grit)
carborundum paper on a flat surface. Do not rub off excessive amounts - both point size and
a tendency to spread microbes to adjacent HGMF grid-cells will increase.
7. About Focus
The Replicator height was supplied adjusted so that the plane of an HGMF is in focus when it is
on an agar plate of normal thickness on the HGMF Slider. There is no rack and pinion - if
HGMFs on agar plates are not in focus loosen the Check Ring and Height Clamp knobs and
raise or lower the whole body of the instrument. Raising or lowering the instrument body will
not affect alignment since all components move simultaneously.
Page 4 of 6
8. Lining up
Although the Replicator will rarely go out of alignment it is advisable to check, every week, that
a test print registers satisfactorily on an HGMF. You will need a rubber stamp-type ink pad, and
an HGMF (or a photocopy). Note that along one border HGMFs have a white "T" design that
allows them to be registered under the Replicator crosshairs.
1. Lock an Inoculator in the Inoculator Dock.
2. "Ink" the Inoculator by bringing it down onto the ink pad.
3. Lay the HGMF on the HGMF Slider, centre its "T" under the microscope crosshairs, and
make a print. (If the plane of focus is too high, use a pad under the HGMF).
4. Check that ink dots in the print fall within their proper grid-cells over the full area of the
HGMF. (Note: it is not essential that dots be perfectly centered in all grid-cells, but the
better the alignment, the greater the tolerance you have when copying colonies. In fact,
HGMFs vary slightly from one another).
In the event that the print is out of register, use the Lineup Tool to re-align the Replicator.
1.
2.
3.
4.
Lock the Lineup Tool in the Inoculator Dock.
Use the Operating Lever to drop the Lineup Tool's cross-lines down into focus.
Slacken off both Dock Clamp Knobs.
Gripping both Dock Clamp Knobs between thumb and forefinger, slide the Dock around
until the Lineup Tool's cross-lines register with the microscope crosshairs.
5. Retighten the Dock Clamp Knobs (Hint: alternately partially tighten opposite sides until
Dock is tight). Do not over-tighten.
Replicator Lineup Tool
(matches the HGMF 'T')
6. Check alignment by making an ink print as above.
9. Flooding the HGMF
Page 5 of 6
These Figures excellently illustrate the importance of controlling pressure, time, and also
avoiding having a concave agar surface when replicating.
HGMF 1
A master HGMF prepared from diluted bovine faeces on
Violet Red Bile agar.
HGMF 2
This replicate of HGMF 1 on Oxoid Chromogenic E. Coli
agar clearly differentiates species.
HGMF 3.
A further replicate on Mueller/Hinton+antibiotic agar has
reproduced the centre of HGMF 1 correctly, but there is a
ring of positive grid-cells around the outside.
The agar may have been concave due to incorrect drying;
greater contact pressure/time on the HGMF at the edge of
the Inoculator compared with its centre increased the risk of
flooding.
(Photos courtesy of Dr. D. Jordan, New South Wales Agriculture, Wollongbar, NSW, Australia)
Page 6 of 6