1
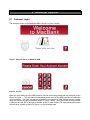
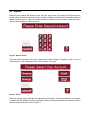
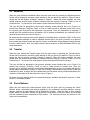
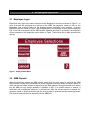
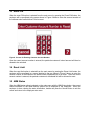
User Manual
for
<MacBank ABM>
Version <2.0>
Prepared by
Group Name: Group 304
Matthew Gardner
Robert Lombardi
Steven Li
Instructor:
Course:
Lab Section:
Teaching Assistant:
Date:
Dr. Kamran Sartipi
SFWR ENG 3K04
L03
Mehran Najafi
11/25/09
Contents
CONTENTS................................................................................................................................................................... I
REVISIONS................................................................................................................................................................. II
1
OVERVIEW .........................................................................................................................................................1
PURPOSE....................................................................................................................................................................1
HOW TO USE THIS DOCUMENT .................................................................................................................................1
ASSUMPTIONS ............................................................................................................................................................1
2
CUSTOMER OPTIONS .....................................................................................................................................2
2.1
2.2
2.3
2.4
2.5
3
CUSTOMER LOGIN .......................................................................................................................................2
DEPOSIT .......................................................................................................................................................4
WITHDRAW...................................................................................................................................................5
TRANSFER....................................................................................................................................................5
CHECK BALANCE .........................................................................................................................................5
EMPLOYEE OPTIONS......................................................................................................................................6
3.1
3.2
3.3
3.4
3.5
EMPLOYEE LOGIN ........................................................................................................................................6
ABM DEPOSIT .............................................................................................................................................6
RESET PIN ..................................................................................................................................................7
RESET LIMIT.................................................................................................................................................7
ABM STATUS...............................................................................................................................................7
Revisions
Version
Primary
Author(s)
Description of Version
Date Completed
Preliminary
V1.0
Steven Li
Started on writing the overview and the
customer options
11/18/09
Preliminary
V1.0
Matthew Gardner
Revised pictures for the screens and
interfaces
11/18/09
Version
Primary
Author(s)
Description of Version
Preliminary
V1.0
Robert Lombardi
Reviewed the overview and customer
sections and made updates and changes
11/19/09
Preliminary
V1.1
Steven Li
Continued to finish the customer options and
started on the employee options
11/23/09
Preliminary
V1.1
Robert Lombardi
Made changes and suggestions on the
current portions done
11/23/09
Preliminary
V1.1
Matthew Gardner
Revised a few more pictures for the
employee sections
11/23/09
Preliminary
V1.2
Steven Li
Finished writing up all sections including the
overview, customer options, and employee
options
11/24/09
Released
V2.0
Steven Li
Reviewed and revised the document
11/24/09
Robert Lombardi
Matthew Gardner
Date Completed
1 Overview
Purpose
This document provides the operational instructions for the users of the MacBank ABM including
the customers and the employees.
How to Use This Document
The information in this user guide, as outlined in the Table of Contents, is divided into two major
sections, where the first section is dedicated to the customer base of the users, and the second
section is dedicated to the bank employees.
When using the MacBank ABM system, the customer needs to log into the system first and are
then able to access the different banking options provided by the ABM menu. These options
include Withdraw, Deposit, Transfer, and Check Balance. The procedures on how to login and use
the banking options are described below under the Customer Options section to aide the user in
the operation of the MacBank ABM.
For the bank employees, the MacBank ABM provides special access for them to use the employee
functions on the system. Employees are allowed to restock the ABM machine with money and
unlock an account in the event that it is locked due to bad PINs. Procedures for these operations
are described below under the Employee Options section to aide them in the use of the MacBank
ABM.
Assumptions
In addition to the instructions outlined in this manual, it is assumed that IIS 7.0 and SQL are
installed on the central ABM server of the bank.
2 Customer Options
2.1 Customer Login
The welcome screen of the MacBank ABM is shown in Figure 1 below.
Figure 1. Welcome Screen of MacBank ABM
Figure 2. Screen for Entering Account Number
When the user walks up to the ABM machine, he/she should be greeted with the welcome screen
shown in Figure 1. The user should insert his/her bank card into the ABM card slot to initiate the
service session. The user will then be prompted to the screen to enter his/her account number
using the number key pad provided as shown in Figure 2 above. Once the correct account number
is entered, the user will be brought to another screen to enter his/her PIN after pressing the button
with the arrow symbol as shown in Figure 3 on the following page.
Figure 3. Screen for Entering User PIN
The user will be given a maximum of three chances to enter his/her PIN correctly. If, within a
period of 24 hours, the user enters the wrong PIN more than three times, his/her account will
become locked for the purpose of security. To unlock the account when such a situation arises,
the user should contact the bank employee for assistance. On the other hand, if the correct PIN is
entered, the main menu will be displayed to the user and allow him/her to access the banking
options displayed as seen in Figure 4 below.
Be aware that at any point in time, the user is able to press the Cancel button to exit the current
activity and return welcome screen. The Cor button can be used to make corrections to the inputs
by clearing all numbers entered thus far. In addition, the user can press the button with the
question mark symbol to request help. All three of these functions will behave the same for all user
screens of the ABM where applicable.
Figure 4. Customer Main Menu of the MacBank ABM
2.2 Deposit
When the user selects the deposit option from the main menu by pressing the Deposit button,
he/she will be directed to the screen shown in Figure 5 below to enter the amount he/she wishes to
deposit into the account. After the correct amount is entered, the user needs to press the button
with the arrow symbol in order to proceed.
Figure 5. Deposit Screen
The user will then be able to choose to deposit into his/her Savings, Chequing, Credit, or Line of
Credit account in the subsequent screen shown below in Figure 6.
Figure 6. Select Account Type
Once the account type is selected, the transaction will proceed. Once the transaction is complete,
a receipt with the updated account information will be printed automatically the customer will be
returned to the main menu seen in Figure 4.
2.3 Withdraw
When the user selects the withdraw option from the main menu by pressing the Withdraw button,
he/she will be directed to a screen nearly identical to the one shown for deposit in Figure 5 above,
except the title will display “withdraw” instead of “deposit”. When this screen appears, the user
should enter the amount he/she wishes to withdraw from the Savings, Chequing, Credit, or Line of
Credit account. To proceed, the user needs to press the button with the arrow symbol.
The user will then be prompted to the account selection screen identical the one in Figure 6 to
choose from Savings, Chequing, Credit, or Line of Credit account to withdraw money from. Once
the account type is selected, the transaction will proceed. Once the transaction is complete, a
receipt with the updated account information will be printed automatically the customer will be
returned to the main menu seen in Figure 4.
Be aware that the customer will only be allowed to withdraw cash in multiples of $20. In the event
where a customer attempts to enter a withdraw amount that is not such a number or an amount
that exceeds the balance inside that specific account, a notification will be displayed asking him/her
to enter a valid amount. Also, any single customer has a maximum of $500 withdrawal limit for any
single transaction.
2.4 Transfer
When the user selects the Transfer option from the main menu by pressing the Transfer button,
he/she will be directed to a screen nearly identical to the one shown for deposit in Figure 5 above,
except the title will display “transfer” instead of “deposit”. When this screen appears, the user
should enter the amount he/she wishes to withdraw from the Savings, Chequing, Credit, or Line of
Credit account. To proceed, the user needs to press the button with the arrow symbol.
The user will then be prompted to the account selection screen identical the one in Figure 6 to
choose from Savings, Chequing, Credit, or Line of Credit account to transfer from. Once the
account type is selected, the same screen will be displayed again for the user to select the account
he/she wants to transfer the money to. After this is chosen, the transaction will proceed. When the
transaction is done, a receipt with the updated account information will be printed automatically the
customer will be returned to the main menu seen in Figure 4.
Be aware that any transfer shall not exceed the balance available that specific account, in other
words, no overdrafts allowed.
2.5 Check Balance
When the user selects the check balance option from the main menu by pressing the Check
Balance button, information and amount regarding to the customer’s chequing balance, savings
balance, and line of credit balance will be displayed to him/her. When the user is done viewing
his/her balance information, he/she can press the Cancel button to exit the screen and a receipt
with the updated account information will be printed. The customer will then be returned to the
main menu automatically.
3 Employee Options
3.1 Employee Login
Employees may login at the same welcome screen displayed to all users as shown in Figure 1. In
order to access the employee-only options on the ABM, the employee needs to click on the
Marauders Coat of Arms symbol on the welcome screen, emulating a key insertion. A screen
identical to the one shown in Figure 3 will be displayed for the employee to enter his/her employee
PIN. If the PIN is recognized by the ABM system database and login is successful, the employee
will be prompted to the employee menu shown in Figure 7 below and will be able access these
options.
Figure 7. Employee Main Menu
3.2 ABM Deposit
When the employee selects the ABM deposit option from the main menu by pressing the ABM
deposit button, he/she will be directed to a screen identical to the one shown in Figure 5 above to
enter the amount he/she wishes to deposit into the ABM machine. Employees need to be aware
that the ABM will only accept deposits in multiples of $20. If an invalid amount is entered, a
notification will be displayed asking for a valid amount. After the correct amount is entered, the
employee needs to press the button with the arrow symbol to proceed with the stocking process.
The physical cash can then be deposited into the ABM slot.
3.3 Reset PIN
When the reset PIN option is selected from the main menu by pressing the Reset PIN button, the
employee will be prompted to the screen shown in Figure 8 below to enter the account number of
the customer who wants his/her PIN to be reset.
Figure 8. Screen for Entering Customer Account Number
Once the correct account number is entered, the particular customer’s locked account will then be
allowed to be unlocked.
3.4 Reset Limit
When the reset limit option is selected from the main menu by pressing the Reset Limit button, the
employee will be prompted to a screen identical to the one shown in Figure 8 above to enter the
account number of the customer who wants his/her withdrawal limit to be reset. Once the correct
account number is entered, the particular customer’s withdrawal limit will be allowed to reset.
3.5 ABM Status
When the ABM status option is selected on the main menu with the ABM Status button, the current
status information of the ABM machine system will be displayed to the employee. When the
employee is done viewing the status information, he/she can press the Cancel button to exit the
screen and return to the employee main menu.