1
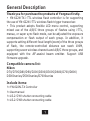
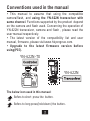
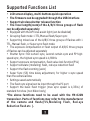
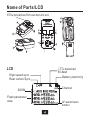
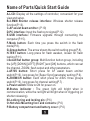
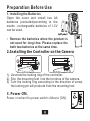
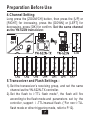
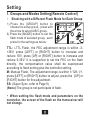
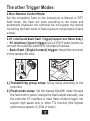
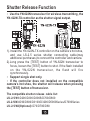
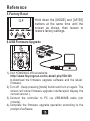
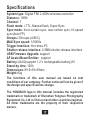
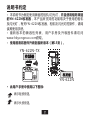
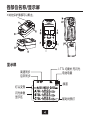
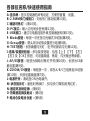
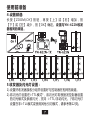
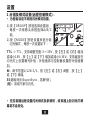
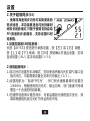
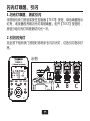
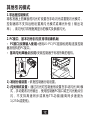
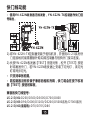
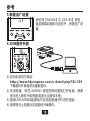
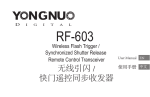
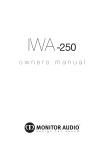
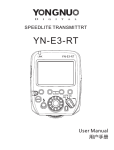
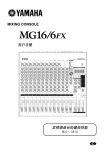
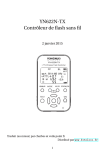
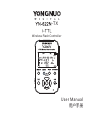
-TX Wireless Flash Controller User Manual 用户手册 Contents General Description . . . . . . . . . . . . . . . . . 1 Conventions used in the manual. . . . . . . . . . . 2 Supported Functions List . . . . . . . . . . . . . . . 3 Name of Parts/LCD . . . . . . . . . . . . . . . . . 4 Name of Parts/Quick Start Guide . . . . . . . . . . . . 5 Preparation Before Use . . . . . . . . . . . . . 6-7 Setting . . . . . . . . . . . . . . . . . . . . . 8-10 Flash awaking and triggering . . . . . . . . . . . 11 The other Trigger Modes . . . . . . . . . . . . . 12 Shutter Release Function . . . . . . . . . . . . 13 Reference . . . . . . . . . . . . . . . . . . . 14-15 Troubleshooting . . . . . . . . . . . . . . . . . . 16 Specifications . . . . . . . . . . . . . . . . . . . 17 Cautions Please turn off power supplies of all equipment when connecting or installing the product. Please keep it dry. Be sure not to use wet hand to touch the product. It is also not allowed to immerse the product into waster or make it be exposed in the rain; otherwise it may not work normally or even be damaged. Do not use it in explosive situations; violation of this warning may cause an explosion or fire. This product involves battery, please be in strict accordance with the relevant provisions on the use of the battery, otherwise it would cause property damage or personal injury. General Description Thank you for purchase the products of Yongnuo firstly. YN-622N-TX i-TTL wireless flash controller is for supporting the use of YN-622N i-TTL wireless flash trigger transceiver. This product adopts flexible LCD menu control, supporting mixed use of the A/B/C three groups of flashes using i-TTL, manua, or super sync flash mode, can be adjusted the exposure compensation or flash output of each group. In addition, it supports setting different focal length(zoom)of the three groups of flash, the remote-controlled distance can reach 100M, supporting seven wireless channels and A/B/C three groups, and equipped with the AF-assist beam emitter. Support USB firmware upgrade. Compatible camera list: Nikon D70/D70S/D80/D90/D200/D300/D300S/D600/D700/D800/ D3000series/D5000series/D7000series Include items: 1×YN-622N-TX Controller 1×Usermanual 1×LS-2.5/N1 shutter connecting cable 1×LS-2.5/N3 shutter connecting cable Conventions used in the manual This manual to assume that using the compatible camera/flash, and using the YN-622N transceiver with same channel. Functions supported by the product depend on the camera and flash used. Concerning the operation of YN-622N transceiver, camera and flash , please read the user manual respectively. The latest version of the compatibility list and user manual, firmware, please visit www.hkyongnuo.com. Upgrade to the latest firmware ver sion before using(P15). YN-622N-TX YN-622N The below icon used in this manual: Refers to short press the button. Refers to long press(hold down) the button. Supported Functions List LCD screen display, multi-buttons quick operation The firmware can be upgraded through the USB interface Support wireless shutter release function The focal length(zoom)of the A/B/C three groups of flash can be adjusted separately Equipped with the AF focus assist light (can be disabled) Grouping flash mode: i-TTL/Manual flash/Super sync Supporting mixed use of the A/B/C three groups of flashes with iTTL , Manual flash, or Super sync flash mode The exposure compensation or flash output of A/B/C three groups of flashes can be adjusted separately Shutter Sync: first curtain sync, second curtain sync and FP highspeed sync, the highest sync speed is 1/8000s Support exposure compensation, flash value lock function(FVL) Support simulate (modeling) flash, red-eye reduction flash Support the flash zooming (auto) Super Sync (SS) time delay adjustment, for higher x-sync speed than the camera allows Settings saved automatically The flash sync signal can be input through the PC port Support the basic flash trigger (max sync speed is 1/250s) of standard hot shoe (non Nikon body) *The above functions need to be used with the YN-622N transceiver. Parts of functions may refer to the manufacturer of the camera and flash.(FVL,Modeling Flash, Red-eye Reduction Flash etc. ). Name of Parts/LCD ※The protective film can be torn out. LCD High speed sync Rear curtain Sync ZOOM Flash parameter area i-TTL balanced fill-flash Battery electricity Channel AF assist beam emitter Name of Parts/Quick Start Guide A-LCD: Display all the settings of controller, convenient for your view and setup. B-2.5MM Shutter release interface: Wireless shutter release function(P.13). C-AF assist beam emitter: (P.10) D-PC interface: Input the flash sync signal(P.12). E-USB interface: Firmware upgrade through connecting the computer(P.15). F-Mode button: Each time you press the switch in the flash mode(P.8). G-Group button: The arrow shown the switch setting group(P.8). H-TEST button: Long press for flash awaken, loosen for flash testing(P.11). I-Select/Set button group: Multifunction button group, including the [UP] [DOWN] [LEFT] [RIGHT] and [OK] buttons, which can set the channel, ZOOM, flash output and other parameters. J-AF/SS button: Short press for AF assist beam emitter switch(P.10), long press for [Super Sync] parameter setting (P.9). K-ZOOM/CH button: Each short press for A/B/C three groups switch(P.10), long press for channel setting(P.7) . L-Power switch: Slide to ON for power on. M-Status indicator : The green light will bright when in communication, while the red light will bright when in triggering (or shutter releasing). N-Locking ring and locking pin: (P.6) O-Hot shoe Mounting foot and contacts: (P.6) P-Battery compartment and battery cover: (P.6) Preparation Before Use 1. Installing the Batteries Open the cover and install two AA batteries (excluded)according to the marks , rechargeable batteries of 1.2V can be used. Remove the batteries when the product is not used for long time. Please replace the both two batteries at the same time. 2.Installing the Controller on the Camera 1). Unscrew the locking ring of the controller. 2). Slip the mounting foot into the hot shoe of the camera. 3). Turn the locking ring according to the direction of arrow, the locking pin will protrude from the mounting foot. 3. Power ON. Power on when the power switch slides to [ON]. Preparation Before Use 4.Channel Setting: Long press the [ZOOM/CH] button, then press the [UP] or [RIGHT] for increasing, press the [DOWN] or [LEFT] for decreasing, press [OK] for confirm. Set the same channel as the YN-622N transceiver. 5. Transceiver and Flash Settings: 1). Set the transceiver’s receiving group, and set the same channel as the YN-622N-TX controller. 2). Set the flash to i-TTL flash mode*, the flash will fire according to the flash mode and parameters set by the controller , support i -TTL/manual flash. ( *For non-i-TLL flash mode or other triggering mode, refer to P.12). Setting 1. Groups and Modes Setting(Remote Control) Shooting with a Different Flash Mode for Each Group 1).Press the [GROUP] button to choose the setup group, press with the arrow to select A/B/C group. 2).Press the [MODE] button to set the flash mode of selected group, each press for the settings as below: TTL: i-TTL Flash, the FEC adjustment range is within -3+3EV, press [LEFT] or [RIGHT] button to increase and reduce 1EV, press [UP] or [RIGHT] button to increase and reduce 0.3EV. It is supported to set the FEC on the flash directly, the compensation value shall be superposed according to flash setting plus the controller setting. M: Manual Flash, The adjustment range is within 1/128-1/1, press [LEFT] or [RIGHT] button to adjust, press the [UP] or [RIGHT] button for fine adjustment. SS: (Super Sync, refer to Page 9) (None):The group is not participate in flash. When setting the flash mode and parameters on the controller, the screen of the flash on the transceiver will not change. Setting 2. About the Super Sync(SS) Use the non-high speed sync flash to realize higher sync speed, this function is more applicable to strobe flashes whose flash duration is longer, and it is for the camera w h i c h s u p p o r t A u t o F P o n l y. Support setup the time delay parameter of Super Sync. 1.Set the time delay parameter of controller SS: Long press the [AF/SS] button to proceed setting, press the [UP][DOWN][LEFT][RIGHT] button to adjust, press [OK] to confirm and exit setup, supports Automatic Setup (AU) or Manual Setup 0.1-3.0. 2. Using Super Sync: 1).Set the flash in manual mode, Support transceiver using hot shoe flash or connecting to the PC port . and it may needs setting at manual full-power flash output (1/1). 2).Set the flash sync speed of the camera as AUTO FP, the maximum shutter sync speeds can reach to 1/8000s. According to the flash model, output power and shutter speed to adjust controller “SS” to a suitable time delay parameters. 3).Take photos and check whether the photos are synchronous , it may see gradations or variations in the photos, results depend on the camera and flash. Setting 3.ZOOM It support the controller setting the the focal length of the flash lamp holder on the transceiver. Each short press the [ZOOM/CH] button, choose one of the A/B/C group, press the [UP] [DOWN] [LEFT] [RIGHT] buttons to setup, supports the range of setup: 24200,AU (automatic), press the [OK] button to confirm. 4. AF Assist Beam Emitter When using AF under low-light, the built-in AF-assist beam emitter of the contorller will be emitted automatically to make it easier to autofocus. Short press the [AF/SS] button to enable/disable the AF Assist Beam Emitter function, the LCD will displayed the icon. ※ It need to using single AF of the camera. Flash awaking and triggering 1.Flash awaking&Testing flash When half press the shutter button of the camera or press the [TEST] button of the controller , the awaking indicator light of green light will bright, the hot-shoe flash on the transceiver will be awakened. When loosing the [TEST] button, the groups have been selected of flash will be tested for once. 2.Flash triggering Completely press the shutter button of the camera will trigger the flash synchronously, the triggering indicator light of red light will bright. Examples: The other Trigger Modes 1.Non-Remote Control Mode: Set the compatible flash on the transceiver to Manual or RPT flash mode, the flash will work according to the mode and parameters displayed, the controller will not support the remote controlling the flash mode or flash exposure compensation (flash output). 2.PC interface & Basic flash Trigger(Support non Nikon body) PC interface (input) trigger: Use LS-PC/PC cable (option)to connect the controller and the PC interface of camera. Basic flash (Single Contact) trigger: Install the controller on the camera hot shoe. 1).Transmitting group setup: Group setup according to the controller. 2).Flash mode setup: Set the manual flash(M) mode through the flash control panel, change the flash output manually, use the controller PC interface or main flash contact trigger, not support high speed sync or other TTL function (the highest synchronous speed is 1/250s or lower). Shutter Release Function Use the YN-622N transceiver for wireless transmitting, the YN-622N-TX controller as the shutter signal output. 1).Install the YN-622N-TX controller on the camera’s hot shoe, and use LS-2.5 series shutter connecting cable(may additional purchases) to connect the controller and camera. 2).Long press the [TEST] button of YN-622N transceiver to focus, loosen the [TEST] button to shot. If the flash installed o n t h e Y N - 6 2 2 N t r a n s c e i v e r, t h e f l a s h w i l l f i r e synchronously. Support single shot only. If the controller does not installed on the compatible camera’s hot shoe, the shutter will release when pressing the [TEST] button of transceiver. The compatible shutter release cable list: LS-2.5/N1: D200/D300/D300S/D700/D800 LS-2.5/N3: D90/D600/D3100/D3200/D5000Series/D7000Series LS-2.5/N2(Optional): D70/D70S/D80 Reference 1.Flash Shutter Sync: Refer to the camera’s setting. Supports front-curtain sync, rear-curtain sync and high speed synchronous(Auto FP*).The relevant icons will be displayed on the LCD(P.4). Using high-speed synchronization need to set the flash sync speed of the camera to “AUTO FP”. The maximum sync speed is 1/8000s or 1/4000s (depends on the camera). Some models of camera does not support the HSS (without Auto FP option), the shutter speed will be limited to 1/250s or less when using this kind of camera. 2.About the LCD backlight: Press any button, the LCD backlight will light for 5 seconds. 3.About the battery electricity display : The battery icon in the upper right corner of the LCD will display the current electricity. When in low battery, the battery icon will blink, please replace the battery. 4. About the Automatic Save Function: Then controller will automatically save the settings of channel, grouping, flash mode, AF assist beam emitter etc. Reference 5.Factory Reset Hold down the [MODE] and [AF/SS] buttons at the same time until the screen as shown, then loosen to restore factory settings. 6.USB Firmware Upgrade 1).Visit YONGNUO official website: http://www.hkyongnuo.com/e-detail.php?ID=339 to download the firmware upgrade software and the latest firmware. 2).Turn off . Keep pressing [mode] button and turn on again. The screen will show firmware upgrade interface(will display the current version ). 3).Connect the controller to PC via USB-MINIB cable (not include) . 4).Complete the firmware upgrade operation according to the prompt of software. Troubleshooting 1. Fail to power on or automatic shutdown: The battery is loaded inversely or exhausted. Ø Install the battery according to the correct direction the battery compartment indicates and ensure the battery is full and restart the power . 2. The flash doesn't fire Ø Ensure the power of all equipments are full, the flash is in ready state(the flash-ready indicator on) Ø The connection among the control ler( transceiver), camera and the flash is reliable; Ø Whether the controller and transceivers are set in the same channels and controllable groups. 3. i-TTL underexposure or overexposure: Check whether the camera body or the flash set compensation setting. It may be underexpose if exceeds the flashing effect distance . It may overexposure when TTL and manual flash are used at the same time, now the manual flash suits to be used as a backlight. v It is suggested using the following procedures to deal with when other trouble occur during the using: 1). Restart all the equipments. 2). Replace the batteries of the controller and transceivers. 3). Reset the factory set of the controller and transceivers. 4).Reset the factory set of the camera/flash. Specifications System type: Digital FSK 2.4GHz wireless controller Distance: 100M Channel: 7 Flash mode: i-TTL, Manual flash, Super Sync Sync mode: front-curtain sync, rear-curtain sync, Hi-speed sync(Auto FP) Groups: 3Groups (A/B/C) MAX Sync speed: 1/8000s Trigger Interface: Hot-shoe,PC Shutter release interface: 2.5MM shutter release interface USB Firmware Upgrade: support AF Assist Beam Emitter: support Battery: AAX2(support 1.2 V rechargeable battery)3V Stand-by time: 120h Dimensions: 89.5×53×39mm Weight:82g The functions of this user manual are based on test conditions of our company. Further notice will not be given if the design and specifications change. The YONGNUO logo in this manual includes the registered trademark or trademark of Shenzhen Yongnuo Photography Equipment Co.,Ltd in China or/and other countries(regions). All other trademarks are the property of their respective owners. 目录 产品功能简介 . . . . . . 说明书约定 . . . . . . . 支持的功能列表 . . . . . 各部位名称/显示屏 . . . . 各部位名称、快速使用指南 . 使用前准备 . . . . . . . 设置 . . . . . . . . . . 闪光灯唤醒、引闪 . . . . . 其他引闪模式 . . . . . . 快门线功能 . . . . . . . 参考 . . . . . . . . . 故障排除 . . . . . . . . 规格 . . . . . . . . . . . . . . . . . . . . . . . . . . . . . . . . . . . . . . . . . . . . . . . . . . . . . . . . . . . . . . . . . . . . . . . . . . . . . . . . . . . . . . . . . . . . . . . . . . . . . . . . . . . . . . . . . . . . . . . . . . . . . . . . . . . . . . . . . . . . . . . . . . . . . . . . . . . . . . . . . . . . . . . . . . . . . 1 . 2 . 3 . 4 . 5 6-7 8-10 . 11 . 12 . 13 14-15 . 16 . 17 注意事项 连接或安装本产品时,请关闭所有设备电源。 请保持干燥,勿用湿手接触产品,亦不可将产品浸入水中或暴露 雨中,否则可能引起无法正常使用,甚至损坏。 请勿在易燃易爆场合中使用,违反此警告可能引起爆炸或火灾。 本产品涉及电池,关于电池的使用请严格按照相关规定,否则会 引起财产损失或人身伤害。 产品功能简介 首先感谢您选购永诺产品。 YN-622N-TX i-TTL 无 线 引 闪 控 制 器 是 为 YN-622N iTTL无线引闪收发器配套使用的产品。 本产品使用人性的LCD菜单控制,支持A/B/C三组闪光灯混 合使用i-TTL,手动闪光或超级同步模式,可调整各分组曝光补 偿或闪光输出,支持设定三组闪光灯不同的焦距,遥控距离可 达100M, 支 持7个 无 线 频 道 及A/B/C三 个 分 组 , 并 带 有 辅 助 对 焦灯功能,支持USB固件程序升级。 兼容的相机列表:尼康 D70/D70S/D80/D90/D200/D300/D300S/D600/D700/ D800/D3000系列/D5000系列/D7000系列 随附物品: 1×YN-622N-TX 控制器 1×用户手册 1×LS-2.5/N1 快门连接线 1×LS-2.5/N3 快门连接线 说明书约定 本说明书为假定使用兼容的相机/闪光灯,并且使用相同频道 的YN-622N收 发 器 , 本 产 品 所 支 持 的 功 能 取 决 于 使 用 的 相 机 及闪光灯,有关YN-622N收发器、相机及闪光灯的操作,请阅 读其使用手册。 最新版本的兼容性列表、用户手册及升级固件请访问 www.hkyongnuo.com获取。 使用前请将固件升级到最新版本(第15页)。 YN-622N-TX YN-622N 此用户手册中使用以下图标: 表示短按按钮。 表示长按按钮。 支持的功能列表 LCD屏幕显示,多按键快捷操作 可通过USB接口升级固件 支持无线快门线功能 可单独调整A/B/C三组闪光灯焦距 内置辅助对焦灯(可禁用) 分组闪光模式:i-TTL/手动闪光/超级同步 A/B/C三组闪光灯可混合使用i-TTL、手动闪光及 超级同步 可单独调整A/B/C三组闪光灯曝光补偿或闪光输出 快门同步:前帘同步,后帘同步,FP高速同步,支持最高同步速度 为1/8000s 支持曝光补偿,闪光值锁定功能 支持模拟(造型)闪光、防红眼闪光 支持闪光灯头变焦(自动) Super Sync(SS)时延调整,更好支持(伪)高速同步功能 设置自动保存 可通过PC接口输入闪光同步信号 支持标准热靴(非尼康机身)的基本闪光引闪(最高同步速度为1/250s) *以上功能需配合YN-622N收发器使用, 以下功能的使用请参阅相 机 及 闪 光 灯 制 造 商 说 明 书:闪 光 值 锁 定(FV LOCK), 造 型 闪 光 , 防 红 眼闪光等。 各部位名称/显示屏 ※此处保护薄膜可以撕去。 显示屏 高速同步 后帘同步 灯头变焦 闪光参数 显示区 i-TTL 均衡补充闪光 电池电量 频道 辅助对焦灯 各部位名称/快速使用指南 A-显示屏:显示控制器的所有设定,方便您查看、设置。 B-2.5MM快门线接口:无线快门线功能(第13页)。 C-辅助对焦灯:(第10页)。 D-PC接口:输入闪光同步信号(第12页)。 E-USB接口:通过与电脑连接升级控制器固件(第15页)。 F-Mode按钮:每按一次在各闪光模式中切换(第8页)。 G-Group按钮:箭头所示切换设置的分组(第8页)。 H-TEST按钮:长按唤醒闪光灯,松开时测试闪光(第11页)。 I-选择/设置按钮组:多功能按钮组,包括【上】【下】【左】 【右】及【OK】按钮,可设置频道、焦距、闪光输出等参数。 J-AF/SS按 钮 : 短 按 为 辅 助 对 焦 灯 开 关(第10页), 长 按 为SS参 数设置(第9页)。 K-ZOOM/CH按钮:每短按一次,将在A/B/C三组焦距中切换 (第10页),长按设置频道(第7页)。 L-电源开关:滑动至ON为电源开。 M-状态指示灯:通信时亮绿灯,引闪(快门释放)时亮红灯。 N-固定环及锁定销:(第6页) O-热靴固定脚及触点:(第6页) P-电池仓及电池仓盖:(第6页) 使用前准备 1.安装电池 打开电池仓,根据电池仓正负极方向 安 装 两 节AA电 池 ( 不 含 ),可 以 使 用 两节1.2V充电电池。 长期不使用产品请将电池取出, 更换电池时,请两节一起更换。 2.安装控制器于相机机顶热靴 1). 按箭头方向旋松固定环。 2). 将热靴固定脚完全卡入相机热靴插座。 3). 按箭头方向旋紧固定环,锁定销将伸出将控制器锁定在相机 热靴插座上。 3 .开 启 电 源 将 电 源 开 关 滑 动 至 【O N】 开 启 电 源 。 使用前准备 4.设置频道: 长 按 【 ZOOM/CH】 按 钮 , 再 按 【 上 】 或 【 右 】 增 加 , 按 【下】或【左】减少,按【OK】确定。设置与YN-622N收发 器相同的频道。 5.收发器及闪光灯设置: 1).设置好收发器接收分组并设置好与控制器在相同的频道。 2).将闪光灯设置在i-TTL模式*, 该闪光灯将根据发控制器设置 的闪光模式及参数闪光,支持 i-TTL/手动闪光 。(*将闪光灯 设置在非i-TLL模式或使用其他引闪模式,请参考第12页)。 设置 1.分组及模式设置(远程控制模式): 为各组设定不同的闪光模式拍摄。 1).按 【GROUP】 按 钮 选 择 设 置 组 , 每 按 一 次 依 箭 头 所 指 选 择 A/B/C 组。 2).按 【MODE】 按 钮 设 置 所 选 分 组 闪光模式 ,每按一次设置如下: TTL:i-TTL,支持调整范围-3-+3EV,按【左】或 【右】增加 或减小1 EV,按【上】或【下】增加或减小0.3EV。支持直接在 闪光灯上设置曝光补偿,补偿值将与控制器设置的补偿值叠 加。 M:调节范围1/128-1/1,按【左】或【右】调整,按【上】 或【下】微调。 SS:超级同步(SuperSync,见第9页) (无):该组不参与闪光。 在控制器远程设置闪光模式及参数时,收发器上的闪光灯屏 幕将不会变化。 设置 2.关于超级同步( SS ) 使用非高速同步闪光灯实现更高的 同步速度,本功能更适合闪光持续时 间较长的影楼灯,只限于使用支持自动 FP(高 速 同 步)的 相 机 , 支 持 设 置SS时 延参数。 1.设置控制器SS时延参数: 长按【AF/SS】按钮进行参数设置,按【左】或【右】调整, 按【上】或【下】微调,按【OK】按钮确认并退出设置,支持 自动设置(AU)或手动设置0.1-3.0。 2 .使用超级同步: 1.)将闪光灯设置在手动模式,支持使用热靴闪光灯或PC接口连 接闪光灯。可能需要设置全功率闪光输出(1/1)。 2.)设 置 相 机 为 “ 自 动FP闪 光 ” , 快 门 同 步 速 度 最 高 可 设 置 在 1/8000s,根据使用的闪光灯、输出功率、快门速度不同调 整至一个合适的时延参数。 3.)拍摄并检查照片是否同步,可能会看到光线的层次变化,效 果将根据相机及闪光灯不同会有所不同。 设置 3.ZOOM:闪光灯头焦距 支持在控制器设置收发器上的闪光灯头焦距。 每 短 按 一 次 【 ZOOM/CH】 按 钮 , 选择A/B/C组其中一组焦距设置,按 【上】【下】【左】【右】按钮设 置,支持设置的范围:24-200,AU(自 动),按【OK】按钮确定。 4.辅助对焦灯 当光线不足以自动对焦时会启动辅助对焦灯功能,控制器的 辅助对焦灯会点亮以辅助镜头更容易对焦。 短按【AF/SS】按钮启用/禁用辅助对焦灯功能,显示屏将有图 标显示。 ※ 需相机 使用 单次AF模式。 闪光灯唤醒、引闪 1.闪光灯唤醒、测试引闪 半按相机快门按钮或 按住控制器【TEST】按钮,绿色唤醒指示 灯亮,收发器的 热靴闪光灯将被唤醒。 松开【TEST】按钮时, 所选分组闪光灯将被测试闪光一次。 2.引闪闪光灯 完全按下相机快门按钮时将同步引闪闪光灯,红色引闪指示灯 亮。 示例: 其他引闪模式 1.非远程控制模式 将收发器上的兼容的闪光灯设置在手动闪光或重复闪光模式, 控制器将不支持远程设置其闪光模式或曝光补偿(输出功 率),该闪光灯将根据其显示的模式及参数闪光。 2.PC接口、基本闪光引闪(支持非尼康机身) PC接口(仅限输入使用):使用LS-PC/PC连接线(另购)连接控制 器及相机的PC接口。 基本闪光(单触点)引闪:安装控制器于标准热靴的相机。 1) .发射分组设置: 依据控制器分组设置。 2).闪光模式设置:通过闪光灯控制面板设置在手动闪光( M )模 式,手动更改闪光输出,使用控制器PC接口或主闪光触点引 闪 , 不 支 持 高 速 同 步 或 其 他 TTL功 能 (最 高 同 步 速 度 为 1/250s或更低)。 快门线功能 使用YN-622N收发器无线发射,YN-622N-TX控制器作快门信 号输出。 1).将YN-622N-TX控制器安装于相机机顶,并使用LS-2.5系列快 门连接线(可能需要额外购买)将控制器与相机快门接口连接。 2) .长按YN-622N收发器【TEST】按钮对焦,松开【TEST】按钮 时将触发快门,若YN-622N收发器上安装了闪光灯,该闪光 灯将同步闪光。 只支持单张拍摄。 若控制器没有安装于兼容的相机热靴,快门将会在按下收发 器【TEST】按钮时释放。 兼容的快门线型号: LS-2.5/N1: D200/D300/D300S/D700/D800 LS-2.5/N3: D90/D600/D3100/D3200/D5000系列/D7000系列 LS-2.5/N2(需另购): D70/D70S/D80 参考 1.关于闪光快门同步: 请在相机上进行设置,支持前帘同步、后帘同步、高速同步 (自动FP ),将有相关图标在控制器屏幕上显示(第四页)。 使用FP高速同步需相机及闪光灯支持, 需设置相机闪光同步速 度 为"自 动FP”, 最 高 同 步 速 度 为1/8000s或1/4000s( 取 决 于 相 机)。 部分相机机型不支持高速同步(无自动FP选项),使用这些类型的 相 机时,快门速度会被限制在1/250s或更低。 2.关于LCD背光: 按任何按钮,屏幕背光将点亮5秒。 3.关于电池电量显示: 屏幕右上角电池图标将显示当前电量,当电量不足时,电池图标 闪烁,请更换电池。 4.关于自动保存功能: 控制器将自动保存频道,分组, 闪光模式, 辅助对焦灯等设置。 参考 5.恢复出厂设置 同时按【MODE】与【AF/SS】按钮, 直至屏幕如图所示后松开,恢复出厂设 置。 6.USB固件升级 1).访问永诺官方网站: http://www.hkyongnuo.com/s-detail.php?ID=339 下载固件升级程序及最新固件。 2).关 闭 电 源 , 按 住<MODE>按 钮 的 同 时 重 新 打 开 电 源 , 屏 幕 显示进入固件升级界面(将显示当前版本号)。 3).使用USB-MINIB连接线(不含)将控制器与PC进行连接。 4).按照软件上的提示完成固件升级操作。 故障排除 1.无法开机或自动关机: 电池装反或电池耗尽。 Ø 按照电池仓指示标志的正确方向安装(更换)电池,并确保 电池有电,重新开启电源。 2.闪光灯不闪光: Ø 确保所有设备电池电量充足, 闪光灯在就绪的状态(闪光灯 回电指示灯已点亮)。 确保 控制器(收发器),闪光灯及相机安装连接可靠。 Ø Ø 确保控制器及收发器已设置在相同的频道及可控制的分组。 3. i-TTL闪光曝光过度或曝光不足 检查是否在相机机身或闪光灯上设置了曝光补偿;超出闪光 有效距离可能会曝光不足;TTL与手动闪光模式混合使用时可能 会过曝,此时手动灯适合作为背景灯使用。 v 在使用过程中遇到其他故障,建议进行以下步骤解决: 1).重启所有设备。 2).给控制器/收发器更换电池。 3).恢复控制器及收发器出厂设置。 4).恢复相机/闪光灯出厂设置。 规格 系统模式:数字FSK 2.4GHz无线控制 距离: 100M 无线通道: 7个 闪光模式: i-TTL、手动闪光、超级同步 同步模式: 前帘、后帘、高速同步 分组控制: A/B/C 3个组别 最高同步速度:1/8000s 引闪接口:热靴、PC接口 快门接口:2.5MM快门接口 USB固件升级:支持 辅助对焦灯功能:支持 闪光灯变焦功能:支持 电池:AAX2节 (支持1.2V充电电池)3V 待机时间:120小时 体积:89.5×53.5×39mm 重量:82克 本手册中的功能是依据本公司的测试条件获得。设计和规格如有变 更,恕不另行通知。 本手册中的永诺(YONGNUO)徽标是深圳市永诺摄影器材股份有限 公司在中国或/和其他国家(地区)的注册商标。其他所有商标均为其 各自所有者拥有。