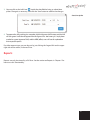
1
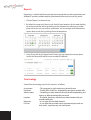
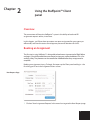
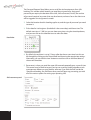
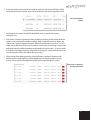
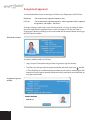
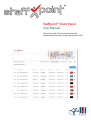
™
Staffpoint™ Client Panel
User Manual
Get to know the Client control panel and
revolutionize the way you personnel your shifts.
Retail
™
2
Retail
™
Contents
Chapter 1
5
Welcome to the Staffpoint™ Client Panel
Chapter 2
9
Using the Staffpoint™ Client panel
5
Introducing the Staffpoint™ Client management panel
6
The Client Interface
7
Shift Status
8
Reports
8
Terminology
9
Overview
9
Booking an Assignment
12
Assignment Approval
13
Reports
14 Going Further
3
Retail
™
4
Chapter
1
Welcome to the Staffpoint™
Client Panel
Introducing the Staffpoint™ Client management panel
As a valued customer, your staffing agency (or head office) has provided you with free
access to their Staffpoint™ personnel scheduling system. This manual will show you
how quick and easy it is to use the Client Interface, as well as the incredible benefits
that this will provide for you the client. If you can remember Red, Blue, Green and
Black then you can already speak Staffpoint™.
The system is web-based, so you can follow Staffpoint™ from anywhere you have
internet access. The client interface allows you to quickly and easily send personnel
requests to your agency, and to see the status of those requests in real time, anytime.
Whenever you create a new personnel request through your username and password,
it creates red tags that show up on your office’s main scheduling module as well as on
your status screen. Your office will therefore be able to fill your personnel request in
the fastest time possible.
You’ll see when your request has been filled, as it will turn the red tag to blue on your
status screen. You the client can click to see exactly who is coming, and cancelling
shifts that you no longer need is as easy and clicking on the little garbage can. Both
your office and their personnel that were assigned will get instant notifications
through emails or phone calls. If your office has given you permission to sign out
assignments, you’ll be able to sign off on completed shifts, turning the tags Green.
In case you, the client, want to set different permissions for requesting and
approving shifts, Staffpoint™ accounts can be set to do both or just one or the other.
Communicating personnel requests and following up on their status has never been
so quick and easy. Staffpoint™ also records every interaction, so with just a few clicks,
you can pull up custom reports to see all your business activity with your office.
Your Staffpoint™-equipped office can therefore provide you a level of customer service
that is not otherwise possible. Direct shift requests, real time status, changes and
updates, reports on demand and so much more.
Please enjoy using your free Staffpoint™ Client management panel.
5
Retail
™
The Client Interface
After logging in as shown below, you’ll come to the Assignment Status screen.
The Assignment Status screen is the default view of the Staffpoint™ Client interface.
This is where you’ll be able to quickly and easily view what’s going on.
Menu bar
The way to navigate around
the Client interface
Assignment Status
screen (full user)
Shift Status
Colour-coded to
show if a shift is being
worked or not.
Cancel Shifts
Click to cancel an open
shift request.
Shift list
This is where you view the vital
information on your shift requests.
The locations that you as a Client User are able to book assignment requests for is
limited by your profile and account-type. You can be limited to a single location, or be
able to book for your entire organization.
6
Retail
™
Shift Status
The Shift Status screen shows you (as a shift requester or full user) all the current
assignments at your location(s). You will see details for each shift, including the
personnel type requested, its location, the attached personnel (if any), if it has been
approved, the from/to date/time, and shift duration. Lastly, colour-coded shift-status
blocks will show you, at a glance, which shifts have personnel assigned, which are
empty, and more. For a Requester, the screen is largely similar, with the exception that
only the New Request and Logout tabs are visible.
Black - A cancelled shift. A shift of any colour will become black when
cancelled.
Red - An open shift; one with no personnel member attached to work it.
Blue - A confirmed shift; one that has a personnel member attached to
work it. When approved as complete, it will become green.
Green - A completed shift as approved by a scheduler.
Clicking on a name under the Personnel column will bring up a shift details panel that
will give you some more details on that assignment.
Shift Details panel
Finally, any open shift can be cancelled before it has begun (within the limit defined by
your head office or agency) by clicking on the ‘Cancel Shift’ trash can icon. This will turn
its status to black.
7
Retail
™
Reports
Reporting is a valuable tool for anyone that wants to keep tabs on their organization, and
Staffpoint™ provides excellent reporting functionality that works just the way you do.
1. Click on ‘Reports’ in the menu bar.
2. By default, the report will show results for all of your locations, for the week leading
up to the current day, although clicking on the calendar icon will bring up a date
picker which you can use to easily select dates.You can change which location the
report shows results for by picking it from the dropdown.
3. Lastly, if you click on the ‘Export Excel’ button, you can export the current report
results to a Microsoft Excel file to use outside of Staffpoint.
Terminology
Some of the terminology used in this manual is as follows:
Assignment
Personnel
Administrator
Location
Requester
Full user
8
- This represents a single continuous period of work.
- The RNs, RPNs, PSWs, etc... employed by your agency to work shifts.
- Scheduling or other administrative personnel employed by your
agency or office to manage the personnel.
- A hospital, franchisee, warehouse or other location that you
provide staffing for.
- A user type who can book requests.
- A user type that can book new assignment requests and see
their status, sign them out, and view reports.
Chapter
2
Using the Staffpoint™ Client
panel
Overview
The cornerstone of the entire Staffpoint™ system is the ability to book and fill
assignment requests online, in real time.
In this chapter, you’ll learn how to create a new open assignment for your agency or
office to fill, and view the status of and approve personnel selections for shifts.
Booking an Assignment
The first step in using Staffpoint™ is being able to book new assignment to be filled. Before
we begin, it should be noted that once created, assignments cannot be deleted. This is for
auditing safety. They however can be cancelled or modified before they are approved as
complete.
Booking an assignment is easy. To begin, first open up the Client panel and log in - the
first thing you’ll see is the Assignment Status screen.
New Request Page
1. Click on ’New Assignment Request’ in the menu bar to go to the New Request page.
9
Retail
™
The Personnel Request Panel allows you to set all the vital requirements for a shift
booking. This includes which location you need the assignment for, the type of
personnel you require, the duration of the shift, shift recurrence (if at all), the number
of personnel required, any notes that may be relevant, and more. You as the client user
will be tagged as the assignment’s creator.
2. Select the location that this booking applies to, and the type of personnel you need
to cover it.
3. Pick a date for it to begin on (the default is the current day) and then a time. The
default start time is 7 AM, but you can choose any time using the time dropdowns,
and you can click on the calendar icons to select the dates.
Date Picker
4. By default, the end time is set to 12 hours after the chosen start time, but this can
be changed by clicking on the ‘Date to’ field and choosing the appropriate settings.
Alternately, you can click the ‘now’ button to set either start or end time/dates to
the current time/date.
5. Recurrence is when you need the same shift covered repeatedly over a span of time.
This control may be familiar to you if you’ve ever used any kind of calendar or taskmanagement software, or even backup software. If you click the ‘Edit’ beside the
‘Recurrence’ heading, the Shift Recurrence panel will open up, presenting you with
all of the various options for setting up a repeating shift.
Shift recurrence panel
10
Retail
™
6. Enter the number of personnel you need to work this shift. Extra Shift Tags will be
created based on the number of personnel entered in the “# of assignments’ field.
Personnel Request
Queue
7. Anything can be written in the Shift Note field, such as special instructions,
reminders, etc...
8. Click on the ‘Create Assignment’ button to add this booking to the queue. Multiple
requests can be queued up before sending - both single and recurring. When you
click on the ‘Create Assignment’ button, they will be queued but not sent. This will
allow you to delete any shifts you’ve made in error or that are no longer required, or
add more requests without needing to repeatedly go back to step 1. If you’ve made
a mistake or no longer need any assignment in the queue, simply click the trash can
icon that appears when you mouse over any listing.
9. When you’re done adding requests, click the ‘Send Assignments’ button at the
bottom and the shift bookings will be added to the Assignment Status as new
entries. Events will also be appended to the Event Log in the office’s system.
Many new assignments
waiting to be filled!
11
Retail
™
Assignment approval
As mentioned earlier, there are two types of Client users: Requesters and Full Users.
Requester
Full user
- Can create new assignment requests only.
- Can create new assignment requests, view assignment status, approve
assignments, see reports - full access.
To recap: viewing a shift’s status, at its most basic level, is as easy at noting its colour
tag at the right of the Assignment Status screen. However, a Full User can view a
assignment’s details by clicking on any name under the Personnel column to bring up
the Shift Details window.
Shift Details window
To view or modify a shift as a Full User:
1. Log in to your Client panel and go to the Assignment sign-out section.
2. Find the entry that you want to approve and click the check mark icon ‘ ‘ beside
it. This will bring up a confirmation panel where you can edit its time/duration (for
example if the personnel member had to leave early, worked an extra half hour, or
was late due to traffic)
Assignment sign-out
window
12
Retail
™
3. You can click on the ‘edit’ icon ‘ ‘ beside the date field to bring up a date/time
picker. Change it as necessary, and click the ‘Save’ button to confirm the changes.
date/time picker
4. To approve the shift, marking it as complete, click the ‘Approve shift’ button, and the shift
will turn green. It will then disappear from the Sign-out list - don’t worry, it’s simply been
marked as a green ‘approved’ shift, and the HRM (office) users will see this updated on
their respective panels.
For either account type, you can log out by just clicking the ‘Logout’ link on the upper
right side of the screen, in the menu bar.
Reports
Reports can only be viewed by a Full User. See the section on Reports in Chapter 1 for
how to use this functionality.
13
Retail
™
Going Further
Congratulations, you’ve gotten to the end of the Staffpoint™ Client Panel manual. Now
that you’re familiar with its basic tools and features you can start filling more shifts,
more easily, and more effectively.
Reading through, you’ve learned to book new shifts, view and approve shifts, view
reports and more.
Staffpoint™ offers advanced tools for staffing and personnel management, but it’s
always getting better. Look forward to even more tools and functionality to come from
Staffpoint™, and we’re sure that as you use it, you may even find ways of doing things
that are even more efficient than we’ve tried to explain in this manual.
14