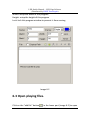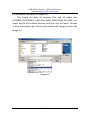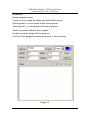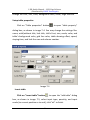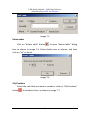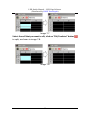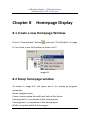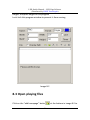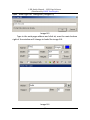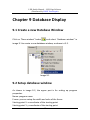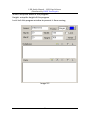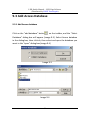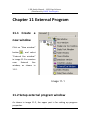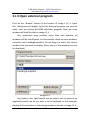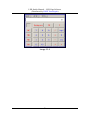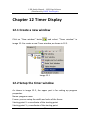
1
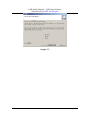
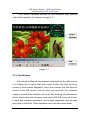
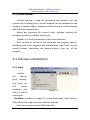
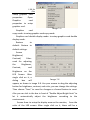
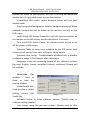
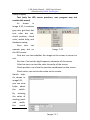
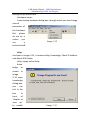
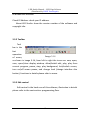
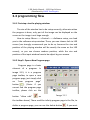
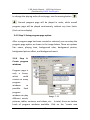
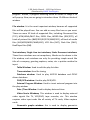
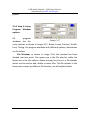
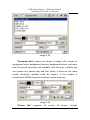
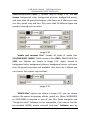
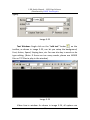
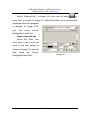
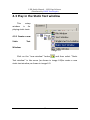
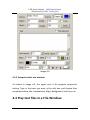
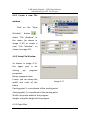
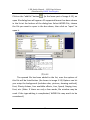
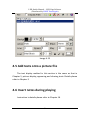
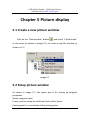
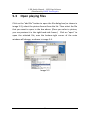
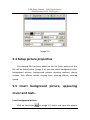
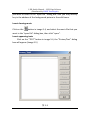
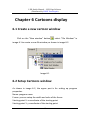
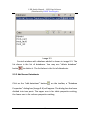
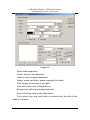
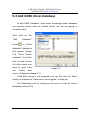
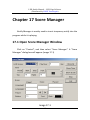
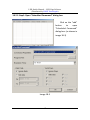
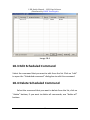
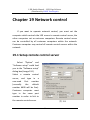
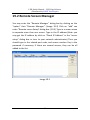
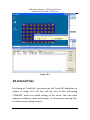
LED STUDIO SDK (LED Sign Software Manual) Distributed by DMX Tecnologías www.dmxtec.com www.pantallasled.com.mx www.displaysled.com 1 Menu LED Studio SDK LED STUDIO SDK (LED Sign Software Manual) ............... 1 Distributed by DMX Tecnologías ......................................... 1 Menu LED Studio SDK ......................................................... 2 Chapter 1 Introduction ..................................................... 1 1.1 Features .................................................................... 1 1.2 Operating Environment ............................................ 1 Chapter 2 Install and Uninstall .......................................... 2 2.1 Installation ................................................................ 2 2.2 Uninstall ................................................................... 3 Chapter 3 Instruction in details ......................................... 5 3.1 Consists of Program.................................................. 5 3.2 Interface Window Introduction ............................... 6 3.2.1 Play Window .............................................................. 7 3.2.2 Control window ......................................................... 8 3.3 Features introduction ............................................... 8 3.3.1 Menu.......................................................................... 8 3.3.2 Toolbar ..................................................................... 15 3.3.3 Edit control............................................................... 15 3.4 programming flow .................................................. 16 3.4.1 First step: size the playing window .......................... 16 3.4.2 Step 2: Open a New Program page .......................... 16 3.4.3 Step 3: Setup program page option. ........................ 17 3.4.4 Step 4: Create program windows............................. 17 3.3.5 Step 5: Setup Program Window options ................. 19 3.3.6 Step 6: Finish Programming ..................................... 23 2 3.3.7 Step 7: Play the program ......................................... 24 Chapter 4 Character display ............................................ 25 4.1 play in a document window ................................... 25 4.1.1 Create a new window .............................................. 25 4.1.2 Setup Text window................................................... 26 4.1.3 Insert and edit text .................................................. 27 4.2 Play in a single line text window ............................ 29 4.2.1 Create a new Single Line Text window ..................... 29 4.2.2 Setup Single Line Text window................................. 30 4.3 Play in the Static Text window................................ 32 4.3.1 Create a new Static Text Window ............................ 32 4.3.2 Setup the static text window ................................... 33 4.4 Play text files in a File Window .............................. 33 4.4.1 Create a new File window ....................................... 34 4.4.2 Setup File Window .................................................. 34 4.5 Add texts onto a picture file ................................... 36 4.6 Insert notes during playing..................................... 36 Chapter 5 Picture display ................................................ 37 5.1 Create a new picture window ................................ 37 5.2 Setup picture window ............................................ 37 5.3 Open playing files ................................................ 39 5.4 Setup picture properties ........................................ 40 5.5 Insert background picture, appearing music and texts. ...................................................................................... 40 Chapter 6 Cartoons display ............................................. 43 6.1 Create a new cartoon window ............................... 43 6.2 Setup Cartoons window ......................................... 43 6.3 Open playing files. .................................................. 44 6.4 Setup Cartoons file properties ............................... 46 3 Chapter 7 table display ................................................ 47 7.1 Create a new table window ................................... 47 7.2 Setup Table Window .............................................. 47 7.3 Insert and edit tables ............................................. 49 Chapter 8 Homepage Display ....................................... 53 8.1 Create a new Homepage Window. ........................ 53 8.2 Setup homepage window ...................................... 53 8.3 Open playing files ................................................... 54 Chapter 9 Database Display ............................................ 57 9.1 Create a new Database Window ............................ 57 9.2 Setup database window ......................................... 57 9.3 Add Access Database.............................................. 59 9.3.1 Add Access database................................................ 59 9.3.2 Add Access Datasheets ............................................ 60 9.3.3 Edit Access Datasheets............................................. 62 9.3.4 Delete Access Datasheets ........................................ 62 9.4 Add ODBC driver database ..................................... 63 Chapter 10 Date and Time .............................................. 64 10.1 Create Date/Time window ................................... 64 10.2 Setup date/time window ..................................... 65 10.3 Setup date and time ............................................. 66 Chapter 11 External Program .......................................... 68 11.1 Create a new window........................................... 68 11.2 Setup external program window.......................... 68 11.3 Open external program ........................................ 70 Chapter 12 Timer Display ............................................... 72 12.1 Create a new window........................................... 72 12.2 Setup the timer window ...................................... 72 12.3 Time Setting ......................................................... 73 4 Chapter 13 VCD/DVD display .......................................... 75 13.1 Direct playing ....................................................... 75 Chapter 14 Video Line-in Display .................................... 77 14.1 Create a new window........................................... 77 14.2 Setup Video Window ........................................... 78 Chapter 15 PowerPoint Display ....................................... 79 15.1 Play ....................................................................... 79 15.2 Stop playing .......................................................... 80 Chapter 16 Notify display ............................................... 81 16.1 Open “Notify Manager” Window ........................ 81 16.2 Setup Notify Manager Window ........................... 81 16.3 Play/Stop Notify Display ....................................... 82 Chapter 17 Score Manager.............................................. 83 17.1 Open Score Manager Window ............................. 83 17.2 Setup Score Manager Window ............................ 84 17.3 Play/Stop Score .................................................... 85 Chapter 18 Playing Schedule ........................................... 86 18.1 open the schedule table ....................................... 86 18.2 Add Scheduled Command .................................... 86 18.2.1 Step1: Open “Scheduled Command” dialog box. 87 18.2.2 Step 2: Setup Command list properties ................. 88 18.3 Edit Scheduled Command .................................... 89 18.4 Delete Scheduled Command ................................ 89 18.5 Start up Scheduled Command.............................. 90 18.6 Exit ........................................................................ 90 Chapter 19 Network control ........................................... 91 19.1 Setup remote control server ................................ 91 19.2 Remote Screen Manager ...................................... 92 19.3 Remote control..................................................... 93 5 19.4 Send Files ............................................................. 94 19.5 Send Program ....................................................... 95 Chapter 20 Background Playing ...................................... 96 20.1 Activate Background playing ................................ 96 20.2 Cancel Background playing .................................. 97 Chapter 21 Software setting ......................................... 100 21.1 Open software setup .......................................... 100 21.2 Play Window ...................................................... 101 22.1 Open User Setup ................................................ 102 22.2 Add user ............................................................. 103 22.3 Delete User......................................................... 103 22.4 Change Password ............................................... 103 22.5 User Authentication ........................................... 104 Chapter 23 Frequently asked ........................................ 105 6 LED Studio Manual – LED Sign Software (Distributed by DMX Tecnologías) Chapter 1 Introduction 1.1 Features “LED Studio”, programmed and produced for LED by the Program Team of “LED Studio”, is of powerful, practical and easy to learn software for making or playing programs, supporting a range of formats, such as txt documents, doc documents, pictures (BMP/JPG /GIF/PCX……) and cartoons (MPG/MPEG/MPV/MPA/AVI/ VCD/SWF/RM/RA/RMJ/ASF……) 1.2 Operating Environment Operating system Chinese/English Windows98/me/2000/NT/XP Hardware Configuration Pentium 300MHz or above ROM: 64M Graphics Card: Standard VGA 256mode or above Related Software Microsoft Media player--compulsory OFFICE2000—in case of *.doc files RealPlayer—in case of RealPlayer files 1 LED Studio Manual – LED Sign Software (Distributed by DMX Tecnologías) Chapter 2 Install and Uninstall 2.1 Installation “LED Studio” can be easily installed, as shown below: Put the “LED Studio” installation CD into the CD-ROM, The Installation Menu will automatically pop up. (if not, then select this CD-ROM, double click it with your mouse)Then select “Install LED Studio” to start the Installation Guide, as Shown in Figure 2-1.After that, simply follow the instruction on the screen. Note: This software is protected by a serial number. Please enter the correct serial number in order to process the installation. Please ask the products provider for your serial number. After “LED Studio” software has been successfully installed, there will be a “LED Software” program group in the 【Start】/ 【Program】,then move to the “LED Software” under this program group, single click to start. Also, there will be a “LED Studio” short-cup on your desktop: as shown to the right: the program by double click on the icon. 2 . Also, you can start LED Studio Manual – LED Sign Software (Distributed by DMX Tecnologías) Image 2-1 2.2 Uninstall “LED Studio” software provide an auto-uninstall function, for your convenience to delete all “LED Studio” files, program groups and short-cuts, users can either select “Delete LED Studio” under the “LED Software” group, or go to the 【control panel】, select 【add/delete program】 to undergo quick uninstall. (Uninstall window as shown in image 2-2), now select “Automatic” can delete all files, program groups and short-cuts. 3 LED Studio Manual – LED Sign Software (Distributed by DMX Tecnologías) Image 2-2 4 LED Studio Manual – LED Sign Software (Distributed by DMX Tecnologías) Chapter 3 Instruction in details 3.1 Consists of Program Program (Program document) consists of one or more than one program pages. There are two kinds of program page: normal program page and overall program page. Normal program pages are the main components of a program, so there may be many, they will be played in order, one after another; there should be only one overall program page, played throughout the playing process. It is mainly used for fixed contents’ broadcast, such as clock, company logo etc. Program page consists of one or more windows, which is used to show the contents that users want to play, like documents, pictures, cartoons, multimedia segments etc. There are twelve kinds of program windows: file window, text window, single line text window, static text window, table window, timer window, data base window, DVD/VCD window, external software window, date/time window, video line-in window, and geometrical graph window. File window: can play various of files like: words, pictures, cartoons, tables etc. Text window: Used for quick inputs of short writings, such as notifies, etc. Single line text window: to play single line text window , such as notices, adverts etc. writings. 。 5 LED Studio Manual – LED Sign Software (Distributed by DMX Tecnologías) Static text window: to play static texts, like company names, title, etc. Table Window: to edit and play table figures. Timer window: for timing, supporting clockwise and anti-clockwise. Database Window: To play ACCESS Database and ODBC Driver Database DVD/VCD window: to play DVD/VCD External program window: To insert external program into the play window, mainly used for small programs made by users. Date/Time window: to display date and time Video line-in window: to play signals from TV cards, Video Collecting Cards, etc. Geometric graph window: to display geometric graphs like straight lines, circles. 3.2 Interface Window Introduction 6 LED Studio Manual – LED Sign Software (Distributed by DMX Tecnologías) “LED Studio” software consists of two windows: play window and control window. (As shown in image 3-1) Image 3-1 3.2.1 Play Window Play Window (Namely the contents displayed on the LED screen) is to display the contents that users want to play, like files, pictures, cartoons, multi-media fragments. Here, the contents are the same as those on the LED screen, and also they are coherent. This software support several play windows (At most 99) working simultaneously, which means that one computer may control 99 LED screen at a time. In each play window, operations can be done separately, such as open files, play or edit files. These operations will not affect each other. 7 LED Studio Manual – LED Sign Software (Distributed by DMX Tecnologías) 3.2.2 Control window Control window is used for controlling the position, size and contents of the playing area, control window can be expanded to edit window. It contains Menu, Toolbar and Edit control: a control window with Editing is shown below: Menu bar: Including file, control, tools, settings, test(only for producer) and help, in total 6 sub-menus. Toolbar: it is the fast operation of the menu functions. Edit: consists of two parts, left hand side are program options, displaying info of the program and sub-windows; right hand side are control options, controlling the playing actions, time, etc. of the program. 3.3 Features introduction 3.3.1 Menu Include file, control, tools, settings, test (only for LED screen producer) and Image 3-3 help, in total 6 sub-menus. File Menu: as shown in image 3-3, include New, Open, Save, Save as, Open Demo File, Open recently used files and Exit. New: for setting up a new LED Studio file. 8 LED Studio Manual – LED Sign Software (Distributed by DMX Tecnologías) Open: for opening a previously done LED Studio file. Save: for saving current LED Studio file. Save as: for saving current LED Studio file as a new LED Studio file. Open Demo File: for opening demo LED Studio file, to process function demonstration. Open recently used file: for opening recently used LED Studio files. Exit: to exit LED Studio. Control Menu: As shown in image 3-4, it includes play, play last, play next, pause, stop, notify, Image 3-4 score manager, play PowerPoint file, stop PowerPoint file, play VCD/DVD, backup program and manager for LED Screen Sever. Play: to play current LED Studio file. Play last: to play the last program while playing. Play next: to play the next program while playing. Pause: to pause currently playing LED Studio file. Stop: to stop currently playing LED Studio File. Notify: to insert temporary playing notice. Scare manager: for displaying the scores. Play Power point file: for playing PowerPoint files. 9 LED Studio Manual – LED Sign Software (Distributed by DMX Tecnologías) Stop PowerPoint file: to stop the currently playing PowerPoint File. Play VCD/DVD: for playing VCD/DVD files. Backup program: to backup current program. Manager for LED Screen Sever: to manage remote screen, please refer to chapter 17: network control, for details. Tool Menu: as shown in image 3-5, it includes Word, Excel, Paint, Notepad, Calculator, etc. Single click on them can open programs which Image 3-5 coming with windows or pre-installed, to shortcut edit the program. Option Menu: As shown in image 3-6, it includes: Setup Graphics card properties, Graphics card copy mode, graphics card double display, Restore to default, Screen Brightness/Contrast/Color, Screen Area, Virtual/Real LED screen, Play Foreground/background, Lock/Unlock LED Screen Properties, Turn on/off LED Screen Power, Schedule Table, Schedule Hide Setup, Language, Show/Hide Play window, Software Setup, User Setup, etc. 10 LED Studio Manual – LED Sign Software (Distributed by DMX Tecnologías) Setup graphics card properties: Open Graphics card properties to setup graphics card. Image 3-6 Graphics card copy mode: to setup graphics card copy mode. Graphics card double display mode: to setup graphics card double display mode. Restore to default: Restore to default settings. Screen Brightness/ Contrast/ Color: used for adjusting the Brightness, Contrast, and Brightness on the LED Screen. After single click on it, a Image 3-8 dialog box will appear, as shown in iamge 3-8. Use your mouse to drag the adjusting button for brightness, contrast, and color, you can change the settings. Then choose “Save” to save the changes or choose Restore to reset. Also you can tick in the box in front of “Enable Adjust Bright Auto” to let it automatically adjust the brightness according to the environment. Screen Area: to setup the display area on the monitor, from the color of the LED screen. After single click on it, there will be a 11 LED Studio Manual – LED Sign Software (Distributed by DMX Tecnologías) dashed-line frame on your monitor, left click it can drag and adjust the display area. Or right click to exit Screen Area Setting. Virtual/Real LED screen: switch between virtual and real pixel display mode. Play Foreground/background: used for background playing. When selected, contents will not be shown on the monitor, but only on the LED screen. Lock/Unlock LED Screen Properties: Lock the current contents on the monitor to the LED screen, and do not refresh. Vice versa. Turn on/off LED Screen Power: for remote control to turn on or off the power of LED screen. Schedule Table: to setup some schedule for the LED screen, such as turn on/off timing. Pleas refer to Chapter 16 for details. Schedule Hide Setup: Enable/disable schedule hide, a window as shown in image 3-9 will appear after selecting it. Language: setup the operating langue of the software, options like auto, English, French, simplified Chinese, traditional Chinese will be available. Show/Hide Play window: Used to show or hide the playing window. Allow/Forbid Edit: Used to allow or forbid editing current LED Image 3-9 Studio file. Software Setup: to setup software options. (Details refer to software setting chapter) User Setup: setup the purview of users. (Details refer to User 12 LED Studio Manual – LED Sign Software (Distributed by DMX Tecnologías) Setup Chapter) Test (only for LED screen producer, user program may not contain this menu) As shown in image 3-10, it contains grey test, grid test, dot test, color bar test, check position, check color, switch help, and Hardware setup. Grey test: can operate grey test on Image 3-10 the LED screen. Grid test: can test whether the image on the screen is correct or not. Dot test: Can test the high frequency character of the screen. Color bar test: can test the color hierarchy of the screen. Check position: can show the position coordinates on the screen. Check color: can check color value on the screen. Switch help: As shown in image3-11, you can view helps about the switch. By entering the value of starting point and width, the switch 13 Image 3-11 LED Studio Manual – LED Sign Software (Distributed by DMX Tecnologías) setting can be worked out. Hardware setup: It can startup hardware dialog box, through which you can change several parameter of the hardware. But please do not try it unless you Image 3-12 are a technical staff. Help: As shown in image 3-12, it contains Help, Knowledge, Check IP Address, and About LED Studio. Help: supply online help. Know ledge: as shown in image 3-13, open knowledge dialog box, you can tick in the box in front of “display at start up” to enable Image 3-13 14 LED Studio Manual – LED Sign Software (Distributed by DMX Tecnologías) or disable this function. Check IP Address: check your IP address. About LED Studio: show the version number of the software and copyright info. 3.3.2 Toolbar Tool bar is the fast operation Image 3-14 of menu, as shown in image 3-14, from left to right the icons are: new, open, save, open/close display window, allow/forbid edit, play, play from current program, pause, stop, play background, lock/unlock screen, turn on/off screen power, and change look (change interface skin button), functions in details please refer to menu. 3.3.3 Edit control Edit control is the hard core of this software, illustration in details please refer to the next section: programming flow. 15 LED Studio Manual – LED Sign Software (Distributed by DMX Tecnologías) 3.4 programming flow 3.4.1 First step: size the playing window The size of the window has to be setup correctly, otherwise when the program is done, only part of the image can be displayed on the screen or the image is not large enough. How to setup: Menu——>Control——>Software setup, can lead you to the software setup window. There, you can choose lock to LED screen (we strongly recommend you to do so, because the size and position of the playing window will be exactly the same as the LED screen); or you can choose random position, while the size and position of the input window have to be adjust by your mouse. 3.4.2 Step 2: Open a New Program page Program page is a basic element of a program. In image 3-15, it is a program page toolbar, to open a new program page, just simply click on “new program page” button . (Note: if you cannot find the program page toolbar, please click on the button “allow edit” Image 3-15 on the toolbar above). There could be infinity program page in the file, to delete a program page, you can use the delete button 16 . If you want LED Studio Manual – LED Sign Software (Distributed by DMX Tecnologías) to change the playing order of each page, use the moving button 、 . Normal program page will be played in order, while overall program page will be played continuously, without any time limits. (Such as time display) 3.4.3 Step 3: Setup program page option. After a program page has been created or selected, you can setup the program page option, as shown in the image below. There are options like: name, playing time, background color, background picture, background picture effect, and background music. 3.4.4 Step 4: Create program windows Program page is only a frame, which could contain as many program windows as possible. Each program window can play Image 3-16 different words, pictures, tables, cartoons, and videos, etc. In total, there are twelve kinds of program windows available. Click on the “create new 17 LED Studio Manual – LED Sign Software (Distributed by DMX Tecnologías) program” button, a program selecting menu as shown in image 3-16 will pop-up. Now, we are going to introduce these 12 different kinds of window. File window: It is the most important window, because all supported files will be played here. You can add as many files here as you want. There are more 10 kinds of supported files, including: Document files (TXT), HTM/HEML/MHT files, EXCEL files, WORD files (DOC/RTF), all kinds of picture files (BMP/JPG/GIF/PCX/WMF/ICO), all kinds of media files (AVI/MPG/MPEG/WMV/ASF), VCD files (DAT), Flash files (SWF), RealPlayer files (RM). Text windows, Single Line text windows, Static Document windows: These three windows are not compulsory. Words can be shown in the File window, such windows are only for providing simple words like title of a company, greeting captions, notes, etc. a quicker method to input. Table Window: Used to edit the play list data. Timer window: Used for timing Database window: Used to play ACCESS database and ODVC driver data base. DVD/VCD window: Used to play DVD/VCD. External Program Window: Used to insert external program into the play window. Date /Time Window: Used to display date and time. Video line-in Window:This window is used to display external video signals like TV, VCD/DVD, tape recorder, etc. This window requires video input cards like all variety of TV cards, Video capture cards. Geometric graphs window: this is used to display geometric 18 LED Studio Manual – LED Sign Software (Distributed by DMX Tecnologías) graphs. 3.3.5 Step 5: Setup Program Window options All program Image 3-17 windows has the same options as shown in image 3-17, Name, Frame, Position, Width, Lock, Timing. For program windows with different options, illustrations are list below. File Window: as shown in image 3-18, the window has been divided into two parts. The upper one is the file play-list, while the lower one is the file options. Above the play-list, there is a file toolbar, which can be used to add, delete or move files. The file options in the lower part various by different file formats, we will explain below. 19 LED Studio Manual – LED Sign Software (Distributed by DMX Tecnologías) Image 3-18 “Document files” options are shown in image 3-19, choose of background color, background pictures, background action, and more than 40 special techniques are available. Also there are 4 effects you can choose: line, speed, stay, and font. (Note, if there are not many words, document window could be chosen; if the preface is complicated, WORD document could be used to make-up) “Picture file” Image 3-19 supports all variety 20 of picture formats LED Studio Manual – LED Sign Software (Distributed by DMX Tecnologías) (BMP/JPG/GIF/PCX /WMF…), options refer to image 3-20. You can choose background color, background pictures, background action, and more than 40 special techniques. Also there are 4 effects you may use: line, speed, stay, and font. Plus, more than 50 different types and speed of clearing you can select. Image 3-20 “media and cartoons files” include all kinds of media files (AVI/MPEG/ASF /WMV), FLASH cartoons files (SWF), REALPLAYER files (RM), etc. Options are shown in image 3-21. Again, choose of background color, background pictures, background action, and more than 40 special techniques are available. Also there are 4 effects you can choose: line, speed, stay, and font. Image 3-21 “WORD files” options are shown in image 3-22, you can choose options like special techniques, effects, speed, etc. (Note: WORD2000 or OFFICE2000 is required in case of .doc files. Some computer and “Rising Anti-virus” Software are not compatible, if you cannot find the pre-installed WORD, please uninstall Anti-virus” Software and try 21 LED Studio Manual – LED Sign Software (Distributed by DMX Tecnologías) again) Image 3-22 Text Window: Single click on the “add text” button on the toolbar, as shown in image 3-23, can let you setup the background, Font, Action, Speed, Staying time, etc. You can also key in words or do type-editing. (Note: If there are too many words, please use WORD files or TXT files to play in the window.) Image 3-23 Video Line-in window: As shown in image 3-24, all options are 22 LED Studio Manual – LED Sign Software (Distributed by DMX Tecnologías) related to the Video Input Equipments. Please refer to your user’s manual of the Video Input Equipments. Image 3-24 Date/time window: As shown in image 3-25, you can setup background color, background mode, background picture, static text, display style, display effect, font, etc. Image 3-25 3.3.6 Step 6: Finish Programming After the above 5 steps, a program has been done. If you want more 23 LED Studio Manual – LED Sign Software (Distributed by DMX Tecnologías) than one program page, please repeat from step 2 to step 5. Please do not forget to save your program page after you finished. Click on the saving button or select menu——〉save. 3.3.7 Step 7: Play the program To play the current program files, click on the button to pause; to start; to stop, or select from control menu. If you want to play a different program file, please click on the open button open a program and play it. 24 , to LED Studio Manual – LED Sign Software (Distributed by DMX Tecnologías) Chapter 4 Character display To play a document program, there are six methods: in a document window; in a single line text window; in a static document window; open the document in a picture and document window; Add words to the picture files and play in a picture and document window; or insert notice while a program is playing. 4.1 play in a document window This window is not compulsory. Words can be displayed in a picture and document window, this window is only a quick way to key in simple words like company name, greeting caption, or notes. 4.1.1 Create a new window Click button on the “new window” , as shown in image 4-1. Then select “Text window” in the menu to create a new text window, as shown in image 4-2. 25 Image 4-1 LED Studio Manual – LED Sign Software (Distributed by DMX Tecnologías) 4.1.2 Setup Text window As shown in image 4-2, the upper part is for setting up program properties. Name: program name Frame: you can setup the width and color of the frame Starting point X: x-coordinate of the starting point Starting point Y: y-coordinate of the starting point Width: setup the width of this program Height: setup the height of this program Lock: lock this program, and prevent it from moving Background: setup the background color of this program 26 LED Studio Manual – LED Sign Software (Distributed by DMX Tecnologías) Image 4-2 4.1.3 Insert and edit text As shown in image 4-2, the lower part is for editing texts. After clicking on the “add text” button , a “Text Edit” dialog box will appear as shown in the image 4-3 below. In the edit box at the bottom, you can key in or paste text. Also you can do type-editing, you can setup options like: Background, Font, Action, Speed, Staying time, etc. 27 LED Studio Manual – LED Sign Software (Distributed by DMX Tecnologías) Image 4-3 Close the “Text Edit” dialog box when you finished editing. Now the Text will appear in the list, as shown in image 4-2. Image 4-4 If you want to make any changes to your texts, just simply select them and then click on the button . An edit box as shown in image 4-3 will appear and let you edit the texts. To delete the texts, you can use the button and . To change the playing order, use buttons . Or you can preview the selected texts by clicking on the 28 LED Studio Manual – LED Sign Software (Distributed by DMX Tecnologías) button . 4.2 Play in a single line text window This window is only for single line sliding captions, such as greeting captions, notes, etc. These texts support transparent display, which can be added on any windows, including video files playing in video windows or in pictures and texts windows. 4.2.1 Create a new Single Line Text window Click on the “new window” button , and then select “Single Line Text window” in the menu to create a new single line text window, as shown in image 4-6. 29 LED Studio Manual – LED Sign Software (Distributed by DMX Tecnologías) Image 4-6 4.2.2 Setup Single Line Text window As shown in image 4-6, the upper part is for setting up program properties. There are two ways to input texts, one is open from external documents, and another is directly input to the edit box. Open from external documents 30 LED Studio Manual – LED Sign Software (Distributed by DMX Tecnologías) Select “External file”, in image 4-6, then click on button to open files, as shown in image 4-7. Edited text files can be dynamically displayed when the program is playing. In image 10-3, you can setup Action, Background, and Font. Input in the edit box Select the “Text”, and then type in texts that you want in the box below, as shown in Image 4-6, you can also setup the Action, Image 4-7 Background and Font. 31 LED Studio Manual – LED Sign Software (Distributed by DMX Tecnologías) 4.3 Play in the Static Text window This setup window is for playing static texts. 4.3.1 Create a new Static Text Window Image 4-8 Click on the “new window” button , and then select “Static Text window” in the menu (as shown in image 4-8)to create a new static text window, as shown in image 4-9. 32 LED Studio Manual – LED Sign Software (Distributed by DMX Tecnologías) Image 4-9 4.3.2 Setup the static text window As shown in image 4-9, the upper part is for program properties’ setting. Type in the texts you want in the edit box, and choose their properties below, like: transparency, Align, Background, and Font, etc. 4.4 Play text files in a File Window 33 LED Studio Manual – LED Sign Software (Distributed by DMX Tecnologías) 4.4.1 Create a new File window Click on the “New Window” button , 图 4-10 select “File Window” in the menu (as shown in image 4-10) to create a new “File Window”, as shown in image 4-11. 4.4.2 Setup File Window As shown in image 4-11, the upper part is for setting up program properties. Name: program name Frame: you can setup the Image 4-11 width and color of the frame Starting point X: x-coordinate of the starting point Starting point Y: y-coordinate of the starting point Width: setup the width of this program Height: setup the height of this program 4.4.3 Open files 34 LED Studio Manual – LED Sign Software (Distributed by DMX Tecnologías) Click on the “add file” button , (in the lower part of image 4-12), an open file dialog box will appear. All supported format has been shown in the list at the bottom of the dialog box. Select WORD File, choose the file you want to open in the box above, then click on “open” to open it. 图 4-12 The opened file has been added to the list, now the options of this file will be listed below. (As shown in image 4-13) Options can let you setup the background (includes color, pictures, drawing method), Font, Plenty Actions, four available effects, Line, Speed, Staying time, Font, etc. (Note: If there are only a few words, file window may be used. If the type-editing is complicated, WORD file may worth to be considered.) 35 LED Studio Manual – LED Sign Software (Distributed by DMX Tecnologías) Image 4-13 4.5 Add texts onto a picture file The text display method in this section is the same as that in Chapter 5, picture display, appearing and clearing texts. Details please refer to Chapter 5 4.6 Insert notes during playing Instruction in details please refer to Chapter 16 36 LED Studio Manual – LED Sign Software (Distributed by DMX Tecnologías) Chapter 5 Picture display 5.1 Create a new picture window Click on the “New window” button , and select “File Window” in the menu (as shown in image 5-1), to create a new file window, as shown in 5-2. Image 5-1 5.2 Setup picture window As shown in image 5-2, the upper part is for setting up program properties. Name: program name Frame: you can setup the width and color of the frame Starting point X: x-coordinate of the starting point 37 LED Studio Manual – LED Sign Software (Distributed by DMX Tecnologías) Starting point Y: y-coordinate of the starting point Width: setup the width of this program Height: setup the height of this program Lock: lock this program window to prevent it from moving. Image 5-2 38 LED Studio Manual – LED Sign Software (Distributed by DMX Tecnologías) 5.3 Open playing files Click on the “add file” button to open the file dialog box (as shown in image 5-3), select the picture format from the list. Then select the file that you want to open in the box above. (Once you select a picture, you can preview it in the right-hand-side frame.) Click on “open” to open the selected file, now the bottom-right corner of the main window will change, as shown in image 5-4. Image 5-3 39 LED Studio Manual – LED Sign Software (Distributed by DMX Tecnologías) Image 5-4 5.4 Setup picture properties The opened file has been added to the list. Now, options of this file will be listed below. (Image 5-4), you can select background color, background picture, background picture drawing method, plenty actions, four effects, speed, staying time, clearing effects, clearing speed. 5.5 Insert background picture, appearing music and texts. Insert background picture Click on the button in image 5-4, select and open the picture 40 LED Studio Manual – LED Sign Software (Distributed by DMX Tecnologías) you want to insert in the “open file” dialog box. Also you may directly key in the address of the background picture in the edit frame. Insert clearing music Click on the button in image 5-4, and select the music file that you want in the “open file” dialog box, then click “open”. Insert appearing texts Click on the “TEXT” button in image 5-4, the “Picture/Text” dialog box will appear (Image 5-5) 图 5-5 41 LED Studio Manual – LED Sign Software (Distributed by DMX Tecnologías) Click on “Add” button in image 5-5 to open “text edit” dialog box, insert the file that you want and setup their properties and effects, and then close the dialog box. The Text file that you edited has been added to the file list, if you want to insert more than one appearing text, you can repeat the two steps above. To edit it, select from the file list and then click on the “edit” button to edit it. To delete it, use the delete button, you may also use move up, move down buttons to select files. Click on Exit to finish the insert of appearing texts. 42 LED Studio Manual – LED Sign Software (Distributed by DMX Tecnologías) Chapter 6 Cartoons display 6.1 Create a new cartoon window Click on the “New window” button , select “File Window” in image 6-1 to create a new file window, as shown in image 6-2. Image 6-1 6.2 Setup Cartoons window As shown in image 6-2, the upper part is for setting up program properties. Name: program name Frame: you can setup the width and color of the frame Starting point X: x-coordinate of the starting point Starting point Y: y-coordinate of the starting point 43 LED Studio Manual – LED Sign Software (Distributed by DMX Tecnologías) Width: setup the width of this program Height: setup the height of this program Lock: lock this program window to prevent it from moving. Image 6-2 6.3 Open playing files. Click on the “add file” button in the lower part (image 6-2) to open 44 LED Studio Manual – LED Sign Software (Distributed by DMX Tecnologías) file dialog box. (as shown in image 6-3) This studio can play all cartoons files and all media files (AVI/MPEG/ASF/WMV), FLASH files (SWF), REALPLAYER files (RM), etc. Select any file of the above formats, and then click on “open” to open it. Now the bottom-right of the main window will change to looks like image 6-4. Image 6-3 45 LED Studio Manual – LED Sign Software (Distributed by DMX Tecnologías) Image 6-4 6.4 Setup Cartoons file properties The opened file has been added to the list, now there will be options of this file appear below. (image 6-4), you can select background color, background picture, background picture drawing method, and three effects are optional. 46 LED Studio Manual – LED Sign Software (Distributed by DMX Tecnologías) Chapter 7 table display There are two ways to display a table, one is set up a table window to insert table display, and the other is pre-done the table in WORD or EXCEL, Then use the second method we introduced in chapter 4 to play the file, we are not going to repeat this. 7.1 Create a new table window Click on “New window” button , select “Table Window” in the menu (image7-1) to create a new table window. (as shown in 7-2) Image 7-1 7.2 Setup Table Window As shown in image 7-2, the upper part is for setting up program 47 LED Studio Manual – LED Sign Software (Distributed by DMX Tecnologías) properties. Name: program name Frame: you can setup the width and color of the frame Starting point X: x-coordinate of the starting point Starting point Y: y-coordinate of the starting point Width: setup the width of this program Height: setup the height of this program Lock: lock this program window to prevent it from moving. Image 7-2 48 LED Studio Manual – LED Sign Software (Distributed by DMX Tecnologías) 7.3 Insert and edit tables Click on “Add Table” button “edit 7-3) table” in lower part of image 7-2 to open the dialog box. (as shown in image Image 7-3 Toolbar “table properties” button “Insert table” button “Delete table” button : setup table properties : insert rows or columns. : delete rows or columns. “Split/Combine” button : split or combine rows or Those to the right are commonly used for type-editing, they can 49 LED Studio Manual – LED Sign Software (Distributed by DMX Tecnologías) change the Font, Size, Color, Background color, mode, align method. Setup table properties Click on “Table properties” button , to open “table property” dialog box, as shown in image 7-4. You may change the settings like: name, with/without title, lock title, title’s Font, size, mode, color, and table’s background color, grid line color, table drawing effect, speed, staying time, and lock the row and column number. Image 7-4 Insert table Click on “insert table” button , to open the “add table” dialog box, as shown in image 7-5, select input type, quantity, and input mode (to current position or to end), click “ok” to finish. 50 LED Studio Manual – LED Sign Software (Distributed by DMX Tecnologías) Image 7-5 Delete table Click on “delete table” button , to open “delete table” dialog box, as shown in image 7-6. Select delete row or column, and then click on “ok” to finish. Image 7-6 Slit/Combine Select the cells that you want to combine, click on “Slit/Combine” button to combine them, as shown in image 7-7. 51 LED Studio Manual – LED Sign Software (Distributed by DMX Tecnologías) Image 7-7 Select the cell that you want to slit, click on “Slit/Combine” button to split, as shown in image 7-8. Image 7-8 52 LED Studio Manual – LED Sign Software (Distributed by DMX Tecnologías) Chapter 8 Homepage Display 8.1 Create a new Homepage Window. Click on “New window” button , and select “File Window” in image 8-1 to create a new file window, as shown in 8-2. Image 8-1 8.2 Setup homepage window As shown in image 8-2, the upper part is for setting up program properties. Name: program name Frame: you can setup the width and color of the frame Starting point X: x-coordinate of the starting point Starting point Y: y-coordinate of the starting point Width: setup the width of this program 53 LED Studio Manual – LED Sign Software (Distributed by DMX Tecnologías) Height: setup the height of this program Lock: lock this program window to prevent it from moving. Image 8-2 8.3 Open playing files Click on the “add homepage” button 54 at the bottom in image 8-2 to LED Studio Manual – LED Sign Software (Distributed by DMX Tecnologías) open “Web Page URL” dialog box. (Image 8-3) Image 8-3 Type in the web page address and click ok, now the main bottom right of the window will change to looks like image 8-4. Image 8-4 55 LED Studio Manual – LED Sign Software (Distributed by DMX Tecnologías) The opened file has been added to the list, now the options of this file will be listed below.(image 8-4). You can change the background color, background picture, background picture drawing method, and three available effects. Also you may change the action, speed, and staying time. 56 LED Studio Manual – LED Sign Software (Distributed by DMX Tecnologías) Chapter 9 Database Display 9.1 Create a new Database Window Click on “New window” button , and select “database window” in image 9-1 to create a new database window, as shown in 9-2. Image 9-1 9.2 Setup database window As shown in image 9-2, the upper part is for setting up program properties. Name: program name Frame: you can setup the width and color of the frame Starting point X: x-coordinate of the starting point Starting point Y: y-coordinate of the starting point 57 LED Studio Manual – LED Sign Software (Distributed by DMX Tecnologías) Width: setup the width of this program Height: setup the height of this program Lock: lock this program window to prevent it from moving. Image 9-2 58 LED Studio Manual – LED Sign Software (Distributed by DMX Tecnologías) 9.3 Add Access Database 9.3.1 Add Access database Click on the “add database” button on the toolbar, and the “Select Database” dialog box will appear (image 9-3). Select Access database in the dialog box, then click ok, then select and open the database you want in the “open” dialog box.(image 9-4) Image 9-3 Image 9-4 59 LED Studio Manual – LED Sign Software (Distributed by DMX Tecnologías) Image 9-5 Control window with database added is shown in image 9-5. The list above is the list of databases. You may use “delete database” button to delete it. The list below is the list of datasheets. 9.3.2 Add Access Datasheets Click on the “add datasheet” button on the toolbar, a “Database Properties” dialog box (Image 9-6) will appear. The dialog box has been divided into two parts. The upper one is for table properties setting, the lower one is for column properties setting. 60 LED Studio Manual – LED Sign Software (Distributed by DMX Tecnologías) Image 9-6 Setup table properties Name: name of the datasheet Inquire: select inquired datasheet Action: come-out effect, speed, staying of the table Row: Height of the rows in the table Grid: select the color of the grid lines. Background: select the background color. Font: select the color of the table name. Title: select Font, size, bold, italic or underline for the title of the table if it do exist. 61 LED Studio Manual – LED Sign Software (Distributed by DMX Tecnologías) Setup column properties All Columns has been listed to the left of image 9-6 you can select and make changes to them. Name: Column name Width: Column width Align: Texts Align method Background: select the background color of this column Texts: color of the texts Font: select texts’ Font Size: texts’ size Button:Whether use bold, italic or underline Click on “Preview”, you may preview the newly added table, click on “ok” to finish adding Access Database. 9.3.3 Edit Access Datasheets Select datasheets that you want to edit from the database. Click on the “edit datasheet” button , appearing a “Database properties” dialog box (Image 9-6), you may edit the sheet itself or columns in it. 9.3.4 Delete Access Datasheets Select the Datasheets that you want to delete from the database, then click on the “delete” button . 62 LED Studio Manual – LED Sign Software (Distributed by DMX Tecnologías) 9.4 Add ODBC driver database To add ODBC Database, some basic knowledge about database are needed, please refer to related books, we are not going to introduce here. After click on the “Add Database” button , a “select database” dialog box will appear. (Image 9-3) Select “Access database”, and then click ok and choose the data source you want to open from Image 9-7 the “select data source” dialog box.(Image 9-7) If the data source is not prepared, you can first click on “New” button to activate the “data source set up guide” to help you. The Datasheets and its setting are the same as that for Access Database (refer to 9.3) 63 LED Studio Manual – LED Sign Software (Distributed by DMX Tecnologías) Chapter 10 Date and Time 10.1 Create Date/Time window Click on “New window” button , and select “date/time window” in image 10-1 to create a new date/time window, as shown in image 10-2. Image 10-1 64 LED Studio Manual – LED Sign Software (Distributed by DMX Tecnologías) 10.2 Setup date/time window As shown in image 10-2, the upper part is for setting up program properties. Name: program name Frame: you can setup the width and color of the frame Starting point X: x-coordinate of the starting point Starting point Y: y-coordinate of the starting point Width: setup the width of this program Height: setup the height of this program Lock: lock this program window to prevent it from moving. Image 10-2 65 LED Studio Manual – LED Sign Software (Distributed by DMX Tecnologías) 10.3 Setup date and time There are two kinds of date/time display, one is analog, another is digital. You may select one of them in display style. (image 10-2) Analog clock As shown in image 10-3, it is the analog clock’s plotting and properties settings. You can set exceed or lag time differences; Static texts and its font; color, size, shape, and font of the time display; color of the hour hand, minute hand, second hand; and also the display and color of the dates and days. Image 10-3 Digital clock As shown in image 10-4, it is the digital clock’s plotting and properties settings. You can select the display style; set exceed or lag time differences; Static texts and its font; hour style; year style; single or multi line display; also the text font. 66 LED Studio Manual – LED Sign Software (Distributed by DMX Tecnologías) Image 10-4 67 LED Studio Manual – LED Sign Software (Distributed by DMX Tecnologías) Chapter 11 External Program 11.1 Create a new window Click on “New window” button , and select “External Exe window” in image 11-1 to create a new External Exe window, as shown in 11-2. Image 11-1 11.2 Setup external program window As shown in image 11-2, the upper part is for setting up program properties. 68 LED Studio Manual – LED Sign Software (Distributed by DMX Tecnologías) Name: program name Frame: you can setup the width and color of the frame Starting point X: x-coordinate of the starting point Starting point Y: y-coordinate of the starting point Width: setup the width of this program Height: setup the height of this program Lock: lock this program window to prevent it from moving. Image 11-2 69 LED Studio Manual – LED Sign Software (Distributed by DMX Tecnologías) 11.3 Open external program Click on the “Browse” button in the bottom of image 11-2, a “open file” dialog box will appear. Select the external program you want to open, here we choose Win2000 calculator program. Now, the main window will look like that as image 11-3 . One application may contains more than one window, all windows will be listed below. In this example, there are two windows: calculator and CalcMsgPumpWnd. Do not forget to select the correct window that you want to display. (Note: some of the windows can not be displayed) Image11-3 Top, bottom, left, right bounds can be used to cut the parts of an application which we do not want it to be displayed. In this example, display of the calculator in the playing window is shown in image 11-4. 70 LED Studio Manual – LED Sign Software (Distributed by DMX Tecnologías) Image 11-4 71 LED Studio Manual – LED Sign Software (Distributed by DMX Tecnologías) Chapter 12 Timer Display 12.1 Create a new window Click on “New window” button , and select “Timer window” in image 12-1 to create a new Timer window, as shown in 12-2. Image 12-1 12.2 Setup the timer window As shown in image 12-2, the upper part is for setting up program properties. Name: program name Frame: you can setup the width and color of the frame Starting point X: x-coordinate of the starting point Starting point Y: y-coordinate of the starting point 72 LED Studio Manual – LED Sign Software (Distributed by DMX Tecnologías) Width: setup the width of this program Height: setup the height of this program Lock: lock this program window to prevent it from moving. Image 12-2 12.3 Time Setting As shown in image 12-3, it is the properties setting of the timer display. You can setup static texts; Text’s action, size, bold, italic, underline, color, etc. Arriving date/time; whether display number of days, hour; 73 LED Studio Manual – LED Sign Software (Distributed by DMX Tecnologías) minute, second, multi line, no negative sign, etc. In this example, timer settings in playing window is shown in image 12-4. Image 12-3 Image 12-4 74 LED Studio Manual – LED Sign Software (Distributed by DMX Tecnologías) Chapter 13 VCD/DVD display 13.1 Direct playing Click on the “control”, choose Play VCD/DVD, and then select the objective drive. Like “E:” As shown in image 13-1 .13.2 Play in program Click on “New window” button , and select I “VCD/DVD window” in image 13-2 to create a new VCD/DVD window, as shown in 13-3. Then set up all variety of parameters. Image 13-1 75 LED Studio Manual – LED Sign Software (Distributed by DMX Tecnologías) Image 13-2 Image 13-3 76 LED Studio Manual – LED Sign Software (Distributed by DMX Tecnologías) Chapter 14 Video Line-in Display Video Window is mainly used for input video signals from TV cards or external VCD/DVD player, note: TV card is needed for all settings. 14.1 Create a new window Click on “New window” button , and select “Video window” in image 14-1 to create a new Video window, as shown in 14-2. Then set up all variety of parameters. 77 LED Studio Manual – LED Sign Software (Distributed by DMX Tecnologías) Image 14-1 14.2 Setup Video Window Video input equipment: you may choose different Video Cards (note: only if you has installed more than one video card) Audio input equipment: to choose audio (note: some TV cards play sounds through Audio cards) Video input source: to choose Video input source (note: most TV cards has three input sources—CATV, Video end, and S-Video) TV Channel: to choose TV channel (Note: some TV cards do not support this function) Image 14-2 78 LED Studio Manual – LED Sign Software (Distributed by DMX Tecnologías) Chapter 15 PowerPoint Display 15.1 Play Click on “Control”, and then click on “Play PowerPoint File”. Select a file to play. (Image 15-1) When playing, it will automatically move the display area to the big screen. (Note: if alternatively playing between LED Studio and Led screen is needed, you may setup it in the repertoire; if you want to play PowerPoint in File window, you may use convert tools to convert PowerPoint Files to Flash Files.) Image 15-1 79 LED Studio Manual – LED Sign Software (Distributed by DMX Tecnologías) 15.2 Stop playing Click on “control”, and then select “Stop PowerPoint File.” 80 LED Studio Manual – LED Sign Software (Distributed by DMX Tecnologías) Chapter 16 Notify display Notify Manager is mainly used to insert temporary notify into the program while it is playing. Image 16-1 16.1 Open “Notify Manager” Window Click on “control” in the main menu, and then select “Notify Manager”. (Image 16-1) A “Notify Manager” dialog box will appear. 16.2 Setup Notify Manager Window In image 16-1, you can select which screen that your notify is going to put; how many times it is going to repeat, whether it is transparent, left edge, right edge, bottom edge, action, background, font, etc. 81 LED Studio Manual – LED Sign Software (Distributed by DMX Tecnologías) 16.3 Play/Stop Notify Display When everything has been set, click on “play” to broadcast the notify. Or click on “stop” to stop it. 82 LED Studio Manual – LED Sign Software (Distributed by DMX Tecnologías) Chapter 17 Score Manager Notify Manager is mainly used to insert temporary notify into the program while it is playing. 17.1 Open Score Manager Window Click on “Control”, and then select “Score Manager”. A “Score Manager” dialog box will appear (image 17-1) Image 17-1 83 LED Studio Manual – LED Sign Software (Distributed by DMX Tecnologías) 17.2 Setup Score Manager Window Scores display includes two different types: Time display and Scores display. Screen number indicates in which screen the display should be; Time display indicates how long the display is going to be. Time Display Setting Reset: Reset time to 0:00; Start: Start to count; Stop: stop counting; Font: Setup Font and properties of the display texts; Top Edge: setup the distance between the display time and the top edge; Right Edge: setup the distance between the display time and the right edge; Scores display settings Home: Scores for Home team, two display language available; Score: Score sign, such as “:” ; Away: Scores for Away team, two display language available; Picture: one display picture for each team. Bottom Edge: setup the distance between the display time and the bottom edge; Font: setup the Font of the display texts; Background: Setup background color; 84 LED Studio Manual – LED Sign Software (Distributed by DMX Tecnologías) 17.3 Play/Stop Score When everything has been set, click on “Show all” in image 17-1 to play time and scores. Click “Show time” to show time; “Show score” to show scores; or “stop” to stop showing time and scores. 85 LED Studio Manual – LED Sign Software (Distributed by DMX Tecnologías) Chapter 18 Playing Schedule 18.1 open the schedule table You may open the schedule table by click on the “option” on the main menu, and select “Schedule Table” (Image 18-1). 18.2 Add Scheduled Image 18-1 Command 86 LED Studio Manual – LED Sign Software (Distributed by DMX Tecnologías) 18.2.1 Step1: Open “Scheduled Command” dialog box. Click on the “add” button to open “Scheduled Command” dialog box. (as shown in image 18-3) Image 18-3 87 LED Studio Manual – LED Sign Software (Distributed by DMX Tecnologías) 18.2.2 Step 2: Setup Command list properties Command properties: select command property, default setting is “Turn on LED Screen power” Program file: this option only valid if the command is to: play program files, perform external program, play PowerPoint files. Click on “select” can let you select files. Execution time: setup when the command starts Valid date: setup valid date Valid days: Setup valid days 18.2.3 Step 3: Exit “Scheduled Command” Dialog box Click “ok” to finish adding scheduled command. As shown in image 18-4, there is already a “Turn LED screen power” command in the list, if you want more than one command, repeat the 3 steps above. 88 LED Studio Manual – LED Sign Software (Distributed by DMX Tecnologías) Image 18-4 18.3 Edit Scheduled Command Select the command that you want to edit from the list. Click on “edit” to open the “Scheduled command” dialog box to edit this command. 18.4 Delete Scheduled Command Select the command that you want to delete from the list, click on “delete” bottom, if you want to delete all commands, use “delete all” bottom. 89 LED Studio Manual – LED Sign Software (Distributed by DMX Tecnologías) 18.5 Start up Scheduled Command Click on “Start up scheduled”, keep it remain selected to activate the schedule table, vice versa. (Image 18-5) Image 18-5 18.6 Exit Click on “Exit” to finish the settings of “Schedule manager” 90 LED Studio Manual – LED Sign Software (Distributed by DMX Tecnologías) Chapter 19 Network control If you want to operate network control, you must set the computer which controls the LED screen to remote control server, the other computers set as costumer computers. Remote control server can be controlled by all customer computers within the network. Customer computer may control all remote control servers within the network. 19.1 Setup remote control server Select “Option” and “Software setup” could lead you to the “Software setup” dialog box.(Image 19-1) Select a remote control server, and type in a non-used Port number (normally the default number 6600 will be fine). Customer computer must type in the same port number in order to link to the remote control server. 图 19-1 91 LED Studio Manual – LED Sign Software (Distributed by DMX Tecnologías) 19.2 Remote Screen Manager You may enter the “Remote Manager” dialog box by clicking on the “option” then “Remote Manager”. (Image 19-2) Click on “add” can enter “Remote server Setup” dialog box. (19-3) Type in a screen name to separate more than one screen. Type in the IP address.(Note: you may get the IP address by click on “Check IP Address” in the “server setup” dialog box or turn to your network administrator) Then you should type in the related port code, and screen number. Key in the password if necessary. If there are several servers, they can be all added to the list. Image 19-2 92 LED Studio Manual – LED Sign Software (Distributed by DMX Tecnologías) Image 19-3 19.3 Remote control Click on “Remote Control” button to enter the “remote control” window (Image 19-4). You may apply any command to the server. 93 LED Studio Manual – LED Sign Software (Distributed by DMX Tecnologías) Image 19-4 19.4 Send Files By clicking on “Send files”, you may enter the “Send file” dialog box, as shown in image 19-5. All files will be sent to the sub-catalog “PRGDATA” under the install catalog of the server. You may input objective catalog to create sub-catalog. Or overcast the existing files, to refresh some playing contents. 94 LED Studio Manual – LED Sign Software (Distributed by DMX Tecnologías) Image 19-5 19.5 Send Program By clicking on “Send files”, you may enter the “Send file” dialog box, as shown in image 19-5. All files will be sent to the sub-catalog “PRGDATA” under the install catalog of the server. You may input objective catalog to create sub-catalog. Image 19-6 95 LED Studio Manual – LED Sign Software (Distributed by DMX Tecnologías) Chapter 20 Background Playing 20.1 Activate Background playing Only Windows98/XP operating system support this function. However, some settings must be done as well: Right click on the space on the desktop, a menu like image 20-1 will appear. Image 20-1 Select property: Appearing a property menu. Click on “option”, and activate monitor “2”. Select “extend the contents of Windows to this monitor”, then click on “apply”, followed by “ok”. Now, you may use the “background playing” function. Click on “background playing” on the toolbar of “LED studio”, playing window will switching between the LED screnn and the Monitor. When playing window is on the monitor, the LED screen will display the contents of Windows. 96 LED Studio Manual – LED Sign Software (Distributed by DMX Tecnologías) Image 20-2 20.2 Cancel Background playing If you want to cancel background playing to play at the front, please apply the setting below: right click on the space of your desktop, appearing image20-1. Select “property”, appearing image 20-2, select monitor “2”, but remove the “√”of “extend the contents of Windows to this monitor”. Then click on “monitor 1” and press “ok”. After that, 97 LED Studio Manual – LED Sign Software (Distributed by DMX Tecnologías) right click with your mouse again, appearing image 20-1. click on property, appearing Image 20-2. Then select “option” and then “advance”, appearing image 20-3. Then click on “display”, appearing image 20-4. Click the red switch in it, the switch will turn green. Now press “ok”. A note may come up, press “ok” again. Like this, coherent display has been achieved. Image 20-3 98 LED Studio Manual – LED Sign Software (Distributed by DMX Tecnologías) Image 20-4 Image 20-5 99 LED Studio Manual – LED Sign Software (Distributed by DMX Tecnologías) Chapter 21 Software setting 21.1 Open software setup Click on “option” in the menu, and select “software setup”. A administrator password dialog box will appear, type in the password and choose “ok” to open the “software setup” dialog box. (As shown in Image 21-1) Image 21-1 100 LED Studio Manual – LED Sign Software (Distributed by DMX Tecnologías) 21.2 Play Window Lock to LED Screen: lock the play window to LED screen area Floating: users may change the position Enable change by mouse: allow the change of size by mouse Always on top: play window will always on top of any other windows Change Virtual/ Real by Auto: Virtual/ Real pixels Changed automatically 21.3 Auto Setup Start when Windows starts up Load file when starting Play document when starts up automatically Play document when starts up manually Above options are all available. 21.4 Networking To set the machine as LED screen or server. 21.5 Other setup Auto restart when error: restart the software automatically when error occurs Restart every day: restart at a certain time everyday Auto Backup: backup program at certain time Prompt when quit: choose whether or not pop-up note dialog box when existing this software. 101 LED Studio Manual – LED Sign Software (Distributed by DMX Tecnologías) Chapter 12 User Setup 22.1 Open User Setup Click on the “Option”, and then select “User Setup”, an “Input Password” dialog box. Type in the password in the box and then press OK.(Image 22-2) Image 22-1 Image 22-2 102 LED Studio Manual – LED Sign Software (Distributed by DMX Tecnologías) 22.2 Add user Click on “Add User” in image 22-2, a dialog box like image 22-3 will appear. Enter the Username and Password. Then press “OK”. Image 22-3 22.3 Delete User Select an exist user from the list (Image 22-2), (Note: Administrator can not be deleted) select “delete”. A notice frame will appear, select “Yes”. 22.4 Change Password Select an exist user from the list (Image 22-2), click on “change password” button. Enter the new password in the “Change password” dialog box, then press “ok”. 103 LED Studio Manual – LED Sign Software (Distributed by DMX Tecnologías) 22.5 User Authentication If you tick the box before “Use password before start up”, the next time the software starts up, User Authentication will be required. 104 LED Studio Manual – LED Sign Software (Distributed by DMX Tecnologías) Chapter 23 Frequently asked questions 1, Warning: MCI systematic error when starts up? This is because that Windows Media Player has not been installed, please install it. Find a file named: Mpsetup2K.exe (for Win2K/XP/ME) or Mpsetup98.exe (forwin98) in your CD-Rom. Double clicks to install. 2, Warning: cannot find LED screen system or transmission error? This is due to the disconnection between the Serial Pot cable and the LED, or they are not well connected. Please check the cable. 3, How to change the position and size of the play window? To change the position and size of the window, you must go to software setup. Set the position of play window to “Any position”, then enter coordinates and screen size. You may also use mouse to drag and change the position and size of the play window. For details please refer to “Software Setup” 4, How to run and play certain files? Firstly, you should go to “Software Setup”, and select all three options under autp-setup. 5, How to edit the existing files (.lsd)? Click on “Open” button to open the file, and then select “allow edit” to allow you make changes to the files. For details please refer to “Programming” 6, Attached switch illustration. Due to the upgrade of hardware, some switches for lower edition maybe not available. 1,OE Switch (JP1 first position), to justify the polarity of the cell 105 LED Studio Manual – LED Sign Software (Distributed by DMX Tecnologías) boards. When the polarity is incorrect, luminance will decrease. 2,Data Switch (JP1 second position),to justify the polarity of the data. When error occurs, picture display will become negative. 3,W16、W32、W64、W128、W256、W512、W1024 (JP1 11 ,3rd,4th, 5th, 6th, 7th, 8th position) , to justify the width of the receiving card. 4,ClkDly switch (JP1 9th position), to justify the properties of displacement clock. When there is problem with unit cell step-connection, please justify this switch. 5,Row Switch (JP1 10th position), to set whether translate code when quartet sweep and double sweep display, or the polarity of row-serial-row output. 6,S16、S32、S64、S128、S256、S512、S1024 (JP2 the 11th, 12th, 1st, 2nd, 3rd, 4th position and JP1 12th position), to justify the horizontal starting point of the screen 7,1/8、1/4、1/2 switch (JP2 the 5th, 6th,7th position) ,to justify the scanning method or vertical starting point. th 8, ClkHi,ClkLo switch (JP2 the 8th 、9th position),to justify the slide-point clock. When CLkHi is on and ClkLo is off the frequency is 16.7Mhz; When ClkHi、ClkLo are both off, the frequency is 2.5Mhz; When CLkHi、ClkLo are both on, the frequency is 8.33Mhz; When ClkHi is off but ClkLo is on, the frequency is 6.25Mhz. 9、Delay Switch(JP2 the 10th position), to justify the delay clearing of a whole row. If there is horizontal dark/bright difference, justify this switch. 106 LED Studio Manual – LED Sign Software (Distributed by DMX Tecnologías) For more information or if you are interested in buying a LED display please visit one of our following sites: www.pantallasled.com.mx (Spanish) www.displaysled.com (English) Our corporate site is www.dmxtec.com. 107