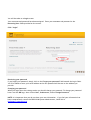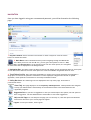
1
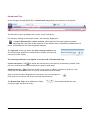
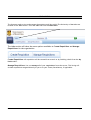
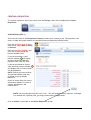
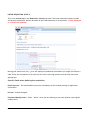
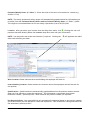
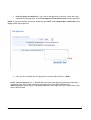
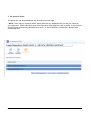
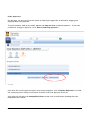
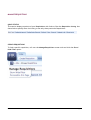
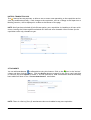
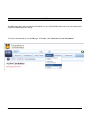
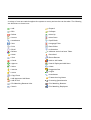
REACH-UM Recruitment and Electronic Application for Candidates and Hiring at the University of Manitoba Powered by HRsmart User Manual PSU Edition Support/Managerial Requisitions October 2011 © University of Manitoba – August 2011 0 TABLE OF CONTENTS GETTING STARTED ................................................................................................................................ 2 WEBSITE ACCESS......................................................................................................................... 2 LOGGING IN................................................................................................................................ 2 ROLES within REACH-UM ............................................................................................................ 4 NAVIGATION ............................................................................................................................... 5 Breadcrumb Tray........................................................................................................................ 7 THE JOBS TAB....................................................................................................................................... 8 STEPS BEFORE POSTING A JOB ............................................................................................................ 9 Obtain a Position Number: ................................................................................................... 9 Prior to Creating a Requisition ............................................................................................. 9 REQUISITIONS...................................................................................................................................... 10 Create Requisitions .................................................................................................................. 10 CREATE FROM “SCRATCH”.................................................................................................. 10 COMPLETE A DRAFT ............................................................................................................ 10 CREATING A REQUISITION......................................................................................................... 11 ASSOCIATIONS (STEP 1) ...................................................................................................... 11 DEFINE REQUISITION (STEP 2)............................................................................................. 12 APPROVAL CHAIN (STEP 3).................................................................................................. 16 MANAGE REQUISITIONS............................................................................................................. 22 QUICK STATUS .................................................................................................................... 22 SEARCH REQUISITIONS ........................................................................................................ 22 REQUISITION LISTING.......................................................................................................... 24 CHANGING THE REQUISITION STATUS ................................................................................. 26 ACTIONS ................................................................................................................................... 26 NOTES & TRANSACTION LOG .............................................................................................. 27 ATTACHMENTS.................................................................................................................... 27 LIBRARIES............................................................................................................................................ 28 ICON DEFINITIONS ............................................................................................................................ 29 REACH-UM User Manual for PSUs Page 1 GETTING STARTED WEBSITE ACCESS https://umanitoba.hua.hrsmart.com/ats The URL above will allow you access to REACH-UM with one simple login. Please add to your Favourites in your web browser. LOGGING IN Make your way to the Login symbol and click. REACH-UM User Manual for PSUs Page 2 You will be taken to a Login screen. Your username and password have been assigned. Enter your username and password in the Returning User fields provided on the screen. Click “Login.” Retrieving your password If you forget your password, simply click on the Forgot your password? link beneath the login fields. You’ll be asked to enter your email address and a new password will be sent to the address you provide. Changing your password When you login after the training session you should change your password. To change your password hover over the HR logo, then click on User, Preferences, and on Change Password. NOTE: It is important that you do not share your user information. If you feel your information has been compromised, contact the REACH-UM System Administrator, Geoff Hui at [email protected] REACH-UM User Manual for PSUs Page 3 ROLES within REACH-UM Business Managers: A Business Manager creates and approves requisitions, and sends them on to Human Resources for final approval and posting. This role can also track requisition activity and candidates. PSUs: A PSU role can create requisitions and then forward them on for further approval. The access to REACH-UM is limited and will not allow PSUs to track applicants within the system. HR Consultant (Recruiter): An HR Consultant can approve/post jobs/requisitions, track candidates, search resumes, upload resumes, schedule events, create offers, initiate onboarding, run reports and more. System Administrator: The System Administrator manages users, documents, dropdown selections and overall site settings. Job Seeker [External]: Site visitors/job seekers may enter a resume profile, build a skills profile, search jobs and set up job search agents, view jobs applied to, and more. Employee [Internal]: Internal users/current employees of the University may enter a resume profile, build a skills profile, search jobs & set up job search agents, view jobs applied to, and more. NOTE: The system will allow users to access the various pages based on their user level permissions. A user could have multiple class permissions. For example, Business Managers and PSUs are also Employees. REACH-UM User Manual for PSUs Page 4 NAVIGATION Once you have logged in using your username and password, you will be directed to the following page: 5 2 3 1 4 1. Keyword Search: Select from the list and enter a name or keyword. Click the search button to initiate the search. 2. Main Menu: This is the Main Directory when navigating through the REACH-UM site. When you hover over the HR icon, you are given the options to click on: Jobs, People, User, and Administration. As the mouse hovers over the menu options, the navigation for each menu will be displayed on the Navigation Bar. 3. Navigation Bar: This space under the Keyword Search will display all the navigational links for each option on the main menu. Rollover the main menu options to view the available navigational links for each. 4. Total Talent Profile: The Total Talent ProfileTM is a unique screen giving employees and managers a single place to view all the pertinent information for each employee and gives users access to update appraisals, career paths and coursework in one easily accessible location. 5. Utility Bar Icons: The following icons are displayed at the top of the page. Click them to perform that action. View FAQ- This page displays a list of Frequently Asked Questions. These questions are designed to help you understand the functionality of the software and the terms associated with the applicable programs. Suggestion Box: If you have a suggestion for how you would improve the system, use this option to enter a suggestion. The Site Administrator will be able to view these suggestions. Help on this Page: To view help for the page you are currently on, click this option and detailed instructions relevant to your current page will appear. Logout: To end your session, click "Logout". REACH-UM User Manual for PSUs Page 5 Click the icon to see the following quick links. My Notifications: The number next to the icon indicates the number of notifications that you have. Click the icon to view the My Notifications screen. My Calendar: The number of calendar events is displayed next to the icon. Click the icon to view My Calendar.*not applicable at this time* Click the icon to hide the quick links. REACH-UM User Manual for PSUs Page 6 Breadcrumb Tray As you navigate through REACH-UM, a Breadcrumb Tray displays your position in the system. The left side of the tray displays the current screen’s hierarchy. For example, looking at the People screen, the hierarchy displayed is > People> Resumes/CVs> Search monster which identifies the menu options accessed beginning with the initial screen selection of the People menu, followed by the Resumes/CVs menu, and ending with the Search Monster selection. The right side of the tray shows the most recently viewed screen. The screen name appears as a link and when clicked, will take the user back to that screen. The following additional icons appear on the left side of Breadcrumb Tray: Screen Instructions. The icon shows the instructions for the specific screen being viewed. Click the icon to show the instructions and click it again to hide them. Add as Favourites. Click this icon found on any screen to add the screen as a favourite. Your favourites are listed under the TTP icon for convenient one-click access. Once a screen has been designated as a favourite, the icon changes to a Click that icon to remove the screen from the Favourites List. The Breadcrumb Tray can be hidden by clicking Clicking it again will show the tray. REACH-UM User Manual for PSUs . the located beneath the tray. Page 7 THE JOBS TAB The features used to view and manage the positions and jobs within The University of Manitoba are located in the Jobs section. Click the Jobs link from the Main Menu. The Jobs section will show the menu options available to Create Requisition and Manage Requisitions for the organization. Create Requisition: All requisition will be created from scratch or by finishing a draft from the My Drafts table. Manage Requisitions: You can manage all of your requisitions from this screen. This listing will include requisitions assigned directly to you or to your Team (Consultants), if applicable. REACH-UM User Manual for PSUs Page 8 STEPS BEFORE POSTING A JOB OBTAIN A POSITION NUMBER: If posting a new support staff position, submit a signed job description to your Human Resources Consultant using the job description available in VIP forms under Position Profiles and Job Description. The new Job Description includes additional information required to create a position in VIP. Once the job description has been classified you will receive an email from Human Resources providing you with a position number. If posting an existing support staff position, you do NOT need to submit a job description and you will use the position number for that position. If posting a revised support staff position, where the content of the job description has changed submit a signed job description to your Human Resources Consultant. Once the job description has been classified you will receive an email from Human Resources providing you with a position number. (Note: if the classification remains unchanged you will be instructed to use the original position number). If posting a revised support staff position where the content of the job description has remained the same, but details that are unrelated to the classification have changed such as the schedule, type (e.g., from project to continuing), you do NOT need to submit a new job description. Use the original position number. PRIOR TO CREATING A REQUISITION In the Create Requisition process in REACH-UM, you will be prompted to provide information that you formerly would have provided on a Position Profile form. Posted support staff positions do NOT require a Position Profile form. REACH-UM User Manual for PSUs Page 9 REQUISITIONS The following section shows how to create requisitions. Create Requisitions There are two ways to post a new job: 1) From "scratch"; and 2) Finish a draft. CREATE FROM “SCRATCH” Option 1: The Requisition Creation page allows you to create a new requisition. You begin by selecting the position history and entering the position number. The associations for the job will be populated from the file feed, based on the information you provided. COMPLETE A DRAFT Option 2: When creating a requisition, you will have the option to "Save as Draft". Those will appear under the My Drafts section of this page. Hiring Managers can return to this draft and complete when convenient. = To edit or complete the draft, click this icon. = To delete the draft altogether, click this icon. REACH-UM User Manual for PSUs Page 10 CREATING A REQUISITION To create a requisition hover your cursor over the HR logo, then click on Jobs and on Create Requisition. ASSOCIATIONS (STEP 1) This is the first step in the Requisition Creation process when creating a job. The purpose of this step is to help the system identify the Workflow that the Requisition should follow. From the Position History* drop down menu, select New, Existing or Revised. Enter the Position Number* and click your mouse beside the Position Number field. If you have entered a valid position number, will display and the remaining fields will populate from a VIP file feed. If you have entered an invalid (non-existent) position number, will display and no further fields will be populated. NOTE: Ensure you have entered the position number that was provided to you by Human Resources. Check to ensure that the correct information appears in terms of faculty, department, and classification*. *NOTE: You may disregard the Division field*. This will populate when required. Although it is marked as a required field, you may proceed with it unpopulated. Click "Continue" to proceed to the Define Requisition screen. REACH-UM User Manual for PSUs Page 11 DEFINE REQUISITION (STEP 2) This is the second step in the Requisition Creation process. The form presented contains contact and posting information. Review and edit all the fields necessary for this position. *Fields displayed in red text are required* Moving your mouse over this icon will display any additional information you might need about a field. Enter the information for the job into the form, selecting options from the drop lists when appropriate. Specific fields when defining the requisition: Email Inquiries: The email address you enter will display on the finished posting for applicants’ information. Division: Please disregard Estimated Weekly Hours: Select “Other” when you are defining a part-time position with regular weekly hours. REACH-UM User Manual for PSUs Page 12 Estimated Weekly Hours (if “Other”): Enter the total of the hours to be worked in a week (e.g., 20.00 or 17.50) NOTE: The hourly and annual salary ranges will automatically populate based on information you provided from the Estimated Weekly Hours and/or Estimated Weekly Hours (if “Other”) fields. The ranges are calculated based on current salary information from a VIP file feed. Location: After you select your location from the drop down menu, click .Clicking this icon will populate the table directly below the Location drop down area with your information. NOTE: You may select more than one location if required. Clicking the with each selection you make. will populate the table Work Location: Please indicate the actual building the employee will work in. Internal Mailing Location: Please indicate the location where the employees mail will be sent for this position Qualifications: Qualifications are automatically populated based on the position number entered when you first started to create the requisition. This information is generated from Human Resources created, “position profile” which matches the position number you inputted. Key Responsibilities: Key responsibilities are automatically populated based on the position number you entered when you first started to create the requisition. This information is also generated from the associated “position profile.” REACH-UM User Manual for PSUs Page 13 # of Hires Needed: Enter the number of positions required for this requisition in numerical values only. HR Consultant: Select the HR Consultant assigned to your unit from the drop down menu Hiring Manager: Select the Business Manager who will give approval on this requisition. Supervisor Name: Please indicate who will be supervising the vacant position. External Advertising: Refers to placing an advertisement through an external source (e.g., Winnipeg Free Press). Selecting “yes” will automatically send an email to the HR Advertising Coordinator, who will contact the supervisor indicated within your requisition in order to plan the external advertising. Additional Information: Once you have selected from the Work Schedule drop down menu, please add any additional pertinent information in the “Additional Information” box. This information will display on the posting. Some examples of information typically provided: Overtime may be required at peak periods This is a seasonal position subject to temporary layoffs. Works Schedule Details: You are required to complete the schedule details. Once you have selected the weekly hours from the drop down menu, complete the required daily schedule information for each day. “Duration” refers to the number of hours to be worked on the particular day. (i.e. 7, 8) NOTE: Please indicate a 0 for the start time and the duration for days where an individual will not be required to work. For variable hour’s schedule, please indicate 0 in all fields. REACH-UM User Manual for PSUs Page 14 Funding Information: Please enter the 16 digit GL code (no spaces) and the corresponding payment percentage from that GL. You may enter a maximum of five paying GLs for the requisition. NOTE: If displays when you enter the GL code and tab (or click your mouse outside of the field), you have entered a valid GL. When displays, the GL is not a valid code. If you hover your cursor over either symbol a message will display as follows: GL exists GL does not exist *You cannot continue with your requisition until a valid GL code is entered. NOTE: You may save the requisition as a draft at any point from the Define Requisition page. You may “Save as Draft” or click “Next” to continue. Clicking “Cancel” will cancel the requisition and empty all data from the fields. However, if you had previously saved a draft, and then clicked “Cancel”, you will be able to retrieve the original saved draft. REACH-UM User Manual for PSUs Page 15 APPROVAL CHAIN (STEP 3) Set Approvers is the third, and final, step in the Requisition Creation process. Depending on the faculty/department, certain approvers may be required for the Requisition NOTE: PSUs creating a requisition MUST add an approver. REACH-UM User Manual for PSUs Page 16 1. Type: Serial. Serial indicates the approvers will only be allowed to take action in the sequence in which they are set. 2. Select the Internal Approvers for this requisition: To select an internal approver (i.e., a user within REACH-UM) click on the Internal Approvers link. Enter the last name of the approver in the Search field and click “Search”. REACH-UM User Manual for PSUs Page 17 Click Scroll down and “Confirm Selection” or click on next to the approver’s name. REACH-UM User Manual for PSUs to remove them from your selection. Page 18 Entering Approvers Manually: If you wish to add approvers manually, enter the email addresses of the approvers in the Enter Approver Email Address(es) text box provided. NOTE: If you are posting a new grant-funded job you MUST enter [email protected] for Budgets and Grants approval. Once you are satisfied with the approvers you have identified click “Next.” NOTE: Internal approvers (i.e., REACH-UM users) have the option of approving/rejecting a requisition from their email message or by logging into their REACH-UM account. Other approvers (those who are not REACH-UM users) must approve/reject requisitions from their email message. REACH-UM User Manual for PSUs Page 19 3. Set Approval Order The approvers you selected should now be present on this page. * NOTE: There may be instances where email addresses are displayed that you did not choose as your approvers. These individuals have been defined as Final Approvers due to either a requirement through the U of M Vacancy Management process, or the individual is needed for a Budgets and Grants approval. REACH-UM User Manual for PSUs Page 20 Order Approvers: On this page, you are now given the option of ordering the approvers as desired by dragging and dropping them into sequence. To move someone, click on the email address and drag and drop to desired sequence. If you want to delete or change an approver, click “Back to Selecting Approvers”. NOTE: Emailed notifications to review the Requisition will be sent in the order you selected. Once have the correct approvers and in an accurate sequence, click 'Complete Requisition' to finish the creation process. Doing so will launch an email to the first Approver in the list. Your page will refresh to the Manage Requisitions screen with a confirmation message that your Requisition was created. REACH-UM User Manual for PSUs Page 21 MANAGE REQUISITIONS QUICK STATUS This section displays statistics of your Requisitions with links to filter the Requisition Listing. Use these links to quickly filter the Listing to see only those particular Requisitions. SEARCH REQUISITIONS To find a specific requisition, roll over the Manage Requisitions screen title and click the Show/ Hide Filter option. REACH-UM User Manual for PSUs Page 22 Enter as much or as little search criteria as needed into the search form that is displayed. Click Filter to run the search. The results are displayed in the table below. The Filter options that were selected or entered are displayed along with the option to clear the filter and return Manage Requisitions to its original listing is displayed above the filter. REACH-UM User Manual for PSUs Page 23 REQUISITION LISTING Click on “Manage Requisitions” to display a list of all of the Requisitions that are assigned to you. The Action(s) column displays one option. = Click this icon to view the additional actions that you can take on a Requisition. Additional Actions: = Edit the requisition = Copy the requisition = Click this icon to add a Screening Questionnaires to a particular requisition. = This icon will allow you to Add a Resume to the requisition. = Notes & Transaction Log. Click this icon if you need to add or view any notes on this requisition or to see its modification history. = Add or view Attachments by clicking on this link. REACH-UM User Manual for PSUs Page 24 When applicable, the appropriate column will contain a icon to indicate that action has been taken, such as assigning a Screening Questionnaire The following explain the acronyms used on the screen. SQ = Screening Questions. CP = Cross-post * not applicable* To view a job's details, click on the Job Title link. The Views column displays the number of times the job has been viewed on your website. The New column displays the number of resumes that have been submitted to the Requisition and have not been reviewed or acted on. Click on the number to see a list of the resumes. The Candidates column reflects the number of resumes submitted that you have selected as Candidates for the Requisition. Click on the number to view and manage each candidate. The Status column displays the status of a Requisition and the ability to change it. Click on the link to view the options page. The Recruiter (HR Consultant) column displays the person assigned to fulfilling the Requisition. REACH-UM User Manual for PSUs Page 25 CHANGING THE REQUISITION STATUS Status(es) of a Requisition can be manually changed at any time in the recruiting process. NOTE: Each change is documented and the system keeps track of the change history. ACTIONS EDIT To edit a Requisition, click the icon to see additional action. A list will appear and the edit icon will be available. Click the edit icon to begin editing the Requisition. The “Edit Requisition” page will be displayed. Make your required edits. Once your edits are complete, scroll down to the bottom of the page and click “Save Changes.” Your changes will appear in real time. REACH-UM User Manual for PSUs Page 26 NOTES & TRANSACTION LOG This feature has two purposes: to allow a user to enter notes pertaining to the requisition and to view any modification history. Each change to the requisition, such as a change in the Supervisor or Building Location, will be displayed in a table at the bottom of the page. NOTE: Until you have checked off the Private option, your requisition is viewable to all users with access. Leaving the Private option unchecked will leave the note viewable. Check Private for the requisition to be only viewable to you. ATTACHMENTS You can add attachments to a Requisition using this feature. Click on the icon in the "Actions" column and then click the icon. Click the Browse button to search for the file on your hard drive or network, and click Upload to attach it. The file size limit is 100K. Attachments that have already been added will show in the “Current Attachments” area below. NOTE: There is a limit of five (5) attachments that can be added to any one requisition. REACH-UM User Manual for PSUs Page 27 LIBRARIES The HR Department will post useful information for you within REACH-UM, such as a user manual and frequently asked questions (FAQ). To access the documents, on the HR logo, click User, then Libraries and then Documents. REACH-UM User Manual for PSUs Page 28 ICON DEFINITIONS A variety of icons are used throughout the system to convey actions that can be taken. The following are definitions to these icons: = Add = Expand = Edit = Collapse = Delete = Move Up = Letters = Move Down = Attachment = Spell Check = Save = Language Filter = Print = Date Picker = Email = Information = Palette = Indicates Action has been Taken = Notes = Download = View = Route Resume = Cancel = Add as Job Seeker = Approve = Search Employees/Add Users = Select = Home = Inactive = Suggestion Box = Active = Logout = Copy/Clone = Attachment = Add Approvers/Add Users = Transaction Log/Notes = Add to Pool = Screening Questionnaire = Find Matching Resumes/Jobs = Find Matching Resumes = Search = Find Matching Employees REACH-UM User Manual for PSUs Page 29