1
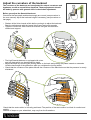
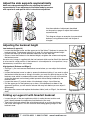
User Manual
1
2
3
Curvature
Smartsit is a patented backrest system which gives
increased comfort, improved stability and better
pressure distribution. The backrest can be adjusted
in depth and curvature. Smartsit also has built-in
adjustable side supports which can be adjusted in size
and shape. The side supports also make it possible to
make an asymmetrical backrest.
The Smartsit backrest can be set up and adjusted with
the user in the chair.
Adjust the backrest for different
curvatures (kyphoses). These
adjustments are sufficient for most users.
High backrest,
Eligo 2 og Emineo
Level 1 adjustments require general skills in
wheelchair adjustment
Level 2 adjustments require experience and
higher skills in wheelchair adjustment
Level 3 adjustments require experience and
special skills in wheelchair adjustment
Achieve better sideways stability and
comfort by using different sizes and
shapes of side support.
Asymmetry
1
2
3
Side support
Low backrest, Legend 2
(Not Available in Canada)
Make more advanced adaptations by
adjusting the backrest asymmetrically.
Adjust the curvature of the backrest
Before you adjust the Smartsit backrest:
Check that the seat depth and backrest angle are correct (see procedure in
the user manual). Adjust the backrest height if necessary (see procedure on
last page).
1
Curvature
The curvature of the backrest can be adjusted for natural curvatures and
kyphoses, as with a normal Velcro backrest. These adjustments should
be made by persons with general skills in wheelchair adjustment.
• Slacken all the Velcro bands a little before you begin to adjust the backrest.
Start the adjustments with the lowest Velcro band and work upwards
• Tighten or loosen the Velcro bands so that the user gets the maximum
comfort and support
• The high Smartsit backrest is equipped with a twopart top plate which can be adjusted for depth
• Adjust the depth by loosening the locking wheel on the back and pushing the plates inwards or outwards.
Hold the back edge of the plates firm while you retighten the locking wheel
• Check that the curvature of the plates follows the curvature of the band below so that the pressure is evenly
distributed
Check that the seat cushion is correctly positioned. The position of the seat cushion is critical for comfort and
stability.
Number of straps on your wheelchair, may vary from the illustrations.
Achieve better sideways stability and comfort by using different sizes
and shapes of side support. These adjustments should be made by
persons with experience and higher skills in wheelchair adjustment.
Each of the bands in the side supports are separate triangles which can be
made different shapes.
To adjust the shape and size of the side supports:
• Loosen or tighten the bands making up the side supports
• Feed the bands through the side support brackets in another position
• Tighten or loosen the orange Velcro bands
Side support
Adjust the side supports
2
Make final adjustments to the orange Velcro bands after adjusting
the side supports.
The principle of the Smartsit
backrest, seen from above
The triangles can be made smaller by feeding
the bands through different slits in the side
support bracket.
• Small triangles give space and support to the broader part of the back
• Large triangles give space and support to the narrower part of the back
• The tightness of the orange Velcro bands determines both the shape of
the triangles and the depth of the backrest
3
Adjust the side supports asymmetrically
Asymmetry
Make more advanced adaptations by adjusting the backrest
asymmetrically. These adjustments should be made by persons
with experience and special skills in wheelchair adjustment.
Use the methods of adjustment described
on the previous pages to adjust the backrest
asymmetrically.
This diagram shows an example of asymmetrical
backrest, using different sizes and shapes of
triangles.
Adjusting the backrest height
Low backrest (Legend 2)
• Loosen the backrest cover and the upper part of the Velcro™ backrest to access the
backrest tubing. The backrest tubing has a scale (A) showing the backrest height
• Loosen the screw (B) on both backrest tubes with a 4 mm Allen key
• Raise or lower the backrest to the desired height, re-tighten the screws and replace
the backrest cover
An extra set of straps is supplied with the low backrest which can be fitted if the backrest
is to be used in a high position. If the backrest is to be adjusted to a low position, it may
be necessary to remove a set of straps.
A
B
High backrest (Emineo and Eligo 2)
Low backrest
• On Eligo 2, you must remove the backrest cover before you can adjust the backrest
height
• Loosen the backrest cover in order to access the backrest tubing. If you want to adjust
the backrest while the user is sitting in the chair, you must first pick up the part of the
backrest cover which is underneath the seat cushion and put it on top of the cushion
so that the backrest can be freely pulled upwards without being hindered by the
backrest fabric
• Loosen the screw (C) on both sides of the backrest using a 4 mm Allen key
• Pull the upper part of the backrest up or down. (If the backrest has been in the
uppermost position, you will need to release the snap lock before you can adjust it
downwards.)
• Re-tighten the screws and replace the backrest fabric (and, on Eligo 2, the backrest
High backrest
shell)
Folding up Legend 2 with Smartsit backrest
• Loosen the part of the seat upholstery which is under the seat cushion and
push it down between the upholstery and the back of the seat
• Take hold of the back edge of the seat tubing and pull up so that the tubing is
free of the side supports. This will avoid the seat tubing getting caught on the
backrest cover
T : 416-739-8333 1-800-514-7061 www.handicare.ca
C