1
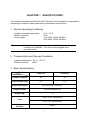
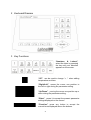
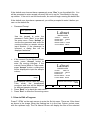
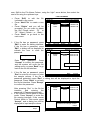
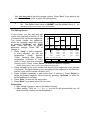
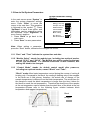
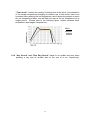
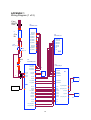
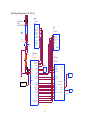
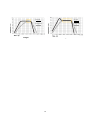
MultiGene Mini Thermal Cycler TC020-24 /TC020-24-230V TC050-18 /TC050-18-230V Operation Manual Ver.1.2 Labnet International CONTENTS CHAPTER 1 SPECIFICATIONS ...................................................................................................... 1 1 Normal Operating Conditions .................................................................................................. 1 2 Transportation and Storage Conditions................................................................................... 1 3 Basic Specifications................................................................................................................. 1 4 Performance ............................................................................................................................ 2 5 Software Functions .................................................................................................................. 2 CHAPTER 2 Features ........................................................................................................................ 3 1 Description ............................................................................................................................... 3 2 Keyboard Diagram................................................................................................................... 4 3 Key Functions .......................................................................................................................... 4 4 Inspection before Power-up..................................................................................................... 5 5 Power-on Procedures .............................................................................................................. 5 CHAPTER 3 OPERATION GUIDE..................................................................................................... 6 1 How to Run a Program ............................................................................................................ 6 1.1 How to edit a program....................................................................................................... 7 1.2 How to Set System Parameters ...................................................................................... 12 CHAPTER 4 TROUBLE SHOOTING ............................................................................................... 14 1 Failure Analysis and Processing Procedures........................................................................ 14 2 Block Error Messages ........................................................................................................... 15 APPENDIX 1 Wiring Diagrams .................................................................................................... 16 APPENDIX 2 Parameter Values.................................................................................................. 18 CHAPTER 1 SPECIFICATIONS This chapter describes the MultiGene Mini Thermal Cycler’s operation, transportation and storage conditions, basic parameters, performance and functions. 1 Normal Operating Conditions Ambient operating temperature: Relative humidity: Power supply: Note: 10°C ∼ 30°C ≤70% ~100-120V, 200W, 50/60Hz ~220-240V, 200W, 50/60Hz Before powering on, please confirm that the above operating conditions are satisfied. The unit must be plugged into a grounded outlet. 2 Transportation and Storage Conditions Ambient temperature: -20 ºC~+55 ºC Relative humidity: ≤80% 3 Basic Specifications Model Parameters TC050-18 TC020-24 Sample Capacity 18 24 Tube Volume (ml) 0.5 0.2 Dimensions (mm) 297×212×200(L×W×H) Display Screen 320×240 Backlit LCD Weight (kg) 3.2 250V 2.5A (Ф5×20mm) Fuse 125V 5A (Ф5×20mm) Computer Interface RS232 1 4 Specifications Temperature range: Maximum Heating rate: Maximum Cooling rate: Temperature Resolution Block Temperature accuracy: Temperature display accuracy: Block temperature uniformity: Heated lid work temperature range: 4ºC~99ºC ≥5.0ºC/sec(max) ≥4.0ºC/sec(max) ± 0.1°C ≤±0.3ºC ≤±0.5ºC ≤±0.5ºC 105ºC±5ºC Note: These performance specifications can be met when the unit is operated in Ambient temperature: 23±5ºC,humidity≤70% Temperature control accuracy and block temperature uniformity are tested at the following temperature settings: 55ºC,72ºC ,95ºC Max. number of cycles: Max. Segments within a cycle: Max. temperature time: Max. incubation and in situ time: Program storage capacity: 5 99 9 99 min. 59 sec. 99 hour 59 min. 100 Software Functions File editing and saving File accessing, modifying and deleting Automatic file link Heating/cooling rate setting Automatic temperature and time increments/decrements during cycling Real-time display of data at each phase of program execution Pause Stop Auto-restart in case of power failure Audible alarm Run time estimation Remaining time estimate Date and time (year, month, day, hour, minute, second) display Audible alarm in the event of failure Note: The above software functions are listed for reference only. Labnet reserves the right to modify the software without notice. 2 CHAPTER 2 Features This chapter covers the MultiGene Mini Thermal Cycler’s mechanics, the keyboard and each key’s function, and preparations before power-on. 1 Description 1 2 3 4 5 6 7 ① Heated lid & Block ② LCD Display ③ Keyboard ⑤ Power switch ⑥ Power connecter ⑦ Fuse Socket Note: ④ RS232 interface 1 The fuse specifications are as follows: 250V:2.5A / 125V:5A, Ø5×20mm. The fuse should be replaced with one that meets these specifications. 2 Contact your distributor or Labnet’s service department if you need proper fuses. 3 2 Keyboard Diagram 3 Key Functions “Numbers & Letters”, select the letter by pressing the key until your selection appears on the screen. “CE”,can be used to change “+, -” when editing temperature and time. “Right/Left”,moves the cursor one position to the left or right during file parameter setting. “Up/Down”,moving the cursor one position up or down during file parameter setting. “Enter”,press it to accept the present parameter settings displayed on the screen. “Function”, press any button to accept the current items displayed above the buttons. 4 4 Inspection before Power-up Before switching the power on, please ensure that: 1) Supply voltage matches the voltage rating label on the instrument. (refer to Chapter 2); 2) The plug has been inserted into the power socket; 5 Power-on Procedures Turn on the power (i.e. turn the power switch to position ‘1’), the MultiGene Mini Thermal Cycler will beep 4 times, and the LCD will display ‘ ’. This means the device is self-testing, which takes about 1-2 minutes. After the self-test is complete, the main menu will be displayed, and the device is ready for the following operations, editing, accessing, modifying, or deleting a file. 5 CHAPTER 3 OPERATION GUIDE There are eight menu selections for the MultiGene Mini Thermal Cycler. In this chapter, we will explain operation, for example, how to edit, access, modify, delete, or run a protocol file and how to set parameters. Warning! If an abnormal sound or display appears on start up or if a failure error during the Self Test mode, Turn off the power immediately and contact Labnet or your distributor Note: If the number of samples is less than the number of wells in the block, the sample tubes should be evenly distributed over the block, in order to ensure that the heated lid will evenly press on the tops of the sample tubes. This also ensures that both the block’s load and the temperature distribution to each tube are even. Note: Before closing the cover, turn the knob counter-clockwise according to the knob diagram until there is a "click....." Please note that the knob can be tightened by turning it clockwise, After closing the cover but before power on, turn the knob clockwise until you hear a click, then turn the knob one more turn. When the knob is turned clockwise or counter-clockwise, you will hear a "click" sound, To open pull the release latch with your finger; and turn the knob counter-clockwise. 1 How to Run a Program Switch on the power, the MultiGene Mini Thermal Cycler will beep 4 times. The screen will display “ ”,and the instrument will carry on self test. The self test takes about 1~2 minutes. If the self test is successful, the screen will display the main Menu. Main Screen On the left top corner of the main Hotlid=020C 2009-04-01 10:05:00 screen the Hot lid status is displayed. Labnet The center of the screen displays Labnet, the software version number, block model, default file, default user, control mode and sample volume. MultiGene Mini Version: 2001-1.0 Default User: Labnet Default File: 1 Module Select: 24*0.2 Control Mode: Block Press “File” to enter file list interface. Press “System” to enter system parameter setting menu. File 6 System Run n If the default user does not have a password, press “Run” to run the default file. You will be prompted to enter sample volume(if the unit is set for Tube Mode) in the pop up window. If the unit is set for block mode, the unit will begin running the default file. If the default user does have a password, you will be prompted to enter it before you can run the default file. Password Prompt Hotlid=off Enter password - 2009-04-01 10:05:00 Labnet MultiGene Mini Version: 2009-1.0 Default User: Labnet Default File: 1 Module Select: 24*0.2 Control Mode: Block Use the keypad to enter the password. Press “Back” to go back the main menu. Press “Accept” to confirm the password and enter file running interface or sample volume input window. If the password is incorrect, a dialog box will be displayed as below: Enter password Back Acceptt Password error. Try again. - If the current Control Mode is Block mode, press “Accept” button to enter file running interface. If the current Control Mode is Tube mode, press “Accept” button, a dialog box will be displayed to input the sample volume. Hotlid=020C 2009-03-24 10:05:00 Labnet MultiGene Mini Version: 2009-1.0 Default User: Labnet Default File: 1 Module Select: 24*0.2 Control Mode: Block Please enter sample volume: 020µl Enter sample volume used. By using Tube mode, the temperature overshoot and time will be adjusted for different sample volumes. Press “Back” to go back the main menu. Press “Run” to enter the file running menu. Please enter sample volume: 020µl Back Run n 1.1 How to Edit a Program Press F1 “File” on the main screen to enter the file list menu. There are 3 files listed as shown in the image. When the flashing bar is in the User Column, select users with the up/down keys; The File Name Column will display the files of the selected 7 user. Shift to the File Name Column, using the “right” arrow button, then select the user’s file using the up/down keys. File List Menu Press “Edit” to edit the file Hotlid=off 2008-07-28 10:05:00 indicated by the cursor. No. User File Name Save Time Press “New File” to create a new 1 Jeff1* Amp1 2008-07-28 2 Mike2 Amp2* 2008-07-28 file. 3 Sue3 Amp3 2008-07-28 Press “Delete” and you will be prompted “Do you want to delete the file? Please select ‘F3’ or ‘F4’”, Select(Delete) or (Back). Press “Back” to go back to the main menu. If the file has no password, press “Edit” to enter file editing interface; If the file has a password, press “Edit”, a dialog will be displayed to indicate the user to enter the password. Edit Hotlid=off No. 1 2 3 Enter password - New File Delete User Jeff1* Mike2 Sue3 2008-07-28 10:05:00 File Name Save Time AMP1 2007-07-28 AMP2* 2007-07-28 AMP3 2007-07-28 Enter the password. Press “Accept” to confirm the password, and the system will enter the file editing menu; or press “Back” to go back to the file list interface. Back Run n Enter password - If the file has no password, press Back Accept t “Run” to enter file run menu or enter the sample volume. If the file is password protected, press “Run”, a dialog box will be displayed to input the password. Press “Back” to go back the file list interface. Press “Accept” Hotlid=off 2008-07-28 10:05:00 No. User File Name Save Time to confirm the password. 1 2 3 After pressing “Run” in the file list interface, and entering the password (If Password protected): If the current Control Mode is Block mode, Press “Accept” to enter the file running interface; If the current Control Mode is Tube mode, press “Accept”, and a dialog box will be displayed to input sample volume. Jeff1* Mike2 Sue3 AMP1 AMP2* AMP3 2008-07-28 2008-07-28 2008-07-28 Please enter sample volume: 020µl Please enter sample volume: 020µl Back 8 Run n Use the key pad to input the sample volume. Press “Back” to go back to the file list menu. Press “Run” to enter file running menu. Note: The symbol “*”at the top of User and File indicates the default User and file. The Default User name is LABNET and the default file is 1. The default file cannot be renamed, but it can be edited. File Editing Screen In this screen, you can add and edit Hotlid=020C 2008-11-01 10:05:00 cycles and segments of the file. A File 100 is comprised by cycles and segments. 75 50 The cycles contain the segments, 25 which are repeated. Move the cursor 0 by pressing “Up/Down” and “Right /Left”. Press the keys to modify Temp 1c 95.0 2c 55.0 3c 72.0 4 04.0 Time 01:00 02:00 01:45 00:00 parameter settings. Press “CE” to Seg. Temp(C) Time Ramp(C/s) +Temp +Time change +/-. 1c 95.0 01:00 #.# +0.0 +0:00 Press “+Seg.” to add a segment. 2c 55.0 02:00 #.# +0.0 +0:00 72.0 01:45 #.# +0.0 +0:00 In every segment, you can set 3c 04.0 00:00 #.# +0.0 +0:00 temperature (Temp), duration 4 Cycle1:×10 From 01 to 03 (Time), Ramping rate (Ramp), +Seg. +Cycler Delete Back Save/Run temperature increment of every cycle (+Temp) and time increment of every cycle (+Time). Press “Delete” to delete the present segment. NOTE: setting ramp to #.# provides the maximum ramping rate. Press “+Cycle” to set cycle number and choose cycle segments to be included in the cycle. The figure shows a cycle including the first segment to the third one, and the cycle is set to repeat 10 times (x10). Press “+Cycle” repeatedly to add cycles (max.: 5 sections ). Press “Delete” to delete the present segment. Move cursor by pressing “Up/Down” to enter the former segment or the latter. Press “Save” to enter the file save menu. Press “Back” to go back to the File List menu. Please Note: 1. After editing a program, save it first before running. 2. When setting “Time” as “--:--” (i.e. ∞), the hot lid will automatically turn off when the block reaches the set temperature. 9 Seg. 1 section 1 Cycle1 ×** From ** to ** File Seg. 2 section 2 Cycle2 ×** From ** to ** ·· · ·· · section 5 Cycle5 ×** From ** to ** Seg. 16 Relation of cycle and segments in a file File Saving Screen In this screen use the keypad to enter the file name. Press “Enter” to move the cursor down one position. Select User and File Name through the popup character selection box. Click left button to delete characters while clicking right button to move the cursor. Press the “Caps” key to shift from a capital to lowercase letter, and on the top left a capital or small letter indication will appear. (example: abc) Hotlid=off abc 2009-07-28 10:05:00 File Save Interface User: LabnetI I File Name: 1 1 Password: ***** * Password confirm:***** * Press “Main” to go back to the main interface. Press “Save” to save the file. When the file is normally saved, “File has been saved. Please continue another operation” will appear. Press “Enter” to close the reminder window. If the file name was already in use, the system will display(Rename)or continue to save (Save). If the current Control Mode is Block mode, press “Run” to enter the file running interface; if the current Control Mode is Tube mode, pressing “Run” will open, a dialog box to input the sample volume. Main Caps Please enter sample volume: 050µl 10 Save Run n Enter the sample volume. Press “Back” to go back to the file save menu. Press “Run” to start running the file. In the file save menu, if you press “Run” without pressing “Save”, the system will display “The modifications will be lost after running. Do you still want to Hotlid=off 2007-07-28 10:05:00 run?” abc Press “No” to go back file save interface. User: Labnet i Press “Yes” to enter the file running menu and sample volume File Name: Num1 1 input screen. (Note: the Password: Num1 1 modification here cannot be Password confirm:Num1 1 saved after the program is run. No Yes s File running interface When the file is running, “Now Hotlid=off 2007-11-1 10:05:00 Running•••” will continuously flash. 100 When the protocol is complete, “File 75 running is over is displayed, Press 50 25 ‘Enter’ to return to the main menu.” 0 Press “Stop” and “Do you want Temp 1c 95.0 2c 55.0 3c 72.0 4 04.0 to stop running?” will be Time 1:00 02:00 01:45 00:00 displayed. Select ‘F1’or ‘F3’”.You File Name:Num1 can then select either “Stop” or User: Labnet Now Running ••• “Start”. 1c Temp=00.0 Time=00:00 Cycle 01 of 10 Press “Pause” and the display Total Time: 00h 56m Remaining Time:00h 56m will show “Pause state now. Press ‘F3’ to continue running.” Stop Pause Start Skip View File You can then select “Start” to continue. Press “View File” to view the file in the editing format. Note: the file cannot be edited while running Press “Skip” to stop current temperature segment and run the next segment. 11 1.2 How to Set System Parameters In the main screen press “System” to enter the system parameter settings menu. Press “Enter” to move the cursor to the next item. This operation is followed by the symbol “ ”. Press “Up/Down” to scroll to an option, and information can be entered by using the keyboard. Press “Right/Left” to move cursor’s position. Press “Back” to go back to the main menu. Press “Save” to save parameters. System Parameter Setting Interface Hotlid=off 2009-02-28 10:06:00 Date(yy-mm-dd): 09-02-28 Time(hh-mm-ss): 10:06:19 Module Select: Control Mode: Hotlid Temp: Block Temp: Key Sound: Run End Sound: 24*0.2 Block OFF 10C OFF ON Back Save 5 Note: When setting a parameter, press the “Save” button, otherwise the changes will be lost. 1.2.1 “Date” and “Time” indicate the system time and date. 1.2.2 “Module Select” stands for module type, including two optional modes, named “18*0.5” and “24*0.2”. The Module type will be preset for the type of unit you purchased. If a different size block is later installed, this setting will need to be changed. 1.2.3 “Control Mode” stands for default control model after power-on, including two optional modes, named “Block” and “Tube”. “Block” mode offers basic temperature control during the course of cooling & heating only. Compared to the block, the cooling & heating rate of the samples in the block are a little slower, therefore, the actual rate of change of the sample temperature is different from the block temperature. The actual time for the sample to reach the block temperature is longer than the time it takes for the block to reach the set temperature. Therefore the dwell time of the sample at the set temperature can be shorter than the dwell time of the block at the set temperature.(Please refer to the following figure: relation between block temperature and reagent temperature.) Block Reagent 12 “Tube mode” controls the cooling & heating rate of the block, inconsideration of the sample temperature changing at a slower rate. In tube mode, there is an overshoot after reaching the set temperature, which allows the sample to reach the set temperature faster, and will help the stay at the set temperature for a longer period. (Please refer to the following figure: relation between block temperature and reagent temperature.) Block Reagent 1.2.4 “Key Sound” and “Run End Sound” stand for an audible key tone when pressing a key and an audible alert at the end of a run, respectively. 13 CHAPTER 4 TROUBLE SHOOTING 1 Failure Analysis and Processing Procedures No. Phenomenon Failure Analysis Disconnected power supply 1 2 3 4 No display and the two beeps missed when power on Abrupt change in heating speed or bad temperature control accuracy Significant change in cooling speed, or unavailable temperature below ambient Heating and cooling terminated Bad fuse Troubleshooting Check power supply for correct connection Replace it (250V 2.5A,Φ5×20mm or 125V 5A, Φ5×20mm ) Switch failure Replace switch Others Contact Labnet or your distributor Ventilation blocked Clear the airflow blockage Bad connection Open the device, check the connectors for reliable connection Cooling module failure Contact Labnet or your distributor Cooling module failure Contact Labnet or your distributor Fan failed or stopped Bad sensor Malfunction of all cooling modules Contact Labnet or your distributor Bad contact between connectors 5 Lid cannot be heated Loose connection between connectors Contact Labnet or your distributor Lid heater failure Lid sensor failure 6 7 Abnormal characters displayed Inactive keys Bad contact of chip with its socket Contact Labnet or your distributor Chip malfunctioning Membrane panel damaged 14 Contact Labnet or your distributor 2 Error Messages No. Error Message Possible Reasons 1 Error Message when running “Please contact the distributor”, with “AD1213 failure” The microchip can not communicate with the AD1213. AD1213 broken or circuit board trouble. 2 Error Message when running “Please contact the distributor.”, with “Heatsink temperature is too high” Heat sink temp. higher than 70℃,the temperature sensor is broken, there is a short circuit or the fan is not working. 3 Error Message when running “Please contact the distributor.”, and "Heatsink sensor is disconnected." Heat sink temp. less than 5℃,the sensor broken, there is a short circuit or the fan is not working. 4 Error Message when running "Please contact the distributor.",and "Temperature sensor No.1 is disconnected." Block sensor No.1 reports an open circuit 5 Error Message when running "Please contact the distributor.",and "Temperature sensor No.1 is short-circuited." Block sensor No.1 reports a short circuit 6 Error Message when running "Please contact the distributor.",and "Hotlid sensor is disconnected" Hot-lid sensor reports an open circuit 7 Error Message when running "Please contact the distributor.",and "Hotlid sensor is shortcircuited." Hot-lid sensor reports a short circuit Note: During the warranty term, please contact Labnet or your distributor. If the instrument is opened by an unauthorized individual the warranty is void. 15 APPENDIX 1 Wiring Diagram (1 of 2) AC input_ 220-240VAC 50/60Hz U5 AC Line Filter PCB1 BYQ904102000110_HOTLID HOTLID 123 N N I EI LPN LID-J1-1_SEN LID-J1-2_SEN LID-J1-3_HEATER+ LID-J1-4_HEATER+ LID-J1-5_HEATER+ LID-J1-6_HEATERLID-J1-7_HEATERLID-J1-8_HEATER- E LPN 564 FUSE1 5*20mm_ 2.5A PCB3 BYQ5041042000000_POWER SW1 PE BLOCK N Switch L N C C A A J1-8_AUX HEATER J1-7_AUX HEATER J1-6_SEN-BLOCK J1-5_SEN-BLOCK J1-4_SEN-SINK J1-3_SEN-SINK J1-2_TEJ1-1_TE+ LID-J2-1_SEN LID-J2-2_SEN LID-J2-3_HEATER+ LID-J2-4_HEATER- FUSE2 5*20mm_ 2.5A L PCB2 BYQ904101000010_BLOCK EJ3-1_HOTLIDEJ3-2_HOTLID+ EJ3-3_LID-SEN1 EJ3-4_LID-SEN2 FJ1-1_ACN FJ1_2_PE FJ1-3_ACL FJ1-4_PE EJ4-1_FANEJ4-2_FAN+ PCB4 BYQ5041041000000_CPU U4 J15-1_SEN-FAN J15-2_SEN-FAN J15-3_SEN-BLOCK J15-4_SEN-BLOCK 2 1 FANFAN+ EJ1-1_TE+ EJ1-2_TE- 1 EJ7-1_LIDSEN EJ7-2_LIDSEN J16-1_SEN-HOTLID J16-2_SEN-HOTLID EJ2-1_HV+ EJ2-2_HVEJ2-3_+5V EJ2-4_HOTLID EJ2-5_FAN EJ2-6_PWM EJ2-7_HEAT EJ2-8_COOL VB1_SUB D9_RS232C J13-1_HV+ J13-2_HV- J9_CPLD_JTAG_IDC10 J13-3_VIN5 J13-4_HOTLID J5_LCD_24P J13-5_FAN J13-6_PWM J10_KEY IN J13-7_HEAT J13-8_COOL J3_CPU_JTAG_IDC20 POWER Heatersink PE CPU EJ5-1_H2+ EJ5-2_H2- J17-1_H+ J17-2_H- EJ6-1_AUX_HEATER EJ6-2_AUX_HEATER 16 LCD LCD1 1 KEY1 KEY-BOARD Wiring Diagram (2 of 2) Hotl id PCB1 BYQ904102000110 Rated Voltage input: AC100-120V 50/60Hz1 N2 3 N HOTLID I EI LPN U5 Filter INLET E LPN 564 FUSE1 5*20mm_ 5A N Powerboard PCB3 BYQ504104200000U SW1 PE J1-8_AUX HEATER J1-7_AUX HEATER J1-6_SEN-B LOCK J1-5_SEN-B LOCK J1-4_SEN-S INK J1-3_SEN-S INK J1-2_TEJ1-1_TE+ BLOCK Switch L N C C A A PCB2 BYQ904101000010 LID-J2-1_SEN LID-J2-2_SEN LID-J2-3_HEATER+ LID-J2-4_HEATER- FUSE2 5*20mm_ 5A L Block LID-J1-1_SEN LID-J1-2_SEN LID-J1-3_HEATER+ LID-J1-4_HEATER+ LID-J1-5_HEATER+ LID-J1-6_HEATERLID-J1-7_HEATERLID-J1-8_HEATER- EJ3-1_HOTLIDEJ3-2_HOTLID+ EJ3-3_LID-S EN1 EJ3-4_LID-S EN2 FJ1-1_ACN FJ1_2_PE FJ1-3_ACL FJ1-4_PE EJ4-1_FANEJ4-2_FAN+ CPU Board PCB4 BYQ5041041000000 U4 DC FAN 2 1 FANFAN+ PE CPU EJ1-1_TE+ EJ1-2_TE- 1 EJ7-1_LIDSEN EJ7-2_LIDSEN J16-1_SEN-HOTLID J16-2_SEN-HOTLID EJ2-1_HV+ EJ2-2_HVEJ2-3_+5V EJ2-4_HOTLID EJ2-5_FAN EJ2-6_PWM EJ2-7_HEAT EJ2-8_COOL VB1_SUB D9_RS232C J13-1_HV+ J13-2_HV- J9_CPLD_JTAG_IDC10 J13-3_VIN5 J13-4_HOTLID J5_LCD_24P J13-5_FAN J13-6_PWM J10_KEY IN J13-7_HEAT J13-8_COOL J3_CPU_JTAG_IDC20 POWER Heatersink J15-1_SEN-F AN J15-2_SEN-F AN J15-3_SEN-B LOCK J15-4_SEN-B LOCK EJ5-1_H2+ EJ5-2_H2- J17-1_H+ J17-2_H- EJ6-1_AUX_HEATER EJ6-2_AUX_HEATER 17 LCD LCD1 1 KEY1 KEY-B OARD APPENDIX 2 Parameter Values Item 1 Parameter Temp(ºC) 2 Time 3 Ramp(C/S) 4 +Temp 5 +Time Cycle1 ×00 6 From 00 to 00 Scale Temp. Control point Time of Temp. Control(mm:ss) Ramping Rate (ºC/Second) Temp. Gain of Every Cycler Time Gain of Every Cycler(mm:ss) Section Numbers Cycler Numbers from beginning to the end The start segment of the section The end segment of the section. Gradient Temp. Difference( ) Range Note 4.0~99.0 --:-(set the value before “:”through “Function” key.) 00:00~59:59 0.1 ~5.0 #.# The time of Temp. control is infinite, meanwhile, the hotlid turned off. Maximum of Ramping Rate 0.0~9.9 0:00~9:59 1~5 1~99 X(and existed segment no.) Cycle1:×00 From 00 to 00 ≤ X+15 7 Grad. 8 Date Date(YY-MM-DD) 00(~99)-01(~12)01(~31) year-month-date 9 Time Time(HH:MM:SS) 00:00:00~23:59:59 hour:minute:second 10 Default File The default file name 11 Default User The default user name 0 ~30 Max. length is 11 characters. Max. length is 11 characters. Block 12 Control Mode Control Mode Tube 13 Sample Volume 14 Hotlid Temp 15 Block Temp 16 Key Beep 17 Run End Beep Sample Volume(ul) 10~200 State of Hotlid: OFF OFF State of Hotlid: Open( ) State of Block Temp during the heating of Hotlid(ºC) Key Sound (ON or OFF) Run End Sound (ON or OFF) Under this mode (once reaching target temperature namely entering into the thermostable state), the time for reagent’s temperature under target temperature is less than setting time (see Fig. 1). Under this mode (once entering into the thermostable state after reaching target temperature and decreasing about 3°C), reagent’s temperature can be close to target temperature very fast (see Fig. 2). 30~99 0~99 OFF/ON Humming OFF/ON Humming continuously 18 block block reagent reagent Image 2 Image1 19 Limited Warranty Labnet International, Inc. warrants that this product will be free from defects in material and workmanship for a period of 18 months from date of purchase. This warranty is valid only if the product is used for its intended purpose and within the guidelines specified in the supplied instruction manual. Should this product require service, contact Labnet International, Inc.’s Service department at 732-417-0700 to receive a return authorization number and shipping instructions. Products received without proper authorization will be returned. All items returned for service should be sent postage prepaid in the original packaging or other suitable carton, padded to avoid damage. Labnet International, Inc. will not be responsible for damage incurred by improper packaging. Labnet International, Inc. may elect for onsite service for larger equipment. This warranty does not cover damage caused by accident, neglect, misuse, improper service, natural forces or other causes not arising from defects in original material or workmanship. This warranty does not cover motor brushes, fuses, light bulbs, batteries or damage to paint or finish. Claims for transit damage should be filed with the transportation carrier. ALL WARRANTIES INCLUDING THE IMPLIED WARRANTY OF MERCHANTABILITY AND FITNESS FOR A PARTICULAR PURPOSE ARE LIMITED IN DURATION TO 18 MONTHS FROM THE ORIGINAL DATE OF PURCHASE. LABNET INTERNATIONAL, INC.’S SOLE OBLIGATION UNDER THIS WARRANTY IS LIMITED TO THE REPAIR OR REPLACEMENT, AT LABNET INTERNATIONAL, INC.’s DISCRETION, OF A DEFECTIVE PRODUCT. LABNET INTERNATIONAL, INC. IS NOT LIABLE FOR INCIDENTAL OR CONSEQUENTIAL DAMAGE, COMMERCIAL LOSS OR ANY OTHER DAMAGES RESULTING FROM THE USE OF THIS PRODUCT. Some states do not allow limitation on the length of implied warranties or the exclusion or limitation of incidental or consequential damages. This warranty gives you specific legal rights. You may have other rights which vary from state to state. No individual may accept for, or on behalf of Labnet International, Inc., any other obligation of liability, or extend the period of this warranty. For research and development use only. Not intended for any animal or human therapeutic or diagnostic use. 20