1
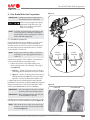
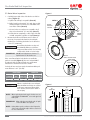
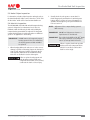
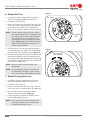
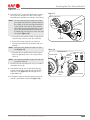
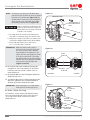
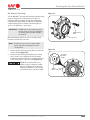
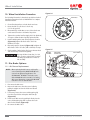
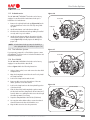
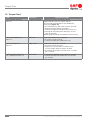
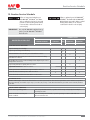
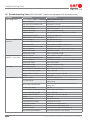
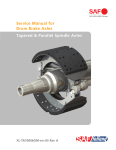
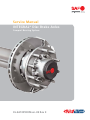
Service Manual INTEGRAL ® Disc Brake Axles Compact Bearing System XL-SA10059OM-en-US Rev E Contents Contents Page Introduction ......................................................................... 2 Warranty .............................................................................. 2 Notes, Cautions, and Warnings ............................................. 2 Section 1 – General Safety Instructions ................................ 3 Section 2 – General Service / Maintenance Instruction ......... 4 Section 3 – Model Identification........................................... 5 Section 4 – Identification Tag ............................................... 5 Exploded View and Parts List ................................................ 6 Section 5 – Disc Brake/Hub Unit Inspection .......................... 7 Contents Page Section 6 – Wheel Rock Test ............................................... 10 Section 7 – Wheel Bearing Noise Test ................................. 10 Section 8 – Hub Unit Grease Leak Inspection...................... 11 Section 9 – Servicing the Disc Brake/Hub Unit .................... 12 Section 10 – Wheel Installation Procedure .......................... 18 Section 11 – Disc Brake Options ......................................... 18 Section 12 – Torque Chart .................................................. 20 Section 13 – Routine Service Schedule ............................... 21 Section 14 – Troubleshooting ............................................. 22 Introduction Notes, Cautions, and Warnings This manual provides the necessary information for the maintenance, inspection and safe operation of the SAF® disc brake system. Knorr/Bendix is the manufacturer of the disc brake caliper assembly described in this service manual, NOT SAF-HOLLAND®. This manual references service documents which are published by Knorr/Bendix. The latest versions can be found on their website at www.bendix.com. These document references are intended to provide additional information when performing service work on the caliper assembly. SAF-HOLLAND® assumes no liability for the use of incorrect or unsuitable parts in the servicing or repair of the Knorr/Bendix disc brake caliper assembly. SAF-HOLLAND® assumes no liability for damages or claims arising out of incorrectly following procedures outlined in the Knorr/Bendix service manuals. For axle end/brake replacement components contact SAF-HOLLAND® Customer Service at 888-396-6501. Read this manual before using or servicing this product and keep it in a safe location for future reference. Updates to this manual, which are published as necessary, are available on the internet at www.safholland.us. Use only SAF-HOLLAND® Original Parts to service your SAF-HOLLAND® INTEGRAL® disc brake axle. A list of technical support locations that supply SAF-HOLLAND® Original Parts and an Aftermarket Parts Catalog are available on the internet at www.safholland.us or contact Customer Service at 888-396-6501. Warranty Refer to the complete warranty for the country in which the product will be used. A copy of the written warranty is included with the product or available on the internet at www.safholland.us. Knorr and Bendix are registered trademarks of the Knorr-Bremse Group. Before starting any work on the unit, read and understand all the safety procedures presented in this manual. This manual contains the terms “NOTE”, “IMPORTANT”, “CAUTION”, and “WARNING” followed by important product information. These terms are defined as follows: NOTE: Includes additional information to enable accurate and easy performance of procedures. IMPORTANT: Includes additional information that if not followed could lead to hindered product performance. Used without the safety alert symbol, indicates a potentially hazardous situation which, if not avoided, could result in property damage. Indicates a potentially hazardous situation which, if not avoided, could result in minor or moderate injury. Indicates a potentially hazardous situation which, if not avoided, could result in death or serious injury. 2 XL-SA10059OM-en-US Rev E · 2014-07-25 · Amendments and Errors Reserved · © SAF-HOLLAND, Inc., SAF-HOLLAND, HOLLAND, SAF, and logos are trademarks of SAF-HOLLAND S.A., SAF-HOLLAND GmbH, and SAF-HOLLAND, Inc. General Safety Instructions 1. Safety Instructions Failure to minimize the use of brakes during overheating conditions could result in deterioration of brake efficiency which could result in death or serious injury. General and Servicing Safety Instructions Read and observe all Warning and Caution hazard alert messages. The alerts provide information that can help prevent serious personal injury, damage to components, or both. Failure to follow the instructions and safety precautions in this manual could result in improper servicing or operation leading to component failure which, if not avoided, could result in death or serious injury. All maintenance should be performed by a properly trained technician using proper/special tools, and safe procedures. NOTE: In the United States, workshop safety requirements are defined by federal and/or state Occupational Safety and Health Act (OSHA). Equivalent laws may exist in other countries. This manual is written based on the assumption that OSHA or other applicable employee safety regulations are followed by the location where work is performed. Failure to properly support and secure the vehicle and axles prior to commencing work could create a crush hazard which, if not avoided, could result in death or serious injury. If possible, unload the trailer before performing any service procedures. After pre-positioning the brake chamber, slack adjuster and/or ABS system as instructed in this manual, always consult the manufacturer’s manual for proper operation. Service both roadside and curbside of an axle. Worn parts should be replaced in sets. Key components on each axle’s braking system, such as friction material, rotors and drums will normally wear over time. DO NOT paint the wheel contact surfaces between the wheel and hub. IMPORTANT: Use only SAF-HOLLAND® Original Parts to service your SAF-HOLLAND® INTEGRAL® disc brake axle. Failure to maintain your SAF-HOLLAND® INTEGRAL® disc brake with SAF-HOLLAND® Original Parts can result in brake or wheel bearing failure which, if not avoided, could result in death or serious injury. Only the wheel and tire sizes approved by the trailer builder can be used. Operational and Road Safety Instructions Before operating vehicle, ensure that the maximum permissible axle load is NOT exceeded and that the load is distributed equally and uniformly. Make sure that the brakes are NOT overheated from continuous operation. Observe the operating recommendation of the trailer manufacturer for off-road operation of the installed axles. IMPORTANT: The definition of OFF-ROAD means driving on non-asphalt/non-concrete routes, e.g. gravel roads, agricultural and forestry tracks, on construction sites and in gravel pits. IMPORTANT: The wheel contact surfaces MUST be clean, smooth and free from grease. Failure to keep wheel and hub contact surfaces clean and clear of foreign material could allow wheel/hub separations which, if not avoided, could result in death or serious injury. If the parking brake is immediately applied to the brakes when overheated, the brake drums or discs could be damaged by different stress fields during cooling. SAF® axles require routine service, inspection and maintenance in order to maintain optimum performance, and operational safety as well as an opportunity to recognize natural wear and defects before they become serious. Refer to the Routine Service Schedule in Section 12. Failure to inspect and maintain your SAF-HOLLAND® INTEGRAL® disc brake axle as outlined in Section 12 can result in brake or wheel bearing failure which, if not avoided, could result in death or serious injury. Properly support and secure the vehicle from unexpected movement when servicing the unit. The parking brake MUST NOT be immediately applied when the brakes are overheated. IMPORTANT: Off-road operation of axles beyond the approved application design could result in damage and impair suspension system performance. Follow the recommended routine maintenance and inspections described in this manual. These procedures are designed so that optimum performance and operational safety are achieved. Contact a qualified towing and/or service company to assist in repairing vehicle or to move it to a qualified repair facility. XL-SA10059OM-en-US Rev E · 2014-07-25 · Amendments and Errors Reserved · © SAF-HOLLAND, Inc., SAF-HOLLAND, HOLLAND, SAF, and logos are trademarks of SAF-HOLLAND S.A., SAF-HOLLAND GmbH, and SAF-HOLLAND, Inc. 3 General Service/Maintenance Instructions 2. General Service/Maintenance 1. Conduct regular visual checks of the brakes, tires and all chassis components. Refer to Section 12 for more information: a. Inspect for secure mounting, wear, leaks, corrosion and damage. b. Check for loose, broken or cracked air hoses, air system leaks, and damaged components. c. Check that brake hoses and cables are properly secured. d. For proper brake pad wear, check that there is enough clearance to allow the caliper full movement during normal operation. 2. Check the brake pads at regular service intervals to ensure that the brake pad hold down springs are in the correct position, and that brake pads are NOT worn beyond the minimum wear limits described in this manual. 3. When replacing brake pads, inspect the rotors for signs of wear, cracks, grooves, scoring or hot spots. 4. Visually check the brake caliper at regular service intervals as defined by the brake caliper manufacturer’s basic inspection program. Refer to Section 5.3 of this manual for further information. 5. Check the spring brake chambers to make sure the parking springs are NOT caged in the released position. Be sure the dust plugs are properly installed. 6. Make sure that the vent holes in the air brake chamber are NOT covered with snow, ice, mud, etc. 7. Inspect the wheel bearing unit for grease leaks at every brake pad change. 8. Visually check the brake assembly (e.g. pads, rotor, etc.) for oil or grease contamination. 9. Check that all dust caps and boots are present and in good condition. 4 10. Regularly conduct general safety checks in accordance with any applicable laws. 11. After every wheel change, the wheel nuts MUST be re-tightened to the specified torque level after the initial 100 miles of operation, and then at every regular service interval. Failure to re-tighten wheel nuts at specified intervals could result in component failure which, if not avoided, could result in damage to property. Use only SAF-HOLLAND® Original Parts to service your SAF-HOLLAND® INTEGRAL® disc brake axle. XL-SA10059OM-en-US Rev E · 2014-07-25 · Amendments and Errors Reserved · © SAF-HOLLAND, Inc., SAF-HOLLAND, HOLLAND, SAF, and logos are trademarks of SAF-HOLLAND S.A., SAF-HOLLAND GmbH, and SAF-HOLLAND, Inc. Serial Number Tag Information 3. Model Identification Figure 1 The disc brake axle serial tag is located near the center of the axle tube (Figure 1). SERIAL NUMBER TAG LOCATED BETWEEN BEAMS OF EACH AXLE TUBE 4. Identification Tag The sample tag shown will help you interpret the information on the SAF-HOLLAND® USA, Inc. serial number tag. The model number, axle body part number and serial number are listed on the tag (Figure 2). Figure 2 Record your tag numbers below for future quick reference. Axle Body Part Number: ____________________________ Model Number: ___________________________________ Serial Number: ____________________________________ XL-SA10059OM-en-US Rev E · 2014-07-25 · Amendments and Errors Reserved · © SAF-HOLLAND, Inc., SAF-HOLLAND, HOLLAND, SAF, and logos are trademarks of SAF-HOLLAND S.A., SAF-HOLLAND GmbH, and SAF-HOLLAND, Inc. 5 INTEGRAL™ Disc Brake Components 16 10 9 1 SERIAL TAG 3 13 5 2 7 17 12 6 8 4 14 15 11 NOTE: Refer to the model number on the serial tag to identify your specific axle model’s wheel end components. Contact SAF-HOLLAND® Customer Service at 888-396-6501. ITEM NO. 1 2 3 4 5 6 7 8 9 6 DESCRIPTION Axle Body Hub with Compact Bearing Rotor w/ Toner Ring M 14 x 1.5 Bolt - Hub Rotor Wheel Studs O-Ring D92 x 4 Axle Nut Right-Hand Axle Nut Left-Hand Hub Cap with Seal ABS Sensor (WABCO) QTY. / AXLE ITEM NO. 1 2 2 20 20 2 10 1 2 2 11 12 13 14 15 16 17 DESCRIPTION Clamping Bush Brake Caliper SK7, Right Brake Caliper SK7, Left M18 x 1.5 Bolt, Standard M18 x 1.5 Bolt, Shoulder Brake Chamber Chamber Nut Dust Shield (Optional) Hub Odometer Cap (Optional) QTY. / AXLE 2 1 6 2 2 4 2 1 XL-SA10059OM-en-US Rev E · 2014-07-25 · Amendments and Errors Reserved · © SAF-HOLLAND, Inc., SAF-HOLLAND, HOLLAND, SAF, and logos are trademarks of SAF-HOLLAND S.A., SAF-HOLLAND GmbH, and SAF-HOLLAND, Inc. Disc Brake/Hub Unit Inspection 5. Disc Brake/Hub Unit Inspection Figure 3 IMPORTANT: During removal inspect components for wear and replace worn components. Failure to properly support axle during maintenance could allow axle to fall which, if not avoided, could result in death or serious injury. NOTE: For further disc brake inspection information, refer to the latest version of the TMC recommended practice RP 652–Service and Inspection of Air Disc Brakes (TMC DVD supplement). 5.1 Pad Wear Inspection Check the brake pads for proper thickness at regular service intervals based on vehicle usage. Brake pad inspections should be carried out at least every three (3) months and in accordance with any legal requirements. Refer to “Routine Service Schedule” in Section 12. VIEW A NOTE: Regular service intervals could be required more frequently for severe duty applications. Refer to Section 12. CALIPER MARKING VIEW B CALIPER MARKING A quick visual inspection of the condition of the brake pads can be performed without removing the wheel: 1. Compare the position of the caliper marking to the carrier marking located on the underside of the caliper unit (Figure 3). CARRIER MARKING CARRIER MARKING a. Figure 3 - "View A" shows the positions of the two (2) markings when the brake pads are in good condition. b. Figure 3 - "View B" shows the positions of the two (2) markings when the wheel MUST be removed for further inspection of wear to the brake pads and brake rotor. For further inspection of the brake pads, the wheel and brake pads MUST be removed. Refer to the Knorr/Bendix SK7 brake pad change service data sheet “SD-23-7541 Air Disc Brake” which can be found at www.bendix.com for more information. Figure 4 PERMITTED NOT PERMITTED IMPORTANT: After inspecting the brake pads, check that the brake system is functioning properly. IMPORTANT: When replacing worn brake pads, ALL pads on the axle MUST be replaced. If the friction material of the brake pad is less than 0.43" (11 mm) at its thinnest area, the brake pad MUST be replaced (Figure 6). NOTE: Minor breakouts at the edges are permitted; major breakouts on the surface of the brake pad are NOT permitted (Figure 4). XL-SA10059OM-en-US Rev E · 2014-07-25 · Amendments and Errors Reserved · © SAF-HOLLAND, Inc., SAF-HOLLAND, HOLLAND, SAF, and logos are trademarks of SAF-HOLLAND S.A., SAF-HOLLAND GmbH, and SAF-HOLLAND, Inc. 7 Disc Brake/Hub Unit Inspection 5.2 Rotor Wear Inspection 1. Figure 5 Carefully inspect both sides of the brake rotor friction surface (Figure 5). AREA A a. Spider web cracking is acceptable (Area A). b. Radial cracks less than 0.06" (1.5 mm) deep or wide and their length is less than 75% of the width of the rotor friction surface (Area B). AREA B ROTOR FRICTION SURFACE c. Grooves in the rotor surface are acceptable only if they are less than 0.06" (1.5 mm) deep (Area C). 75% OF ROTOR WIDTH d. Cracks that run completely to either edge of the hub are NOT acceptable, regardless of depth (Area D). 2. AREA D Measure the brake rotor thickness and re-surface, if necessary. For proper brake function, the minimum thickness for re-surfacing the brake rotor is defined as 1.54-1.57" (39-40 mm). Re-surfacing the brake rotor beyond the minimum thickness could cause component failure which, if not avoided, could result in death or serious injury. IMPORTANT: DO NOT use high-pressure cleaners or liquid cleaners on the brake rotor. AREA C AREA C CROSS SECTION VIEW If the overall wear limits for the brake rotor and brake pads are exceeded (Figure 6), the rotor and pads MUST be replaced. Refer to brake pad and rotor replacement instructions as detailed in Section 9.1 and 9.2. 0.06" (1.5 MM) MAX. DEPTH For both the inner and outer pads, the maximum brake pad wear difference is 0.2" (5.0 mm). BRAKE ROTOR BRAKE PAD DIAMETER "A" NEW "B" WEAR LIMIT "C" NEW "D" WEAR LIMIT 430 mm 16.93" 45 mm 1.77" 37 mm 1.46" 30 mm 1.18" 11 mm 0.43" Failure to replace brake rotor and pads when minimum wear limits are reached could cause component failure which, if not avoided, could result in death or serious injury. NOTE: When replacing the brake pads or brake rotor, use only Original SAF-HOLLAND® rotors and approved brake pads. IMPORTANT: When replacing worn brake pads, all pads on the axle MUST be replaced. Figure 6 "C" NEW PAD "A" NEW ROTOR "B" WORN ROTOR "D" WORN PAD NOTE: During brake repairs, conduct a visual inspection of the seals on the brake caliper. Refer to Section 5.3 for more information. 8 XL-SA10059OM-en-US Rev E · 2014-07-25 · Amendments and Errors Reserved · © SAF-HOLLAND, Inc., SAF-HOLLAND, HOLLAND, SAF, and logos are trademarks of SAF-HOLLAND S.A., SAF-HOLLAND GmbH, and SAF-HOLLAND, Inc. Disc Brake/Hub Unit Inspection 5.3 Brake Caliper Inspection For instructions on brake caliper inspection and repair, refer to the Knorr/Bendix SK7 Caliper service data sheet "SD-23-7541 Air Disc Brake" which can be found at www.bendix.com. 5.4 Hub Unit Inspection The SAF-HOLLAND® disc brake hub unit with compact bearing system is designed to be maintenance-free. If there is a malfunction with the hub unit, the hub unit including the compact bearing system MUST be replaced. The integrated compact bearing system is sealed and requires no additional grease or oil application to the bearing. IMPORTANT: DO NOT remove the integrated compact bearing system. If there is a malfunction, the bearing system and hub unit MUST be replaced. 1. When changing brake pads and rotors or in the event of damage (e.g. brake overheating), inspect the bearing for signs of wear and grease leakage. Perform the Grease Leak Inspection, Wheel Rock Test and Wheel Bearing Noise Test as described in Sections 6 through 8. 2. Visually check the seal system to ensure that it is functioning properly and that there is minimal grease leakage. Refer to Section 8 for more information. For guidance about diagnosing seal system malfunctions refer to Section 13. NOTE: Adjustment of the compact bearing system is NOT necessary. IMPORTANT: DO NOT use high-pressure cleaners or liquid cleaners on the hub unit. IMPORTANT: The red dot in the middle of the SAF® plastic hub cap is permanent. If you attempt to remove it, hub cap failure will result. Failure to replace plastic hub cap when broken could cause component failure which, if not avoided, could result in death or serious injury. Failure to replace bearing system and hub unit when required could cause component failure which, if not avoided, could result in death or serious injury. XL-SA10059OM-en-US Rev E · 2014-07-25 · Amendments and Errors Reserved · © SAF-HOLLAND, Inc., SAF-HOLLAND, HOLLAND, SAF, and logos are trademarks of SAF-HOLLAND S.A., SAF-HOLLAND GmbH, and SAF-HOLLAND, Inc. 9 Wheel Rock and Bearing Noise Tests 6. Wheel Rock Test Figure 7 1. For sufficient clearance to perform the test, raise the wheel off the ground. DO NOT remove the wheel! 2. Carefully remove the hub cap. 3. Using a size 85 mm socket, check the torque of the axle OVUUPFOTVSFUIBUJUJTUPSRVFEUPGUMCT/tN by rotating the nut in either a left- or right-handed direction, for the roadside or curbside of the axle respectively. DIAL GAUGE AXLE NUT NOTE: The SAF® compact bearing system uses a single piece spindle nut, which has a left-hand thread on the roadside of the axle and a right-hand thread on the curbside of the axle. The axle nut with a left-handed thread can be identified by a circular groove (Figure 13). The left-hand threaded axle spindle can be identified by a frontal groove on the end of the axle spindle. 4. Clean the surface of the axle nut. Attach the magnetic foot of the dial gauge to the surface of the nut and spindle. Place the pointer on the rim surface as shown (Figure 7). 5. Rock the wheel by first pulling at the top and pressing at the bottom, then pulling at the bottom and pressing at the top. Push and pull with approximately 50 lbs. (220 N) of force. While rocking/moving the wheel, record the end play shown on the dial gauge. NOTE: Rotate the wheel several times before each measurement. MAGNETIC FOOT Figure 8 ROTATE WHEEL FAST AND SLOW AXLE NUT NOTE: If a recorded wheel end play of more than .01" (0.25 mm) while alternating +/- 50 lbs. (220 N) force is measured, the hub unit MUST be replaced. 7. Wheel Bearing Noise Test 1. For sufficient clearance to perform the test, raise the wheel off the ground. DO NOT remove the wheel! 2. Carefully remove the hub cap. 3. Using a size 85 mm socket, check the torque of the axle OVUUPFOTVSFUIBUJUJTUPSRVFEUPGUMCT/tN 4. Rotate the wheel in both forward and rearward directions, using varying speeds (Figure 8). 5. If the bearing feels rough and/or a “grinding” noise is heard, the hub MUST be replaced. NOTE: Noises can also be caused by the brakes. Before removing the hub unit, remove the brake pads and repeat the bearing noise test. 10 XL-SA10059OM-en-US Rev E · 2014-07-25 · Amendments and Errors Reserved · © SAF-HOLLAND, Inc., SAF-HOLLAND, HOLLAND, SAF, and logos are trademarks of SAF-HOLLAND S.A., SAF-HOLLAND GmbH, and SAF-HOLLAND, Inc. Hub Unit Grease Leak Inspection 8. Hub Unit Grease Leak Inspection Figure 9 A hub unit grease leak inspection should be performed if more than half of the wheel flange is covered with grease. 1. Carefully remove the hub cap. 2. Inspect the grease levels inside of the wheel flange including the inside of the hub cap, the axle nut, axle tube spindle and hub seal. HUB SEAL NOT COMPLETELY COVERED a. If the hub seal is NOT completely covered with grease (Figure 9), the hub units are correct and DO NOT need replacement. b. If the hub seal is completely covered with tar-like grease (Figure 10), the hub unit MUST be replaced. NOTE: There may be a small amount of grease on the lower edge of the hub seal. This is normal, and DOES NOT indicate grease leakage. Figure 10 HUB SEAL COMPLETELY COVERED XL-SA10059OM-en-US Rev E · 2014-07-25 · Amendments and Errors Reserved · © SAF-HOLLAND, Inc., SAF-HOLLAND, HOLLAND, SAF, and logos are trademarks of SAF-HOLLAND S.A., SAF-HOLLAND GmbH, and SAF-HOLLAND, Inc. 11 Servicing the Disc Brake/Hub Unit 9. Disc Brake/Hub Unit Service Contact SAF-HOLLAND® Customer Service at 888-396-6501 before performing any work on the SAF-HOLLAND® INTEGRAL® disc brake hub unit. IMPORTANT: Only qualified mechanics should perform the procedures detailed in this manual. NOTE: If the seal between the axle spindle and spindle nut is broken before the end of the stated warranty period, all warranty coverage will be invalidated unless the repair work has been approved by SAF-HOLLAND®. For approval, contact Customer Service at 888-396-6501. IMPORTANT: During removal inspect components for wear and replace worn components. Failure to properly support axle during maintenance could allow axle to fall which, if not avoided, could result in death or serious injury. DO NOT hit steel parts with a steel hammer as parts could break, sending flying steel fragments in any direction creating a hazard which, if not avoided, could result in minor to moderate injury. NOTE: For certain service and repair work, some bolts MUST be replaced. DO NOT oil or grease bolts for installation. Tighten bolts with a torque wrench following the specified procedure and torque value. Refer to Torque Chart in Section 11. 9.1 Brake Pad Replacement For instructions on brake replacement, refer to the Knorr/Bendix SK7 Caliper service data sheet "SD-23-7541 Air Disc Brake" which can be found at www.bendix.com. IMPORTANT: After inspecting the brake pads, check that the brake system is functioning properly. IMPORTANT: When replacing worn brake pads, all pads on the axle MUST be replaced. 12 XL-SA10059OM-en-US Rev E · 2014-07-25 · Amendments and Errors Reserved · © SAF-HOLLAND, Inc., SAF-HOLLAND, HOLLAND, SAF, and logos are trademarks of SAF-HOLLAND S.A., SAF-HOLLAND GmbH, and SAF-HOLLAND, Inc. Servicing the Disc Brake/Hub Unit 9.2 Rotor Replacement Failure to observe these instructions could cause component failure which, if not avoided, could result in death or serious injury. 1 Cage the spring brake. 2. Remove the ABS sensor by following the instructions detailed in Section 10.1. 3 Remove the brake chamber from the brake caliper by loosening and removing the two (2) mounting nuts (Figure 11). 4. Remove the brake caliper from the brake spider by using a size 24 mm socket to loosen and discard all four (4) brake caliper bolts (Figure 12). 5. Using a hub cap puller, remove the plastic hub cap (Figure 13) at the reinforced undercut on the side of the cap. IMPORTANT: The red dot in the middle of the SAF® plastic hub cap is permanent and MUST NOT be removed. 6. Figure 11 BRAKE CHAMBER MOUNTING NUTS, TWO (2) Figure 12 BRAKE SPIDER BRAKE CALIPER BOLTS, FOUR (4) Using a size 85 mm socket, remove the axle spindle nut by rotating the nut in either a left- or right-handed direction, respectively for the road or curbside of the axle. NOTE: The SAF® compact bearing system uses a single piece spindle nut which has a left-hand thread on the roadside of the axle and a right-hand thread on the curbside of the axle. The axle nut with a left-handed thread can be identified by a circular groove (Figure 13). The left-hand threaded axle spindle can be identified by a frontal groove on the end of the axle spindle. NOTE: DO NOT remove the SAF® compact bearing spindle nut with an impact wrench. Due to the self-tightening design of the SAF® compact bearing spindle nuts, it may be necessary to apply high UPSRVFPGVQUPGUMCT/tN UPMPPTFO the spindle nuts. Use an appropriate length hand wrench and torque multiplier to loosen the SAF® compact bearing spindle nut. BRAKE CALIPER Figure 13 FRONTAL GROOVE LEFTHAND THREAD AXLE SPINDLE END HUB UNIT IMPORTANT: DO NOT use an impact wrench to remove the SAF® compact bearing spindle nut. The high speed generated from air impact wrench to loosen the high clamp load of the SAF® compact bearing spindle nut could result in damage to the spindle threads. CIRCULAR GROOVE AXLE SPINDLE NUT LEFT-HAND THREAD XL-SA10059OM-en-US Rev E · 2014-07-25 · Amendments and Errors Reserved · © SAF-HOLLAND, Inc., SAF-HOLLAND, HOLLAND, SAF, and logos are trademarks of SAF-HOLLAND S.A., SAF-HOLLAND GmbH, and SAF-HOLLAND, Inc. HUB CAP 13 Servicing the Disc Brake/Hub Unit 7. 8. Remove the head unit by gently sliding it off the spindle. (Figure 14). Remove the bearing O-Ring seal from the hub unit and discard (Figure 15). Figure 14 HEAD UNIT NOTE: The O-Ring seal may be stuck to the bearing system or on the axle spindle. 9. Clean the hub unit bearing surface. 10. Remove the hub unit from the rotor by using a size 15 mm socket to loosen and discard all ten (10) connection bolts (Figure 15). AXLE SPINDLE 11. Clean the rotor contact surface on the hub unit. Using compressed air, clean the tapped holes in the disc unit. Check that the threads are in good working conditions. 12. Re-install the hub unit to the rotor by using ten (10) new SAF® specific connection bolts. Use a torque wrench to QSFUPSRVFUIFCPMUTUPGUMCT/tN 'PSGJOBM torque, tighten the bolts with an additional 120° turn using a criss-cross pattern. Refer to the Torque Chart in Section 11 for more information. IMPORTANT: When re-installing the hub unit and rotor, use only new SAF® specific connection bolts. Bolts MUST be clean and free of oil and grease. Figure 15 ROTOR CONTACT SURFACE AND TAPPED HOLES CONNECTION BOLTS,TEN (10) Failure to observe these instructions could cause component failure which, if not avoided, could result in death or serious injury. BEARING O-RING SEAL 13. Clean any grease residues from the axle spindle end and re-coat the bearing journal with Renolit Paste AZ 0-1. DO NOT grease or oil the spindle threads. ROTOR HUB UNIT NOTE: Renolit Paste AZ 0-1 is available in 5 g packets through SAF-HOLLAND® Original Parts online at www.safholland.us or by contacting Customer Service at 888-396-6501. IMPORTANT: DO NOT use high-pressure cleaners or liquid cleaners on the spindle. Figure 16 HEAD UNIT 14. Insert a new bearing O-Ring seal into the groove of the hub unit (Figure 16). 15. Re-install the head unit by gently sliding it on the spindle (Figure 14). During re-installation be sure the O-Ring seal is in the proper position. BEARING O-RING SEAL O-RING GROOVE 14 XL-SA10059OM-en-US Rev E · 2014-07-25 · Amendments and Errors Reserved · © SAF-HOLLAND, Inc., SAF-HOLLAND, HOLLAND, SAF, and logos are trademarks of SAF-HOLLAND S.A., SAF-HOLLAND GmbH, and SAF-HOLLAND, Inc. Servicing the Disc Brake/Hub Unit 16. Re-install the SAF® specific axle spindle nut by rotating the nut onto the axle spindle in either a left-or righthanded direction, depending on the direction of the thread: NOTE: The SAF® compact bearing system uses a single piece spindle nut which has a left-hand thread on the roadside of the axle and a right-hand thread on the curbside of the axle. The axle nut with a left-handed thread can be identified by a circular groove. The left-hand threaded axle spindle can be identified by a frontal groove on the end of the axle spindle (Figure 13). Figure 17 AXLE SPINDLE NUT HEAD UNIT 30º MARKS O-RING SEAL a. Pre-torque the axle spindle nut with a torque wrench BOETJ[FNNTPDLFUUPGUMCT/tN HUB CAP b. Rotate the head unit slowly five (5) revolutions. c. For final torque tighten the axle spindle nut by 1/12 turn (30°). NOTE: Each mark on the spindle nut equals 1/12 (30°) turn (Figure 17). d. Check that the axle spindle nut has a final torque of GUMCT/tN 3FGFSUPUIF5PSRVF$IBSUJO Section 11. Figure 18 SHOULDER BOLT BRAKE SPIDER INNER CALIPER BOLTS SHOULDER STD. BOLT BOLT NOTE: The maximum permissible end play of the hub unit is shown in Section 6. 17. Check that the hub cap O-Ring seal is in good condition and replace if necessary. 18 Re-install the hub cap onto the hub unit by pressing it slowly and uniformly against the hub seat until the snap fit is secure (Figure 17). Visually inspect for a proper O-Ring seal. OUTER CALIPER BOLT BRAKE CALIPER 19. Re-install the caliper to the brake spider using four (4) new SAF® specific brake caliper bolts (Figure 18). XL-SA10059OM-en-US Rev E · 2014-07-25 · Amendments and Errors Reserved · © SAF-HOLLAND, Inc., SAF-HOLLAND, HOLLAND, SAF, and logos are trademarks of SAF-HOLLAND S.A., SAF-HOLLAND GmbH, and SAF-HOLLAND, Inc. 15 Servicing the Disc Brake/Hub Unit NOTE: The caliper is connected to the disc brake spider using four (4) SAF® specific bolts: three (3) standard bolts and one (1) shoulder bolt (Figure 19). The shoulder bolt is located at the outer mounting hole where the brake rotor rotates OUT of the caliper when turning in driving direction (Figure 19). Figure 19 ROTOR ROTATION SHOULDER BOLT IN OUTER MOUNTING HOLE Failure to install the shoulder bolt in the proper location could cause component failure which, if not avoided, could result in death or serious injury. DRIVING DIRECTION B 1SFUPSRVFUIFCPMUTUPGUMCT/tN GSPN inner bolts to outer bolts using a size 24 mm socket. b. Verify the pre-torque of the bolts a second time, and JGOFDFTTBSZSFUJHIUFOBMMCPMUTUPGUMCT/tN c. Final torque from inner bolts to outer bolts to GUMCT/tN IMPORTANT: Make sure that the brake caliper is mounted on the correct side of the axle. The correct location can be identified by the lengths of the guide pins on the caliper unit. The longer guide pins should be located on the bottom of the caliper unit when installed on the axle in driving direction. The shorter guide pins should be located on the top of the caliper unit (Figure 20 and 21). Figure 20 SHORT GUIDE PIN 20. Re-install the SAF® brake chamber by following the instructions in “SAF® Brake Cylinders for Disc Brakes Installation and Service Guide” available online at www.safholland.us. 21. Re-install the ABS sensor by following the instructions detailed in Section 10.1. 22. To enable the ABS sensor to function properly press the ABS sensor against the toner ring at the hub unit to eliminate any clearance between these parts. IMPORTANT: After replacing the rotor, verify that the brake system is functioning properly. 9.3 Brake Caliper Servicing For instructions on brake caliper and repair/replacement, refer to the Knorr/Bendix SK7 Caliper service data sheet “SD-23-7541 Air Disc Brake” which can be found at www.bendix.com. LONG GUIDE PIN ROADSIDE CURBSIDE Figure 21 SHORT GUIDING PIN AT TOP DRIVING DIRECTION LONG GUIDING PIN AT BOTTOM 16 XL-SA10059OM-en-US Rev E · 2014-07-25 · Amendments and Errors Reserved · © SAF-HOLLAND, Inc., SAF-HOLLAND, HOLLAND, SAF, and logos are trademarks of SAF-HOLLAND S.A., SAF-HOLLAND GmbH, and SAF-HOLLAND, Inc. Servicing the Disc Brake/Hub Unit 9.4 Hub Unit Servicing Figure 22 ® The SAF-HOLLAND disc brake hub unit with compact bearing system is designed to be maintenance-free. If there is a malfunction with the hub unit, the hub unit including the compact bearing system MUST be replaced. The integrated compact bearing system is lifetime sealed and requires no grease or oil application to the bearing. IMPORTANT: DO NOT remove the integrated compact bearing system. If there is a malfunction, the bearing system and hub unit MUST be replaced. WHEEL BOLTS (TEN) HUB UNIT When replacing the wheel bolts, refer to the hub removal instructions described in Section 9.2 NOTE: Not all bolts may need to be replaced. Only replace bolts that are damaged or in need of replacement. 1. Remove the wheel bolts by pressing them out of the hub unit and discard (Figure 22). 2. Install new wheel bolts by pressing them into the hub unit. To ensure correct alignment of the bolts during installation, position the flat side of each wheel bolt head so that it is facing the center of the hub (Figure 23). DO NOT hit steel parts with a steel hammer as parts could break, sending flying steel fragments in any direction creating a hazard which, if not avoided, could result in minor to moderate injury. Figure 23 FLAT SIDE OF BOLT HEAD WHEEL BOLTS, TEN (10) XL-SA10059OM-en-US Rev E · 2014-07-25 · Amendments and Errors Reserved · © SAF-HOLLAND, Inc., SAF-HOLLAND, HOLLAND, SAF, and logos are trademarks of SAF-HOLLAND S.A., SAF-HOLLAND GmbH, and SAF-HOLLAND, Inc. 17 Wheel Installation 10. Wheel Installation Procedure Figure 24 The following information is intended to provide basic wheel installation instructions. Refer to TMC RP222C for complete installation details. 1. Clean all mating surfaces on hub, wheels and nuts. 2. Rotate the hub so a pilot boss is at the top (12 o'clock) position. 3. Mount wheel(s) on hub. One or more of the wheel nuts can be started in order to hold wheel in position. PILOT BOSS 1 10 5JHIUFOUIFUPQXIFFMOVUGJSTU"QQMZGUMCT/tN of torque to draw the wheel up fully against the hub. 5. Install remaining wheel nuts. Using sequence shown in (Figure 24), tighten all wheel nuts to 50 ft.-lbs. /tN PGUPSRVF 6. Repeating sequence shown in (Figure 24), retighten all XIFFMOVUTUPGUMCT/tN PGUPSRVF 7. Check seating of wheel at the pilot bosses. Rotate wheel and check for any rotational irregularity. Retorque all wheel nuts after 5 to 100 miles of service on the initial "in-service" following any installation of wheel to hub assembly. 8 3 6 5 4 9 7 2 Figure 25 SENSOR HOLDER RETAINING SPRING CLIP ABS SENSOR 11. Disc Brake Options 11.1 ABS Sensor Replacement NOTE: When replacing the ABS sensor, only install a sensor manufactured by WABCO. DO NOT mix sensors from different manufacturers. The SAF-HOLLAND® INTEGRAL® Disc Brake comes with a WABCO ABS mini sensor Ø11. For further ABS sensor information, contact SAF-HOLLAND® Customer Service at 888-396-6501. 1. Disconnect the ABS sensor. 2. Remove the ABS sensor from the sensor holder by pulling it straight out from the holder and discard (Figure 25). 3. If necessary, remove the sensor retaining spring clip from the sensor holder and replace with new clip. (Figure 25). 4. Install a new ABS sensor by pushing it directly into the sensor holder/spring clip until it contacts the tooth wheel in the hub unit (Figure 25). 5. Re-connect the ABS sensor. 18 XL-SA10059OM-en-US Rev E · 2014-07-25 · Amendments and Errors Reserved · © SAF-HOLLAND, Inc., SAF-HOLLAND, HOLLAND, SAF, and logos are trademarks of SAF-HOLLAND S.A., SAF-HOLLAND GmbH, and SAF-HOLLAND, Inc. Disc Brake Options Figure 26 11.2 Hubodometer ® ® The SAF-HOLLAND INTEGRAL Disc Brake can be factory equipped or retrofitted with a hubodometer hub cap for installation of a hubodometer. 1. Remove the original plastic hub cap (Figure 26) at the reinforced undercut on the side of the cap using a hub cap puller. 2. Install hubodometer onto hubodometer hub cap. 3. Check that the hubodometer hub cap O-Ring is installed correctly and is in good condition. 4. Install the hubodometer hub cap by pressing it slowly and uniformly against the hub seat until the snap fit is secure (Figure 27). Visually inspect the O-Ring for a proper seal. HUB UNIT HUB CAP NOTE: A hubodometer hub cap cannot be installed on axles equipped with a Tire Inflation System (TIS). 11.3 Tire Inflation System Figure 27 If your system is prepped for a Tire Inflation System, contact SAF-HOLLAND® Customer Service for further information and installation instructions. HUB UNIT 11.4 Dust Shield The SAF-HOLLAND® INTEGRAL® Disc Brake can be factory equipped or retrofitted with a dust shield. HUBODOMETER HUB CAP Refer to Figure 28 for the following instuctions: 1. Using a 13mm socket, loosen and remove the dust shield clamp band bolt. 2. Wrap the clamp band around the axle and loosely install the clamp band bolt. 3. Position the clamp band around the axle. 4. Route any ABS sensor wires through one of the two rubber grommets on the dust shield. 5. Position the clamp band over the clamp band lip portion of the dust shield. 6. Figure 28 BRAKE ROTOR Slide the dust shield and clamp band together toward the disc brake until the clamp band is about 12mm (0.5”) from the brake rotor, pulling the ABS sensor wire through the rubber grommet as necessary. CLAMP BAND LIP CLAMP BAND 5PSRVFUIFDMBNQCBOECPMUUPGUMCT/tN 8. Use a pry bar and/or rubber mallet to ensure that there is clearance between the dust shield and the rotor. 9. Plug the ABS sensor into the abs system wire. RUBBER GROMMET AXLE DUST SHIELD XL-SA10059OM-en-US Rev E · 2014-07-25 · Amendments and Errors Reserved · © SAF-HOLLAND, Inc., SAF-HOLLAND, HOLLAND, SAF, and logos are trademarks of SAF-HOLLAND S.A., SAF-HOLLAND GmbH, and SAF-HOLLAND, Inc. CLAMP BAND BOLT 19 Torque Chart 12. Torque Chart PART APPLICATION SAF® Specific Axle Spindle Nut M75 x 1.5 Compact Bearing System Left-hand thread located on the roadside of the axle. Right-hand thread located on the curbside of the axle. The axle nut with a left-handed thread can be identified by a circular groove (Figure 13). 1SFUPSRVFXJUIBTJ[FNNTPDLFUUPGUMCT/tN 2. Rotate the head unit slowly five (5) revolutions. 3. For final torque tighten the axle spindle nut by 1/12 turn (30°). 4. Check that the axle spindle nut has a final torque of at least GUMCT/tN Maximum permissible end play of the hub unit is shown in Section 6. SAF® Specific INTEGRAL® Bolt M14 x 1.5 Rotor - Hub Torque all ten (10) bolts in a criss-cross pattern. 1SFUPSRVFUPGUMCT/tN 2. For final torque tighten by an additional 120° turn. SAF® Specific Caliper Bolt M18 x 1.5 Caliper - Spider Torque bolts from inner bolts to outer bolts. 1SFUPSRVFUPGUMCT/tN 2. Verify the pre-torque of the bolts a second time, and, if OFDFTTBSZSFUJHIUFOBMMCPMUTUPGUMCT/tN 3. Final torque from inner bolts to outer bolts to 331 +/- 22 ft.-lbs. /tN SAF® Specific Brake Chamber Nut 5/8"-11 UNC Nylock or M16 x 1.5" Brake Chamber 1SFUPSRVFCPUIDIBNCFSOVUTUPGUMCT/tN 2. For final torque tighten both chamber nuts to 130-155 ft.-lbs. /tN 20 TORQUE SPECIFICATIONS XL-SA10059OM-en-US Rev E · 2014-07-25 · Amendments and Errors Reserved · © SAF-HOLLAND, Inc., SAF-HOLLAND, HOLLAND, SAF, and logos are trademarks of SAF-HOLLAND S.A., SAF-HOLLAND GmbH, and SAF-HOLLAND, Inc. Routine Service Schedule 13. Routine Service Schedule Failure to maintain your SAF-HOLLAND® INTEGRAL® disc brake with SAF-HOLLAND® Original Parts can result in brake or wheel bearing failure which, if not avoided, could result in death or serious injury. Failure to inspect and maintain your SAF-HOLLAND® INTEGRAL® disc brake axle as outlined in Section 12 can result in brake or wheel bearing failure which, if not avoided, could result in death or serious injury. IMPORTANT: Use only SAF-HOLLAND® Original Parts to service your SAF-HOLLAND® INTEGRAL® disc brake axle. PERIODIC CHECKS WHICHEVER OCCURS FIRST MILEAGE INTERVALS After First 3,000 Miles TIME INTERVALS After First Month Daily Every 20,000 Miles Every 50,000 Miles Every 3 Months Every 6 Months VISUAL AND SAFETY INSPECTION Inspect for missing, or loose hubcap. t Inspect for grease leakage around hubcap. t Hub unit maintenance-free. Check for grease leaks. Refer to Section 8. t Inspect the brake caliper guide system. Check for free movement and sliding action. Refer to Section 5.3. t Check rubber dust covers for cracks and damage. Check adjuster cap for correct seating. Refer to Section 5.3. t Inspect brake pad thickness regularly. Refer to Section 5. t Inspect brake rotors for cracks. Refer to Section 5. t Perform general service / maintenance inspection. Refer to Section 4. Perform disc brake / hub unit inspection. Refer to Section 5. t t Perform wheel rock and wheel noise tests. Refer to Section 6 and 7. t t MECHANICAL CHECK Attention: Check torque of wheel nuts after the first 5-100 miles (8-160 km) from date vehicle was placed into service and after every wheel removal. Continually check wheel torque every 10,000 miles (16,000 km), or at the intervals indicated in your vehicle owner's manual, whichever occurs first. SPECIAL SERVICE CONDITIONS Vehicles with long standing periods. Service at specified time intervals, e.g. trailer used for storage or frequently left standing for several days at a time. Vehicles used under severe duty and extreme conditions. Service at suitably reduced intervals, e.g. trailer operating in continuous multi-shifts or in off-road construction sites. XL-SA10059OM-en-US Rev E · 2014-07-25 · Amendments and Errors Reserved · © SAF-HOLLAND, Inc., SAF-HOLLAND, HOLLAND, SAF, and logos are trademarks of SAF-HOLLAND S.A., SAF-HOLLAND GmbH, and SAF-HOLLAND, Inc. 21 Troubleshooting Chart 14. Troubleshooting Chart (SAF-HOLLAND® suspensions equipped with disc brake axles) PROBLEM Brakes will NOT release POSSIBLE CAUSE Lubricate or replace brake caliper Brake hoses restricted Replace hoses Brake control valve restricted/inoperable Repair/replace control valve Brake out of adjustment Adjust brake/repair or replace automatic adjustment device as necessary Damaged brake chamber Replace brake chamber Damaged brake assembly Replace or repair brake assembly Supply air interrupted Open glad hand cut-out cock or push brake control valve in Supply line improperly coupled Properly couple supply air line Brake pads frozen to rotor in cold weather Warm brakes No brakes or insufficient brake Service air interrupted performance Service air line improperly coupled Brake hoses restricted Dragging Brakes/Slow brake application or release timing Dog tracking Uneven tire wear 22 POSSIBLE REMEDY Disc brake caliper bound up Open glad hand cut-out cock Properly couple service air line Relieve restriction or obstruction or replace hoses Brake control valve restricted/inoperable Repair/replace control valve Brake out of adjustment Adjust brake/repair or replace automatic adjustment device as necessary Damaged brake chamber Replace brake chamber Damaged brake assembly Replace or repair brake assembly Brake hoses restricted Relieve restriction or obstruction or replace hoses Brake control valve restricted/inoperable Repair/replace control valve Brake out of adjustment Adjust brake/repair or replace automatic adjustment device as necessary Damaged brake chamber Replace brake chamber Damaged brake assembly Replace or repair brake assembly Axle not properly aligned Align axle Slider assembly racked or NOT aligned properly Repair or replace slider assembly Frame bent or NOT aligned properly Repair or align frame Damaged suspension component Repair or replace suspension component Bent axle Replace axle Improper tire inflation Inflate tire to proper pressure Loose wheel stud nuts Inspect for and repair any resultant wheel end damage and tighten properly Improper wheel bearing adjustment Inspect for and repair any resultant wheel end damage and adjust properly Axle NOT properly aligned Align axle Slider assembly racked or NOT aligned properly Repair or replace slider assembly Frame bent or NOT aligned properly Repair or align frame Damaged suspension component Repair or replace suspension component Bent axle Replace axle Mismatched tire sizes Properly match tire sizes Unequal brake balance or timing Repair brakes as necessary Overly aggressive braking Instruct/train driver in proper brake use High speed turns Instruct/train driver in proper vehicle speeds High level of side scrub Instruct/train driver in proper vehicle maneuvering Anti-Lock Brake System malfunction Refer to ABS manufacturer’s service literature XL-SA10059OM-en-US Rev E · 2014-07-25 · Amendments and Errors Reserved · © SAF-HOLLAND, Inc., SAF-HOLLAND, HOLLAND, SAF, and logos are trademarks of SAF-HOLLAND S.A., SAF-HOLLAND GmbH, and SAF-HOLLAND, Inc. Troubleshooting Chart PROBLEM Grabbing brakes Excessive heat cracks in rotor POSSIBLE CAUSE POSSIBLE REMEDY Contaminants on brake lining Replace brake pads Brake out of adjustment Adjust brake/repair or replace automatic adjustment device as necessary Warped brake rotor Machine or replace brake rotor Damaged brake chamber Replace brake chamber Damaged brake assembly Replace or repair brake assembly Unequal brake balance or timing Repair brakes as necessary Anti-Lock Brake System malfunction Refer to ABS manufacturer's service literature Brake out of adjustment Adjust brake/repair or replace automatic adjustment device as necessary Overly aggressive braking Instruct/train driver in proper brake use Unequal brake balance or timing Repair brakes as necessary Anti-Lock Brake System malfunction Refer to ABS manufacturer's service literature Damaged brake chamber Replace brake chamber Damaged brake assembly Replace or repair brake assembly XL-SA10059OM-en-US Rev E · 2014-07-25 · Amendments and Errors Reserved · © SAF-HOLLAND, Inc., SAF-HOLLAND, HOLLAND, SAF, and logos are trademarks of SAF-HOLLAND S.A., SAF-HOLLAND GmbH, and SAF-HOLLAND, Inc. 23 SAF-HOLLAND Original Parts are the same quality components used in the original component assembly. SAF-HOLLAND Original Parts are tested and designed to provide maximum performance and durability. Will-fits, look-alikes or, worse yet, counterfeit parts will only limit the performance potential and could possibly void SAF-HOLLAND’s warranty. Always be sure to spec SAF-HOLLAND Original Parts when servicing your SAF-HOLLAND product. SAF-HOLLAND USA · 888.396.6501 · Fax 800.356.3929 www.safholland.us · · SAF-HOLLAND CANADA WESTERN CANADA 604.574.7491 · · Fax 604.574.0244 52.55.5362.8743 · Fax 52.55.5362.8743 519.537.3494 Fax 800.565.7753 www.safholland.ca SAF-HOLLAND MEXICO www.safholland.com.mx [email protected] SAF-HOLLAND USA, INC. 1950 Industrial Blvd., Muskegon, MI 49442 www.safholland.com · XL-SA10059OM-en-US Rev E · 2014-07-25 · Amendments and Errors Reserved · © SAF-HOLLAND, Inc., SAF-HOLLAND, HOLLAND, SAF, and logos are trademarks of SAF-HOLLAND S.A., SAF-HOLLAND GmbH, and SAF-HOLLAND, Inc. From fifth wheel rebuild kits to suspension bushing repair kits,