1
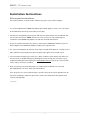
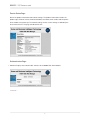
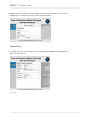
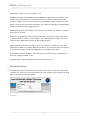
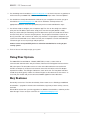
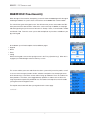
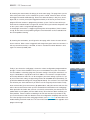
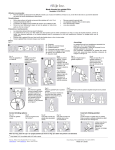
HABIT | DSC Owners manual
HABIT | DSC Owners manual
Before you begin:
Read instructions fully before you install the HABIT DSC Module as this product contains parts
that can be damaged if incorrectly installed. Incorrect installation may also void your
manufacturer’s warranty. Follow the instructions carefully. HABIT will not be responsible for
replacing the HABIT DSC Module due to incorrect installation.
Attention: This product should be installed as closely as possible to your DSC Security
unit. We strongly recommend that you consult with your original security system installer, or
an authorized DSC security installer. Avoid installing the HABIT DSC Module in an area that is
susceptible to extreme heat or cold.
Warranty: Home and Business Intelligent Technology Inc. (HABIT), 1136 Centre Street,
Suite 407, Thornhill, Ontario, Canada, L4J 3M8, warrants to the original purchaser only that the
enclosed product is free from material and workmanship defects under normal and its intended
use at time of purchase. Defective product or part must be returned to HABIT at the above
noted address ( Attention: Service Department ), along with the proof of purchase. Upon receipt of the defective part, the item will be repaired or replaced at the option of HABIT,
without charge to the original purchaser and returned to the customer. All shipping costs for
defective items will be borne by HABIT, unless it is determined that the part was not defective. This limited warranty does not apply to damage resulting from the tampering, accident, neglect,
misuse, alteration, or operation which is not in accordance with the instructions contained
herein, or to any repairs made or attempted by any unauthorized persons in any manner of
the HABIT DSC Module or to any accessory parts designed to be used in conjunction with the
HABIT DSC Module. This limited warranty applies only to the product enclosed and does not
apply to any accessory parts, or ancillary software.
THE HABIT LIABILITY HEREUNDER IS LIMITED SOLELY TO THE REPAIR OR REPLACEMENT
OF THE DEFECTIVE PRODUCT OR PART AND HABIT SHALL IN NO EVENT BE LIABLE FOR
ANY INCIDENTAL OR CONSEQUENTIAL DAMAGES WHICH MAY ARISE FROM ANY DEFECT
IN MATERIAL OR WORKMANSHIP OR FROM THE BREACH OF ANY EXPRESS OR IMPLIED
WARRANTY.
HABIT Products and Replacement Parts:
To order any HABIT products or replacement parts visit us online at www.thehabitgroup.com.
1
HABIT | DSC Owners manual
Installation Instructions
Tools required for installation:
Flat head screwdriver, small flat head screwdriver (eye-glass size), and wire strippers.
1. It is recommended that the HABIT DSC Module be installed upright as shown. The unit should
be installed within two feet (2’) of the DSC Security Box. 2. Find the four corresponding wires from the DSC Security Alarm Board, that corresponds with
the same four wire colours. NOTE: Do not cross wires as this may seriously damage the
components of the HABIT DSC Module. The red wire should be attached last.
3. Plug in the network cable from your router or switch into the HABIT DSC Module. Plug in the
power adapter to the HABIT DSC Module and plug it into a power outlet.
4. The system should power up and have all four lights on briefly. After about ten seconds the test
lights (yellow ones) should go out and the two power lights (green ones) should stay on.
5. You next need to configure your router. This is done as follows: (enter details here). Make sure
that your router is capable of doing the following items after you log onto your router: (a) set
up port forwarding (for further details go to www.portforward.com ), (b) set up a Dynamic DNS
service and (c) reserve the IP address.
6. When you first log in to the web manager, you need to enter the default user name and
password (default user name: admin, password: admin).
Once you gain access to the web manager, a menu bar at the far left column provides links for
the various web pages and the far right column shows some information with regards to the
currently selected page.
continued...
2
HABIT | DSC Owners manual
Device Status Page
Shows the product information and network settings. The product information includes the
product type, firmware version, firmware build date, the module serial number and the uptime
of the module since power-up. The network settings are the current settings as defined by the
local router and user. This page should look like this:
Authentication Page
7. Statistics: Displays the network traffic statistics for the HABIT DSC Alarm Module
continued...
3
HABIT | DSC Owners manual
8. Authentication: The module can be specified with more than one account for access to the
Web Manager. The default is Username: admin, Password: admin.
Network Page
9. This page shows the current network interface settings for the HABIT DSC Alarm Module and
allows you to configure it.
continued...
4
HABIT | DSC Owners manual
DHCP Client: Select On or Off. The default is On.
IP Address: At power up the HABIT DSC Alarm Module attempts to lease an IP address from
a DHCP server and maintain the lease at regular intervals. If DHCP is set to OFF, then enter
the static IP address which consists of four octets separated by a period. Changing this value
requires you to recycle the power to the module. This is done by unplugging the power adapter
for fifteen seconds and then plugging it back in. Default Gateway: Enter the IP address of the router for this network. This address is used only
when DHCP is set to Off. Hostname: The module hostname can be entered and must begin with a letter, continue with
a sequence of letters, numbers, and/or hyphens, and end with a letter or number. This is the
hostname that is obtained by the router for identification purpose.
DHCP Client ID: Enter the ID if the DHCP server uses a DHCP ID. The DHCP server’s lease
table shows IP addresses and MAC addresses for devices. The lease table shows the Client ID,
in hexadecimal notation, instead of the HABIT DSC Alarm Module MAC address.
Primary DNS: Enter the IP address of the primary name server. This entry is required if you
choose to configure the DNS servers.
Secondary DNS: Enter the IP address of the secondary name server.
Port & Protocol Page
10. This page specifies the local port number. The default port number is 2200. The protocol type
is fixed to TCP. You must ensure that your router, the web manager and your app on the config
page are all set to the same port number.
continued...
5
HABIT | DSC Owners manual
11. You should log onto the website at www.thehabitgroup.com to check if there are any updates to
the firmware for your HABIT DSC Module. Just follow the prompts under “Firmware Updates”. 12. You should have already downloaded the software for your smartphone. If not then just go to
the website at www.thehabitgroup.com and click on “Software”. Either purchase the
appropriate software or enter when prompted your purchase code and follow the steps.
13. You will now need to configure your smartphone app. First click on the config icon and first
enter your local IP address (from router setup), then enter the local port (default is 2200).
Enter your alarm code (not mandatory), but it will allow for the quick arm and disarm functions
to work. Finally, fill in a username and passphrase. The passphrase should be a minimum of
four (4) characters and a maximum of sixteen (16) characters. The passphrase will protect your
system from unauthorized access. Make sure that your smartphone is not left unattended for
someone to gain access to your login and passphrase. HABIT assumes no responsibility for losses related to unauthorized accessing of your
security system.
14. That’s it. You are now ready to enjoy your system.
Using Your System
The HABIT DSC Control Module – Model#: HABIT-DSC-H-100, is a state of the art
communication tool that works with your iPhone, iPod Touch or iPad app to interface with the
DSC alarm panel. This black box consists of a four wire cable to direction connection with
the DSC control panel, an Ethernet connector to connect to the internet, and a DC adapter
to power the module. The LED lights indicate the status of the unit. The two power indicators
should always be lit (green). If Status A or Status B lights are lit and remain lit, then there is an
issue with your module and you should contact HABIT support for further directions.
Key Features
No monthly service fees. Real time functionality. Alarm remote access. Building out additional
functionalities – upgrades to include: alarm notifications, log history of alarm activity, cameras,
and more.
We would like to hear from you with suggestions on additional functionalities, and what you like
about the app. Please send your comments to: [email protected].
6
HABIT | DSC Owners manual
HABIT-DSC Functionality
When the app is first turned on, the opening screen will show the HABIT logo while the app in
the background does its system checks and connects to the HABIT DSC Control module.
The unit will then go to the keypad screen. You will know that you are connected to the DSC
alarm panel when the date and time show on the screen at the top. In addition, the top right
indicator light will give you the status of the alarm ie. Ready = Green, in armed mode = Amber
and Armed = Red. From this screen you are able to duplicate any functions available on your
physical keypad
1.
2.
3.
4.
At the bottom you will notice options for four different pages:
Keypad
Status
Zones
Config While in the keypad screen on the top right corner is the F keys (function keys). When this is
engaged, you will be brought to the function keys screen.
This screen enables you to arm and disarm the alarm system with just one keystroke, as well
as access to the emergency buttons for fire, ambulance and police. On the top right corner
of the function keys screen there are two arrows facing up and down. These are used for the
alarm partitions. This allows you to toggle between partitions in order to arm or disarm via
single keystroke that particular partitioned area. The button at the top left corner will enable
you to get back to the keypad screen.
The top left status button will allow you to go back to the status page.
continued...
7
HABIT | DSC Owners manual
By choosing the status button, this brings you to the status page. This page shows you the
status of key alarm items such as whether the system is armed, if there has been an event
that triggers the trouble notification (eg. Phone line is down or battery is low), if any zone is
bypassed, or a memory event (alarm triggered activation). It will also let you know via the
program LED that someone is programming the alarm system. The Fire status will let you
know that the smoke detectors have gone off, and A/C will let you know that the power is off
on the system, and it is using backup battery power.
In the top right corner there is a toggle to go through the various partitions (if this has been
set up), for the status of each partition giving the same information as discussed above for
the current partition showing.
By choosing the zone button, you will go to the zone page, which shows the status of each
zone in real time. When a zone is triggered it will change from green status to a red status. It
will stay red until the activity is corrected, ie. Door is closed or the motion detector is once
again in its normal (restored) state.
Finally, if you choose the config page, it shows the various configurations programmed into
the app. It shows the local address which you must enter before the system is functional.
The local address is found by going onto your router settings. Go into your router basic settings as noted above in step #6 to locate the IP address. The next item is the port number
that usually defaults to 2200. This can be changed in your router settings if you like. It is up
to you, but the router setting, the app setting and also for the HABIT device (black box), you
go onto the HABIT web manager to change (Step #6 above). The next item is the alarm code. You will enter your alarm code here if you want to use the single key disarm feature. Finally,
there are three tabs (a) test and connect, (b) update labels, and (c) disconnect and clear. You
will use the test and connect when you have entered all the information on the config page. When pressed it will confirm that you have successfully connected to your alarm panel. The
update labels key will update your zone labels for any zones that have been named by your
alarm provider. If there has been no labelling it will still show the zones by number. Finally,
you use the disconnect and clear button to clear the configuration completely and start over. The in the top right corner of the config page will take you to our website for information and
troubleshooting should the need arise. The site will also show you what future upgrades are in
progress for the app.
8
HABIT | DSC Owners manual
Troubleshooting
If there is no response on the iPhone/iPad app.
Did you set up the port forward on the router properly?
The default on the web manager is 2200. These two (web manager and router) and also the
app on the config page must all be the same.
The green indicator light for the DSC Panel is not on. Ensure that when you attached the HABIT DSC module to the security panel each of the four
wires were attached to the corresponding colors on the DSC alarm panel. Try to redo so that the green light comes on.
The green light is not on for the power adapter.
Make sure the adapter is plugged in or that there is power in that outlet.
The alarm zone names do not show up for the zone area of the app.
Call your alarm installer to program these in for you through the DSC alarm panel.
Make sure that you reserved the ip address as per point #5 above.
9