1
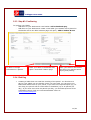
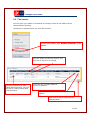
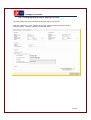
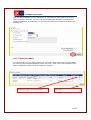
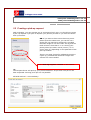
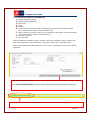
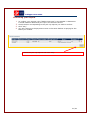
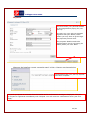
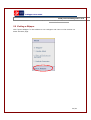
e-Shipper User Guide
e-Shipper User Guide
1
INTRODUCTION...............................................................................................................3
2
USER GUIDE......................................................................................................................4
2.1
2.2
2.2.1
2.2.2
2.3
2.3.1
2.3.2
2.3.3
2.3.4
2.4
2.4.1
2.4.1
2.4.2
2.5
2.6
LOGGING ON TO E-SHIPPER ONLINE.................................................................................4
DETAIL OF THE E-SHIPPER WELCOME PAGE ....................................................................4
MENU BAR ......................................................................................................................5
SIDEBAR ..........................................................................................................................5
CREATING LABELS ............................................................................................................6
STEP #1: ENTERING BASIC INFORMATION .........................................................................6
STEP #2: SELECTING ADDED-VALUE OPTIONS ..................................................................9
STEP #3: CONFIRMING ...................................................................................................10
RED FLAG ......................................................................................................................10
THE BASKET ....................................................................................................................11
2.4.1 CHANGING LABELS BEFORE PAYING FOR THEM .....................................................11
2.4.1 CHANGING LABELS BEFORE PAYING FOR THEM .....................................................12
PAYING FOR LABELS ......................................................................................................13
CREATING A PICK-UP REQUEST ......................................................................................19
EXITING E-SHIPPER ........................................................................................................24
2/24
e-Shipper User Guide
1 Introduction
e-Shipper is an online tool for preparing your Taxipost parcels.
What you can do with e-Shipper:
Securely pay to send a parcel
Print labels for your parcels
Request and pay for a pick-up
1. You have
one or several
parcels to
send.
2. Log on to
www.taxipost.be/eship
per
3. Select the relevant
parcel options and
products.
4. Request a pickAsk a Pick-up
service if desired
7. Attach the labels
and hand the parcels
to our driver (if you
have requested a pickup service) or drop
them off at a Post
Office or PostPoint in
your neighbourhood.
You do not need to pay
again.
6. Print the labels
for your parcels.
5. Pay for your
labels and any
pick-up service
3/24
e-Shipper User Guide
2 User guide
2.1 Logging on to e-Shipper online
1. Go to the De Post-La Poste website at http://www.taxipost.be/eshipper.
2.2 Detail of the e-Shipper welcome page
Menu bar
Sidebar
4/24
e-Shipper User Guide
2.2.1 Menu bar
The menu bar provides access to the following functionality:
1. Change the language (available in English, French, Dutch and German).
2. Access the customer service page.
3. Access the application help page.
1
2
3
2.2.2 Sidebar
The sidebar provides access to the following functionality:
1. Return to the welcome page.
2. Create labels for your parcels.
3. Create a parcel pick-up request.
4. Display your basket before printing your labels.
5. Return to the welcome page.
1
2
3
4
5
5/24
e-Shipper User Guide
2.3 Creating labels
In e-Shipper you can create the right barcode labels for your parcels individually.
Click "Create label" in the sidebar to create your
labels.
There are three steps in the label creation process:
1. Enter basic information about your parcel.
2. Select any options.
3. Confirm before paying and printing your labels.
2.3.1 Step #1: Entering basic information
1
2
3
The first page in the label creation process is split into three sections:
1
Sender and recipient details
2
Product selection
3
Parcel reference
6/24
e-Shipper User Guide
1
Sender and recipient details
All fields marked * are mandatory.
2
Product selection
Click the "Select a product" dropdown list to select a product
You can choose from three
products:
Select a product
- Taxipost 24h
- Taxipost Secur (insured
maximum up to €500, with
signature)
- Taxipost PayPack (COD, insured
up to €500, with signature)
You should also enter the weight of
your parcel. The maximum weight
is 30 kilos.
Specify the weight of your parcel
Click ‘i’ to view a list of available products, with a short description and e-Shipper
prices.
7/24
e-Shipper User Guide
3
Parcel reference
You can enter a reference to make it easier to track your parcel. You can use the
same reference for more than one parcel. To find out where your parcel is at any one
time, simply enter this reference into e-Tracker at www.taxipost.be/track.
8/24
e-Shipper User Guide
2.3.2 Step #2: Selecting added-value options
Various options are available to complement the basic parcel delivery service.
The extra options available
for Taxipost 24h, Taxipost
Secur and Taxipost PayPack:
The GSM (mobile phone) or landline
may contain only digits and the
characters / . + ( ) -.
Before 11.00: the parcel
will be delivered next day
between 9 am and 11 am.
The recipient has to sign for
delivery.
“Received in good order”
info: Confirmation that the
recipient has received the
parcel in good order.
The following information is
required for Taxipost PayPack:
- amount to be paid by
recipient upon delivery
- account number on which
the amount should be
deposited
- any reference message. In
the future this message will be
used by De Post-La Poste
when depositing the COD
amount on your bank account.
Format:
Cash On Delivery amount
- Digits only, use comma as decimal separator,
do not use thousand separators
- Between 0,01 and 1000 euros
- Maximum 7 digits
Example: 255,50
Taxipost PayPack always
requires the recipient to sign
for delivery.
Before 11.00 and “Received
in good order” info are also
available
Cash On Delivery bank account
- 12 digits in the following format: xxx xxxxxxx xx The spaces may be replaced with
the characters . / - , or the number may be written without spaces.
9/24
e-Shipper User Guide
2.3.3 Step #3: Confirming
To confirm your labels:
- Add them to your basket and view basket: add to basket & pay
- Add them to your basket and create a new label (your details will be placed in
the basket and a new label creation page will open): add to basket & new
Delete
Go back to change
information or options.
Place your label in the basket and
open a new label creation page.
Place your label in the basket
and show your details before
paying and printing.
2.3.4 Red flag
1. Creating a label does not entail the sending of the parcel. You first have to
pay for your labels via your basket. Once you have paid, you can print your
labels and attach them to your parcel. If you have not requested pick-up, you
can drop your parcels off at a Post Office or PostPoint (up to 20 parcels per
day). If you have more than 20 parcels per day, you should drop them off at
a MassPost centre. Find your nearest MassPost centre at
www.post.be/masspost.
10/24
e-Shipper User Guide
2.4 The basket
You can place your labels in the basket for storage. Labels in the basket can be
changed before printing.
The basket is emptied when you print the contents.
To view your basket, click "Basket Overview" in the
sidebar.
Click the square to sort the column. The
sort type is shown by a triangle.
Click the reference to view
labels before printing. You will
be able to change some label
characteristics.
2.4.1
Check the box to select labels for
printing or deletion.
Click here to remove the label from the
basket.
Click here to pay for and print the
selected labels.
11/24
e-Shipper User Guide
2.4.1 Changing labels before paying for them
You can change the parcel options before paying for the labels.
Click the reference on the “Basket Overview” page to change the label on the
following page: “Change options for selected label”.
12/24
e-Shipper User Guide
Only the parcel options can be changed, e.g. "Received in good order" info or the
Cash on Delivery amount. The price will be automatically updated. To change the
recipient’s address, for example, you will have to create a new label and delete the
existing one.
Zodra u de wijzigingen hebt uitgevoerd, klikt u op de knop "Opslaan".
2.4.2 Paying for labels
You have to pay for your labels before you can print them. Select the relevant labels
by checking the corresponding boxes and click “Pay”. After your online payment has
been accepted the labels will be available for printing.
Select the label you wish to print
Click "Pay"
13/24
e-Shipper User Guide
The “ePayment: customer ID (Step 1/2)” page will open. Here, you should enter
your personal details for payment. Again, all fields marked * are mandatory.
Check this box if you
wish to receive an
invoice.
Check this box if you
wish to save your details.
For this to work, your
browser should be
configured to accept
cookies.
NB
1) You must enter a VAT number in the “KBO-BCE/VAT number” field if you check
the “Invoice” box.
2) Payment confirmation will be sent to the email address you enter on this page.
14/24
e-Shipper User Guide
Click ‘Next’ to open the Ogone payment page.
Click this button to go
back.
Enter your payment details securely on this page. VISA and American Express credit
cards are accepted.
The order number is also stated in your order confirmation email.
The total amount is the amount including VAT that will be charged to your credit
card.
When you’re ready, click ‘Yes, I confirm my order’ to confirm.
15/24
e-Shipper User Guide
When your payment has been accepted the "Print label" page opens. Here, you can
print your labels. The labels contain a barcode that allows you to track your parcel in
the delivery process.
NB
1. You must never use the same barcode on two or more different parcels. Any
infringement will be considered as fraud.
2. Labels created in e-Shipper must be dropped off to Taxipost within 10 business
days, as the information you provide to Taxipost, such as your email address for the
option “Received in good order info", are kept for only 10 days.
Click the PDF icon to open your labels.
Click this button to download a free copy of Adobe
Acrobat Reader © for opening the PDF.
You can save the label as a
PDF or open it immediately.
Click ‘Open’ to view.
16/24
e-Shipper User Guide
The label will open as a PDF, which you can then print. Attach the upper part (above
the broken line) to your parcel. You do not need to pay anything else when you drop
your parcel off at a Post office or PostPoint or when you have it picked up. Keep the
lower part safe. You can use the barcode number to track your parcel at
www.post.be/track.
You will also receive payment confirmation by email, with a summary of the products
you have paid for.
17/24
e-Shipper User Guide
The labels you have paid for together with the
corresponding barcode are stated in your confirmation
21.04.2008
email. You should not delete this email, as the barcode
can be used to track your parcel on e-tracker.
You payment has been accepted. Thank you for your confidence in
De Post-La Poste.
The details of your order are summarised below. Be sure to contact our Customer Service on
022 012345 if you have any questions.
You track your parcel at http://www.post.be/track
Payment details Payment number: 2386111
Order number: 354
Order date: 04/21/08 Your details
Name:
Richard Emerencia
Street :
Krabbenberg
No:
2
Box:
Postcode:
3090
Place:
Country:
BE
Phone:
026881639
Mobile:
0498919603
Fax:
026881638
Email:
[email protected]
Invoice:
No
Overijse
VAT number:
Your order
Labels:
Barcode
323289000016071016
Reference Product Company Name
Monthly
order 04
Taxipost Vermalens Theo
Secur
Projects
Maes
Street
Postcode
Mechelsesteenweg 54 D
2350
18/24
V
e-Shipper User Guide
Total price excluding VAT: € 21.15
Total price including VAT: € 21.15
Copyright 2007 De Post - La Poste | Disclaimer | Algemene Voorwaarden
2.5 Creating a pick-up request
With e-Shipper, you can request one or more parcel pick-ups. You should not create
a pick-up request if you plan to deposit your parcels yourself or you have the Home
Pick-up contract.
NB: If you want to have more than one parcel
picked up at the same time, you can fill out a
single pick-up request for all parcels, provided
the total weight is not more than 270 kg and the
total volume is less than 3 cu m. Having your
parcel picked up costs 6 euros (zone 1) or 15
euros (zone 2), depending on the postcode of the
pick-up location.
There is no extra charge for additional parcels in
a pick-up, provided the maximum weight and
volume are not exceeded.
Click "Pick-up request - Create" in the sidebar.
NB:
The Taxipost driver will pick up your parcel between 1:30 pm and 4:30 pm on the
date requested. Morning pick-ups are not possible.
All fields marked * are mandatory.
19/24
e-Shipper User Guide
The following fields are mandatory
1. Name [company name]
2. Street (pick-up address)
3. Post code
4. Place
5. Country
6. Total weight (the total weight in kilograms of all parcels. The total weight
value must be more than 0 and less than 270)
7. Total volume (the total volume in cubic metres of all parcels. The total volume
value must be more than 0 and less than 3)
8. Number of pieces
9. Pick-up date
Use the calendar to select the pick-up date. You must schedule a pick-up within ten
days. Only requests received before 11:30 can be picked up on the same day.
When all the fields have been filled out, click "next". A summary of your order will be
displayed.
Click "Add to basket & new" to save in your basket and open a new pick-up request page.
Click “Add to basket & pay” to save in your basket and proceed straight to payment.
Your request will be placed in the basket. It still has to be confirmed and paid for.
20/24
e-Shipper User Guide
Confirming your request
1. To confirm your request, click “Basket Overview” in the sidebar. A distinction
is made between labels and pick-ups in the Product column.
2. Check the box corresponding to the pick-up request you wish to confirm.
3. Click “Pay”.
4. You will continue to the payment screen in the same fashion as paying for the
labels you created.
Select the pick-up request and click "Pay".
21/24
e-Shipper User Guide
Payment
You must enter your personal details
on this page before paying for your
pick-up.
You may pay your pick-up requests
together with your labels, which
means you only have to go through
the payment process once.
The payment details need to be
entered again (see 2.4.2 Paying for
labels) when you click ‘Next’.
Wanneer de betaling correct verwerkt werd, krijgt u hiervan een bevestiging
te zien, en verdwijnt de afhaalaanvraag uit uw winkelmandje.
Confirmation that your pick-up request
has been accepted
The pick-up request is removed from the basket and a confirmation message is displayed. The pickup request is registered immediately with Taxipost. You will receive a confirmation email (see next
page).
22/24
e-Shipper User Guide
In the confirmation email your pick-up request
21.04.2008
is identified by a code starting with PCK.
Your payment has been accepted. Thank you for your confidence in De Post-La Poste.
The details of your order are summarised below. Be sure to contact our Customer
Service on 022 012345 if you have any questions.
You track your parcel at http://www.post.be/track
Payment details Payment number: 2386160
Order number: 355
Order date: 04/21/08 Your details
Name:
Richard Emerencia
Street:
Krabbenberg
No:
2
Box:
Phone
3090
Place:
Country
BE
Phone
026881639
Mobile:
0498919603
Fax:
026881638
Email:
[email protected]
Invoice:
No
Overijse
VAT number:
Your order
Pick-ups:
Number
Weight Volume Qty
PCK0000238 25.0 kg
2.5 m
6
Pick-up
date
Company
Axen
24.04.2008
bvba
Name
Street
Laurent
Gulledelle 92 / F
Grumiaux
Postcode
1200
Total price excluding VAT: € 6.0
23/24
Pla
Brusse
(SintLambre
Woluw
e-Shipper User Guide
Total price including VAT: € 6.0
Copyright 2007 De Post - La Poste | Disclaimer | Algemene Voorwaarden
2.6 Exiting e-Shipper
Click “Quit E-Shipper” in the sidebar to exit e-Shipper and return to the De Post-La
Poste welcome page.
24/24