1
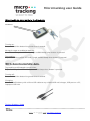
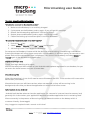
Microtracking user Guide
Customer Support.Microtracking AB. Kristinebergs Strand 3, 11252 Stockholm.
Phone: +46 734 345638 email: [email protected]
Revision 1.1en 4/11/2011
Microtracking user Guide
This page is Blank
Customer Support.Microtracking AB. Kristinebergs Strand 3, 11252 Stockholm.
Phone: +46 734 345638 email: [email protected]
Revision 1.1en 4/11/2011
Microtracking user Guide
Normally in the beginning of a user guide there is some flowery sales spiel thanking you for
purchasing our products. Well here we go.
Cheers!
As you may have noticed Microtracking is different, you’ve downloaded this manual for a reason. So
let’s get crack’n’ and do some Microtracking (sorry couldn’t resist the rhyme).
Words of caution, these instructions are based around a Motorola Defy running Android 2.2.2 so your
screens may not look exactly the same as mine do in the videos. The options should be available on
other Android versions.
Your Phone must have internet access to send data to our servers.
Firstly we are going to need your phones IMEI number.
What's my IMEI number?
The IMEI is your phones unique ID which will not change even if you exchange sim cards or networks.
We use this for security. Our servers will only grant access to phones with their IMEI numbers in our
database.
How do I find my IMEI number?
On most phones simply dial *#06# and your IMEI will pop up. You can save this number to your
contacts ready for when you need it next. Write it down as we will need it.
Customer Support.Microtracking AB. Kristinebergs Strand 3, 11252 Stockholm.
Phone: +46 734 345638 email: [email protected]
Revision 1.1en 4/11/2011
Microtracking user Guide
Alternatively you can find the IMIE number inside your phone.
1. Ensure the phone is off.
2. Remove the battery.
3. Look in the phone for a white sticker/label (check out that barcode), which will now be exposed
after battery removal. The IMIE should be the first 15 digits (exclude any slashes and letters) of
the number under the barcode.
Important
Once you have found your IMIE number you will need to send it to us [email protected] along
with your company and contact details. We will then add your details to our server. This will grant
access and we will issue you with your own user name and password. These you will need later when
we set up Microtracking.
Secondly we need to ensure your mobile device has some settings changed so we get a smooth
installation of Microtracking.
1. Turn on Bluetooth and pair your Blueberry via Bluetooth (so we can scan tags with the
Blueberry later)
2. Allow Unknown sources (this allows the installation of Microtracking, via non-market sources.
You can turn it off once the installation is complete).
3. Turn on GPS (this activates the GPS module so that tag location data can be uploaded to the
Microtracking servers).This is an optional extra.
Please be aware that turning on these services will increase the drain on your battery.
If you know how to do this, go ahead, and I will catch you later at the installation instructions.
So, you need some help?
Set up Microtracking
Turn on your phones Bluetooth & Pairing: 1
To turn on Bluetooth and connect to an RFID reader
1.
2.
3.
4.
5.
6.
7.
On the Home screen, press the Menu key
Touch the Settings icon.
Touch the Wireless & networks icon.
Touch the Bluetooth settings icon.
Touch the Bluetooth icon to turn it On (Ensure the tick is highlighted green).
Touch the Scan for devices icon (Ensure Blueberry is on, see page 10).
Select the TERTIUM_BBU device when scanning is complete.
Customer Support.Microtracking AB. Kristinebergs Strand 3, 11252 Stockholm.
Phone: +46 734 345638 email: [email protected]
Revision 1.1en 4/11/2011
Microtracking user Guide
8. Enter the pairing code of “0000” then touch OK. Do this quite quickly or it will not pair in time.
When this operation fails just repeat steps 7 &8
The phone will display “Paired but not connected“when successful.
9. Press the Home key.
Turn on Bluetooth and pairing video
Allow unknown Sources.
1.
2.
3.
4.
5.
6.
On the Home screen, press the Menu key.
Touch the Settings icon.
Touch the Applications icon.
Touch Unknown sources icon and ensure that the tick is green.
Touch OK; you can turn this off later after installation if you want to.
Press the Home key to return to the home screen.
Turn on GPS (Required for optional tag location data).
1.
2.
3.
4.
5.
On the Home screen, press the Menu key.
Touch the Settings icon.
Touch the Location & Security icon.
Touch the Use GPS satellites icon and ensure that the tick is green.
Press the Home key to return to the home page.
GPS and Unknown source movie
Now we need to install a 2D Barcode reader application
Already have a 2D barcode application installed. Open the application and then follow steps 14-16
Installation of 3rd party Barcode Application to demo 2D scanning
1. Touch the Home key.
2. Scroll and find the Market icon.
3. Touch the Market icon: This will open the online Android market site (A wireless network or
mobile broadband connection is required for this to work).
4. Touch the Search icon (magnifying glass).
5. Enter Zx in the search bar using the touch pad.
6. Select Zxing for the list.
7. Select Barcode Scanner.
Customer Support.Microtracking AB. Kristinebergs Strand 3, 11252 Stockholm.
Phone: +46 734 345638 email: [email protected]
Revision 1.1en 4/11/2011
Microtracking user Guide
8. Touch the Install icon.
9. Touch the Storage icon from the list.
10. Touch the OK icon to accept (This allows Barcode scanner to save your scanned data to the
mass memory).
11. Touch the Accept & Download icon, wait while the application downloads and installs.
12. Touch the Open icon.
13. Touch the Done icon.
14. Now scan the Barcode below by placing the barcode inside the viewfinder rectangle to scan it.
15. Touch the Open browser icon. Microtracking will be downloaded.
16. Press the Home key
Barcode Application Installation movie
Zxing Application Help
How and where to get Microtracking
Please Scan
Installation of Microtracking from a location on your phone
Once you’ve downloaded Microtracking and it’s on your phone we need to install it.
I am going to use Androids quickoffice for these instructions. Quickoffice is Androids default
document viewer on many Android devices.
1. Press the Home key.
2. Locate and touch the Quickoffice icon by scrolling the page.
Browse to the saved location of Microtracking.
3.
4.
5.
6.
7.
8.
9.
Touch the Memory card icon followed by the download icon.
Touch the Microtracking_demo_kit icon.
Touch the install icon. Wait while Microtracking installs.
Touch the Open icon. Microtracking will open.
You will be invited to “synchronise work flow settings”.
Touch the Ok icon.
Press the Home key.
Installation of Microtracking movie
Customer Support.Microtracking AB. Kristinebergs Strand 3, 11252 Stockholm.
Phone: +46 734 345638 email: [email protected]
Revision 1.1en 4/11/2011
Microtracking user Guide
Now we can set up the rest of the application.
Selecting devices for use with Microtracking: 2
1.
2.
3.
4.
5.
Press the Menu Button and find the Microtracking icon press it to open the application
You may be asked to “synchronise your work flow settings”, press Ok.
Touch the blue Settings icon
Touch the Select external device icon
Touch the Discover devices icon and wait until the Blueberry has been found ensuring that the
RFID reader is on. If you’re using the Blueberry, turn on the Blueberry by pressing the button for
greater than one second.
6. When completed select the desired device from the list (you may have discovered more than
one device so make sure you have the correct device).
7. Touch the Save icon followed by OK, that appears on the pop up screen.
8. Press the back key to return to the settings screen.
Turn on Bluetooth and pairing video
Login set up: 3
1. From the settings screen touch the blue Login settings icon. From the home screen follow 1-3
of the pairing instructions.
2. Enter the Server name (demokit) using the touch pad, when done, check it, and then touch
Next on the touch pad.
3. Enter your user name followed by Next.
4. Enter your password followed by Next.
5. Now touch the blue Test login icon.
6. When notified of a successful login touch Ok.
7. Touch the blue Save icon.
8. Touch the Back key.
9. Touch the Synchronize workflow icon
10. Touch the Ok icon.
11. Touch the Home key.
Login video
Customer Support.Microtracking AB. Kristinebergs Strand 3, 11252 Stockholm.
Phone: +46 734 345638 email: [email protected]
Revision 1.1en 4/11/2011
Microtracking user Guide
If your Test login fails check your login details and try again.
We will the need your IMEI number of your Android mobile phone registered in our database, for you
to access the cloud servers and your scanned data.
How to use Microtracking:
Scan & Track 2D Barcodes
Scan
1.
2.
3.
4.
Touch the Microtracking icon to launch the application.
Touch the SCAN icon.
Touch the 2D Barcode icon.
Now scan away by placing a barcode inside the viewfinder rectangle to scan it. The device will
lock on and capture the data.
5. Now you can scan more items using the Scan more icon. The tag count will increment by 1
with each successful scan, or if scanning is complete you can upload the scanned data by
touching the SEND icon. This will create an “Event” on the Microtracking servers.
The Microtracking menu screen will be displayed after the send operation is complete.
Track
1. Touch the Microtracking icon to launch the application.
2. Touch the TRACK icon.
3. Touch the 2D Barcode icon.
Now scan away by placing a barcode inside the viewfinder rectangle to scan it. The device will
lock on and capture the data.
4. Now you can track more items using the Track another item icon or if scanning is complete
you can upload the Track request by touching the SEND icon.
The cloud server will reply with found “Events”. Touch the View event details icon for more
information on your track request.
5. Press the Back key to return the Microtracking menu screen.
2D Scan & Track...the movie
Customer Support.Microtracking AB. Kristinebergs Strand 3, 11252 Stockholm.
Phone: +46 734 345638 email: [email protected]
Revision 1.1en 4/11/2011
Microtracking user Guide
Scan & Track RFID Tags
Scan
1.
2.
3.
4.
Touch the Microtracking icon to launch the application.
Touch the SCAN icon.
Touch the RFID icon. (Application will connect to Bluetooth device).
Read the RFID tag. Point the Blueberry (or other Bluetooth devise) at the RFID tag and give the
reader’s button a quick press. The Blueberry will give a triple bleep and triple flash of the yellow
LED when successfully reading the tag.
5. Tag details will be displayed. To continue scanning just point the Blueberry and press it’s
button. The tag count will increment by 1 with each successful scan.
6. When done, touch the SEND icon on the application to upload data (events) to the server.
7. The Microtracking home menu will be displayed.
Track
1.
2.
3.
4.
Touch the Microtracking icon to launch the application.
Touch the TRACK icon.
Touch the RFID icon.
Read the RFID tag. Point the Blueberry (or other Bluetooth devise) at the RFID tag and give the
reader’s button a quick press. The Blueberry will give a triple bleep and triple flash of the yellow
LED when successfully reading the tag.
5. Tag details will be displayed.
6. Touch the View history icon. The application will track the item on the server and display any
found events.
7. Touch the View event details icon. This will display the event details.
8. Touch the Track event on map icon to view the tags location (optional feature).
9. Press the Back key to return to the Microtracking menu screen.
10. Press Home key to return to the phone’s home screen.
RFID Scan and Track... the movie
To view events, EPCIS information
1. Go to https://demokit.microtracking.se/microtracking/
2. Enter your username and password(same as the one used to set up the application)
3. Login
Customer Support.Microtracking AB. Kristinebergs Strand 3, 11252 Stockholm.
Phone: +46 734 345638 email: [email protected]
Revision 1.1en 4/11/2011
Microtracking user Guide
Microtracking’s quick guide to the Blueberry
The Button
Turning on:
Press and hold the button for greater than 1 second.
No tag in range or unable to read tag:
One flash of the yellow LED with single audible bleep when button is pressed.
Tag reading:
Triple flash of the yellow LED and a single audible bleep when button is pressed.
With the Blueberry connected to a device.
Tag reading and Bluetooth transmission:
Triple flash of yellow LED with triple audible bleep when button is pressed.
Turning off:
Press and hold the button for greater than 1 second.
Charging:
Connect the Blueberry with a Micro USB cable to any suitable USB wall charger, USB port on a PC,
Laptop or USB hub.
Tertium Blueberry Video
Customer Support.Microtracking AB. Kristinebergs Strand 3, 11252 Stockholm.
Phone: +46 734 345638 email: [email protected]
Revision 1.1en 4/11/2011
Microtracking user Guide
Trouble shooting Microtracking
“Unable to connect to Bluetooth socket”
1.
2.
3.
4.
5.
Make sure the Blueberry is on and fully charged.
Cycle power on the Blueberry and try again. If you still get this message.
Restart the Microtracking application. Still having issues?
Restart phone and Blueberry and try again. Still having issues?
Follow the Setting up instructions parts 1 and 2 for Bluetooth.
“Blueberry bleeps but scan does not register”
1. Press the back key.
2. Select SCAN or TRACK, select 2D or RFID and try again.
3. Still having issues? Then restart the Blueberry.
Do not press the Blueberry’s button while the phone or Microtracking is establishing a connection.
Pressing the button will cause these scan errors. If the Blueberry is off when you try to connect or scan
please wait until the connection error is displayed. Then turn on the Blueberry and select SCAN or
TRACK again in the Microtracking application.
If your Test login fails
Check your login details and try again.
We will the need your IMEI number of your Android mobile phone registered in our database, for you
to access the cloud servers and your scanned data.
Short battery life
When Microtracking is in use it will need to access Bluetooth and GPS. These services will increase the
demand on your battery.
We advise that you turn off these services when not required, as they will be running in the
background, even after you leave the application or return to the home screen.
Information about Android
"Android itself decides when to close the application (i.e. remove its instance from the memory) and
generally this is done when your application becomes the oldest application that is not being used."
We are currently in the process of discussing ways to reduce the drain on the battery which is
customer friendly. (Auto toggle)
May I suggest a couple of work a rounds at this time?
Customer Support.Microtracking AB. Kristinebergs Strand 3, 11252 Stockholm.
Phone: +46 734 345638 email: [email protected]
Revision 1.1en 4/11/2011
Microtracking user Guide
A: Turn on/Off GPS and Bluetooth Manually.
6.
7.
8.
9.
On the Home screen, press the Menu key.
Touch the Settings icon.
Touch the Location & Security icon.
Touch the Use GPS satellites icon to turn it off. Ensure that the tick is grey.
Press the Home key to return to the home page
10. On the Home screen, press the Menu key
11. Touch the Settings icon.
12. Touch the Wireless & networks icon.
13. Touch the Bluetooth settings icon.
14. Touch the Bluetooth icon to turn it off. Ensure the tick is grey.
Press the Home key to return to the home page.
B: Download and Install Power widget
https://market.android.com/details?id=at.abraxas.powerwidget.free
With Power Widget you gain quick access to most of your important settings and most importantly it
is highly customisable. Change background transparency, the order of your toggles or even how many
toggles you put on your toggle bar is up to you. This includes a quick toggle for GPS.
I have mine set for Wi-Fi, Bluetooth, GPS, and flight mode, by having a quick toggle for Bluetooth and
GPS; I can quickly turn off these services when I am not Microtracking.
Still having issues with Microtracking? Then please visit our website www.microtracking.se/customersupport for the latest FAQ’s, articles and our support ticket system.
We will gladly assist you with your Blueberry. You can also visit http://www.tertiumtechnology.com for
more assistance and information on Blueberry devices.
For support of Zxing please visit http://code.google.com/p/zxing/wiki/FrequentlyAskedQuestions
We can help you through the installation and connection of Microtracking onto your mobile device.
We can also direct you to support websites and support staff for your mobile device; as we do not
provide support for all the different hardware devices and networks in the market place. We will leave
that to the manufacturers, suppliers and network providers.
We will however do everything we can to ensure the maximum uptime of Microtracking.
Regards
Microtracking
Customer Support.Microtracking AB. Kristinebergs Strand 3, 11252 Stockholm.
Phone: +46 734 345638 email: [email protected]
Revision 1.1en 4/11/2011