1
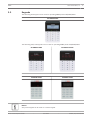
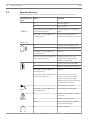
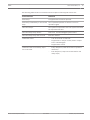
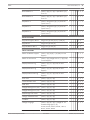
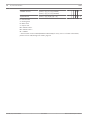
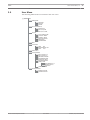
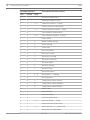
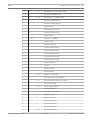
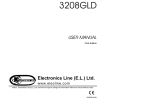
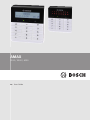
AMAX
2100 / 3000 / 4000
en
User Guide
AMAX
Table of Contents | en
3
Table of contents
1
Safety
5
2
Short information
6
2.1
Introduction
6
2.2
Keypads
7
2.3
Keypad Indicators
8
2.4
Quick Keypad Operations Instructions
10
2.5
User Menu
13
3
Arming and Disarming the System
14
3.1
Arming the System
14
3.1.1
Arming in AWAY Mode
14
3.1.2
Arming in STAY Mode
15
3.1.3
Forced Arming
15
3.1.4
Arming with a Master Keypad
16
3.2
Disarming the System
17
3.2.1
Disarming with Code
17
3.2.2
Disarming with Key Switch
17
3.2.3
Disarming with RADION RF Keyfob
17
3.2.4
Disarming with a Master Keypad
17
4
Changing the Menu Language
18
5
System Test
19
5.1
Siren Test
19
5.2
Communication Test
19
5.3
Walk Test Mode
19
6
Bypassing
20
6.1
Bypassing/Unbypassing Zones
20
6.1.1
How to Bypass/Unbypass a Zone via Text Keypad
20
6.1.2
How to Bypass/Unbypass a Zone via LED/LCD Keypad
20
6.2
Bypassing Faults or Tamper Conditions
20
7
Schedules
21
8
Macros
22
8.1
Recording Macros
22
8.2
Playing Macros
23
9
Codes
24
9.1
Add/Change User Codes
24
9.2
Change Individual Code
25
10
Keypad Alarm Operation Commands
26
10.1
Keypad Panic Alarm
26
10.2
Keypad Fire Alarm
26
10.3
Keypad Medical Alarm
26
11
Domestic Dialing
27
11.1
Domestic Dialing Alarm
27
11.2
Confirming the Domestic Call
27
12
Event Log Recall Mode
28
12.1
How to Select All Event Log Recall Mode
28
12.2
How to Select EN Event Log Recall Mode
28
12.3
How to Select Dialer Event Log Recall Mode
28
Bosch Sicherheitsysteme GmbH
User Guide
2014.09 | 03 | F.01U.295.569
4
en | Table of Contents
AMAX
13
Faults and Tamper Conditions
29
13.1
System Fault or Tamper Analysis Mode via Text Keypad
29
13.2
System Fault or Tamper Analysis Mode via LED/LCD Keypad
29
14
Resetting the Control Panel
33
15
Troubleshooting
34
2014.09 | 03 | F.01U.295.569
User Guide
Bosch Sicherheitsysteme GmbH
AMAX
Safety | en
5
Safety
1
Danger!
Electricity
Injuries due to electricity are possible if the system is not operated correctly or if the system
is opened or modified.
–
Never open or modify the system.
–
Please contact your installer if you want to get your system modified.
Caution!
!
Sensitive components
Damage of sensitive components is possible if the system is not handled carefully or if the
system is opened or modified.
–
Always handle the system carefully.
–
Never open or modify the system.
–
Please contact your installer if you want to get your system modified.
Bosch Sicherheitsysteme GmbH
User Guide
2014.09 | 03 | F.01U.295.569
6
en | Short information
2
Short information
2.1
Introduction
AMAX
This User Guide contains information on how to operate the system easily and quickly. The
guide describes the main steps required for operation of the AMAX panel 2100/3000/4000
together with a text and/or a LED/LCD keypad described in Keypads, page 7. It is possible
to add an optional text keypad as a master keypad.
Detailed information about the installation of this and other modules and devices, advanced
settings and programming can be found in the Installation Guide. Information on the main
steps required for basic system installation and setup can be found in the Quick Start Guide.
2014.09 | 03 | F.01U.295.569
User Guide
Bosch Sicherheitsysteme GmbH
AMAX
2.2
Short information | en
7
Keypads
The following text keypad can be used for operating AMAX panel 2100/3000/4000.
IUI-AMAX4-TEXT
The following LED/LCD keypads can be used for operating AMAX panel 2100/3000/4000.
IUI-AMAX3-LED8
IUI-AMAX3-LED16
IUI-AMAX-LED8
IUI-AMAX-LCD8
Notice!
Only a text keypad can be used as a master keypad.
Bosch Sicherheitsysteme GmbH
User Guide
2014.09 | 03 | F.01U.295.569
8
2.3
en | Short information
AMAX
Keypad Indicators
The following table shows an overview and a description of the keypad indicator icons.
Keypad Indicator
Status
Definition
on
Zone is triggered.
off
Zone is normal.
Fast flash (0.25 seconds lights on/
Zone was alarmed or is in alarm
0.25 seconds lights off)
status.
Slow flash (1 second lights on/1
Zone is manually bypassed or
second lights off)
interior Zone is in STAY arm mode.
on
System is armed in AWAY mode.
off
System not armed in AWAY mode.
Slow flash (1 second lights on/1
Exit time.
Icons
1 2 3 ….
ZONE (1-8)
AWAY
second lights off)
Fast flash (0.25 seconds lights on/
Programming mode or code
0.25 seconds lights off)
function mode. STAY indicator
flashes simultaneously.
STAY
on
System is armed in STAY mode.
off
System not armed in STAY mode.
Slow flash (1 second lights on/1
Exit time.
second lights off)
Fast flash (0.25 seconds lights on/
Programming mode or code
0.25 seconds lights off)
function mode. AWAY indicator
flashes simultaneously. When
bypass function is performed, only
the STAY indicator flashes.
MAINS
on
AC main power is normal.
Slow flash (1 second lights on/1
AC main power supply failed.
second lights off)
on
System fault or Tamper condition
is present.
FAULTS
off
System is in normal status.
Flashes
System fault or tamper condition
must be acknowledged.
on
2014.09 | 03 | F.01U.295.569
System is disarmed.
User Guide
Bosch Sicherheitsysteme GmbH
AMAX
Short information | en
9
The following table shows an overview and a description of the keypad sound icons.
Sound Indicator
Definition
Short beep
A keypad button has been pressed.
Short beep, followed by a one-second
The requested operation is refused. Incorrect
beep
operation signal.
Two short beeps
The system accepted the code. The system executed
the requested function.
One short beep every minute
Fault tone, unacknowledged system failure.
One short beep every two seconds
Exit time started.
Continued sound
–
Last 10 seconds on exit time
–
Keypad fault or tamper sound (fault or tamper
to be acknowledged)
–
Continuous 0.5 second beep, stops
–
for 0.5 seconds
Keypad alarm sound
Entry delay time (until alarm ends or system is
disarmed)
–
Exit delay time (stops 10 seconds before exit
delay stops)
Bosch Sicherheitsysteme GmbH
User Guide
2014.09 | 03 | F.01U.295.569
10
2.4
en | Short information
AMAX
Quick Keypad Operations Instructions
The following table shows an overview of the quick keypad operations and the corresponding
user permissions. For information on changing codes and defining user permission levels,
please refer to Codes, page 24.
Function
Command
D A B S M M I
Default User Code = 2580
1
2
N
Arm/Disarm
AWAY Arm
[code] + [#] / [#] for 3 sec. (quick arm)
√
√
√
√
√
√
√
AWAY Arm All Areas (only
[code] + [0] [0] + [#]
√
√
√
√
√
√
√
√
√
√
on master keypad)
Direct AWAY Arm (only on
[code] + [2-digit area no.] + [#]
master keypad
STAY Arm
[code] + [*] / [*] for 3 sec. (quick arm)
√
√
√
√
√
√
√
STAY Arm All Areas (only
[code] + [0] [0] + [*]
√
√
√
√
√
√
√
√
√
√
on master keypad)
Direct STAY Arm (only on
[code] + [2-digit area no.] + [*]
master keypad
Disarm
[code] + [#]
√
√
√
√
√
√
Disarm All Areas (only on
[code] + [#]
√
√
√
√
√
√
√
√
√
√
√
√
[code] + [3] [4] + [#]
√
√
√
[code] + [6] + [#]
√
√
√
√
√
√
master keypad)
Display
Display Info (Fault/Tamper
[code] + [2] [1] + [#]
Analysis)
Bypass
Bypass/Unbypass Zone
[code] + [3] [1] + [#] + [2-digit zone no.]
√
√
+ [#]
Bypass Fault/Tamper
Reset
Reset Fault/Tamper (In
some country versions only
the installer can reset a
tamper alarm)
Macros
Record Macro 1
[code] + [8] [1] + [#] + operation + [#]
√
for 3 sec.
2014.09 | 03 | F.01U.295.569
User Guide
Bosch Sicherheitsysteme GmbH
AMAX
Short information | en
Record Macro 2
[code] + [8] [2] + [#] + operation + [#]
11
√
√
√
√
√
√
√
√
for 3 sec.
Record Macro 3
[code] + [8] [3] + [#] + operation + [#]
for 3 sec.
Play Macro 1
[code] + long press [1] / [1] for 3 sec.
*
*
*
*
*
*
√
*
*
*
*
*
*
√
*
*
*
*
*
*
√
(quick macro)
Play Macro 2
[code] + long press [2] / [2] for 3 sec.
(quick macro)
Play Macro 3
[code] + long press [3] / [3] for 3 sec.
(quick macro)
Alarm commands
Keypad Emergency Alarm
long press [1] and [3] or [*] and [#]
√
√
Keypad Fire
long press [4] and [6]
√
√
Keypad Medical Alarm
long press [7] and [9]
√
√
√
√
√
√
√
√
√
√
Other Commands
Switch to Master Keypad
[code] + [0] [0] [0] + [#] (only on text
keypad)
Switch to Area 01-16
[code] + [0] [2-digit area no.] + [#] (only
on text keypad)
Display all Event Log
[code] + [2] [2] + [#] (only on text
√
√
√
√
√
√
keypad)
Display EN Event Log
[code] + [2] [3] + [#] (only on text
keypad)
Display Dialer Event Log
[code] + [2] [4] + [#] (only on text
keypad)
Siren Test
[code] + [4] [1] + [#]
√
√
√
Communication Test
[code] + [4] [2] + [#]
√
√
√
Walk Test
[code] + [4] [3] + [#]
√
√
√
Daylight Saving Time (+1h) [code] + [5] [2] + [#]
√
√
√
Daylight Saving Time (-1h)
[code] + [5] [3] + [#]
√
√
√
Add/Change User Code
[code] + [5] [4] + [#]
√
√
√
Change Individual Code
[code] + [5] [5] + [#]
√
√
√
Call Back
[code] + [5] [7] + [#]
√
√
√
Change Language
[code] + [5] [8] + [#] + [2-digit no. for
√
√
√
available languages] + [#]
01=EN; 02=DE; 03=ES; 04=FR ; 05=PT;
06=PL; 07=NL; 08=SE
Bosch Sicherheitsysteme GmbH
User Guide
2014.09 | 03 | F.01U.295.569
12
en | Short information
Installer Access
AMAX
[code] + [7] [1] + [#] (enable)
√
√
√
√
[code] + [7] [2] + [#] (disable)
System Reset
[code] + [9] [9] [8] [9] + [#]
√
D = Duress User
A = Arming User
B = Basic User
S = Super User
M1 = Master User 1
M2 = Master User 2
IN = Installer
* This function can be enabled/disabled individually for every user. For further information,
please refer to Add/Change User Codes, page 24.
2014.09 | 03 | F.01U.295.569
User Guide
Bosch Sicherheitsysteme GmbH
AMAX
2.5
Short information | en
13
User Menu
The following table shows an overview of the user menu.
[ / ]USER MENU
ARM/DISARM
ARM AWAY
ARM STAY
DISARM
ZN/FLT/TAMP BYPASS
ZONE BYPASS
BYPASS INQUIRE
BYPASS FLT./ TAMP.
INQUIRE
FAULT/TAMP INQUIRE
ALL EVENT RECALL
EN EVENT RECALL
DIAL EVENT RECALL
EVENT PRINT
PRINTER ENABLE
RESET
SYSTEM TEST
SIREN
TEST
COMMUNICATIN TEST
WALK
TEST
AREA SWITCH
SYSTEM SETTINGS
DAYL.SAV.TIME +1h
DAYL.SAV.TIME -1h
ADD/CHG USER CODE
CHANGE INDIV CODE
INITIATE CALL BACK
CHANGE LANGUAGE
MACRO START
INPUT MACRO No 1-3
RECORD :END # 3s
START PLAY
SCHEDULE ENABLE
INSTALLER ACCESS
ENABLE INSTALLER
DISABLE INSTALLER
Bosch Sicherheitsysteme GmbH
User Guide
2014.09 | 03 | F.01U.295.569
14
en | Arming and Disarming the System
AMAX
3
Arming and Disarming the System
3.1
Arming the System
Notice!
When the number of incorrect code entries on the keypad reaches a specified limit
(configured by the installer), the keypad will automatically lock for 180 seconds and an alarm
is reported. If the keypad is idle for one minute, the system will automatically exit from any
operational mode.
3.1.1
Arming in AWAY Mode
The AWAY Mode is used to arm the premises to detect a would-be intruder, when you leave
the premises and require that all zones are activated in a ready state.
Keypad Arming
There are two methods to arm your system in AWAY mode.
Method 1:
4 Enter your code and press [#].
P
The system beeps twice, the AWAY indicator flashes slowly and exit time starts. After the
exit time, the AWAY indicator is lit.
Method 2 (Quick Arm):
4 Press and hold [#] until the system beeps twice.
P
The AWAY indicator flashes slowly and exit time starts. After the exit time, the AWAY
indicator is lit.
Please contact your installer to enable/disable this function.
Telephone Remote Arming
Users can use a telephone to arm the system.
1.
Dial the control panel number.
2.
Press [#].
P
When the panel receives the signal it confirms the arming of the control panel with a high
The control panel answers the call and issues a long beep.
tone.
Please contact your installer to enable/disable this function.
Notice!
Telephone remote arming is only possible when the system has only one assigned area.
Key Switch Arming
Users can use a key switch to arm the system.
4
Activate the key switch.
P
The AWAY indicator flashes slowly and exit time starts. After exit time, the AWAY indicator
is lit.
Please contact your installer to enable/disable this function.
2014.09 | 03 | F.01U.295.569
User Guide
Bosch Sicherheitsysteme GmbH
AMAX
Arming and Disarming the System | en
15
RADION RF Keyfob Arming
Users can use a RADION RF keyfob to arm the system.
4
Press the arming button of the RADION RF keyfob.
P
The AWAY indicator flashes slowly and exit time starts. After exit time, the AWAY indicator
is lit.
Please contact your installer to enable/disable this function.
3.1.2
Arming in STAY Mode
The STAY Mode is used to arm the perimeter and unused areas of the premises to detect a
would-be intruder, while at the same time being able to move freely within an area that is
automatically isolated.
Keypad Arming
There are two methods to arm your system in STAY mode.
Method 1:
4 Enter your code and press [*].
P
The system beeps twice, the STAY indicator flashes slowly and exit time starts. After the
exit time, the STAY indicator is lit.
P
The lights corresponding to all zones programmed as automatically isolated zones
(Interior Instant Zone) begin to flash and continue until the exit time is finished.
Method 2 (Quick Arm):
4 Press and hold [*] until the system beeps twice.
P
The STAY indicator flashes slowly and exit time starts. After the exit time, the STAY
indicator is lit.
Please contact your installer to enable/disable this function.
RADION RF Keyfob Arming
Users can use a RADION RF four button keyfob to arm the system via the third button.
4
Press the third button of the RADION RF four button keyfob.
P
The STAY indicator flashes slowly and exit time starts. After the exit time, the STAY
indicator is lit.
Please contact your installer to enable/disable this function.
3.1.3
Forced Arming
Arming the system when a zone is not sealed is known as forced arming.
If the AWAY indicator is not lit and a long beep sounds when you attempt to arm the system in
AWAY mode, then forced arming is not permitted. In this case, you have to seal all zones or
manually isolate them before you can arm the system.
Please contact your installer to enable/disable this function.
Bosch Sicherheitsysteme GmbH
User Guide
2014.09 | 03 | F.01U.295.569
16
en | Arming and Disarming the System
3.1.4
AMAX
Arming with a Master Keypad
An optional master text keypad can be added if there is more than one assigned area on your
system.
Please contact your installer to enable/disable this function.
The master keypad can be used to arm single or all assigned areas.
How to Arm All Areas in AWAY Mode:
4 Enter your code + [0] [0] and press [#].
P
The system beeps twice, the AWAY indicator flashes slowly and exit time starts. After the
exit time, the AWAY indicator is lit and all areas are displayed as armed.
How to Arm All Areas in STAY Mode:
4 Enter your code + [0] [0] and press [*].
P
The system beeps twice, the STAY indicator flashes slowly and exit time starts. After the
exit time, the STAY indicator is lit and all areas are displayed as armed.
How to Arm a Single Area in AWAY Mode (Direct Arm):
1. Enter your code and the two-digit number of the area you want to arm.
2.
Press [#].
P
The AWAY indicator flashes slowly and exit time starts. After the exit time, the AWAY
indicator is lit and the selected area is displayed as armed.
4
Repeat step 1 if you want to arm multiple areas.
How to Arm a Single Area in STAY Mode (Direct Arm):
1. Enter your code and the two-digit number of the area you want to arm.
2.
Press [*].
P
The STAY indicator flashes slowly and exit time starts. After the exit time, the STAY
indicator is lit and the selected area is displayed as armed.
4
2014.09 | 03 | F.01U.295.569
Repeat step 1 if you want to arm multiple areas.
User Guide
Bosch Sicherheitsysteme GmbH
AMAX
Arming and Disarming the System | en
3.2
Disarming the System
3.2.1
Disarming with Code
3.2.2
4
Enter your code and press [#].
P
The system beeps twice and the AWAY or STAY indicator is extinguished.
17
Disarming with Key Switch
4
Deactivate the key switch.
P
The system is disarmed and the AWAY or STAY indicator is extinguished.
Please contact your installer to enable/disable this function.
3.2.3
Disarming with RADION RF Keyfob
4
Press the disarming button of the RADION RF keyfob.
P
The system is disarmed and the AWAY or STAY indicator is extinguished.
Please contact your installer to enable/disable this function.
3.2.4
Disarming with a Master Keypad
An optional master text keypad can be added if there is more than one assigned area on your
system.
Please contact your installer to enable/disable this function.
The master keypad can be used to disarm all assigned areas.
How to Disarm All Areas
There are two methods to disarm your system via a master keypad.
Method 1:
1. Enter your code and press [#].
2.
The system beeps twice and the AWAY or STAY indicator is extinguished. All areas are
disarmed.
Method 2 (Quick Disarm):
4 Press and hold [#] until the system beeps twice
P
The AWAY or STAY indicator is extinguished. All areas are disarmed.
How to Disarm a Single Area (Direct Disarm):
1. Enter your code and the two-digit number of the area you want to disarm.
2.
Press [#].
P
The system beeps twice and the AWAY or STAY indicator is extinguished. The selected
area is disarmed.
4
Bosch Sicherheitsysteme GmbH
Repeat step 1 if you want to disarm multiple areas.
User Guide
2014.09 | 03 | F.01U.295.569
18
4
en | Changing the Menu Language
AMAX
Changing the Menu Language
The menu language of the AMAX panel can be changed.
Notice!
This function can only be operated with a text keypad.
How to Change the Menu Language:
1. Enter your code + [5] [8] and press [#].
The available menu languages are displayed.
2.
Enter the two-digit number for the desired language.
3.
Press [#].
P
The system beeps twice and the menu language is changed.
2014.09 | 03 | F.01U.295.569
User Guide
Bosch Sicherheitsysteme GmbH
AMAX
System Test | en
5
System Test
5.1
Siren Test
19
This function allows the users to test the siren.
5.2
4
Enter your code + [4] [1] and press [#].
P
The system beeps twice and the siren is activated for one second.
Communication Test
This function allows the users to send a test report to a central monitoring station.
1.
Enter your code + [4] [2] and press [#].
The system beeps twice and a test report is send.
The keypad displays the status of the test report for all communication paths.
2.
5.3
Press [#] to exit.
Walk Test Mode
This function allows users to test detection devices to ensure they are functioning correctly.
Bypass any zones that are not required for testing before activating the walk test mode.
During the walk test, no walk test report is sent out to the control panel system.
How to Select Walk Test Mode:
1. Enter your code + [4] [3] and press [#].
The system beeps twice and the STAY and AWAY indicators flash.
2.
Unseal and seal the zones to be tested.
P
The system beeps. The siren beeps once each time a zone status is changed.
How to Exit Walk Test Mode:
4 Enter your code + [4] [3] and press [#].
Bosch Sicherheitsysteme GmbH
User Guide
2014.09 | 03 | F.01U.295.569
20
en | Bypassing
AMAX
6
Bypassing
6.1
Bypassing/Unbypassing Zones
One or more zones can be disabled for one arming cycle. After bypassing a zone, you can arm
the system even when a zone is in alarm state.
6.1.1
How to Bypass/Unbypass a Zone via Text Keypad
1.
Enter your code + [3] [1] and press [#].
The STAY indicator flashes fast. The available zones are shown. Already bypassed zones
are checked. Unavailable zones are marked with an x.
2.
Use [▲] and [▼] to display all zones.
3.
Enter the two-digit zone number you wish to bypass/unbypass.
The selected zone is checked/unchecked.
6.1.2
4.
Repeat step 3 if you want to bypass/unbypass multiple zones.
5.
Press [#] to confirm.
6.
Press [#] to exit.
How to Bypass/Unbypass a Zone via LED/LCD Keypad
1.
Enter your code + [3] [1] and press [#].
The STAY indicator flashes fast. The lit number indicators show the bypassed zones. If no
numbers are lit, no zones are bypassed yet.
2.
Enter the zone number you want to bypass/unbypass.
3.
Press [*].
The system beeps twice. The corresponding number indicator is lit/extinguished.
6.2
4.
Repeat step 2 if you want to bypass/unbypass multiple zones.
5.
Press [#] to exit.
Bypassing Faults or Tamper Conditions
One or more faults or tamper conditions can be disabled for one arming cycle. After bypassing
a fault or tamper condition, you can arm the system even when a fault or tamper condition
exists.
Only zone tampers can not be bypassed.
How to bypass a Fault or Tamper Condition
4
Enter your code + [3] [4] and press [#].
P
The system beeps twice and fault or tamper conditions are bypassed.
2014.09 | 03 | F.01U.295.569
User Guide
Bosch Sicherheitsysteme GmbH
AMAX
7
Schedules | en
21
Schedules
This function is used to schedule operations according to the needs of the users. The
following operations can be scheduled:
–
Arming/disarming
–
Switching output on/off
–
Activating/deactivating users
It is possible to schedule up to 16 operations on a daily or hourly basis.
Please contact your installer to enable/disable this function.
How to activate/deactivate a schedule
1. Enter your code + [▼] until you reach SYSTEM SETTINGS.
2.
Press [#] + [▼] until you reach SCHEDULE ENABLE.
3.
Press [#].
4.
Select SCHED ENABLE and press [#].
The available schedules are shown. Already selected schedules are checked.
5.
6.
Use [▲] and [▼] to display all schedules.
Enter the two-digit schedule number you wish to activate/deactivate.
The selected schedule is checked/unchecked.
7.
Repeat step 6 if you want to activate/deactivate multiple schedules.
8.
Press [#].
9.
Press [-] twice to exit.
Bosch Sicherheitsysteme GmbH
User Guide
2014.09 | 03 | F.01U.295.569
22
8
en | Macros
AMAX
Macros
Macros are used to assign complicated or often used operation to one button to simplify the
operation of the system. It is possible to record up to three macros.
Notice!
This function can only be operated with a text keypad.
8.1
Recording Macros
How to Record a Macro
1. Enter your code + [8] and the number to which you want to assign the macro. (Possible
numbers are 1, 2 and 3.)
2.
Press [#].
The system beeps twice.
3.
Perform the operation you want to assign to the macro.
4.
Press [#] for three seconds.
P
The system beeps three times. The macro is recorded and the operation is executed.
Example of Recording a Macro: Bypassing a Zone
This example shows how to assign macro 1 to bypassing zone 3. This can be useful if you want
to bypass zone 3 on a regular basis.
In this example there are no bypassed zones yet.
1.
Enter your code + [8] [1].
2.
Press [#].
3.
The system beeps twice.
4.
Enter your code + [3] [1] + [#] for bypassing zones (see also Bypassing/Unbypassing
Zones, page 20).
The STAY indicator flashes fast. The available zones are shown. Unavailable zones are
marked with an x.
5.
Enter [0] [3] for bypassing zone 3.
Zone 3 is checked.
6.
Press [#] to confirm.
7.
Press [#] to exit the bypass menu.
8.
Press [#] for three seconds to exit the record macros menu.
P
The system beeps twice. The macro 1 for bypassing zone 3 is recorded. Zone 3 is
bypassed.
2014.09 | 03 | F.01U.295.569
User Guide
Bosch Sicherheitsysteme GmbH
AMAX
8.2
Macros | en
23
Playing Macros
How to Play a Macro
There are two methods to play a macro.
Method 1:
4 Enter your code and press the number on which the macro is assigned for three seconds.
(Possible numbers are 1, 2 and 3.)
P
The system beeps and the operation which is assigned to the macro is executed
automatically.
Method 2 (Quick Play):
4 Press the number on which the macro is assigned for three seconds. (Possible numbers
are 1, 2 and 3.)
P
The system beeps and the operation which is assigned to the macro is executed
automatically.
Please contact your installer to enable/disable this function.
Notice!
Please note that the play function has to be enabled/disabled individually for every user.
Please refer to Add/Change User Codes, page 24.
Example of Playing a Macro: Bypassing a Zone
This example shows how to play macro 1 for bypassing zone 3 (see the example in Recording
Macros, page 22).
4
Enter your code and press [1] for three seconds.
The system beeps and the macro 1 is executed automatically.
P
If zone 3 was unbypassed before playing macro 1, it is bypassed now.
P
If zone 3 was bypassed before playing macro 1, it is unbypassed now.
Bosch Sicherheitsysteme GmbH
User Guide
2014.09 | 03 | F.01U.295.569
24
en | Codes
AMAX
9
Codes
9.1
Add/Change User Codes
This function is used if you want to add a code for a new user or if you want to change the
user permission levels or the code of an existing user. Only master users can add or change
user codes.
Notice!
This function can only be operated with a text keypad.
How to Add/Change User Codes
1. Enter your code + [5] [4] and press [#].
The system beeps twice and the STAY and AWAY indicators start flashing.
2.
Enter a user number (1-64) and press [#].
The current user permission level for this user is shown. (Default for user number 2-64 is
15-Not used)
3.
Select the desired user permission level. You can choose the following user permission
levels for a code:
0-Master1 code
1-Master2 code
2-Super code
3-Basic code
4-Arming code
5-Duress code
15-Not used
Please refer to Quick Keypad Operations Instructions, page 10 for a description of the user
permission levels.
4.
Press [#] twice.
The available areas are shown. Already selected areas are checked.
5.
Use [▲] and [▼] to display all areas.
6.
Enter the two-digit area number you wish to enable for the user or enter [0] [0] if you
want to enable all areas.
The enabled area is checked.
7.
Repeat step 6 if you want to enable multiple areas for the user.
8.
Press [#].
The available macros are shown. Already selected macros are checked.
9.
Enter the two-digit macro number you wish to enable for the user.
The enabled macro is checked.
10. Repeat step 9 if you want to enable multiple areas for the user.
11. Press [#].
12. Enter a (new) code with a default length of four digits. (A code with five or six digits is
also possible but has to be enabled by the installer.)
13. Press [#].
14. Optionally enter a keyfob ID manually.
Or
Press and hold [*] for three seconds to switch to the KEYFOB ID: AUTO menu.
Trigger the keyfob to give alarm once.
2014.09 | 03 | F.01U.295.569
User Guide
Bosch Sicherheitsysteme GmbH
AMAX
Codes | en
25
The keyfob ID will be entered automatically.
15. Press [#].
16. Optionally select the keyfob button 3 function.
17. Press [#].
P
The system beeps twice. The new user code is added/changed.
4
Press [-] twice to exit.
Notice!
This function is automatically terminated if you do not press a button within 240 seconds or if
you press [#]. One long beep indicates that the code already exists or that you entered an
incorrect user number.
9.2
Change Individual Code
This function allows users to change the individual user code.
1.
Enter your code + [5] [5] and press [#].
The system beeps twice and the STAY and AWAY indicators start flashing. The current
user code is displayed.
2.
Enter a new code with a default length of four digits. (A code with five or six digits is also
possible but has to be enabled by the installer.)
3.
Press [#].
P
The system beeps twice and the STAY and AWAY indicators stop flashing. The user code
is changed.
Bosch Sicherheitsysteme GmbH
User Guide
2014.09 | 03 | F.01U.295.569
26
en | Keypad Alarm Operation Commands
AMAX
10
Keypad Alarm Operation Commands
10.1
Keypad Panic Alarm
4
Press and hold [1] + [3] or [+] + [#] for three seconds.
P
A silent panic alarm is transmitted.
Please contact your installer to enable/disable this function.
10.2
Keypad Fire Alarm
4
Press and hold [4] + [6] for three seconds.
P
A silent keypad fire alarm is transmitted.
Please contact your installer to enable/disable this function.
10.3
Keypad Medical Alarm
4
Press and hold [7] + [9] for three seconds.
P
A silent keypad medical alarm is transmitted.
Please contact your installer to enable/disable this function.
2014.09 | 03 | F.01U.295.569
User Guide
Bosch Sicherheitsysteme GmbH
AMAX
Domestic Dialing | en
11
Domestic Dialing
11.1
Domestic Dialing Alarm
27
When a zone tamper or zone alarm is activated, the control panel can dial a phone number of
a contact person. A maximum of four numbers can be dialed by the control panel during an
alarm.
Indication of Domestic Call Alarm:
Domestic call 1 (1 alarm tone)
Domestic call 2 (2 alarm tones)
Domestic call 3 (3 alarm tones)
Domestic call 4 (4 alarm tones)
Please contact your installer to enable/disable this function.
11.2
Confirming the Domestic Call
All alarm events need acknowledgement. The transmission sequence is repeated until the
control panel receives an acknowledgement tone. The control panel automatically closes the
line after 45 seconds if it can not detect the acknowledgement tone and redial later.
4
Press [#] between two acknowledgement tones to confirm the alarm.
P
The system beeps for two seconds and closes the line.
Bosch Sicherheitsysteme GmbH
User Guide
2014.09 | 03 | F.01U.295.569
28
en | Event Log Recall Mode
12
AMAX
Event Log Recall Mode
This function allows users to playback the last 254 events saved in each event log on the text
keypad.
12.1
12.2
12.3
All Event Log
all events are logged
EN Event Log
only mandatory EN 50131-3 events are logged
Dialer Event Log
only mandatory EN 50136 events are logged
How to Select All Event Log Recall Mode
4
Enter your code + [2] [2] and press [#].
P
The system beeps twice and the event logs are displayed.
1.
Use [▲] and [▼] to display all event logs.
2.
Press [#] to exit.
How to Select EN Event Log Recall Mode
4
Enter your code + [2] [3] and press [#].
P
The system beeps twice and EN event logs are displayed.
1.
Use [▲] and [▼] to display all EN event logs.
2.
Press [#] to exit.
How to Select Dialer Event Log Recall Mode
4
Enter your code + [2] [4] and press [#].
P
The system beeps twice and dialer events are displayed.
1.
Use [▲] and [▼] to display all dialer event logs.
2.
Press [#] to exit.
2014.09 | 03 | F.01U.295.569
User Guide
Bosch Sicherheitsysteme GmbH
AMAX
13
Faults and Tamper Conditions | en
29
Faults and Tamper Conditions
Whenever a system fault or tamper condition occurs, the FAULT indicator flashes and the
keypad beeps.
Notice!
This operation is only possible in disarmed status.
13.1
System Fault or Tamper Analysis Mode via Text Keypad
To display the fault or tamper analysis for describing a system fault or tamper condition,
perform the following steps:
1.
Enter your code + [2] [1] and press [#].
2.
Use [▲] and [▼] to display all fault or tamper conditions.
3.
Press [#] to exit.
The system beeps twice and the fault or tamper conditions are displayed.
13.2
System Fault or Tamper Analysis Mode via LED/LCD Keypad
To display faults and tampers via a LED/LCD keypad, perform the following steps:
1.
Enter your code + [2] [1] and press [#].
The system beeps twice. The FAULT indicator is extinguished and the STAY and AWAY
indicators flash. One of the number indicators is lit. Example: 2.
2.
Enter the number that is lit in the system. Example: 2.
One of the number indicators is lit. Example: 1.
3.
4.
Repeat step 2 until there is no number lit anymore.
Refer to the table Types of fault or tamper conditions for a description of the fault or
temper. The consecutively lit number indicators correspond to fault or tamper types.
Example: 2 – 1, which indicates a panel AC failure.
5.
If necessary press [0] to return to step 2.
6.
Press [#] to exit.
P
The STAY and AWAY indicators are extinguished and the FAULT indicator is lit.
Bosch Sicherheitsysteme GmbH
User Guide
2014.09 | 03 | F.01U.295.569
30
en | Faults and Tamper Conditions
AMAX
Lit number indicators
First
Second
Description of the fault or tamper
Third
1
Accessory module failure
1
1
Network/IP module 1 failure
1
1
1
2
1
2
1
3
1
3
1
4
1
4
1
Module DX4010 missing
1
4
2
Printer missing
1
4
3
Printer fault
1
5
1
5
1
RF receiver 1 fault
1
5
2
RF receiver 1 missing
1
5
3
RF receiver 1 jammed
1
6
1
6
1
RF sensor missing*
1
6
2
RF sensor fault*
1
7
1
7
1
8
1
8
1
Configuration conflict sensors*
1
8
2
Configuration conflict repeaters*
1
8
3
Configuration conflict keyfobs*
1-2
Network/IP module 1 - 2 failure
Output expansion module failure
1-2
Output expansion module 1 – 2 fault
Input expansion module failure
1-6
Input expansion module 1 - 6 failure
Printer failure
RF receiver failure
RF sensor failure
RF repeater failure
1–8
RF repeater 1 – 8 missing
RF config failure
2
Power failure
2
1
Panel AC failure
2
2
Panel low battery
2
3
Panel Aux power failure
2
3
2
4
2
4
2
5
2014.09 | 03 | F.01U.295.569
1-2
Panel Aux power 1 – 2 fault
Bosch option bus power failure
1-2
Bosch option bus 1 – 2 power fault
RF repeater AC power failure
User Guide
Bosch Sicherheitsysteme GmbH
AMAX
Faults and Tamper Conditions | en
2
5
1-8
2
6
2
6
2
7
RF sensor power failure*
2
8
RF keyfob battery failure*
RF repeater 1 – 8 AC power fault
RF repeater battery failure
1–8
3
RF repeater 1 – 8 battery fault
Output failure
3
1
Onboard output 1 fault
3
2
Onboard output 2 fault
4
4
Keypad failure
1 - 16
Keypad 1 – 16 failure
5
5
System failure
1
Date time not set
6
Communication failure
6
1
Communication fault 1
6
2
Communication fault 2
6
3
Communication fault 3
6
4
Communication fault 4
6
5
Phone line fault
7
Tamper
7
1
System tamper
7
2
Keypad tamper
7
2
7
3
7
3
7
4
7
4
7
5
7
5
7
6
7
6
7
7
7
7
7
8
7
8
Bosch Sicherheitsysteme GmbH
31
1 - 16
Keypad 1 - 16 tamper
Zone expansion module tamper
1-6
Zone expansion module 1 -6 tamper
Zone tamper DEOL
1 - 16
Sensor tamper DEOL
Zone type tamper
1 – 16
Zone type 1 – 16 tamper
Keypad Lock out
1
Keypad Lock out
RF receiver tamper
1
RF receiver tamper
RF repeater tamper
1–8
RF repeater tamper
User Guide
2014.09 | 03 | F.01U.295.569
32
en | Faults and Tamper Conditions
8
8
AMAX
External failure
1 - 16
External fault zone 1 - 16
Table 13.1: Types of fault or tamper conditions
* In case one or more faults occur in this category
2014.09 | 03 | F.01U.295.569
User Guide
Bosch Sicherheitsysteme GmbH
AMAX
14
Resetting the Control Panel | en
33
Resetting the Control Panel
This function allows users to reset all alarms, faults and tamper conditions.
Notice!
You can only reset alarms, faults or tamper conditions when they are not active anymore.
4
Enter your code + [6] [#].
P
The system beeps twice and the signal is eliminated.
Bosch Sicherheitsysteme GmbH
User Guide
2014.09 | 03 | F.01U.295.569
34
15
en | Troubleshooting
AMAX
Troubleshooting
Please contact your installer in case of problems or any unexpected behavior of the system.
2014.09 | 03 | F.01U.295.569
User Guide
Bosch Sicherheitsysteme GmbH
Bosch Sicherheitssysteme GmbH
Robert-Bosch-Ring 5
85630 Grasbrunn
Germany
www.boschsecurity.com
© Bosch Sicherheitssysteme GmbH, 2014